Nikon Z MC 50mm f2.8 review
-
-
Written by Thomas
Quality
Testing: Longitudinal Chromatic Aberration and focus shift
Lenses with focal ratios of f2.8 or larger are often prone to longitudinal color aberrations (loCA, a.k.a. “axial color” or “bokeh CA”). These show up as magenta coloration in the foreground and greenish hues in the background and are not easily corrected in post-processing. Wide open the Nikon Z MC 50mm f2.8 shows a bit of loCA at normal distances and in close-up shooting. Focus shift is hardly discernible.
Nikon Z MC 50mm f2.8 longitudinal Chromatic Aberration (loCA)
Above: Shot at 2m distance, f2.8 (top), f4.0 (bottom); 100% crops, left = foreground, right = background
Above: Shot at 0.5m distance, f3.3 (top), f5.6 (bottom); 25% crops, left = foreground, right = background; click image for 100% crop
In the following close-up shot you can see some purple and green CAs around high-contrast edges:

Above: Nikon Z MC 50mm f2.8 at f4.5, 1:2; 100% crop, click image for 4k version, here for large original
The effect is not overly disturbing but clearly stronger than from Nikon’s Z MC 105mm f2.8 VR S (see here).
Sharpness and contrast
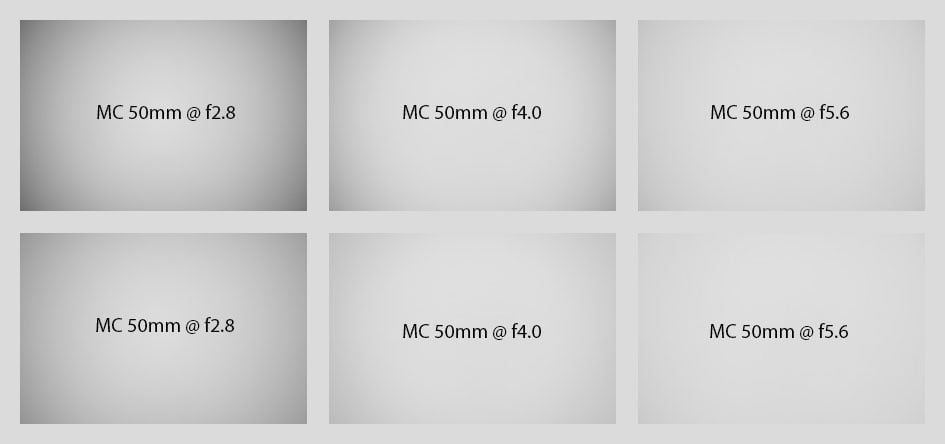
Let’s have a look at the theoretical performance of the Nikon Z MC 50mm f2.8 first and compare it to some other lenses:
Above: Nikon Z MC 50mm f2.8 (left), Nikon AF-S Micro-Nikkor 60mm f2.8 G ED (right)
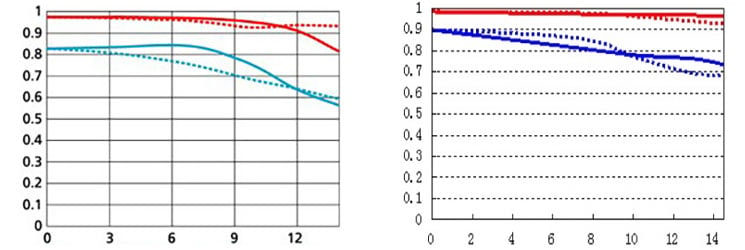
Above: Nikon AF-S DX Micro-Nikkor 40mm f2.8 G (left), Laowa 60mm f2.8 2x Macro (right)
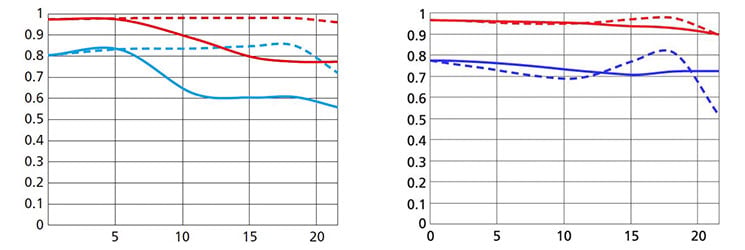
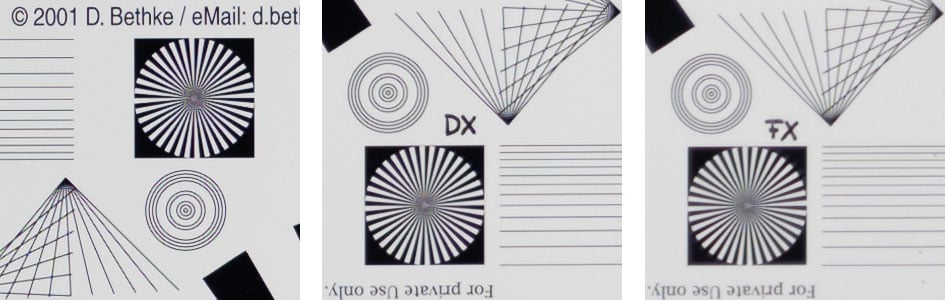
These MTF charts show the computed lens-performance of lenses wide open at infinity without influence of diffraction at 10 line-pairs/mm (red) and 30 lp/mm (blue). Higher values are better (more contrast) and the closer the dotted and solid lines are together the less contrast dependents on the orientation of the test-pattern. The x-axis displays the distance from the optical axis (=center of the sensor) in mm. I’ll show you the real-life performance at 4 mm (“center”), 13 mm (DX-corner), and 20 mm (FX-corner) on a on a 45MP Nikon Z7 camera.
Sharpness: From the MTF-chart the new Z-Nikkor should be quite sharp up to 7-8mm image height but sagittal resolution drops fast even inside the DX image-circle.
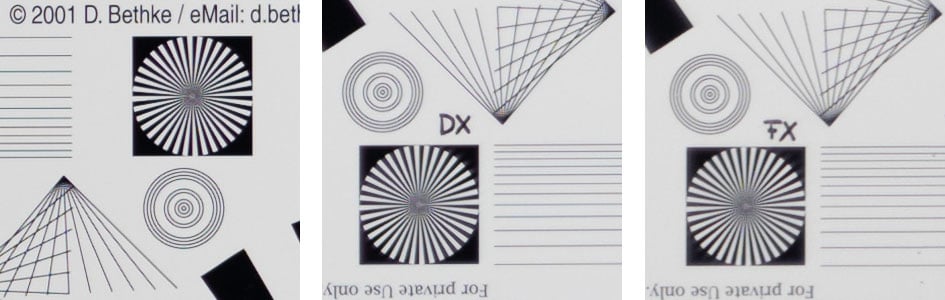
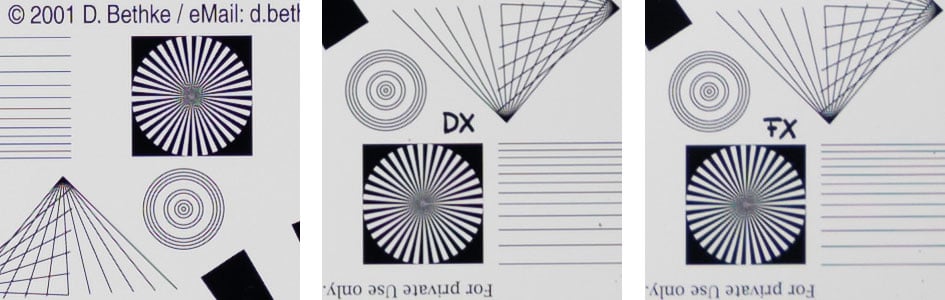
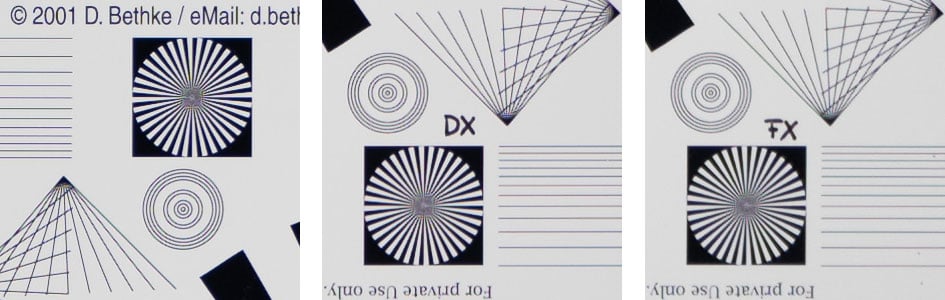
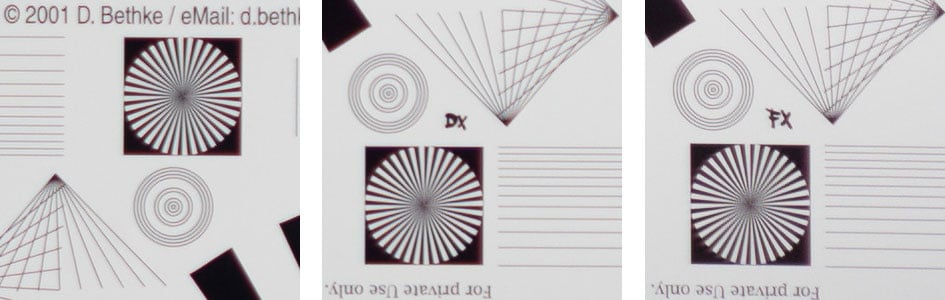
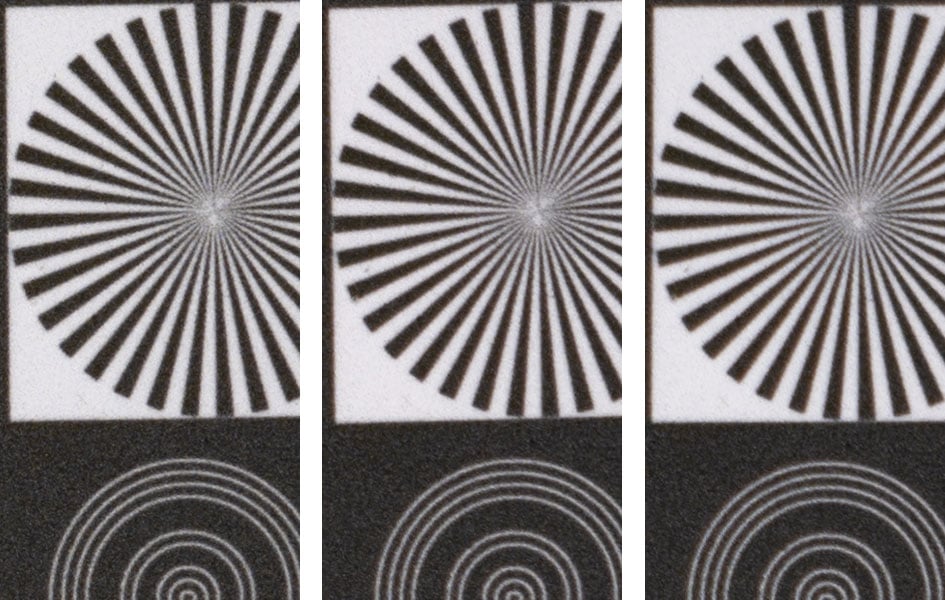
Let’s see how this theoretical performance translates into real life results in the sharpness test based on Siemens-stars. Shooting distance was 45x focal length i.e. at around 2.2m. Processing was done in Lightroom 10.3/CRAW 13.3 from RAW to Adobe Color profile with the built-in lens profile compensating CA, vignetting, and distortions. Noise-reduction is set to 0, sharpening to 50/0.5/36/10, with no extra tone, color, or saturation adjustment. White-balance was adjusted to a neutral white and I did some exposure compensation to make the brightness of all crops match. So you will not see light fall-off in the corners.
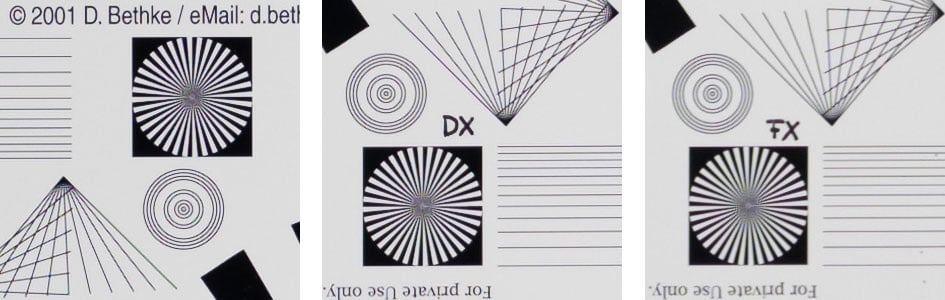
The following 100% crops show the Nikon Z MC 50mm f2.8 from f2.8 down to f11 compared to the Nikon Z 50mm f1.8 S, Nikon Z 105mm f2.8 VR S, and AF-S Micro-Nikkor 60mm f2.8 G ED at f2.8. The latter was shot on a 36MP D800 with 12% lower linear resolution than the Z7. This makes it a bit easier on the 60mm Micro-Nikkor in comparison but the test images are still a bit softer due to the strong AA-filter of the D800. The Z 50mm f1.8 S does not seem like an obvious candidate for a comparison but it provides a nice benchmark for longer shooting distances.
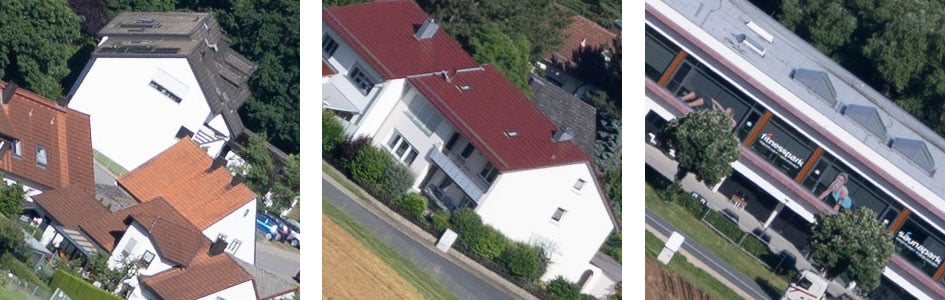
Nikon Z MC 50mm f2.8 compared; 100% crop from center, DX-corner, FX-corner
Above: Nikon Z MC 50mm f2.8 at f2.8
Above: Nikon Z 50mm f1.8 S at f2.8
Above: Nikon Z 105mm f2.8 VR S at f2.8
Above: Nikon AF-S 60mm f2.8G at f2.8
Above: Nikon Z MC 50mm f2.8 at f4.0
Above: Nikon Z MC 50mm f2.8 at f5.6; also available at f8.0, f11
Wide open Nikon’s Z MC 50mm f2.8 provides good resolution across the sensor but it’s clearly softer than the Z 50mm f1.8 S or Z 105mm f2.8 VR S. Compared to the Nikon AF-S 60mm f2.8G the Z MC 50mm f2.8 seems to have the advantage – except perhaps for the FX-corner. Stopping the Z MC 50mm f2.8 down to f5.6 improves acuity visibly and brings the DX image-circle up to very good levels. The test also showed the Z MC 50mm f2.8 to have practically no field-curvature.
Performance at long distances
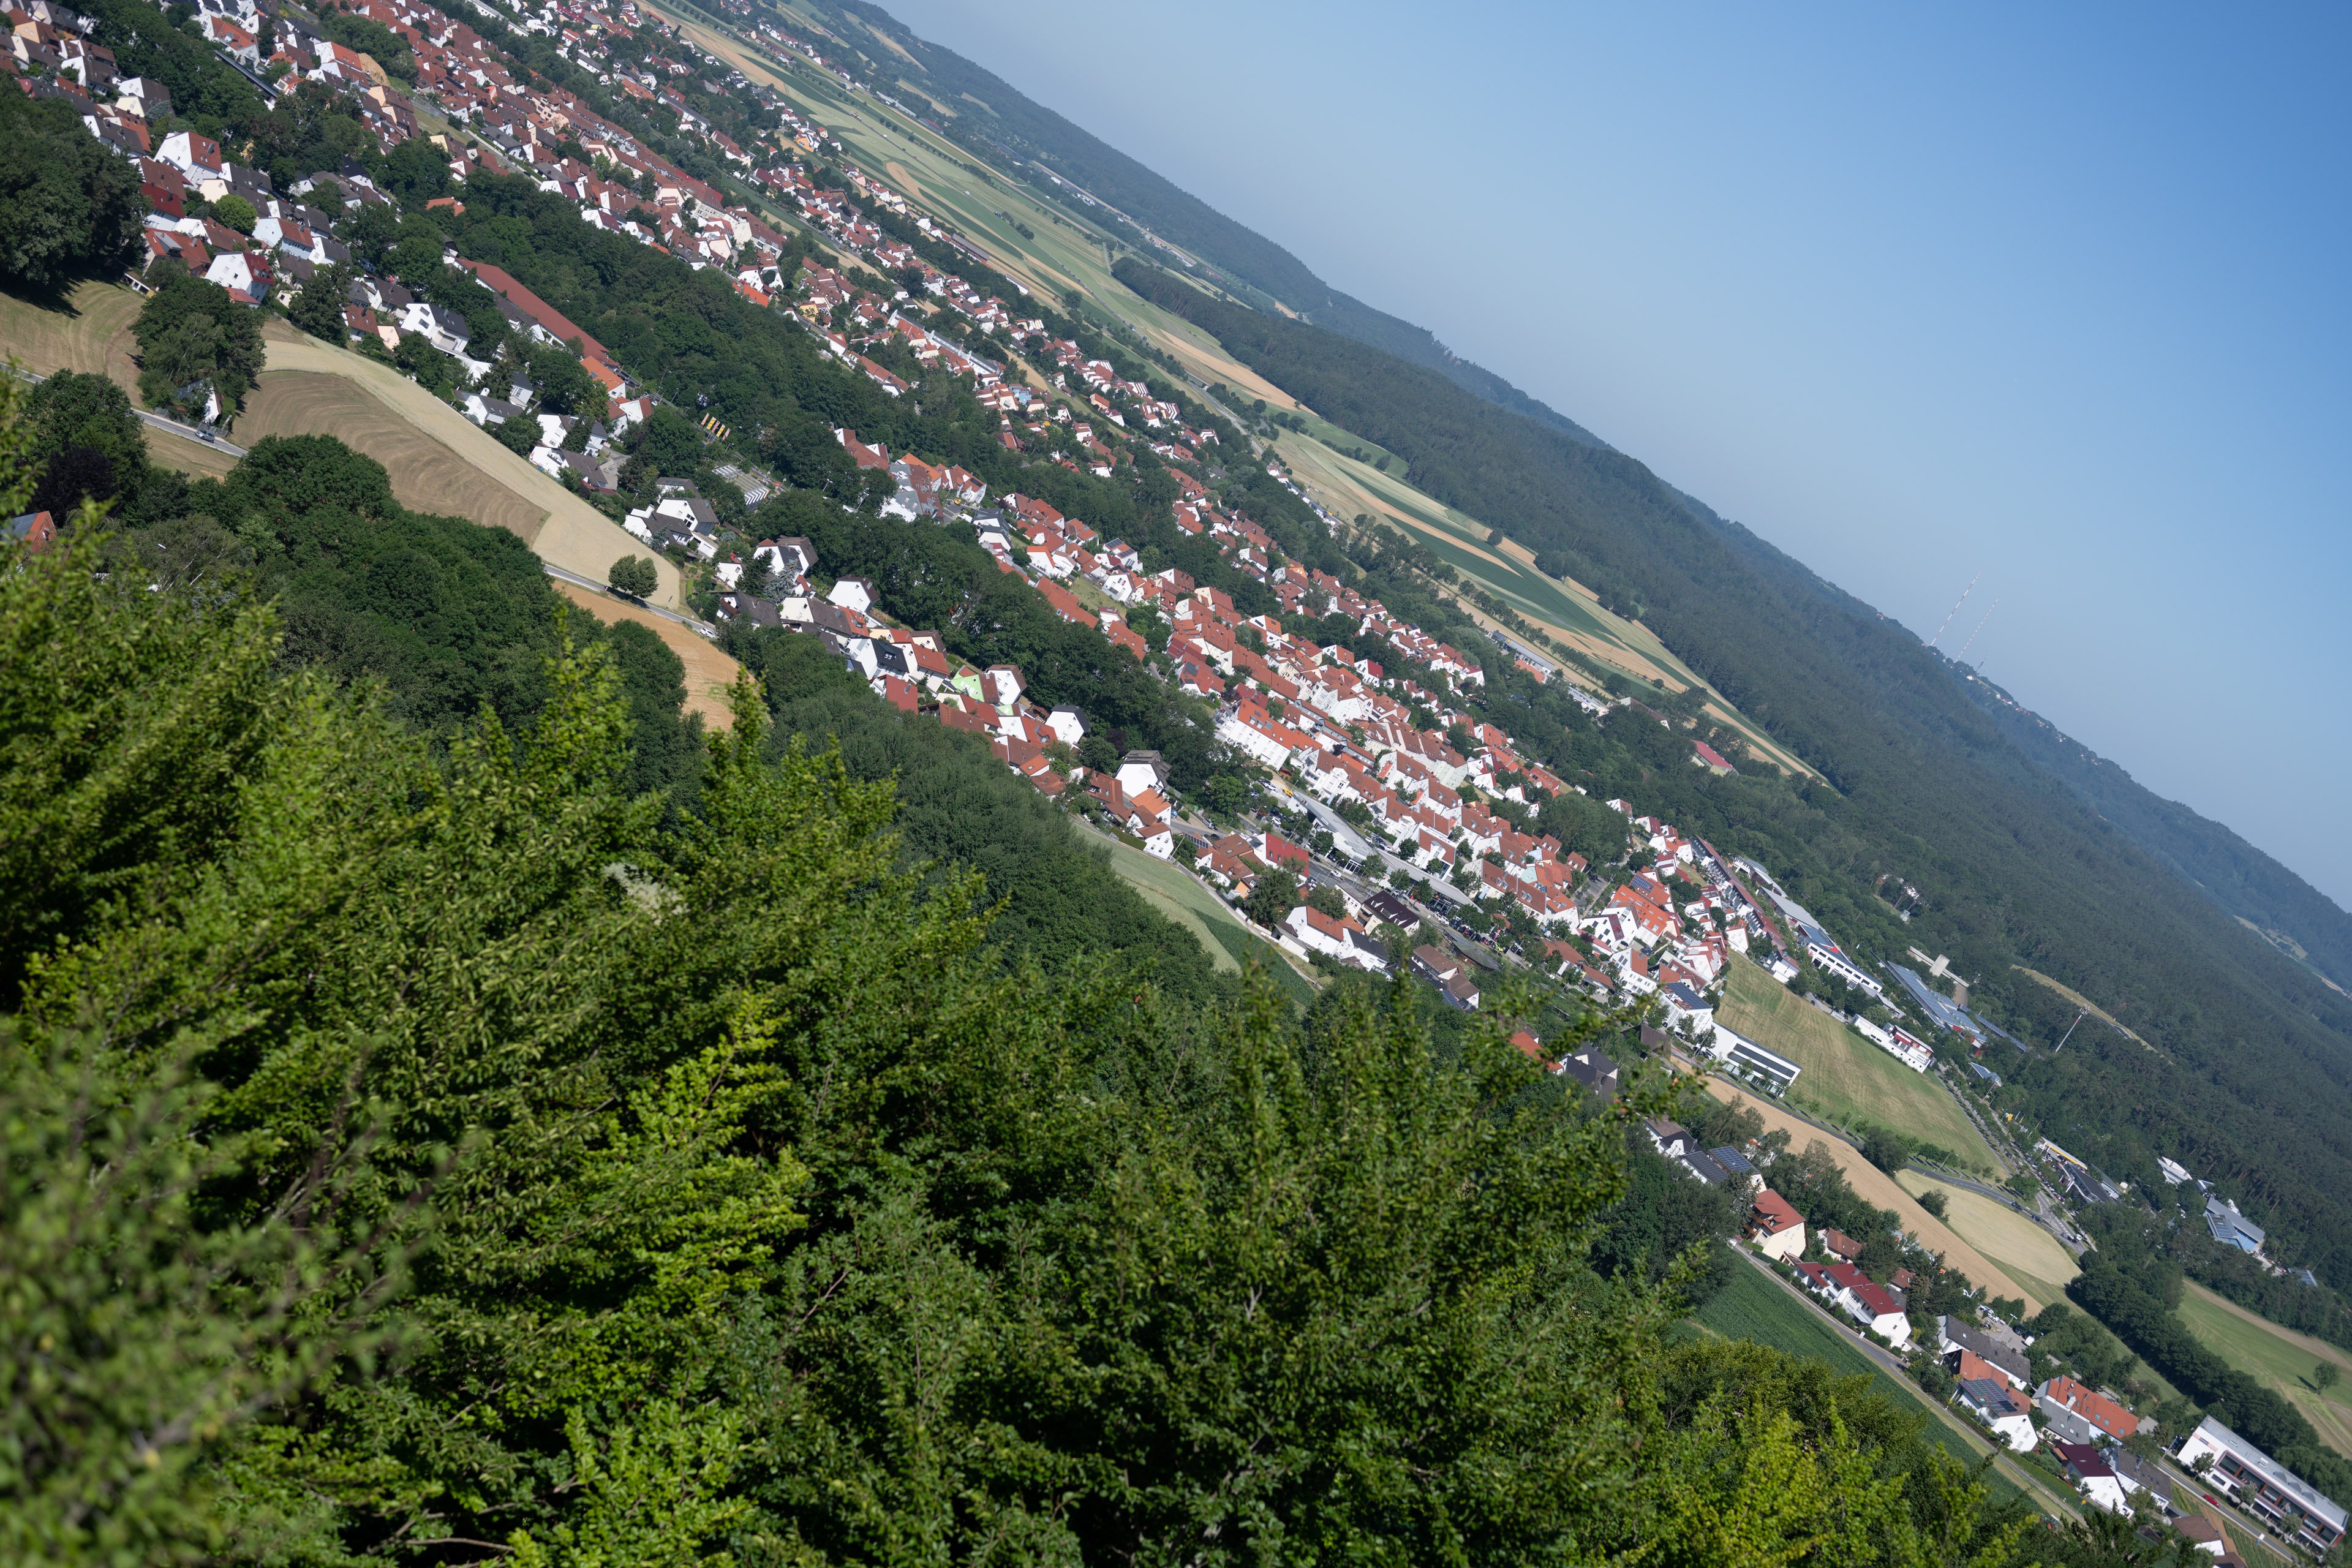
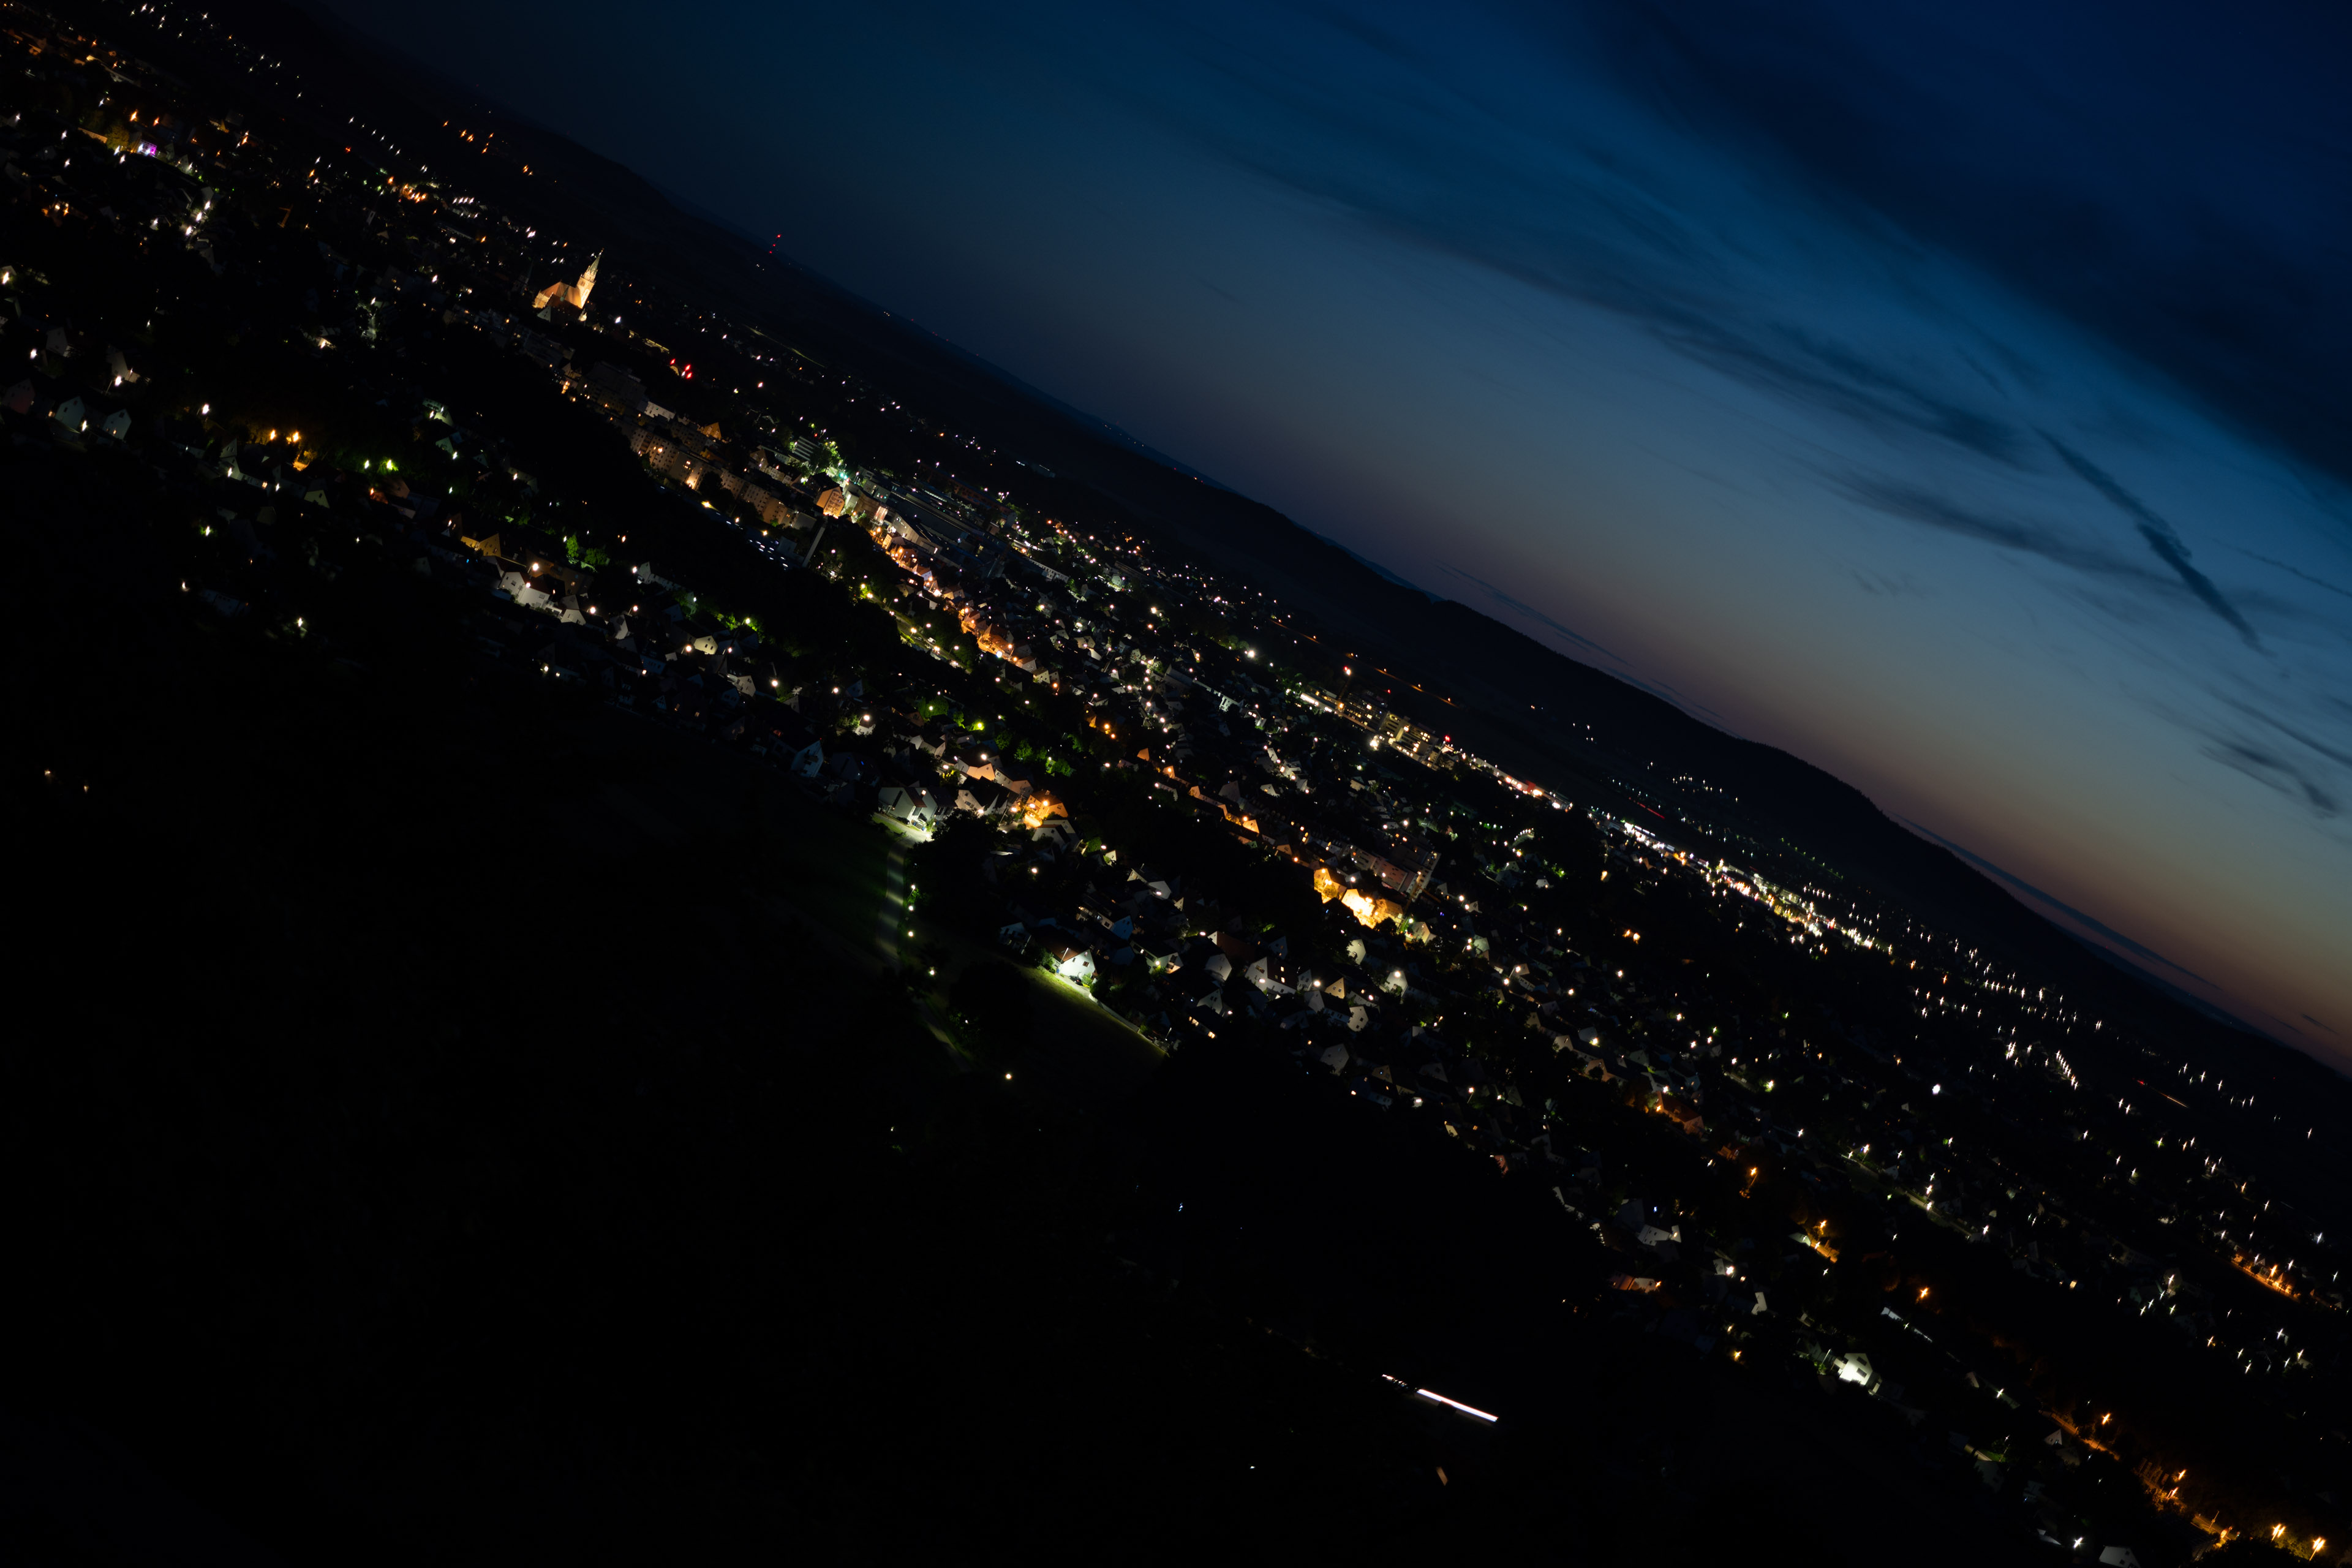
As performance of lenses also depends on the shooting distance I present another series of test-shots of a city around 1 km away. Processing was done in Lightroom 10.3/CRAW 13.3 from RAW to Adobe Color profile with the built-in lens profile compensating CA, vignetting, and distortions. Same with the Nikon Z 50mm f1.8 S. Noise-reduction is set to 0, sharpening to 50/0.5/36/10, with no extra tone, color, or saturation adjustment. I used manual focus at the largest aperture and did not change focus for other apertures.
The following image shows the complete scene wide open to give you an impression of the angle of view. Following the main image are 100% crops from the center, DX-corner, and FX-corner from the Nikon Z MC 50mm f2.8 compared to the Nikon Z 50mm f1.8 S at f2.8. The latter was shot another day but atmospheric conditions were pretty comparable. As usual I have selected the diagonal that provided the better corner results as almost any lens is a bit decentered.
You can access the large originals but please respect our copyright and only use those images for personal use.
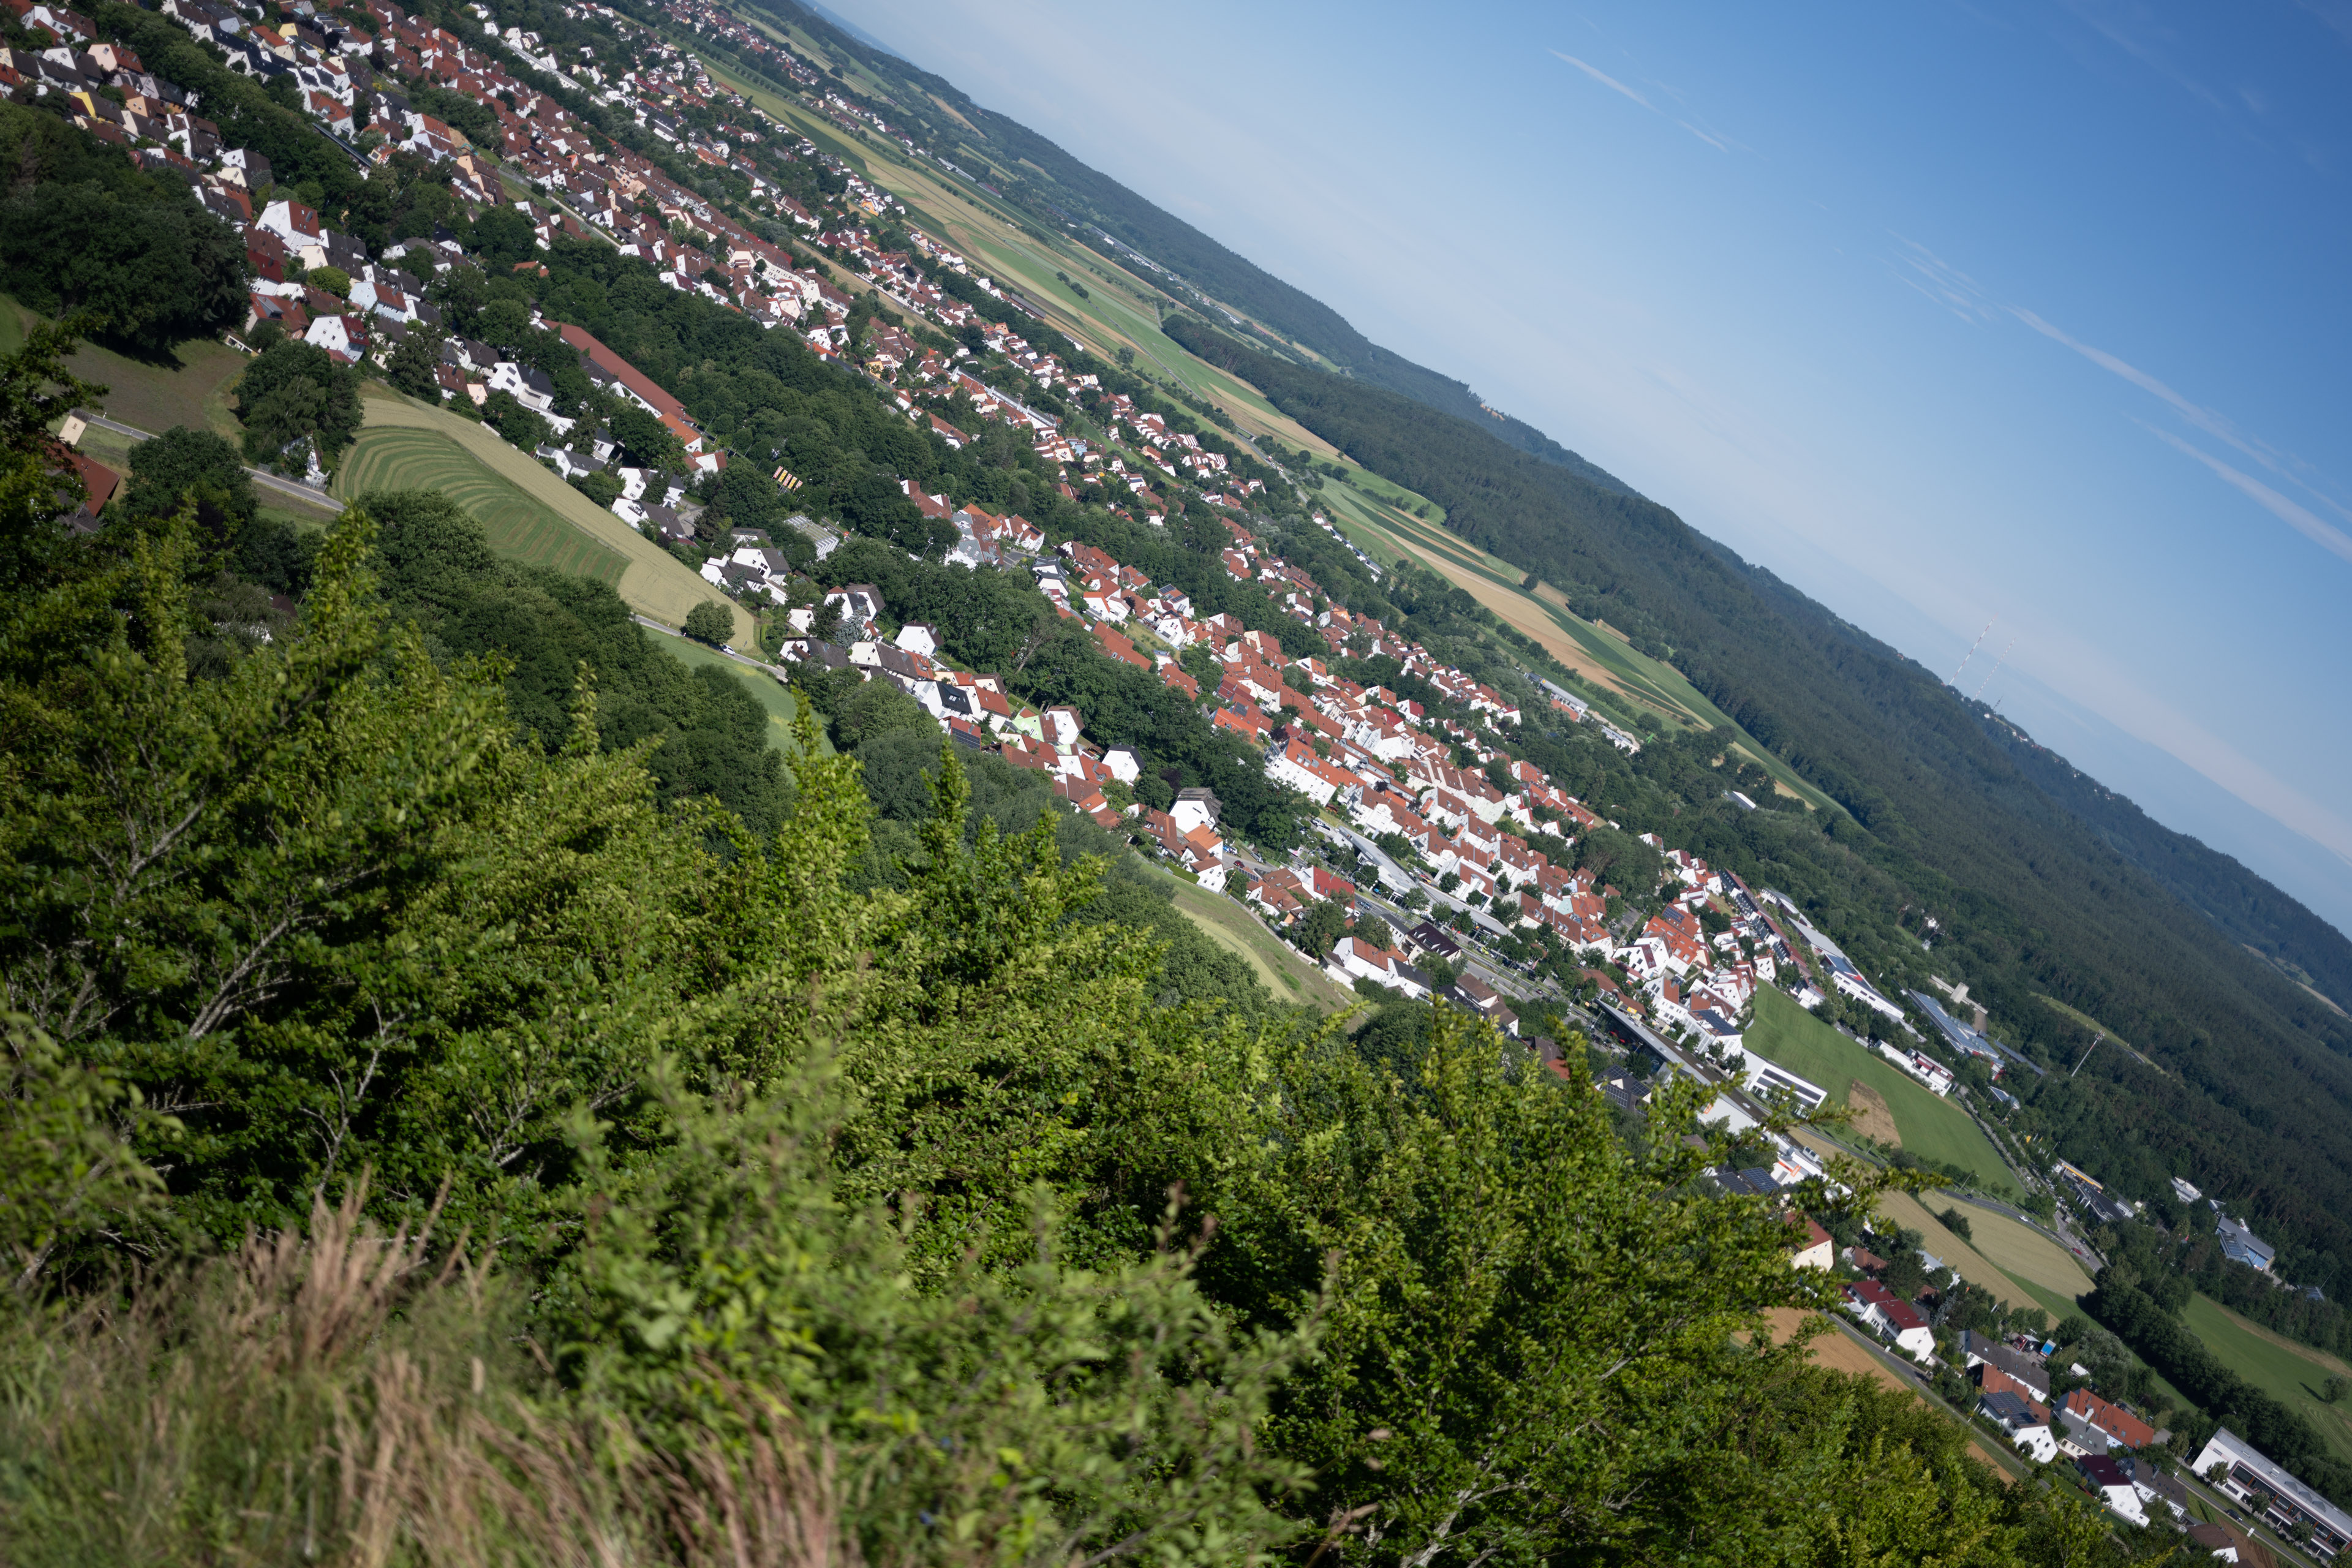
Above: Nikon Z MC 50mm f2.8 at f2.8
Above: Nikon Z MC 50mm f2.8 at f2.8; 100% crops, click image for 4k version, here for large original
Above: Nikon Z 50mm f1.8 S at f2.8; 100% crops, click image for 4k version, here for large original

Above: Nikon Z MC 50mm f2.8 at f4.0
Above: Nikon Z MC 50mm f2.8 at f5.6; also available at f8.0, f11
The center of the Nikon Z MC 50mm f2.8 look a little softer than from the Z 50mm f1.8 S, the DX-corner even more so. But the FX-corner shines. Stopping down to f5.6 lifts performance across the full-frame sensor to very good levels.
Vignetting and distortions
To make it easier to see light fall-off in the corners of a full-frame sensor I’ve arranged a series of three shots each with the new Z-Nikkor from f2.8 to f5.6 and focused to infinity. All images were developed to the same brightness in the center and are shown with vignette control Off (1st row) resp. Normal (2nd row):
Above: Nikon Z MC 50mm f2.8 at infinity without vignette compensation (top) / vignette compensation set to Normal (bottom)
The sample images above show that with the lens profile applied vignetting is OK at f2.8. From f4.0 onwards there is nothing to worry about. At f2.8 automatic shading compensation lifts the extreme corners about 0.5-0.6 EV which is pretty moderate. Set Vignette control to “high” to give the corners a stronger lift. As is typical with most lenses, vignetting is reduced when focusing closer. Even without any vignette compensation and wide open it is not a problem at macro shots.
Adobe’s RAW converter automatically applies Vignette control as it was set in camera – but you cannot alter the setting in postprocessing. That’s different with distortions: Adobe’s RAW converter ignores what was set in camera and always corrects them. So I had to do the following comparison with JPGs straight out of camera. Distortions are of a mild pin-cushion type at 2m distance and are well-corrected by the lens profile:
Distortions: Nikon Z MC 50mm f2.8, as is (top) / with distortion compensation On (bottom)
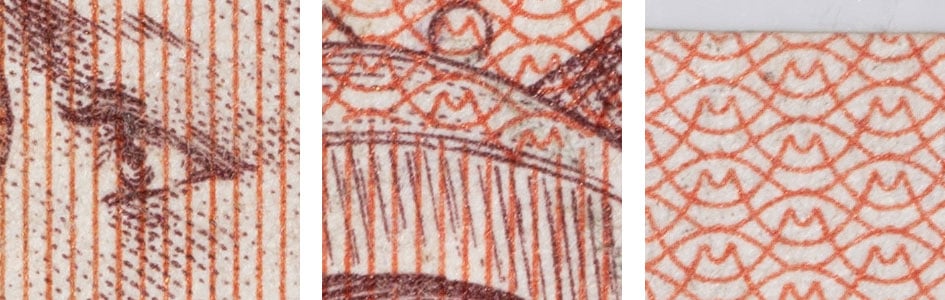
In close-up shots you also hardly notice any distortions as can be seen in this 1:1 macro shot.
Rendering of point-light sources at night-shots
Night-shots pose a different challenge for lenses as the contrast is even higher than under bright sun and point-light sources can reveal some weaknesses such as coma, haloing and colour-aberrations that do not show up as prominently in other test-shots. The 100% crops below the main image show the effect of coma in the FX-corner of the Nikon Z MC 50mm f2.8 at different apertures:
Above: Nikon Z MC 50mm f2.8 at f2.8; click image for 4k version, here for large original
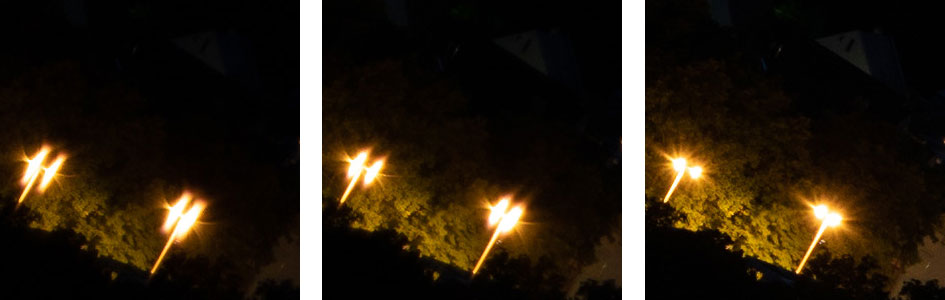
Above: Nikon Z MC 50mm f2.8; 100% crops from the FX-corner at f2.8 (left), f4.0 (middle), f5.6 (right)
The Nikon Z MC 50mm f2.8 produces very visible coma (even in the DX-corner) up to f4.0 whereas the Nikon Z MC 105mm f2.8 VR S is practically free of it. This is by far the worst coma I’ve seen on any of the Z-Nikkors I’ve tested and is probably the biggest optical flaw of the lens. Fortunately the Z MC 50mm f2.8 shows only little color artifacts around bright streetlights at f2.8.
Bokeh quality
This test is for the rendering of point-light sources in an out-of-focus background. The circle of confusion that is produced by this test is pretty indicative of Bokeh performance (in the background) and light fall-off. Ideally the out-of-focus image of the point-light is evenly lit and perfectly circular, with no “onion-rings”, and without coloration. Large aperture lenses normally produce an effect known as “cat’s eye” the further away from the optical axis the point-light is projected. This is due to optical vignetting in the lens barrel when light enters the lens from an angle.
The crops below the main image are from the center, DX-corner, and FX-corner resized to make them comparable across all my reviews.
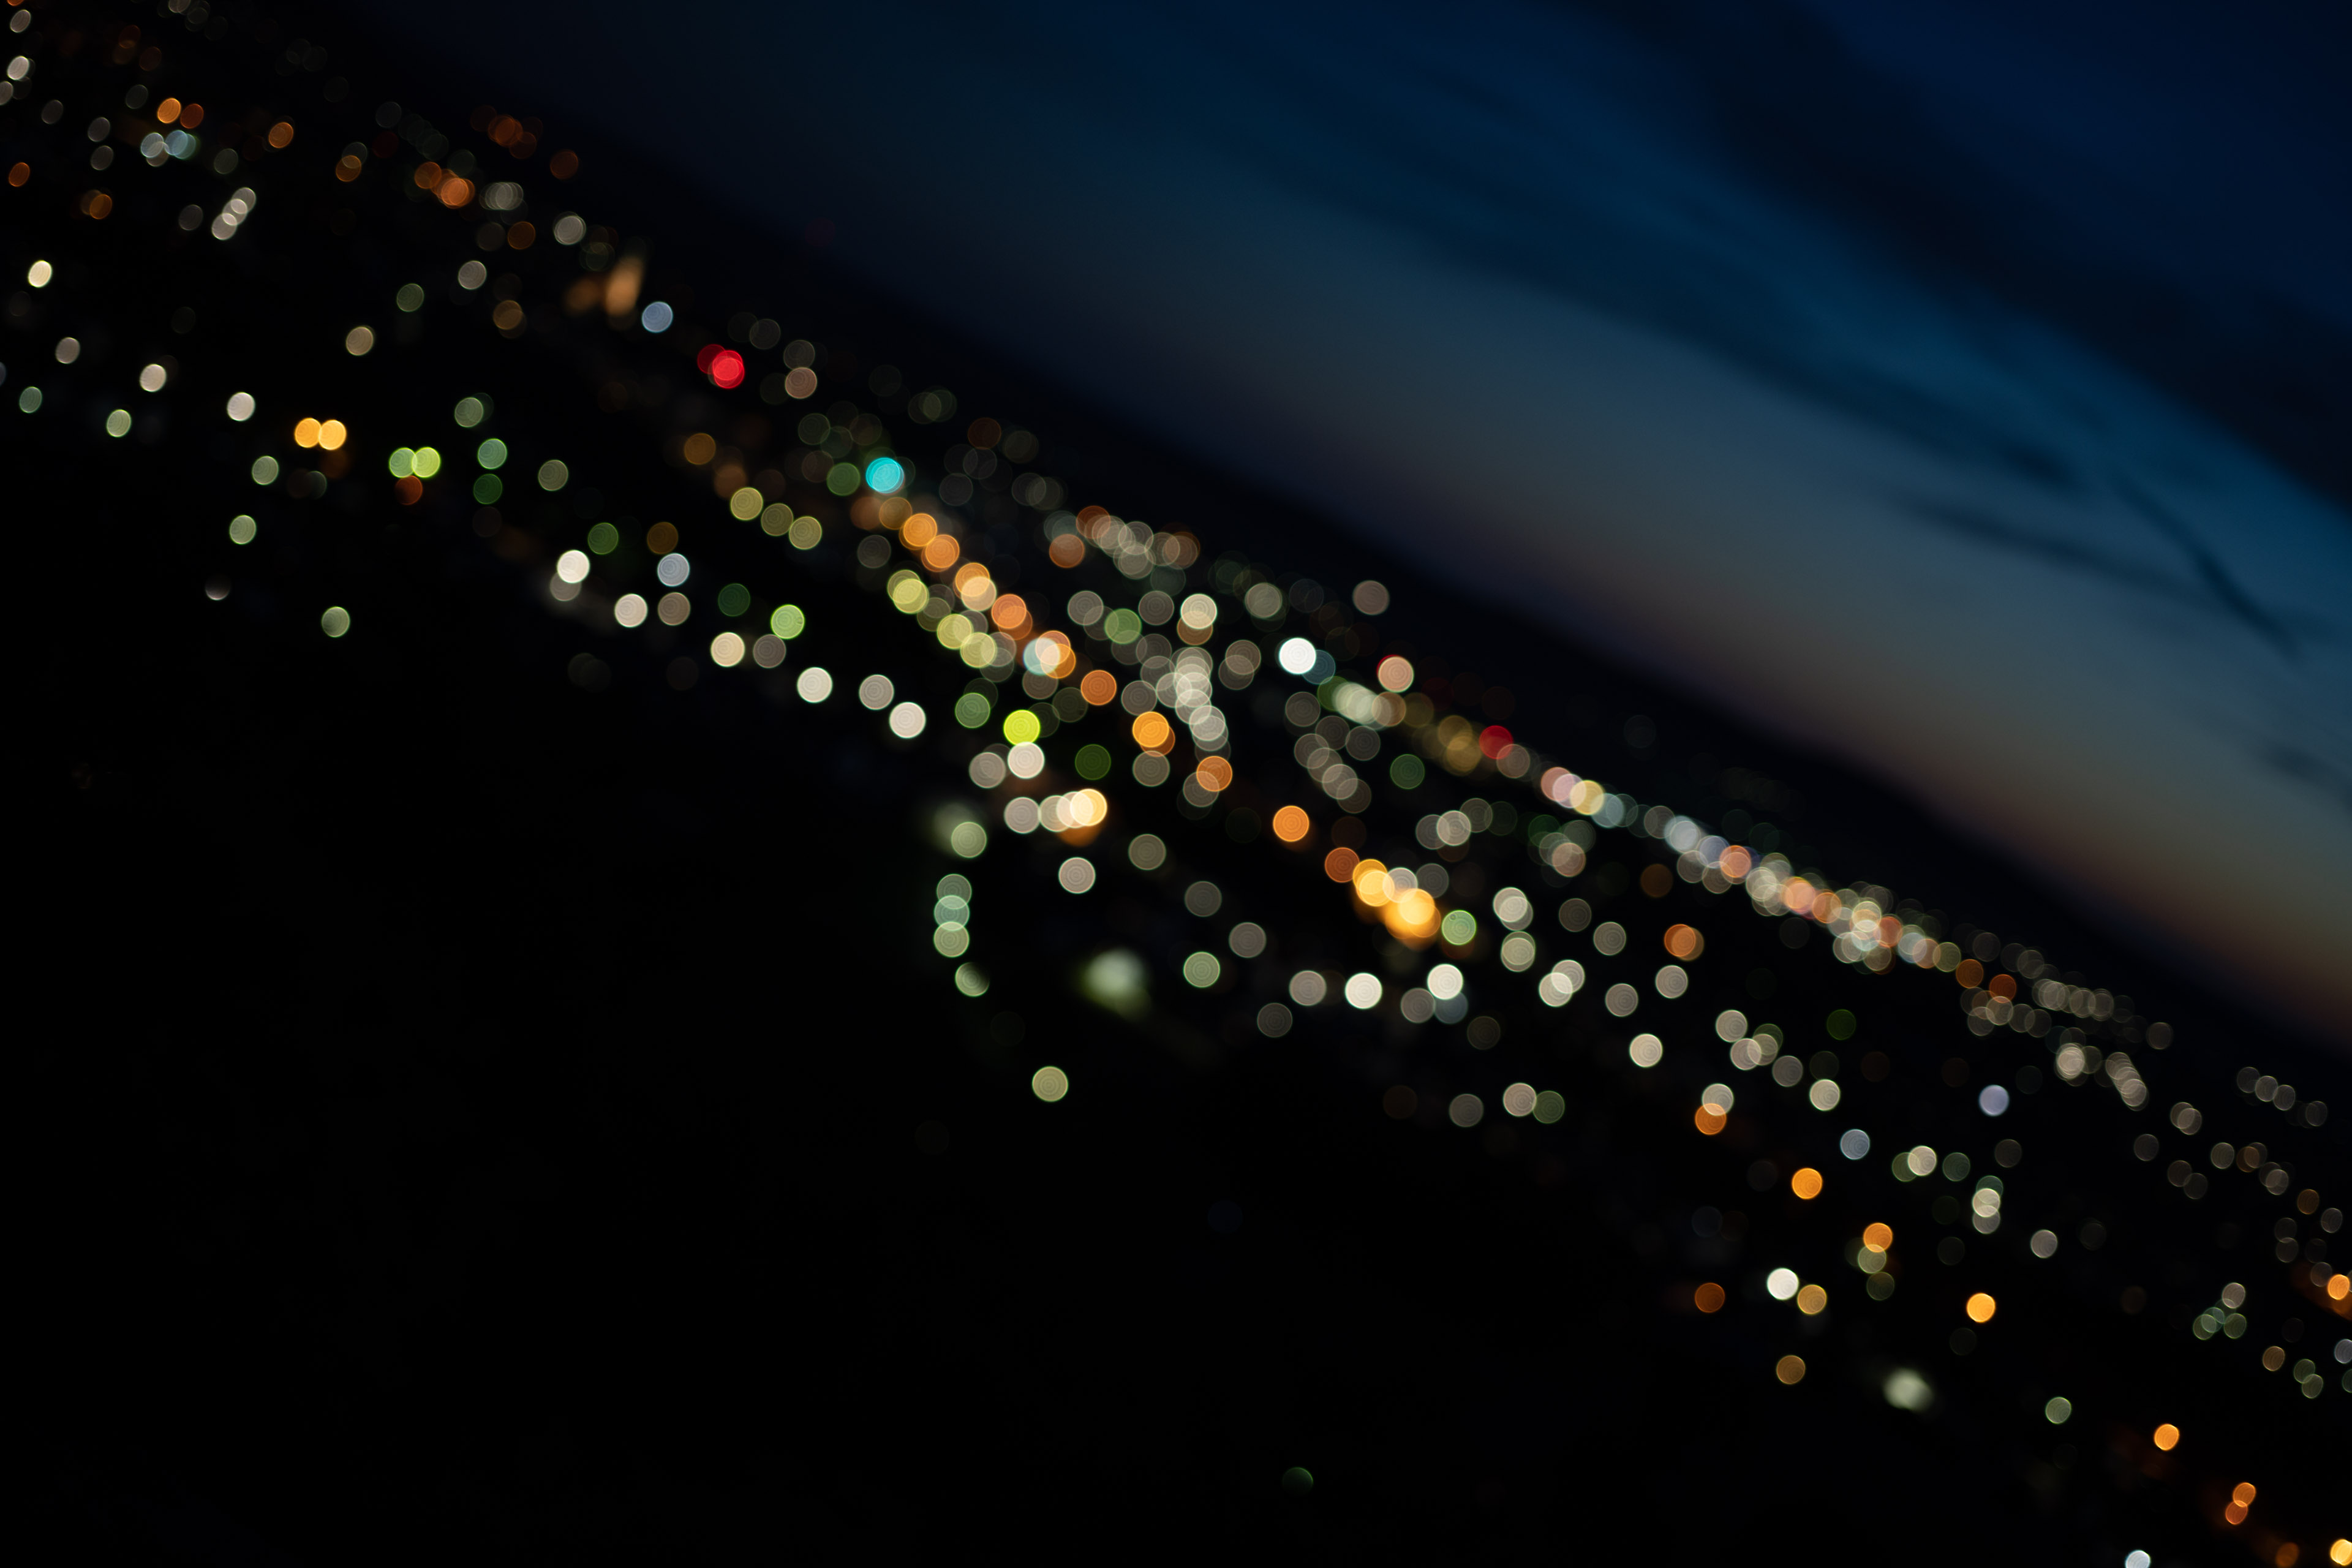
Above: Nikon Z MC 50mm f2.8 at f3.0; click image for 4k version

Above: Nikon Z MC 50mm f2.8 at f3.0; click image for 100% crop

Above: Nikon Z MC 50mm f2.8 at f4.0; click image for 100% crop

Above: Nikon Z MC 50mm f2.8 at f5.6; click image for 100% crop
The diameter of the Bokeh balls in the center is determined by the entrance pupil of the lens which is 18mm. So it’s no surprise that the Z-Nikkor produces relatively small Bokeh balls. There’s also strong outlining with a bit of coloration and some onion rings although compression of the circle towards the corners is relatively mild.
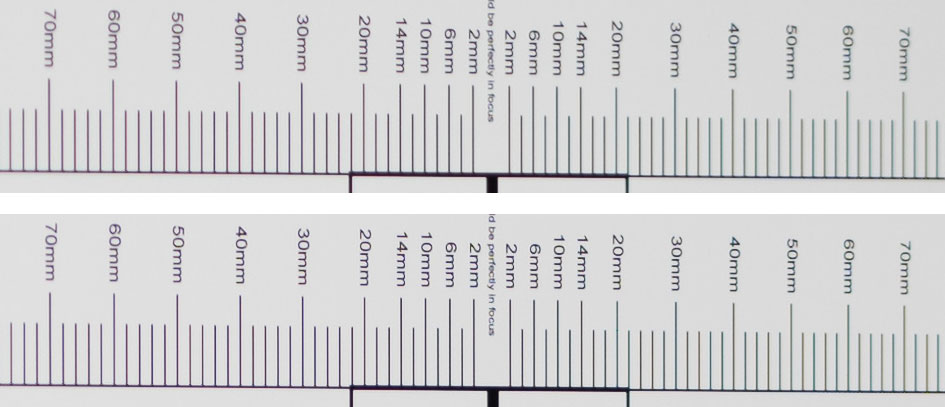
Now let’s see how this analysis of out-of-focus point-light sources translates into Bokeh-performance shooting a book-shelf. Crops are from the foreground, middle-ground, and background resized to make them comparable across all my reviews.
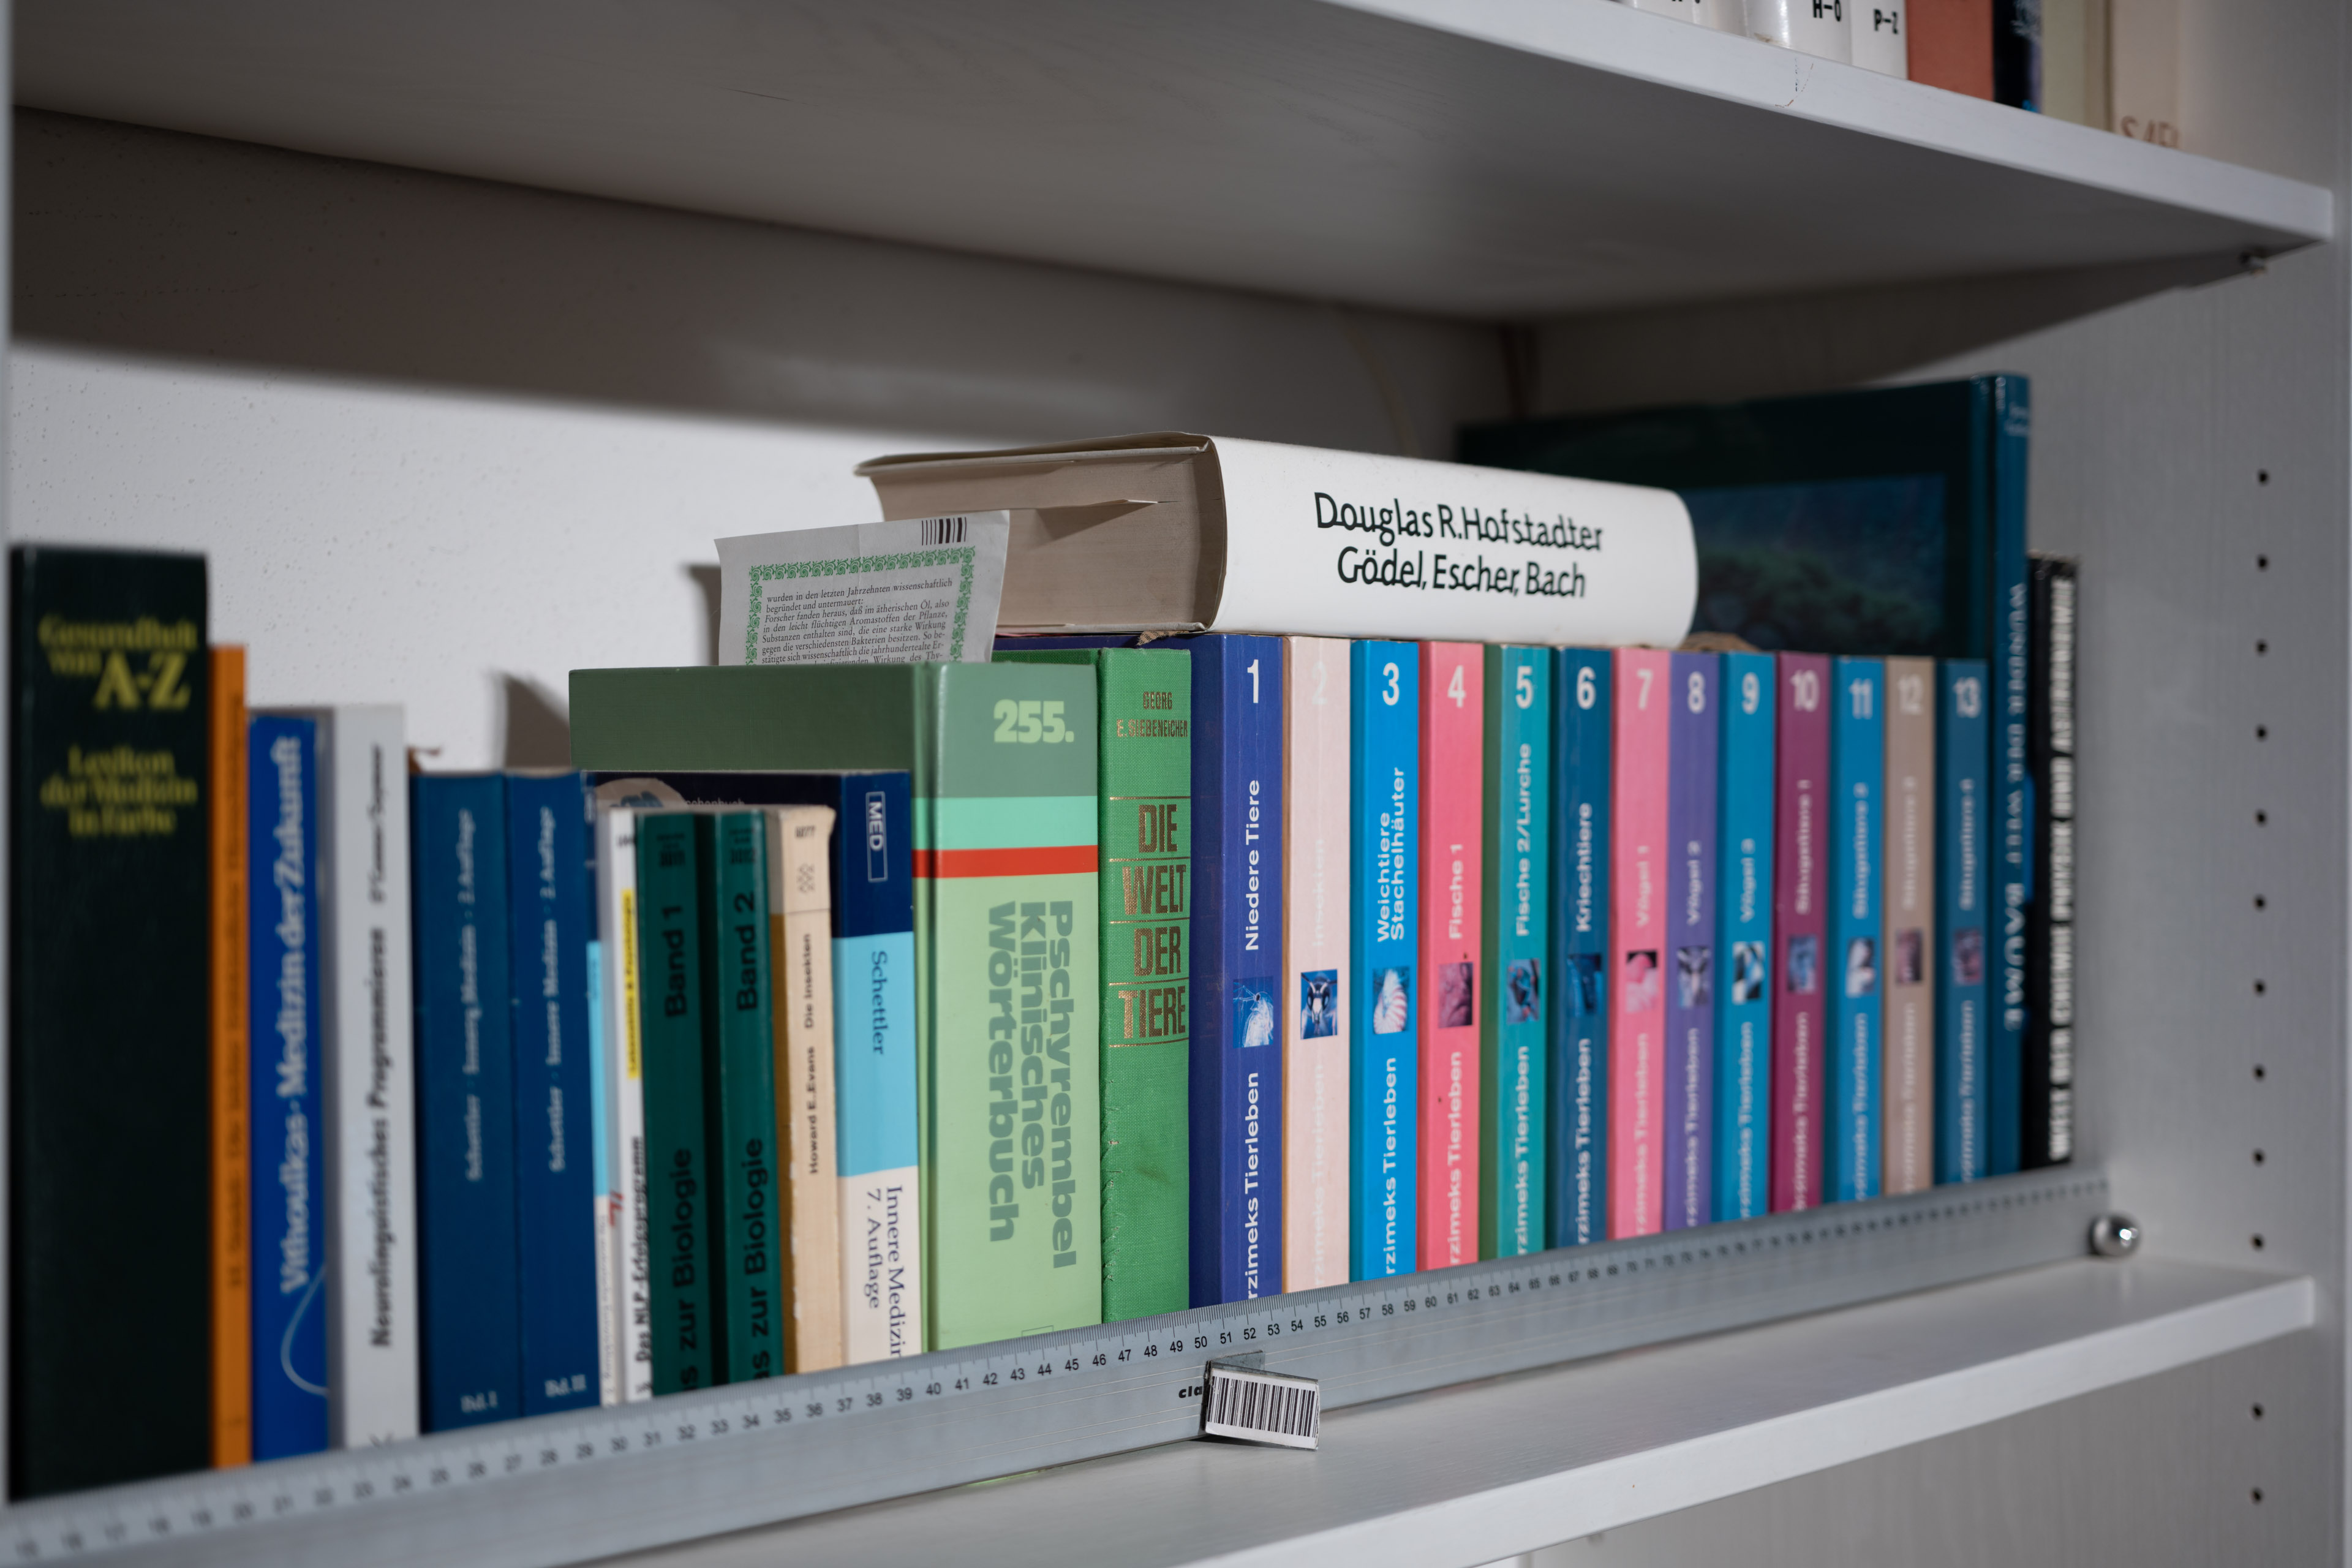
Above: Nikon Z MC 50mm f2.8 at f2.8
Above: Nikon Z MC 50mm f2.8 at f2.8; click image for 4k version, here for large original

Above: Nikon Z 50mm f1.8 S at f1.8; click image for 4k version, here for large original
Above: Nikon Z 105mm f2.8 VR S at f2.8; click image for 4k version, here for large original
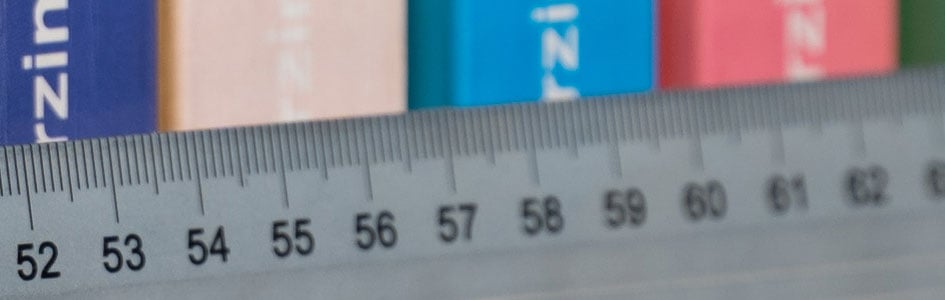
The Nikon Z MC 50mm f2.8 has the least attractive Bokeh of the three lenses in the middle-ground and background. Especially the background looks prone to double contours.
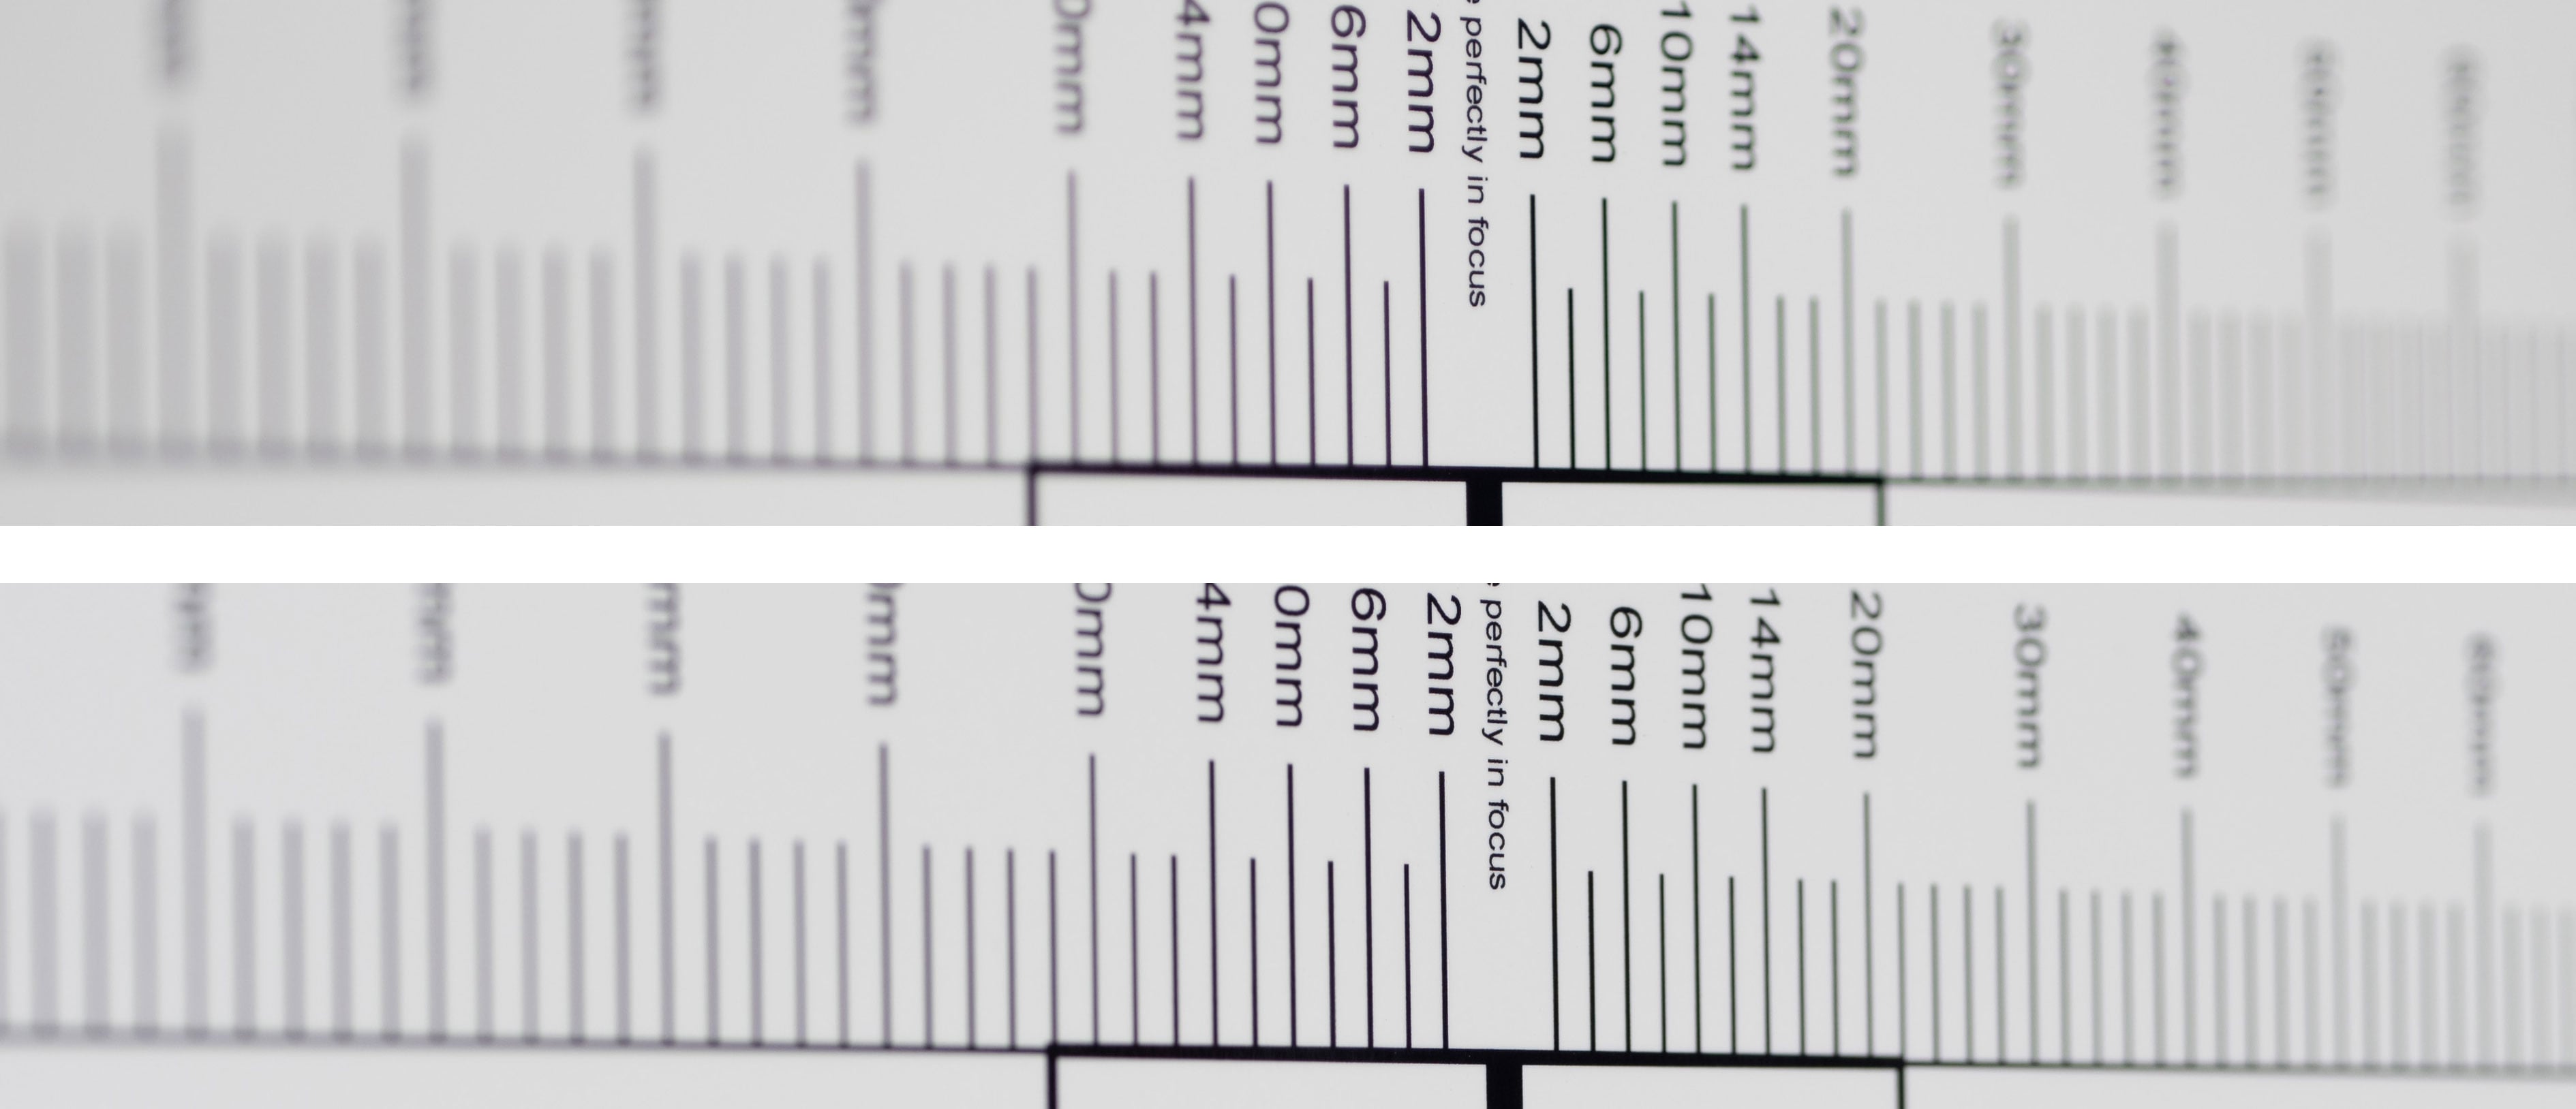
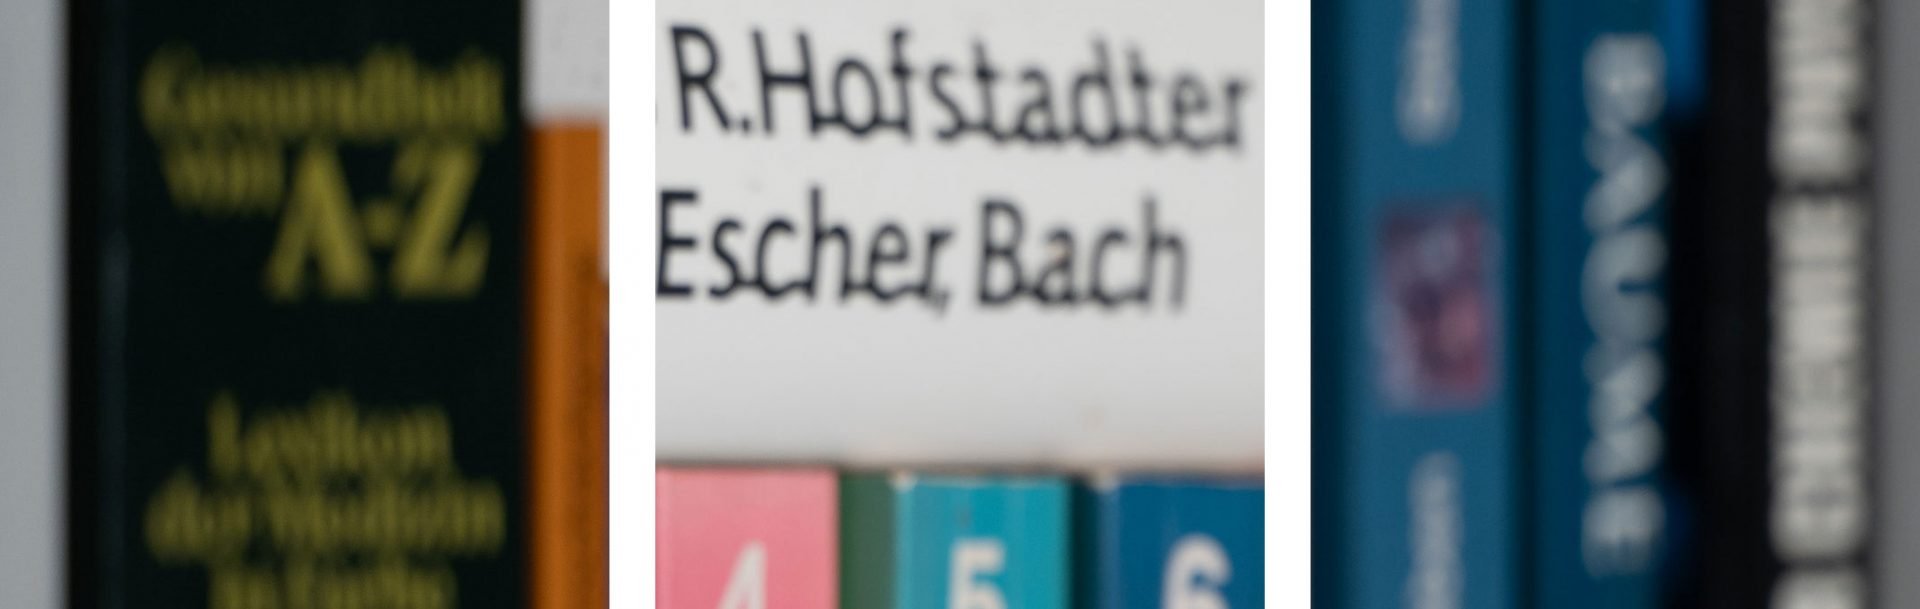
Looking at another crop (now at 100%) from the same images showing the ruler reveals the Nikon Z 50mm f1.8 S renders the softest transition zone with both micro-Nikkors showing busy results.
Above: Nikon Z MC 50mm f2.8 at f2.8; click image for 4k version, here for large original
Above: Nikon Z 50mm f1.8 S at f1.8; click image for 4k version, here for large original
Above: Nikon Z 105mm f2.8 VR S at f2.8; click image for 4k version, here for large original
Another test shot confirms that the Nikon Z MC 50mm f2.8 can indeed produce some ugly double contours and a busy background: have a look at the upper corners of this image. At larger magnifications the effect does not show as prominently though.
Close-up performance
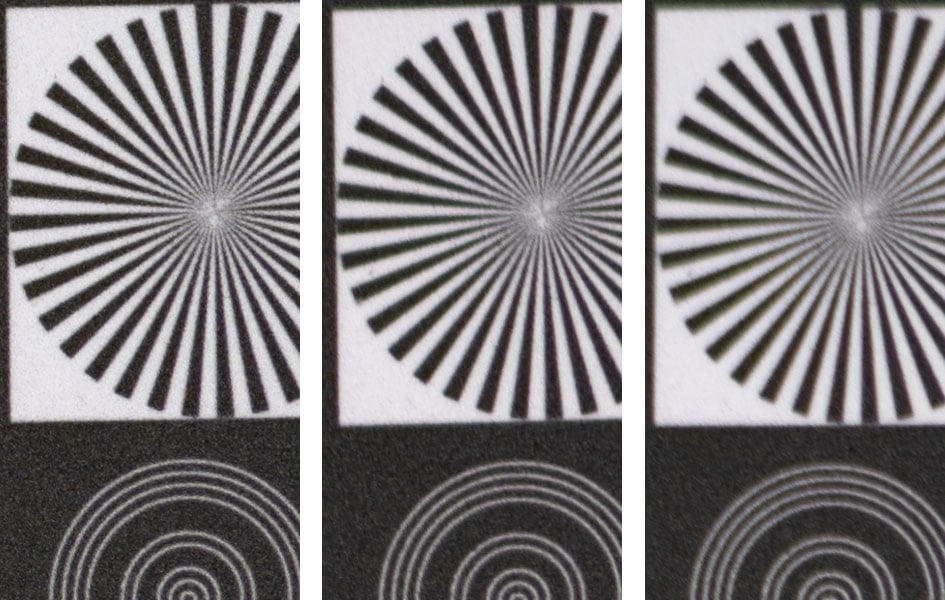
The Nikon Z MC 50mm f2.8 goes down to 1x magnification (1:1). The first set of images was shot at 1:3.8 magnification where the area of sharp focus is just 91 x 137mm. The crops shown below are from 4mm, 13mm, and 20mm off the center of the sensor respectively. For the following crops I focused once on the center wide open and did not change focus: Each row of crops is from the same shot, focused optimally for the center. So this is the best results you can get from a single shot as any issues with field curvature would show up here.
Nikon Z MC 50mm f2.8; 100% crop from center, DX-corner, FX-corner

Above: Nikon Z MC 50mm f2.8 at f3.8 (effective), 1:3.8

Above: Nikon Z MC 50mm f2.8 at f5.6 (effective), 1:3.8
Above: Nikon Z MC 50mm f2.8 at f11 (effective), 1:3.8
Results at f3.8 are a bit soft. Better to stop the Nikon Z MC 50mm f2.8 down to f5.6 or even further to achieve sharpest results in close-up shooting. For comparison have a look at the Nikon Z MC 105mm f2.8 VR S, which is clearly sharper.
The next set of images was shot from low ISO b&w film negativ at 1:1 magnification. So the “noise” that you see in the crops is actually the film grain. The crops shown below are from 0mm, 15mm, and 19mm off the center of the sensor respectively. The lens was focused specifically for each crop which eliminates the risk of a misaligned target or any residues of field curvature. So this is the best result you can get from focus stacking multiple shots with the Nikon Z MC 50mm f2.8.
Nikon Z MC 50mm f2.8; 100% crop from center, DX-corner, FX-corner
Above: Nikon Z MC 50mm f2.8 at f5.6 (effective), 1:1
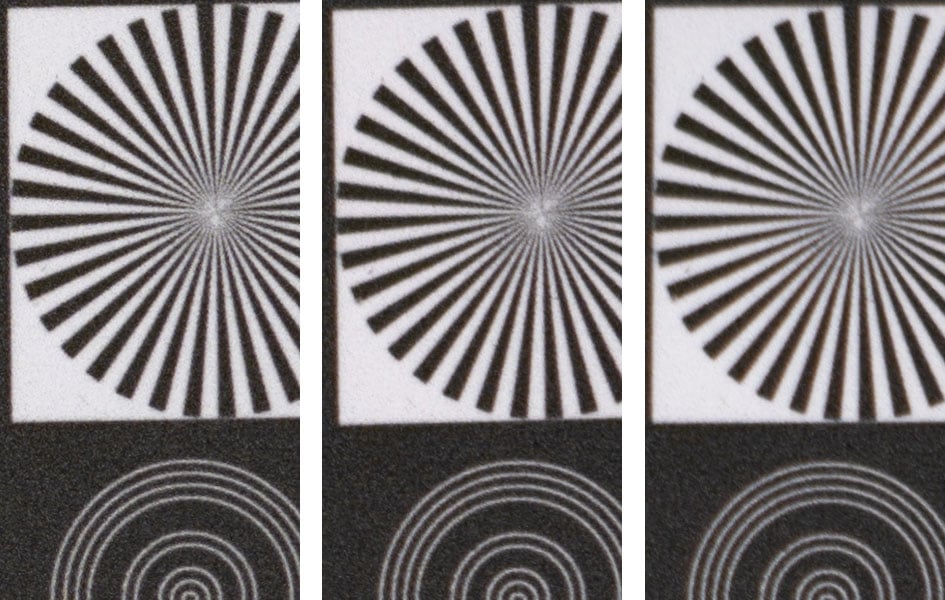
Above: Nikon Z MC 50mm f2.8 at f8.0 (effective), 1:1
Above: Nikon Z MC 50mm f2.8 at f11 (effective), 1:1
AT a magnification of 1:1 Nikon’s Z MC 50mm f2.8 produces a sharp center wide open (which is f5.6 now). The DX-corner needs stopping down to f8.0 to become satisfyingly sharp sharp. And the FX-corner profits even from stopping further down.
A few observations from using focus shift shooting with the Nikon Z MC 50mm f2.8 between 1:1 and 1:4 magnification:
- Focus on the nearest point you need to be sharp. Focus shift shooting takes the indicated number of shots focusing incrementally further away from this point.
- Focus step width (1-9) and effective aperture determine how far focus is changed between each shot. For sharpest results from focus stacking use a step width of 4 (values between 1 and 4 do not change the results). A value of 7 doubles the focus shift distance, a value of 10 doubles it again. So at 10 you only need a quarter of the shots that you need with 4. But then you’ll end up with a lower quality focus stack.
- If you stop the lens down depth-of-field increases and the camera automatically increases the focus shift distance accordingly – no need to change the focus step width. So you could capture the same focus range at f5.6 with 100 shots or f11 with 50 shots.
- When shooting at 1:1 magnification, a focus step width of 4, and an aperture of f5.6 the focus shift distance of the Z MC 50mm f2.8 is around 140 micron which is well within the depth of field. So even shooting with a focus step width of 7 (resulting in a focus shift distance of 280 micron) should be a safe step size for stacking, allowing for 20% image overlap.
- When the focus shift sequence is done, focus remains at the farthest point. Check the last image and if it is not far enough away simply start another focus shift sequence from that point. Should the lens hit infinity, focus shift shooting is automatically terminated and no shots wasted reaching “beyond the horizon”.
All in all focus shift shooting involves a bit of guesswork regarding the number of shots to cover the desired focus range. But after a bit of experimenting you can quickly and easily get perfect image sequences which you then can merge with the stacking software of your choice. For starters have a look at the stacked images on the next page: I’ve listed the number of steps I used to create the images. So you can get a feeling of what you might need at a focus step width of 4.
Flare, ghosting, and sun-stars
Catching a strong light-source shining directly into the lens is always a risky business: it could produce strange colorful ghost-images or reduce contrast considerably through flare and glare. The appearance of flare and ghosting depends on factors like the aperture and the angle of the light hitting the lens. So to judge the proclivity of Nikon’s Z MC 50mm f2.8 for these artifacts I went through a series of well calculated shots against a strong light-source to provoke glare and ghosting. The lens hood was mounted in all shots but I fear it is much to short to have a positive influence. Following is one of the more extreme example results plus one shot showing the streak of light generated when the light source is just outside the corner. The little bright square inset in the upper left shows the respective area with an exposure compensation of +3 EV to make it easier to see which levels of black the lens renders at that point:
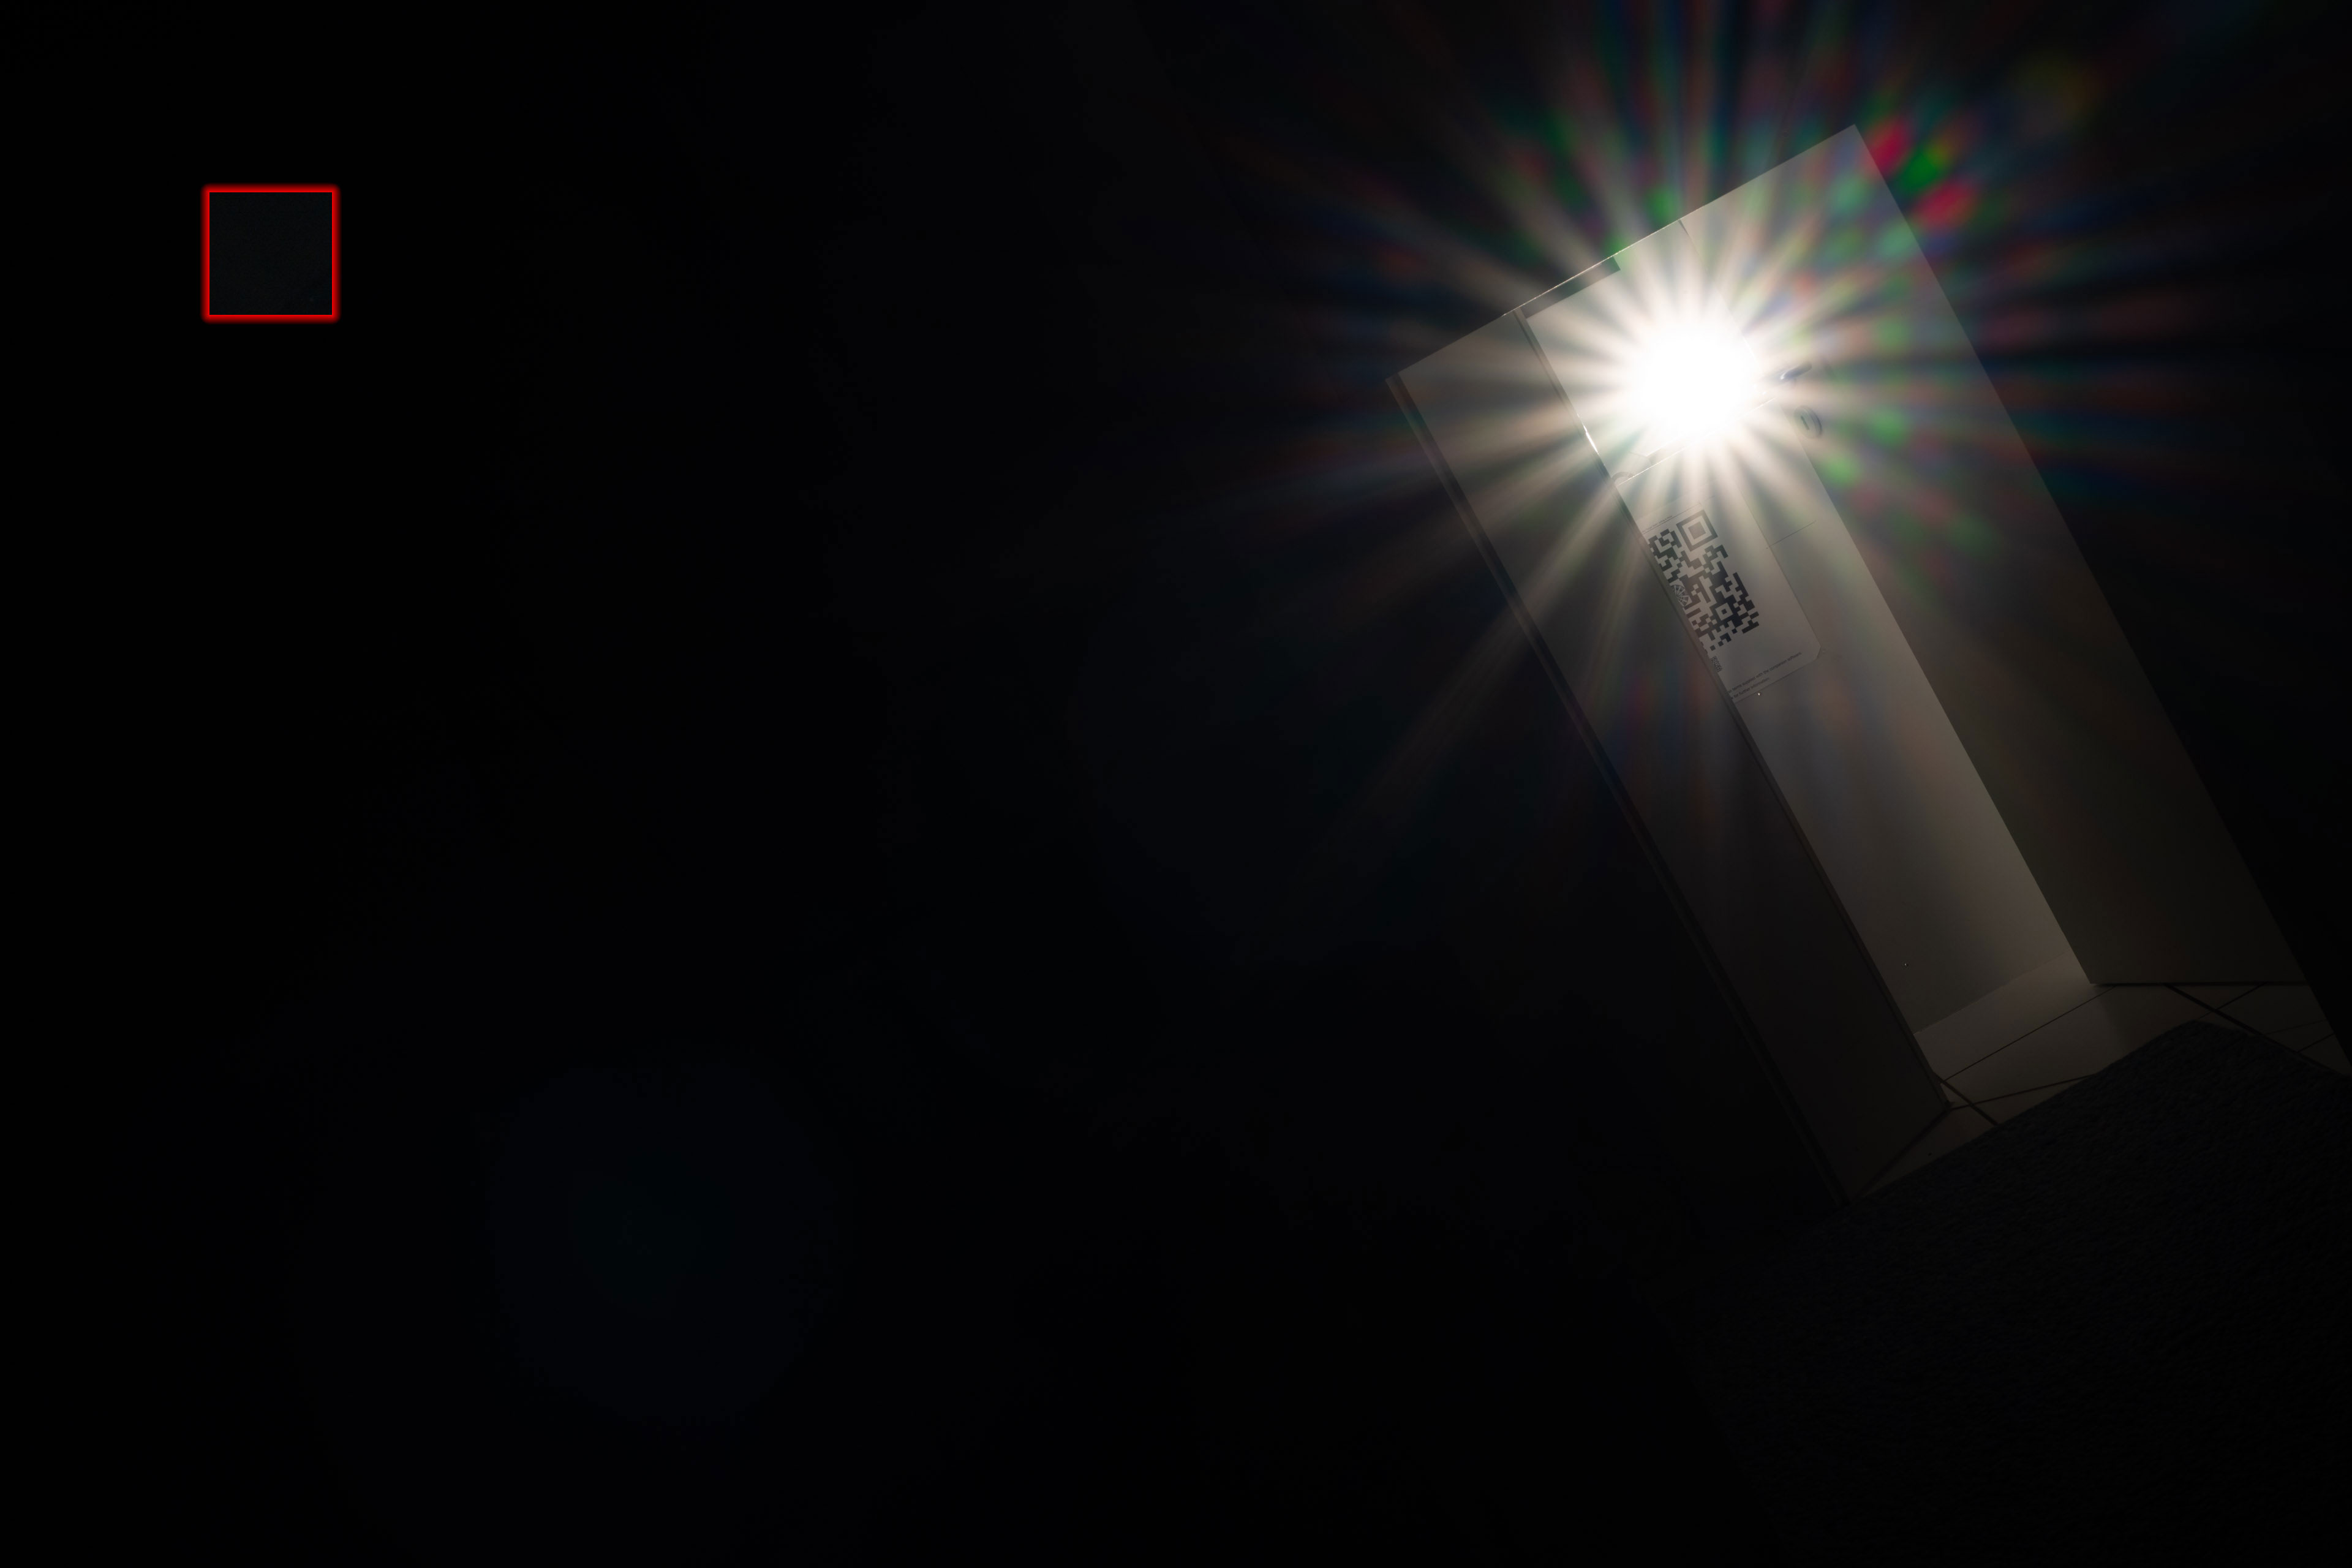
Above: Glare and ghosting from strong light hitting the Nikon Z MC 50mm f2.8 at f2.8; click image for 4k version or here for +3 EV exposure compensation
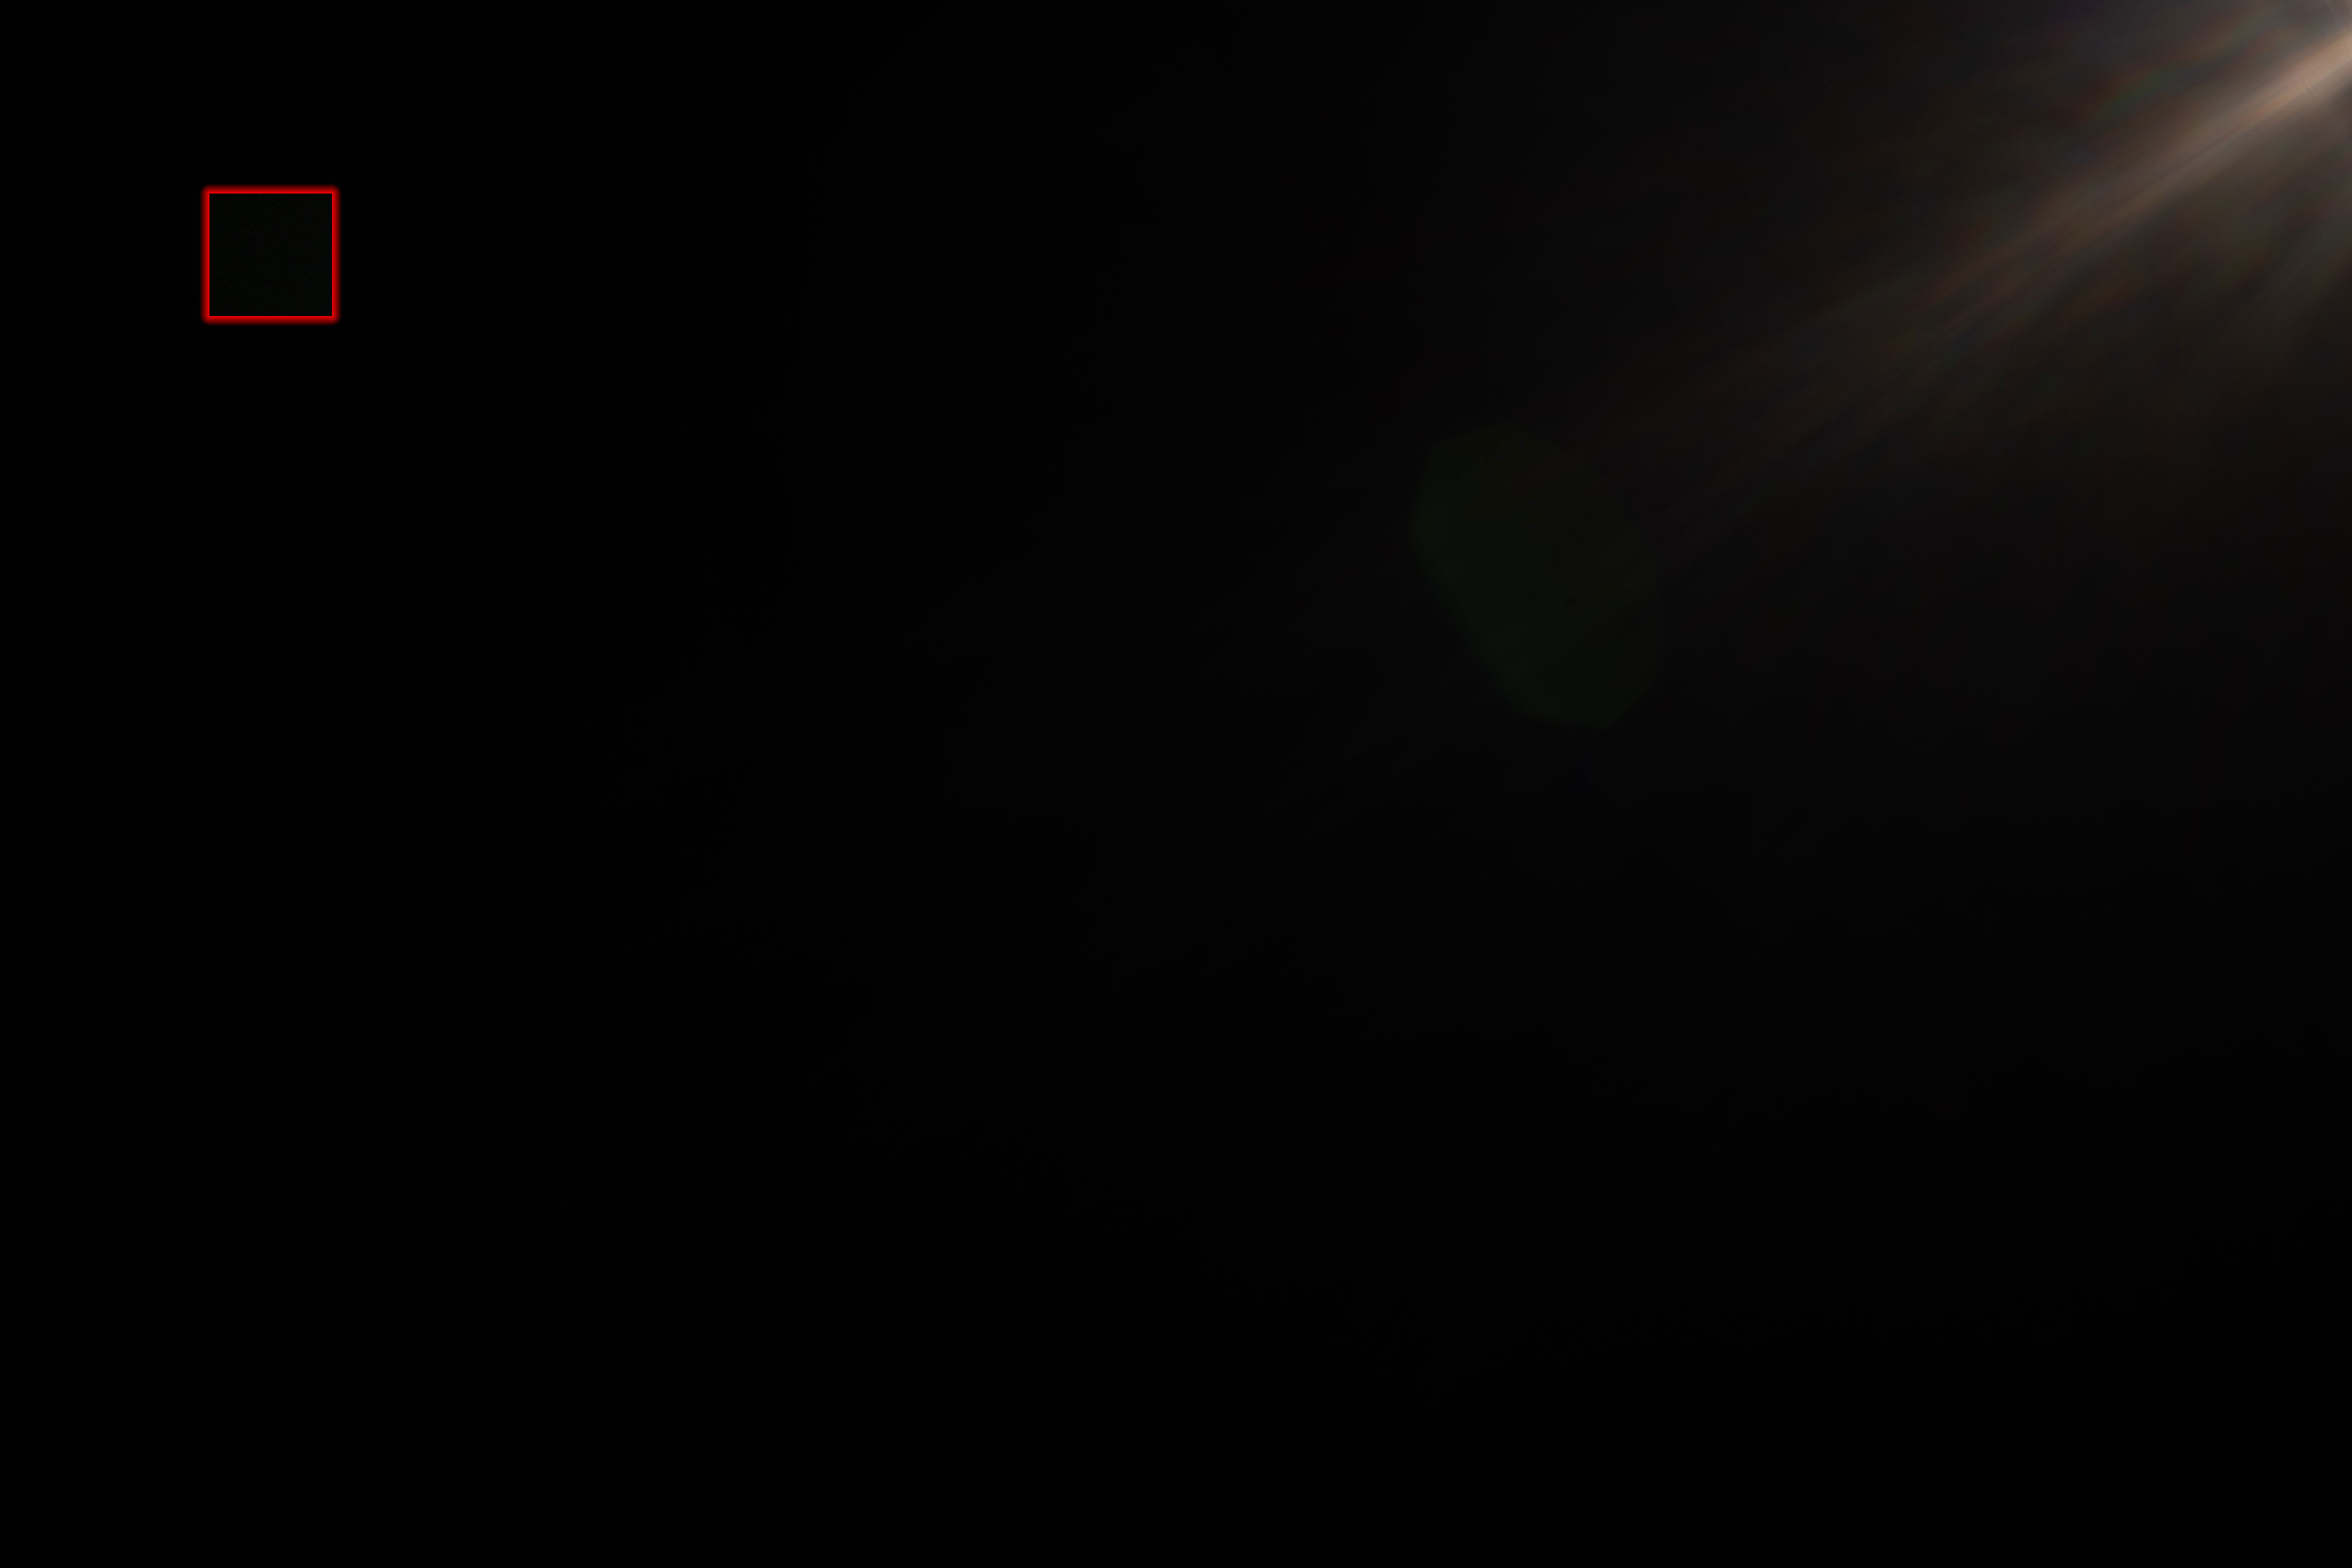
Above: Flare from strong light hitting the Nikon Z MC 50mm f2.8 at f11; click image for 4k version or here for +3 EV exposure compensation
The Nikon Z MC 50mm f2.8 produces some weak ghosting artifacts and the blacks stay pretty deep even in adverse contra light situations.
The lens starts producing sunstars at f5.6. But better stop down further to make them more prominent:
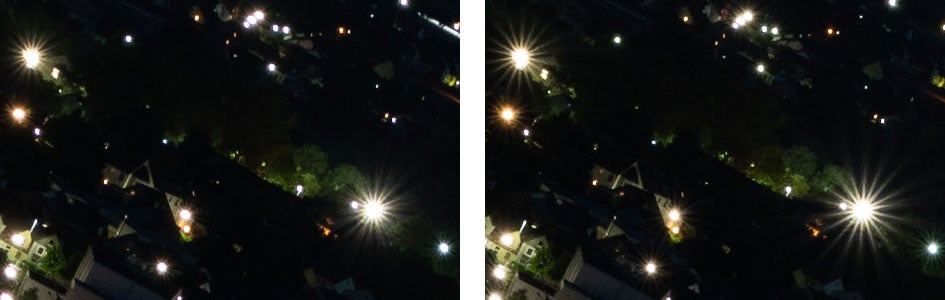
Above: Sunstars from the Nikon Z MC 50mm f2.8 at f5.6 (left), f8.0 (right), 100% crops
Next check out my sample images!
Check prices on the Nikon Z MC 50mm f2.8 at B&H, Adorama, WEX UK or Calumet.de. Alternatively get yourself a copy of my In Camera book or treat me to a coffee! Thanks!


