Canon EOS 60D
-
-
Written by Gordon Laing
In depth
Canon EOS 60D design and controls
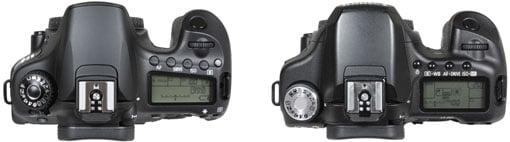
The Canon EOS 60D may represent a new mid-range DSLR category for Canon, but when viewed from the front, it greatly resembles its semi-pro predecessor with a similar shape and styling. Measuring 145x106x79mm, it falls roughly in-between the EOS 50D and EOS 550D / T2i in size. Nikon’s D7000 is roughly the same height and depth, but over one cm narrower in width. We’ve pictured the EOS 60D alongside its predecessor, the EOS 50D below.
 | ||
 |
|---|
The EOS 60D may resemble the EOS 50D from the front, but there are considerable differences on the top and rear which we’ll describe in a moment. One of the biggest changes though lies under the skin of each body: the EOS 50D as a traditional semi-pro DSLR employed magnesium alloy construction whereas the EOS 60D has switched to the same plastic-over-metal construction as the entry-level bodies. This single change has caused considerable concern with enthusiasts on the forums, but it’s important to look beyond the theory and actually compare them in person.
Canon puts a positive spin on the change of materials by describing the EOS 60D as being 8% lighter than the EOS 50D while also coming-in at a lower price point. Looking at the body weight including card and battery, the EOS 550D / T2i, EOS 60D, EOS 50D and EOS 7D weigh-in at 527g, 755g, 812g and 900g respectively, while Nikon’s D7000 weighs roughly the same as the 60D at 780g.
So technically the EOS 60D certainly is lighter than the EOS 50D, but we were hard pushed to notice the 57g difference in use. Sure, the EOS 60D is noticeably lighter than the EOS 7D, and conversely, noticeably heavier than the EOS 550D / T2i, but when compared side-by-side with the EOS 50D, there’s really not much in it.
 |
|---|
This is the first surprise concerning the 60D’s build, and it’s a little disappointing not to find the ‘downgrade’ in materials making a more significant difference to the weight. The second surprise though is discovering the EOS 60D feels much better in your hands than you first assume, and in our view is actually more comfortable than its predecessor. Like the EOS 7D before it, the EOS 60D takes inspiration from Nikon’s design book by incorporating a small indentation on the inside of the grip for your finger tips. The thumb rest on the rear has also been changed from the quarter-circle of the EOS 50D for a longer diagonal raised ridge. Both added-up to a body that felt more comfortable and secure in our hands than the EOS 50D, while similar rubber coatings on crucial surfaces ensured no slips.
 |
It’s also important to remember plastic can be very strong. We asked Canon how the toughness and weather-proofing of the EOS 60D compared to the EOS 50D and the company claimed there was no significant difference in terms of shock resistance and the weatherproofing was identical. Of course a magnesium alloy body is more likely to dent rather than crack on hard impacts, but the message we want to get across is the EOS 60D’s build and ergonomics are much better than you might assume – and despite sharing the same construction as the EOS 550D / T2i, the shape and handling are certainly a big step-up. Sure, if you’re likely to drop your camera or take regular hard knocks, then we’d still recommend a magnesium alloy body, but average photographers will find the EOS 60D more than adequate.
Looking at the upper surface in more detail, the photos above reveal changes in the Command mode dial and information screen. The former is now black on the EOS 60D and for the first time on a Canon DSLR employs a lock button in the middle. Like those on some earlier Canon film SLRs, this button must be held down to allow the dial to turn, which prevents accidental changes.
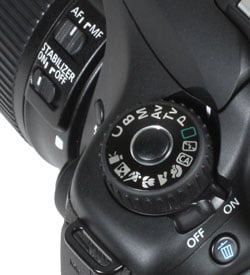
The EOS 60D’s mode dial offers the usual PASM modes, along with a separate Bulb position and a single Custom mode along with full Auto, Creative Auto, Flash Off, five presets and the Movie mode. Eagle-eyed Canon spotters will note the EOS 50D offered two Custom modes along with the automatic depth-of-field A-DEP mode, while accessing Blub from the Manual setting. So the new EOS 60D gains a movie mode, promotes Bulb to its own position, and loses one Custom mode.
 |
 |
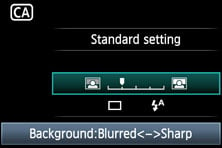 |
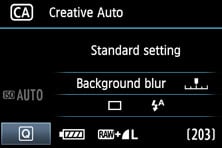
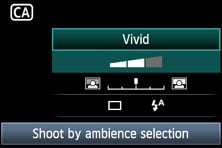
Curiously the Creative Auto (CA) mode has shifted in location and also features a new interface. As before it still offers a beginner-friendly approach to controlling depth-of-field with a ‘background blur’ scale taking care of the lens aperture, but there’s now also a ‘shoot by ambience selection’, which allows you to choose from Standard, Vivid, Soft, Warm, Intense, Cool, Brighter, Darker and Monochrome processing. There’s also direct access to the Drive and Flash options on-screen, and these along with the background blur and ambience can be adjusted using the Q-Menu system we’ll describe lower on this page.
 |
| ||||||||||||

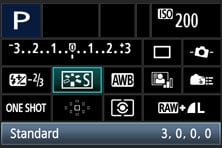
On the upper right side of the body is an LCD information screen that’s a little smaller and less detailed than that on the EOS 50D, but which still represents an upgrade over an entry-level body which typically has none. While all the shooting details can be displayed on the main colour screen on the rear of the camera, the benefit of having some of it replicated on the top is greater visibility in bright conditions (not to mention less blinding in the dark), along with much lower power consumption.
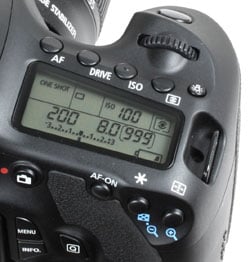
The EOS 60D’s upper LCD screen shows the shutter speed and aperture, ISO value, exposure compensation, shots remaining, metering, drive and AF modes, along with icons indicating AEB, battery life, monochrome shooting, white balance correction, and flash exposure compensation. What you won’t find from the EOS 50D are the image quality and white balance settings, but in its favour, the EOS 60D features a broader +/-3EV exposure compensation scale, a more accurate battery indicator, and the simple but considerate inclusion of the letter M to indicate manual focus. Note where more than 1000 frames are available, the EOS 60D still just shows 999 rather than adopting Nikon’s cleverer approach of abbreviating, say, 1100 shots as 1.1k.
The EOS 60D features four buttons running along the top of the screen – one more than the EOS 50D and 7D – although for simplicity all now offer a single function only. From left to right, the 60D’s controls offer direct access to the AF mode, Drive mode, ISO setting and Metering mode. So it loses the 50D and 7D’s direct access the White Balance and Flash Compensation settings, but both can still be adjusted via the main screen interface. It’s a sensible compromise, although interesting to note the EOS 550D / T2i offers direct access to the AF mode, Drive mode and ISO settings in addition to the White Balance and Picture Style, so the loss of a metering button aside, actually offers a little more direct control.
Completing the upper surface controls are a button to illuminate the LCD screen, a finger dial and the same click-style shutter release button as the EOS 50D.
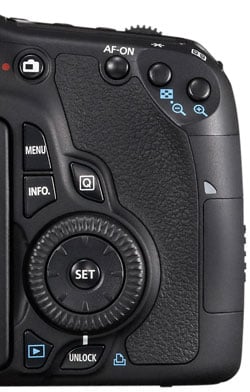 |
The biggest external changes from the EOS 50D can be found on the rear surface. Most obviously there’s a switch to an articulated screen which we’ll describe in detail below, but equally there’s significant differences in the controls. The AF-ON, AE lock and AF point buttons are still in the upper right corner, but pretty much everything else has changed in some regard.
Like the EOS 7D, there’s now a satisfyingly chunky power switch around the base of the Command dial rather than the smaller switch by the thumb wheel of the 50D. Live View now gets a dedicated button to the right of the viewfinder, and it also doubles-up as the record button in the Movie mode. The Menu, Info and Play buttons are now to the right of the screen, along with a new dedicated Q button to fire-up the on-screen user interface, while the delete button is now to the left of the viewfinder. Note the FUNC and Picture Style buttons of the EOS 50D are no longer present, and more importantly, neither is the mini joystick.
The biggest control change concerns the rotary thumb wheel. First the good news: there is one on the EOS 60D, differentiating it from the entry-level models and lending it an air of the traditional semi-pro models. But the bad news is it’s a little smaller in diameter than those on existing Canon DSLRs, the SET button in the very middle is much smaller, and worse, there’s now an eight-way rocker in the centre to replace the separate mini joystick of the semi-pro models.
Now there’s nothing inherently wrong with a rocker control, but the one on the EOS 60D just doesn’t feel right. It’s almost flush to the surface of the wheel around it, and suffers from minimal travel and feedback when you push it in any direction. As a result it can be hard to press at times and equally hard to know if you have pressed it; and as you spin the wheel with your thumb it’s also easy to accidentally depress it.
Ergonomically this is an own-goal, and ironically we found the control wheel on the tiny PowerShot S95 (where the entire wheel tilts as a rocker) was easier to use. We understand Canon removed the joystick from the EOS 60D to further differentiate it from the semi-pro models, and are relieved it kept a control wheel of some description, but the rocker button inside just doesn’t do the otherwise decent ergonomics of the EOS 60D any justice.
 |
 |
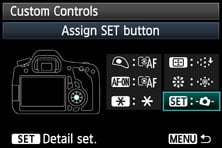 |
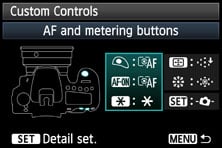
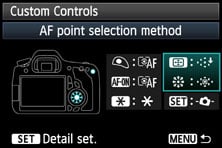
On the upside, the EOS 60D does at least offer a respectable array of button customisation – see above. You can make changes to the AF and metering buttons, the AF point selection button and customise the SET button in the middle of the rocker and wheel. It’s no EOS 7D in regard to customisation, but at least there’s some options.
Finally, around the front of the camera, you’ll be relieved to learn the depth-of-field preview button is still present. This also works in Live View, with the screen brightening to compensate for smaller apertures, although obviously if the light levels are already low, there’ll be increased noise in the live preview.
Canon EOS 60D flash
 |
| ||
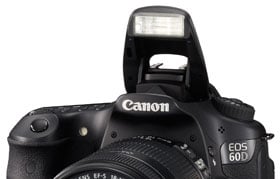
The Canon EOS 60D features a built-in flash, which can popup by itself in the fully automatic modes, or at a push of a button in other modes; like other Canon DSLRs, this flash is flickered for AF assistance rather than using a dedicated lamp like Nikon’s bodies. The 60D’s fastest flash sync speed is 1/250, matching semi-pro bodies and slightly quicker than the 1/200 of the 550D / T2i. The maximum coverage matches lenses with a 17mm focal length, so will be a perfect match for the various kit zooms, although it falls a little short of the 15mm coverage of the EOS 7D.
 |
 |
 |
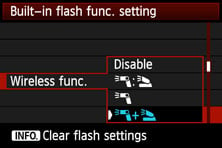
In a welcome upgrade over its predecessor, the EOS 60D follows the EOS 7D to become the second Canon DSLR to support wireless flash control with the built-in flash.
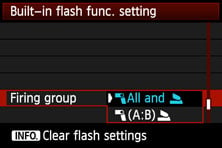
Like the EOS 7D, the popup unit can become a wireless Speedlite transmitter, allowing the EOS 60D to control up to three groups of Speedlites, without the need for an additional master unit. It’s a great upgrade to have on the 60D, albeit not as sophisticated in the number of remote units as the 7D.
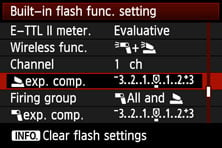
There is of course a hotshoe on the top of the body, which like recent semi-pro Canon DSLRs features a plastic surround which mates with Canon’s higher-end Speedlites to provide environmental sealing. The EOS 60D also offers options to configure both the internal and compatible external flashguns.
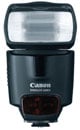
Options for both types include flash compensation, curtain sync, wireless setting and E-TTL II mode. External Speedlites which support camera-control include the 430 EX II and 580 EX II. Connect one of these and the camera controls additionally offer flash bracketing and zoom options.
While the EOS 60D features wireless flash control, its repositioning as a mid-range body means the PC Sync port of the EOS 50D has been lost. Existing xxD owners may be sorry to see it go, but the EOS 60D’s target audience will find the support for wireless flash control arguably more useful than the ability to connect to studio lighting or flashes without compatible hotshoes. Indeed many existing xxD owners will find wireless flash control more useful than a PC Sync port.
Canon EOS 60D viewfinder
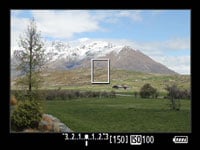
The Canon EOS 60D employs a penta-prism viewfinder with 0.95x magnification and 96% coverage. The coverage is quoted as being 1% greater than the EOS 50D, although we believe it’s the same head with minor tweaks – either way, you wouldn’t notice 1% extra coverage in use, so it’s fair to describe the EOS 60D’s viewfinder size and coverage as being the same as the EOS 50D.
 | |
While EOS xxD owners will find the specification unremarkable, it does represent a step-up in brightness and apparent size over entry-level DSLRs which normally employ penta-mirror viewfinder systems. Nikon realised long ago the value of a penta-prism viewfinder to upsell enthusiasts from entry-level to mid-range bodies on models like the D80, D90 and D7000, so it’s no surprise to find Canon following the same strategy here. It gives the EOS 60D a degree of classiness that’s lacking from entry-level models.
But Nikon’s not stood still and having implemented penta-prism viewfinders on mid-range bodies for several generations, it’s raised the game with the latest D7000 which boasts nothing less than 100% coverage. This kind of specification is normally reserved for high-end semi-pro bodies like the D300s or Canon EOS 7D, so to find it on a mid-range model is very impressive. So while the use of a penta-prism viewfinder is a classy upgrade for the EOS 60D over entry-level models, the D7000 trumps it in this respect.
The EOS 60D’s viewfinder may essentially match the specification of the EOS 50D before it, but Canon’s updated the information running below the frame to match that of the EOS 7D. There’s still the usual exposure details along with the ISO value always displayed, but the EOS 60D now extends the exposure compensation scale to +/-3EV and includes a four-segment battery icon.
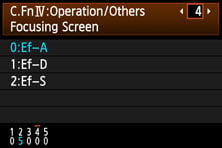 |
The information bar may be the same as the EOS 7D, but the EOS 60D doesn’t share its transmissive LCD focusing screen. Instead the nine AF rectangles and the spot-metering circle are etched onto the same Ef-A Precision Matte focusing screen as the EOS 50D before it, and like that model you can swap it for the optional Ef-D Matte with an alignment grid (pictured) or the Ef-S Super-Precision Matte for easier manual focusing with lenses sporting apertures faster than f2.8.
Interchangeable focusing screens are feeling old hat now though, since Nikon has implemented transmissive LCD graphics for several generations in its mid-range models upwards. These allow you to switch an alignment grid on and off in a menu rather than buying and fitting a fiddly optional accessory; they also allow AF markings to disappear when inactive for an uncluttered view. Canon implemented its first transmissive LCD screen for a DSLR in the EOS 7D, and it’s a shame not to find one here on the EOS 60D. Again it’s an aspect where Nikon takes the lead.
The EOS 60D may be lacking the transmissive LCD screen of the EOS 7D, but still offers a single axis electronic levelling gauge through the viewfinder, using the exposure compensation scale to indicate tilt if desired. The SET button can be configured to offer this facility.
Canon EOS 60D screen
The Canon EOS 60D becomes the first Canon DSLR to feature a fully-articulated screen. The screen is hinged on the left side of the body (as viewed from the rear), allowing it to flip and tilt in any direction for easier composition at high or low angles, while also being able to turn to face the photographer or back on itself for protection.
 |
This is the single biggest new feature of the EOS 60D and one which will be welcomed by videographers, along with anyone who takes pictures at unusual angles. It’s also a key advantage the EOS 60D enjoys over the Nikon D7000 which still uses a fixed panel; interestingly the only Nikon DSLR with a flip-out screen at the time of writing was the upper entry-level D5000.
In use the articulated mounting feels very smooth and robust; there’s obviously some concerns over potential damage, but the literal flipside is being able to protect the screen by folding it back on itself. We should also note in all our time testing cameras, we’ve never experienced any issues with the mechanisms used by Canon on its articulated screens.
As mentioned above, the most obvious application is when shooting movies, and it’s certainly nice to finally be able to hold the camera at waist height or high angles when filming. But it’s useful when taking stills too. Beyond being able to take images at high, low or discreet angles, it’s also a considerable relief not to strain your neck when the camera’s mounted on a telescope – indeed we can see many astro-photographers selecting the EOS 60D just for this aspect alone. Macro photographers or anyone else who finds their cameras in unusual positions will also love it. The only downside is the screen flips out by 175 degrees rather than 180, which means it’s slightly tilted in relation to the direction of the camera. This can feel a little odd at times, but is far from a deal-breaker.
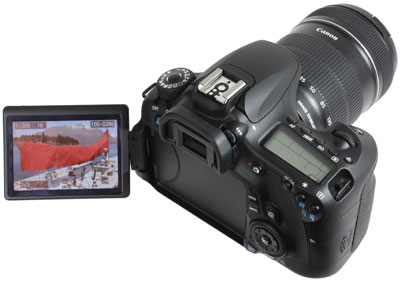
The articulated mount isn’t the only thing which makes the EOS 60D’s screen special, as it also inherits the superb TFT panel first seen on the EOS 550D / T2i. This panel measures 3in and employs a wider 3:2 aspect ratio which perfectly matches the shape of its images. The vast majority of other cameras use squarer 4:3 aspect ratio screens which mean 3:2 images in Live View or playback have black bars above or below when the entire frame is viewed. Not so on the EOS 60D, which like the EOS 550D / T2i before it, fills its screen in Live View or playback.
Like the EOS 550D / T2i, the 60D’s screen also sports a slightly higher resolution of 1040k dots compared to the 920k of earlier models. While this may not sound like a big leap, the crucial difference is the entire vertical resolution can now be devoted to the image. When viewing 3:2 images on earlier 4:3 shaped / 920k screens, letterboxing meant the actual image only occupied a portion measuring 640 pixels wide by 427 pixels tall. Now on the EOS 60D, the full 720×480 pixel resolution of the screen can be used to display images, giving it almost 15% more detail in each axis. And while framing wider 16:9 HD video will still involve some letterboxing, the 3:2 shape is a better fit than previous 4:3 models, again with the image filling more of the screen.
In use, this actually makes a big difference. Previous VGA screens already looked very good, but having the image filling the screen without letterboxing makes for a much preferable composing and viewing experience. Indeed you wonder why it’s taken so long for DSLR manufacturers to fit screens which match the shape of their sensors – we know 4:3 shaped screens are more commonly available, but that hasn’t stopped Panasonic from fitting 3:2 shaped screens for some time now, albeit – ahem – on cameras with 4:3 shaped sensors.
The Canon screen itself is bright and crisp, but like most is not immune to the effects of bright sunlight. With the Sun shining directly on the screen, the image can be hard to see, and any smears or fingerprints become obtrusive. But the ability to twist the screen out to a different angle allows you to minimise the effect and keep the image visible.
Overall the quality of the panel along with the articulated mounting is a real highlight of the EOS 60D. The panel is the best we’ve seen on a DSLR and the uncompromised articulation, not hindered by the hinge position or a single axis design is genuinely useful. This is a major selling point of the EOS 60D over the competition.
Canon EOS 60D Live View
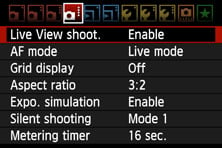
The EOS 60D is equipped with Live View facilities which allow you to compose with the main screen. The implementation is essentially the same as the EOS 550D / T2i before it, with a couple of minor but useful additions.
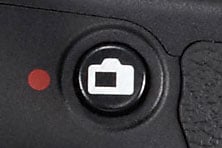 |  |
Entering Live View is the same as the EOS 550D / T2i: simply press a dedicated button to the side of the viewfinder and start composing a couple of seconds later. To autofocus, just half-press the shutter release. Both steps may seem fairly obvious, but represent a major improvement in usability over the EOS 50D. Back then Live View was still viewed with suspicion by semi-pro photographers and the feature felt almost hidden away from sight. First you needed to actually enable Live View in a menu. Secondly you entered Live View with a button which shared its function with Direct Printing. And third, you had to press the AF-ON button to actually autofocus. None of this was particularly intuitive, so it’s great to find the EOS 60D following the EOS 550D / T2i with its much friendlier and easier approach.
Like the EOS 550D / T2i, the default AF mode in Live View on the EOS 60D is the contrast-based Live Mode option (see below), which again matches the defaults of its main rivals. While this remains the slowest of the Live View AF modes, the lack of noise and interruption to the image – not to mention support for face detection – makes it the most sensible choice, at least in a lower-end model.
Once you’re in Live View, the EOS 60D delivers 100% coverage and exploits the full resolution of the screen, with a smooth refresh rate of 30fps. The effect of different apertures can be previewed by pressing the depth-of-field preview button below the lens release, and under most conditions the camera will temporarily brighten the screen to maintain a consistent image; if the subject’s already quite dark though, the screen will become noisier during the preview.
 |
 |
 |
 |  |
 |  |
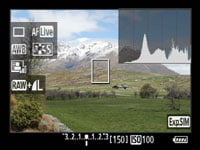
Pressing the Info button cycles between five views: a clean image, one with basic shooting information at the bottom (now super-imposed thanks to the image filling the screen), one which adds additional information down the left side of the image, one which additionally places a live histogram in the upper right corner, and finally one which swaps the histogram for a single axis virtual horizon.
The latter is a nice update to find here and while it may lack the dual-axis display of the 7D, the presence of tilt information remains very useful. You can also view the virtual horizon on-screen out of Live View, or using the exposure compensation scale through the viewfinder. Note the Nikon D7000 also offers a virtual horizon, but strangely continues to avoid providing a live histogram.
The Display view which adds details to the left side of the image indicates the current settings for the Drive Mode, White Balance, Auto Lighting Optimizer, Quality, AF Mode and Picture Style in two columns. Like the EOS 550D / T2i before it, these can all be adjusted on-screen by pressing the Q button. This rearranges the icons in a single taller column (with the addition of flash compensation) and allows you to highlight the required detail using the rocker, before then turning the finger or thumb wheels to adjust it. Meanwhile the dedicated AF, Drive and ISO buttons on the top fire-up dedicated menus for each, although adjustments to the metering mode are not possible in Live View.
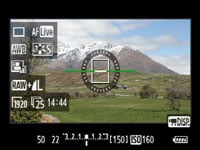
Canon continues to offer the choice of two alignment grids in Live View, although like existing models you’ll need to enable them in the Live View menu; while this means you can see a grid and histogram at the same time, we’d prefer it simply appeared as an option when cycling through the Display views.
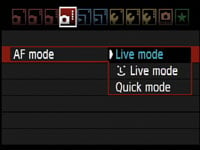
Looking at autofocus in more detail, the EOS 60D inherits the same three modes as the 550D / T2i: the default contrast-based Live Mode, followed by Live Mode with face detection and finally Quick Mode which uses the traditional phase-change AF system. As described above, all three are activated with an intuitive half-press of the shutter release rather than having to press the AF ON button on the EOS 50D.
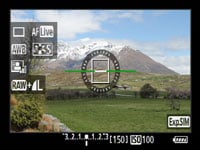
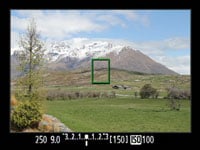
With the EOS 60D set to its default Live Mode, a white rectangle is shown in the middle of the frame, which can be moved around using the cross-keys. Half-press the shutter release and the 60D will focus on whatever’s in the frame using a contrast-based system. Like other DSLRs, contrast-based autofocus in Live View is relatively slow, but operates very quietly without the sound or interruption of the mirror flipping.
 |
 |
 |
|
Like earlier Canon models, Live Mode adjusts the lens roughly at first before slowing down to fine-tune the focus. At best this could take around two seconds, but it’s not uncommon to find it taking as long as four. Beyond a lack of interruption, the technical benefit is taking a focus reading direct from the sensor’s image, so Live mode doesn’t suffer from the potential AF inaccuracies of a traditional phase-change system; this is of particular benefit since the EOS 60D now sadly lacks the AF micro-adjustment of its predecessor which allowed you to calibrate lenses to minimise front and back focusing issues.
The EOS 60D’s Live Mode with face detection (indicated by a smiley icon) uses the same contrast-based system as normal Live Mode, but if it recognises a human face, it’ll frame it with a box and focus on that instead when you half-press the shutter release; if there’s more than one face in the scene, you can use left and right cross keys to select the one to focus on.
As you might expect, the 60D’s processor can recognise and track faces as quickly as a compact, but the actual focusing process itself remains the same speed as normal Live Mode – as such it can take several seconds. If you’re lucky, the camera will lock on and confirm within a couple of seconds, but if it ends up being longer, it’s easier to exit Live View and frame a portrait shot through the viewfinder instead.
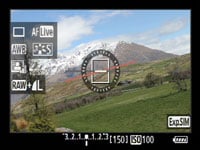
Finally, the EOS 60D’s third AF option, Quick Mode, employs the traditional 9-point phase-change AF system used when composing through the optical viewfinder. As such, the camera shows a graphical representation of the nine AF points on-screen in the same diamond configuration, with the active point(s) now illuminating green for consistency with the Live mode. An adjustable white frame remains in the middle for magnified focusing assistance – see below.
Like other phase-change AF modes in Live View, the camera needs to flip its mirror down to take a reading before flipping it back up again to continue the live feed. There’s obviously some noise and an interruption to the image during this time, but it remains the quickest if the three AF modes in Live View – indeed, if the AF system locks onto the subject without a problem, the entire process can take less than a second.
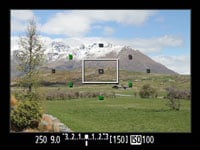
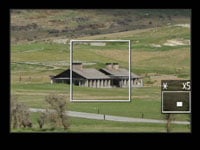
At any time during the Live or Quick AF modes, you can press the magnify button to show a 5x view, then a 10x view. The 60D will zoom-in on wherever the white frame is positioned on screen, which can be moved before or during using the cross-keys. At 10x, the EOS 60D shows an area that’s one tenth the width of the full image as you’d expect, but then scales this 518 pixel wide crop to fill the 720 pixel width of the monitor. So the 10x mode actually appears to be operating at greater than 1:1 magnification.
 |
 |
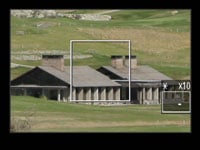 |
For purists it may be shame there’s still no exact pixel-mapped 1:1 viewing mode, but at 10x there’s little evidence of scaling or fuzziness; indeed the image looks pin-sharp and allows you to confirm auto-focusing or make very precise manual focus adjustments. This view is also sharper than that of existing Nikon models which become relatively fuzzy at their maximum magnification, including the D90 with its VGA screen, although we’re yet to test the facility on the newer D7000.
Live View on the EOS 60D is also available at a higher resolution when the camera’s connected to an HDTV using the HDMI port, or connected to a PC or Mac and using the supplied EOS Utility – see our Features page for more details on the latter.
 |
 |
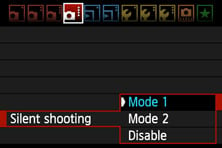
The EOS 60D also inherits the additional silent shooting options of the 50D. Mode 1, the default, is quieter than normal shooting and also supports continuous shooting at up to 5fps. Mode 2 is quieter still by employing an electronic first curtain shutter to actually take the picture, but delaying the noisier re-cocking of the physical shutter so long as you keep the shutter release held.
The idea is to press the shutter release button to take the photo (with a very faint click), but keep it held until you’re out of ear shot, after which you can let go, allowing the 60D to audibly re-cock the physical shutter. You may only be able to take one photo with this technique, but it could be useful in certain situations. Note there’s also an option to disable Silent Shooting altogether, which sounds like the camera’s taken two shots; Canon only recommends using this to avoid exposure issues with extension tubes or Tilt and Shift lenses.
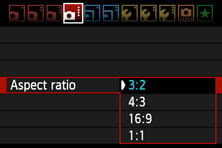
Finally, new to the EOS 60D’s Live View facilities are the choice of aspect ratios: you can now shoot in 3:2, 4:3, 16:9 or 1:1 shapes.
So all-in-all, by making some minor changes, Canon’s enhanced what was already a very capable Live View system. Dedicating a button to Live View and using a half-press of the shutter release to autofocus make the process much more intuitive than its predecessor, while devoting the entire screen to the composition delivers a superior image. The addition of a virtual horizon in addition to a live histogram and grid view is also useful.
The main contrast-based AF system hasn’t become any faster though and like most equivalent systems, you still can’t continuously autofocus for tracking action. If you want a DSLR which can track moving subjects in Live View as quickly as through the viewfinder, then you’ll need to turn to Sony which offers a variety of models which are able to exploit the quick phase-change AF systems while composing with the screen.
Canon EOS 60D shooting information and menus
Like its recent predecessors, the EOS 60D uses its main colour screen to display all shooting information and the high resolution allows the fonts to look very smooth. At first glance the details displayed look similar to the earlier 550D / T2i and 7D, but as always Canon’s taken the opportunity to rearrange them a little.
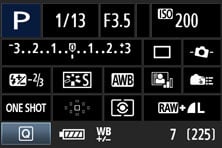 |  |
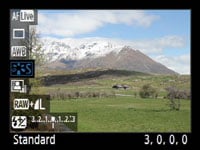
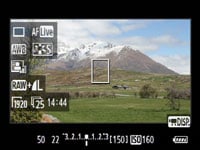
With one of the Creative (PASM, Bulb or Custom) modes selected, you’ll see the following: on the top row you’ll find the shooting mode, shutter speed, aperture, ISO sensitivity and a D+ icon indicating whether Highlight Tone Priority is enabled or not. On the second row there’s the +/-3EV exposure compensation scale, drive mode and electronic level status. Next down on the third row are the flash compensation value, Picture Style, White Balance, Auto Lighting Optimizer setting and Custom Controls status. On the fourth row you’ll find the AF mode, a graphical representation of the nine AF points, the metering mode and the image quality, leaving a four-segment battery indicator and the shots remaining at the bottom. This lower strip also indicates the transmission status of an Eye-Fi card if present.
Also at the bottom, in the lower left corner is a box labelled Q, indicating that pressing the new Q button will activate the camera’s Quick Control mode. This allows you to highlight a desired setting, before then turning the finger dial or thumb wheel to directly adjust it, or pressing SET to present a dedicated menu for that item.
It’s similar in practice to other on-screen adjustment systems like those pioneered on Olympus DSLRs, although affirming its more serious nature in Canon’s range, the 60D is lacking the choice of alternative colour schemes of the entry-level models. Disappointingly Canon has also continued to resist the temptation to rotate the on-screen details to remain upright as you turn the camera.
 |
 |
 |
The menus are similar to those on the earlier 550D / T1i, exploiting the high resolution monitor and processing for smooth fonts, colourful icons and fading transitions between pages; it’s a good-looking system. Like semi-pro bodies you can use the finger dial and thumb wheel to scroll through pages and options respectively, which is easier than trying to get to grips with the new rocker button.
In terms of the actual pages, there’s now four devoted to Recording options, followed by two for Playback, three for Setup, and one each for Custom Settings and ‘My Menu’ settings; there’s 20 Custom Functions in total and throughout the review we’ll highlight some of the options. Note that switching to the Movie mode adds three new pages dedicated to this function, while temporarily losing the Custom Functions, My menu and three of the four Recording pages; we’ll detail these in the Movie mode section under the Features tab.
 |
 |
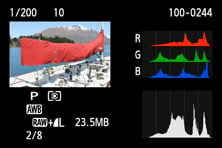 |
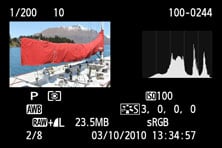
In playback mode, pressing the Info button cycles between a clean image, one overlaid with basic information, followed by a thumbnail with extended shooting information and a brightness histogram, and finally a thumbnail with less shooting information, but both brightness and RGB histograms. You can also use the magnify buttons to zoom-in on an image or zoom out to display either four or nine thumbnail views. Images look great played back on the quality screen, but it’s a bit old fashioned to only offer nine thumbnails when rivals offer many more along with calendar views.
New to the EOS 60D are a number of in-camera post-processing options from a series of Creative Filters to RAW processing. These are available in the Play menus and we’ll detail them in the processing section of the Features page.
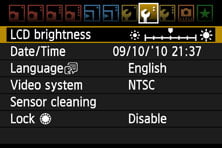
Canon EOS 60D battery and connectivity
The EOS 60D is powered by the same LP-E6 as the EOS 7D and EOS 5D Mark II: an 1800mAh Lithium Ion pack which Canon claims is good for up to 1600 shots through the viewfinder without flash – a significant boost over the EOS 7D which only offers 1000 shots under the same conditions, presumably due to having two DIGIC 4 processors rather than one. In Live View, the battery should be good for 350 shots without flash, or for about two hours of movie recording.
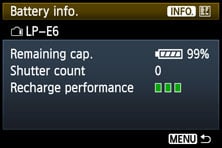 | 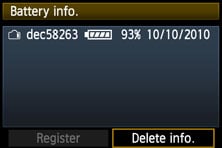 |
Like the EOS 7D and EOS 5D Mark II before it, the LP-E6 allows the EOS 7D to offer accurate feedback on the exact charge remaining. Like Nikon though, it inexplicably hides the percentage figure in a menu, but at least it’s there and the main icons indicating battery life on the main screen, upper panel and in the viewfinder feature more segments than before.
The Battery Info menu page shows the exact percentage of charge remaining, along with the number of shots fired during this charge so far, and an indication of the recharge performance using three squares. With all three lit green, the battery recharging performance is in good condition. Two lit squares indicate the recharging performance is reduced, while a single red square means it’s time to buy a new battery.
If you’d like extended battery life, you can fit the optional BG-E9 Battery grip which takes two LP-E6 packs (or a set of AA batteries) while additionally providing a portrait grip and controls. Note the EOS 60D’s battery and optional grip are different from those on the EOS 50D, so anyone hoping to reuse accessories from this model will be disappointed; there’s also no wireless transmitter option. That said, the batteries from the EOS 7D and EOS 5D Mark II are the same, which is handy if you’re considering the EOS 60D as a backup body.
 |
|
Like other Canon DSLRs, the various ports are located behind a flap on the left side of the body, although unlike the EOS 50D and EOS 7D, there’s only one flap on the 60D. Behind this you’ll find a 3.5mm stereo jack for connecting an external microphone, a Type-C mini HDMI port, a combined USB and TV output and a socket for the optional RS-60E3 remote switch. These are actually the same four ports offered by the EOS 550D / T2i, and owners of higher-end Canon bodies will note the switch from the more capable N3-type remote port of the EOS 50D, EOS 7D and EOS 5D Mark II.
Owners of semi-pro bodies will also notice the absence of a PC Sync port for connecting to studio or flash lighting which isn’t compatible with the hotshoe. The removal of this port has caused much gnashing of teeth by existing 50D owners, although as detailed in the flash section, the average 60D owner will arguably find the added support for wireless flash control more useful.
Like other Canon DSLRs, there’s still no option to force different resolutions over HDMI; instead the EOS 60D will display images at the TVs optimum resolution (normally outputting a 1080i signal). As mentioned in the Live View section, the EOS 60D can output a live image at up to 1080i for a very detailed view, although once you press the record button for movies, the signal is degraded to standard definition PAL or NTSC. So while you can use an external display while filming with the EOS 60D, it’s a shame the quality is degraded to the same resolution as the built-in screen once you press the record button. Anyone wanting to exploit an HD output for more accurate on-screen focus pulling will be disappointed.
In terms of memory, Canon has made a switch from Compact Flash on the EOS 50D to SD on the EOS 60D. This isn’t surprising considering the target audience of the EOS 60D, although again it’ll prove frustrating for any EOS 50D owners looking to upgrade as they won’t be able to reuse existing memory cards.
The EOS 60D supports the SDXC format which allow cards bigger than 32GB, along with exploiting the speed of cards rated up to Class 10; it’ll also work with Eye-Fi cards for wireless transfer of images. Canon recommends using a card rated as Class 6 or higher for recording HD movies; we used a Lexar Professional 8GB SDHC 133x model in our tests which is rated as Class 6 and worked fine with all the movie modes. SanDisk’s Ultra III cards are also rated as Class 6, so should be a great match for the EOS 60D; note the cheaper Ultra II cards are only Class 4, so while fine for still photography on this camera, will be too slow to support the HD movie modes for longer recording times.
At this point it would be remiss of us not to mention the dual SD card slots of the Nikon D7000. These allow the D7000 to record duplicate images on both cards for instant backup or RAW files to one and JPEGs to another. It’s an impressive capability to find on a mid-range DSLR and one which trumps the EOS 60D.
Now let’s check out the Features section which includes details on the sensor, autofocus, drive modes, image processing and of course the 60D’s new Movie modes.
Canon EOS 60D lenses, focusing, sensor and drive
Click here to find out about the EOS 60D’s Movie Mode
The Canon EOS 60D employs an EF lens mount and is fully compatible with both Canon EF and EF-S lenses. Thanks to its APS-C sensor size, all lenses effectively have their field of view reduced by 1.6 times.
 |
The EOS 60D is available as a body alone or in a choice of kits with stabilised zoom lenses. Most geographic regions will be offered either the budget EF-S 18-55mm IS kit lens, which offers a basic 3x optical range that’s equivalent to 29-88mm, or the more recent EF-S 18-135mm IS which offers a much longer range equivalent to 29-216mm. As a side-note, this lens is also slightly longer than the DX 18-105mm VR model supplied in the Nikon D7000 kit.
 |
You can compare the quality of both kit lenses in our Canon EF-S 18-135mm IS review. Given the choice between them, we’d go for the EF-S 18-135mm IS for its greater range, although for much longer reach you could alternatively complement the EF-S 18-55mm IS with the EF-S 55-250mm for around the same total price. It all depends if you want to carry one or two lenses.
If you want a single lens with the maximum zoom range, consider buying the body alone and fitting it with the EF-S 18-200mm IS lens. Like other super-zooms, the quality may not be as good as lenses with shorter ranges, but having an 11x zoom at your disposal in a single lens sure is handy. See our Canon EF-S 18-200mm IS review for full details.
Alternatively if image quality and quicker focusing are your priorities, we can highly recommend buying the EOS 60D body alone and fitting it with the excellent EF-S 15-85mm IS USM lens. It may not zoom as long as the EF-S 18-135mm IS (nor obviously the EF-S 18-200mm IS), but it will zoom wider, while delivering better image quality and quicker, quieter focusing; in our view it’s the best general-purpose lens for Canon’s APS-C DSLRs. For more details, see our Canon EF-S 15-85mm IS USM review. Finally, if you’d like other recommendations for specific styles of photography, like portraiture, sports or close-ups, please check out our Canon lens buyer’s guide.
Canon EOS 60D focusing
The Canon EOS 60D employs the same 9-point AF system as the EOS 50D. All nine points are cross-types, sensitive to both horizontal and vertical lines when used with lenses of f5.6 or brighter. The central point is also twice as sensitive as the others when used with a lens aperture of f2.8 or brighter.
 | 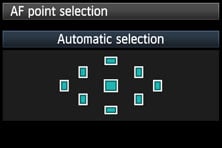 |
Like the 50D, the AF points are arranged in a diamond pattern and represented by small rectangular outlines which illuminate red when active; you can switch the red lights off if preferred in a custom menu. Press the focus area button and you can use the rocker to manually select a single focus point or use the finger dial or thumb wheel to cycle through the options. Under dim conditions, the flash will popup and flicker to provide AF assistance, but if you find this alarming, you can disable it or only request AF assistance from an external flashgun in a custom menu
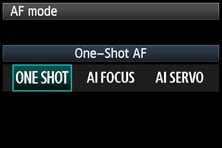
Like all Canon DSLRs there’s three auto-focusing modes: One Shot AF for still subjects, AI Servo AF for moving subjects, and AI Focus AF which automatically switches from One Shot to Servo when it detects a subject starting to move. If you switch your lens to Manual focus, the ‘AI Focus AF’ wording in the upper LCD display is replaced with ‘M Focus’ – a small but considerate touch
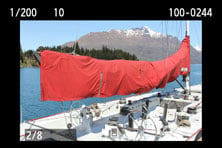
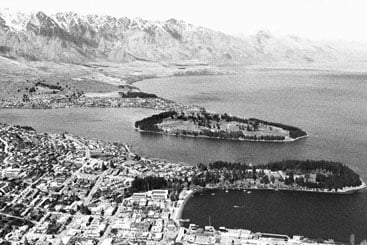
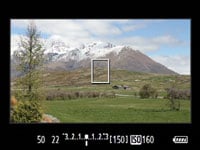
Fitted with the EF 24-105mm IS USM lens we used during our tests, the EOS 60D focuses quickly and confidently like its predecessor. To put the AI Servo AF system to the test we photographed Queenstown’s famous Shotover Jet boats using this lens. These boats race along the Shotover river in Queenstown New Zealand, approaching at high speed before suddenly executing 360 degree spins. As such they represent a challenge to any AF system. Under these conditions we found the EOS 60D’s AI Servo tracked the boats effectively, and you can see some continuous shooting examples below and in our Gallery.
 |
 |
 |
 |
 | ||||
 |
 |
 |
 |
 |
| ||
In terms of numbers, the EOS 60D’s inherited 9-point AF system sounds less glamorous than the new 39-point AF system of the Nikon D7000, but it’s worth noting the latter shares the same number of cross-type sensors. Until we test the D7000 we can’t comment on the effectiveness of its new AF system, although the greater number of AF points in the D300s, not to mention the EOS 7D, give them an edge when a subject changes distance unpredictably between focusing points. But again in our tests the EOS 60D’s AF system was sufficiently quick and responsive to deliver decent results, and if you can keep the action around the diamond capture area, you’ll be fine in most situations.
Existing EOS 50D owners will however be disappointed that the AF system has essentially remained the same for several XXD generations, especially as Nikon continues to develop more sophisticated options. Indeed it’s one of the few areas where Canon allows itself to be beaten on the numbers game.
While the EOS 60D’s AF system is the same as that on the EOS 50D though, there’s one important feature missing on the new model: AF Micro-adjustment. This allows you to tweak the point of focus to compensate for lenses which suffer from front or back focusing. Pro DSLRs have featured AF Micro-adjustment for some time, but the EOS 50D was the first non-pro Canon DSLR to boast the feature, and now annoyingly it’s been removed from the new EOS 60D. So if you want AF Micro-adjustment, the cheapest current Canon DSLR to offer it is the EOS 7D. It’s also revealing to note Nikon’s D7000 features something similar with its AF Finetuning.
But while it’s annoying to discover another feature from its predecessor has been removed, how important is AF Micro-adjustment? If you have lenses which suffer from front or back focusing, and you know how to use AF Micro-adjustment properly, it can certainly make a noticeable difference when focusing through the viewfinder.
But equally it’s important to remember the vast majority of DSLR owners do just fine without AF Micro-adjustment, and we’ve also spoken to many pros who’ve never even applied the feature despite having it on their cameras; you’d be surprised how many hadn’t even heard of it. It’s also important to note any front or rear focusing issues can be eliminated by using contrast based AF in Live View, since this ignores the phase-change AF system and simply looks directly at the output from the sensor. Admittedly contrast-based AF is only practical for static subjects with the camera mounted on a tripod, but it really does work and it really can bypass AF errors under these conditions.
So is the absence of AF Micro-adjustment a big issue on the EOS 60D? Only you can decide. It will be disappointing for higher-end photographers who know how to exploit it, and undoubtedly a loss for Canon now that Nikon has implemented it on the rival D7000, but we don’t think the 60D’s target audience will be that concerned. Remember while you can easily knock the EOS 60D by comparing it to a semi-pro body, it’s equally important to consider what it offers over an entry-level one. As such, while both the EOS 60D and EOS 550D / T2i may both share 9-point AF systems, the former features nine cross-type sensors rather than just one in the middle, making it more accurate and confident in use.
Canon EOS 60D metering, exposures and bracketing
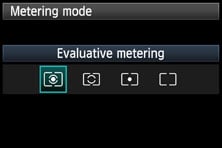 |
The Canon EOS 60D offers the same four metering modes as its recent predecessors: TTL Evaluative, Partial (6.5% of v/f area), Spot (2.8% of v/f area) and Center-weighted; the viewfinder also indicates the spot metering area with a circle. In a welcome upgrade over the 35-zome TTL Evaluative metering system of the earlier EOS 50D though, the new EOS 60D has inherited the more sophisticated 63-zone Focus Colour Luminance (iCFL) system introduced on the high-end EOS 7D. This employs dual layers allowing it to take colour information into account, and finally bringing Canon’s latest DSLRs more in line with Nikon’s legendary 3D Colour Matrix Metering system.
 |
And it really works too. We used Evaluative metering for all our sample images and found few if any occasions when we’d want to apply any compensation. It certainly seems more effective than the earlier 35-zone system of the EOS 50D, and we felt more confident on relying on it for our day-to-day shots.
The EOS 60D offers shutter speeds from 1/8000 to 30 seconds plus a Bulb option; the fastest flash sync speed is 1/250. The fastest speeds are in-line with the Nikon D7000 and semi-pro models, and are a step-up from the entry-level EOS 550D / T2i which offers maximum shutter and sync-speeds of 1/4000 and 1/200 respectively.
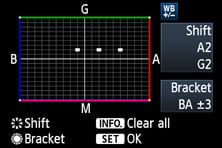
Basic exposure bracketing is available with three frames up to 2EV apart in 0.3EV increments, which puts it in line with most cameras at this price-point including the Nikon D7000. Both cameras also share exposure compensation in a broad +/-5EV range, again a step-up from most entry-level models.
Canon EOS 60D sensor and processing
The Canon EOS 60D features an 18 Megapixel CMOS sensor which delivers the same resolution as the EOS 550D / T2i and the high-end EOS 7D. Indeed we understand the only difference between the sensors in each body is the data readout: four channels on the lower-end models compared to eight on the 7D, allowing the latter to support quicker continuous shooting for RAW files. Speed aside, Canon describes the image quality on all three models to be essentially the same.
The physical size and pixel count is certainly identical: the EOS 60D’s sensor measures 22.3×14.9mm and generates 3:2 aspect ratio images with a maximum resolution of 5184×3456 pixels. At 300 dpi, these can be reproduced at up to 17.3×11.5in, compared to 15.8×10.5in on the 50D. The rival Nikon D7000 employs a new 16.2 Megapixel CMOS sensor with 4928×3264 pixels, allowing reproduction at around 16.5x11in – so the extra two Megapixels of the EOS 60D only give it an advantage of around one diagonal inch at 300dpi.
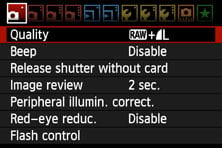
The EOS 60D’s JPEGs can be recorded at four lower resolutions (8, 4.5, 2.5 and 0.3 Megapixels) and with the choice of Fine or Normal compression for all but the final two small sizes. RAW files are of course offered, although unusually in the choice of three resolutions: either the full 18 Megapixels in RAW, 10.1 Megapixels in MRAW or 4.5 Megapixels in the SRAW.
Cleverly the RAW and JPEG options can be set separately, allowing you to choose any combination. So if recording both JPEG and RAW, you could have RAW, MRAW or SRAW, accompanied by a JPEG at any of the five resolutions or two compression settings. Unsurprisingly the dedicated RAW / JPEG button of the higher-end EOS 7D isn’t here, but you can configure the SET button to go straight to the image quality page. Best quality Large Fine JPEGS typically measure 6-8MB each, while full-size RAW files measure around 22-25MB each.
Like its predecessor, the EOS 60D employs 14-bit analogue to digital conversions, and this 14-bit tonal detail is also recorded in the RAW images. See our Results pages for examples comparing the camera’s JPEG and RAW output. RAW files can also now be processed in-camera with the ability to apply chromatic aberration and distortion corrections – see the Menus section on the previous page for full details.
Like the EOS 50D, copyright data can be added to images, but in a welcome move inherited from recent models, the author and copyright details can now be entered in-camera unlike its predecessor which required you to do it through the supplied EOS utility.
With the same physical sensor characteristics as the EOS 550D / T2i, it’s not surprising to find the EOS 60D also inheriting is sensitivity range which runs from 100 to 6400 ISO, with a maximum of 12800 ISO (H) available if ISO expansion is enabled in the Custom settings. Note: if Highlight Tone Priority is enabled, the EOS 60D’s sensitivity range is reduced to 200-6400 ISO.
In a welcome update over the EOS 50D, there’s now an Auto ISO setting with the option to set the maximum sensitivity between 400 and 6400 ISO. If the ISO is set to Auto, the PASM modes will operate between 100 ISO and the maximum sensitivity set in this menu. With Auto ISO, the scene presets operate between 100 and 3200 ISO, apart from the Portrait setting which is fixed at 100 ISO. If you’re using Auto ISO with the flash, the sensitivity is fixed at 400 ISO, unless this results in an over-exposure in which case it’s reduced to 100 ISO.
On previous Canon DSLRs, the sensitivity would stick at 400 ISO when the ISO was set to Auto in Manual or Bulb; this remains the case for Bulb or flash exposures on the EOS 60D, although sensibly Manual mode now works with Auto ISO in the same way as Program and the other exposure modes.
 |  |
 |  |
Like the EOS 50D, two noise reduction modes are available in the Custom Functions menu: Long Exposure Noise Reduction is applied to exposures longer than one second and can be set to Auto, On or Off, while High ISO Noise Reduction is available in the choice of four settings, Standard (the default), Low, Strong or Disable. Note Strong NR will reduce the maximum burst during continuous shooting.
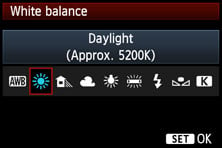
Unusually there’s no dedicated White Balance button on the EOS 60D, but you can easily access it via the Q menu or within the main menu system.
Pressing the White Balance button allows you to choose from Auto, Daylight, Shade, Cloudy, Tungsten, White Fluorescent, Flash and Custom. White Balance correction and bracketing are also available, and in a nice update over entry-level models, you can manually enter a colour temperature from 2500 to 10000K.
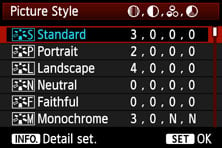
Sharpness, Contrast, Saturation and Colour Tone are applied using a number of Picture Styles: for colour photography, you have the choice of Standard, Portrait, Landscape, Neutral and Faithful, while a further Monochrome option offers four filter and four toning effects. Contrast, Saturation and Colour Tone can be adjusted in a range of +/-4, while Sharpness is offered from 0 to 7. While it’s possible to tweak these presets or configure your own with the three custom modes in-camera, software supplied with EOS 60D lets you create and edit precision Picture Styles to your absolute requirements.
We used the default Standard Picture Style for all our sample images, and found it delivered fairly lively-looking JPEGs similar in style to the EOS 550D / T2i and EOS 7D. All three bodies deliver much punchier and crisper JPEGs by default than the earlier EOS 50D which was fairly muted and laid-back in comparison. These different approaches are quite apparent in our JPEG results pages, although our RAW results prove it’s easy to match the output styles.
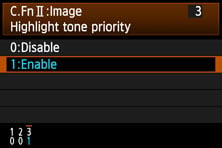 |
Leveraging the EOS 60D’s 14-bit A-D conversion is the Highlight Tone Priority (HTP) option, inherited from recent models but still buried away in one of the custom function menus and disabled by default. According to Canon, this improves the highlight detail by expanding the dynamic range from the standard 18% grey to bright highlights. This option is only available between 200 and 6400 ISO and Canon warns noise could be increased in shadow areas. ‘D+’ icons in the viewfinder, upper screen and rear screen indicate when Highlight Tone Priority is enabled, so there’ll be no surprises.
Below you can see crops taken from our main results image, taken with and without Highlight Tone Priority, HTP. If you have a fairly good monitor, you should be able to spot tonal differences in the snowy ridge of the mountaintop on the HTP version which has become burnt-out on the version without HTP. It can be pretty subtle though and when measuring actual values in Photoshop, you’re only looking at a difference of around 10 levels. Looking at the image as a whole, the histogram of the HTP version has been compressed a little at the highlight end, like a Levels adjustment, albeit made at the point of exposure. As with previous HTP tests, it remains a subtle effect, but one which could still benefit subjects with bright highlights, such as snowy scenes, or wedding dresses.
Canon EOS 60D JPEG Highlight Tone Priority Disabled (default) |
Canon EOS 60D JPEG Highlight Tone Priority Enabled | |
 |  | |
 |  | |
100% crop, 1/640, f8, 200 ISO |
100% crop, 1/640, f8, 200 ISO |
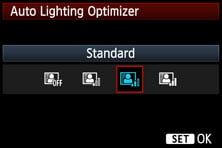 |
The EOS 60D additionally inherits the Auto Lighting Optimizer from recent models, which adjusts the brightness and contrast of images with dark areas (such as backlit portraits). The camera offers the same four settings as the EOS 50D: Standard, Low, Strong and Disable. The Standard setting is always applied when the EOS 60D is set to Auto or the Scene presets, and is also applied by default in PASM modes, although you can adjust it to one of the other three settings if preferred.
The settings and implementation may be the same as its predecessor, but Auto Lighting Optimizer on the EOS 60D (like the EOS 550D / T2i and EOS 7D) has now been promoted from the depths of the Custom section to its own prominent position on the second menu page. The camera also indicates the current setting on-screen, so again there’s no surprises.
| ||||||||||||||||


Above you can see two examples of the same composition taken with the Auto Lighting Optimizer disabled (above left) and with its Strong setting (above right). In this particular example which includes dark shadow areas and blown highlights, you can see a subtle boost to the interior walls and within the dark roofing, although the bright window highlights remain saturated. We’ve included histograms of each which reveal a reduction and slight rounding of the shadow values and a minor boost in upper mid-tones on the version with Strong Auto Lighting Optimization. Beware when using the Strong setting that continuous shooting speeds will fall.
Following our policy of using default settings when testing cameras, most of the same images you’ll see in this review were taken with Highlight Tone Priority off and the Auto Lighting Optimizer set to Standard. Since both can result in artificially higher noise levels though, we ensured both were disabled for our High ISO Results pages.
 |
The EOS 60D also inherits the Peripheral Illumination Correction of its predecessor and recent models. This is optionally applied to JPEG images to reduce the effect of vignetting where the image darkens towards the corners. The EOS 60D contains a database of 26 Canon lenses and allows you to enter a further 14 models or swap existing ones for other models if preferred. If the lens model is recognised, the correction will be applied by default to JPEG images, although you can switch the option off if preferred. Canon describes the resulting effect as similar to that offered on RAW images in recent versions of its Digital Photo Professional (DPP) software, although DPP itself can offer additional corrections.
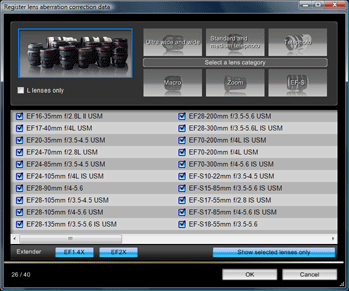 |
Any lens for which DPP offers corrections can be entered into the EOS 60D’s internal database using the supplied EOS Utility. The latest version includes correction data for the new EF-S 15-85mm and EF-S 18-135mm IS zooms, but none of the lenses announced in autumn 2010. DPP also offers data for each lens fitted with a 1.4x or 2x Extender, although these will count as additional entries in the camera’s 40-model internal database.
Since Peripheral Illumination Correction is enabled by default, you’ll see the effect of it on our JPEG sample images throughout this review taken with the EF 24-105mm f4L IS USM lens. In our tests, it proved effective at reducing the effect of vignetting, although in extreme cases with certain lenses there can still some darkening in the extreme corners. It remains an improvement over the versions without though, but remember any digital brightening will result in potentially greater visible noise in the applied areas – especially if the ISO was already high on the original.
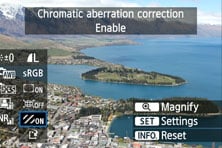
Unfortunately Canon still doesn’t offer in-camera reduction of coloured fringing on JPEGs – at least not automatically anyway. This is in contrast to Nikon which has offered automatic fringing corrections on its DSLR JPEGs for some time. But the EOS 60D does let you reduce them on RAW files using its new in-camera processing tools.
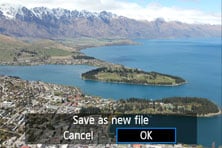
Select RAW Image Processing in the first play menu, choose a RAW file and the EOS 60D will present a series of in-camera processing options. These allow you to adjust the brightness by +/-1EV, change the white balance, picture style, Auto Lighting Optimizer, High ISO noise reduction, the colour space, the JPEG size and quality, along with applying correction for peripheral illumination, distortion or chromatic aberrations; these last three are simply either on or off. If you adjust the Picture Style, you get further options to adjust the sharpness, contrast and saturation in the same way as edting Picture Styles in the main menus. The resulting image can then be written as a new JPEG file.
 |
 |
 |
The correction data for chromatic aberrations and distortion is stored in the same internal database as peripheral illumination. So you can store correction data for up to 40 lenses and choose the desired models using the EOS Utility software, see the drive section below. Since this correction data comes from DPP, we suspect details for chromatic aberration and distortion data were actually already present in earlier EOS DSLRs which supported peripheral illumination correction, but simply not implemented until now.
To put the RAW processing capabilities to the test we took our main outdoor resolution photo, then processed the RAW file both in-camera and using the supplied Digital Photo Professional software. You can compare the results in our Canon EOS 60D Raw results page.
The DPP software obviously offers many more controls, not to mention finer adjustments for each, but at least the EOS 60D finally has the ability to reduce coloured fringing in-camera. That said, the EOS 60D makes you jump through hoops to get it: you’ll have to go through the fuss of taking a RAW file and processing it into a JPEG in-camera with chromatic aberration correction enabled. Compare that to Nikon’s DSLRs which simply apply correction in-camera to JPEGs automatically – can we have that next time please Canon?
The EOS 60D’s in-camera post-processing doesn’t stop there: the playback menu also offers a series of Creative Filters, no doubt inspired by the Olympus Art Filters, although here applied after the event. The EOS 60D offers four Creative Filters which can be applied to RAW or JPEG files, then saved as new JPEG files. You can choose from the ever-popular Grainy Black and White or Soft Focus, opt for Toy Camera (which darkens the corners and applies a colour cast), or choose the increasingly common Miniature effect (which simulates a tilt and shift lens). Each filter offers a selection of options to tweak the effect.
So once again it’s over to our standard real-life resolution test shot with each of the four filters applied.
Canon EOS 60D JPEG Grainy B/W Creative Filter |
Canon EOS 60D JPEG Soft Focus Creative Filter | |
 |
 | |
Canon EOS 60D JPEG Toy Camera Creative Filter |
Canon EOS 60D JPEG Miniature Creative Filter | |
 |  |
Canon EOS 60D drive modes and remote control
|

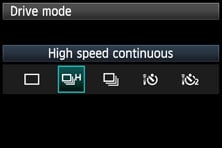 |
The Canon EOS 60D offers two continuous shooting modes: Low, which shoots at 3fps and High, which shoots at 5.3fps. The top speed is 1fps slower than the EOS 50D, another downgrade which again has caused frustration for owners of that body, but to be fair to the EOS 60D, it is shifting 3 Megapixels more data with every frame. It’s also important to look at the camera’s position in the current range, with its 5.3fps sitting roughly between the 3.7fps and 8fps of the models immediately below and above.
Canon quotes a buffer of up to 58 Large Fine JPEGs, 16 RAW files or seven RAW plus JPEG shots. The RAW buffer matches the EOS 50D, although the JPEG burst is reduced from around 90 frames. To put these figures to the test we fitted the EOS 60D with a formatted Lexar Professional 133x 8GB Class 6 SDHC card. In Large Fine JPEG mode and at 100 ISO, the EOS 60D fired-off 50 frames in 9.4 seconds and showed no signs of slowing; this confirms the quoted speed of 5.3fps. With the camera set to RAW, we fired-off the quoted 16 frames in 3 seconds before the camera stalled, again corresponding to a speed of 5.3fps.
So in practice, both the JPEG and RAW rate matched the quoted speed of 5.3fps. Interestingly in our earlier tests, the EOS 50D actually came up a tad slower than quoted at 6.1fps for JPEGs and 5.9fps for RAW files. So while the EOS 60D is technically slower than its predecessor, it’s only by 0.8fps for JPEGs and 0.6fps for RAW files in our tests, which doesn’t make a huge difference in real-life situations.
Indeed to put the EOS 60D’s action credentials to the test, we photographed the famous Shotover Jet boats in Queenstown and found both the continuous AF and continuous drive were sufficiently quick for grabbing decent sequences. Sure, it’s not as quick as the EOS 7D, which delivered 7.85fps for JPEGs in our tests, but it is good enough for most action situations, and again only fractionally slower than the EOS 50D. You can see a burst of ten frames from our AF section above, and a close-up sample of one in our Gallery. Note the rival Nikon D7000 claims a slightly quicker speed of 6fps, but again we’ll have to wait for a final production sample to verify that in practice.
In terms of the self-timer, the EOS 60D gives you the choice of 10 or 2 second countdowns, although it doesn’t share the additional custom timers of recent entry-level EOS DSLRs which can take multiple shots as insurance.
A mirror lockup option is however available in the custom menu, which applies to either normal or self-timed shots.
In a feature which first made its debut on the EOS 40D, the EOS 60D can be remote-controlled by a PC or Mac using the supplied EOS Utility and USB cable. Still images can be recorded to your computer’s hard disk, the internal memory card or both, and there’s Intervalometer facilities for programmed shoots.
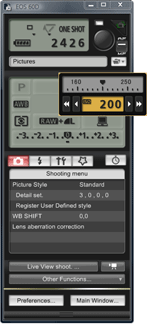 |
The EOS Utility lets you remote control and adjust pretty much any setting that doesn’t involve the physical turn of a dial or flick of a switch. So you can’t change the exposure mode from, say, Aperture to Shutter Priority using the software, but you can adjust the aperture or shutter value, the image quality, white balance, metering and sensitivity or even set the mirror-lockup. Impressively the software also lets you see the Live View on your computer monitor and even lets you manually or autofocus the lens with a magnified view for assistance.
The latest version 2.9.0.0 which comes supplied with the EOS 60D appears very similar to the previous version with the EOS 550D / T2i. As such there are separate controls to enter either Live View or Movie mode, both supplying live images to your computer’s screen. As before, while you can start and stop recording a video from your computer, the video file itself is only stored on the camera’s internal memory card – there’s still no means to record video direct to your computer’s hard disk.
You’ll also see an option introduced with the EOS 7D to automatically popup the internal flash if desired, although you’ll need to push it back down again yourself. The Flash Function settings popup menu also lets you configure the wireless flash control.
New to this latest version is a subtle change in the description of one of the Shooting Menu options: what used to be described as ‘Peripheral Illumination Correction’ is now known as ‘Lens aberration correction’. As before, this lets you populate the camera’s internal database with correction data for up to 40 lenses from the entire Canon catalogue (or at least those already supported in the latest version of Digital Photo Professional). The difference this time is the correction data is not just limited to peripheral illumination, but now also includes chromatic aberration and distortion information. Annoyingly the camera will still only apply peripheral illumination corrections to JPEGs, but the additional chromatic aberration and distortion data can be used by the EOS 60D’s new in-camera RAW processing facility (see section above).
Software-based remote control is a wonderful feature to have and if you have a laptop handy, it could even eliminate the need for certain photographers to invest in a cable release. It would be nice to be able to record video direct to your computer’s hard disk, but considering other manufacturers charge for software-based remote control, or don’t offer the facility at all, it seems churlish to complain.
Indeed remote control with the EOS Utility is now supported by and supplied with every single DSLR in the current EOS range, including the entry-level EOS 1000D / XS. So while Canon can be a bit mean about not supplying lens hoods with its non-L models, it certainly doesn’t skimp on the bundled software. Similar remote control software – often without the Live View capabilities – is an optional extra from other manufacturers, and Canon also bundles decent RAW processing software with its Digital Photo Professional program.
Now let’s find out about the new video recording capabilities in our EOS 60D Movie Mode section!
Canon EOS 60D Movie Mode
Click here to find out about the EOS 60D’s Lens, AF, sensor and drive modes
The EOS 60D becomes Canon’s latest DSLR to offer HD video recording, and shares the same core modes as the EOS 550D / T2i and EOS 7D before it. It also features an external microphone input and the ability to manually set audio levels, while the icing on the cake is the fully-articulated screen which allows you to film comfortably at unusual angles.
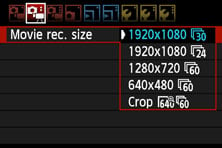
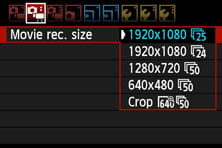
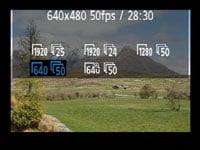
Starting with the actual video quality, the EOS 60D gives you have the choice of filming at either 1920×1080, 1280×720 or 640×480 pixels.
The Full HD 1080p mode can be set to record at either 30fps (29.97 actual) or 24fps when the Video System is set to NTSC, and 25 or 24fps when set to PAL. The 720p and VGA modes record at a higher frame rate of either 60fps (59.94 actual) when set to NTSC or 50fps when set to PAL. The screen-grabs below show the quality page when the video system is set to NTSC or PAL.
 |  |
The inclusion of a 24fps option at 1920×1080 pixels will delight independent film makers who were frustrated with the fixed 30fps speed of earlier models. Anyone wanting to integrate footage into PAL projects will also be pleased to find a 25fps option which matches their video standards. And remember while the EOS 5D Mark II can now shoot 1080p at a choice of three frame rates, there’s still no 720p options for that model.
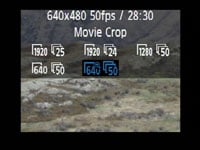
The EOS 60D also inherits the Movie Crop mode of the EOS 550D / T2i which shoots standard definition VGA video, but only using the central 640×480 pixels of the sensor. Since these occupy a small cropped area in the middle of the frame, the captured view is effectively magnified by 7.2x, allowing you to get much closer to distant detail.
Before going any further, let’s pause for a clip filmed with the EOS 60D’s best quality 1080p / 30fps mode under bright conditions with the camera mounted on a tripod. We used the Canon EF 24-105mm f4L IS USM lens zoomed-out to 24mm and with IS disabled. Immediately following this clip we filmed the same sequence using the 1080p / 25fps and 1080p / 24fps modes, along with the 720p / 60fps and 720p / 50fps options for comparison. Registered members of Vimeo can download each video for closer examination; we deliberately started each clip from the same position and kept the camera still for a few seconds to allow frame-grabbing resolution comparisons.
| |
|---|---|
|
Note if you’re downloading the files from Vimeo using Internet Explorer 8, you may find the file extension is MP4 rather than the original MOV. Don’t worry, the file is otherwise identical, and you can rename the extension to MOV if necessary. As with other Canon cameras employing the same encoding system, the playback may be jerky under QuickTime for Windows; we recommend playing the files under Windows using VLC Player, but even then you’ll also need relatively quick hardware for smooth results.
|
 |
 |
 |
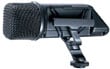
Like the EOS 550D / T2i, EOS 7D and EOS 5D Mark II, there’s a built-in mono microphone and, impressively for a camera of its class, a 3.5mm stereo mini jack to connect an external microphone. The use of an external microphone, like the Rode SVM, can transform the audio quality and is highly recommended over the internal microphone.
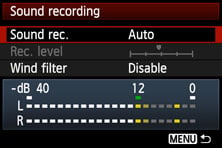
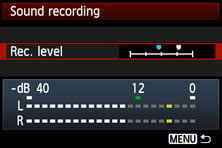
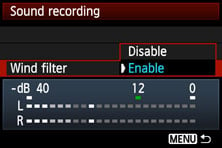
In a welcome update over the EOS 550D / T2i and EOS 7D, the EOS 60D now lets you manually set audio recording levels; indeed in Canon’s current range, the only other DSLR to offer manual recording levels is the firmware-updated EOS 5D Mark II. Go to the Sound recording page and you’ll find stereo level meters (with peak holds) and the option to switch between Auto or Manual, the latter offering 64 levels of adjustment. This is a very welcome feature to find on the EOS 60D and we can only keep our fingers crossed it’s implemented on all future Canon DSLRs, not to mention in a firmware update for the EOS 7D.
The Sound recording page is also where you’ll find a wind filter, which can be applied to the internal or external microphones. In our tests around windy Queenstown, the filter certainly cut down on noise, but the result sounded quite artificial and echo-ey like over-zealous digital noise reduction. It’s handy to have in emergencies, but much better to use an external microphone with a wind cover where possible.
As before, video is encoded using H.264 with uncompressed PCM audio (at 16 bit 48KHz), and stored in a QuickTime MOV wrapper – and as before, while the mild video compression ensures great quality, the encoding format remains a challenge to edit (or even play) smoothly on many computers. You’ll also need a Class 6 (or higher) SD card to support the maximum recording times.
The maximum time per file remains 29 minutes and 59 seconds or 4GB, whichever happens first. You’re looking at about 330MB per minute in any of the HD movie modes, with the 720 option consuming the same as the 1080 due to its higher frame rates. So that 4GB file limit will actually be reached after approximately 12 minutes, regardless of the HD quality setting. A fully charged battery should last for about two hours worth of recording.
|
|
The EOS 60D may be positioned between the EOS 550D / T2i and EOS 7D, but when it comes to actually start and stop filming video, it’s essentially the same as the entry-level model. As such you’ll first need to turn the mode dial to the Movie Mode position. This flips open the mirror and shutter to deliver a live feed to the screen, after which you simply press the dedicated Live View button (with a red dot next to it) to start and stop recording.
With the movie mode running, you’ll see the image framed with black bars above and below for the 16:9 HD modes and to the sides for the 4:3 SD modes. Like the EOS 550D / T2i before it, the borders when shooting in HD are thinner than on most models thanks to the wider 3:2 aspect ratio of the screen, although this also explains the vertical bars for narrower 4:3 footage.
It is possible to take a high resolution photo while filming by fully depressing the shutter release, and doing so will interrupt your video by about one second. Unlike previous models though, the photo will share the same aspect ratio as the current movie mode – so if you’re shooting HD video, any still photos will be 16:9 in shape. They will still be much higher resolution than the video frame, but not 3:2 in shape.
 |
 |
 |
Pressing the Info button cycles between a clean view, one with basic shooting details superimposed along the bottom of the frame, a third which overlays further settings running down the left side in two columns, and finally a fourth view which adds a small virtual horizon graphic in the middle of the screen. Options in the menu allow you to superimpose one of two alignment grids, although there’s no live histogram.
Like normal Live View, you can directly adjust a number of settings by pressing the Q button, then using the rocker to highlight the desired setting before turning the finger dial or thumb wheel to change it. Here you have the ability to adjust the AF mode, Drive mode (for stills), White Balance, Picture Style, Auto Lighting Optimizer, Quality (for stills) and Quality for video.
The same options and more besides are available by pressing the Menu button. This presents three new menu pages dedicated to movie options which aren’t visible with the camera set to any other mode. So while it can be initially confusing not to find any movie options when casually browsing the menus in other modes, it does at least avoid potential conflicts.
 |
 |
 |
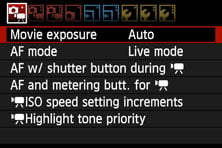
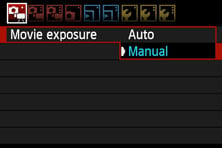
The first option on the first page is where you can switch the exposure mode from Auto to full Manual. In Auto, the movie mode will automatically adjust the aperture, shutter and sensitivity, and like previous Canon DSLRs, it has a preference for selecting unusually small apertures and high ISOs even under bright light, perhaps in an attempt to maximise the depth-of-field. As such it’s not unusual to find the camera shooting at f22 under bright sunlight which has the undesirable side-effect of making any dust marks on the sensor quite visible. In Auto mode you can turn the thumb wheel to adjust exposure compensation in a +/-3EV range. You can even do it while recording, although the stepped design of the control will result in quite audible clicks and even minor vibration.
The Manual exposure option allows you to take control and deliberately select large apertures to minimise the depth-of-field, or lower ISOs to maximise the quality. Just like Manual for still photos, the shutter speed is adjusted with the finger dial, while the aperture is adjusted by the thumb wheel. Shutter speeds from 1/4000 to 1/60 (in all the VGA and 720p modes) or 1/30 (in all the 1080p modes) are available, as are sensitivities from 100-6400 ISO, while any aperture offered by the lens can be selected.
It’s wonderful to have manual control over exposures from day-one, as the automatic mode often chooses very small apertures and thereby eliminates any chance of enjoying a nice shallow depth-of-field – one of the major benefits of using a DSLR for video in the first place.
The next clip below demonstrates a shallow depth of field and selective focusing with the EOS 60D. We used the EF 24-105mm f4L IS USM on a tripod at a focal length around 50mm and set the aperture to f4 in Manual mode. We then adjusted the manual focusing ring to focus from a close to a distant subject and back again. If this effect appeals, you can achieve much greater blurring with lenses like the EF 50mm f1.4 and EF 85mm f1.8, and if you get really addicted to it, Canon’s f1.2 options at the same focal lengths beckon to those with deeper pockets.
| |
|---|---|
|
Like the EOS 550D / T2i and EOS 7D before it, the EOS 60D offers auto-focusing while filming, but before you get too excited, it’s fairly useless. First of all, it doesn’t operate continuously like a camcorder. Instead it only refocuses when you half-press the shutter release and worse, takes several seconds to do so using the contrast-based Live mode. So while you can refocus while filming, you’ll just end up recording the leisurely adjustment process. To be fair, it’s occasionally handy for ensuring the subject is in focus without manually adjusting the lens or exiting to make an automatic reading, but it’s a process you’ll definitely want to edit out later. You can disable autofocus while filming if desired.
 |
 |
 |
|
As mentioned earlier, one of the interesting video options on the EOS 60D is the Movie Crop function, inherited from the EOS 550D / T2i. Again this shoots standard definition VGA video, but rather than take (or combine) pixels from the entire height of the sensor, only the central 640×480 pixels are used. Since these occupy a small cropped area in the middle of the frame, the captured view is effectively magnified over the normal shooting modes. In fact, the Movie Crop mode effectively multiplies the focal length by 7.2x, allowing you to get much closer to distant detail.
Since there’s no pixel-binning taking place, the image can become noisy under anything other than bright conditions, and unsurprisingly the focusing becomes absolutely critical. It’s like using the magnified focus assistance in Live View, but then actually recording what you see filling the screen rather than withdrawing to a normal magnification once confirmed. But for the right subjects, the result can be impressive.
It’s also worth doing the maths to realise the same effect cannot be achieved by simply enlarging a VGS portion of a 1080p clip in an editor later. A 1080p clip has a maximum height of 1080 pixels, so taking a crop that’s 480 pixels tall will only result in a magnification of just over two times. The unique thing about the Movie Crop mode is that it’s taking a 640×480 window from the full sensor height of 3456 pixels, which is how the 7.2x magnification is derived.
Here’s a clip filmed with the EOS 60D in its standard definition movie mode with the EF 24-105mm f4L IS USM lens fully zoomed-in, and working at an effective focal length of 168mm. Later in the clip you’ll see the same view at the same focal length, but taken with the Movie Crop mode, where the 7.2x magnification is effectively delivering a focal length of 1210mm. If you had a 70-300mm, the effective focal length when zoomed-in would jump from 480mm to a whopping 3456mm, allowing you to better see incredible detail. Of course this would require critical focusing, a very steady tripod and ideal atmospheric conditions, but the possibilities are exciting.
| |
|---|---|
The downside is the Movie crop mode is only available in standard definition VGA. Of course if it were offered in HD on a 720p or 1080p frame, the magnification would reduce to 4x or 2.7x thanks to the active area occupying a larger portion of the sensor – but it would still have been a really nice option. Coincidentally, Canon’s ageing PowerShot SX1 IS offers a similar facility in HD with a 2x mode at 1080p. So please Canon can we have a firmware update which allows Movie crop filming in HD?
Finally, the EOS 60D completes its movie experience with another feature inherited from the EOS 7D: the ability to trim clips at either end during playback. The shorter file can then overwrite the original or be saved as a new movie. We used this process to trim the clip demonstrating a shallow depth-of-field above.
 |
 |
 |
As for filming with the EOS 60D, the experience and results are unsurprisingly similar to the EOS 550D / T2i and EOS 7D before it. As such, the EOS 60D is capable of delivering superb-looking results in both bright and low light. It’s easy to enter the movie mode and start filming, the choice of resolutions and frame rates allows you to integrate footage into almost any project, the manual exposure control gives you the creative freedom which typical camcorders can only dream of, and the external microphone input allows far superior audio quality. The addition of manual control over audio levels is also very welcome.
|
|
Where the EOS 60D really scores over previous models though is its articulated screen. DSLRs aren’t the easiest things to handle for filming and the necessity to hold them relatively high in order to see the screen is far from ideal. With the EOS 60D though, you can simply flip the screen out and angle it upwards for comfortable framing at waist-height. Equally you can film comfortably with the camera on the ground or held high over your head. Discreet filming is also possible thanks to the adjustable screen.
Of course DSLRs with articulated screens aren’t new to other manufacturers: Nikon, Sony, Panasonic and Olympus all offer them, but it doesn’t diminish from the delight of using one on the EOS 60D – and again making it even more pleasant is the excellent quality panel.
So unless you demand (or desire) the full-frame sensor of the EOS 5D Mark II, we’d say the EOS 60D boasts the best movie recording experience of any Canon DSLR to date. The quality is known from previous models, but adding manual audio recording levels and an articulated screen have taken it to a new level.
 |
As with all DSLR video modes though, there are caveats. First, there’s no continuous autofocus while filming. Second, without optional mountings, the DSLR form factor isn’t particularly comfortable to handle for filming, and it’s tricky to pull focus or adjust the zoom without twisting or wobbling the camera. Third, the dreaded jello effect can still rear its head under certain conditions. Handheld filming with wobbly pans or attempted zooms can be particularly susceptible, and if you’re into this kind of casual filming style, you’ll still be better-off with a dedicated camcorder. Professional film makers who are interested in monitoring or recording over HDMI should also note that while the port outputs a 1080i signal while framing, it’s downgraded to 480p once you start recording.
|
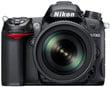
It’s also important to consider the competition. Nikon’s D7000 can film at 320×216 or 640×424 at 24fps, 1280×720 (720p) at 24, 25 or 30fps, or 1920×1080 (1080p) at 24fps. Note unlike Canon, the D7000 does not offer 25 and 30fps options at 1080p, only 24fps. Nikon’s also switched from the previous Motion JPEG format for the same H.264 as Canon, and allows recording times of up to 20 minutes per clip, depending on available memory; Nikon quotes around 700MB for five minutes of Full HD, or around half that for five minutes at 720p / 24fps, which implies a much higher compression ratio than Canon. This may allow longer clips to be recorded before maximum file limits kick-in, but the higher compression may be harder to edit and suffer from greater artefacts.
Like the EOS 60D, the D7000 also offers an external microphone input, along with the ability to adjust recording levels, albeit with just three presets rather than proper graphical level meters. Most importantly of all for consumers though is the D7000’s claim of continuous AF while filming, which could give it a significant advantage over the EOS 60D, depending on how well it works in practice.
So while the D7000 lacks the Full HD options at 25 and 30fps of the Canon EOS 60D, not to mention its fine audio level adjustment and articulated screen, the ability to continuously autofocus while filming could make up for it if it works effectively. We’ll have to wait until final production samples are available before making a final decision.
Ultimately it’s the independent film makers or very serious amateurs who’ll really appreciate the EOS 60D’s movie capabilities. They’ll already be used to manually pulling focus where necessary and working around the caveats to achieve great-looking footage. The EOS 5D Mark II’s bigger sensor may offer greater potential for shallow depth-of-field effects and low light performance, but by matching the EOS 7D’s output with the addition of manual audio levels and an articulated screen, the EOS 60D arguably becomes Canon’s most confident and flexible movie camera yet. Now let’s see how the still image quality compares in our Canon EOS 60D Real-life results.


