 The Panasonic Lumix LF1 is a very satisfying pocket camera for enthusiasts. It delivers better quality than most point-and-shoots, packs in a longer and brighter zoom than you might expect for its size, offers a full array of manual control and RAW files, features the latest in Wifi and NFC connectivity and includes the bonus of an electronic viewfinder. It all adds up to a compelling specification for anyone who wants a genuinely pocketable camera, but doesn't want to compromise on composition or control.
Panasonic Lumix LF1 review
-
-
Written by Gordon Laing
Intro
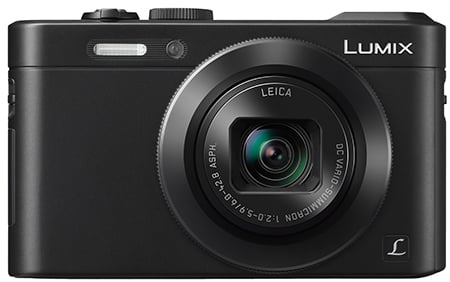
Panasonic’s Lumix LF1 is a pocket-sized camera aimed at the demands of enthusiasts. Announced in April 2013, the LF1 represents a new line in Panasonic’s Lumix range that sits alongside the existing LX series, but addresses requests for a longer zoom that’s still fairly bright and a built-in electronic viewfinder. Like many of its most recent cameras Panasonic has also squeezed in Wifi and Near Field Communications (NFC).
The LF1 is comfortably smaller than the Lumix LX7 and employs quite a different shape and style that’s more reminiscent of Sony’s RX100. The sides curve round like a bar of soap and there’s no grip at all on the smooth front surface. A bulge on the upper right side as you view the camera from the front may look like a popup flash, but is the housing for the new electronic viewfinder which offers an alternative to the main 3in screen for composition, although without an eye sensor you’ll need to switch between them manually. As for the flash, it’s a built-into the front surface on the opposite side, and unlike the LX7 there’s no hotshoe for anything more powerful.
The optical range has almost doubled from the LX7 with a new 7.1x zoom that’s equivalent to 28-200mm, equipping the LF1 with much longer telephoto coverage. The lens is inevitably dimmer as a result, but still starts reasonably brightly at f2.0, slowing to f5.9 at the telephoto end. Round the barrel is a configurable zoom ring like Canon’s PowerShot S series. Inside is the same sized 1/1.7in sensor as the LX7, but with a small boost in resolution from 10 to 12 Megapixels. Finally, the LF1 is equipped with Wifi and NFC, allowing you to wirelessly browse, transfer, share or backup photos along with offering remote control via a free app for iOS and Android devices. Meanwhile NFC can take care of the initial Wifi network and password details on compatible devices.
The Lumix LF1 is an exciting alternative for enthusiasts who are after a genuinely pocketable camera with a step-up in quality and features over a basic point-and-shoot – but what makes it really different from existing options like Canon’s S110 is a longer zoom range and built-in viewfinder. In my Lumix LF1 review I’ll compare it to a number of riavls including the S110, Sony RX100 II and in particular Panasonic’s own LX7. If you’re looking for a high-performance pocket camera, you’ve come to the right place!
 |
Panasonic Lumix LF1 design and build quality
The Lumix LF1 sports a clean and stylish design that’s smaller than it looks. From promotional photos it’s easy to assume it’s close to the Lumix LX7 in size, but place them side-by-side and you’ll realize the LF1 is noticeably smaller – indeed the total thickness of the LF1 including its protruding lens barrel is roughly the same as the LX7’s main body alone, making it a camera you can squeeze into a trouser pocket, whereas the LX7 is decidedly chunkier, requiring a coat pocket or a bag.Â
In terms of looks, the LF1 is much simpler than the LX7, swapping the latter’s many buttons and levers for a much simpler design. But if we’re looking for style similarities, the camera it most resembles is Sony’s Cyber-shot RX100 and its successor, the RX100 II, with their rounded sides which present a semi-circular profile from above.
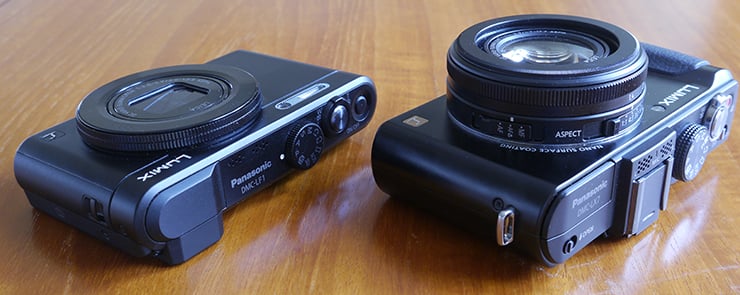 |
In terms of actual dimensions, the LF1 measures 103x62x27.9mm and weighs 192g including battery. This makes it comfortably smaller in every dimension than the LX7 which measures 111x67x45.6mm and noticeably lighter too with the LX7 weighing-in at 298g including battery. When I first heard about the LF1 I assumed it was essentially an LX7 with a longer zoom, Wifi and a built-in viewfinder, but it’s clearly a much smaller camera which, as mentioned above, can squeeze into a trouser pocket. I’ve pictured them above in their smallest powered-off configurations and the LX7 is considerably chunkier – and this is even without its lens cap fitted.
Sony’s Cyber-shot RX100 II shares a very similar size to the LF7 when viewed from the front, measuring 102x58mm, but the Sony is thicker at 38.3mm excluding protrusions, and closer to the LX7 in weight at 281g including battery. But don’t forget the RX100 II sports a sensor with 2.7 times the surface area and a screen which tilts – although there’s no built-in viewfinder.
Meanwhile Canon’s PowerShot S110 is fractionally smaller than the LF1 overall at 99x59x26.9mm, and essentially the same weight at 198g including battery. Considering Canon’s S110 was always the smallest of the group, Panasonic’s done a great job in squeezing in a longer zoom range and an electronic viewfinder into a body that’s much the same size and weight. It’ll certainly be interesting to see where Canon takes the PowerShot S line going forward.
It’s the viewfinder which makes the Lumix LF1 really unique and I’ll be talking more about it later in the review, but while we’re discussing sizes and weights, it’s worth remembering the only compacts with viewfinders, be they optical or electronic, are usually much larger. Think of models like Canon’s PowerShot G15, which measures 107x76x40mm and weighs 352g including battery. Or Fujifilm’s X20 which measures 117x70x57mm and weighs 353g including battery. Both models feature brighter zooms at their long end (although not as long as the LF1), and the X20’s 2/3in sensor is a little larger too, but these cameras are considerably chunkier propositions which won’t squeeze into a trouser pocket.
So from this group of enthusiast-grade compacts, it’s clear the LF1 is going after the successful niche Canon has carved with the PowerShot S110: namely, being genuinely pocket sized.
 |
In terms of a grip, there’s not a great deal to hold onto. The LF1’s smooth front surface means your middle finger can slip a little, leaving all positive purchase to your thumb, pressing against a small ridge on the rear. I found I needed to hold the camera quite tightly if using one hand, although if you can use both hands, there’s no issues. As far as build quality is concerned though, the LF1 feels very solid and well constructed.
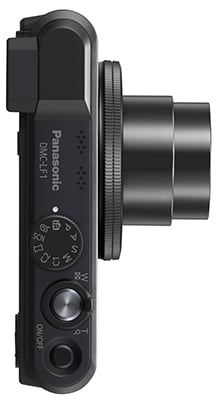
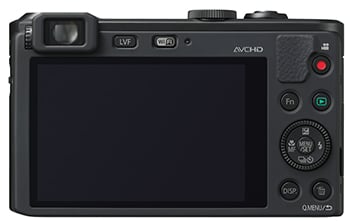
In terms of controls the Lumix LF1 keeps it simple with an approach that’s closer to the Lumix pocket super-zooms than the LX7. On the top surface there’s the mode dial, the shutter release surrounded by a zoom collar, and the power button. I’m pleased Panasonic now implements power buttons instead of switches on its 2013 compacts, in addition to play buttons which can power the camera straight into review with a prolonged press.
To the side of the viewfinder on the rear you’ll find a button to switch between the screen and electronic viewfinder and another to fire-up the Wifi. In the upper right corner there’s a dedicated button to start recording video in any mode. The video record button is placed for thumb control, but I found I had to adjust my grip to press it which invariably meant a wobbly start and end to most of my movies. Remember thanks to the smooth front surface, the only solid grip to press against is the thumb rest, so by forcing you to move your thumb to start and stop the video, you’ll really need to hold the camera with both hands. Ultimately it would have been better to squeeze the record button on the top surface somewhere.
To the right of the screen is a thumb wheel which doubles-up as a four-way rocker; push up to adjust exposure compensation, push right for flash mode, push down for drive modes and push left for macro options, while a button the middle confirms or enters the Menu system. The wheel is surrounded by four further buttons for playback, delete, display options and a programmable function key.
Finally, around the lens barrel is a rotary control with satisfying tactile feedback. By default this changes function depending on the exposure mode, for example adjusting the ISO in Program mode or the f-number in Aperture Priority, but you can change its function in the menu to only adjust the zoom in fixed increments, exposure compensation, aspect ratio, sensitivity or white balance if you prefer. You may want to do this as by default its function is often duplicated by the rear thumb wheel. There’s also some odd limitations like not being able to shift the Program exposure, but with a little tweaking to the lens dial and the function button, you can enjoy a great deal of physical control with the LF1.
Pressing the Delete button during composition fires-up Panasonic’s Q.Menu system which allows you to adjust exposure compensation, Step Zoom, aspect ratio, resolution, sensitivity, white balance, AF mode, movie quality and monitor brightness using either the front or rear dials. In each instance the options are presented on the top section of a virtual dial which is a nice tie-in with the LF1’s physical controls.
I was however surprised to find the LF1 not employing a touch-screen interface. While the earlier LX7 didn’t have a touch-screen either, I still find them an incredibly useful means of controlling a camera, especially when it comes to repositioning a single AF area. As I’ll mention later you can adjust the position of the AF area on the LF1 using the four-way rocker dial, but I’d much sooner be able to do it with a touch-screen. I understand they’re not fitted onto cheaper models for cost reasons, but the LF1 is a premium compact aimed at enthusiasts who I’m sure would appreciate this type of control. Since Panasonic is one of the most pro-active camera manufacturers for deploying touch-screens I find this an odd and disappointing omission. I should note that Canon’s S110 has a touch-screen.
The LF1 features a small flash built-into the front surface, compared to a slightly larger flash on the LX7 which pops up when required. Panasonic doesn’t quote Guide Numbers for either model, only a range based on auto ISO, but the bottom line is the LF1’s flash is on the small side, akin to models like Canon’s S110. It’s fine for basic fills or close-range snapshot portraits in dim conditions though, and despite its proximity to the lens I didn’t experience any red-eye during my tests.
What you can’t do though is fit the LF1 with anything stronger. Not only does the earlier LX7 feature a bigger built-in flash, but it’s also equipped with a hotshoe for mounting external flashguns. Clearly if you’re into lighting, the LX7 offers much greater flexibility.
On the right side of the camera as you hold it is a small flap, behind which you’ll find a Mini HDMI port and a combined USB / AV port. On the left side is a label indicating the presence of the Near Field Communications, NFC, sensor which I’ll discuss in detail later.
The camera’s powered by a DMW-BCN10E 950mAh Lithium Ion pack that’s good for 250 shots under CIPA conditions. This is fewer than the 330 shots for the LX7, but more than the 200 quoted for Canon’s S110. Like most of Panasonic’s recent compacts, the LF1’s battery is charged over USB and it’s supplied with a mains USB adapter in the unlikely event you don’t already have one for another device. I personally prefer USB charging as it means carrying fewer things when travelling and also allows you to top-up the camera’s charge using a laptop or in-car USB adapter. That said, the battery is removeable, so you can carry a spare. The battery compartment also houses an SD memory card slot.
The tripod thread is positioned at the other side of the camera, but while it’s past the lens axis, there’s still sufficient purchase for a tripod. Mounting the camera on a tripod will of course block access to the memory card, but thanks to built-in Wifi, you can copy images from the camera wirelessly if desired – more of which later.
Panasonic Lumix LF1 lens
The Lumix LF1 features a 7.1x lens with an equivalent range of 28-200mm and a focal ratio of f2-5.9. This places it firmly in the camp of compacts for enthusiasts which start off with a bright focal ratio, but dim considerably at the long-end. But where the LF1 differs from models like Canon’s S110 and Sony’s RX100 II is the extent of the telephoto reach: 200mm compared to 120mm on the S110 and 100mm on the RX100 II. Sure, the S110 starts wider at 24mm compared to 28mm on the LF1, but the fact is the Lumix enjoys a considerably more powerful reach at the long end. You can see an example of the coverage below.
Panasonic Lumix LF1 coverage wide |
Panasonic Lumix LF1 coverage tele | |
 |  | |
| 6-42.8mm at 6mm (28mm equivalent) | 6-42.8mm at 42.8mm (200mm equivalent) | |
In comparison, the Canon S110 has a 5x zoom with an equivalent range of 24-120mm and an f2-5.9 focal ratio, while the Sony RX100 II has a 3.6x zoom with an equivalent range of 28-100mm and a focal ratio of f1.8-4.9. Meanwhile, Panasonic’s earlier Lumix LX7 falls into the alternative camp of chunkier compacts allowing the lens to remain bright throughout the range with a 3.8x zoom equivalent to 24-90mm and an f1.4-2.3 focal ratio.
In this respect, the LF1’s lens specification makes sense as it complements the LX7 rather than going up against it. The LX7 starts wider, not to mention one stop brighter, but stops at 90mm, albeit at a still bright f2.3. In contrast the LF1 zooms more than twice as close but slows down to f5.9 at the long-end. There’s pros and cons to each approach, and while I love the way the LX7’s bright aperture allows you to maintain low ISOs for the best quality even when zoomed-in, I also really enjoyed having the extra reach of the LF1 at my disposal – you can see its flexibility in my LF1 sample images page.
To illustrate the difference between the LF1 and LX7 coverage in practice, I mounted each cameras to a tripod in turn and took photos with their widest and longest focal lengths. Below you can see both cameras at wide angle, where it’s clear the LX7’s 24mm coverage is capturing a broader field of view than the 28mm of the LF1, but it may not be as significant a difference as you thought. But if you’re in a tight spot, it’s definitely useful to have.
Panasonic Lumix LF1 coverage wide |
Panasonic Lumix LX7 coverage wide | |
|  | |
| 6-42.8mm at 6mm (28mm equivalent) | 4.7-17.7mm at 4.7mm (24mm equivalent) | |
Zoom both cameras into their longest focal lengths though and there’s a significant difference between them, as illustrated below. The LF1 zooms more than twice as far as the LX7, allowing you to get much closer to distant subjects. So personally speaking while I love wider lenses, I have to say the considerably longer reach of the LF1 makes it preferrable for general use.
Panasonic Lumix LF1 coverage tele |
Panasonic Lumix LX7 coverage tele | |
|  | |
| 6-42.8mm at 42.8mm (200mm equivalent) | 4.7-17.7mm at 17.7mm (90mm equivalent) | |
But returning to the subject of bright apertures, they allow you to do more than just maintain lower sensitivities or allow faster shutter speeds – they can also be used to deliver a shallower depth of field, so the big question is how does the lens on the LF1 compare to the LX7 in this regard? To put them to the test I shot two compositions, starting with a macro shot at close to the minimum focusing distance, followed by a typical portrait shot at the longest focal length, both using the respective maximum apertures of each camera.
First-up the macro comparison, taken from about four cm away with both cameras zoomed-out to their widest focal lengths and set to their maximum apertures; the LX7 was positioned a tad closer to compensate for its slightly wider focal length, and it’s this wider focal length that’s responsible for reproducing the camera in the background smaller. In macro compositions it’s easy to blur anything in the background, even if it’s quite close, such as the DSLR camera in my example which was about 30cm away. In this example, below, the LX7 at 24mm f1.4 has delivered a shallower depth of field than the LF1 at 28mm f2 with greater blurring, but as you can see, it’s quite possible for both cameras to isolate the foreground under these conditions. I have a number of additional macro shots in my LF1 sample images.
Panasonic Lumix LF1 depth-of-field for macro |
Panasonic Lumix LX7 depth-of-field for macro | |
 |  | |
| 6-42.8mm at 6mm f2 (28mm equivalent) | 4.7-17.7mm at 4.7mm f1.4 (24mm equivalent) | |
For my second comparison I zoomed both lenses to their maximum focal lengths and opened their apertures. The background was about five meters behind the subject and the distance between the camera and subject adjusted to deliver a similar subject size on the frame. You’d assume the brighter focal ratio of the LX7 would deliver a shallower depth of field, but remember countering this to some extent is the longer focal length of the LF1.
Panasonic Lumix LF1 depth-of-field for portraits |
Panasonic Lumix LX7 depth-of-field for portraits | |
 |  | |
| 6-42.8mm at 42.8mm f5.9 (200mm equivalent) | 4.7-17.7mm at 17.7mm f2.3 (90mm equivalent) | |
When viewed at a reduced resolution above, the LX7 enjoys an edge over the LF1 in terms of blurring the background, but not significantly so. Indeed when both images are examined at 100%, the blurring effect on the LF1 is actually quite similar to the LX7. The bigger difference here is the impact of their respective focal lengths. The LF1 at 200mm has delivered a flatter perspective and a tighter view of the background with fewer distractions, but obviously I needed to be more than twice as far away as the LX7 for the same subject size, and that may not be convenient. Certainly if you were to set the LF1 to 90mm, then the LX7 would enjoy a shallower depth of field thanks to its larger aperture at that focal length, but if you’re willing and able to shoot with the LF1 at 200mm, you can achieve similar blurring effects.
Just before wrapping-up the differences between the LF1 and LX7 it’s important to note the LX7 additionally features a built-in three-stop Neutral Density filter which you can deploy with a click of a button on the rear. Three stops isn’t going to get very long exposure fanatics overly excited, but it will let you employ longer shutter speeds to blur water or open up the aperture for a shallow depth of field in bright light conditions.
The LX7 also supports optional mounting kits to fit additional filters if desired, including Panasonic’s own DMW-FA1 which provides a 37mm thread. At the time of writing there were no filter kits for the Lumix LF1 and looking at the design I suspect it may not be possible. So if you want to use physical filters, or simply exploit a built-in ND option, then the LX7 will be a better bet.
But while the LF1 misses out on filters, I should note it enjoys the rarely-discussed benefit of an automatic cover which slides across when the camera’s powered down and opens by itself when powered-up. The LF1, S110 and RX100 all offer this, which makes them much quicker to get ready than models like the LX7 which thanks to its larger aperture has to employ a separate lens cap that needs to be fitted for protection and obviously removed before shooting. When shooting with the LF1 and LX7 side-by-side, the former really is ready to shoot much faster – so long as you’re using the lens cap on the LX7 of course.
Panasonic Lumix LF1 Image Stabilisation off / on | ||
 |  | |
100% crop, 6-42.8mm at 42.8mm, 1/25, 100 ISO, IS off |
100% crop, 6-42.8mm at 42.8mm, 1/25, 100 ISO, IS on | |
Finally, the Lumix LF1 features optical stabilisation to iron out the wobbles. Above are examples taken with and without stabilisation using the Lumix LF1 fully zoomed-into its maximum equivalent of 200mm, and at a shutter speed of 1/25. Traditional photographic advice would recommend a shutter speed of at least 1/200 to eliminate camera shake, but the stabilised LF1 allowed me to capture sharp handheld shots at 1/25. In contrast under the same conditions I required 1/200 without stabilisation to achieve the same degree of sharpness; this corresponds to around three stops of compensation. It’s certainly very useful to have when shooting at longer focal lengths in lower light.
Â
Panasonic Lumix LF1 screen and viewfinder
The Lumix LF1 is fitted with a 3in TFT screen with 920k dots and a 3:2 aspect ratio, which matches the specification of the LX7, although to my eyes, the LF1’s panel looked a tad crisper when both were placed side by side. This may be due to the default settings, or an updated panel with reduced air gaps.
 |
A quick note on the aspect ratio which like many Panasonic compacts is wider than the native 4:3 shape of the sensor. So if you’re shooting in 4:3 for the maximum resolution, there’ll be thin black bars running down either side of the screen. On the upside though, 16:9 HD video occupies a larger portion of the screen than it would with a 4:3 panel. But if you want your images to fill the screen you’ll need to shoot in a cropped 3:2 mode.
In use the LF1’s screen looks good, remaining easily visible under all but the brightest conditions. My only complaint as mentioned earlier is that it’s not a touch-sensitive panel. To be fair the LX7’s screen isn’t touch sensitive either, but I’ve become so used to using them on other Panasonic models from super-zooms to system cameras that I really miss not being able to tap to reposition the active AF area. Since Panasonic is so strongly into touch-screens I find it odd and disappointing not to find them implemented on their compacts for enthusiasts. One of the few compacts for enthusiasts which does have a touchscreen is actually Canon’s S110.
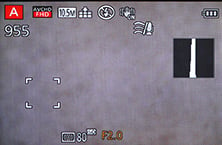
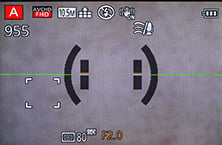
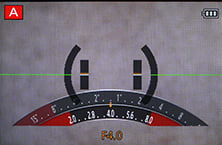
Pressing the DISP button on the LF1 cycles through a series of views: a clean view, one with shooting information and a dual-axis virtual horizon, one with the horizon but little else, and one with detailed shooting information but no horizon. You can also enable alignment guides and or a live histogram from the menus, but due to the lack of touchscreen you won’t be dragging them around with your finger.
 |
 |
 |
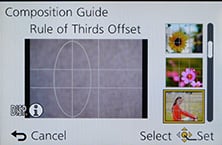
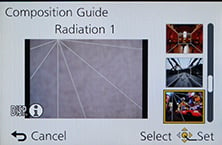
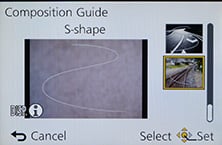
Panasonic has updated the choice of alignment guides though, letting you choose from six based on the rule of thirds (including offset and additional circular and elliptical guides), two based on diagonal lines, two on tunnels, four on radiating lines from each corner, and two on S shapes. These are really neat additions to the basic rule of thirds grid and encourage you to try different compositions.
 |
 |
 |
During playback you can view the image cleanly or with shooting information, with a brightness histogram if it’s been enabled in the menus. Note the GPS message in the screenshot below right, indicating that GPS data has already been synced with the image via the Panasonic Image app, as described later in the review.
 |
 |
 |
What makes the Lumix LF1 unique though is the option to alternatively compose with its built-in electronic viewfinder. This is hugely beneficial under bright conditions when the screen becomes hard to see, and of course holding the camera to your face makes it more stable too, allowing you to handhold at slower shutter speeds.
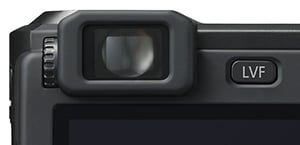 |
Now before you get your hopes too high, the LF1’s viewfinder is nothing like what you’ll get built-into a decent system camera or indeed using the LVF2 accessory on the LX7. The panel is much smaller at 0.2in and much lower resolution too at just 200k dots. Indeed peering into the LF1’s finder window is not unlike looking down a tunnel. You’ll also need to manually switch between the screen and EVF using a button – there’s no room for an eye sensor here.
But lets put this into perspective. The LF1 squeezes its EVF into a body that’s only 1mm thicker, 3mm taller and 4mm wider than Canon’s S110, and of course it’s included in the price. The LVF2 accessory for the LX7 may deliver a bigger and much more detailed image, but it costs between half and two thirds of the LF1 itself and adds considerably to the bulk of the camera. So the LF1’s finder may be small and coarse, but you’re getting it built-into a camera which can squeeze into your trouser pocket, and I can’t think of any other model which offers this. As discussed earlier, most cameras with built-in viewfinders (be they optical or electronic) are considerably chunkier models like Canon’s G15 and Fujfilm’s X20 which most definitely will not fit into a trouser pocket.
My personal feeling about the LF1 is the viewfinder is something you’ll only use from time to time, normally when the screen becomes hard to view or you need the extra stability of holding the camera to your face. It’s certainly not something you’ll use for the majority of your shooting. If you prefer to compose mostly with a viewfinder, I’d recommend going for a better quality solution (such as the Fujifilm X20 or an LX7 with the VF2), although again this will involve a larger and more expensive camera.
But once you get your head around the fact the LF1’s viewfinder is only meant for occasional use, it’s easy to forgive its modest size and resolution. You’ll probably even forgive the absence of an eye sensor given you probably won’t be using it that often. Ultimately the LF1’s viewfinder is a basic but useful and welcome addition to a genuinely pocketable camera, which separates it from pretty much everything else on the market.
Panasonic Lumix LF1 exposure modes
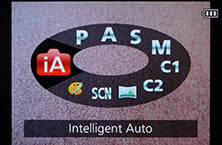
Like the Lumix LX7, the Lumix LF1 offers a wealth of shooting options via the main mode dial including full manual control over exposures. While manual exposure control on a compact lacks the impact of a DSLR or mirrorless system camera (at least when it comes to depth-of-field anyway), it can be useful in other areas which I’ll discuss in a moment.
 |
 |
 |
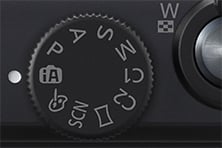 |
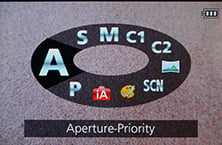
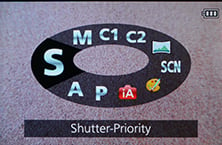
The LF1 inherits all but one of the LX7’s mode dial options, so you get Intelligent Auto, Program, Manual, Aperture and Shutter Priority, along with Creative Control, SCN and two custom modes. As for what’s missing, the LX7’s Manual Movie mode is sadly absent on the LF1 (it’s auto only for video here), and in its place is a dedicated position for the Panorama mode.
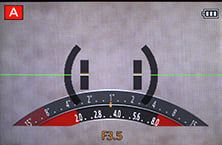
There’s the choice of 13 aperture values (when zoomed-out) and you still have the ability to adjust them in Aperture Priority or Manual modes. Switch to Shutter Priority and you can choose from exposures between 1/4000 and eight seconds, although set the camera to manual and you can extend the exposure time to an impressive 250 seconds – that’s just over four minutes. The shutter speed range is the same as the Lumix LX7 and both represent a broader range than typical compacts, especially at the long end. To make changes in Aperture or Shutter Priority just turn either the front or rear dials, or if you’re in Manual mode, the front dial adjusts the aperture and the rear dial adjusts the shutter speed.
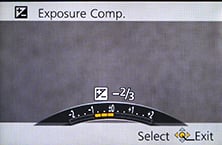
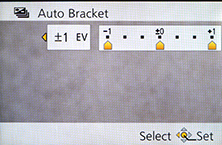
Exposure compensation and auto exposure bracketing are both available, but with bog standard options: +/-2EV for compensation and three frames at up to 2EV apart for bracketing. The LX7 is a little better in this regard, offering a broader +/-3EV range for compensation and three frames up to 3EV apart for bracketing, but again three frames isn’t going to set the world of HDR alight. It’s a shame Panasonic doesn’t offer the same bracketing on the LX and LF as it does on the G-series, which boast seven frames even on the cheaper models.
 |
 |
 |
Earlier in the review I illustrated what’s possible when you open the aperture up for macro and portrait shots on the LF1, but what about actually controlling the depth of field using the aperture? To illustrate what’s possible, I photographed a still-life arrangement in a sweetshop and focused on the red lollypop; this was positioned around 5cm from the camera, with the lens set to its widest focal length of 6mm (28mm equivalent). I chose to shoot this composition with the lens zoomed-out in order to access the maximum range of apertures from f2 to 8. As you can see below, the shot on the left has a noticeably shallower depth-of-field than the one on the right. But again to really see any blurring effect you’ll ideally need to be shooting in a macro environment. If you’re hooked on very shallow depth of field effects for subjects that are further away, you’ll really need to invest in a DSLR or mirrorless system camera with a bright lens.
Panasonic LF1: Depth-of-field in Aperture Priority | ||
 |  | |
| Aperture Priority: f2, 6-42.8mm at 6mm (28mm equivalent) | Aperture Priority: f8, 6-42.8mm at 6mm (28mm equivalent) | |
 |  |
Intelligent Auto on the Lumix LF1 combines Panasonic’s latest technologies to deliver a pretty foolproof experience. Like earlier models, these include Intelligent ISO and Scene Detection which both do a good job of figuring out what you’re trying to take and whether the subject’s in motion. In practice this works very well, with the camera automatically recognising and switching between portraits, landscapes, close-ups, night scenes (with or without people) and sunsets. If Face Recognition is enabled and spots a previously registered under-three year old, it’ll switch to Baby mode, and if a night scene is recognised without a tripod, the camera can opt for the Handheld Night Shot mode, more of which in a moment. The camera’s also good at detecting motion and increasing the sensitivity if necessary to maintain a quick shutter to avoid blurring – great when photographing unpredictable children, although obviously the quality reduces quickly at higher ISOs.
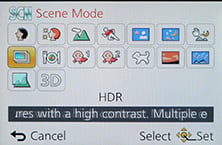
Turning the dial to SCN lets you choose from 16 Scene Presets which include Handheld Night Shot and HDR; note like other 2013 Lumix compacts, the Panorama mode enjoys its own position on the main dial. Sadly there’s no High Speed Video option on the LF1 for slow motion capture though.
Moving on, unlike the High Dynamic mode in the Creative Control section (see below), the LF1’s HDR mode actually takes three different exposures and combines them into one. You can see an example below, where it’s clear the version with HDR has boosted mid-tones and retrieved a little blown highlight detail in the backlit window. I’m glad Panasonic has equipped the LF1 with a proper multi-frame composite HDR mode rather than the simulated version of earlier models – although again that’s still available in the Creative Control mode if desired, see below.
Panasonic Lumix LF1 Program at 80 ISO |
Panasonic Lumix LF1 HDR Scene Preset at 160 ISO | |
 |  | |
 |  | |
1/200, f3.9, 80 ISO |
1/320, f3.9, 160 ISO | |
As mentioned earlier, the LF1 offers a panorama mode accessed direct from the mode dial. This works similarly to the sweep panorama option on Sony’s Cyber-shot cameras, capturing a series of images in a burst as you pan the camera across the scene in an arc, after which the camera automatically stitches them together for you.
 |
Again like Sony you can choose from panning with the camera held horizontally or vertically, but unlike Sony the LF1 seems happy to capture a full 360 degree panorama if you’re able to keep turning it during the four second capture process – during which time it has to be said everybody around you will be staring.
The maximum image size is 8000×1080 pixels in landscape mode or 1440×8000 in portrait mode, so the total resolutions of around 8 and 11.5 Megapixels aren’t going to win any detail contests. Depending on how much you wobble, the camera may need to crop some of that down to an even smaller image. For example in my tests I typically captured images measuring 6000×864 in landscape and 1104×4440 in portrait. So you won’t even come close to matching the same resolution as a single frame shot in one of the normal modes, but the Panorama preset will give you massive coverage which may be preferred depending on the subject. Like other 2013 Lumix compacts, it’s possible to preview and apply some Creative Filter effects to panoramas. Here’s a couple of examples.
| |||
| |||


Like other Lumix compacts, the LF1 offers a Handheld Night Shot mode which captures a burst of images before automatically combining them into a single image in an attempt to reduce noise or camera shake. It’s potentially one of the most useful modes on the camera, but still hidden away within the Scene presets, but at least Intelligent Auto mode can deploy it.
Like Sony’s Handheld Twilight mode, it operates completely automatically with no control over exposure or sensitivity. Here’s one example of the mode in practice, compared to the same composition taken moments later in Program mode with the same sensitivity and exposure. I’d say the noise levels are actually quite similar on both images, and that the biggest difference is actually a warmer white balance and increased contrast on the Handheld Night Shot version. But the effect may be more beneficial at higher ISOs.
Panasonic Lumix DMC-LF1: Handheld Night Shot at 400 ISO | ||||
 |
 |  | ||
f3.2, 1/13, 400 ISO |
f3.2, 1/13, 400 ISO |
f3.2, 1/13, 400 ISO | ||
Panasonic Lumix DMC-LF1: Aperture Priority at 400 ISO | ||||
 |
 |  | ||
f4, 1/10, 400 ISO |
f4, 1/10, 400 ISO |
f4, 1/10, 400 ISO | ||
The LF1 also inherits the 3D capture mode of earlier models, locating it in the scene presets. Traditionally a 3D capture would require twin lenses, but inspired no doubt by Sony, Panasonic has developed a means by which a single lens can generate a 3D image.
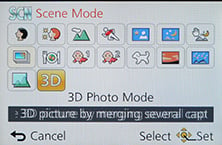 |
Like Sony it achieves this by analysing a burst of images taken while moving the camera, and using parallax changes to generate depth information. Two files are subsequently recorded: a conventional 2 dimensional JPEG for normal viewing, and an MPO file which contains the depth information and typically measures around 2MB. When connected to an ‘MPO-compatible’ 3DTV over an HDMI connection, both files are interpreted into a single 3D image; all commercial 3DTVs I’ve seen are MPO compatible. Unlike commercially produced 3D content though, the images produced by Sony and Panasonic’s single lens cameras only contain depth which extends ‘behind’ the screen, rather than in front of it.
The practical approach and image options from Sony and Panasonic are also slightly different. Sony’s 3D Panorama function grabs its images in an arc, whereas Panasonic’s 3D mode requires you to simply move the camera horizontally in a straight line; it recommends a shift of around 10cm in around four seconds for the best success.
While both cameras take a burst of images during the motion, Panasonic only takes the two most appropriate to generate a 3D image. The Lumix LF1 can also only generate 3D images measuring 1920×1080 pixels (Full HD 1080), whereas the Sony models additionally offer wider panoramas which slide across the screen during playback.
In use, it’s hard not to pan the LF1 in an arc rather than sliding it horizontally as requested by the manual, but both approaches will generate a 3D image. When viewed on a 3D TV, you can peer around objects to a certain extent and there’s certainly a convincing impression of depth conveyed – although again it only extended behind the screen, not in front of it.
Like other Lumix compacts, the LF1 collects a selection of special effects into the Creative Control position on the dial, indicated by a painter’s palette. You have the choice of Expressive, Retro, High Key, Low Key, Sepia, Dynamic Mono, Impressive Art, High Dynamic, Cross process, Toy, Miniature, Soft Focus, Star Filter and One Point colour, but lacks the additional Smooth defocus and Radial defocus options of the LX7. Here’s a selection showing some of the Creative Controls in practice.
Panasonic Lumix LF1 Sepia Creative Control |
Panasonic Lumix LF1 Impressive Art Creative Control | |
 |
 | |
Panasonic Lumix LF1 Toy Creative Control |
Panasonic Lumix LF1 Dynamic Mono Creative Control | |
 |  | |
You can also apply Creative Control effects to movies by simply pressing the red record button. This includes the Miniature effect, although as with other cameras, processing overheads mean you’ll only capture a few frames per second. This does however have the visual benefit of accelerating motion when played-back at normal frame rates. Here’s an example below I filmed with the LF1 where the action is effectively reduced by eight times.
| |
|---|---|
| |
Finally, the Lumix LF1 offers an Intelligent Resolution mode, which applies greater sharpening to images, and if i.ZOOM is also enabled, allows the camera to digitally extend its zoom from 7.1x to 14.2x. To put this to the test, I photographed the same scene fully zoomed-in first with the normal settings, followed by Intelligent Resolution, then with i.ZOOM extending the range to ‘14.2x’.
Panasonic Lumix LF1 Maximum zoom with IR disabled |
Panasonic Lumix LF1 Maximum zoom with IR and i.ZOOM enabled | |
 |  | |
| Uncropped image, 7.1x, 200mm equivalent | Uncropped image, 14.2x, 400mm equivalent. |
Above left is an image taken at the maximum 20x zoom with IR disabled, while above right shows the image taken at the maximum zoom with IR and i.ZOOM enabled, working at an equivalent of 40x. When viewed at the reduced size above, the latter certainly delivers a large boost to the effective magnification, but how does it look at 100%? To find out I took three sets of crops with IR disabled, IR enabled, and both IR and i.ZOOM enabled.
LF1 normal shooting |
LF1 with Intelligent Resolution (IR) |
LF1 with IR and max i.ZOOM | ||
 |
 |
 | ||
 |
 |
 | ||
 |
 |
 | ||
 |
 |
 | ||
100% crop, 6-42.8mm at 42.8mm, 80 ISO |
100% crop, 6-42.8mm at 42.8mm, 80 ISO |
100% crop, 6-42.8mm at 42.8mm, 80 ISO |
Judging from the crops above, Intelligent Resolution in the centre column applies greater sharpening and contrast to give a crisper edge to subjects, and is sometimes more pleasing to look at, although there certainly isn’t any additional detail. Meanwhile as you can see in the far right column, applying i.ZOOM may effectively double the zoom range but the results sure ain’t pretty when viewed at 100%. In fact there doesn’t appear to be any greater detail there, just a scaled-up image, including any undesirable artefacts. So while Intelligent Resolution can crispen-up your images, I’d treat i.ZOOM with caution as it seems no different from a normal digital zoom in my tests above. That said, the i.ZOOM results from the LF1 look a little better than those from Panasonic’s compacts with smaller sensors, like the TZ40 / ZS30.
One final note: sadly the LF1 does not offer any multiple exposure, time-lapse or interval timer features as found on the LX7 or indeed the GF6 and G6. A shame as I’m sure the target audience would use them.
Panasonic Lumix LF1 Wifi and NFC
The Lumix LF1 becomes Panasonic’s latest camera to offer Wifi with Near Field Communications, or NFC for short. It joins the Wifi and NFC equipped TZ40 / ZS30, G6, GF6 and FT5, proving Panasonic is really committed to these technologies and intends to integrate them into all but its budget-oriented cameras. The presence of Wifi and NFC on the LF1 is a major upgrade over the earlier LX7.
 |
Wifi allows you to wirelessly browse the LF1’s images on the larger and more detailed screen of a smartphone, tablet or laptop, copy them onto these devices, upload them to online storage or social media services (either directly or via a smartphone), or become remote-controlled by a free app for iOS or Android devices. These are flexible and powerful features to have at your disposal, and if your phone or tablet is additionally equipped with NFC you can simply hold it against the LF1 for a second and they’ll sort out the Wifi network selection and password entry for you, making the whole process much quicker and easier.
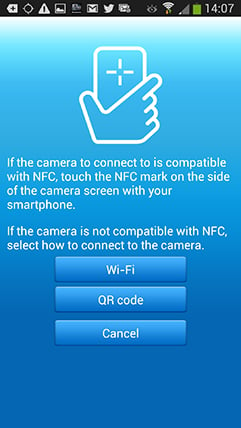
At the time of writing, only a handful of smartphones and tablets were equipped with NFC, most famously including the Google NEXUS 4, 7 and 10, and Samsung Galaxy S3 and S4, but sadly not yet any iOS devices. As luck would have it, I own a Galaxy S3, S4 and a NEXUS 7 so I can tell you exactly how the NFC experience works in practice. If you don’t have an NFC device yet though, don’t worry. You can achieve the same end result by manually choosing a Wifi network and entering any security by hand, it’s just that NFC will do that part for you with a simple tap or two. I’ll concentrate on the Android app from here on.
Okay so let’s start with establishing a connection between the camera and a smartphone or tablet. NFC or not, the first thing you’ll need to do is install the free Lumix Image app, available for iOS or Android devices. Next you’ll need to enable Wifi on your phone or tablet and if you’re intending to use NFC, you’ll also need to enable this on your phone / tablet.
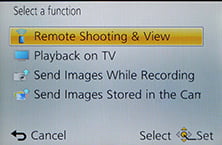
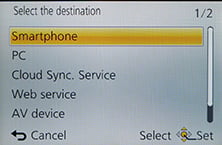
If your phone / tablet doesn’t have NFC you’ll now need to press the Wifi button on the back of the camera and either create a new connection, or load one you’ve previously configured. If you’re creating a new connection you can choose from ‘remote shooting and view’, ‘playback on TV’, ‘send images while recording’ or ‘send images stored in the camera’. For a smartphone / tablet connection, you should choose the first option for remote shooting and view. This then sets up the LF1 as a wireless access point, displaying the SSID name and password. You’ll then need to start the Lumix Image app, select Wifi as your means of connection, select the LF1’s network and enter the password.
If your phone or tablet has NFC you should start the Lumix Image app then briefly hold the two devices next to each other for about one second. For security, NFC has a very short range, so you’ll need to ensure the NFC chips on both devices are literally right next to each other for the initial negotiation. The location of the NFC chip is clearly marked on the left side of the LF1, but it may not be as obvious on your handset. On the NEXUS 7 it’s actually hidden behind the large NEXUS logo on the back, but on the Galaxy S3 and S4 it’s hidden on the rear to one side, but all you need to do is brush the camera’s NFC sensor over the other device and when it finds it, it’ll let you know. A message will appear on both the camera and phone or tablet asking you to tap again to confirm the connection, and that’s it. I found it worked most times, but at others it required a couple of attempts, or a restart of the Image app.
If the connection was unsuccessful for some reason you’ll hear an error sound from your phone or tablet, but if it works, you’ll hear a triumphant ‘ta-da’ sound instead. When it works you’ll feel like whooping too, at least the first couple of times, but clearly the Lumix engineers feel excited every time as the app plays the confirmation literally at full blast. The problem is some handsets, such as the GS3 and GS4, can be pretty loud at full volume and there doesn’t appear to be any way to change this sound or turn it down. It even plays at full blast when your phone is muted. This caused me some embarrassment on more than a couple of occasions including one time when literally every customer in a small bar turned round to see what was going on – quite alarming.
The NFC negotiation process takes about 15 to 20 seconds to complete, but the devices only need to be in close contact for the initial handshake which takes less than a second. You may be twiddling your thumbs during the negotiation, but it’s still quicker and much easier than manually searching for and selecting the right Wifi network and entering any security.
Once your phone or tablet becomes connected to the LF1, you can remote control it, browse the images direct from the memory card, copy them onto the handset and if desired send them onto various storage or sharing services. You can also set the app to make a GPS log for subsequent syncing and tagging, which I’ll cover in a separate GPS section below.
 |
 |
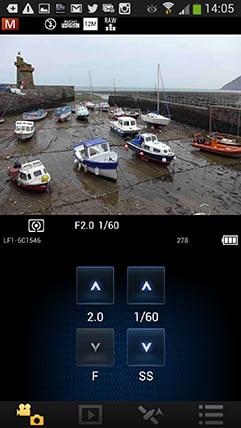 |
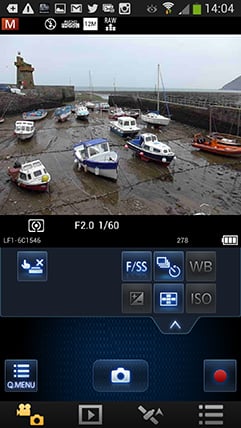
The remote control feature is really neat, showing a live image on your phone or tablet’s screen and allowing you to take a photo or start or stop a video. You can drag a slider to zoom the motorised lens and even tap anywhere on the live image to set the focus to that area or directly take the shot – at last giving the LF1 the touch-screen capabilities it always deserved. If the camera’s mode dial is set to Aperture or Shutter Priority, you can remotely adjust the aperture or shutter speed respectively, and in Manual you can change both.
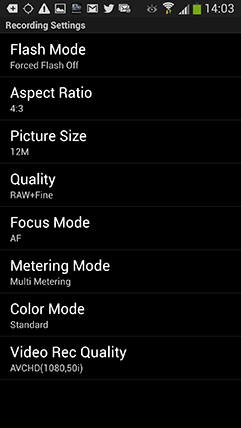
You can also adjust the drive mode, exposure compensation or focus area, although strangely the ISO and White Balance buttons were always greyed-out when I used the remote control; maybe you need to use a different shooting mode to enable them. There’s also a Q.Menu button which presents a list of additional options you can remotely change including the flash mode, aspect ratio, resolution, compression, focus mode, metering mode, colour mode or movie quality.
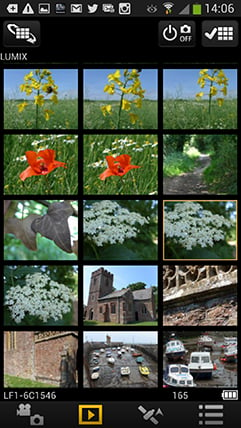
Moving on, you can also use a connected phone or tablet to quickly browse the images in your camera on their bigger screens without having to copy them over first. This is more useful than it sounds. I found myself really enjoying scanning through a day’s shoot on an iPad or NEXUS 7 without having to remove the card, physically connect the camera or copy any unnecessary files.
 |
 |
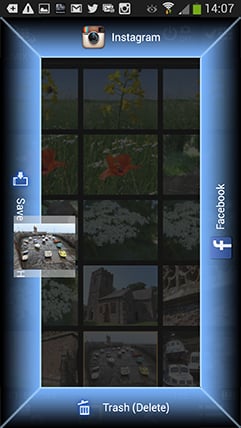 |
To maintain a responsive experience which feels like the images are stored locally on your phone or tablet, the camera sends a lower resolution version. So you can pinch to zoom-in a little, but not as much as if you were viewing the original. But when you see an image you like, just press and hold it on-screen for a second and the Lumix Image app will let you save the original to your device or start uploading it to one of the social, sharing or storage services installed on your device. You can configure the app to provide shortcuts to two or three of your most used services which could include Dropbox and Instagram in addition to the more usual suspects. Or of course once the image is copied into your device, you could just exit the Panasonic app and handle it direct from whichever sharing or storage app you like via your phone’s gallery.
You can also choose whether to copy images in their original resolution, or in one of two smaller versions. It typically took about 20 seconds to copy a 5MB original JPEG from the camera to my Galaxy S4 from a distance of about 1m; it’s not possible to copy RAW files though. On some Wifi cameras we’ve noticed the JPEGs sent over Wifi can be modified (typically shrunk) even if ‘original’ is selected, but I checked the JPEG files wirelessly transferred from the LF1 against the genuine originals and they were identical, meaning you really can use the Wifi to make transfers or backups.
Alternatively if you’re browsing your images on the camera and you see one you’d like to share, just tap the camera against your NFC phone or tablet and it will automatically establish a temporary network and copy the original over; the entire process again takes about 20 seconds. This is a brilliant feature and makes it easy to share or store your images.
It’s so much fun interacting with the camera using a smartphone or tablet that it’s easy to forget the Lumix LF1 can also upload images directly to the internet by itself via a suitable Wifi connection. You can upload directly to Facebook, Twitter, Picasa, Youtube, Flickr, but there’s two gotchas. The first is the camera doesn’t have any kind of built-in browser to accept the terms and conditions of many public hotspots, so you’ll mostly be using home or office-based Wifi. To be fair though, the only Wifi-equipped cameras I can think of which do have a browser to accept terms and conditions are Sony’s NEX 5R and NEX 6.
The second problem is before letting you upload anything directly from the camera you’ll first need to register for Panasonic’s free Lumix Club. Again this is an approach shared by most manufacturers, although unlike many, your images aren’t actually sent via this service. So if the images are going direct, why do you need to sign-up to Lumix Club at all? Well on the upside it does offer you some cloud storage, albeit temporary, deleting your images 30 days after uploading them. But on the downside when you’re using Lumix Club to authorize the use of, say, Facebook or Twitter on your camera, it’ll also ask you to let it view your contacts and post on your behalf. You can untick the posting permissions on Facebook, but not for Twitter. Now this may be the perfectly innocent process of an app doing something helpful in the background, or it could be something more advertiser or commercial driven. Either way, when it’s technically possible to upload direct from the camera without any third party apps or services, I’d prefer not to have to sign up for or agree to anything thankyou very much.
Once you do upload any images direct from the camera, they wait in a private Lumixclub album to be shared with a description. Since this requires you to have access to a computer, tablet or phone, it makes more sense to just use NFC / Wifi to copy the image from the camera to that device first and upload from there. The process is faster and avoids having to go accept Lumix Club’s privacy settings.
 |
 |
 |
As mentioned earlier, you can also configure the Lumix LF1 to automatically send images after they’re taken to a smartphone, tablet, or a computer, although as far as I understand it, you can only send images to a computer via a separate access point, such as a home or office network; I certainly couldn’t configure a direct peer-to-peer link between the Lumix LF1 and my MacBook Air, although direct connections are of course possible to smartphones and tablets as discussed earlier. Either way, it’s nice to have images automatically sent to devices which can subsequently upload them to cloud storage and backup if desired. Sure it’s heavy on bandwidth, not to mention battery power, but if neither are significant issues for you, it’s a compelling proposition. Or of course you could simply have a client viewing images on a tablet as you’re taking them, inside or out.
Like the Lumix ZS30 / TZ40 and G6 before it, I was very fond of the Wifi capabilities of the Lumix LF1. I enjoyed browsing through a day’s shoot on the larger screen of a tablet and once connected it was a doddle to select original images to copy over for closer examination or sharing. The remote control facility was also fun and genuinely useful, although the range could vary significantly depending on surroundings and interference.
The only thing that could have been better was uploading direct from the camera to online services, but to be honest the more I test connected cameras, the more I think this is a red herring and that the actual getting online part is best left to your phone, tablet or computer. Beyond remote control or backup, the job of a Wifi camera should simply be to get your photos onto the sharing device as quickly and easily as possible, and in that respect the LF1 works very well. Indeed if you have a device with NFC it becomes much easier still and once you’ve used it to establish a connection you’ll never want to search for a Wifi network or enter security passwords ever again. It really gives the LF1 a compelling edge over rivals. When I bought my Galaxy S3 and NEXUS 7 in 2012, NFC was a feature I didn’t give a second thought to, but now it’s become a must-have and I really hope Apple equip the next generation of iOS devices with it. At least Panasonic, Samsung and now Sony are really driving it forward and we can look forward to many more NFC-equipped devices this year.
My only bugbear with the NFC implementation on the Lumix LF1 is that it’s not quite a single step process. In my tests I always needed to launch the Lumix Image app on my phone or tablet before holding it against the camera. If I tapped before launching the app, the phone or tablet would attempt to connect to a Panasonic website instead with information about the app. Maybe I’m being lazy but I’d like the NFC negotiation to automatically launch the required app on my device. I’m sure it’s just an association which needs to be set, and to be fair it may have also been the fault of an early NFC implementation on my test camera or the app software, but it’s just so tantalizingly close to being a single-step operation.
If Panasonic manage to fix this and also let us adjust the alarmingly loud Ta-da! sound, then I’ll be delighted. As it stands though I’m still very happy and as the owner of several NFC-equipped devices it would certainly drive me towards the LF1 and away from rival models.
Note I briefly tried the LF1 with the Lumix app on the iPad. At the time of writing, this didn’t appear to fully support the LF1, so in remote control mode only offered live view, power zooming and remote shutter with none of the exposure controls. I tried copying images across, but the iPad reported they weren’t compatible. The playback worked fine though and location logging was also present, although obviously it would require a device with an actual GPS receiver to work properly. I did however try all this before the LF1 was broadly on sale, so hopefully the iPad version will receive an update soon and I’ll report back as soon as there’s any news.
Panasonic Lumix LF1 GPS
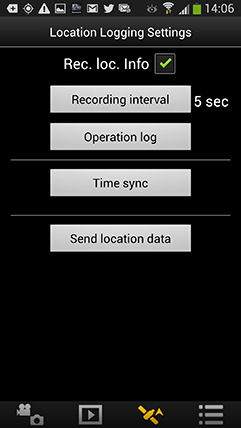 |
There’s no GPS built-into the Lumix LF1, but the Lumix Image app can be set up to record a GPS log with your phone that can later be synced with the camera in the same way as the Lumix G6. There’s several steps to this process. First you’ll need to start the Lumix Image app then connect the camera to your phone using Wifi. Next you should select the satellite icon and then click the button for Time Sync which ensures your camera and phone agree on the current time. The third step is to tick the box labeled ‘Rec Loc Info’, after which the phone will record its current position at pre-determined intervals, the default being every five seconds.
Now you can merrily snap away with the LF1, safe in the knowledge that your phone should be recording your current position in preparation for a synchronization at a later point. The camera and phone don’t need to be in Wifi contact while you’re taking photos, only during the initial time sync and final data transfer. The only thing you need to remember is to take the phone with you and try to ensure it has a relatively clear view of the sky for successful GPS acquisition.
As with my Wifi tests earlier, I used my Samsung Galaxy S4 to try out the GPS syncing process. At first I kept the phone in the top of my backpack to maximize a clear view of the sky, but later became lazier and simply popped it in the pocket of my jeans. At first I was concerned the five second recording interval would hammer my phone’s battery life, but it didn’t seem to have a significant impact. Put it this way I could happily leave the logging running all day while also performing a number of camera, Wifi and internet tasks on a single charge.
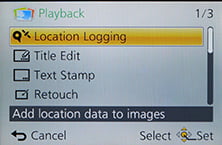
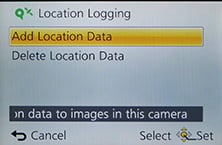
At some point you’ll need to transfer the location data recorded by your phone into the LF1, and this process again starts by connecting the camera to Lumix Image app running on the phone. Then from the satellite section, choose to ‘Send Location Data’, which normally takes a few seconds. This seems satisfyingly quick and simple, but the transfer is only one half of the process. The second is to have the camera actually apply the data to your images. To do this choose Location Logging from the LF1’s Playback menu, then select ‘Add Location Data’. You’ll then be presented with a list of date ranges for the periods where location data is available.
Actually applying this data to images can however be quite time-consuming. It can take a few minutes to append a day’s worth of shots, during which time the camera gives no indication of how far through the process you are; indeed the LF1’s screen powered-off on me a couple of times. But the process always completed successfully and my images were subsequently tagged with location details.
 |
 |
 |
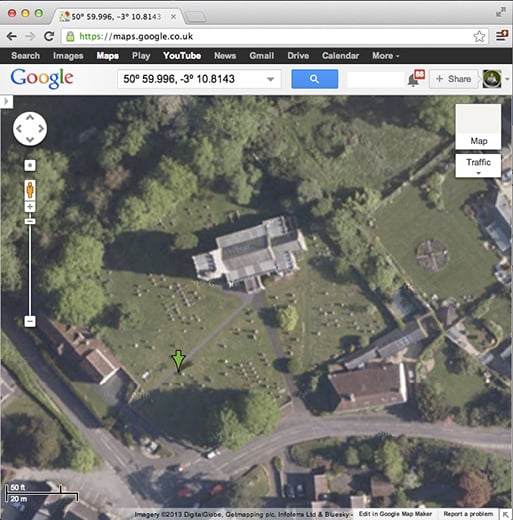
Out of curiousity I entered the co-ordinates of several images into Google maps and was impressed to find some were extremely accurate – indeed the one corresponding to my main resolution test was literally bang-on. From the screenshot below you can see my position on a path leading to the church used as my subject, and you can see the actual photo alongside. I’d say this was within a meter of my actual shooting position.
 |
 | |
However the example above was a best-case scenario where my phone had a clear view of the sky from the top of my backpack. When I more commonly carried my phone in my pocket, the accuracy was generally reduced by at least 20m – sufficiently accurate for an approximate location, but not as precise as it could be.
And this is the big problem when you’re using a separate device to gather the location data. For the best results you have to make sure it’s got a clear view of the sky while you’re taking the photos, and since we’re talking about your phone, it’s more likely to be stuffed into a pocket or a bag. Obviously you also have to make sure you have it with you while you’re shooting. If only there was a device which was always with you and out in the open when you’re taking photos – oh hang on, there is, it’s called your camera.
Ultimately the process also isn’t that much different to making a log with a standard GPS device and syncing the data with your images once they’re on your computer using tagging software. The only benefits the LF1 has over this traditional process is being able to sync the GPS and camera using Wifi, transfer the data wirelessly and then tag the images within the camera itself, so there’s no computer or additional software involved. While this sounds more convenient, the process remains quite involved and I can’t help but wish Panasonic had simply built a GPS receiver directly into the Lumix LF1 as it had with its Lumix ZS30 / TZ40 super-zoom. It’s so much easier if the camera just handles it all itself and you only have to choose if the GPS is on or off. It would have also made this section of the review simpler: I’d have just written ‘if you enable the GPS option, it’ll record your position on images’. What’s not to like about that?
Panasonic
Lumix LF1 focusing and face detection
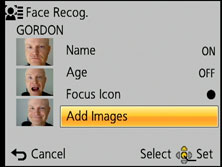
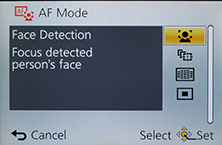
The Lumix LF1 is equipped with the same four main AF modes as the LX7 which can be manually selected in the PASM modes, or left to the camera to choose from in auto. First is Face Detection, which can detect and track human faces. This works alongside Face Recognition, which can memorise up to six people (using one to three poses) along with their names and birthdays if desired. Once registered, these faces can have focusing priority over ‘strangers’, and it’s also fun to see their name popup under the tracking frame. If the subject’s age is less than three years old, the camera will also automatically switch to its Baby scene preset in auto modes. You can see an example of it working in practice below on the earlier TZ30 / ZS20 – obviously the LF1 doesn’t have GPS or touch-controls.
 |
 |
 |
In practice it really works too, and is fairly tolerant of accessories like hats, although sunglasses can fool the system.
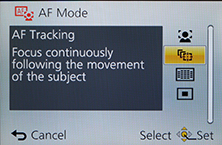
The second AF mode is AF Tracking, which is essentially like face detection for non-human subjects. This allows you to place a target over a subject, after which the LF1 will track it across the frame and adjust its focus as required.
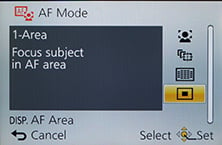
Next up comes the standard 23-area AF system, which the LF1 defaults to in the absence of recognisable faces in the auto modes. The fourth AF mode is single-area, which as its name suggests, just uses one area for quicker response. If you press the Disp button after selecting the single area mode, the LF1 allows you to move the AF frame around the screen using the cross keys and or adjust it to one of four sizes from large to tiny.
 |
 |
 |
What you can’t do though is simply tap to move the AF area becuase the LF1 does not feature a touch-screen. To be fair in this respect it’s no different from the LX7 before it, but that doesn’t stop me wishing Panasonic had fitted one. As I’ve mentioned elsewhere in the review I’m also more than a little surprised by its absence here given Panasonic’s fondness of the technology.
In terms of speed, I shot with the LF1 alongside the earlier LX7 and in general use I’d say their focusing speeds were very similar. Set to their standard focusing ranges, both cameras can lock onto subjects of sufficient contrast almost instantly. Switching to their AF Macro modes which extend the focusing range also extended the AF time on both models to roughly half a second to one second depending on distance, but it was still swift. Indeed I often forgot I had the extended range enabled at some times and still found the AF speed acceptable for distant subjects. The camera also has a decent stab at continuous auto-focusing while filming movies and you can see some examples lower on this page.
Panasonic Lumix LF1 movie mode
The Lumix LF1 is equipped with Full HD movie capabilities, but lacks the manual exposure, 1080p and high speed video options of the earlier LX7; indeed the LF1’s movie capabilities feel closer to, say the Lumix TZ35 / ZS25. As such the LF1 can record 1080i video at 50i or 60i depending on region at a rate of 17Mbit/s.
 |
 |
 |
Audio is recorded in stereo using built-in microphones, and you can also zoom the lens while filming. You can start filming in any mode by simply pressing the red record button and you can also capture still photos while filming, at a resolution of 9, 6 or 2 Megapixels in a cropped 16:9 format to match the video frame. In my tests the LF1 could capture up to 15 still frames at the highest 9 Megapixel resolution while simultaneously capturing video.
While you can start recording in, say, Aperture Priority or Manual, don’t get too excited as exposures are fully automatic once you start filming. The only exception is when filming in the Intelligent Auto mode, where the LF1 can choose from one of four scenes: portrait, landscape, macro and low light. Like earlier models, stabilisation is always active, even if you’ve disabled it for still photos. This is one of the major differences compared to the LX7 which offers a separate Manual Movie mode, allowing you to choose PASM exposure modes and their subsequent adjustments. You have to ask why Panasonic didn’t equip the LF1 with manual exposure modes, given it’s clearly a compact aimed at enthusiasts who’d appeciate such things – is it simply to differentiate it from the LX7?
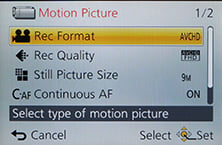
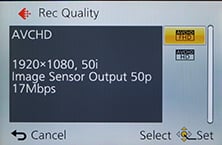
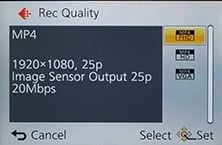
Moving on, Panasonic continues to offer the choice of two encoding formats, AVCHD or MP4, with Panasonic recommending the former for the best quality results or playback on HDTVs, and the latter for extensive editing or uploading.
The AVCHD mode can record video in either 1080i or 720p, both at a rate of 17Mbit/s. 1080 footage is recorded at 50i or 60i depending on region, while 720p footage is recorded at 50p or 60p depending on region. Using the best quality 1080i AVCHD mode, you’re looking at about 120Mbytes per minute of footage.
The MP4 mode can record video in Full HD 1080p, 720p or standard definition VGA, at rates of 20, 10 and 4 Mbit/s respectively. All three modes are encoded using progressive video at 25p or 30p depending on region. Panasonic quotes both the AVCHD and MP4 modes as being restricted to clips with a maximum length of 29 minutes and 59 seconds. It also recommends using an SD card rated at Class 4 or faster for recording movies.
So once again compared to the LX7, the Lumix LF1 lacks its best quality 1080p modes at 50/60p, manual exposure modes and high speed filming options; in this respect it’s not dissimilar to, say, the Lumix TZ35 / ZS25, only with stereo rather than mono mics. It’s however revealing to note even the TZ40 / ZS30 sports 1080p video and High Speed options, so it’s a shame the LF1 hs stepped back to a lesser specification for its movies. Here’s a number of samples showing it in action.
| |
|---|---|
| |
| |
| |
|---|---|
| |
| |
| |
|---|---|
| |
| |
| |
|---|---|
| |
| |
| |
|---|---|
| |
| |
Panasonic Lumix LF1 drive modes
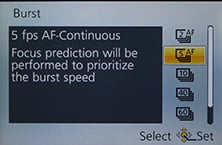
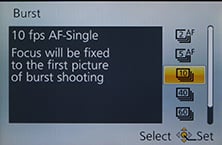
The Lumix LF1 is equipped with virtually the same array of continuous shooting options as the earlier LX7 and indeed the super-zoom TZ40 / ZS30. The only aspect where they slightly differ is their top speeds at their maximum resolutions.
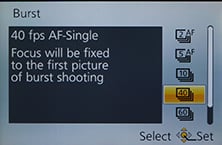
So the LF1 offers 2, 5 or 10fps at the full 12 Megapixel resolution, but the focus and exposure are locked from the first frame if shooting at the top speed. The LX7 squeezes-out 11fps at its top resolution, but then it’s recording 2 Megapixels less per frame. All three cameras also offer one second burst modes at 40fps and 60fps, but at a reduced resolution of 5 and 2.5 Megapixels respectively.
 |
 |
 |
To put the various modes to the test I fitted the LF1 with a freshly-formatted 16GB SanDisk Extreme Pro UHS-1 card and started timing various modes. With the camera set to 5fps I fired-off 38 Fine JPEGs in 7.2 seconds, corresponding to a speed of 5.28fps; after 38 frames, the camera stalled and shot erratically. Switching to RAW in the 5fps mode, I fired-off eight shots in 1.49 seconds, for a speed of 5.37fps.
Next I tried the 10fps mode, again first with Fine JPEG quality, firing-off 12 shots in 1.12 seconds for a rate of 10.7fps. Switching to RAW let me capture ten shots in 0.91 seconds for a speed of 10.9fps. Both bursts took several seconds to write to the card, especially the RAW version, but after a couple of seconds the camera was happy to start shooting again in shorter bursts.
I then set the LF1 to 40fps, which forces the quality to 5 megapixel JPEGs only. This took exactly 40 frames in 0.95 seconds, for a speed of 42fps. Finally I tried the 60fps mode which further reduces the resolution to 2.5 Megapixels and captured exactly 60 frames in just under a second for a speed of 63.2fps.
So in each case, the LF1 slightly exceeded the quoted speeds. Incidentally so did the earlier LX7 in our tests, capturing 12 JPEGs in exactly one second for a speed of 12fps. I should also add the number of frames the LF1 could capture was useful too, with 12 JPEGs at 10fps or 38 at 5fps. Even the RAW rate of ten frames at 10fps was pretty respectable. Ultimately the choice of speeds and resolutions gives you great flexibility to select the rate that best suits your particular subject and it’s refreshing to find higher-end Lumix compacts so usable in this regard compared to many rival manufacturers.
These all add up to an impressive array of options at your disposal and I couldn’t wait to try them out in the field – or rather, at the Seaside to see if I could capture decent images of seagulls taking off. I tried each of the continuous shooting modes with the birds and found the 10fps mode could deliver some good results. Here’s half of a burst of 12 images taken in that mode to illustrate the performance in practice.
| Panasonic Lumix LF1 Continuous shooting at 10fps | ||||
 |
 |
 | ||
 |
 |
 | ||
Finally in terms of self-timer, the LF1 offers the usual 2 or 10 second modes without any frills. Canon’s recent compacts out-gadget these facilities with customisable self-timer and face timer modes, the latter cleverly exploiting face detection to wait for a new person to enter the frame, smile or wink before starting the countdown.
Panasonic Lumix LF1 sensor
Panasonic has equipped the Lumix LF1 with a new 12 Megapixel sensor which measures 1/1.7in – that’s the same effective size as the LX7’s sensor, but with two more Megapixels squeezed in there. The 1/1.7in sensor size is a little larger than the 1/2.3in size commonly employed by average point-and-shoot cameras, potentially giving models like the LF1 and LX7 a small advantage when it comes to noise levels and dynamic range. To actually see the difference between these sensor sizes in practice, I compared the LF1 and LX7 against Panasonic’s TZ35 / ZS25 in my results pages.
| Sensor sizes compared, Lumix LF1 (and LX7) indicated in red |
 |
While the LF1 and LX7’s sensor may be the same size as the one in Canon’s S110 and G15, they all fall below the 1in sensor employed by Sony’s Cyber-shot RX100 (Mark I and II), and you can see the physical difference in my chart above.
In terms of image sizes, the LF1 delivers 4:3 shaped photos with a maximum of 4000×3000 pixels which can be reproduced at 13.3x10in at 300dpi – or about an inch more in each direction than the 10 Megapixel LX7. Don’t assume more pixels means more actual real-life detail though, as you’ll see when I compare the LF1 against the LX7 in my results.
The LF1 also offers a wealth of alternative image resolutions and sizes. You can shoot in the full 12 Megapixels, or at 8, 5, 3 or 0.3 Megapixels in the 4:3 aspect ratio, or switch to 3:2, 16:9 or 1:1 cropped shapes instead, each with reduced resolutions. There’s also the choice of two JPEG compression levels, Fine or Standard, along with the option to record the data as a RAW file, either by itself or accompanied by a fine or standard JPEG.
Note the sensor in the earlier LX7 actually had a border of extra pixels around the edges, allowing it to (mostly) maintain the field-of-view when switching between different apsect ratios, along with not losing too much resolution in the process. For example, switching the LF1 to the 16:9 aspect ratio crops the images to 4000×2248 pixels, compared to the LX7 which records 16:9 at 3968 x 2232, making them virtually the same in this respect. So you’ll only see the maximum benefit of the LF1’s extra two Megapixels over the LX7 when shooting in 4:3. If you shoot at 3:2 and especially 16:9, the LX7’s multi-aspect sensor actually delivers images of almost the same size.
 |
 |
 |
I always take my shots in the best quality mode, which on the LF1 was with it set to 12 Megapixels / 4:3 / Fine compression, and most of the files worked out around 4.9Mb in size. Panasonic includes 87MB of internal memory to get you started, but you’ll obviously be wanting to fit an SD card sooner rather than later.
In terms of sensitivity, the LF1 offers a range of 80-12800 ISO at the full resolution, giving it an ‘advantage’ over the LX7 which reduced its resolution at 12800 ISO. But as you’ll see in my results, neither look great at this point. Thankfully though, things look much better at lower ISOs.
To see how the quality of the measures-up in practice, take a look at my LF1 quality and LF1 noise results pages, browse my LF1 sample images, or skip to the chase and head straight for my verdict.


