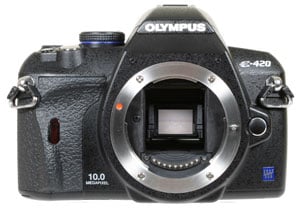
Olympus E-420
-
-
Written by Gordon Laing
Olympus E-420 lenses
The Olympus E-420 employs a Four Thirds lens mount and is compatible with the complete range of Four Thirds lenses which includes models from Olympus, Sigma and Panasonic / Leica. All these lenses are designed from the ground-up for DSLR use and many offer superb quality.
 |
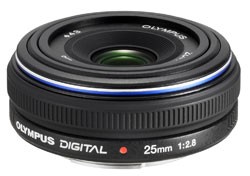
Like other Four Thirds DSLRs, the E-420’s sensor size effectively reduces the lens field of view by two times, so the optional 14-42mm kit zoom delivers an equivalent of 28-84mm, while the 25mm pancake becomes a standard 50mm.
Due to its tiny dimensions, the 25mm pancake lens is likely to be a very popular choice for anyone buying the E-420 – indeed it’s already become a must-have for owners of existing Olympus DSLRs. At first there’s some concern over its flexibility compared to a typical 3x kit zoom, but before long you really become used to its fixed coverage, exploring the subject rather than standing still and zooming in and out.
 |
It’s also wider than you may first assume. In order to match the vertical field of view in our tests, we had to zoom the Canon 450D / XSi’s kit lens to 28mm, giving an equivalent focal length of 45mm. The difference here is of course down to the different aspect ratios, but the bottom line is you can still squeeze in a reasonable landscape shot with the 25mm pancake, while also being able to take a decent portrait with a small depth of field. Indeed our Gallery page proves we were able to capture almost exactly the same compositions as a normal 14-42mm zoom by simply moving closer or further away.
At f2.8, it’s also brighter than any kit lens, typically by one stop at the same focal length, and by two stops when most kit lenses are zoomed-in. This gives a useful advantage in low light, making the lack of Image Stabilisation less of an issue, while also allowing a smaller depth of field.
The optical quality is also pretty good – sharp across the frame and into the corners, unlike most kit zooms. Indeed we took matching landscape shots at f8 with the high-end Zuiko Digital 12-60mm at 25mm, and the only thing to tell them apart was a very small amount of coloured fringing in the corners of the pancake lens which was absent on the zoom. Beyond this, both samples were essentially the same.
As you can probably gather by now, we very much enjoyed using the 25mm pancake lens and would recommend it to anyone buying the E-420, especially if size and weight were an issue. As you can see in the photos on the Design page, the E-420 with this lens is tiny compared to most DSLR kits, and this in turn means it’ll rarely be left at home. To find out more about this lens, see our Olympus Zuiko Digital 25mm pancake review.
In this part of our reviews we normally talk about image stabilisation, but as most will know by now, the E-420 doesn’t offer any. Unlike the E-510 / E-520 or the flagship E-3, it isn’t built-into the body, which means you’re relying on a lens with optical stabilisation. Sadly these are few and far between for the Four Thirds standard, which means most E-420’s will be non-stabilised systems.
This is the major downside to the E-420, but is the price you pay for its compact dimensions. Whether it’s a deal-breaker or not is entirely personal, and while IS can be very useful, it’s worth remembering we all lived without it not so long ago. Optically brighter lenses like the 25mm f2.8 also ensure shutter speeds can be at least a stop quicker than typical kit zooms, which also helps prevent camera-shake. Ultimately though it’s a choice only you can make. The E-510 / E-520 offer it built-in, but are physically larger and heavier cameras.
Olympus E-420 focusing
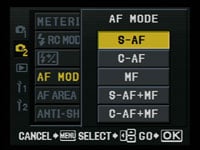
Like its predecessor, the E-420 employs a fairly basic 3-point auto-focus system when using the optical viewfinder. This makes it considerably less sophisticated than the 9-point AF systems of rivals like the Canon EOS 400D / XTi and Sony Alpha A200 / A300 / A350. That said, like the 3-point system of the Nikon D40(x) and D60, the E-420’s auto-focus is fine for general use and we rarely experienced a time when it didn’t snap onto the desired subject.
 |
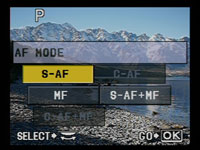 |
The new Imager AF contrast-based option in Live View allows the E-420 to enjoy an extended 11-point system, which along with face detection can certainly help lock onto subjects beyond the main three-point system. But since the Imager AF mode is fairly slow at focusing and continuous AF is unavailable in Live View, its increased number of focus points isn’t really going to help in an action situation. The bottom line is if you’re shooting a moving subject which could go anywhere in the frame, there are better cameras to use.
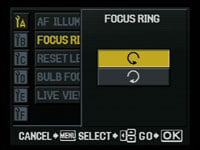
Most Four Thirds lenses including the kit zooms and 25mm pancake (but excluding the 12-60mm), employ motor-assisted manual focusing which can feel a little odd if you’re used to traditional mechanical systems. It also has quirks like not being adjustable unless the camera’s switched on, not to mention resetting itself to infinity when the power’s switched off (this last option can be disabled if you prefer though). It does however allow the E-420 to sport one of the more unusual features on a DSLR: the ability to reverse the direction of the focusing ring.
 |
If manual focusing’s very important to you, we’d advise trying out a Four Thirds body first before buying as you may not get on with the implementation. That said, it’s perfectly possible to manually focus easily and fairly accurately with the E-420’s optical viewfinder, while the magnified option in Live View allows you to get it absolutely spot-on.
For more details on the E-420’s auto-focusing options in Live View, see the Live View section in our Design page.
Olympus E-420 metering and exposures
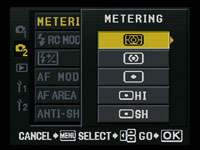
The Olympus E-420 offers five metering modes: 49-zone Digital ESP, Center-weighted, and the choice of three spot-metering options. Along with normal spot-metering, the additional Hi Spot and SH (Shadow) Spot modes are designed for scenes dominated by large areas of light and dark respectively; these modes then deliberately over and under-expose respectively to compensate.
 |
 |
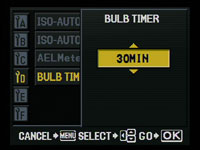 |
The E-420 offers shutter speeds from 1/4000 to 60 seconds plus a Bulb option that’s adjustable up to 30 minutes. Exposure compensation is also available in a wide range of +/-5EV, although beyond +/-3EV, it’s expressed numerically.
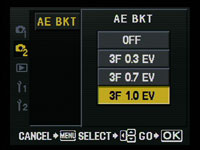
Exposure bracketing is available but fairly basic with three frames up to 1EV apart – so while it’s fine for getting the right exposure, it’s not sufficiently flexible for automated HDR work.
Olympus E-420 anti dust
In a DSLR market where anti-dust facilities are becoming the norm, it’s important to remember Olympus was the first to truly address the problem. So the E-420 becomes the latest Olympus DSLR to employ the SuperSonic Wave Filter (SSWF). This vibrates a filter in front of the sensor in an attempt to shake-free any foreign particles and has proven more effective than rivals.
 |
 |
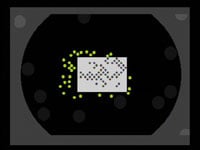
Dust reduction takes place every time the camera powers-up and when entering and exiting Live View or activating the pixel mapping function – the process is indicated by a brief flicker of the SSWF light to the side of the mode dial. The animation screengrabs shown to the left only appear if there’s no card present in the camera.
Following our usual DSLR torture-test we left the E-420 face-up without a lens, inside and outside for ten minutes each; we can’t know how much dust entered the body during this time, nor even how much was present to start with, but we know such a process would result in dust being a problem for most models.
We then activated the SSWF by powering the camera on and off twice, before taking a series of photos at every aperture setting of a plain white surface at close range with the Zuiko Digital 25mm manually focused to infinity. Dust marks normally become most apparent at the smallest apertures (eg f16 and f22), but it’s also important to test at more common apertures.
Olympus E-420 dust example at f22 / f22 with auto-levels | ||
 |  | |
100% crop, 25mm, f22 |
100% crop, 25mm, f22, auto-levels | |
At f22, absolutely no dust marks were visible on our E-420 image. So to reveal anything that was too faint to see normally we applied Photoshop’s Auto Levels and found three very minor examples, one of which we’ve cropped at 100% above right. We then cropped the exact same area on the normal image which you can see above left. Feel free to download this image onto your own computer to apply the Levels and see for yourself that it really is the same area.
We can’t know how many dust particles entered our E-420 body while the lens was removed, nor how many were shaken free by the SSWF, but one thing’s for certain: none were visible on the f22 sample without applying an extreme Levels command. Since none were apparent on the f22 sample, there certainly weren’t any visible on those at larger apertures.
This is a return to form for the SSWF which while impressive on the E-3, wasn’t quite as good as we’d seen before. Once again, the final result may be as much to do with the distance between the filter and sensor as it is with the effectiveness of the filter itself, but either way, dust was not an issue at all for our E-420, and that makes it pretty unique in the current DSLR market.
Olympus E-420 sensor and processing
The Olympus E-420 is equipped with a 10.1 Megapixel Live MOS sensor which conforms to the Four Thirds standard and therefore measures 17.3x13mm. It generates 4:3 aspect ratio images which are narrower than the traditional 3:2 aspect ratio of other DSLRs. The size and resolution may be the same as its predecessor, but Olympus describes the E-420’s sensor as a new chip which boasts improved dynamic range that’s closer to that of the E-3.
 |
 |
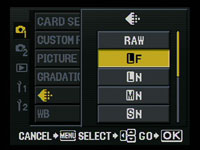
The maximum resolution remains 3648×2736 pixels and there’s the choice of no fewer than six lower resolutions. Like the E-410, there’s a variety of JPEG compression options, but it’s out with the old descriptions like SHQ, and in with Basic, Normal and Fine. You can also adjust the quality setting used by each description.
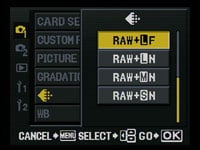
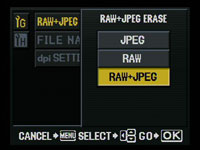
RAW files can be recorded with 12-bits of data either by themselves or accompanied by a JPEG – you can also choose whether the JPEG is Large Fine, Large Normal, Medium Normal or Small Normal. There’s also a custom option which lets you choose whether both the RAW and JPEG files are deleted when you OK the erase button, or just one of them.
 |
Large Fine JPEGs typically measure 4 to 5MB each, while RAW files weigh in between 9 and 11MB each. To see resolution and detail results from the E-420 compared to Canon EOS 400D / XTi and EOS 450D / XSi, check out our results pages.
 |
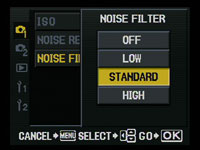 |
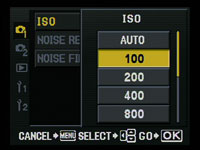
Sensitivity runs between 100 and 1600 ISO in 1EV increments; there’s also an Auto setting and you can set the maximum ISO for the camera to use. The E-420 offers noise reduction on long exposures and like the E-510 and E-3, there’s also four different noise filter settings, Off, Low, Standard and High – we have examples at all the settings in our results pages, where we found reducing the noise filter from the default could deliver preferable results across the sensitivity range.
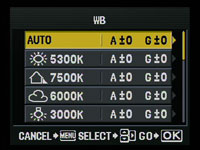 | |
Alongside Auto White Balance and eight presets, there’s a custom mode and the option to dial in an exact colour temperature. You can also fine-tune the white balance in the amber / blue or green / magenta directions, or apply adjustments as part of a three-frame white balance bracketing option. White balance adjustments can also be previewed in Live View.
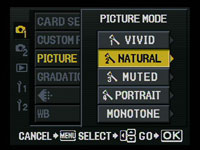
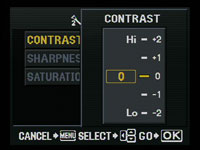
Like the E-3, contrast, sharpness and saturation are applied using a choice of Picture Modes: Vivid, Natural, Muted, Portrait and Monotone. In the colour Picture Modes, contrast, sharpness and saturation can all be adjusted on a scale of -2 to +2. In the Monotone mode you can apply colour effects including a sepia tone, or simulate the use of colour filters including yellow, orange, red and green.
 |
 |
 |
We used the default Natural setting which is more refrained than the Vivid mode and better-suited to subsequent enhancement in software. If you intend to use JPEGs straight from the camera though, the Vivid mode delivers punchier output without going over the top.
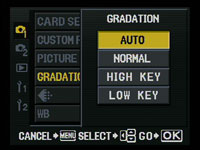
Also following the E-3, the E-420 additionally offers a choice of Graduation options: along with the default Normal there’s High Key and Low Key settings which extend tonal graduations for subjects which are mostly highlighted or in shadow respectively. The Auto Gradation option activates the E-420’s Shadow Adjustment Technology, or SAT for short.
SAT divides the image into regions and adjusts the brightness in each which Olympus describes as being effective for compositions with very bright or dark areas. Note: if you’ve set the left / Function key to enable Face Detection, then the Gradation will also set to Auto, but if you enable Face Detection using the screen controls, it won’t.
To put SAT to the test we took identical photos with and without it in a dark interior with bright light streaming through the windows. This composition normally suffers from clipped shadow and highlight areas, although to capture both we switched from the pancake lens to the Zuiko Digital 12-60mm and zoomed it out.
| Support this site by shopping via these links | ||||
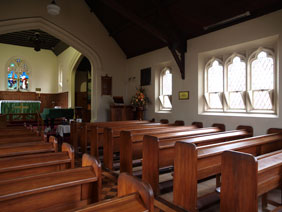 |
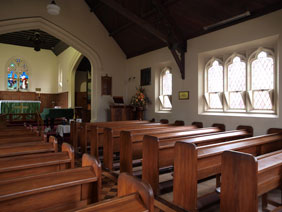
Olympus E-420 Shadow Adjustment Technology (SAT) off / on | ||
 | ||
Olympus E-420, SAT Off, 100 ISO, 1/5, f2.8 |
Olympus E-420, SAT On, 100 ISO, 1/6, f2.8 | |
 |  | |
Olympus E-420, SAT Off, Histogram |
Olympus E-420, SAT On, Histogram | |
The shot without SAT, along with its histogram is shown on the left, while the shot using SAT and its histogram are on the right. The E-420 has used a slightly quicker exposure with SAT to better-protect highlight areas, while artificially boosting shadow areas. The result on the right has certainly boosted the brightness of the dark shadowy areas in the roofing, and although you can’t see it very clearly on the reduced samples above, the stained glass windows are less saturated – although sadly still blown.
The penalty is unsurprisingly greater noise in those shadow areas and even at 100 ISO, the roofing area looks very grainy at 100%. The histograms confirm the highlights are clipping on both samples, and to a lesser extent there’s also clipping on both shadow areas. Note the reduction of the shadow peak on the histogram with SAT enabled and also the boost in mid-tones.
Olympus E-420 drive modes
The Olympus E-420 offers one continuous shooting modes which is slightly faster than its predecessor: 3.5fps versus 3fps on the E-410. Olympus quotes unlimited JPEGs while memory remains or up to eight RAW files. We fitted a Lexar Professional UDMA 300x 4GB card and put the specifications to the test. Note the E-420 doesn’t officially exploit the UDMA transfer aspect like the E-3, but we used it none-the-less as it remains a very quick card.
 |
Set to Continuous, we shot 28 Large Fine JPEGs in eight seconds before the camera slowed slightly; this corresponds to a rate of exactly 3.5fps, and it should be noted the camera could keep on firing beyond this point, but not always at this consistently fast rate. The buffer also cleared almost instantly.
Set to RAW mode, the E-420 captured nine shots in 2.6 seconds before slowing to about 1.5fps. This initial nine shot burst again corresponds to a rate of 3.5fps, and the buffer emptied four seconds after we repeated the test and let go at the nine-frame mark.
It’s good to see Olympus boosting the continuous shooting rate on the E-420 – and crucially, delivering on it in practice. It ranks the E-420 at a similar level to the pricier Canon 450D / XSi, with both models coming-in comfortably faster than the 2.35fps reality of the Sony A350.
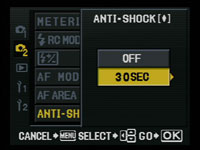 |
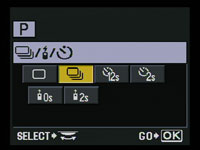
In terms of other drive modes, there’s the choice of a two or 12 second self-timer, and two options for use with the optional RM-1 infra-red remote control, one which fires as you press the button and the other which fires after a two second delay. Impressively you can also adjust the delay of a mirror-lockup between one to 30 seconds.
Finally it is possible to remote control the camera using the Olympus Master software, but unlike Canon’s latest DSLRs, this is an optional extra. Also unlike the Canon 450D / XSi and 40D, you won’t be seeing a live view on your computer monitor.


