Olympus E-420
-
-
Written by Gordon Laing
Olympus E-420 design and controls
By sharing virtually the same body as its predecessor, the Olympus E-420 also shares the honour of being the world’s smallest and lightest DSLR. Certainly by measuring 130x91x53mm and weighing just 421g with battery, it’s surprisingly compact. Seeing a photo of the E-420 by itself just doesn’t do it justice, so we’ve pictured it below alongside the Canon EOS 450D / Rebel XSi. The Canon’s fitted with the EF-S 18-55mm IS kit lens, while the Olympus is fitted with the new 25mm pancake lens, which will undoubtedly be a popular combination.
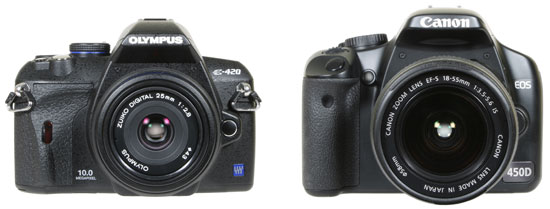 |
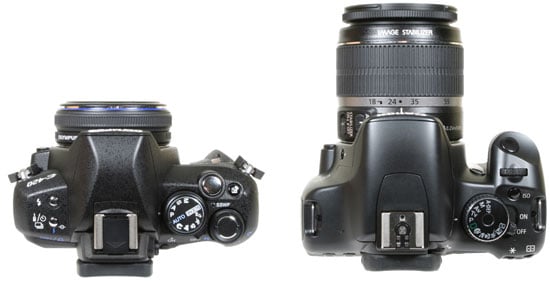
It’s also clear from the photos Olympus has been inspired by classic 35mm film SLRs of the 80s, designing the E-420’s body with a retro style that’s bereft of the large grips you find on modern DSLRs – this is particularly apparent when viewed from above, as are the slim dimensions of the pancake lens. The combination of E-420 and 25mm lens really results in a tiny overall package which will squeeze into small bags or larger coat pockets. It’s the most portable DSLR to date and will certainly tempt those who were considering an enthusiast compact like the Canon G9 or Sigma DP1.
Olympus has slightly enlarged the grip on the E-420 compared to its predecessor, and while there is now more to hold onto, it remains little more than a raised surface on the right side of the body. As we wrote of its predecessors, the combination of reduced dimensions and lack of a conventional apparent grip would normally sound alarm bells in terms of comfort and usability, but there’s thankfully little cause for concern here.
 |
While there’s obviously less to wrap your fingers around, the E-420 can still be held comfortably and securely, and after only a few minutes you forget the absence of a modern grip. This shouldn’t come as too much of a surprise though, as all 35mm film SLRs were built like this for years with little or no complaint.
The lack of a modern grip has also allowed the E-420 to avoid common criticisms levelled at the other small DSLRs: since there’s no grip, there’s no tight area between it and the lens barrel to pinch your fingers.
The funny thing about the E-420, like its predecessors, is just how quickly you become used to this design. Carefully placed rubber surfaces allow you to hold the body comfortably and securely, and at few times do you miss the grip of modern DSLRs. That said, the E-420 can be dwarfed and unbalanced by larger lenses, so if these are a possibility, you should try them on the smaller body before buying. The right strap eyelet also remains in a position which can dig into your right hand a little.
The E-420’s weight and price-point unsurprisingly result in a plastic shell, but its glass-reinforced construction feels solid and very well-built without any creaks or poor joins. In these respects it feels built to a similar standard to Canon’s 400D / XTi, although the slightly textured finish gives the E-420 a less plasticky, and more serious look.
Despite their physical similarities, we believe the E-420 is not compatible with the existing PT-E03 underwater housing of the E-410. Interestingly, this used to be an advantage the E-410 had over the stabilised E-510, but in a strange swap, it’s now the new E-520 which has an optional housing.
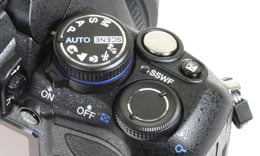 |
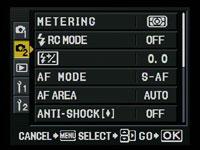
The E-420’s control layout is identical to the earlier E-410, although new blue labelling on the E-420 makes it easier to read for those with colour blindness. The upper right surface is home to the main command dial which offers Auto, Program, Manual, Aperture and Shutter Priority modes, along with direct access to five popular scene presets and a dedicated Scene position which provides access to the full selection of 18 via an on-screen menu, complete with example images and a brief description. Note the Panorama preset which exploits Live View for aligning images will only work if you’re using an Olympus xD memory card.
 | |
 | |
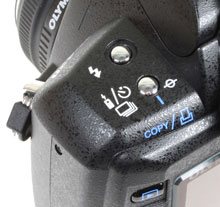
To the right of the main command dial is a single thumb dial, used to adjust the aperture, shutter speed, playback magnification or various menu options, while towards the front of the camera lie the shutter release and exposure compensation buttons. The upper left side is home to just two buttons controlling the drive mode and flash options.
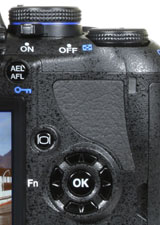 |
Round the back there’s four buttons to the left side of the screen for image playback, image delete, accessing the main menu and switching the on-screen information. To the right of the screen are a traditional four button layout with an OK button in the middle for navigating and confirming options, along with an AEL / AFL button by the viewfinder and another which activates the Live View feature.
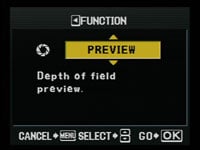
The E-420 uses its left arrow button as a programmable function key, and can be set in the custom menu to offer one-touch white balance, shoot a test photo without saving, activate the new face detection (see Features page), or the choice of depth-of-field previews using the optical viewfinder or the Live View facility.
Interestingly, while there’s essentially the same number of buttons on the back as rival DSLRs, none are labelled as offering direct access to popular settings such as the ISO, White Balance, Metering or AF modes. At first this seems like a terrible omission, but like its predecessor, the new E-420 employs a surprisingly quick and easy means to adjust a huge variety of options which we’ll fully describe below and demonstrate in our video tour. Indeed, far from being a compromise it works very well in practice.
Olympus E-420 flash
 |
 |
Pressing the flash button once pops up the built-in flash and pressing it again presents a wide variety of options including Auto, redeye, always on, forced off, slow sync with or without redeye, slow sync with rear curtain, and four different power options. The main menu additionally offers flash compensation settings (+/-3 EV) and you can also set a custom option which prevents the flash from popping-up automatically if preferred.
New to the E-420 is wireless flash control when used with the FL-50R and FL-36R flashguns; the built-in flash is used as a controller. This is an impressive feature to find on a camera of the E-420’s class and is inherited from the E-3. Flash exposure settings can be assigned to multiple units in three different groups and includes auto, manual, TTL and Super FP control; the latter is designed for use with the FL-50R and FL-36R and allows sync speeds up to 1/4000. The normal flash sync speed is 1/180.
Olympus E-420 viewfinder
|
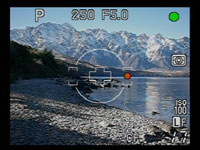
The Olympus E-420’s viewfinder is identical to that on the E-410. It shares the same Penta-mirror system to deliver 95% coverage and 0.92x magnification with a 50mm lens set to infinity. Unlike most DSLRs which have their shooting information running along the bottom, the E-420, like all Four Thirds DSLRs other than the E-3, has its information to the right side of the frame.
 |
You’ll see the aperture, shutter, exposure mode, metering mode, exposure compensation (expressed numerically up to +/-5EV), and a battery icon. You won’t find the ISO displayed in the viewfinder, but it is at least shown on the main screen at all times.
Like its predecessor, the actual viewfinder on the E-420 appears smaller than other DSLRs. Typically it looks around the same height as models like Canon’s EOD 400D / XTi, but with narrower to match the squarer 4:3 aspect ratio of the images. This makes it noticeably smaller than the viewfinders on models like the Nikon D80 and the Canon EOS 450D / XSi.
This is a downside to the E-420, although if you don’t have another DSLR alongside, you can get used to it pretty quickly; it should also be noted the viewfinders of Sony’s A300 and A350 aren’t exactly large either. Ultimately the size of the viewfinder image is a very personal thing, so we’d recommend trying the E-420 for yourself and seeing if it’s a deal-breaker, or something you could happily live with.
Olympus E-420 Screen and Live View
The Olympus E-420 is equipped with a new 2.7in screen with 230k pixels. This is one of the main external differences between it and its predecessor, but there’s more than just 0.2in over the E-410. The E-420’s screen also boasts increased contrast, a broader colour gamut and a wider viewing angle of 170 degrees. You can adjust the screen brightness and colour temperature, although the latter will only impact images viewed in playback.
 |
In use the screen is certainly bright and vibrant, but making it equally useful are reflective properties after the backlight has switched off. This makes the various on-screen settings very easy to view during intense, direct sunlight. An annoying aspect inherited from the E-410 and E-400 though is the lack of proximity sensors which automatically switch the screen off when you look through the viewfinder. To be fair it does switch off when you half-press the shutter, but we’d ultimately prefer a sensor-based approach like most of its rivals.
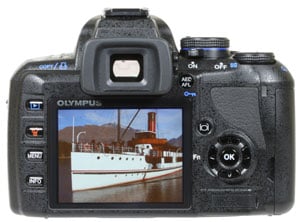
Like its predecessor, the E-420 offers Live View facilities which employ the main sensor to deliver the feed. Like other systems which use the same strategy, this may incur delays, but has the benefit of previewing exactly what you’re going to capture.
To activate Live View on the E-420, you’ll need to press the monitor button on the back of the camera. The mirror will then flip up and just over a second later the live image will appear on the screen; the view shown represents 100% of the frame and while the refresh may not be quite as fluid as the best compacts, it’s certainly pretty smooth.
The earlier E-410 only offered one autofocus option in Live View: you’d press the AEL / AFL button to drop the mirror, take an AF reading, before flipping it back up again to continue composing. This interrupted the view and made some noise.
The E-420 also offers this option when Live View AF is set to ‘Sensor AF’ in a custom menu, and like the E-3, the view is temporarily frozen rather than going dark for a moment. If the subject’s still, you may not even notice. New to the E-420 though are two additional AF options: ‘Imager AF’ and ‘Hybrid AF’.
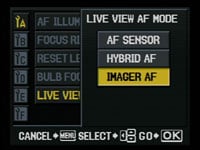 |
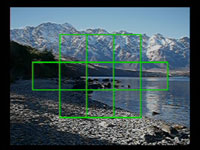
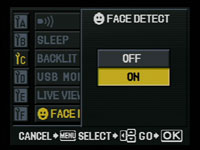
Imager AF is the contrast-based option that’s a headline feature on the E-420. It allows the camera to autofocus in Live View without dropping the mirror or interrupting the view. It also allows the E-420 to extend its relatively basic 3-point AF system to one with 11 points while additionally supporting face detection. If face detection is enabled and the E-420 spots a human subject, their face will be framed by a white box which tracks them across the frame.
 |
 |
Imager AF is the default setting on the E-420 and will certainly make anyone coming from a point and shoot feel at home. While you can still autofocus by pressing the AEL / AFL button on the back of the camera, you can alternatively half-press the shutter release as you would outside of Live View. In practice this feels very natural and while the process is slightly slower than the ‘Sensor AF’ option, the lack of interruption or noise while focusing will be preferable for most.
Imager AF will however only work with lenses which support the feature, and at the time of writing, there were only three from Olympus: the 14-42mm and 45-150mm kit lenses and the new 25mm pancake model. To be fair though, these will be the most common lenses used with the E-420.
 |
Other lenses fall back on either the traditional Sensor AF system or the new Hybrid AF option which uses a combination of the other two modes. Hybrid AF roughly but quietly focuses using the contrast method when you half-press the shutter, but unlike the Imager AF mode, then takes a reading from the traditional AF sensor when you fully press the button to take the picture.
Both the Imager AF and Hybrid AF result in several mirror flaps as you take the photo, but the Hybrid mode is slightly slower. You can see a demonstration of all three Live View modes in our video tour.
 |
 |
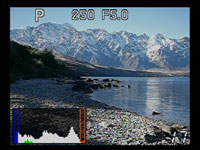 |
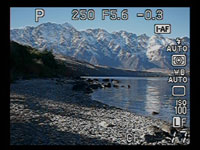
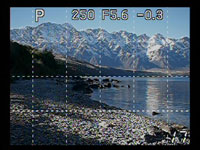
Pressing the Info button during Live View cycles between a clean view, one with a choice of alignment graphics, one with detailed shooting information, followed by a live brightness histogram, the Enlarged display option and finally the Perfect Shot Preview.
 |
 |
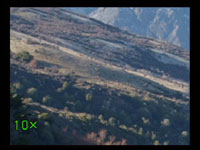 |
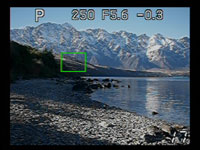
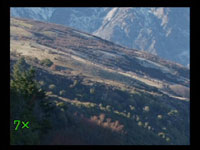
Enlarged display presents a small green frame on the screen which can be moved around using the cross keys. Then when it’s over a point of interest, press OK and turn the thumb dial to switch between 7x and 10x magnification (the 5x option of the E-3 isn’t present). This allows you to carefully check the focus and is especially useful in manual focus mode, although once you’re zoomed-in, the cross-keys are locked from moving the frame around until you fully zoom back out.
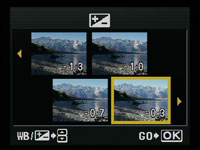
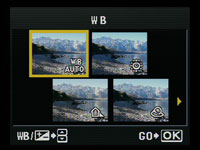
Perfect Shot Preview builds on what was already offered on Olympus compacts by showing four different thumbnail versions of the same composition which are all updated in real time. You can either choose for the thumbnails to show variations in exposure compensation or white balance, and seeing four different options on the screen at once certainly makes it easier to choose the right one.
 |
 |
You can also preview white balance and exposure compensation on the full image in Live View, along with seeing a depth-of-field preview. The E-420 will increase the gain as required to maintain the image brightness during the depth-of-field preview, which under darker conditions can result in a monochrome and slightly grainy image, but the final result of course looks fine.
So with 100% coverage, live histogram, a choice of alignment grids, magnified manual focus assistance, previews of white balance, exposure compensation and depth of field, not to mention the choice of contrast-based AF, the E-420 delivers a powerful and comprehensive live view experience. The only thing that’s really missing is a flip-out screen, for which you’ll need to go for the flagship E-3 model.
Olympus E-420 menus
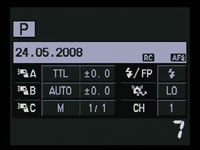
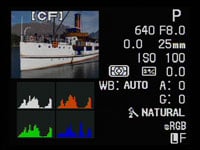
Like its predecessor, the E-420 uses its colour monitor to display shooting information. Gone is the option to scale the fonts for a coarse or detailed view, and instead you just have the latter on the E-420. As such it displays a vast amount of information at a glance – in fact the same as the E-3 with the exception of IS and the addition of face detection.
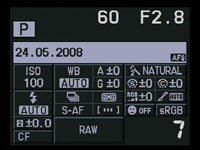 |
You’ll see the Shutter and Aperture value, an exposure compensation scale, the shooting mode, date, flash and NR setting, sensitivity, white balance (plus adjustments), Picture Mode, Sharpness, Contrast, Saturation and Gradation, Colour Space, Face Detection on / off, AF Area, Metering, AF and Drive modes, Flash mode and flash compensation, memory card in use, image size and quality and number of shots remaining. Battery life is shown with a basic two segment icon.
Like its predecessor, the E-420 doesn’t have any buttons dedicated to adjusting any of these beyond the flash and drive mode, but luckily you’re not forced to delve into the menu system just to make any changes.
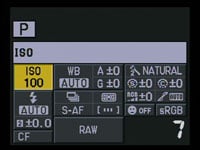 | 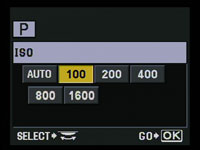 |
With the camera powered-up, press the OK button and the ISO value is highlighted in yellow. You can then turn the thumb-dial to change the setting, or if you prefer, press OK again to enter a dedicated adjustment menu. Alternatively with ISO highlighted, just use the up, down, left and right buttons to highlight any other option, before then using the dial to adjust it, or pressing OK to again view a dedicated menu. In practice it’s quick, intuitive and works really well. We’ve got a demonstration in our E-420 video tour.
 |
 |
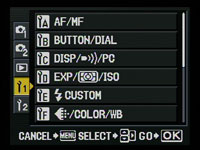 |
Pressing the Menu button presents the E-420’s options arranged into five vertically-tabbed pages: two for recording, one for playback and two for setup. These pages offer alternative access to the dedicated adjustments described above, along with no fewer than 32 custom settings which include setting the Live View AF mode, choosing the maximum exposure in Bulb, configuring the function (left arrow) button, swapping the alignment grid and customising the quality settings.
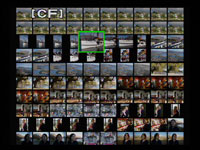 |
During playback, turning the thumb-dial to the right zooms-in on the image, while turning it to the left presents a number of thumbnails, first four, then nine, then 16, 25, 49, and even 100, followed by a fun calendar view of the current month showing a tiny photo thumbnail on the days you took a photo.
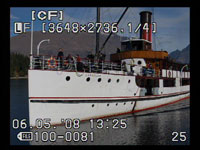
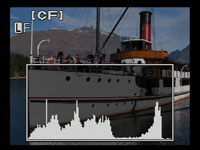
With an image filling the screen in playback, pressing the Info button cycles through RGB and brightness histograms, along with options to flash any clipped highlight or shadow areas. The histograms look a little coarse compared to those on rival models, but it’s still good to have this number of options on an entry-level DSLR.
 |
 |
 |
Turning the camera to a portrait orientation also turns the image by 90 degrees, either clockwise or anti-clockwise. That’s a nice feature to ensure portrait image fill the screen during playback, but it’s a shame the shooting menu doesn’t also rotate as it does on Sony’s Alpha models and the Nikon D60.
Olympus E-420 battery and connectivity
 |
 |
The Olympus E-420 is unsurprisingly powered by the same slim PS-BLS1 1150mAh Lithium Ion battery pack as its predecessor and supplied with a mains recharger. Olympus quotes up to 500 shots, although this will obviously vary depending on how much you use Live View.
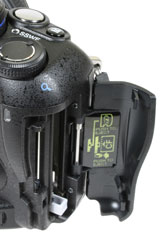
The E-420 can handle both xD and Compact Flash memory cards using two separate slots behind a door on the right side of its body, although sadly you still can’t record to both simultaneously. And finally, behind a small flap on the rear of the E-420 you’ll find a single port delivering both USB and TV connectivity.


