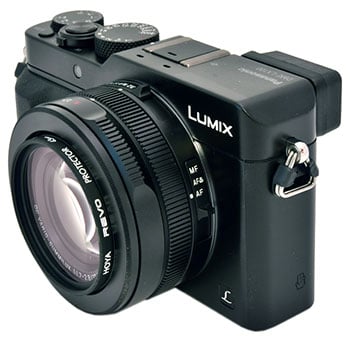
 The Panasonic Lumix LX100 is one of the most powerful compact cameras to date. Forget 1in sensors, Panasonic's squeezed in the larger Four Thirds sensor from the Lumix GX7 along with its big and detailed viewfinder too. Sure the lens specification means only 12 Megapixels of the original 16 are used, but the active area is still larger than a 1in sensor and the spare border allows the camera to cpature at different aspect ratios without cropping. As for the lens, the LX100 sports a 24-75mm zoom with a bright f1.7-2.8 focal ratio and an impressive macro mode than can focus as close as 3cm at wide angle. The AF system is very fast and impressively keeps working at much lower light levels than the competition. And the icing on the cake? The LX100 can film video at 4k resolution and actually lets you grab 8 Megapixel stills from it. The body may be larger than the RX100 III and G7X, and the screen may not tilt or be touch-sensitive, but it's hard to argue with the powerful specification.
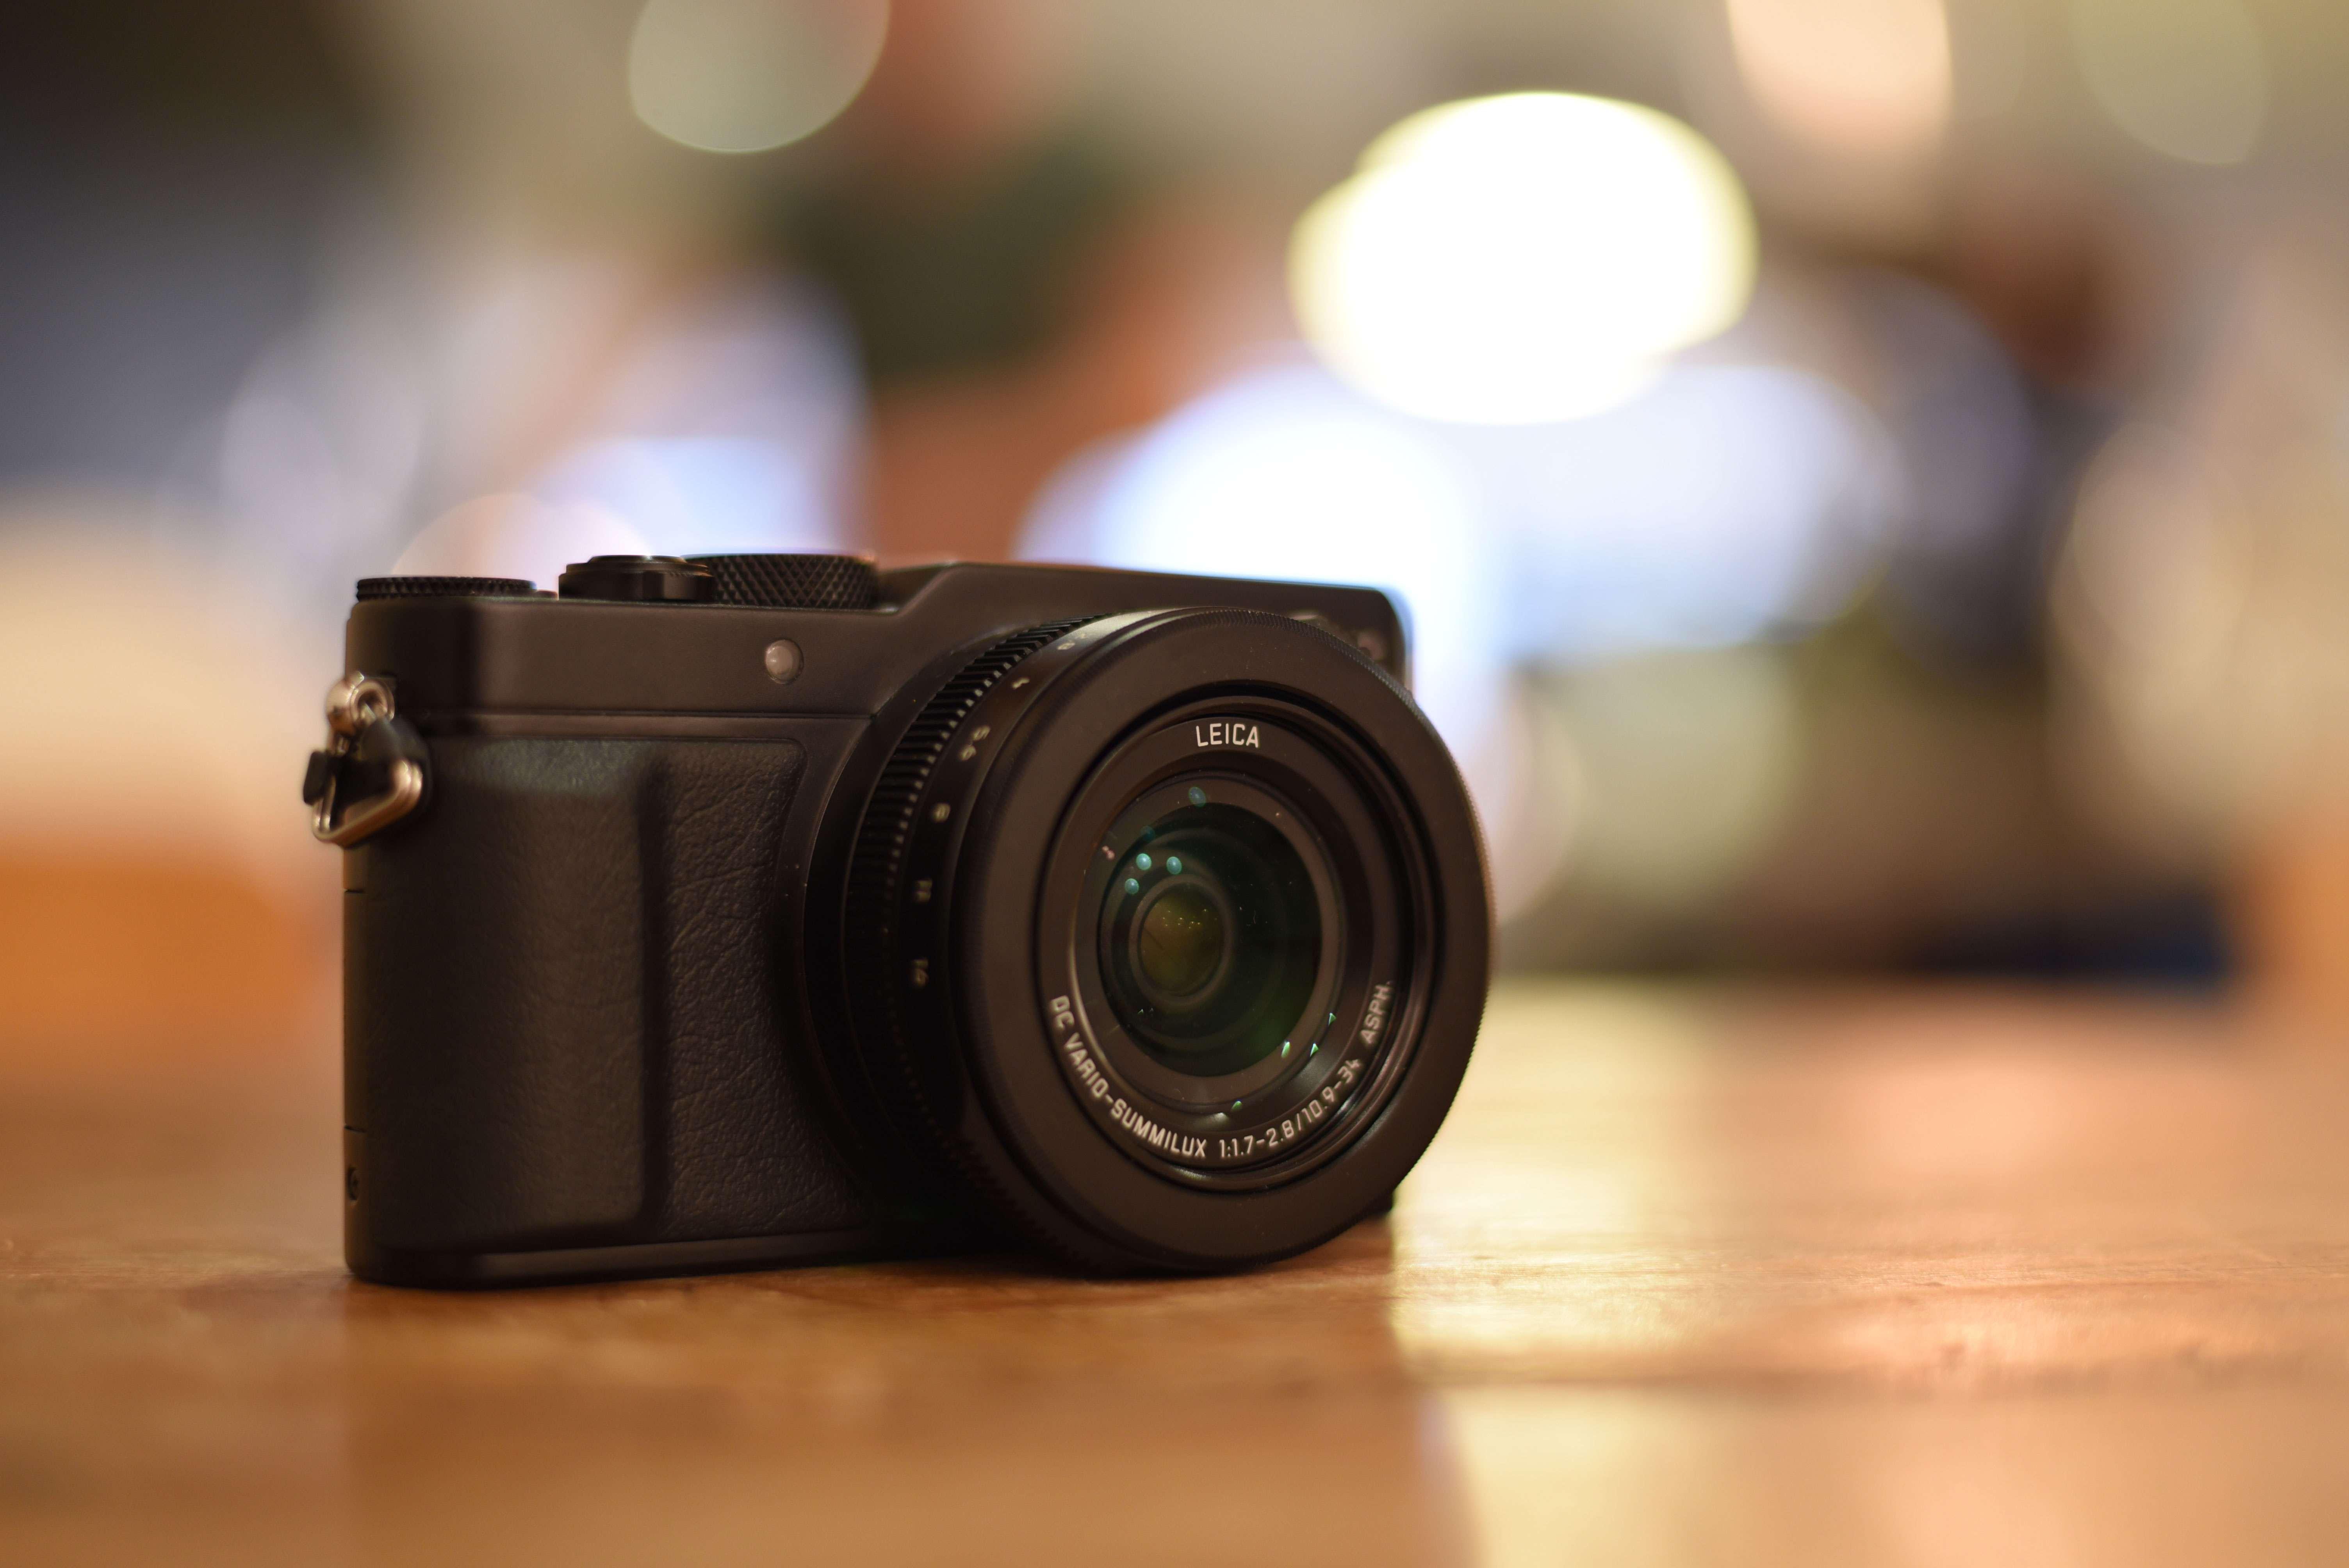
Panasonic Lumix LX100 review
-
-
Written by Gordon Laing
Intro
The Panasonic Lumix LX100 is a high-end compact camera based around a Four Thirds sensor and a lens with a 24-75mm f1.7-2.8 focal ratio. Announced in September 2014, it’s the first time Panasonic has deployed one of its Four Thirds sensors in a fixed lens compact, giving it a quality advantage over models employing smaller 1in type sensors such as Sony’s RX100 series and Panasonic’s own FZ1000.
The 24-75mm lens range is a fraction longer than the RX100 III and sports essentially the same focal ratio. Since the sensor behind it is larger than the Sony though, the optics and body of the Panasonic are inevitably bigger too. So the LX100 is larger than the RX100 III, but crucially a little smaller than Canon’s G1 X or Fujifilm’s X100 series. But Panasonic’s made the most of the larger body to deploy a wealth of controls (including an aperture ring and exposure compensation dial) and an attractive retro design inspired by the company’s classic LC1.
Panasonic’s also found room to include the 2.76 million dot electronic viewfinder (from the GX7), 11fps continuous shooting, Wifi, autofocus that works down to -3EV and is aided by the company’s DFD technology, and trumping all rivals, 4k video capabilities. Panasonic tells me the sensor is in fact from the GX7 but coupling it with the GH4’s Venus engine is what allows 4k video, so sadly no update for GX7 owners. So while the LX100 may not quite be as pocketable as the RX100 series, it still becomes one of the most exciting cameras launched this year. In my review I’ll make in-depth comparisons with Sony’s RX100 III, Canon’s G7X and much more, so if you’re weighing up these three cameras, read on to disocver which will be best for you!

Panasonic Lumix LX100 design and controls
The Lumix LX100 is a mid-sized compact that’s reminiscent of Panasonic’s L1 in style. Size-wise it’s roughly between the Sony RX100 and Fujifilm X100, meaning it’s not the smallest compact for enthusiasts out there, nor the largest either.
The Lumix LX100 measures 115x66x55mm and weighs 398g with battery. Of the smaller models, the Sony RX100 III measures 102x58x41mm and weighs 290g and the Canon G7X measures 103x60x40.4mm and weighs 304g. Place them side-by-side and you’ll notice the LX100’s main body is roughly the same thickness, but taller and wider than the RX100 III or G7X, and with more protrusions too, most notably the grip and viewfinder housing. I’ve pictured the LX100 alongside the RX100 III below.

So the LX100 is larger and heavier than the RX100 III and G7X, but what about the even chunkier models out there? Canon’s G1 X II measures 116x74x66.2mm and weighs 558g, while Fujifilm’s X100T measures 127x75x52.4mm and weighs 440g, so the LX100 is comfortably smaller and lighter than either. In terms of interchangeable lens cameras, the LX100 is roughly similar in size to a Sony A6000 fitted with its 16-50mm kit zoom.
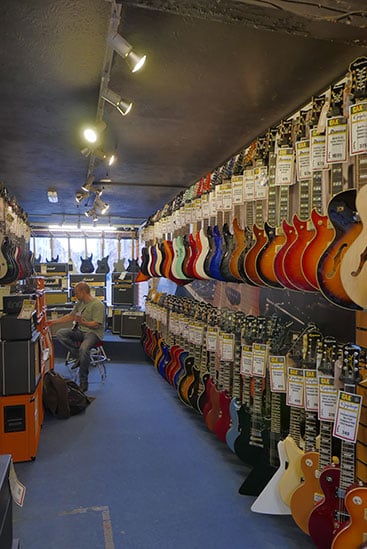
This actually places the LX100 in a fairly unique position in terms of size and weight in today’s compact market, but it can’t be described as pocketable, unless you’re talking cargo pants or a large coat pocket. To me this also makes the LX100 more of a replacement camera than a carry-everywhere companion.
Personally speaking I find the RX100 III and G7X are about the largest compacts I’d want to carry all the time and anything bigger becomes a more conscious decision that I may not take out everywhere. So for me the LX100 falls into the latter category meaning it’s up against my interchangeable lens cameras, but I know this is a very personal choice and some will find it very portable, especially if their main camera is a DSLR.
What’s not in question though is the feel of the camera in your hands: the LX100’s generous front grip and rear thumb rest, coated with a very tactile rubber, give it a degree of confidence and comfort that’s sorely lacking on its smaller rivals. The controls, which I’ll describe in detail in a moment, raise the experience further, especially the aperture ring with its soft clicks reminiscent of Leica’s Micro Four Thirds lenses. It is in short very satisfying to hold and operate, and a definite step-up not just from the smaller models out there, but many of the larger ones too.
 |
Okay, now for those controls. The LX100 adopts a very retro, analogue stance on controls with the body and lens adorned with dials, buttons and switches. There’s a high degree of dedication here and little you can’t operate or adjust with a physical turn of a dial or flick of a switch. It all makes not just for a very tactile experience, but one that gives the camera a very distinct look compared to other modern cameras. Think Fujifilm XT1 and you’ll be on the right track. The sheer number of controls could be intimidating, but instead to me it simply looks smart, attractive and functional – it’s a camera that wants to be used.
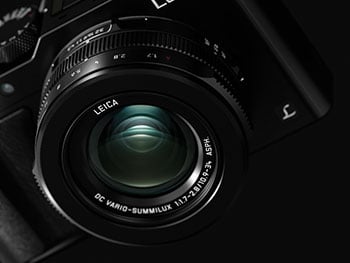
I’ll start with the lens barrel which sports a lovely aperture ring at the end. It features two small handles on opposite sides and turns with just the right degree of resistance, employing soft but sure clicks at one-third stop intervals. Indeed it feels a lot like the aperture rings on the high-end Panasonic / Leica lenses for Micro Four Thirds. It all adds up to a very satisfying experience, but while you can use it to control the aperture during video, you can’t de-click it for smooth and silent adjustments. The ring is labelled with 1.7, 2.8. 4, 5.6, 8, 11 and 16, along with A. Setting the ring to A allows the camera to automatically adjust the aperture.
Behind this is a customisable control ring – it’s fairly narrow, but turns very smoothly indeed, again more like a high-end interchangeable lens than a compact camera. By default in iA, Program and Aperture Priority, it adjusts the optical zoom, while in Shutter Priority and Manual it can be used to adjust the shutter speed. Alternatively you can customise the operation to adjust the sensitivity, white balance or filter, and if the camera’s set to manual focus, it understandably takes on the role of adjusting the focusing distance – and very good it is too for that. I should however note in day to day handling, I often found it easy to accidentally nudge the ring, causing the zoom to jump forward or back a little, so long term I may choose to disable the default setting on it. I would also have liked the chance to assign aperture to it for smooth adjustments during video.
Sandwiched between the control ring and the camera’s body are two switches. The first, facing up, sets the camera’s photo aspect ratio with the choice of 3:2, 16:9, 1:1 and 4:3. As you’ll discover later in the review, the LX100 allows you to shoot in 3:2, 16:9 and 4:3 with the same diagonal field of view – that is to say, no cropping on the diagonal coverage – so it’s nice to be able to switch so easily between shapes. As someone who posts a lot on Instagram (I’m @cameralabs if you want to follow me there!), I also appreciate being able to quickly dial-in 1:1 for easy framing in the square shape.
 |
On the left side of the lens barrel as you hold the camera is a smaller switch for the focusing mode with options for MF, AF with macro, and normal range AF. I’ll discuss the focusing options in the separate focus section later in the review but note for now that this is the only place to set the manual focus and macro AF options.
There’s no controls on the front of the body or its sides, so I’ll move to the top surface which is smooth and flat for its left half, punctuated only by a recessed hotshoe in line with the optical axis. The left side is where a camera like this would normally have a popup flash, but the space is clearly occupied by the electronic viewfinder housing, leaving Panasonic with the decision to either squeeze a popup flash in the middle or deploy a hotshoe instead. I think the decision of the latter is a sensible one as it’s more in-line with the higher-end target audience, and also a differentiator with the Sony RX100 III and Canon G7X. Panasonic bundles a small flash unit with the LX100 with a Guide Number of 10 at 200 ISO, and offers a selection of optional larger units. There’s also an optional optical viewfinder you can slot onto the hotshoe, but there’s no external microphone accessories.
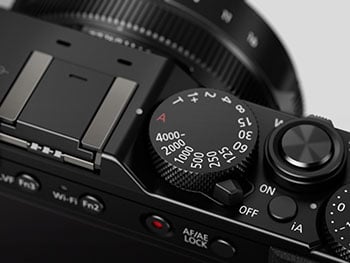
To the right of the hotshoe the top plate dips down to accommodate a number of dials. First is the shutter speed dial, the top of which is almost flush with the upper surface to the left of it. The dial offers direct selection if shutter speeds between 1 second and 1/4000 in 1EV steps, along with a T option (offering exposures up to 128 seconds in my tests) and A. Setting the dial to A lets the camera select the shutter speed automatically.
You’ll notice there’s no traditional mode dial on the LX100, so the A positions on the shutter and aperture dials is very important. Set them both to A and the camera is put into Program. Set the shutter dial to A and turn the aperture ring for Aperture Priority. Set the aperture ring to A and turn the shutter dial for Shutter Priority. Or turn both dials for full manual control. I’ll discuss this more in the exposure mode section later in the review.
Around the shutter dial is a power switch and next to this a dedicated button for toggling Intelligent Auto. This works like a ‘don’t panic!’ button, switching the camera into full auto and back again to whatever settings you were previously using. To the right of the shutter dial is a large shutter release with a zoom collar; I found myself using this for adjusting the zoom rather than the lens control ring.
Perched on the far right side of the top surface is a dial dedicated to exposure compensation in a range of +/-3EV. It’s really nice to be able to dial this-in as desired, but I personally found the wheel had often been turned as the camera was pulled out of a bag, so keep an eye on it before shooting. Finally in the front right corner of the top panel is a button dedicated to the Filter effects which I’ll describe later. Remember these effects along with full Auto would normally be on a mode dial, but in its absence, the LX100 needs to deploy additional buttons.
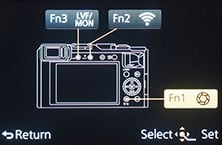
Turning to the rear, you’ll find two function buttons, a red record button and an AF AE lock above the screen, and to the right side, a tilting thumb wheel surrounded by buttons for the on-screen Q.Menu, image playback, display options and another Function button. You can customise the three Function buttons to any one of a massive 40 different options. Like other Panasonic cameras, the Q.Menu fires-up an on-screen interface to adjust a wide variety of settings, and you can customise what’s shown if desired.
 |  |  |
Pushing the rear wheel up, down, left and right provides direct access to the ISO, drive mode, AF area and white balance menus, while pushing the middle either confirms a selection or enters the main menus. Tilting thumb wheels always run the risk of being pressed accidentally while turning, and I’m afraid to say I did push the LX100’s by mistake a few times while turning it, but it’s not as bad as some cameras I’ve tested.
Moving onto composition, the Lumix LX100 offers you the choice of a 3in screen or a built-in electronic viewfinder. In this respect it’s like the RX100 III and unlike the Canon G1 X II or G7X which lack a viewfinder, but there are many more differences to weigh up.
Starting with the screen of the LX100, it’s 3:2 shaped with 921k dots. If you’re shooting in the 3:2 shape, the images fill the screen of the LX100 – and the G7X too – but the RX100 III has a squarer 4:3 shaped screen which means 3:2 images have a thin black strip at the bottom. Sony uses this for shooting information, but there’s no denying the active image area looks smaller on the Sony than it does on the Panasonic and Canon.
The LX100’s screen is however fixed in place (unlike the Sony and Canon which can both flip up and down) and it’s not touch-sensitive either (unlike the Canon). I understand the fixed non-touch screen of the LX100 was chosen on both size and cost reasons, but I can’t help feeling it’s a mistake. The vast majority of screens on these types of cameras now tilt, not just making it easy to compose at unusual angles, but also to support selfies, and being able to tap to reposition AF areas or pull focus is the icing on the cake. Sadly you won’t be doing either with the LX100. It’s a really tough one as implementing a tilting screen could have made the LX100 more like the G1 X II in heft which I wouldn’t have liked either, but I would have been happy to pay a bit extra for touch-capabilities.
The LX100 also has an electronic viewfinder, and not just any old EVF either. It’s the same EVF as the Lumix GX7 which some regard as one of the best around. It’s large with 0.7x magnification and detailed with 2.76 million dots, and unlike the RX100 III you don’t need to pull out a housing to access it. So far so good, but I wasn’t personally a fan of the GX7’s EVF and my complaints equally apply here. First is its 16:9 shape which may be ideal when filming video, but results in a smaller and less detailed image when shooting 4:3 or 3:2. Secondly is the field-sequential panel technology which suffers from rainbow artefacts when I glance across the image. Now I know I’m sensitive to this and it may not affect you personally, but I’d still sooner have the 4:3 OLED of the GH4. But it’s still a classy viewfinder and important to note the heftier G1 X II doesn’t have one built-in.
Moving onto connectivity, the LX100 has just two ports behind a small flap on the right side of the body: Micro HDMI and a proprietary USB / AV output for which Panasonic includes a cable. There’s no wired remote control option, but you can trigger stills and video wirelessly using an iOS or Android smartphone running the Lumix app – I’ll describe this fully in the Wifi section later. Speaking of wireless though, the LX100 features both Wifi and NFC, with the NFC sensor embedded in the left side of the body. Sadly there’s no external microphone input, so for superior audio to go with your video, you’ll need to use a separate recorder.
Underneath the camera you’ll find the battery compartment and SD memory card slot, the door for which becomes blocked when the LX100 is mounted on a tripod. The LX100 is powered by a DMW-BLG10E Lithium Ion battery pack which Panasonic claims is good for 300 shots under CIPA standards. This is about half as much again as Canon’s quote for the G7X and while Sony quotes 320 for the RX100 III, I’d say its closer to the Canon than the Lumix. Bottom line: when out shooting with each camera, I noticed the battery depleting faster on the Canon and Sony than the Panasonic, but before you become too confident, 300 shots is still not a great deal and will become a lot less if you make regular use of video or Wifi.
The LX100’s battery (like the G7X) is recharged outside of the camera in a supplied AC unit. While I know this will please traditionalists, I’d have sooner had in-camera USB charging as with some of the smaller Lumix compacts. When a camera is out and about with you pretty much all the time and only has a small battery, it’s important to be able to top it up at every opportunity. With USB-powered models like the Sony RX100 III, I can top it up with my laptop, handy USB ports in cars or buses, any number of AC-USB chargers that may be available, or via portable batteries like the Anker Astro range. I know some disagree with me on this, but I wish all cameras with small to medium sized batteries could be USB-chargeable. As it stands with the LX100 you’ll need to either carry a spare or the recharger unit and keep an eye open for sockets when you run low.when composing on the GH4.
Panasonic Lumix LX100 display views
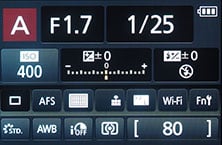
When composing with the LX100 you have a choice of information views. Pressing the DISP button cycles through a view with basic shooting information, a clean view, basic shooting info with the addition of a dual-axis virtual horizon, the horizon on a clean view, and finally one which dedicates the entire screen to detailed shooting information; the latter is really begging for a touch-screne interface, but alas the LX100 is not equipped with a touch-screen. Meanwhile the electronic viewfinder cycles through the first four information views, and can be set to automatically switch between it and the screen with eye sensors; the switching delay is less than a second.
 |  |  |
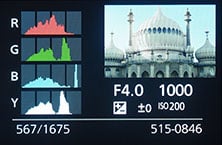
From the menus you can choose to additionally overlay a choice of alignment grids and a live histogram, although again unlike Lumix G models, you won’t be dragging any of the guides or the histogram around the screen with your finger. You also have the chance to switch the composition into black and white, although the recording still happens in colour. Enabling the Highlight option flashes saturated areas on the image.
During playback there’s varying levels of exposure detail with each press, culminating in separate RGB and brightness histograms. In a missed opportunity though, Panasonic still resists the chance to auto-rotate images in playback as you turn the camera, so portrait shaped images in playback will never fill the screen. You can however process RAW files in-camera to JPEGs, using a variety of adjustable parameters.
 |  |  |
 |  |  |
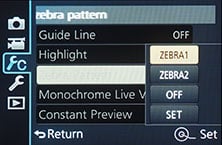
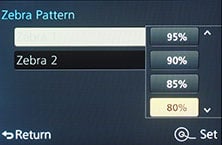
As a camera aimed at video professionals, there’s also a choice of Zebra patterns to indicate exposure. There’s two Zebra options, which you can independently preset to between 50 and 105% in 5% intervals. There’s also focus peaking available when manually focusing.
 |  |  |
Panasonic Lumix LX100 lens
Panasonic has equipped the Lumix LX100 with a 3.1x optical zoom equivalent to 24-75mm with an f1.7-2.8 focal ratio. This gives it roughly the same range and speed as Sony’s RX100 III with its 24-70mm equivalent f1.8-2.8 zoom, although both fall short of the reach of Canon’s G7X (24-100mm f1.8-2.8) and G1 X II (24-120mm f2-3.9), not to mention Panasonic’s early LX7 (24-90mm f1.4-2.3), although of course the latter had a much smaller sensor. You can see an example of the LX100’s coverage below. I shot these in the 3:2 aspect ratio and will explain the multi-aspect capabilities in the sensor section at the bottom of this page.
Panasonic Lumix LX100 coverage wide (3:2) | Panasonic Lumix LX100 coverage tele (3:2) |
 |  |
| 10.9-34mm at 10.9mm (24mm equiv) | 10.9-34mm at 34mm (75mm equiv) |
Unlike the Sony RX100 III and Canon G7X, the Lumix LX100’s lens employs a separate lens cap that you must remove for use and pop back on again for protection. This may sound like a redundant statement, but the auto lens covers of the smaller models really does make them quicker for action, not to mention putting away again.
But wait, Panasonic has a solution with the optional DMW-LFAC1 auto lens cap, that clips onto a bayonet mount on the end of the lens barrel (after first twisting-off a ring). This has three petal blades that are simply poked out the way as the lens extends, and which fold back when it closes. It’s a brilliant solution that we’ve seen before on the Olympus STYLUS 1 and I just wish it were part of the standard package on the LX100.
Moving onto the aperture, it’s clear all manufacturers know what we want on our high-end compacts: nice bright apertures across the entire focal range, allowing us to keep the ISO low, the shutter speeds high and if possible also deliver shallow depth of field effects. A small f-number can certainly let you deploy lower sensitivities and faster shutters on any camera, but the depth of field is greatly impacted by the sensor size and actual lens focal length – and that’s the rub with most compacts as they typically employ much smaller lenses and shorter focal length lenses than those in interchangeable lens cameras. The key benefit of the LX100 though is coupling a bright lens with a sensor that’s comfortably larger than most compacts, but what sort of blurring can you expect in practice? I’ll start with two portraits taken with the lens zoomed-to 75mm and the aperture opened to the maximum f2.8.
| |||
|


Based on comparisons I’ve made, I’d say there’s not much between the LX100 and Sony RX100 III when it comes to portraits taken from these distances. The LX100 does enjoy a minor edge with its slightly bigger sensor and longer actual length when zoomed-in, but I wouldn’t say it’s sufficient to choose one over the other. Interestingly the Canon G7X delivers a similar depth of field to the LX100 thanks to it sharing similar lens specifications when both are zoomed to their maximums, but the G7X’s slightly smaller sensor makes a tighter crop, making background elements appear a little larger.
A more revealing comparison comes in a macro environment, as getting closer to your distance to the subject greatly reduces the depth of field effect. Here the combination of sensor size, lens focal length, maximum aperture and of course closest focusing distance all play a role in the depth of field, while the actual optical design influences the quality of the bokeh (out of focus rendering).
To put this to the test I made two comparisons with the Sony RX100 III, first with the lenses zoomed-out to 24mm and second with their lenses zoomed-into their respective longest focal lengths, 70mm for the Sony and 75mm for the Lumix. For the wide angle comparison I shot at a distance of 5cm, the closest the Sony RX100 III will focus.
Panasonic Lumix LX100 Macro at 24mm at 5cm | Sony RX100 III Macro at 24mm at 5cm |
 |  |
| 10.9-34mm at 10.9mm (24mm equiv) – full image | 8.8-25.7mm at 8.8mm (24mm equiv) – full image |
 |  |
| crop made from upper left corner | crop made from upper left corner |
As you can see above, the depth of field looks very similar on both models, despite the LX100 sporting a slightly longer actual focal length and bigger sensor, not to mention a fractionally brighter aperture of f1.7 to f1.8, but my crop of the upper left corner reveals the actual rendering on the Lumix to be superior: cleaner ‘bokeh-balls’ and smoother transitions.
In the comparison above I had to shoot at the lowest common denominator, which was at a distance of 5cm to accommodate the RX100 III. But one of the key advantages the LX100 enjoys over it – and indeed most models in this class – is an even shorter minimum focusing distance of 3cm. To illustrate what you can achieve at 3cm, I moved closer to the bottle in the composition and took the shot below, which is clearly superior to anything the RX100 III or G7X can achieve at their closest focusing distances of 5cm.
|

My second macro comparison was made at their longest respective focal lengths of 70mm for the Sony and 75mm for the LX100. Both models share a closest focusing distance of 30cm when zoomed-in, so there’s no compromises on subject distance in this comparison. Note in practice I found the Lumix could focus a bit closer though.
Panasonic Lumix LX100 Macro at 75mm at 30cm | Sony RX100 III Macro at 70mm at 30cm |
 |  |
| 10.9-34mm at 34mm (75mm equiv) – full image | 8.8-25.7mm at 25.7mm (70mm equiv) – full image |
 |  |
| crop made from upper left corner | crop made from upper left corner |
In the comparison above, shot from virtually the same distance with only minor adjustments to match the field of view, I think the difference in quality is striking. Here the benefit of a longer actual focal length on the LX100 is quite apparent with a noticeably shallower depth of field. But again it’s the quality of the rendering that’s really striking here, with the out-of-focus lights on the LX100 looking far superior to those on the Sony.
Based on these comparisons, I know which model I’d prefer to have to for shooting macro: the Lumix LX100 beats the Sony RX100 III not just on reproduction at wide angle, but on quality at both ends of the lens range. As for the Canon G7X, my tests showed that it too was superior to the Sony RX100 III for macro work, especially at the telephoto end, and while my results at 100mm f2.8 were more similar in style to the LX100, I personally feel the LX100 still pips it to the post on quality – and again don’t forget it’ll focus closer than the Canon at wide angle.
At this point it’s worth looking at whereabouts in the focal range the aperture changes, as some lenses slow down faster than others. The LX100 only offers f1.7 between 24 and 25mm at which point it slows a fraction to f1.8. The aperture then closes to f1.9 at 26mm, f2 at 27mm, f2.1 at 28mm, f2.2 at 30mm, f2.3 at 34mm, f2.4 at 37mm, f2.5 at 41mm, f2.6 at 44mm, f2.7 at 49mm, and finally at f2.8 from 52-75mm.
The Canon G7X starts at f1.8 at 24mm then slows to f2 at 28mm, f2.2 at 35mm, f2.5 at 39mm, then reaches its minimum aperture of f2.8 at 55mm and stays with it all the way up to 100mm.
On the Sony RX100 III, the f1.8 aperture is only available at 24mm, slowing to f2 at 25mm and f2.5 at 28mm. Then at 32mm the lens slows to f2.8 and stays there for the rest of the range up to 70mm. The older RX100 II starts at f1.8 at 28mm, hits f2 at 30mm, then f2.8 at 35mm, f4 at 66mm and the minimum f4.9 between 97mm and 100mm.
So the Lumix LX100 and Canon G7X stay slightly brighter than the Sony RX100 III until they’re mid-way through their ranges. For example at 28mm or 35mm, the LX100 and G7X enjoy approximately two thirds of a stop advantage over the RX100 III, in turn allowing them to deploy lower ISOs under the same conditions. It’s revealing to note the Mark III actually slows down by one whole stop by the time it reaches 28mm, whereas the LX100 and G7X don’t lose a whole stop until they’re at 37mm and 39mm respectively.
 |
One aspect where both the G7X and RX100 III take a lead over the LX100 though is with their built-in ND filters, a feature that’s sadly missing on the Lumix. On both the Canon and Sony, the ND filters soak up three stops of light, and in the case of the RX100 III, it’ll even deploy automatically under very bright conditions if desired.
Now ND filters have two main purposes: to let you shoot with large apertures in bright conditions and to force longer exposures than usual to blur things like water or skies. The Lumix LX100 lets you shoot with large apertures thanks to a very fast maximum shutter speed of 1/16000 (equivalent to using a 3 stop ND filter at 1/2000), but while that’s fine for stills, it’s not ideal for video. When filming movies, it’s best to shoot at relatively slow shutter speeds, such as 1/48 for 24p, and these slow shutters let in lots of light, making it harder to deploy large apertures without an ND filter.
The LX100’s lens barrel does however have a 43mm thread which in theory should be able to accommodate filters. Panasonic doesn’t offer any filter accessories and I didn’t get a chance to try any third party filters in person, but after completing my own tests I asked my friends at Park Camera to try it out in their store – and I’m pleased to report it worked. Here’s a photo of the LX100 with a filter mounted and Park confirmed there’s no vignetting even with the lens wide. I can’t yet comment on compatibility with the petal lens cap accessory, but it is at least good news to confirm that filters can be used on the LX100.
Moving onto stabilisation, the LX100 employs optical stabilisation for stills and movies. To test the stabilisation for stills, I shot a subject at the maximum focal length at shutter speeds decreasing one stop at a time with and without stabilisation enabled to see what was the slowest shutter I could handhold for a sharp result.
Panasonic Lumix LX100 Optical Stabilisation Off / On |

100% crop, 10.9-34mm at 34mm (75mm equiv) 1/15 OIS on.
On the day, I needed a shutter speed of 1/60 to successfully handhold a sharp image without shake when stabilisation was turned off. With stabilisation enabled, I could achieve a similar result at 1/15, corresponding to around two stops of compensation. Not only is this below the usual three or even four stops I can normally expect from a Panasonic optical stabilisation system, but the difference between stabilised and unstabilised stills wasn’t great either. This performance extended into video too, with the LX100 delivering fairly lacklustre compensation against wobbles. I’m somewhat perplexed by this as Panasonic normally has a fantastic track record for optical stabilisation, and as far as I understand, my test sample was a final production model. I’ll investigate further and report back with any updates.
Panasonic Lumix LX100 shooting modes
The Lumix LX100 offers a very retro, analogue approach to setting the exposure with dedicated dials for the shutter speed and exposure compensation on the top surface of the body, and an aperture ring around the lens barrel. Like other cameras that adopt this approach, there’s no mode dial to select, say, Program or Aperture Priority. Instead the shutter and aperture rings both have A positions in addition to their numerical settings. Position them both to A and the LX100 is set to Program mode. Leave the shutter dial at A and turn the aperture ring to use Aperture Priority. Leave the aperture ring at A and turn the shutter dial to use Shutter Priority. Or of course turn either dial away from A to put the camera into full Manual. In Program, Aperture and Shutter Priority, the exposure compensation dial offers a range of +/-3EV, while in Manual it has no effect.
It’s an approach shared by, say, the Fujifilm XT1, delivering an experience reminiscent of older film cameras; Panasonic has also deployed it before on models like the L1. Is it better than a modern PASM mode dial? Yes and no. Since I mostly shoot in Aperture Priority and Program modes, it’s nice to essentially switch between them by simply turning the aperture ring alone, and I should also add the aperture ring feels very high quality, like one on a decent interchangeable lens. But when I’m shooting long exposures, I find having to turn the shutter dial to 1+, before then using the rear control wheel to make my selection a bit long-winded. Since there’s no mode position for full Auto or filters, these also have to be accessed via separate buttons, and the approach additionally limits the degree of exposure control in the smartphone app. So while I like the look of these dials, I sometimes feel we’re adopting retro for looks and nostalgia rather than superior functionality.
In Aperture Priority, you can select values between f1.7 and f16 on the ring (with the lens set to wide) with three soft clicks between each stop; if the lens is zoomed-in, the aperture starts at f2.8, so any values lower than that are just ignored on the ring. In Shutter Priority you can select speeds between 1/4000 and one second in one-stop increments from the top dial. Once a value is selected you can fine-tune it in 1/3 stop increments using the rear dial.
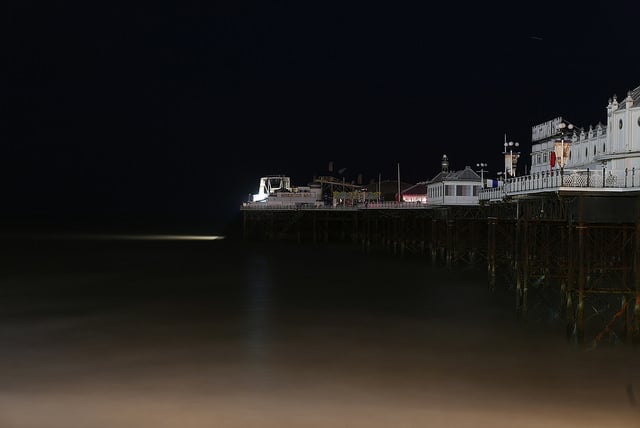
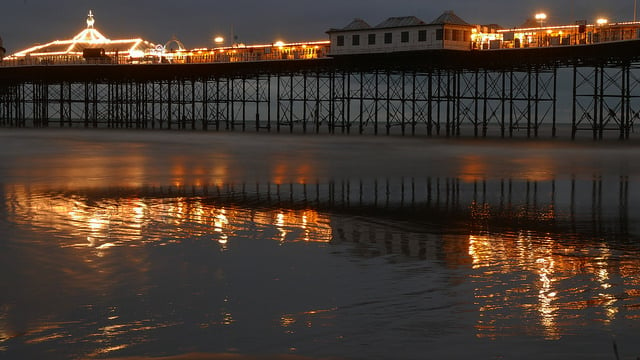
If the shutter dial is set to 1+, you can use the rear wheel to dial-in exposures up to 60 seconds, while the T setting opens the shutter with a press of the shutter release, then closes it with another press; Panasonic quotes the maximum exposure as being around two minutes, and in tests I confirmed that with 128 seconds. Here’s a long exposure image I took with the maximum 128 seconds – I didn’t need to press the shutter release again to end the exposure as it stopped by itself at this maximum length. Sorry it’s not a great shot, it was my only chance during a period of bad weather and they’d turned most of the pier lights off! But it does show there’s no hot pixels to worry about, although I did use long exposure noise reduction, incurring an additional 128 second delay after the initial exposure. I’ve also included a nicer-looking one using 20 seconds below it.
| ||||||
With the dial set to 4000-, you can use the rear wheel to dial-in even faster shutter speeds up to 1/16000 which will freeze pretty much any subject in motion, not to mention allow you to shoot with bright apertures in daylight conditions. Shutter speeds faster than 1/4000 are achieved using an electronic shutter which the camera automatically switches to, although if desired, you can deploy it across the entire shutter range if you’d prefer to shoot silently. Note the mechanical shutter only supports 1/4000 at f4 or smaller, so if you shoot at 1/4000 at apertures larger than f4, such as f2.8, then the LX100 again switches to its electronic shutter.
Having the option of an electronic shutter is fantastic, as it allows the LX100 to operate in complete silence, making it very discreet in quiet environments like weddings or ceremonies. Indeed you may wonder why you wouldn’t want to use it all the time. The reason is an electronic shutter can suffer from an undesirable rolling shutter / jello effect which can actually skew subjects in fast motion; it can even be a problem with heavy camera shake. So the trick is to understand its weaknesses and only use it when you’re sure the subject or handling won’t be an issue. But the bottom line is the LX100 offers a very wide range of exposures from 1/16000 to 60 seconds, with an easy to access two minute ‘bulb’-like option too, covering you for pretty much eventuality.
In the absence of a mode dial, Intelligent Auto, creative filters and panoramas are accessed via other buttons and menus. The iA button is sandwiched between the shutter and exposure compensation dials and toggles the camera between full auto and whatever mode you were in previously. In this respect it’s no different to older Lumix compacts which had a separate iA button – it acts like a ‘Don’t Panic’ button, letting you quickly and easily take a snap regardless of how creative you’d been getting before.
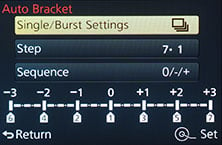
Moving on, like most Lumix G cameras, the LX100 offers very capable auto exposure bracketing with three, five or seven frames up to 1EV apart. You can choose to trigger them in a Single or Continuous drive mode, but annoyingly like many cameras there’s no way to trigger the entire burst using the self-timer. If you want to trigger the burst without touching the camera, you’ll need to use a remote control, but there’s no need to buy the cabled accessory as the built-in Wifi lets you do it via the free Lumix Image app on iOS or Android devices. I tried this and it works a treat.
 | 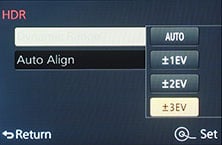 |  |
If you prefer a more automatic approach to HDR, you can choose the HDR option from the recording menu, although note it’ll be greyed-out if you’re recording in RAW or RAW+JPEG modes. The HDR mode automatically captures three frames at one, two or three EV apart and assembles them for you, with the auto-alignment cropping the result slightly compared to a single frame. The camera only records one image though, so there’s no chance to access the three separate frames afterwards if preferred, and again no RAW option either. On the upside it will trigger the entire process with a single press of the shutter release, allowing you to capture an HDR using the self-timer. Here’s an example below with a single frame on the left and a composite three frame HDR at 3EV on the right. As you can see, the HDR version has flattened the main concentration of tones, brightening shadows and retrieving some highlight detail in the window. Also notice how the auto alignment has slightly cropped the HDR result compared to the single frame version.
Panasonic Lumix LX100 Single frame | Panasonic Lumix LX100 HDR mode at 3EV | |
 |  | |
 |  | |
1/40, f2.8, 800 ISO | 1/40, f2.8, 800 ISO | |
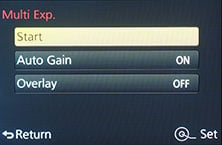
If you fancy some fun, there’s a Multiple Exposure mode which can automatically combine up to four images. You can retake them if they go wrong, or combine new ones with existing ones if desired. If you’d like to apply creative filters, you’ll need to press the dedicated Filter button to the right of the shutter release button. This presents an on-screen menu with access to 22 digital filters, including sepia, four several options, high key, low key and the popular miniature mode. Here’s an example of six of them in practice, many of which also offer further adjustments. I’m also pleased to report that you can shoot with the Creative Control in RAW+JPEG mode and only have the effect applied to the JPEG, leaving the RAW as a backup. Sony, are you listening?
Panasonic Lumix LX100 Dynamic Mono | Panasonic Lumix LX100 Expressive | |
 |  | |
Panasonic Lumix LX100 Toy | Panasonic Lumix LX100 Old Days | |
 |  | |
Panasonic Lumix LX100 Impressive Art | Panasonic Lumix LX100 Sunshine | |
 |  | |
While cycling through these options, the camera previews the effect on a live thumbnail, and most effects can also be applied to movies by simply pressing the red record button. Here’s an example of the miniature mode applied to a movie, which simply inherits your existing quality settings – this makes it easy to record a 1080p miniature movie, although sadly it’s no possible to record the miniature effect in 4k this way. You could however set the camera to record a sequence of stills using the timelapse mode, all with the miniature creative effect applied, then encode these stills into a movie at resolutions up to 4k.
| |
|---|---|
| |
| |
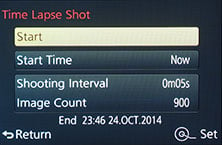 | 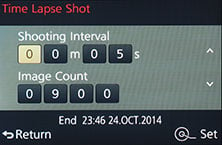 |
The Lumix LX100 is also well-catered when it comes to time lapse sequences with the choice of a traditional interval timer (Time Lapse Shot mode) or one which lets you take photos manually as and when each frame is ready (Stop Motion Animation).
In either mode, once the sequence is complete the LX100 can assemble them in-camera into a movie at a variety of quality settings and frame rates including 1080p up to 50 / 60fps or 4k UHD up to 25 / 30fps; the individual still photos are retained in case you’d like to use them later. The LX100 also lets you assemble a timelapse sequence into a video at a later point using the playback menu.
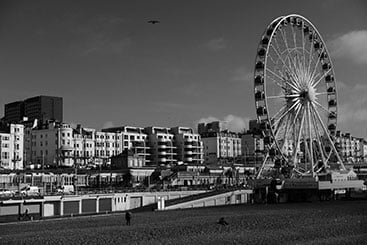
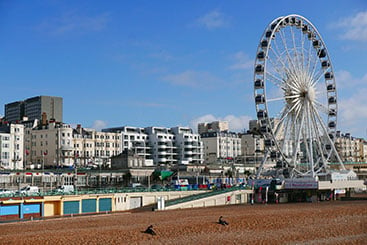
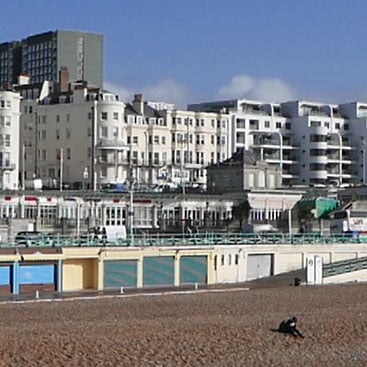
The Time Lapse Shot timer can record up to 9999 frames at intervals from one second to a second shy of 100 minutes, and you can delay the starting time by up to 24 hours. Here’s a movie I filmed of the Sun setting behind Brighton’s old West Pier using the LX100 timelapse mode, later encoded into a 4k UHD movie at 25fps all in-camera; the camera reckoned it’d take about 12 minutes to perform the encode, but it happened faster.
| |
|---|---|
| |
| |
Finally, I’m delighted to report the Lumix LX100 is equipped with a panorama mode, although in the absence of a mode dial you need to access it from a menu – in this case the drive mode options. You can choose to pan in four directions, and it’s also possible to apply a selection of filter effects. The camera sets the zoom to its widest angle and assembles the images itself with a maximum size of 8176×1920 for horizontal panning or 2560×7680 for vertical penning. Note if you wobble up and down while panning, the camera will have to trim the top and bottom, reducing the potential resolution. Here’s a couple of examples.
| |||
| |||


Panasonic Lumix LX100 focusing
The Lumix LX100, like all modern Panasonic cameras, relies on a 100% contrast detect autofocus system, which means it’s accurate but needs to focus beyond the subject and back again to confirm the correct distance. This is par for the course for most compacts, and the only models I’ve seen which deploy a hybrid system with embedded phase-detect AF sensors are Fujifilm’s X100S and X100T.
But Panasonic has a great track record in AF speed and low light performance which I’m pleased to report the LX100 inherits. In my tests the LX100 focused faster than the Sony RX100 III under normal conditions and much more confidently than either the RX100 III or G7X in very low light; indeed in my low light test shots I had to switch to manual focusing on the Sony when the Lumix happily locked-on.
The Lumix LX100 also becomes Panasonic’s third camera to feature the company’s Depth from Defocus, or DFD, technology, first seen on the Lumix GH4 and FZ1000. This profiles the out-of-focus characteristics of the lens to better recognise what direction to focus in – the result is faster than models without DFD, although there’s still a final overshoot and retreat hump to nail the final focus which obviously isn’t ideal for continuous AF. DFD is certainly impressive, but I wish Panasonic would employ phase detection AF assistance to deliver more usable continuous AF.
To test the continuous AF of the LX100, I shot sequences of subjects approaching from a distance of 50-100m away until they went right past me. People walking normally or briskly were generally all in focus. Kids approaching on scooters were mostly but not always in focus. Cyclists peddling slowly were about 75% in focus and cyclists going faster saw the hit rate fall to 50% or less. Here’s a few frames from a cyclist approaching at a fairly leisurely speed – when the full image is reproduced here shrunk-down, they look acceptable, but when viewed at 100% only about half of them are in sharp focus.
| Panasonic Lumix LX100 Continuous AF at 6.5fps with lens at 75mm f2.8 | ||||||
 |  |  |  | |||
 |  |  |  | |||
 |  |  |  | |||
 |  |  |  | |||
So I wouldn’t recommend the LX100 for shooting subjects that are close to you and moving quickly. To be fair it’s no worse than its rivals from Canon and Sony, but none of them are convincing for this sort of thing. The best I’ve found from a small camera is the hybrid system of the Sony A5100 and A6000, and the sooner something similar is deployed on smaller formats, the better.
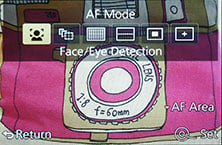
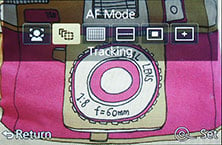
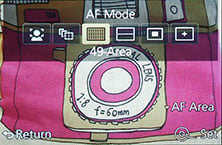
In terms of AF options, there’s six area modes to choose from: Face detection, AF Tracking (which lets you place crosshairs on a subject that’s then tracked), 49-area focusing, Custom Multi (which lets you select a strip of AF areas or even create your own custom shape like a zig-zag), and single area or pinpoint, the former letting you adjust the size and both letting you adjust the position.
 |  |  |
At this point I’d like to give a stern look towards the person who decided not to implement a touch-screen on the LX100. So instead of simply tapping where you’d like the AF area moved to, you’ll need to first select the Single Area AF mode (even if it’s already selected), then push down to say you want to move it, and then use the tilting wheel to actually move it around the screen. To be fair the RX100 III doesn’t have a touch-screen either, but both the Canon G7X and G1 X II do. I’ve got plenty of these stern looks too, so watch out Panasonic.
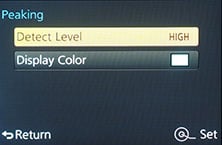
As mentioned earlier, a switch on the side of the lens lets you choose AF in a normal range, AF with a broader range for macro shooting and Manual Focusing. In Manual focusing mode, the lens ring sensibly takes the role of adjusting the focusing distance, indicated on-screen by a scale. The camera also provides an enlarged view of a specific part of the image which you can move around the frame and adjust the magnification level; you can also choose whether the magnified view sits in a small window or fills the screen, and you can also exploit peaking to confirm the focus. It all works really well, especially with the very smooth and perfectly-damped lens ring. It’s a superior manual focusing experience to its rivals.
 |  |  |
I’ll discuss movie AF in the movie mode section below.
Panasonic Lumix LX100 movies
 |
 |
 |
 |
 |
The Lumix LX100 is a very capable movie camera, letting you film in 1080p up to 50 or 60p or in 4k UHD at 25p or 30p depending on region. So not only does it become Panasonic’s third consumer camera to offer 4k, but also its smallest and lightest to date. The LX100 was also the first of the Lumix cameras to feature Panasonic’s new 4K Photo mode, a feature now added to the GH4 and FZ1000 with a firmware update. I think this is a pretty big deal so I’m covering it in a separate section after the main movie section.
Back to the LX100 movie mode: there’s full manual control over exposures, along with the chance to make adjustments while filming. You can optically zoom the lens while filming, and if you like the camera will also have a good stab at continuous autofocusing. Audio is recorded using the built-in stereo mics, although sadly there’s no means to connect an external microphone either through a jack or an accessory shoe.
Set the LX100 to AVCHD encoding and you can choose from 1080 at 50p / 60p (at 28Mbit/s), 50i / 60i (at 24 or 17 Mbit/s), or 24p (at 24 Mbit/s). You can’t choose between 50 and 60 rates, that’s defined by the origin of the camera.
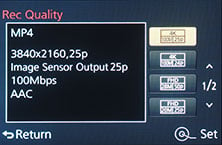
Set the LX100 to MP4 encoding and you can choose from 4k UHD at 25p / 30p or 24p (all at 100Mbit/s), 1080 at 50p / 60p (at 28Mbit/s), 1080 at 25p / 30p (at 20 Mbit/s), 720 at 25p / 30p (at 10Mbit/s) or lowly VGA at 25p / 30p (at 4Mbit/s). Again the choice of 50 / 60 or 25 / 30 is down to the origin of the camera. I’m pleased Panasonic has included 4k UHD (as well as 1080) at 24p in addition to the regional TV frequencies as it makes the camera much more flexible for shooting B-roll for film-makers. You will however note there’s no frame rates above 50 / 60p at any resolution, ruling out any slow motion work. There’s also no extended teleconverter option.
Prior to filming, or during filming, you can adjust the aperture, shutter or exposure compensation dials, along with firing-up the ISO menu and adjusting that too if you like (up to a maximum sensitivity of 6400 ISO). Unfortunately all of the adjustments involve turning very clicky controls which isn’t ideal when filming, and in the absence of a touch-screen, there’s none of the silent controls offered by the GH4 or most other Micro Four Thirds bodies. You can also switch the camera to Manual Focus and use the lens ring to adjust the focusing distance while filming, with focus peaking to help you confirm – albeit not with any magnified assistance. Zebra patterns are also available with two presets that can be set between 50 and 105% in 5% intervals.
Some more notes for anyone thinking of using the LX100 in a professional environment. It may offer 4k UHD (3840×2160), but not Cinema4k (4096×2160). You can apply various Photo Styles, but it lacks the Cinelike D and V profiles of the GH4 and FZ1000; if you want to capture the flattest footage for subsequent grading, the best you can do is turn the sharpness, contrast, saturation and noise reduction all down to their minimum -5 settings (see my LX100 flat footage sample).
It’s also worth looking at how Panasonic generates both 1080 and 4k video. When filming 1080, the LX100 takes the full usable sensor width of 4480 pixels and scales it down to 1920 pixels. So the diagonal field of view when filming in 1080 is identical to shooting 16:9 stills, but of course the uneven scaling factor means there’s also artefacts to deal with.
So far so similar to the GH4 and FZ1000, but the LX100 handles 4k differently. On the GH4, the 4k modes simply took 3840×2160 or 4096×2160 crops direct from the middle of the sensor and recorded them without scaling. Since they were crops, there was a reduction in the field of view, but since there was no scaling, there was also no moire to worry about.
On the FZ1000 the sensor resolution was higher than the GH4, so a 1:1 crop would have resulted in an even greater field of view reduction. So I believe Panasonic took a milder crop and scaled it down.
Since the LX100 already crops its 16 Megapixel sensor to 11.1 Megapixels for 16:9 stills, it has the potential for a 1:1 4k crop with the least field-reduction of the three cameras. After all, 16:9 stills on the LX100 measure 4480 pixels wide compared to 4608 pixels on the GH4. So making a UHD crop measuring 3840 pixels wide on the LX100 would only reduce the field of view by 1.17 times. So instead of 24mm at the widest zoom, you’d be looking at 28mm.
But bizarrely Panasonic has opted to employ a mild crop and a scale to generate the desired frame size. This means the LX100’s 4k footage not only has a slightly narrower field of view to 1080 video and 16:9 stills (so instead of 24mm at the widest zoom, you’re getting 26mm), but it also now suffers from moire. I feel it’s an unnecessary compromise too, since a nice clean 1:1 crop would have only involved losing 4mm in the diagonal field of view.
I put my disappointment to Panasonic and I got the impression the scaling along with absence of Cinelike D profiles was partly for the LX100’s target audience and partly to protect the GH4, but I still think a 1:1 crop would have been better, and rather than detract from GH4 sales, I could see existing GH4 owners picking up an LX100 as a B-roll camera. Maybe flat profiles and 1:1 video crops will be offered in future third-party firmware.
At this point, it’s worth taking a look at the difference in the field of view as it stands on the LX100, with 1080 below left and 4k UHD below right. Once again, the 1080 field-of-view is identical to shooting 16:9 still photos with the camera, so you get 24mm equivalent. Meanwhile the mild crop for 4k UHD means the field reduces slightly to 26mm.
Panasonic Lumix LX100 Wide angle coverage in 1080 MP4 video | Panasonic Lumix LX100 Wide angle coverage in 4k UHD MP4 video | |
 |  | |
| full image width 24mm equivalent | full image width 26mm equivalent | |
What about the difference in resolution? Below left and right are 100% crops from the original 1080 and 4k UHD footage and it’s immediately clear that while both suffer from scaling artefacts (look at the blue shutters at the bottom of the crops), the 4k UHD version still contains dramatically more detail. Indeed even if you down-sample the 4k UHD footage to 1080p, it still looks much better than native 1080p, so unless you want to film at the higher 50 / 60p frame rates or lower bit rates of 1080p, I’d recommend always filming in 4k with the LX100 and just downsampling if desired.
Panasonic Lumix LX100 100% crop from 1080 / 50p MP4 video | Panasonic Lumix LX100 100% crop from 4k UHD / 25p MP4 video | |
 |  | |
| 100% crop taken from video grab | 100% crop taken from video grab | |
 |
How about noise levels though? To find out I filmed four clips between 800 ISO and the maximum 6400 ISO available for movies in both 1080 25p and 4k UHD 25p, and presented 100% crops from each below.
Note the light levels were too low to generate a correct exposure of the whole scene at 800 ISO and the desired aperture, hence the darker crops. The ‘correct’ exposure only begins at 3200 ISO here, although ironically the area I’ve chosen to crop for the detail comparison looks a bit bright lower in the sequence!
Despite the brightness differences though, the crops confirm what we need to see: the LX100 records considerably more detail in 4k UHD than 1080, across the sensitivity range. Sure there’s more noise on the 4k crops, but remember we’re viewing them at 1:1 and if displayed the same size on a screen the differences in noise become less obvious. The bottom line remains the LX100 will deliver superior results if you shoot in 4k, even if you’re intending to downsample it to 1080.
Panasonic Lumix LX100 100% crop from 1080 / 25p MP4 video | Panasonic Lumix LX100 100% crop from 4k UHD / 25p MP4 video | |
 |  | |
| 100% crop taken from video grab at 800 ISO | 100% crop taken from video grab at 800 ISO | |
 |  | |
| 100% crop taken from video grab at 1600 ISO | 100% crop taken from video grab at 1600 ISO | |
 |  | |
| 100% crop taken from video grab at 3200 ISO | 100% crop taken from video grab at 3200 ISO | |
 |  | |
| 100% crop taken from video grab at 6400 ISO | 100% crop taken from video grab at 6400 ISO | |
Now it’s time to look at my sample movies, all of which were filmed in 4k UHD and 1080p, allowing you to compare the quality. I’ve chosen to present the 4k UHD ones below, but at the end of each caption have provided links to the alternatives. As always, the original files can be downloaded from Vimeo (for registered users) and if you’re really interested in evaluating the quality, I recommend you view those files.
| |
|---|---|
| |
| |
| |
|---|---|
| |
| |
| |
|---|---|
| |
| |
| |
|---|---|
| |
| |
| |
|---|---|
| |
| |
| |
|---|---|
| |
| |
| |
|---|---|
| |
| |
| |
|---|---|
| |
| |
| |
|---|---|
| |
| |
| |
|---|---|
| |
| |
Panasonic Lumix LX100 4K Photo mode
One of the most exciting things about capturing high resolution video is the ability to extract high resolution still photos from it. Video grabbing is not a new thing, but in standard definition you were looking at stills measuring a third of a Megapixel, and even in Full HD you’d only enjoy 2 Megapixels. But with 4k video you can make 8 Megapixel grabs which is much more useful.
|  |
 |  |
The key benefit to video grabbing regardless of the resolution is the frame rate, typically 24-30fps, which is much faster than even professional sports cameras operate at. Since the LX100 can record 4k at 24-30fps, it’s effectively capturing 8 Megapixel stills at 24-30fps. After capturing the video you simply go through it a frame at a time until you see the perfect moment, then extract a still image from it.
Previously to extract stills from video you’d use a player like VLC to play the video, pause it close to the desired point, then shuffle back and forth before then saving the decisive moment as a snapshot. Panasonic believes there’s an easier way so now offers video grabbing in-camera. This so-called 4K Photo mode was introduced on the LX100 and added to the GH4 and FZ1000 via a firmware update.
Enabling 4K Photo mode sets the movie quality to 4K at the highest frame rate supported by the camera – on the LX100 that’s 25fps for PAL models and 30fps for NTSC models. In my tests if the camera is set to Program mode for exposures, the 4K Photo mode also generally selected faster shutter speeds than when shooting ‘normal’ video; this makes sense as ideal shutter speeds for video are fairly slow and not ideal for taking grabs from. So long as your shutter speeds are faster than 1/100 you should be fine for grabbing portraits, and for action, aim for faster than 1/500.
Interestingly the 4K Photo mode also inherits the selected aspect ratio, so it’s not tied to filming and grabbing in the traditional 16:9 widescreen video shape. Set the LX100 to 16:9, 3:2, 4:3 or 1:1 and it’ll capture video at 3840×2160, 3504×2336, 3328×2496 or 2880×2880 respectively; note the 1:1 shape may have more pixels vertically than the 4:3 shape, but like the still photos on the LX100 it shares the same vertical field of view. Also note all of the 4K Photo modes involve a mild crop compared to normal still photos, so the lens coverage is slightly less.
When you play the videos back in-camera, you can use the transport controls to pause and shuttle back and forth one frame at a time, then press the OK button to extract a still JPEG image at the same shape and resolution as the video. Interestingly you can also do this with video filmed in the normal 4k movie modes (without 4K Photo enabled), but they’ll always be in 16:9 and if you were shooting in Auto or Program, the shutter speeds may be slower than you’d like for still capture.
I tested the 4K Photo mode with a variety of subjects: fairly static, moving slowly and moving quickly. Starting with fairly static, I filmed a portrait session and extracted the following still from it.
| |||

Now the 4K Photo mode may be capturing an 8 Megapixel image with a little scaling applied, but in terms of quality it’s actually not too far-off a native 12 Megapixel image shot normally with the camera. The nice thing about filming video for portraits is you notice very subtle differences as you shuttle-through the frames, and you also invariably capture a variety of posed and candid poses. The LX100’s continuous AF needs a second or so to catch-up if you or the subject moves much, but in general it’s a very practical way to grab some very usable images while also having a ‘behind-the-scenes’ video to go with it. It’s especially good for kids who’s expressions change a lot.
Shooting at 25-30fps and extracting the decisive moment is also obviously of interest to wildlife, sports and action photographers, and I was interested to see how well the camera could handle such subjects. In short, the limiting factors are the continuous AF on the camera, coupled with the modest telephoto reach of the lens. If the subject is very close and moving quickly, it’ll invariably be out of focus on many frames. If the subject is relatively distant though and not so demanding on focus, then you’ll enjoy more success, although obviously with only a 75mm reach the subject may not be fairly small on the frame. Here’s one of a kite surfer practising – unfortunately he looked tiny approaching face-on at 75mm.
| ||

I enjoyed more success with subjects that may move quickly, but not always towards or away from you – such as a bird taking-off. We have plenty of seagulls around my home town of Brighton, so I thought I’d get them to model for me in payment for all the presents they’ve left on my car. Here’s a frame grab from a 4K Photo video, followed by 16 consecutive frames I grabbed from the video to illustrate the movement when shooting at 25fps.
| |||

| Panasonic Lumix LX100 4K Photo video grabs – each is one frame apart | ||||||
 |  |  |  | |||
 |  |  |  | |||
 |  |  |  | |||
 |  |  |  | |||
Personally speaking I’m very excited about capturing stills from high resolution video, and it’s another feather in the cap of the LX100. But I also hear a lot of resistance from some photographers over this technique like it’s cheating at best, or at worst, the death of photography. That’s absolute nonsense. Traditional still capture isn’t going away – this is just another tool in the photographer’s box to capture the image they desire. But equally it got me thinking about the meaning of photography with modern gear.
Is grabbing stills from pre-recorded video so different from capturing stills from live video? After all, that’s effectively what live view mirrorless cameras do. Who cares if the video is live or pre-recorded? Sure there’s some joy in being lucky enough to capture a decisive moment with a single shot, but believe me sports, wildlife and portrait photographers don’t take any chances, and frequently rattle off hundreds of frames before then picking through them later for the best moment. Is shooting stills at 10fps somehow more ‘worthy’ than shooting video at 30fps? Is it the word video that people have a problem with?
It’s also important to point out that while video grabbers may sit back and cherry-pick the best frames from their footage, the actual video footage itself still required a degree of skill to capture. You still need to find it, compose it, light it, direct the subject or wait for the best conditions. The hard work of capture is done on-site, leaving you later reap the rewards when extracting your still image.
In this way, it’s really not unlike shooting RAW or bracketed exposures, where you capture all the information you desire on-site in the knowledge you’ll create your ideal still from it later.
Maybe you’re on-side, or perhaps still to be convinced. For me, I’m a believer. Of course I’m not of course going to swap all of my still photography for video grabbing, but I can certainly see many situations when it would be an extremely valuable tool.
As for the LX100’s implementation, I think Panasonic has done a great job of making it as easy as possible, although I wonder if capturing footage at 4k is an arbitrary limit or bumping against the actual bandwidth of the processor. If the LX100 can capture 4k video at different aspect ratios, then is there in fact sufficient processing muscle to record the entire frame? I know it’d be a nonstandard video size and shape, but if it’s just for grabbing stills, then why not? Imagine capturing 12 Megapixel images at 25-30fps without a field-crop or any scaling? I see RED doing it at 6k today and Panasonic discussing 8k in the future, so my question is whether we in fact already have the tools to do better than 4K for photos on the current Lumix lineup? It’s an intriguing thought, but in the meantime I’m impressed with 4K Photo capture on the LX100 (and it’s pricier siblings) – it’s a key benefit over the competition at any end of the market.
Panasonic Lumix LX100 Wifi
The Lumix LX100 features Wifi with NFC, allowing you to wirelessly browse images on the larger and more detailed screen of a smartphone, tablet or laptop, copy them onto these devices, upload them to online storage or social media services (either directly or via a smartphone), or become remote-controlled by the free Lumix Image app for iOS or Android devices. These are flexible and powerful features to have at your disposal, and if your phone or tablet is additionally equipped with NFC you can simply hold it against the LX100 for a second and they’ll sort out the Wifi network selection and password entry for you, making the whole process much quicker and easier. If you don’t have an NFC device yet though, don’t worry. You can achieve the same end result by manually choosing a Wifi network and entering any security by hand, it’s just that NFC will do that part for you with a simple tap or two. I’ll concentrate on the Android app from here on, using my Samsung Galaxy S4.
 |
Okay so let’s start with establishing a connection between the camera and a smartphone or tablet. NFC or not, the first thing you’ll need to do is install the free Lumix Image app, available for iOS or Android devices. Next you’ll need to enable Wifi on your phone or tablet and if you’re intending to use NFC, you’ll also need to enable this on your phone / tablet.
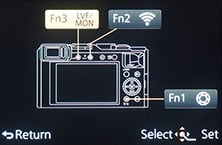
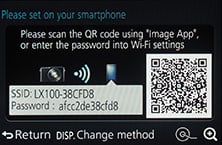
If your phone / tablet doesn’t have NFC you’ll now need to press the Wifi button on the camera (by default assigned to Fn 2 on the back of the LX100) or choose Wifi from the setup menu and either create a new connection, or load one you’ve previously configured. If you’re creating a new connection you can choose from ‘remote shooting and view’, ‘playback on TV’, ‘send images while recording’ or ‘send images stored in the camera’. For a smartphone / tablet connection, you should choose the first option for remote shooting and view. This then sets up the LX100 as a wireless access point, displaying the SSID name and password, alongside them both encoded as a QR graphic. You’ll then need to start the Lumix Image app, select Wifi as your means of connection, select the LX100 network and either enter the password, or simply point your handset’s camera at the QR code.
If your phone or tablet has NFC you should start the Lumix Image app then briefly hold the two devices next to each other for about one second. For security, NFC has a very short range, so you’ll need to ensure the NFC chips on both devices are literally right next to each other for the initial negotiation. The location of the NFC chip is marked on the left side of the LX100, but it may not be as obvious on your handset. On the NEXUS 7 it’s actually hidden behind the large NEXUS logo on the back, but on the Galaxy S3 and S4 it’s hidden on the rear to one side, but all you need to do is brush the camera’s NFC sensor over the other device and when it finds it, it’ll let you know. A message will appear on both the camera and phone or tablet asking you to tap again to confirm the connection, and that’s it. I found it worked most times, but at others it required a couple of attempts, or a restart of the Image app.
If the connection was unsuccessful for some reason you’ll hear an error sound from your phone or tablet, but if it works, you’ll hear a triumphant ‘ta-da’ sound instead (annoyingly played at full-blast on Galaxy S phones). The NFC negotiation process takes about 15 to 20 seconds to complete, but the devices only need to be in close contact for the initial handshake which takes less than a second. You may be twiddling your thumbs during the negotiation, but it’s still quicker and easier than manually searching for and selecting the right Wifi network and entering any security.
Once your phone or tablet becomes connected to the LX100, you can remote control it, browse the images direct from the memory card, copy them onto the handset and if desired send them onto various storage or sharing services. You can also set the app to make a GPS log for subsequent syncing and tagging, which I’ll cover in a moment.
 |  |  |
The remote control feature is fun, although lacks the remote exposure control of earlier Lumix models. Once connected to the Lumix app, you’ll see a live image with buttons to take a photo or start or stop a video. You can tap anywhere on the live image to set the focus to that area or directly take the shot – minor consolation for the absence of a touch-screen on the actual camera, although annoyingly you can’t tap to refocus while recording a movie, a feature that was possible on earlier models. You can adjust the drive mode, ISO, white balance or focus area remotely, and there’s also a Q.Menu button which presents a list of additional options you can remotely change including the flash mode, aspect ratio, resolution, compression, metering mode, photo style or movie quality, which for the LX100 includes all the options.
What you can’t do though is adjust the exposure. On earlier Lumix cameras, you could adjust the aperture, shutter speed or exposure compensation all with the app, but sadly on the LX100 you ca’t adjust any of them remotely. You’d be forgiven for assuming this is a limitation of having physical dials for the shutter, aperture and compensation, but don’t forget with the shutter and aperture controls set to A, the camera is quite capable of selecting and adjusting the aperture and shutter electronically. Why can’t we set the dials to A and use the app to control these settings I don’t know, but if it is a limitation of having the retro controls, I’m beginning to like them less.
Moving on, you can also use a connected phone or tablet to quickly browse the images in your camera on their bigger screens without having to copy them over first. This is more useful than it sounds. I found myself really enjoying scanning through a day’s shoot on my Galaxy S4 without having to remove the card, physically connect the camera or copy any unnecessary files.
 |  |  |
To maintain a responsive experience which feels like the images are stored locally on your phone or tablet, the camera sends a lower resolution version. So you can pinch to zoom-in a little, but not as much as if you were viewing the original. But when you see an image you like, just press and hold it on-screen for a second and the Lumix Image app will let you save the original to your device or start uploading it to one of the social, sharing or storage services installed on your device. You can configure the app to provide shortcuts to two or three of your most used services which could include Dropbox and Instagram in addition to the more usual suspects. Or of course once the image is copied into your device, you could just exit the Panasonic app and handle it direct from whichever sharing or storage app you like via your phone’s gallery.
You can also choose whether to copy images in their original resolution, or in one of two smaller versions. It typically took about 20 seconds to copy an original JPEG from the camera to my Galaxy S4 from a distance of about 1m; it’s not possible to copy RAW files though.
Alternatively if you’re browsing your images on the camera and you see one you’d like to share, just tap the camera against your NFC phone or tablet and it will automatically establish a temporary network and copy the original over; the entire process again takes about 20 seconds. This is really neat, although not quite as seamless as Sony’s latest implementation. With the LX100 you’ll need to start the Image app on yuor phone yourself and enable Wifi, before holding the two devices together; on Sony’s RX100 III you simply play the image and hold the camera against the phone and it’ll automatically launch the desired app, enable Wifi and get on with the trasnfer process. Both are neat, but the Sony is definitely quicker and easier.
It’s so much fun interacting with the camera using a smartphone or tablet that it’s easy to forget the Lumix LX100 can also upload images directly to the internet by itself via a suitable Wifi connection. You can upload directly to Facebook, Twitter, Picasa, Youtube, Flickr, but there’s two gotchas. The first is the camera doesn’t have any kind of built-in browser to accept the terms and conditions of public hotspots, so you’ll mostly be using home or office-based Wifi. To be fair though, the only cameras I can think of which do have a browser to accept terms and conditions are Sony’s Wifi-equipped models. The second problem is before letting you upload anything directly from the camera you’ll first need to register for Panasonic’s free Lumix Club.
To be fair, the approach is not dissimilar to the way most other manufacturers implement direct uploads, but this side of sharing images is just so much easier and flexible using a smartphone or tablet. For me it makes more sense to just use NFC / Wifi to copy the image from the camera to a more capable device (with a touchscreen to caption for starters) and upload from there instead.
 |  |  |
As mentioned earlier, you can also configure the Lumix LX100 to automatically send images after they’re taken to a smartphone, tablet, or a computer. The LX100 claims to be able to communicate with computers directly, rather than require an intermediate access point, but I couldn’t get it to talk directly to my MacBook Pro. Either way, it’s nice to have images automatically sent to devices which can subsequently upload them to cloud storage and backup if desired. Sure it’s heavy on bandwidth, not to mention battery power, but if neither are significant issues for you, it’s a compelling proposition. Or of course you could simply have a client viewing images on a tablet as you’re taking them, inside or out.
There’s no GPS built-into the Lumix LX100, but the Lumix Image app can be set up to record a GPS log with your phone that can later be synced with the camera. I successfully tested this with earlier Lumix cameras including the GH4, but for some reason the LX100 didn’t want to play ball. When I fired-up the Geo-tagging page, it claimed it couldn’t find a position – despite the GPS working fine for other apps. Thinking it could be my GS4 at fault, I tried it again with an older GS3, but the same thing happened. I’m assuming this is a temporary incompatibility with the app and the LX100 as once again it all worked fine with the GH4 (and earlier cameras) with the same GS4 handset, so I hope to retest it in the future and report success. In the meantime I’ll explain how the process worked with the earlier GH4.
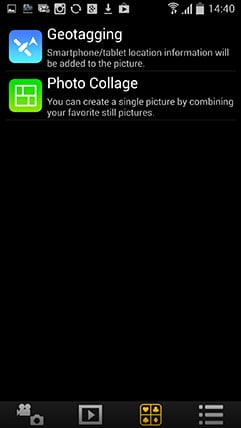
Once your handset is connected to the camera over Wifi, the first step is to tap the third icon at the bottom of your device’s screen (with the four playing card symbols on it), then choose the Geotagging option on the next page. This fires-up the interface pictured below center with three main buttons at the bottom.
 |  |  |
The first button performs a time-sync with the camera – essential to make sure the recorded co-ordinates match up with the pictures on the card. The middle button then starts the log recording GPS positions, with the default setting being every five seconds.
Now you can merrily snap away with the camera, safe in the knowledge that your phone should be recording your current position in preparation for a synchronization at a later point. The camera and phone don’t need to be in Wifi contact while you’re taking photos, only during the initial time sync and final data transfer. The only thing you need to remember is to take the phone with you and try to ensure it has a relatively clear view of the sky for successful GPS acquisition.
As with my Wifi tests earlier, I used my Samsung Galaxy S4 to try out the GPS syncing process. At first I kept the phone in the top of my backpack to maximize a clear view of the sky, but later became lazier and simply popped it in the pocket of my jeans. At first I was concerned the five second recording interval would hammer my phone’s battery life, but it didn’t seem to have a significant impact. Put it this way I could happily leave the logging running all day while also performing a number of camera, Wifi and internet tasks on a single charge.
At some point you’ll need to transfer the location data recorded by your phone into the camera, and this process again starts by connecting it to Lumix Image app running on the phone. Once you’ve selected the Geotagging page you should tap the third icon at the bottom with the arrow pointing up at a camera. This copies the location data to your camera and in a new and very welcome option you can now execute the actual embedding of co-ordinates into images from the app itself. Previously you’d need to find a GPS logging menu buried in the setup section of the camera and start the process from there. Thankfully the new approach is much easier and more intuitive – you need never touch the camera during the process.
As usual I entered the co-ordinates of several images into Google maps afterwards and was impressed by their accuracy. Of course this is entirely dependant on the GPS signal captured by the handset, but in general so long as it had a fair view of the sky before shooting and so long as the time sync was performed at periodic intervals (remembering to update clocks on both devices if you enter a new timezone), there was rarely an issue.
Panasonic Lumix LX100 continuous shooting
The Lumix LX100 offers four continuous shooting speeds: Low which shoots at 2fps, Medium at 7fps, High at 11fps, or Super High which rattles-off 40fps. There are a few caveats to note though. All of the speeds quoted above are with the focus set to Single or Manual. If you’re in Continuous AF, the Medium and High speeds both fall to 6.5fps, and if you’re shooting in Super High mode, the resolution drops to small. In terms of burst size, Low, Medium and High should be able to keep shooting until you run out of memory for JPEGs or up to 20 frames for RAW, while the Super High mode is limited to bursts of 60 small (3 Megapixel) JPEGs. Oh, and if you’d like to see the view update in real-time as you shoot, you’ll need to opt for the Medium or Low speeds.
 |
 |
 |
These are Panasonic’s figures, but as always I like to test these capabilities for myself, so I fitted with LX100 with a freshly-formatted UHS-1 SD card, set the shutter speed to 1/500, the sensitivity to 400 ISO and started timing different modes.
Starting with the High option, which is the fastest you can shoot at the full resolution, I fired-off 63 Large Fine JPEGs in 5.31 seconds, corresponding to a speed of 11.9fps; the camera slowed after 63 shots, but that’s still quite a burst at this speed. Switching the camera to RAW allowed me to shoot 21 images in 2.29 seconds, corresponding to a speed of 9.2fps; after 21 frames, the speed reduced to 2fps.
In the High speed option, the LX100 would abandon live view and instead display the last photo taken. Since it did this around 11 times a second, it approximated a real feed, albeit with some lag, so you’d notice movement just after it happened. Like other cameras that suffer from this limitation though, it’s possible to get a feel for this and to anticipate moves based on the feedback.
Switching to Medium speed however gives you a live view between frames, allowing you to react to changes. I fired-off 65 shots in 11.04 seconds, corresponding to a rate of 5.9fps, and the camera seemed happy to keep shooting at this speed while I still had memory remaining.
If you’d like something faster though and don’t care about any feedback, try Super High speed, which in my tests fired-off 60 frames in 1.47 seconds, for a speed of 40.8fps. During the one and a half second burst, the screen goes blank, so it’s best-done when holding the camera still. Note the resolution drops to 3 Megapixels though.
So far all the tests have been with Single AF. To test Continuous AF, I switched the LX100 back to High speed, set the focus to AFC and varied the distance between the camera and subject as I held the shutter down. In this situation I fired-off 91 shots in 15.7 seconds, corresponding to a speed of 5.8fps, and like my earlier continuous AF tests with bike riders, about three quarters of the images were fully sharp.
In all the modes, the LX100 performed pretty much as quoted in terms of speed and depth, and lest we forget there’s also the 4K Photo option, which effectively takes 8 Megapixel images at 25 or 30fps depending on the region of your camera. So there’s no shortage of continuous shooting options to choose from. Indeed since none of the enthusiast-class compacts with telephoto coverage currently take a decisive lead in continuous autofocusing, the LX100 at least edges ahead on burst options. The 4K Photo mode in particular is fantastic for grabbing action that’s not moving towards or away from you.
Panasonic Lumix LX100 sensor and processing
The Lumix LX100 is equipped with a Four Thirds sensor, indeed the exact same sensor employed by the Lumix GX7, albeit coupled with a newer image processor to support things like 4K video. This sensor measures 17.3x13mm and is therefore comfortably larger than the 1in sensors (13.2×8.8mm) used in the Sony RX100 III and Canon G7X, not to mention Panasonic’s own FZ1000.
But it’s important to note the Lumix LX100 does not use its whole sensor. Due to the lens design, the imaging circle does not extend to the corners of the sensor, forcing Panasonic to crop the effective image area from 16 to 12 Megapixels. If the lens could have delivered an image to the entire sensor, then it would have been much larger, heavier and more expensive, so Panasonic took the decision to use a smaller lens and crop the sensor instead.
If you’ve never come across imaging circles before, then I understand if you’re a bit confused right now. Every lens produces a circle inside which the quality meets a desired standard. Outside this ‘imaging’ circle, there’s a brief transition of poor quality before darkness, so clearly camera designers need to make sure their sensors fit within the circle, or conversely, lens designers need to ensure they deliver a sufficiently big imaging circle to cover the desired sensor area.
Four Thirds sensor with imaging circle in blue | Four Thirds sensor with LX100 lens imaging circle in red | |
 |  | |
| Blue circle represents imaging circle to cover whole sensor | Red circle represents actual imaging circle of LX100 lens | |
I’ve created a diagram to illustrate what’s going on with the LX100. Above left is the Four Thirds sensor in black with the blue circle indicating the minimum imaging circle to cater for it. Above right is the same sensor, but this time with a smaller red circle representing the actual imaging circle of the LX100’s lens. It’s clear how if the image must remain inside the red circle, it needs to be cropped, hence the loss of around four Megapixels around the edges. So the native 4:3 shape of the whole sensor (as used on the GX7) would deliver 4608×3456 pixels, while the cropped 4:3 shape on the LX100 delivers 4112×3088 pixels. It’s also now clear why the LX100’s lens can’t be made into an interchangeable lens for Micro Four Thirds cameras, as the imaging circle isn’t big enough to cover the sensor.
While it’s a shame the LX100 doesn’t use its entire sensor area, the first important thing to take home from this explanation is the cropped area is still larger than the full area of the 1in sensor used by the RX100 series, G7X and FZ1000. Even with the crop, the LX100 still has a larger effective sensor area: 15.4×11.6mm on the LX100 versus 13.2×8.8mm on the RX100 series.
Secondly, Panasonic’s engineers realised they could exploit unused portions of the sensor that were still within the imaging circle to capture multiple aspect ratios without reducing the diagonal field of view. Normally when you want to shoot in wide aspect ratios like 16:9, you have to crop slices from the top and bottom of the native image, reducing not just the total number of pixels, but also the diagonal field of view – in turn making your lens less wide.
Panasonic Lumix LX100 aspect ratios. Red circle represents the lens imaging circle. Notice how wider aspect ratios exploit spare pixels at the sides to maintain diagonal field of view | ||||
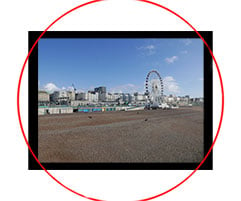 |  | 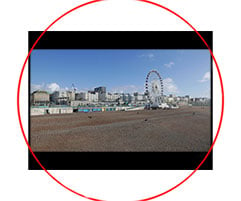 | ||
4:3 image capture on LX100 | 3:2 image capture on LX100 | 16:9 image capture on LX100 | ||
But with the LX100, spare pixels to the side of the 4:3 image allow it to capture 3:2 and 16:9 shaped images that are actually a little wider as well as shorter. They maintain the same diagonal field of view, meaning the same 24mm wide angle coverage at any of these aspect ratios, and also lose fewer pixels in the process. So as a reminder, the LX100 shoots 4:3 at 4112×3088 pixels, and offers 3:2 at 4272×2856 pixels and 16:9 at 4480×2520 pixels; notice how they’re getting wider as well as shorter. Compare that to the GX7 which shoots 4:3 at 4608×3456 pixels, 3:2 at 4608×3072 pixels and 16:9 at 4608×2592 pixels. You’ll notice while the GX7 of course starts with a larger image when shooting 4:3, by the time it’s cropped-down to 16:9, it’s actually very close to the LX100 when shooting the same wide shape. So this multi-aspect capability is a nice spin on what could otherwise be seen as a negative side to the camera.
Oh wait, there is one thing I’m not happy about: the 1:1 square aspect ratio. On Panasonic’s normal cameras with 4:3 shaped sensors, the 1:1 shape is a simple crop from the middle. So it shares the same pixel height as the 4:3 image, but is just narrower on the sides. For the LX100, Panasonic has done exactly that: taken the 4:3 image and shaved off the left and right sides, reducing a 4112×3088 pixel image to 3088×3088 pixels. Same height, but narrower.
LX100 1:1 aspect ratio: cropped from 4:3 image | LX100 imaging circle could accommodate a larger 1:1 | |
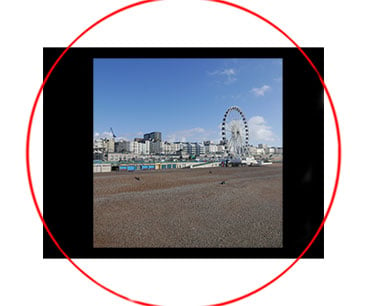 | 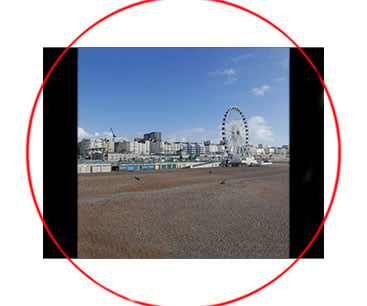 | |
| 1:1 image capture on the LX100 | 1:1 image capture if it used the full sensor height | |
This may seem like the natural thing to do, but look at my diagram above and see how a square crop could in fact be taller than the 4:3 shape, indeed exploiting the full height of the sensor. A full-height square fits inside the imaging circle of the LX100 just fine, and while it can’t quite maintain the same diagonal field of view as the other shapes, it could be captured with less of a compromise. Indeed a square crop made with the LX100’s full sensor height would be the same as a square crop on a GX7 or other 16 MP Micro Four Thirds cameras: 3448×3448, containing 12 Megapixels to the current 10 on the LX100, and a wider field of view too. Hopefully this is something that could be resolved with a firmware update.
Right, now that’s all out the way, what about the actual quality options? You already know the LX100 can record in four different aspect ratios, selected using a dedicated switch on the lens barrel. Each aspect ratio can be recorded in three different resolutions, with the smaller two being around 6.5 and 3 Megapixels respectively. You can choose to record images with two different JPEG compression levels or as a RAW file; you can also record RAW files with an accompanying JPEG is desired. Note if RAW is enabled, many of the picture enhancement menus are greyed-out.
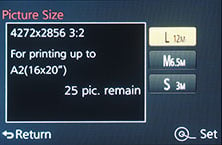 | 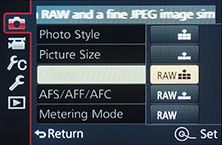 | 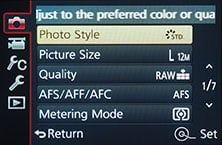 |
The sensitivity ranges from 125 to 25600 ISO and from the Photo Styles menu you can adjust the noise reduction, along with contrast, sharpness and saturation on a scale of +/-5 steps. Note Auto ISO and iISO options are available, but the latter not in the Manual or Shutter Priority exposure modes.
There’s the usual selection of White Balance presets, along with two custom readings and the opportunity to manually enter a colour temperature from 2500 to 10000K. The LX100 also inherits the tone curve adjustment of recent Lumix G cameras from the Highlight / Shadow menu. There’s four presets for Standard, Higher Contrast, Lower Contrast and Brighten Shadows, along with three Custom positions where you can adjust Highlights and Shadows in a range of +/-5 steps; you can even drag the curve, although you can’t change the anchor points, only the degree of the curve for each half. This is however a real boon to anyone who likes to nail a particular style in-camera for JPEGs rather than going through the processing of RAW files later – and while it’s a feature we’ve seen before on Lumix G cameras, it’s a classy option to find on a fixed lens compact.
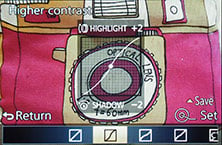 | 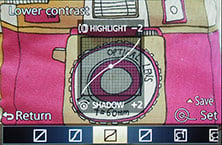 |  |
If you prefer a more automatic approach, the Lumix LX100 offers Panasonic’s iResolution and iDynamic options to enhance images with either additional sharpness or contrast. These can certainly deliver punchier results and are deployed in the Intelligent Auto mode, but I prefer to keep things flatter for possible adjustment later. In PASM modes, both are set to off by default, so that’s what you’ll see in my results and sample images pages.
The only thing which remains now is to present my results pages where you can see how the Lumix LX100 measures-up against the Sony RX100 III, Fujifilm X30 and Sony Alpha A5100; so I have results for a variety of cameras with smaller and bigger sensors.


