
Fujifilm Finepix XP120 review
-
-
Written by Ken McMahon
In depth
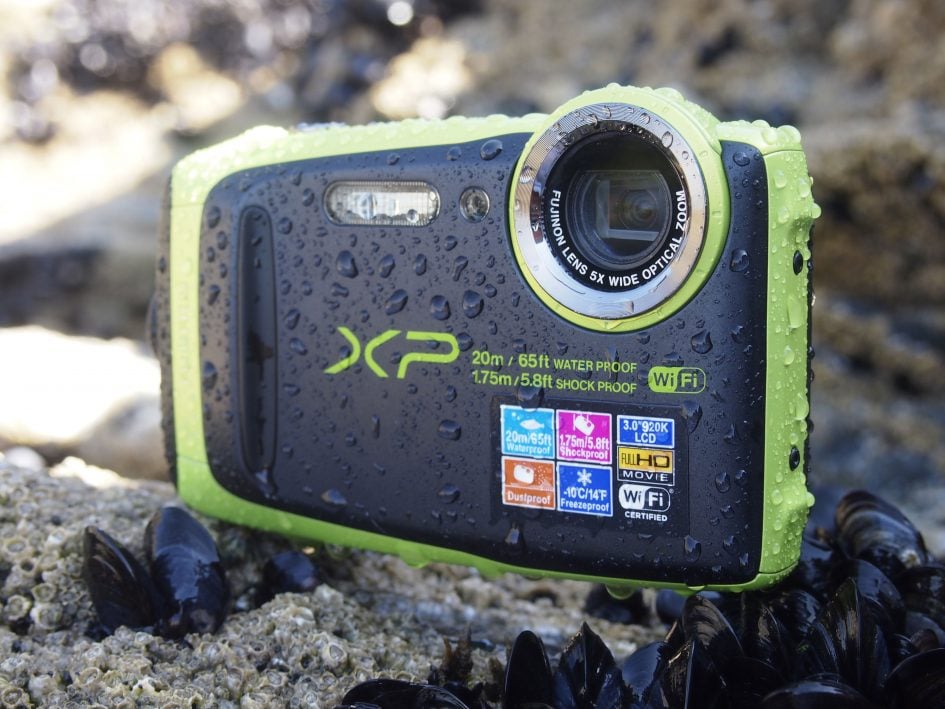
The Fujifilm FinePix XP120 is a waterproof rugged compact with a 5x optical zoom and a 16.4 Megapixel sensor. It’s waterproof to a depth of 20 metres, freezeproof to -10C, can withstand a drop from 1.75 metres and is also dustproof.
Released in January 2017, XP120 is an update to the then year-old FinePix XP90. The new model shares the same 28 – 140mm equivalent zoom lens, the sensor and the 3 inch 920k dot fixed screen of its predecessor. What’s new is that it can dive 5 metres deeper and has a new cinemagraph mode that creates still images with moving elements.
While Fujifilm doesn’t exactly push the boat out with updates to its XP range – the XP90 added a larger, higher resolution screen to the earlier XP80 – it remains a very popular model for beachgoers and outdoor adventurers looking for an easy to use tough waterproof compact that’s relatively inexpensive.
In my review I’ve tested the FinePix XP120 alongside the Olympus TOUGH TG-5. The TG-5 is a more sophisticated compact with a higher specification than the XP120 (though it can’t dive quite as deep), and of course is more expensive. Read my full review to discover if the Fujifilm FinePix XP120 is good enough for what you need, or you should spend the extra on the TOUGH TG-5.
Fujifilm FinePix XP120 Design and controls
The design of the FinePix XP120 hasn’t changed much in three generations, but that’s no bad thing as it looks modern and stylish and functions well both in and out of the water. It’s available in four colours, blue, green, sky blue and yellow – all of which make it easy to spot if you drop it.
The rounded edges make it easy to slip it inside a wetsuite – my favoured option for swimming and surfing, but the same applies for bags and pockets. The black front panel has a top to bottom ridge which provides a reasonable secure grip for your fingers. The lens is mounted in the top left corner of the body (as you hold the camera facing away form you) which is a more conventional arrnagement for underwater compacts than the centrally mounted lens on the TOUGH TG-5. I don’t think there’s much of an advantage one way or the other, but you do have to make a bit more of an effort to keep your fingers out of the way with the XP120.
On the top panel there’s a shutter button with a rugged looking textured surface. Next to that is a small on/off button and next to that an even smaller, slightly recessed movie record button. To begin with I found myself frequently acddentally turning the camera off when I meant to record a movie because of the proximity and similar size of the two. The movie button is red, but you can’t see it if you’re looking at the screen. Then I discovered there’s a slight dimple between the two that can help with orientation.

The thumb-operated zoom control is on the rear panel. This is where it used to be on the TOUGH TG-4 – Olympus moved it to a collar around the shutter release on the TG-5. I prefer it on the collar, but that’s just me, I don’t think it really makes a great deal of difference.
What does make a difference is the prominent on-screen zoom bar on the XP120 which leaves you in no doubt how far zoomed in you are. The tiny numerical read-out on the TG-5 isn’t nearly as good. It’s a minor point, but if you’re floating in the ocean with few landmarks apart from maybe boats and other people, it can be hard to tell whether you’re zoomed in or out.
The XP120 has a four-way controller with exposure compensation, flash mode, Self-timer and interval shooting options, and macro focussing at the cardinal points. There’s no mode dial or control dial like on the TOUGH TG-4, but the XP120 is a simpler camera and doesn’t really need them.
The centre button on the four-way controller doubles as a menu/OK button. So to change the shooting mode you press the centre button, select the shooting mode from the shooting mode menu, the press the centre button again. Simple enough, but not quite a straightforward as rotating a dial.
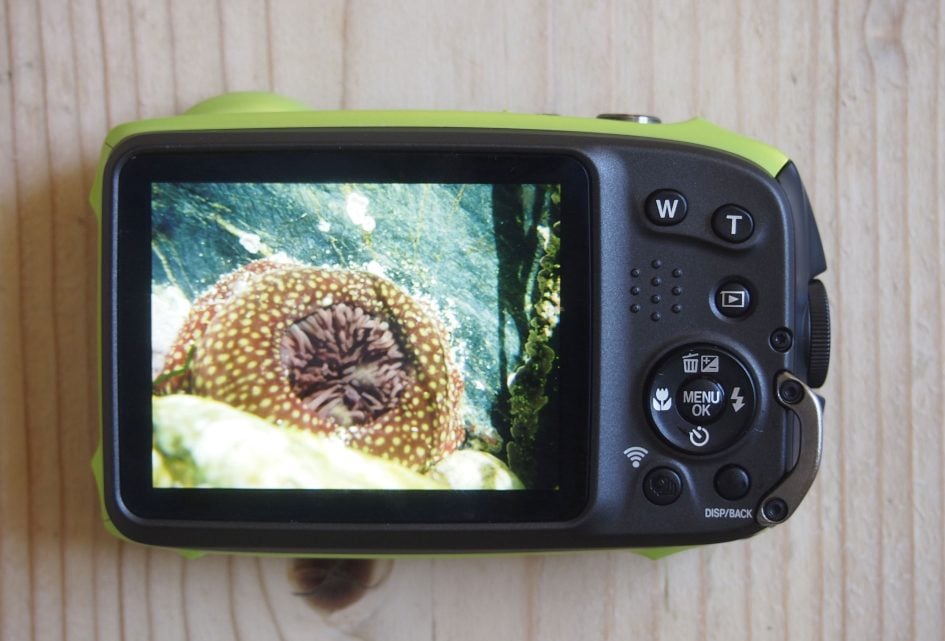
The FinePix XP120 retains the 3 inch 920k dot LCD screen that was introduced on the earlier XP90. My first impression of the screen on switching the camera on was that it wasn’t particularly bright. By default the screen brightness is automatically adjusted for the ambient lighting conditions and possibly the screen wasn’t at full brightness as I was indoors. But in Auto mode the screen was also difficult to see outdoors in bright sunlight. To be fair, most screens are, but for the whole of the review period I manually set the XP120’s screen brightness to +5. At that setting it worked very well – and in fact was better outdoors than the lower resolution screen on the TOUGH TG-5, but having the screen turned up to maximum brightness will inevitably have a negative effect on the XP120’s already fairly mediocre battery life.
So let’s talk about that. A fully charged battery will provide you with enough power to take 210 shots. That’s a fairly meagre quantity and, unless you plan on fairly casual use, you might want to think about carrying a spare, particulalry if you’re out for a day or weekend’s adventuring.
The battery is charged in-camera over the USB connection using the supplied charger and USB cable which has standard A and micro B connectors, so you may have other devices that use the same cable and can avoid taking multiple cables and chargers when travelling. As well as the supplied charger you can charge the XP120 from a laptop or other suitable source.
The FinePix XP120’s combined battery and card compartment is accessed via a full-length waterproof door on the right side of the camera body. It has a large wheel-style catch with a locking button at the centre, so to open it you press the button and rotate it. It’s much easier to operate than the small dual catches on the TOUGH TG-5 and seems just as secure.
Inside the door there are also two ports, a USB port for charging and image transfer and a micro HDMI for connecting to a TV. On the base of the XP120 you’ll find a standard 1/4 inch tripod bush.
Fujifilm FinePix XP120 Lens and stabilisation
The Fujifilm FinePix XP120’s 5x optical zoom has an equivalent range of 28 – 140mm and a maximum aperture of f3.9 closing to f4.9 when fully zoomed in.
Fujifilm FinePix XP120 coverage, wide and tele

Above left: at 5mm (28mm equivalent), above right: at 25mm (140mm equivalent)
A 5x optical zoom may not sound like a lot, particularly when compared with non-rugged compact super-zooms with a 30 or even 40x range. But water-proof compacts have enclosed zooms and due to design constraints rarely exceed 5x. The XP120 out-reaches the 4x TOUGH TG5 by quite a bit at the telephoto end of the range – 140mm compared with 100mm. At the wide-angle end though, it’s the TG-5 that wins with 25mm compared with 28mm on the XP120.
In my view, a decent wide angle is more important on a rugged waterproof than a longer telephoto. For one thing, the situations in which you use a rugged compact – floating in the sea, dangling from a rope, holding the camera one-handed while hanging on to something with the other – don’t make it easy to frame shots when zoomed in a long way. For another, you’re often quite close to the action, so you don’t really want to be zoomed in too far.
A good wide angle on the other hand can be very useful for self-shooting, when you want to fit in as much as possible from an arm’s length viewpoint, or if you’re in a cramped environment, like a tent, a cockpit, or a cave. I’ll talk more about this in the shooting experience section below.
The other important lens specification to consider on a camera intended for underwater use is the maximum aperture. On the XP120 that’s f3.9 at the wide angle end of the zoom, closing to f4.9 at the telephoto end. It’s not particualry bright, especially compared with the f2 – 4.9 aperture on the TOUGH TG-5 and that means that in low light you’ll be forced to use a higher ISO sensitivity setting in order to be able to select a fast enough shutter speed to avoid camera shake.
One thing that can help in those sorts of situations is good image stabilisation. The FinePix X120 employs sensor-shift stabilisation to reduce the effects of camera movement at slower shutter speeds. There are two modes, Continuous and Shooting only – the latter activates when you half-press the shutter button.

Above left: 100% crop, 5-25mm at 25mm, 1/10, 100 ISO, IS off. Above right: 100% crop, 5-25mm at 25mm, 1/10, 100 ISO, IS continuous.
To test the stabilisation on the FinePix XP120 I zoomed it to 140mm equivalent and took a series of shots in fading light at progressively slower shutter speeds first with the stabilisation turned off, then with it in continuous mode. As you can see from the 100 percent crops above, with stabilisation you can handhold the XP120 at speeds down to around 1/10 – that almost four stops slower than conventional wisdom suggests is possible without stabilisation.
Fujiflim Finepix XP120 5mm (28mm equivalent) 1/100 f3.9 100 ISO, Macro AF.
Before I move on to talk about the XP120’s movie recording features, I should mention that the closest focus distance of the XP120’s lens is 9cm. If you want to shoot close-ups of small subjects that’s not really going to get you close enough, at that distance, anything smaller than, say, a pair of goggles, isn’t going to fill the frame. By contrast, the TOUGH TG-5 has the best macro features of any compact camera I’ve ever tested, it’ll allow you to get to within 1cm of your subject and use the zoom to magnify it. But even compared with average compacts, that will let you focus down to between 1 and 5cm, the XP120’s macro is pretty disappointing.
Fujifilm FinePix XP120 Movies
The Fujifilm XP120 has a best quality HD video mode of 1080 60p. You can also shoot 1080 / 30p, 720 / 60p and 640 / 30p. Additionally there are three high speed (slow motion) modes that trade off resolution for slower playback. Sadly none of them is HD resolution, the best quality is 640 x 480 and records at 120 fps for 1/4 speed playback at 30fps. There’s also a 320 x240 /240fps and a 160 x 120 320fps mode for playback at 1/8th and around 1/10th speeds respectively.
The maximum recording time for the HD modes is 29 minutes. You can shoot 640 x 480 / 30p for two hours and the hi speed modes are restricted to 30 seconds recording.
To start recording you just press the red record button (not the on/off button next to it). The 4:3 proportioned screen displays 16:9 HD recording with black bars top and botton. If you want to frame up your shot beforehand one of the display overlays shows guides so you don’t end up decapitating people once the record button is pressed. It’s quite handy, but not so helpful as the dedicated movie mode on the tough TG-5 which shows you exactly what your going to get before you press the button.
Of course the other thing the TOUGH TG-5 has over the XP120 is 4k UHD recording. It’s nice to have, but I’d say not the most important feature on a rugged compact. Far more important is good continuous shooting performance and a good range of interval shooting options – I’ll talk about that in the Shooting experience section coming up after this selection of clips to demonstrate the FinePix XP120’s video performance in various conditions.
Above: Download the original file (Registered members of Vimeo only). This clip, like the others below was shot using the Fujifilm FinePix XP120 set to its best quality 1080 / 60p mode. The XP120 takes a second or two to get to grips with the exposure and AF and as the camera pans around the exposure steps in a quite noticeable fashion. The stabilisation doesn’t make a great job of steadying my rather wobbly handling, but the AF does a good job on the whole and the image quality is good.
Above: Download the original file (Registered members of Vimeo only). For this tripod pan I disabled the stabilisation on the FinePix XP120. As in the previous clip, the exposure is a little overcooked to begin with, but corrects in a slightly stepped fashion once the pan progresses.The continuous AF does a pretty good job and the picture quality – when the exposure is right – is very good..
Above: Download the original file (Registered members of Vimeo only). This interior pan from the FinePix XP120 suffers from the same problem as the other clips, overexposure. That aside, the stabilisation isn’t all that steady at the wide angle setting, but again, the continuous AF does a good job.
Above: Download the original file (Registered members of Vimeo only). To test the continuous AF in low light on the FinePix XP120, I zoomed in a little and focused on the coffee cup on the table in the foreground before pressing record. I then panned up to the menu board and back to the coffee cup a couple of times. There’s a little bit of hunting about but generally the XP120’s continuous AF does a pretty good job here – it’s certainly a lot better than the Olympus TOUGH Tg-5 in this respect. The exposure in this clip is better, but you can still see it stepping.
Fujifilm FinePix XP120 Shooting experience
The FinePix X120 has three AF area modes, Centre, Multi and Tracking. I mainly used the Centre mode which uses a single AF area in the centre of the frame that can’t be moved or resized. On the whole the XP120’s AF works pretty well, it’s not the fastest, but it takes only a fraction of a second to lock onto subjects in good light. When the light fades, however, and with low-contrast subjects, it’s less reliable and failed to acquire focus more often than the TOUGH TG-5.
The Multi AF area mode automatically selects the AF area for you and Tracking follows a moving subject. It also has a intelligent face detection which recognises faces in the frame and sets the focus and exposure for them. There’s no manual focus option on the XP120.
The XP120’s best continuous shooting performance is quoted at 10 frames per second. The exposure and focus is fixed on the first frame, which means that if your subject is moving towards or away from the camera it might not remain sharp. That’s quite common on all but the most advanced compacts though, even the TOUGH TG-5 doesn’t offer continuous shooting with continuous AF. What it does have is a button on the back (it does double-duty as a Wifi button) that immediately puts the camera into the continuous mode that’s set in the menu – I found that really handy for toggling continuous shooting on and off.
To test the continuous shooting on the FinePix XP120 I fitted it with a fast SD card and set it to it’s best quality fine JPEG mode before firing off a burst of frames in its fastest ful-resolution continuous H mode. With the shutter button held down the XP120 fired a burst of 10 frames in 1.05 seconds. So pretty much exactly as the quoted speed of 10fps.
10fps is a pretty respectable frame rate, providing you can continue to shoot for more than a second or two. It can be quite challenging to time your burst to capture the one second of action that you want though. The finePix XP120 provides a couple of alternatives. One is a ‘Final’ mode that shoots a burst of pictures but saves only the final 10 – so you just keep shooting until the action happens and, providing you stop within a second of the action, you’ve got it.
Well, that’s the theory, in practice when I tried Final mode it only recorded a 24-frame burst before stopping, so it doesn’t really give you a lot more scope. Also, the frame rate dropped to a little over 7fps.
There’s also a 60fps Continuous SH mode that shoots 16:9 images at 1920 x 1080 size. However at a maximum 70 frames you’re still limited to capturing around a second of action. There are also slower full resolution modes at 5 and 3fps, these are also limited to 10 frames, but at least provide a longer burst – just over 3 seconds in the case of the 3fps one. Finally, if you’re happy to accept reduced resolution images the 5 and 3fps modes can shoot bursts of 20 and 40 frames respectively at 3MP image size.
Fujiflim Finepix XP120 25mm (140mm equivalent) 1/1000 f8 100 ISO, Continuous H.
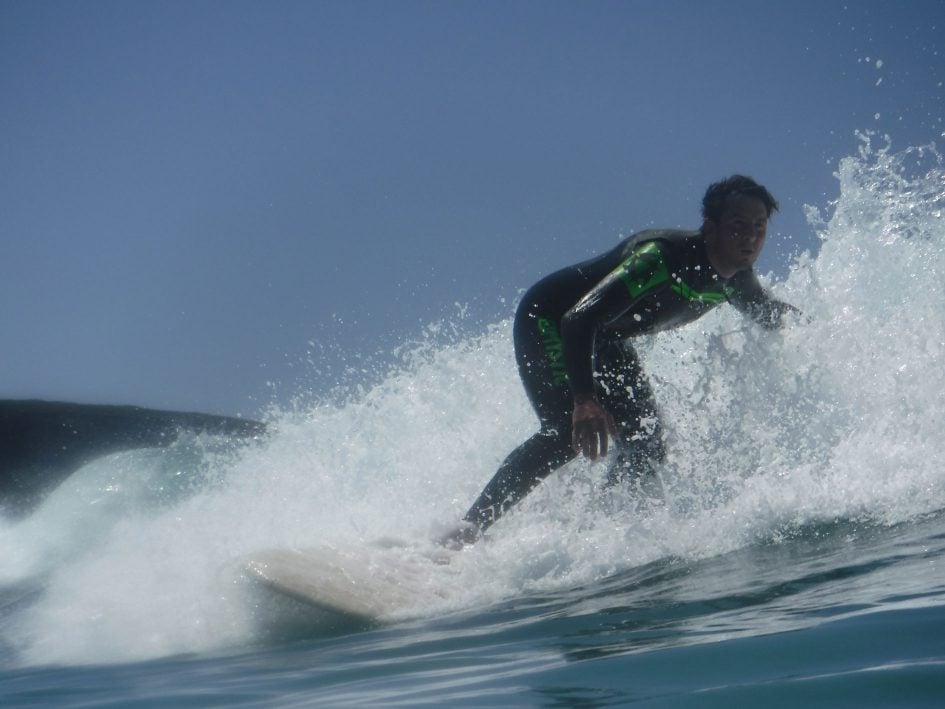
So there are plenty of options, but I found I got best results using the full resolution 10fps burst and carefully timing my shots. All of the surfing shots in the sample images were shot this way. If you want really capable full resolution continuous shooting, the TOUGH TG-5 makes a much better job of it with a 20fps top speed for an unlimited number of frames and the buffered Pro Capture feature at 10fps.
Fujifilm FinePix XP120 Wifi
The FinePix XP120 has built-in Wifi that allows you to connect to it with a smartphone or a PC to view and download pictures and movies. You can also use you phone to remotely control the camera and shoot photos and video with a live view on you rphone screen.
SmartPhone connection is handled by the free FujiFilm Camera Remote app which is available for iOS and Android phones. I tested it with my iPhone 6. Setup with a iPhone is straightforward, but you need to be in playback mode on the camera – even if you plan to shoot remotely – before pressing the Wifi button to initiate a connection. Next you just select the camera as the access point in the phone’s Wifi settings. The camera and your phone connect over an unsecured Wifi connection and there doesn’t appear to be any way to setup a password- something to think about if your at all concerned about privacy.
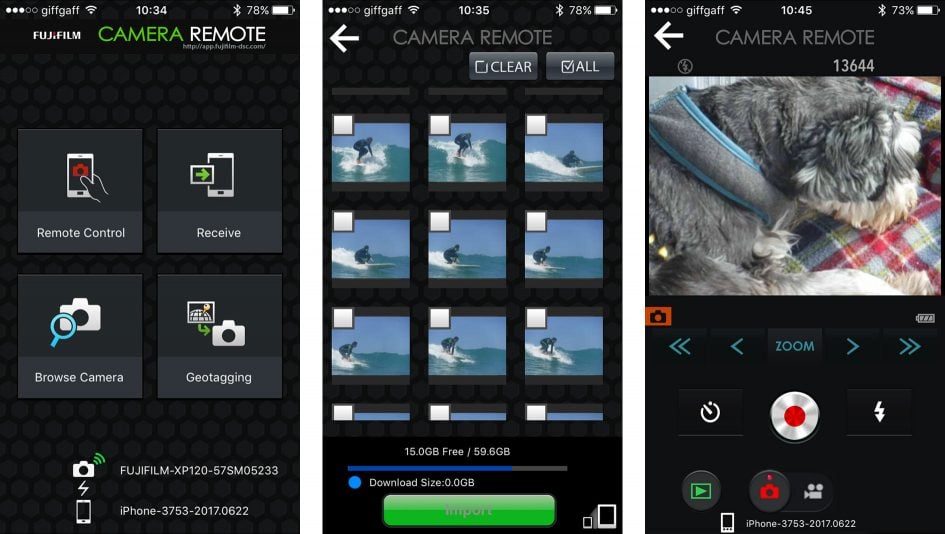
Once connected, launching the Camera Remote app provides you with four options; you can browse images on the camera card and select them for download to your phone, transfer images by selecting them on the camera, use your phone to display the live view from the camera and shoot remotely, or transfer GPS data from your phone to photos on the camera.
Browsing images work pretty well. I’d been shooting surfers using the 10fps continuous mode so I had a lot of images on the card, but the thumbnails displayed pretty quickly, and when you click a thumbnail to display it large on your phone screen the preview can be zoomed a little.
You can select multiple images and videos for transfer to your phone, or do them individually, but you can’t playback videos on your phone until they’ve been downloaded. Images for downloading can be reduced to 3 Megapixel reolution, but, oddly, this is set on the camera rather than from within the app.
The remote control is basic, but it gets the job done. You can zoom the lens, at one of two available speeds, set a self-timer and change the flash mode, you can also switch between stills and movie recording and there’s a playback button so you can browse and transfer images.
Like the XP120 itself, the Remote Camera app is basic, but easy to use. That said, It would be nice to have an option to select burst shooting or set up the interval timer from the app, like you can do on the Olympus TOUGH TG-5.
Finally, you can use the FujiFilm Camera Remote app to transfer GPS location data to images in the camera – a handy feature to have as the XP120 lacks a built-in GPS. This tags images with your location as you take them – unlike most cameras which record a log for syncing later. This sounds fine until you realise the actual location isn’t updated after the point you activate it, meaning all images tagged from that point on share the same location even if you’ve physically moved. The solution is to activate it, take the shot, then deactivate it again, hardly ideal, but Fujifilm knows it’s an issue from previous models and will hopefully update it in the future. Hopefully.
In addition to Scene Recognition Auto, Auto, and Program auto modes, the Finepix XP120 has a wide range of scene and feature modes all accessed from the menu. Mode selection is the first item – so you don’t have to go hunting for it – and in addition to those just mentioned includes Underwater, Underwater macro, Motion panorama, HDR, Pro Low-light, Action Camera and Cinemagraph modes. There’s also a a good range of effects filters including Toy camera, Miniature, Pop colour, high and low key, Dynamic tone, fish eye, Soft focus, cross screen (star effect, sketch and Partial colour.
You guess at what most of these do, so I’ll confine myself here to talking about the action Camera, Cinemagraph and Motion panorama modes.
Action camera had me quite interested, because waterproof compacts don’t usually make good action cameras. Mainly this is because they don’t have a wide enough angle of view to fit you in from a short distance away, and with the camera mounted on a selfie-stick, or a surf board, or kayak, you’ll only get to see a part of your body – usually you’ll want to see it all so you can admire your slick moves.
In action camera mode, the XP120 basically disables the zoom so that it’s fixed at the widest setting and turns off the screen. I have to say this was a bit of a disappointment. The manual suggests that you should then shoot video, instead I opted to make use of the XP120’s interval timer which can be set to record for up to 6 hours (though the battery wouldn’t last that long) at fixed intervals ranging from 10 minutes down to three seconds. As I was surfing I opted for 30 minutes at 3 second intervals.

Fujiflim Finepix XP120 25mm (28mm equivalent) 1/1250 f6.2 100 ISO, Action camera mode with interval timer.
As you can see from the image above, my concerns about the angle of view were well founded. The XP120’s 28mm wide angle just isn’t wide enough to capture all the action – on my 7ft 6in surfboard I can have either my feet or my head, but not both. I guess I could adopt a lower profile, or get a longer board. Though it’s not well suited to action self-shooting the interval timer has it’s uses though. And it also has an option to automatically create an HD time-lapse movie.
Motion panorama lets you shoot panorams with a 120, 180 or full 360 degree angle of view. You can choose the camera orientation and direction before shooting, then simply press the shutter and start pirouetting – the XP120 does the rest. 360 panoramas shot with camera in landscape orientation measure 11520 x 1088 pixels, and if you turn the camera sideways (or if you’re shooting vertical panos) it’s 11520 x 1632 pixels.
Finally, new to the FinePix XP120 is Cinemagraph mode. Cinemagraphs are still images that have a moving element – a waterfall, or a model’s hair blowing in the breeze for example. Creating them on the FinePix XP120 is pretty straightforward. Essentially Cinemagraph mode shoots a five second movie. You then select the portions of it that you want to move and those parts are blended with a still frame forming the rest of the image and saved as a new 640 x 480 pixel movie. It’s fun, but I’m not sure it’ll catch on. Next check out my quality or samples pages or skip to my verdict!
Check prices on the Fujifilm XP 120 at Amazon, B&H, or Adorama. Alternatively get yourself a copy of my In Camera book or treat me to a coffee! Thanks!


