
 Panasonic's Lumix LX10 / LX15 is a highly compelling premium compact which bravely goes head-to-head with the big hitters from Sony and Canon. Rather than producing a me-too version, the LX10 / LX15 features a number of unique differences which stand out from the crowd: a 24-72mm f1.4-2.8 lens that's brighter and focuses closer than most when zoomed-wide, generous 15 minute 4K movie clips, and Panasonic's wealth of clever 4K Photo modes which now let you refocus and adjust the depth-of-field after the event. You're also getting a touchscreen that tilts up (albeit not down), 1080 video at 120p for slow motion, decent Wifi features and USB charging. There no built-in viewfinder, nor ND filter, but for the price this won't bother most buyers. Ultimately the LX10 / LX15 is a welcome addition to the increasingly crowded premium compact market and one I can highly recommend.
Panasonic Lumix LX10 / LX15 review
-
-
Written by Gordon Laing
In depth
The Panasonic Lumix LX15, or LX10 as it’s known in North America, is a premium compact with a 1in / 20 Megapixel sensor, a bright 3x / 24-72mm zoom, 4k video and a tilting touchscreen. Announced in September 2016, it’s aimed at enthusiasts and jointly replaces the earlier LX7 and LF1, although the LX100 continues as a higher-end option with a viewfinder.
The LX10 / LX15 adopts the popular 1in / 20 Megapixel Sony sensor that’s become dominant in the premium compact category. It’s comfortably larger than the sensors in most phones or basic compacts allowing it to deliver better quality in low light, but small enough to maintain pocketable bodies with bright lenses. And the LX10 / LX15 boasts the brightest lens in its class with a 24-72mm equivalent range and f1.4-2.8 aperture. Compare that to the 24-70mm f1.8-2.8 of Sony’s RX100 III and IV or the 24-100mm f1.8-2.8 of the Canon G7X Mark I and II. The LX10 / LX15 lens also focuses closer at 3cm versus 5cm for the Sony and Canons which, coupled with the slightly brighter f1.4 vs f1.8 focal ratio at 24mm, allows it to capture tighter macro shots with a shallower depth-of-field. The LX15 is also equipped with two lens ring controls: one dedicated to the aperture and one that’s customizable.
Speaking of movies, the LX10 / LX15 can capture 4k at 24 to 30p or 1080 at up to 120p for slow motion. Like other Panasonic cameras, the LX15 exploits 4k in a wealth of modes, including 4k Photo (effectively capturing 8 Megapixel stills at 30fps), Post Focus (which racks the focus during capture to let you later extract the one at the desired point of focus), and the latest Focus Stacking (which again racks the focus during capture but then lets you create a stacked image in-camera between a defined range of distances). These modes are all defined and adjusted using the 3in touchscreen which also tilts by 180 degrees to face the subject for selfies, but there’s no built-in viewfinder, nor a hotshoe to mount one.
The market for premium compacts is one of the fastest-growing in the camera industry and in my review I’ll help you make the right choice between the LX10 / LX15 and its rivals.

Panasonic Lumix LX10 / LX15 video review / podcast
In the video below, Doug Kaye and I discuss everything you need to know about the Panasonic Lumix LX10 / LX15! I also have an audio podcast of this discussion below, or you can subscribe to the Cameralabs Podcast at iTunes.
Panasonic Lumix LX10 / LX15 design and controls
The LX10/ LX15 is a smart-looking camera that’s roughly similar in size and weight to rival premium compacts with 1in sensors and similar zoom ranges. The styling is pretty clean, but inherits some classiness with the use of the Leica font on the lens – albeit switching to a more standard font for labelling around the rest of the body.
Like Sony’s RX100 series, the LX10 / LX15 has a smooth and slightly slippery front surface, although in its favour over the Sonys, Panasonic has added a small ridge along the full height of the body to act as a grip. This and the small bulge for your thumb to rest against on the rear allowed me to hold the camera more securely and comfortably than the Sonys, but Canon takes the lead here with the PowerShot G7X Mark II which sports more substantial front and rear grips, both coated with a non-slippery rubber surfaces. Of the three recent models, it’s the Canon G7X II which felt best in my hands thanks to the more pronounced grip and especially its coating. It’s interesting to note Panasonic’s earlier LX100 actually features a similar grip to the G7X II, so it’s a shame not to see something similar deployed here on the newer LX10 / LX15, or at least some of the textured coating; I appreciate it’s pitched as a lower-end model but it’s still a premium compact with a similar price tag. I’ve pictured the LX10 / LX15 on the left alongside the Canon G7X II on the right in the photo below.

Measuring 106x60x42mm and weighing 310g with battery, the LX10 / LX15 is essentially identical in size and weight to the Canon G7X II which measures 106x61x42mm and weighs 319g with battery. Meanwhile Sony’s RX100 Mark III and IV / V at 102x58x41mm and 290g are fractionally smaller, while Panasonic’s TZ100 / ZS100 at 110x64x44mm and 310g is fractionally larger, but in-person all are essentially in the same ballpark. As such they’re neither the slimmest nor lightest compacts around, but they will all just about squeeze into trouser pockets. Just before I continue, remember the Sony RX100 III / IV / V and Lumix TZ100 / ZS100 all feature built-in electronic viewfinders whereas the Lumix LX10 / LX15 and G7X Mark II do not. If you’re after something smaller and lighter but still with a decent-sized 1in sensor, you should consider Canon’s PowerShot G9X which sacrifices some zoom range and aperture and the ability to tilt its screen to achieve an impressively compact size of 98x58x31mm and weight of just 209g.
From left to right on the top surface you’ll find a popup flash released by a small lever on the side, stereo microphones on either side of the lens axis, a small mode dial with a power collar, shutter release with a zoom collar, and at the end a red record button and a thumb wheel. While the thumb wheel is set back a little, it’s still possible to just about turn it with your thumb while holding the camera one-handed; this is in contrast to the flat wheels on the back of the Canon and Sony models which really demand a two-handed grip as you turn to minimise the chance of dropping them.
Regular readers will note Panasonic’s adoption of a power switch instead of the power button of its rivals; this may seem like a trivial difference but it means the LX10 / LX15 misses out on the ability to power straight-into playback with a prolonged push of the play button alone. Admittedly you can perform an awkward two-fingered approach where you hold the play button down as you switch the power lever, but it’s not as convenient and if you don’t press the play button during the process, the camera will power-up into record mode with the lens extending, further delaying the chance to review your pictures. Interestingly Panasonic has a long history of power switches on compacts, but briefly deployed some buttons on recent models, although now it’s returned back to switches again here. While I’m fond of switches, I think a power button makes more sense on this kind of camera.
Round the back are cross keys dedicated to exposure compensation, white balance, drive modes and focus distance modes, with a Menu / SET button in the middle and a playback button.
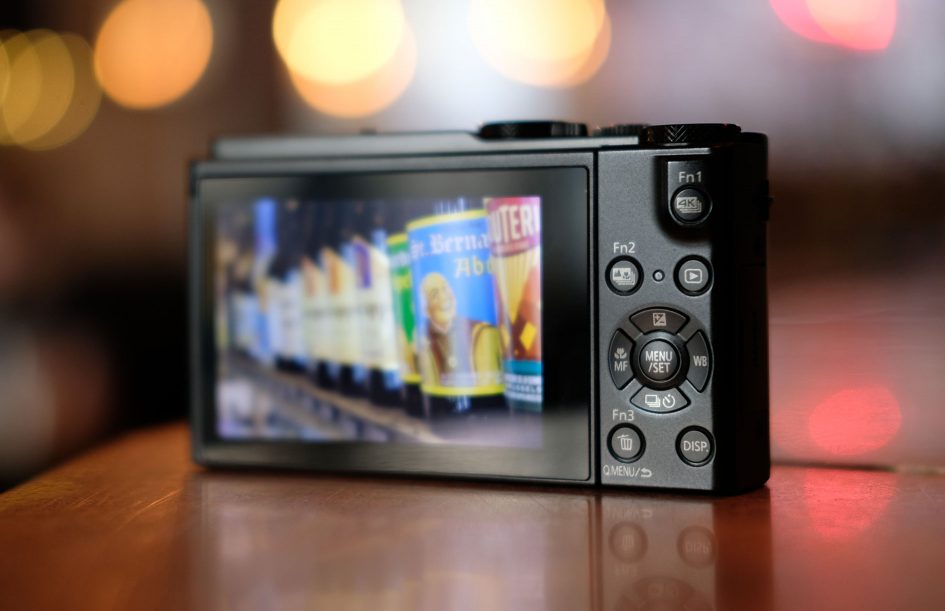
Three more buttons on the rear are labelled 4K Photo, Post Focus and Trash / Rubbish, but double-up as customisable Fn1, Fn2 and Fn3 function buttons if you’d prefer to assign them something different – there’s 44 different functions available too including the ISO sensitivity or AF mode. There’s a further five ‘soft’ function keys that can be pulled-out from a ‘tray’ on the right side of the touch-screen. Meanwhile the Fn1 and Fn2 buttons can also be assigned up to seven alternative functions in playback if desired, with Fn1 set to fire-up the Wifi by default.
Most premium compacts feature a lens control ring, but the LX10 / LX15 sports two. An inner ring is dedicated to setting the aperture from f1.4 to f11 in third-EV increments. The aperture ring has two small bulges on either side which act as handles to help you push it round, and as you do so there’s tactile feedback from defined clicks at each position. This ring only works in Aperture Priority and Manual modes (for stills or video) and can’t be re-configured.
A second, outer ring spins smoothly with no fixed limits and can be configured to 16 different functions, or left at a default or disabled if preferred. You could, for instance, configure the outer lens ring to adjust the ISO sensitivity and make silent adjustments while filming a video.
I like that there’s a clicky ring devoted to the aperture in addition to a smooth one that can be configured to different functions, but it can cause some confusion in some shooting modes. Remember the aperture ring is only active in Aperture Priority or Manual and ignored in any other mode – so you could be in Program, Auto or another mode and the aperture value indicated on the ring will have no influence on the actual aperture the camera selects. I personally think it would make more sense to have an A option on the aperture ring which tells the camera to set the aperture automatically, then there’d be less ambiguity – this could also work well with a shutter dial in a similar way to Panasonic’s earlier Lumix LX100.
This may or may not bother you though. I know some people who mentioned it straightaway, but others for whom it was a non-issue. Certainly I still enjoyed having the choice of two dials, and the fact the outer smooth dial is configurable gives you the flexibility you need. It’s a classy move beyond the single lens rings of the rival Sony and Canon models. For the record I’d add Sony’s RX100 series only offers a smooth ring which doesn’t give the feedback you really want for aperture adjustments, although the ring on the Canon G7X II can be switched between clicked and smooth operation.
In terms of composition, the LX10 / LX15 offers a screen only – there’s no viewfinder of any description, nor any means to connect one as an accessory. In this respect it’s no different to the Canon G7X Mark II, and if you’re used to framing at arm’s length, say with a phone, you’ll be perfectly happy. But Sony’s RX100 III, IV and V all manage to squeeze in a pretty respectable popup electronic viewfinder in the corner of their bodies, while Panasonic’s own Lumix TZ100 / ZS100, not to mention the TZ80 / ZS60 pocket super-zoom, feature one permanently perched above their screens. Viewfinders are easier to use in direct sunlight, while also providing an additional point of contact on your face for extra stability; I also find them easier for critical framing. They’re definitely desirable things to have, but equally they increase the cost of a camera, so you have to decide how much you’re happy to spend on a premium compact with a 1in sensor. Panasonic already includes them in several models, so I’m at peace with them deciding not to on the LX10 / LX15 in order to hit a lower price point and differentiate it in the range.
The LX10 / LX15 screen employs a 3in / 1040k dot panel with a 3:2 shape that matches the native aspect ratio of images – that is to say you’ll be composing and playing back photos without black bars. It’s worth noting as Sony continues to use squarer shaped 4:3 screens on the RX100 series which means a strip is unused when composing and displaying photos shot in the best quality; sure it’s used for shooting information, but it means the displayed image for photos is smaller than its rivals.
As you’d expect for a modern compact, the screen on the LX10 / LX15 can tilt upwards by 180 degrees to face forward for taking selfies or filming pieces to camera. Angling it completely up also pops-out a touch-tray with related selfie settings including slimming and soft skin effects and multiple shot options. So far so good, but annoyingly the screen won’t angle down for more convenient shooting at high angles over the heads of crowds. In this respect it’s like the original Canon G7X Mark I which had a screen that could tilt up but not down, but it’s unlike the current G7X Mark II and the latest RX100 models from Sony which angle in both directions. To be fair, if you do find yourself trying to compose with the LX10 / LX15 held over head, you can of course hold it upside-down, but ultimately I’d still have preferred a screen that angles both up and down.
On the upside the screen is at least touch-sensitive, allowing you to simply tap to reposition a single AF area in an instant – great whether you’re shooting stills, or pulling-focus in video. Panasonic is a master of touch interfaces and not only lets you tap your way through the main menus and super-imposed Q Menu, but also use the screen to push around the optional live histogram, or drag alignment guides to the ideal position. There’s also the touch-tray mentioned earlier that pops-out from the right side of the screen with context-sensitive options or soft function keys. It all works a treat, but if desired, virtually everything can be alternatively controlled with the physical buttons if preferred. Before moving-on, I should also note the DISP options offer a dual-axis levelling gauge.
Behind a small flap on the right side of the body you’ll find the LX10 / LX15’s only physical ports: a Type D Micro HDMI and Micro-B USB port. The LX10 / LX15 also features built-in Wifi, although sadly lacks NFC; it’s strange as Panasonic was an early supporter of NFC, but seems to have lost interest of late just as more companies are adopting it. Still, it’s easy to get your phone and camera connected over Wifi and I’ll cover that later in the review.
Under the camera in a combined compartment are the 680mAh DMW-BLH7E Lithium Ion pack, rated at 260 images under CIPA conditions and an SD slot that can exploit UHS-I Speed Class 3 cards. The LX10 / LX15 charges its battery internally over USB and is supplied with an AC-USB adapter in the unlikely event you don’t have one already.
Regular readers of Cameralabs will know I love USB charging, especially on compact cameras as it’s just so easy to top-up in a variety of situations – you could use a laptop, a portable battery, a car adapter, or any number of USB chargers that may be around. Personally speaking I always carry an Anker USB battery with me, primarily for topping up my phone on busy days, but I love that I can also bring the charge-up on compatible cameras too between shooting. Like most cameras, the LX10 / LX15 will ignore any USB power source once it’s switched on – right now I only know of Sony which allows its cameras to operate under USB power too – but it’s still great to charge the camera over USB.
As for actual battery life in practice, I found I could squeeze about 150 to 200 shots per charge including a few minutes of 4k video and some mild Wifi use. If you’re shooting a large number of consecutive images, you’ll typically enjoy longer life – I managed 1200 frames for a Timelapse on a full charge and still had a little remaining. In terms of pure video on a full charge, I recorded five 4k clips lasting 15 minutes each before the battery icon started to flash at the start of the sixth. In the end, I recorded just over 77 minutes worth of 4k on a single charge.
Panasonic Lumix LX10 / LX15 lens
The Lumix LX10 / LX15 is equipped with a new Leica-branded 3x optical zoom, equivalent to 24-72mm and with a bright f1.4-2.8 focal ratio. The closest focusing distance is just 3cm when zoomed-wide to 24mm or 30cm at the longer 72mm end of the range. It’s a useful general-purpose range with above average macro capabilities and the chance to deliver a shallow depth of field under the right conditions. Here’s shots taken from the same position comparing its widest and longest focal lengths. Note when shooting 1080p and 4k video, the effective coverage reduces to 25-75mm and 36-108mm respectively, the latter due to the fairly tight crop the LX10 / LX15 takes on 4k.

Above: Panasonic Lumix LX10 / LX15 coverage, 24mm (left), 72mm (right)
Looking at the competition, Sony equips its RX100 III, IV and V with a 2.9x optical zoom delivering an equivalent range of 24-70mm with a focal ratio of f1.8-2.8 and a closest focusing distance of 5 and 30cm at the wide and tele ends. So the Lumix LX10 / LX15 shares essentially the same coverage, but is a little brighter at the wide end and also focuses 2cm closer at 24mm too.
Canon’s G7X Mark II offers a longer 4.2x range equivalent to 24-100mm with an f1.8-2.8 focal ratio and closest focusing distances of 5cm and 40cm at the wide and tele ends of the scale. So again the Lumix LX10 / LX15 is a little brighter at the wide end and can focus 2cm closer too, but the Canon enjoys a telephoto reach that’s almost 50% longer. To put this in perspective, here’s the coverage of the LX10 / LX15 and Canon G7X Mark II at their respective longest telephotos of 72 and 100mm; clearly the Canon is capturing a tighter field of view. You can of course crop-into the Lumix LX10 / LX15 images to deliver a similar field-of-view, but doing so will half your total resolution from 20 to 10 Megapixels.

Above: Panasonic Lumix LX10 / LX15 vs Canon G7X Mark II telephoto reach, 72mm (left), 100mm (right)
If you want longer telephoto reach from a 1in compact though, the Lumix TZ100 / ZS100 remains the current leader with a 10x / 25-250mm equivalent range, f2.8-5.9 focal ratio, and a closest focusing distance of 5cm when wide and 70cm at the long-end. So while all the models discussed here start at roughly the same wide-angle coverage of approximately 24mm, the Lumix TZ100 / ZS100 zooms two and a half times further than the G7X II and almost four times longer than the LX10 / LX15 and the Sony’s at the long-end, giving it considerably greater reach. The compromise is the focal ratio, with the TZ100 / ZS100 being roughly one stop dimmer throughout the same focal range as the shorter zoom models. This allows the Canon, Sony’s and LX10 / LX15 to deploy sensitivities one stop lower or shutter speeds twice as fast under the same conditions, and also achieve slightly shallower depth of field effects in the standard ranges.
So what exactly can you expect in practice? In terms of exposure, f1.4 is two thirds of a stop faster than f1.8, so when the LX10 / LX15 and, say, the Sony RX100 or Canon G7X models are set to 24mm with their apertures wide-open, the Lumix will be able to use a faster shutter or lower ISO sensitivity. For example 400 ISO on the LX10 / LX14 when then RX100 / G7X models would need 640 ISO – remember this when comparing their high ISO performance in my noise results, although also bear in mind this light-gathering advantage is quickly eroded as you zoom-in. The LX10 / LX15’s focal ratio drops to f1.8 just 2mm into the range at 26mm, and to f2 at 26.5mm, before reaching its slowest f2.8 from 31mm onwards. So that two-thirds of a stop advantage is pretty much only when shooting at 24mm.
For me though, the really revealing test is to compare the potential for blurring and the quality of rendering in macro and portrait environments. I started with the macro, shooting the same subject with both cameras at their maximum apertures and closest focusing distances; so both were at 24mm, but the LX10 / LX15 was focused at 3cm and opened to f1.4 compared to the G7X II which was focused at 5cm and opened to f1.8. Once again the Lumix is on the left and the Canon on the right.
Panasonic Lumix LX10 / LX15 macro at 24mm f1.4 (left), Canon G7X Mark II macro at 24mm f1.8 (right)
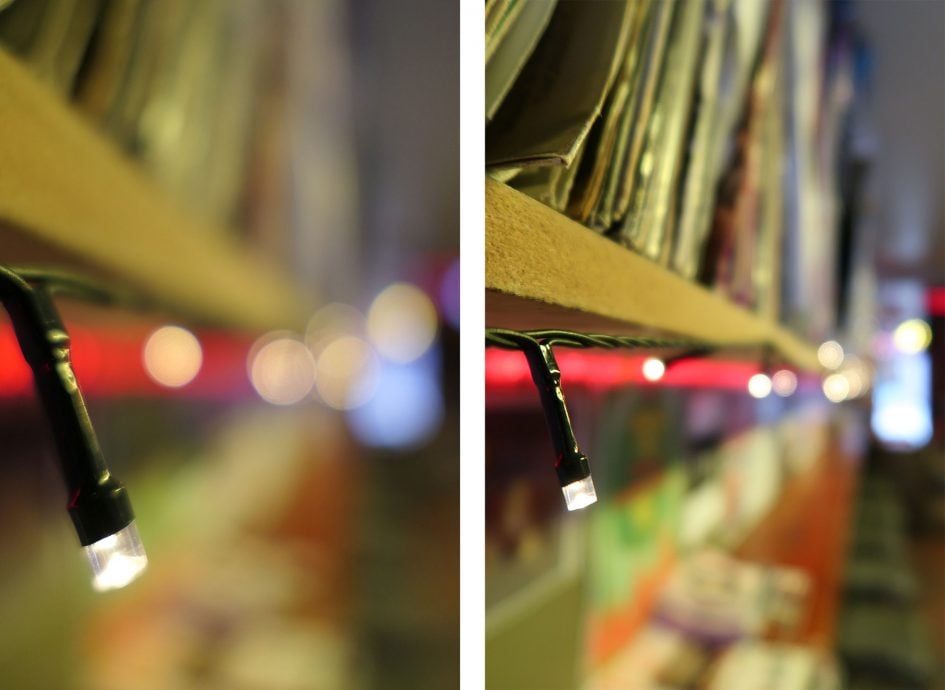
Above left and right: at closest focusing distance and maximum aperture
The difference in the example above is striking: being able to focus almost twice as close has allowed the LX10 / LX15 to achieve a much bigger reproduction of the fairy light bulb, while the combination of closer focusing and a brighter aperture has delivered a significantly shallower depth of field with larger ‘bokeh balls’. So in this first round, a win for the Lumix LX10 / LX15 over the Canon G7X II and its other rivals, although I should note the quality can vary when you’re focused as close as 3cm to your subject; I have a variety of sample images taken at close range for you to see what you can expect.
Moving on, I shot portraits with each camera fully zoomed-into their longest focal length and again with the maximum aperture: 72mm f2.8 on the Lumix LX10 / LX15, below left, and 100mm f2.8 on the G7X II, below right. I adjusted my position to try and maintain the subject size on the frame. Note both cameras evaluated the white balance differently here, with the Canon better-balancing the indoor lighting – which you prefer though is entirely personal.
Panasonic Lumix LX10 / LX15 portrait at 72mm f2.8 (left), Canon G7X Mark II portrait at 100mm f2.8 (right)
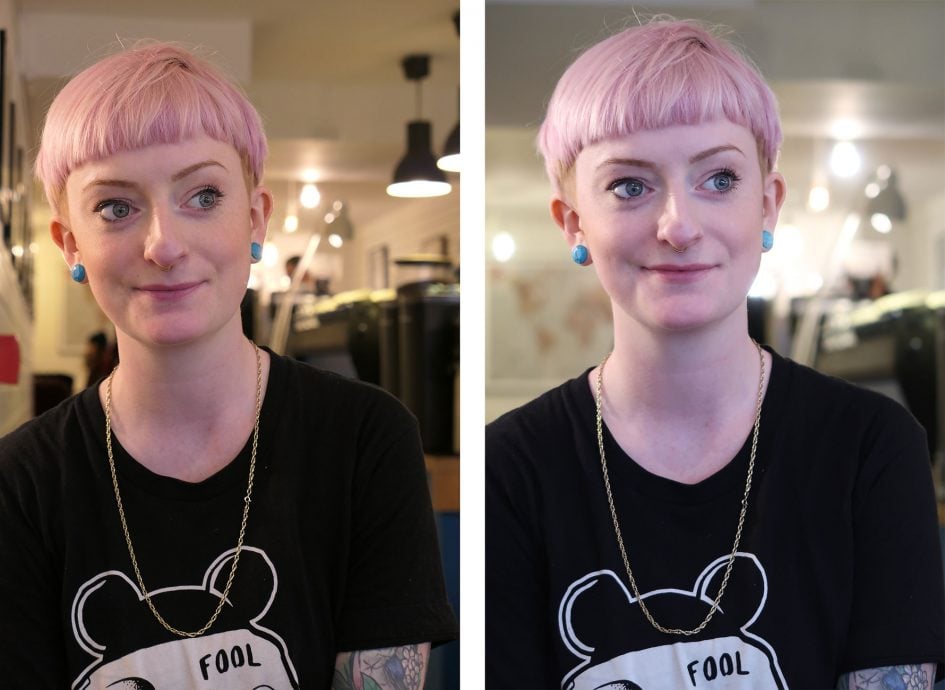
Above left and right: maximum zoom and aperture
The difference between 72mm and 100mm may not sound like a big deal, but here it’s allowed the Canon G7X II to deliver a slightly shallower depth of field with a tighter crop of the background for less overall distraction from the main subject; the longer focal length is also more flattering for portraits. So while the difference here is less dramatic than the first macro example, I’d still say the Canon G7X II enjoys the advantage for portraits over the Lumix LX10 / LX15; and also over the Sony RX100 series which additionally share the same shorter telephoto reach of the Panasonic.
The Lumix LX10 / LX15 is equipped with optical image stabilisation which operates in five axes. To test it I shot a distant subject at the longest focal length with steadily decreasing shutter speeds to discover the slowest I could handhold with and without stabilisation enabled. With OIS off, I needed a shutter of 1/80 to confidently handhold the shot, but with OIS enabled, I could handhold reliably down to 1/10 and in some cases 1/5, corresponding to three to four stops of compensation.
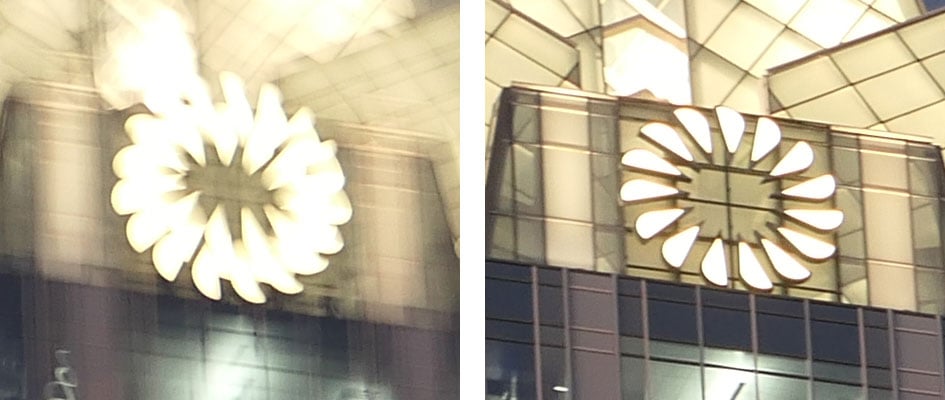
Above: Panasonic Lumix LX10 / LX15 OIS off (left), on (right) at 1/5 and 72mm equivalent
Before moving onto the next section I wanted to mention the LX10 / LX15 does not feature a built-in Neutral Density / ND filter. In this respect it may be the same as the Lumix LX100, but it differs from the Sony RX100 and Canon G7X series as they both do. The ND filters in the Sony and Canon can be deployed automatically or manually, and typically reduce the incoming light by three stops.
Typically an ND filter would be used when you want to open the aperture for a shallow depth of field in bright conditions. If you’re already at the lowest ISO and maximum shutter speed, but still can’t open the aperture as wide as you’d like to go, you’d simply enable the ND filter to soak-up the unwanted light.
The Lumix LX10 / LX15 doesn’t need to do this though as it has an optional electronic shutter that increases the maximum mechanical shutter speed from 1/2000 (or 1/4000 if you’re shooting smaller than f2.8) to 1/16000, giving you three (or two) stops of light-reduction.
Super-fast electronic shutters may negate the need for an ND filter when shooting stills, but they don’t help when filming video at typically much slower speeds. So unfortunately you may not be able to film video with the LX10 / LX15’s aperture open in daylight conditions with motion-friendly shutter speeds, whereas on the Sony and Canon you could much more easily.
Another situation where an ND filter is desirable is when shooting long exposures, as a typical three-stop filter could extend a one second exposure to eight seconds, or 15 seconds to two minutes. These longer exposures are great for smoothing water or blurring cloud motion and again cameras which feature built-in ND filters are preferred.
Panasonic Lumix LX10 / LX15 Shooting modes
The Lumix LX10 / LX15’s mode dial offers Intelligent Auto, Creative Control, Scene, Panorama, Custom, Movie Manual and the traditional Program, Aperture Priority, Shutter Priority and full Manual.
Shutter Priority and Manual offer access to the full exposure range of 1/4000 to 60 seconds using the mechanical shutter, although shutter speeds faster than 1/2000 are only available if the aperture is smaller than f2.8; if you’re shooting between f1.4 and f2.8, the fastest mechanical shutter is limited to 1/2000. This is a typical limitation of a leaf shutter.
Set the LX10 / LX15 to its electronic e-shutter option and the fastest shutter speed increases to 1/16000, although the slowest is limited to one second. A clever Auto option lets the camera use both types of shutter, prioritising the mechanical but switching to the e-shutter when you need the fastest speeds to block light or freeze the quickest action. Do beware though, the e-shutter can suffer from bad skewing of the image if you shoot fast moving subjects or while panning quickly. I should also add that while the e-shutter can operate in almost complete silence, the mechanical leaf shutter on the LX10 / LX15 makes barely more than a very faint click in operation – so like most cameras of its class, it’s very discreet.

Above: horizontal skewing caused by electronic shutter while panning very quickly. Worse-case scenario.
Set the LX10 / LX15 to Manual and an additional T option becomes available which opens the shutter with one press and closes it with another for up to 128 seconds. The absence of a built-in Neutral Density filter limits the chance to deploy really long exposures on the LX10 / LX15, but here’s one I managed to extend to 60 seconds by selecting the minimum aperture of f11 and the minimum sensitivity of 80 ISO. I’d have loved the chance to try a longer exposure of this scene at a more diffraction-friendly aperture, but with an ND to soak up the light, it’s not possible.
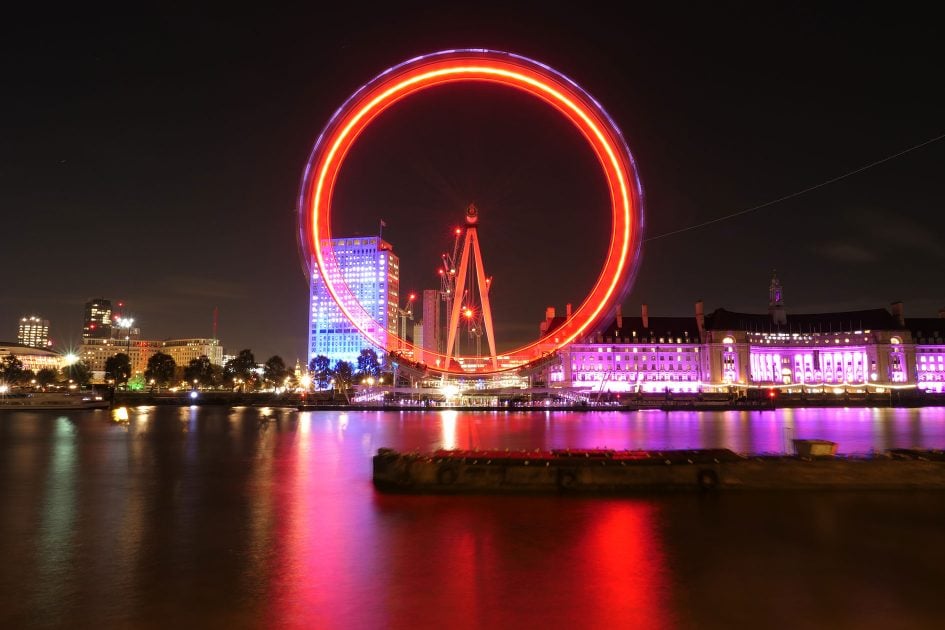
Above: Panasonic Lumix LX10 / LX15 long exposure: 60 seconds, f11, 80 ISO
Auto Exposure Bracketing is available at three, five or an impressive seven frames, up to one EV apart. Even better you can configure the camera to capture the entire sequence in a burst which can also be triggered hands-free by the self-timer. Great news for HDR fanatics. Focus, Aperture, White Balance
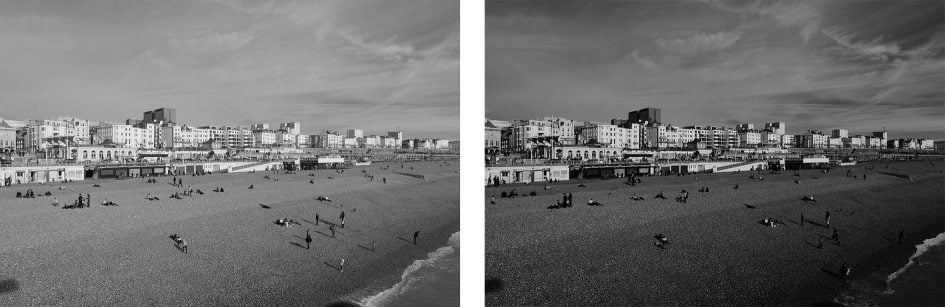
If you prefer your HDR in-camera, the LX10 / LX15’s built-in HDR mode will capture three frames at one, two or three EV apart and combine them into a single image with auto-alignment too if desired; although the latter will result in a mild crop. Note there’s no choice of tone-mapping options, so the effect is fairly mild. Here’s a handheld example showing a single, normal exposure below left and an in-camera HDR composite with +3EV range below right. I’ve also pictured histograms for both images, but it’s pretty clear how the HDR version has really lifted the shadow areas. If that’s the effect you desire, then it’s a useful feature.


Above: Panasonic Lumix LX10 / LX15 HDR disabled (left), enabled with 3EV range (right)
If you’re into multiple exposures, the LX10 / LX15 will let you capture and combine up to four exposures, and gives you the chance to retake the current image until you’re happy with how it looks.
Like earlier Lumix cameras, the LX10 / LX15 features a built-in Time Lapse facility which lets you capture up to 9999 images at intervals between one second and a second shy of 100 minutes; it’s also possible to delay the start by between one minute and a minute shy of one day.
Once the time lapse is completed, the camera helpfully asks if you’d like to generate a movie, and gives you the choice of resolutions, frame rates and even directions in case you want to play the sequence in reverse; it’s also possible to trigger the movie generation later from the Time Lapse Video option in the playback menu. Impressively the quality options include not just 720p and 1080p, but also 4k, and remember since you’re originally capturing still photos, you have the full 24-72mm focal range at your disposal, rather than the crop when filming 4k in real-time. Here’s a sequence of 600 frames taken at three second intervals which I later encoded into a 4k movie. If your intention is to generate an in-camera movie at the end, I’d recommend changing the photo aspect ratio to 16:9 for easier framing.
Download the original file (Registered members of Vimeo only). Sample movie filmed with a final production Panasonic Lumix LX10 / LX15 using its Timelapse mode. I set the camera to take 600 frames at 3 second intervals in Aperture Priority at 125 ISO; following sunset the slower exposures would introduce some motion blur. I then used the menus to generate a 4k / 25p movie in-camera.
Next up is Stop Motion Animation which works a little like the Time Lapse option, but if desired will wait for you to trigger each frame. This allows you to animate a model like a child’s toy or a special effect monster, and again at the end of the process you can have the camera generate a video of varying quality. It’s enormous fun.
Turn the mode dial to Creative Effects and the LX10 / LX15 lets you choose from 22 different styles, including popular miniature, sepia, soft focus and black and white filters. Here’s four of the colour options.

Above: Panasonic Lumix LX10 / LX15 creative effects: Old Days (left), Impressive Art (right)

Above: Panasonic Lumix LX10 / LX15 creative effects: Old Days (left), Impressive Art (right)
Monochrome is particularly well-catered for with four different options: Monochrome, Dynamic Monochrome, Rough Monochrome and Silky Monochrome. Here’s how they all look.
Above: Panasonic Lumix LX10 / LX15 creative effects: Monochrome (left), Dynamic Monochrome (right)
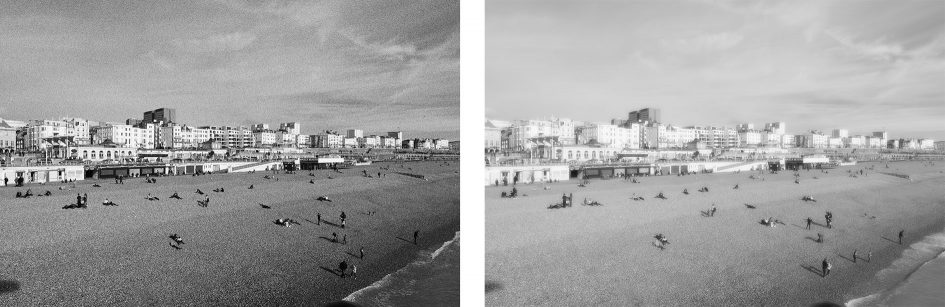
Above: Panasonic Lumix LX10 / LX15 creative effects: Rough Monochrome (left), Silky Monochrome (right)
Download the original file (Registered members of Vimeo only). Sample movie filmed with a final production Panasonic Lumix LX10 / LX15 in its Miniature effect mode.
Turn the mode dial to Panorama and the camera will stitch together a horizontal or vertical sweep of images. You can choose between four directions for the pan and two image sizes. In general the LX10 / LX15 did a good job at stitching so long as you managed to perform a smooth uninterrupted sweep, but even if the last small section was a little off for some reason (typically a different exposure) then it’s easy to chop it off. Here’s one taken with the camera held vertically on its side.

Above: Panasonic Lumix LX10 / LX15 panorama

Above: Panasonic Lumix LX10 / LX15 panorama
Like other recent Lumix cameras, the LX10 / LX15 offers a 4K Photo mode. This exploits the fact 4K video actually contains 8 Megapixels worth of information on every frame, so why not use it for capturing reasonable quality stills at high frame rates? Panasonic’s taken this idea and run with it, making the initial capture and subsequent photo extraction process as simple as possible. There’s three options: Burst (which records video while the shutter button is pressed), Burst S / S (which starts recording with one press and stops with another), and 4K Pre-burst (which keeps a one-second rolling buffer to avoid unwieldy clips to store and go through). I ended up using the Pre mode more often than not. When you press the shutter in Pre-burst mode, the camera records two seconds / 60 frames worth of action: you get the second before you pressed the button and the second after. So if you press the button as soon as the action has just happened, you should have a frame which includes some part of it from a moment earlier.
When you play the capture back, you’re shown a still photo rather than a video clip, with the option to cycle through the frames quickly by oppressing the left or right arrow keys. This makes it very easy to jog back and forth before selecting the perfect moment, after which a press of the Menu / Set button saves the frame as a new JPEG with 8 Megapixel resolution. You can’t save RAW files in the 4K Photo mode, but you can choose the aspect ratio prior to capture along with having full control over the focus, exposure mode, aperture, shutter and ISO.
The 4K Photo mode is great for capturing the perfect moment when faced with fast action, but it’s also surprisingly useful for portraits, especially of kids, where an expression can change between frames.
Next there’s the Post Focus mode, which again exploits the ability of 4K video to record 30 relatively high resolution images every second. What makes it different from the 4K Photo modes though is during a short video clip the camera attempts to shift the focus between all the subjects in the frame, near and far. If successful, this short video clip essentially contains frames where any part of the composition is in focus, and it only took a few seconds to capture. The clever bit is in playback where the camera lets you tap anywhere on the screen and the camera automatically selects the frame from the video where it’s in focus, offering focus-peaking to further help you make the choice. Like the 4K Photo modes, it then lets you export it as an 8 Megapixel JPEG.
In practice it works so transparently it almost feels like you’re working with a Light Field image. The initial process captures about two seconds of video while refocusing the lens, then takes a further three or four seconds to process it into an image you can navigate by touch. Once complete you simply tap the part of the image you’d like in-focus and it ‘magically’ becomes sharp – it’s a great party trick to impress your friends, although of course all you’re doing is using a clever media player to navigate a short video where the focus racked over the subjects from near to far.
Here’s an example where I tapped to choose to focus on two different areas after the event. In this case I’ve illustrated the extremes, changing the focus from near to far, but you can alternatively choose anywhere in-between, so long as it fell within an AF area.

Above: Panasonic Lumix LX10 / LX15 Post Focus, on foreground, left and background, right
New to the LX10 / LX15 (and possibly making its way to other Lumix 4K / touchscreen cameras with a firmware update) is the Focus Stacking option. Focus Stacking is a technique that increases the depth-of-field by compositing multiple images where the focus has been adjusted a little between each. Of course the 4K Post Focus mode already has a video file that contains multiple images where the focus has been adjusted slightly, so the data required for stacking is ready to be redeployed.
During Post Focus playback, the Lumix LX10 / LX15 lets you enter the Focus Stacking mode which then offers Range or Auto Merging options. Auto Merging maximises the depth-of-field by compositing the full range captured in the image, while Range Merging lets you define the closest and furthest points of sharp focus using the touch-screen. Once selected, the camera generates an 8 Megapixel JPEG with the desired depth-of-field. To illustrate it in practice I took a ‘photo’ of this railing and then a flower using the maximum aperture. I then extracted one still with the focus positioned close to the front, then used the Focus Stacking option to generate a new one with the maximum depth-of-field; the difference below, considering both are from the same source file, is quite dramatic. The second example with its busy background has been less successful, but the first has worked well.

Above: Panasonic Lumix LX10 / LX15 Focus Stacking: none, left, maximum range, right

Above: Panasonic Lumix LX10 / LX15 Focus Stacking: none, left, maximum range, right
I’ve grown very fond of Panasonic’s various 4K Photo modes and feel they give their models a unique edge over the competition. The first key behind them is of course the ability to capture 4K footage to start with and this is something that eludes the LX10 / LX15’s biggest rival, the Canon G7X Mark II. But even if you were to spend more on Sony’s RX100 Mark IV or V in order to gain 4K video recording, neither offers the ease of photo extraction after the event, nor implements focus-racking during capture to offer selective focusing later; indeed even if they did, they lack touchscreens which makes the process so easy to control.
That said, there are of course limitations to shooting in 4K Photo. First is the quality which across all Lumix cameras with the facility to date is limited to 8 Megapixel JPEGs. Second is the field-of-view which is defined by the actual 4K movie mode itself – now this varies between models, but on the LX10 / LX15 involves quite a tight crop which reduces the original 24-72mm optical range to 36-108mm – so you miss out on the very wide coverage, although you do at least gain a little extra reach on the long-end. Third is the use of an electronic shutter which as we’ve seen elsewhere in this review can result in undesirable skewing when panning quickly or shooting subjects quickly moving sideways.
But so long as you bear the limitations in mind, 4K Photo remains a valuable addition to the LX10 / LX15 and like other Lumix bodies, allows it to stand out from the pack. Interestingly while the earlier LX100 also has 4K Photo, it can’t implement Post Focus due to its lack of touch-screen – I always said it should have one!
Finally like most higher-end cameras aimed at enthusiasts, the LX10 / LX15 is equipped with in-camera RAW Processing in playback. This lets you adjust the white balance, exposure compensation, Photo Style, i-Dynamic, contrast, highlight, shadow, saturation, noise reduction, i-Resolution and sharpness, along with the colour space and image resolution. Sadly you can’t apply any of the Creative Filter effects after the event, but you can still have fun with the Photo Styles and it’s a useful capability.
Panasonic Lumix LX10 / LX15 focusing and continuous shooting
Like all recent Panasonic cameras the Lumix LX10 / LX15 relies on contrast-based autofocus, aided by the company’s depth-by-defocus technology; this profiles the optics to use out-of-focus characteristics to know which way to focus the lens. The bottom line is the LX10 / LX15 focuses swiftly and confidently under a variety of conditions, light and dark, and does a fair job at tracking subjects in motion even if they enter the frame suddenly.
There’s a wide choice of AF areas to choose from: pinpoint, single area, Custom Multi, the full 49 area, tracking or face / eye detection. In all cases the touch-screen is well-used to manually reposition single AF areas or configure the custom options; indeed Custom Multi lets you effectively create a zoned area shape of your choice by tapping any of the 49 AF areas, before then using the touch-screen to move it to the desired part of the composition.
I generally used Single Area for most of my day-to-day shooting in Single AF mode, regularly using the touch-screen to reposition the AF area. If you’re using the smallest AF area option you may occasionally find the camera hunting if the subject doesn’t have sufficient contrast, but it’s easy to enlarge the area or slightly reposition it to help it along.
If I were shooting people I’d enable Face Detection and if I was capturing action I’d generally favour a Custom Multiple area with Continuous AF over the tracking mode as it invariably delivered better results – of course your mileage will vary depending on the subject and the background.

While photographing the seagulls in my home town of Brighton, I found a small zoned area created in Custom Multi proved quite effective even as they swooped in and out of frame. Here’s some examples and believe me they weren’t hanging around that day.


If you prefer to focus manually, the LX10 / LX15 configures the lens ring for smooth adjustments and presents handy visual aids. You can magnify the entire image by up to ten times or opt for a movable window containing a magnified view up to six time for a closer look, and also deploy focus-peaking too. Manual focusing is also possible when filming movies.
In terms of burst shooting the LX10 / LX15, like most Lumix cameras, offers a wide variety of options. Set to Single AF, it’ll shoot at up to 10fps with the mechanical shutter but without live feedback between frames; drop to 6fps or 2fps and you’ll see a brief live image between frames. Set the camera to Continuous Autofocus and the top speed falls to 6fps with or without Live View. There’s also a Super High Speed mode which shoots 5 Megapixel stills at 50fps with the electronic shutter and fixed focus.
To put the camera to the test I fired-off a variety of bursts with the sensitivity set to 400 ISO and the shutter to 1/500 using a freshly-formatted UHS-1 Class 3 card. Starting with the 10fps mode and the quality set to JPEG, I shot 36 frames in 3.4 seconds for a rate of just over 10fps; after this it stopped shooting. Switching to RAW saw the camera capture 14 frames in 1.37 seconds for a rate of again just over 10fps.
Setting the camera to Continuous autofocus confirmed the drop in speed. When shooting JPEG I captured 39 frames in 6.13 seconds for a rate of 6.36fps. Meanwhile the Super High mode captured a 60 frame burst of 5 Megapixel images in 1.18 seconds for a speed of 50.8fps.
So the Lumix LX10 / LX15 delivers on its quoted speeds and offers modes that are practical for a variety of situations – and lest we forget there’s also the 4K Photo modes which shoot 8 Megapixel images at 30fps.
Panasonic Lumix LX10 / LX15 Wifi
The LX10 / LX15 is equipped with Wifi for wireless image transfer and remote control with Andoid and iOS smartphones. There’s sadly no NFC for touch-based connections, but it’s still quick to establish a connection using a QR code.
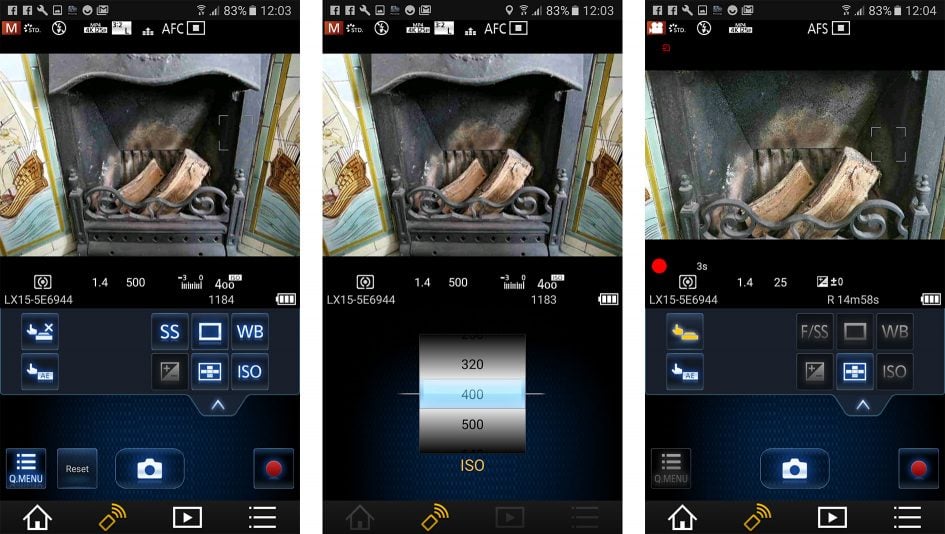
I tried the Lumix Image App on my Samsung Galaxy S7 and the functionality is essentially the same as recent models. You get (almost) full manual control over the camera with the chance to adjust pretty much anything that’s not set by a physical dial. So while the exposure mode and aperture still has to be adjusted on-camera using their respective dials, the app lets you set the photo and video quality, shutter, ISO, white balance, exposure compensation and AF area. You can tap zoom buttons to adjust the lens focal length remotely and can tap to reposition the AF area too, with or without triggering the shutter. You can start and stop video recordings of any quality via the app, and also tap the phone screen to pull-focus while filming.
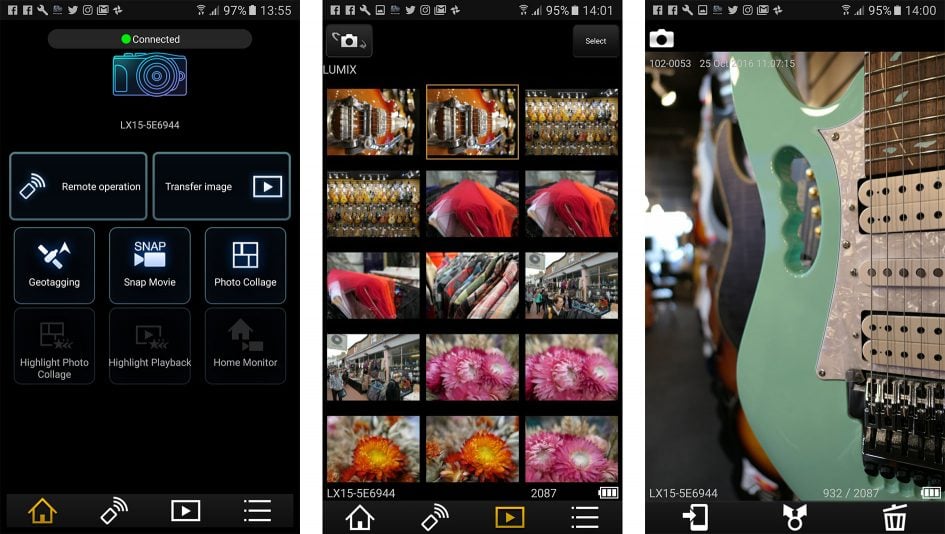
During playback you can view thumbnails of stills and videos. JPEGs can be copied onto the phone over Wifi, but not RAW files. Videos up to 1080p in quality can be streamed from the camera for playback on the phone’s screen, and you can copy them over too. Note this isn’t possible with 4K videos though; you may be able to trigger new 4K recordings remotely, but you won’t be able to stream or copy them onto your phone, at least using the Lumix Image App.
The app also lets you record a GPS log for later syncing with images in the camera, a process that involves wirelessly copying a log to the camera, before using the camera’s playback menus to apply it to relevant images in that timeframe.
Panasonic’s Wifi experience may be much the same as previous models, but I’m not complaining as it’s offered a great deal of control for a long time. The GPS tagging and auto image transfer may not be as seamless as the low-power Bluetooth connectivity of Nikon’s SnapBridge, but the degree of remote control is significantly better and it doesn’t require any convoluted in-camera app upgrading as Sony demands.
Panasonic Lumix LX10 / LX15 movie mode
The Lumix LX10 / LX15 is equipped with excellent movie capabilities, filming 1080p video up to 120p or 4K / UHD up to 30p, with full control over exposure and focus-pulling by touch or even over Wifi with your phone. There’s also time-lapse and stop motion movie modes available.
With the camera set to record in the MP4 format you can choose between 4K at 24, 25 or 30p (all at 100Mbit/s), 1080p at 25, 30, 50 or 60p (all at 20Mbit/s), or 720p at 25 or 30p (both at 10Mbit/s). Set it to the AVCHD format and you have the choice of 1080 in a variety of progressive and interlaced formats including 24p at 24Mbit/s. The longest recording time per clip in 4K is 15 minutes, extending to 29:59 in 1080 or 720 modes.
15 minute clips of 4K video is impressive on a camera of its size when you consider Sony’s RX100 Mark IV and V are limited to five minutes per clip to avoid overheating. So does the LX10 / LX15 get hot under the collar? On a full battery charge, I recorded five 4K clips in a row lasting 15 minutes each before the battery icon started to flash. The battery gave up a couple of minutes later, but I’d still managed to record just over 77 minutes worth of 4K on a single charge and while the camera felt warm it was certainly not hot nor did it warn of over-heating. This is a key bonus over the RX100 IV and V if you’d like to record longer clips of 4K.
When filming 720 or 1080 video without stabilisation up to 60p, the LX10 / LX15 takes the full sensor width and scales it down – so with only the change in aspect ratio to consider, the lens range becomes equivalent to 25-75mm. If you enable the stabiliser, the LX10 / LX15 applies a minor crop, reducing the lens range to 27-81mm and if you have Level Shot enabled to keep the horizon straighter, you’ll experience a further reduction to 30-90mm due to the border being used for digital compensation.
Switch into 4K and the LX10 / LX15 applies an even tighter crop with the change reducing the field-of view to an equivalent of 36-108mm, although interestingly this remains the same whether stabilisation is enabled or disabled (Level Shot isn’t available in 4k). Here’s how the difference in coverage looks between shooting 1080 and 4K video from the same position, with the former having stabilisation and Level Shot disabled.

Above: Lumix LX10 / LX15 movie coverage with lens wide: 1080p (25mm equiv), left, 4K (38mm equiv), right
If you’re filming with High Speed Video enabled (capturing unstabilised 1080 at 100p or 120p depending on region) the field is cropped to 31-93mm and the zoom disabled once filming starts.
High Speed Video saves your footage in 25p or 30p depending on region, so in playback you’ll see the action moving four times slower than normal. Four times may not achieve the 10, 20 or even 40x slow-downs of the Sony RX100 Mark IV and V (albeit with decreasing quality as the frame-rate increases), but the quality on the LX10 / LX15 remains pretty good and four-times is enough for a nice effect. Here’s a compilation of clips filmed in the mode.
Download the original file (Registered members of Vimeo only). Sample movie filmed with a final production Panasonic Lumix LX10 / LX15 in its High Speed Video mode. This shoots 1080p at 120p or 100p depending on region and saves it at 30p or 25p respectively for a 4x slowdown. Note stabilisation is disabled and there’s no audio recorded.
You can start recording video in any mode by simply pressing the red record button, but if you first set the camera to Movie Manual on the mode dial, you unlock more options. First is the ability to expose in Program, Aperture Priority, Shutter Priority or full Manual. These let you take control over the aperture and shutter speed, not to mention ISO sensitivity and exposure compensation before or during filming. The touch-screen popout tray has a dedicated movie tab under which you’ll find options to silently adjust the shutter, compensation, ISO and zoom by dragging a slider, but like still photography, the aperture can only be adjusted manually using the clicky lens ring – not ideal for quiet or smooth changes, but since you can adjust the ISO and shutter speed silently, it shouldn’t be an issue for discreet exposure adjustments. Note while Auto ISO is available in semi and automatic exposure modes, it’s sadly not possible when filming in the Manual movie exposure mode.
You can apply the full range of Photo Styles if you’d like to boost, or mute colours or switch into monochrome for example. As you’d expect for a camera of its class, there’s no Cinelike D or V profiles for subsequent grading, but you can choose a Custom Photo Style and turn contrast, sharpening, noise reduction and saturation down to their minimum values for fairly flat output – I have an example below.
In terms of focus you can set the camera to Single or Continuous AF, and use the touch-screen to pull focus between subjects as you film. If you set the focus mode to Manual, you can use the smooth lens ring to quietly adjust the focus while filming, complete with focus-peaking for a visual aid if desired. Prior to filming you can additionally exploit the various magnified assistance views, either in a window up to 6x or full-screen up to 10x, for a really close look, but once you start filming the screen will return to showing the full capture area.
Here’s a clip showing the touch-screen focus-pulling in action.
Download the original file (Registered members of Vimeo only). Sample movie filmed with a final production Panasonic Lumix LX10 / LX15 in 4k / 25p using the Standard Photo Style; I filmed in Aperture Priority mode at f1.4 and 400 ISO.
Now for some more sample videos filmed with the Lumix LX10 / LX15.
Download the original file (Registered members of Vimeo only)
Download the original file (Registered members of Vimeo only). Sample movie filmed with a final production Panasonic Lumix LX10 / LX15 in 4k / 25p using the Standard Photo Style; I filmed in Manual exposure mode at 1/50, f1.4 and 400 ISO.
Download the original file (Registered members of Vimeo only)
Download the original file (Registered members of Vimeo only). Sample movie filmed with a final production Panasonic Lumix LX10 / LX15 in 4k / 24p using the Standard Photo Style; I filmed in Program exposure mode at 125 ISO ISO. I also have a version filmed with a Custom profile where I turned all the settings down for a ‘flatish’ output.
Download the original file (Registered members of Vimeo only). Sample movie filmed with a final production Panasonic Lumix LX10 / LX15 in 4k / 25p using the Standard Photo Style; I filmed in Manual exposure mode at 1/25, f1.8, 3200 ISO.
Right, that’s enough talk, it’s time to check out my results and samples!
Check prices at Amazon, B&H, Adorama, eBay or Wex. Alternatively get yourself a copy of my In Camera book, an official Cameralabs T-shirt or mug, or treat me to a coffee! Thanks!


