 Panasonic's FZ2000 / FZ2500 is the company's best bridge super-zoom camera to date. Everyone benefits from the 20x / 24-480mm zoom range, larger viewfinder and articulated touchscreen, but movie shooters will adore having unlimited 4k recording, 10-bit HDMI output, smooth internal zooming and a built-in ND filter adjustable by 2, 4 or 6 stops. With so many enhancements and improvements over its predecessor, it's hard not to enthuse over the Lumix FZ2000 / FZ2500 which packs in a huge range of features at a very competitive price. As a high-end camera I do wish it had weather-sealing, but it doesn't hold it back from earning a Recommended award. Compare closely with the Sony RX10 series.
Panasonic Lumix FZ2000 / FZ2500 review
-
-
Written by Ken McMahon
In depth
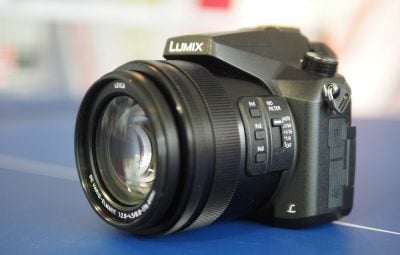
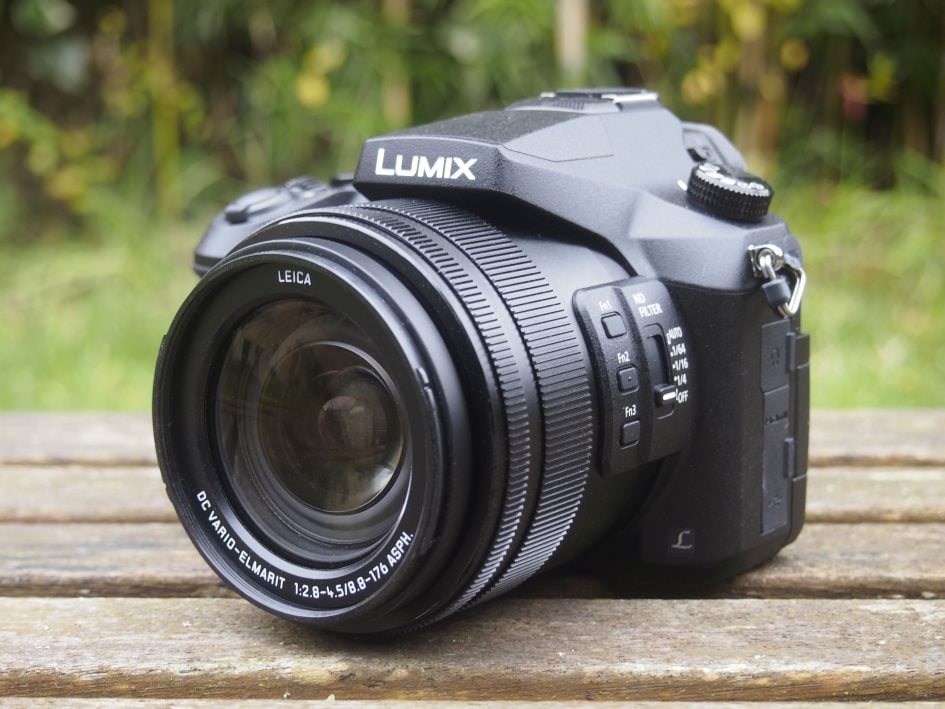
The Panasonic Lumix FZ2000, or FZ2500 as it’s called in North America, is a high-end DSLR-styled super-zoom camera with a 20x / 24-480mm range, 1inch 20 Megapixel sensor, large EVF, fully-articulated touchscreen and a wealth of pro movie options including unlimited 4k recording in UHD or Cinema 4k. Announced in September 2016, it’s positioned above the existing FZ1000 which remains on sale.
The FZ2000 / FZ2500 shares the same 1inch 20 Megapixel sensor as the FZ1000, giving it a step-up in quality over cameras with smaller sensors, while also allowing a large zoom to be accommodated. The lens is the major upgrade over the earlier FZ1000, boosting the previous 16x / 25-400mm f2.8-4 range to 20x / 24-480mm f2.8-4.5 and, importantly for balance and minimising image shift, the zooming now takes place internally so once the camera’s powered-up the barrel doesn’t extend any further. Panasonic has also fitted a coreless DC motor for smooth zooming at a choice of speeds. The nine-blade diaphragm can now be controlled smoothly for step-free adjustments, while a pair of built-in ND filters work together provide two, four or six stops of light absorption.
4k movies (with an approximate 1.5x crop) can be captured in UHD or the wider Cinema 4k format at 24 to 30p for as long as you have memory and battery remaining (there’s no 29:59 limit in any region), while 1080 is available between 24 and 60p with variable frame rate options for further slowdown (effectively up to 120fps). Movie pros will appreciate the 4k / 10 bit / 4:2:2 HDMI output along with the chance to buy an upgrade to support V-Log; note Cinelike profiles are included as standard.
Like other Panasonic cameras, the FZ2000 / FZ2500 exploits 4k in a wealth of photo modes, including 4k Photo (effectively capturing 8 Megapixel stills at 30fps), Post Focus (which racks the focus during capture to let you later extract the one at the desired point of focus), and the latest Focus Stacking (which again racks the focus during capture but then lets you create a stacked image in-camera between a defined range of distances). These modes are all defined and adjusted using the 3in fully-articulated touchscreen. The viewfinder uses the same 2360k dot / OLED panel as the FZ1000 but boosts the magnification from 0.7x to 0.74x for a satisfyingly large and detailed image.
In my review I’ve tested and compared the Lumix FZ2000 / FZ2500 alongside the Sony’s RX10 Mark III. Many of the FZ2000 / FZ2500’s upgrades over the FZ1000 are in response to Sony’s earlier RX10 models, but I wanted to see how it measured-up against the latest Mark III. It’s certainly a compelling rival which trumps the range of the FZ2000 / FZ2500 with its 25x / 24-600mm f2.4-4 lens, weather-sealed body, High Frame Rate (HFR) video up to 1000fps and faster continuous shooting. It’s comfortably more expensive than the FZ2000 / FZ2500 though, and lacks its Cinema 4k option, fully-articulated touch-screen (versus vertical tilt only and non-touch), 4k photo modes and variable ND filter. Read on to find out which movie-oriented premium super-zoom will be best for you!
Lumix FZ2000 / FZ2500 design and controls
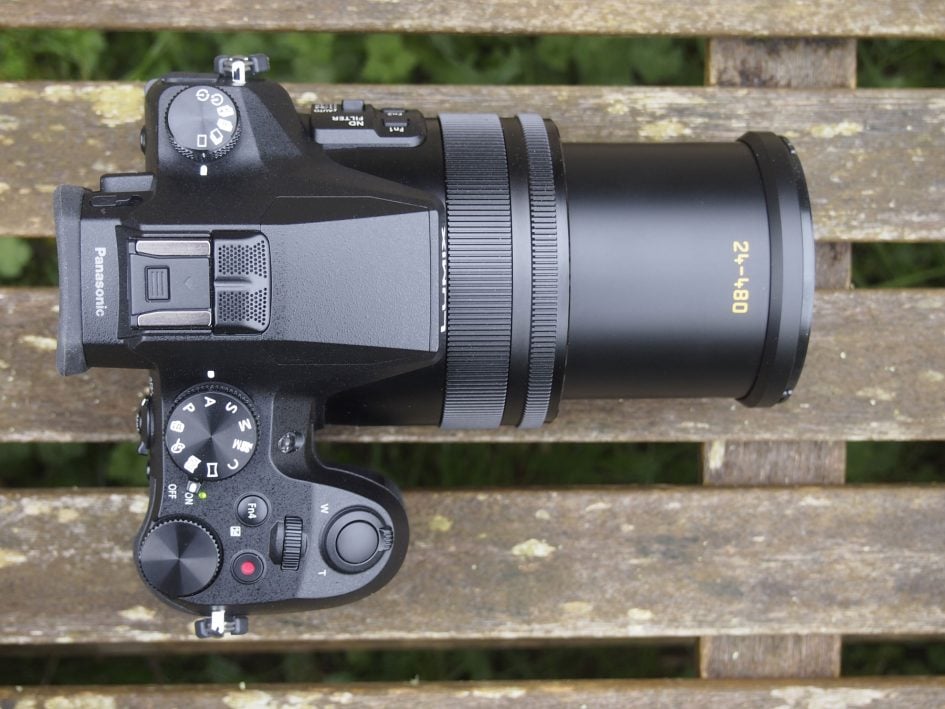
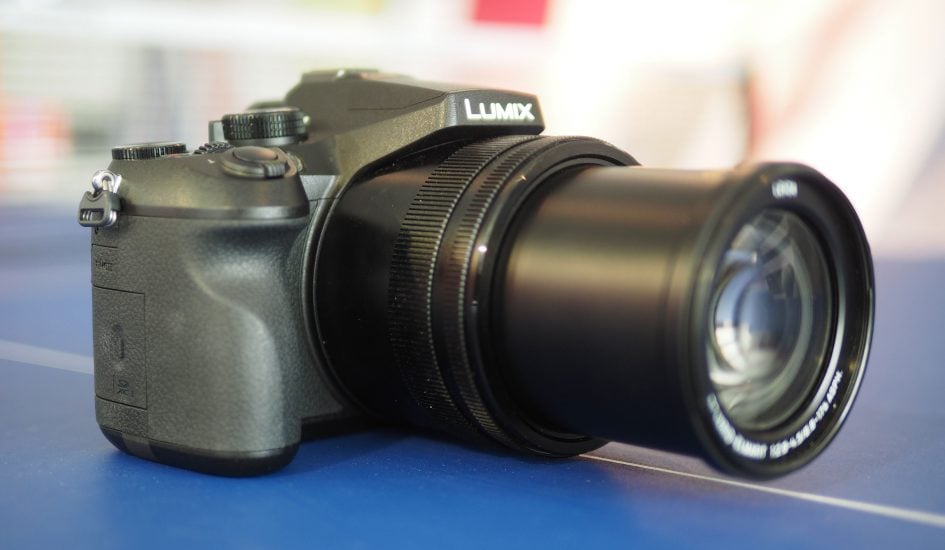
Though the Lumix FZ2000 looks a lot like the earlier FZ1000, there’s much that’s new. It’s roughly the same size and weight as its predecessor, which is to say comparatively big and heavy if you’re used to a smaller sensor superzoom. The FZ2000 / FZ2500’s dimensions are 138 x 102 x 135mm and it weighs 4 grams short of a Kilo with the battery and a card fitted.
The figures for the Sony RX10 III are 132 x 94 x 127mm and 1095g, a little bit, though not noticeably smaller and a bit heavier. But compare those figures with Panasonic’s FZ200, which measures 132 x 91 x 117mm and weighs 691g and you begin to appreciate how much more substantial the larger sensor super-zooms are.
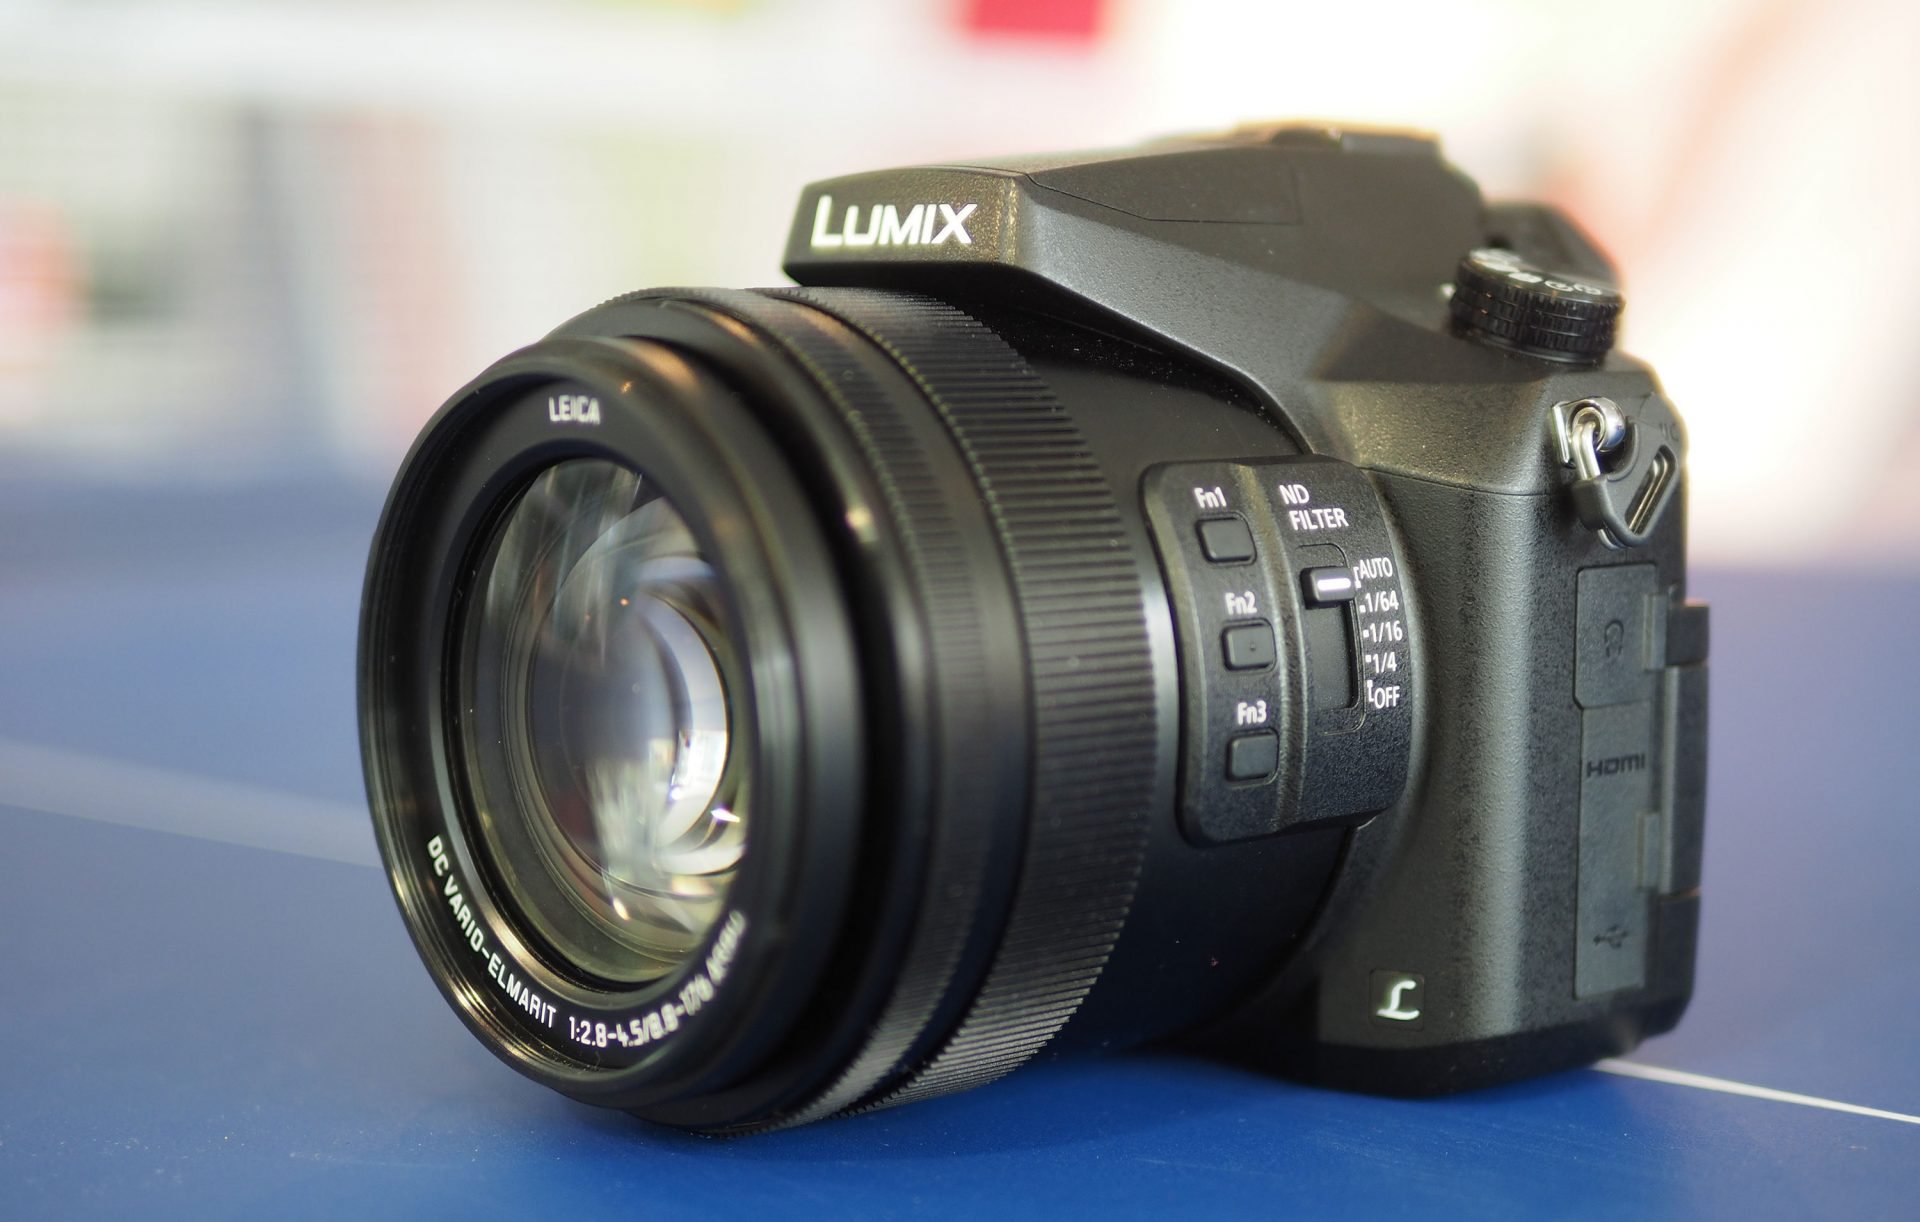
The FZ2000 / FZ2500 has no fewer than seven programmable function buttons compared with five on the earlier FZ1000. The first three are mounted on the left side of the lens barrel: Fn1 and Fn2 zoom the lens in and out at the slowest of the available speeds, Fn3 controls white balance and ISO sensitivity. These Function buttons replace the zoom/focus switch which toggled the function of the lens ring and the switch for stabilisation. There’s now a second ring for focusing and stabilisation is set from the menu.
Behind the three function buttons is the five-position switch for the ND filter which has three manual settings of 1/4, 1/16 and 1/64 (2, 4 and 6 stops) as well as off and auto positions. Moving up to the top panel, the big change here regards the control dials. The original thumb-operated wheel that was recessed into the back becomes a fully-formed, generously-proportioned, top-mounted dial. A second index finger-operated control wheel as now situated just behind the shutter release.
Just behind it there’s now a single function button, Fn4, and slightly moved to the right of that is the movie record button. The mode dial loses its second custom position to panorama mode but is otherwise unchanged.
Fn5, Fn6 and Fn7 are on the rear panel in the places previously occupied by Fn3, Fn4 and Fn5 and, as before they’re assigned to the Q Menu, delete/back and the viewfinder / screen toggle. Styling details aside the rear panel is otherwise very similar to the Lumix FZ1000, with the four-way controller, display and playback buttons on the right side of the articulated screen. The screen itself gets a boost in resolution from 920k to 1040k dots. As before it’s 3:2 proportioned so when shooting stills in the native 3:2 sensor shape the image fills the entire screen area.
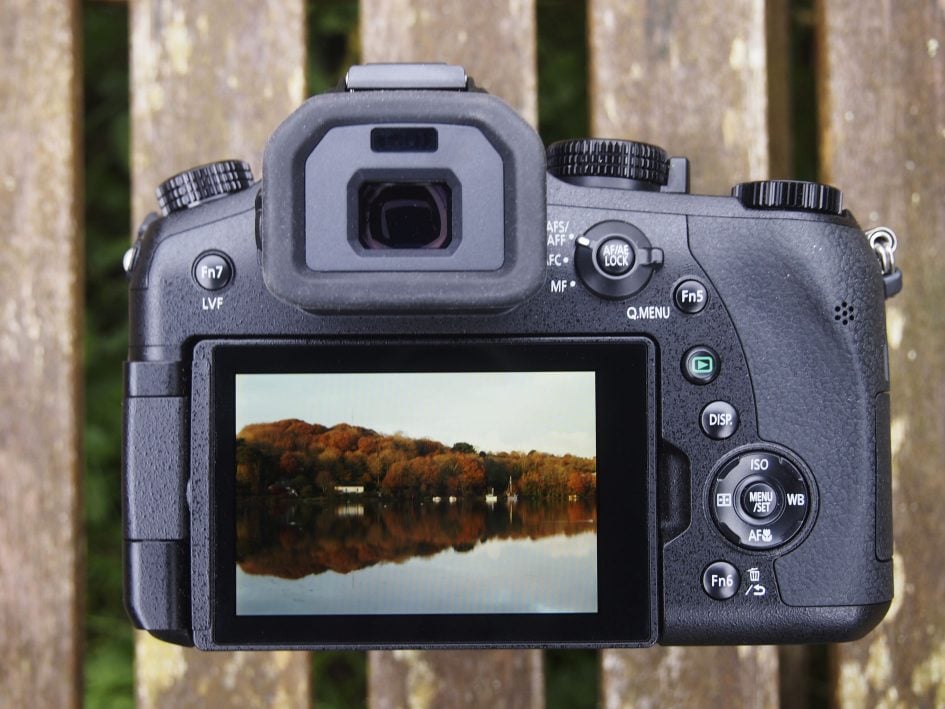
But the big news is that it’s now a touch sensitive panel which means you can tap it to set the AF area, make menu selections and take advantage of other features like screen function buttons. Touch screens have been a great success on other Lumix models and it’s an obvious, but nonetheless welcome addition to the FZ2000 / FZ2500.
None of the Sony RX10 models have touch screens and, like the earlier models, the RX10 III’s screen is attached at the bottom with a double-hinge so that it can flip up and down, but the side hinge on the FZ2000 / FZ2500 means it can be positioned at any angle including forward-facing for self-shooting and it can also be folded in on itself for protection when not in use.
The FZ2000 / FZ2500’s OLED viewfinder has the same 2359k dot resolution as its predecessor but now presents a larger view thanks to a higher magnification of 0.74x. The FZ2000 / FZ2500’s native 3:2 image shape means that when shooting full-sized stills the image doesn’t quite fill the 4:3 proportioned viewfinder and narrow black bands appear at the top and bottom. These areas don’t go to waste though and are used for information display. Shooting mode, photo style, flash mode, movie mode, image size and quality, focus mode and battery life are displayed along the top; with metering mode, aperture and shutter speed, exposure compensation and remaining card capacity along the bottom.
In practice, the quality of the viewfinder is excellent and on a par with the best EVFs fitted to compact system cameras. It’s big, bright and the image is nice and stable though inevitably when panning there’s an ever so slightly perceptible lag. If this bothers you there’s an option to increase the refresh rate from the default 30fps to 60fps though at the higher rate the battery will run down more quickly.
For most situations though, I found the FZ2000 / FZ2500’s viewfinder a pleasure to use. In a side-by-side comparison with the Sony RX10 III the FZ2000 / FZ2500’s viewfinder looks slightly bigger, brighter and more detailed. Perhaps most importantly the view looks more stable with no hint of flicker even at the default 30fps refresh rate.
An eye sensor is positioned just above the FZ1000’s viewfinder so the display automatically switches from the screen to the viewfinder when you raise your eye to it. Pressing the Fn7 button toggles between the EVF and screen displays. This is also handy to prevent the EVF kicking in when you don’t want it, for example when shooting at waist level with the screen flipped up.
Pressing the Disp button on the rear panel toggles between four viewfinder display overlays: one displays the full information, a second only shows exposure details with both of these options also available with a two-axis level. Generally, what’s displayed in the viewfinder is replicated when you switch to the screen, however, the screen has two other options one being a detailed information only display and the other which is blank.
So it’s possible to have a clear uncluttered view in the viewfinder with all the detailed information displayed on the rear screen, though you can’t have both at the same time, but need to remove your eye from the EVF to switch the screen on. If you’re really not keen on using the screen at all you can set the blank option, which uses less battery power than permanently switching to the EVF as the viewfinder then only becomes active when you put your eye to it. With the rear screen disabled you can still get the detailed information screen if you want it by setting the viewfinder to monitor mode.
Finally, if you like the way the FZ2000 / FZ2500 switches between the EVF and screen but don’t like how it sometimes happens accidentally, there’s even an option to alter the sensitivity of the sensor. All in all it’s a very well thought through, practical system which is easy to configure.
On the right side of the body a plastic flap covers the mini HDMI port with a USB / A/V out port below. Panasonic has rectified the ommission of a headphone jack on the earlier FZ1000 and on the new model it’s positioned just above the HDMI and USB ports with its own separate cover. The socket for the DMW-RSL1 wired remote has moved to the right side of the body just above the SD card compartment. The HDMI will impressively output 4k in 10 bit / 4:2:2.
The Lumix FZ2000 / FZ2500 takes the same DMW-BLC12E battery as the FZ1000. From a full charge you can expect to get 350 shots if you use the screen exclusively and 270 if you use the viewfinder, for most people using both it’ll be somewhere between those two numbers. That’s on the low side for a super-zoom and you’ll probably want to carry a spare. The Sony RX10 III does better with a quoted figure of 420 / 370 for screen / EVF use. Plus you can recharge the Sony’s battery over USB from sources including a laptop, car charger or portable battery, a big advantage if you’re travelling as you don’t need to carry a separate charger and rely on mains power. Sadly the FZ2000 / FZ2500 can’t be charged over USB.
One of the unique things about the FZ2000 / FZ2500 is its ability to keep filming clips beyond the usual 29:59 limit. But how long will the battery last and is overheating an issue? To find out I fitted a freshly-formatted 64GB card and started filming 4k / 25p at 100Mbit/s. It kept filming well-beyond the traditional half hour limit, and only stopped when the 64GB card filled-up after an hour and 26 minutes. I then reformatted the card and started recording again straightaway, capturing an additional 44 minutes before the battery gave up. So with a large enough card, you should be able to film a single 4k clip lasting over two hours on a single charge, which is pretty impressive.
Like the FZ1000, the Lumix FZ2000 / FZ2500 is fitted with a integral pop-up flash which is raised by sliding a small switch on the right side of the viewfinder housing. In fact it appears to be the exact same flash as on the earlier model. The switch releases a spring-activated mechanism which pops the flash forwards an up, raising it well clear of the body and lens barrel. To return it you just push it back down. It has a maximum range of 13.2 Metres and offers forced on, forced on red-eye, slow sync and slow sync red-eye modes.
There’s also a standard hot shoe for fitting an external flash and the built-in flash can be used to wirelessly control compatible Panasonic external flash units like the DMW-FL360 and DMW-FL580. The RX10 III’s hotshoe can also accommodate an external flash, but Sony offers a host of other accessories, including a variety of LED lights, external microphones and even Sony’s XLR-K1M adapter which not only includes an external microphone but XLR jacks for other professional mics.
Lumix FZ2000 / FZ2500 lens and stabilisation
The FZ2000 / FZ2500’s fixed zoom lens gets a major upgrade with an extended range that now starts slightly wider than before at 24mm equivalent and extends to 480mm compared with 400mm previously. The maximum aperture remains at f2.8 but now closes to f4.5 at the telephoto end of the range.
Below you can see the comparative coverage of the lens at either end of the range. This is one of, if not the most important factors for people thinking of buying a super-zoom, so lets look at how it compares with the competition. Sony and Panasonic have been playing leapfrog with their respective RX10 and FZxxxx series zooms for a couple of years now. About six months after the RX10 with its 8.3x / 24-200mm zoom was launched in October 2012 Panasonic announced the FZ1000 with double the range – 16x / 25-400mm f2.8-4. The RX10 II stuck with the 24-200mm lens until the arrival of the RX10 III in March 2016 with a 25x / 24-600mm f2.4-4 lens. Then six months later came the FZ2000 / FZ2500. This time around it doesn’t leapfrog the RX10 III with it’s 20x zoom, but the new lens has some other very interesting features which might swing the balance in its favoure despite the shorter range.
Panasonic Lumix FZ2000 / FZ2500 coverage, wide and tele

Above left: 8.8-176mm at 8.8mm (24mm equivalent), above right: 8.8-176mm at 176mm (480mm equivalent)
Panasonic calls the new lens a ‘photo/video hybrid lens’. It features an enclosed inner zoom structure which means the barrel doesn’t extend externally as you zoom. Another aspect of this feature is a guide pole mechanism which maintains a smoother stable zoom action. According to Panasonic this suppresses image shift by 80 percent compared with the FZ1000 and in practice it certainly does produce a silky smooth zoom action as you’ll see in my video clips later.
A coreless DC motor enables slow constant speed zooming which is very effective for video, you can see how it looks in my video samples in the next section. The iris diaphragm which controls the aperture has also been upgraded and now has nine blades which can be adjusted steplessy to smoothly accommodate rapid changes in brightness.
Finally, the lens has two built-in neutral density filters which work together provide two, four or six stops of light absorption making it possible to shoot with a wider aperture or slower shutter speed for reduced depth of field or motion effects. The ND filters are controlled by a five-position switch on the side of the lens barrel. In the off position the filters are inactive and there’s an auto position at the other end which activates them if the light is too bright for a manually set exposure.
In between are three positions marked 1/4, 1/16 and 1/64 referring to the light reduction factor rather then the number of stops of light reduction. So assuming the unfiltered exposure was, say, 1/2000 at f8, the three positions would offer you 1/500, 1/125 or 1/30 respectively, or a wider aperture or combination of the two. The ND filters are especially useful for video where you might want to open the aperture for shallow depth of field while maintaining an approximately 2x frame rate 180 degree shutter speed for motion quality reasons.
Panasonic Lumix FZ2000 / FZ2500 O.I.S Off / On

Above left: 100% crop, 8.8-176mm at 176mm 125 ISO 1/25th O.I.S off, above right: 100% crop, 8.8-176mm at 176mm 125 ISO 1/25th O.I.S on.
The FZ2000 / FZ2500 features Panasonic’s Power O.I.S stabilisation which moves the lens elements to compensate for camera shake and permit hand-held shots at slower shutter speeds. To test the stabilisation I zoomed the lens to its maximum 480mm focal length and took a series of shots in shutter priority mode at progressively slower shutter speeds first with the stabilisation turned off, then with it turned on. As you can see from the crops above, the Lumix FZ2000 / FZ2500 can shoot at shutter speeds as slow as 1/25th with the stabilisation enabled; that’s about four stops slower than conventional wisdom suggests is safe.
Lumix FZ2000 / FZ2500 movie modes
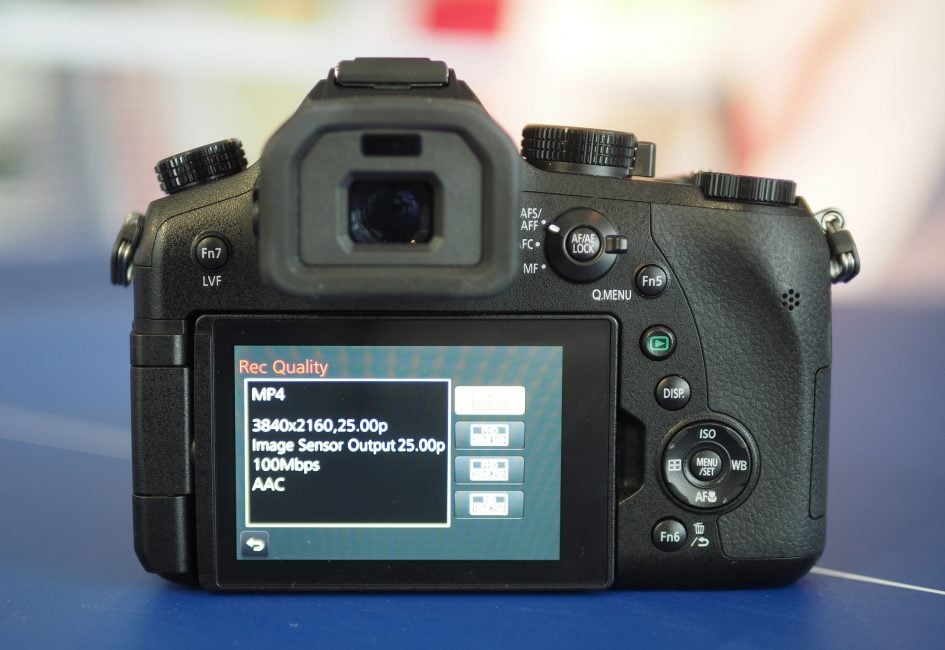
The Lumix FZ200 / FZ2500 video capabilities have been upgraded with the option of 4k movies in either UHD or the wider Cinema 4k format, and no limit (other than battery life and memory capacity) on recording time. 1080 is available between 24 and 60p with variable frame rate options for further slowdown (effectively up to 120fps). Movie pros will appreciate the 4k / 10 bit / 4:2:2 HDMI output along with Cinelike D and V profiles for flatter output, along with the chance to buy an upgrade to support V-Log. These updates effectively put the FZ2000 / FZ2500’s video capabilies on a par with Panasonic’s flagship mirrorless model the Lumix GH4.
You can record Cinema 4k (4096×2160) at 24fps or UHD 4k (3840×2160) at 23.98, 24, 25 or 29.97fps, all at a bit rate of 100Mbit/s and in the choice of MOV or MP4 wrappers with LPCM audio. Note most 4k cameras only offer the UHD format.
The FZ2000 / FZ2500 is also very capable at 1080p, offering it at 23.98, 24, 25, 29.97, 50 and 59.94fps. Each frame rate can be encoded at 50, 100 or a huge 200Mbit/s. In addition the 200Mbit/s modes encode with All Intra, which means frames are compressed individually for better quality and easier editing. Again all modes are offered with MOV or MP4 with LPCM wrappers.
If the 1080p frame rate is set to 23.98, 24, 25 or 29.97fps and the bit rate to 100Mbit/s, you’re also given the chance to apply a variable frame rate to speed up or slow down the footage. The maximum frame rate in the 23.98 and 24fps modes is 96fps, which in turn results in a four-times slowdown.
Two other new features you can take advantage of when shooting in these modes are Slow/quick and Dolly zoom. The first allows you to speed up or slow down the action by a factor of 2x by pressing Fn1 or Fn2 respectively. You can of course do this in post processing, but it’s much easier in the camera. Dolly zoom is a special effect zoom, most often used to create a creepy altered reality look where the central subject remains fixed while only the background zooms.
There’s also lower bit-rate video modes available from the MP4 (without LPCM) and AVCHD menus. In AVCHD you can choose 1080 video at 23.98p, 29.97p, 50p, 59.94p or 50i or 59.94i at 17 to 28Mbit/s. In MP4 you can choose 1080 at 25p, 29.97p, 50p, or 59.94p, 720 at 25p or 29.97p. The one ommision from the GH4 video mode line-up is the VGA (640 x 480), which I suspect few will miss.
The high bit rates of the MOV and MP4+LPCM will be welcomed by demanding videographers and movie makers, but they require a pretty quick SD card to support them. Panasonic recommends at least Class 4 for AVCHD, Class 10 or UHS-I Class Speed 1 for 50Mbit/s, and UHS-I Class Speed 3 (U3) for the 100 and 200Mbit/s options.
The sheer wealth of video formats can understandably cause confusion, so Panasonic divides them up by region with three system frequencies: 24Hz for Cinema, 50Hz for PAL and 59.94Hz for NTSC. You change the frequency in the Setup menu and need to reboot the camera after each change by switching it off and on again.
There can be some confusion though. If you want 24.0fps, you’ll need to select the 24Hz frequency, but if you want 23.98fps, you’ll find it under the 59.94Hz NTSC configuration. As a format aimed for theatrical release, Cinema 4k is only available at 24.0fps, so you’ll only see it offered when the system frequency is set to 24Hz – and in addition only when the shooting mode is set to Creative Movies. In contrast, UHD, as a TV format, is available across all three system frequencies, and for any shooting mode.
Panasonic Lumix FZ2000 / FZ2500 movie coverage: full frame (1080p), green frame (C4k), red frame (UHD 4k)
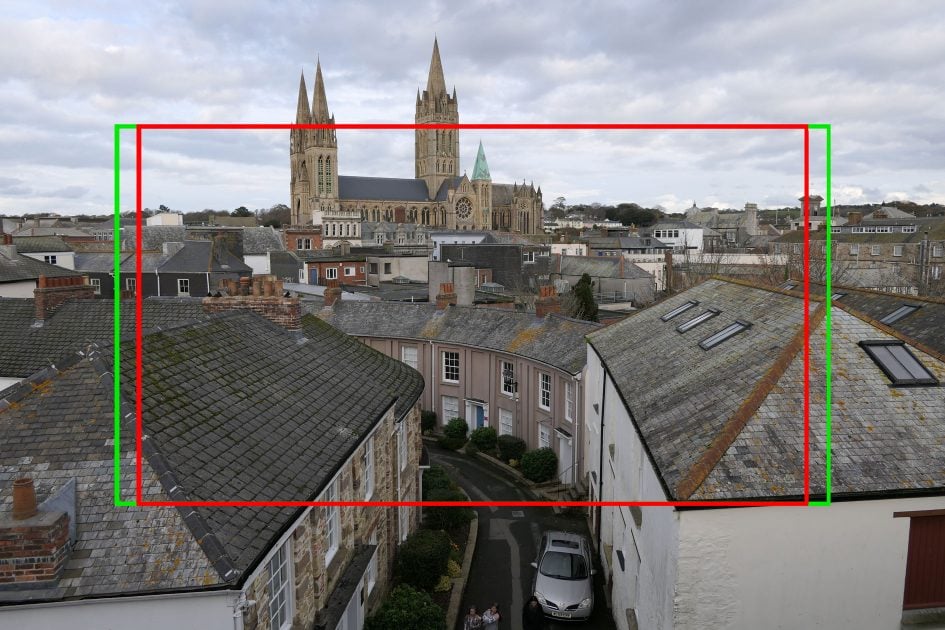
The FZ2000 / FZ2500 delivers UHD by taking a 3840×2160 pixel crop straight from the middle of the 5472 x 3648 pixel sensor. As illustrated by the red rectangle above, the cropping results in a significantly reduced field of view compared to shooting still photos at the native resolution, but the benefit is a complete absence of scaling, thereby allowing the 4k mode on the FZ2000 / FZ2500 to avoid the undesirable moire artefacts of most cameras. Plus while you miss out on the widest coverage, you do gain extra reach at the telphoto end. The Cinema 4K mode likewise uses a 4096×2160 pixel crop providing a slightly wider field of view with the same vertical angle shown by the green rectangle above. The GH4 is the same in this regard, although with a lower resolution 16 Megapixel sensor as a starting point, the field of view isn’t reduced as significantly.
For 1080p video, the FZ1000 takes the full sensor width and scales it down to 1920 pixels using a non-integer factor of 2.85 times. The benefit is 1080p footage shares the same horizontal field of view as shooting stills, but the downside is again the potential for moire artefacts from the non-integer scaling factor. With this in mind, those wanting the best 1080p output may prefer to shoot in UHD and scale it down by two times, although they’ll have to accept the reduced field of view. Once again this is the same approach employed by the GH4 for 1080p.
The FZ2000 / FZ2500 lets you start recording movies in most shooting modes, but for the greatest control – and to unlock the Cinema 4k option, variable frame rate and Slow / Quick and Dolly zoom features – you’ll need to turn the mode dial to Creative Movies. This reformats the screen to preview the video aspect ratio and lets you choose to shoot in Program, Aperture Priority, Shutter Priority or full Manual.
The FZ2000 / FZ2500 can present and adjust the shutter speed and sensitivity as conventional seconds and ISO, angle and ISO, or seconds and db. Film makers will gravitate towards the second option so they can set the shutter to 180 degrees for the most natural-looking capture of motion. Anyone used to consumer cameras will also be interested to find the chance to adjust the video Luminance Level between 0-255, 16-235 or 16-255, giving more latitude to grade, along with a Master Pedestal Level for setting black levels. There’s also a variety of timecode options and the chance to display or output SMTPE, EBU or ARIB colour bars for calibration.
One of the unique things about the FZ2000 / FZ2500 is its ability to keep filming clips beyond the usual 29:59 limit. But how long will the battery last and is overheating an issue? To find out I fitted a freshly-formatted 64GB card and started filming 4k / 25p at 100Mbit/s. It kept filming well-beyond the traditional half hour limit, and only stopped when the 64GB card filled-up after an hour and 26 minutes. I then reformatted the card and started recording again straightaway, capturing an additional 44 minutes before the battery gave up. So with a large enough card, you should be able to film a single 4k clip lasting over two hours on a single charge, which is pretty impressive.
Now here’s some example clips.
Download the original file (Registered members of Vimeo only)
Above: this clip, like the others below was shot in the using the Lumix FZ2000 / FZ2500’s 1080/50p 28mb/s mode. There’s also a 4K UHD version. The stabilisation doesn’t do a great job particularly when zoomed out, though it settles down after a while. Here I used the zoom buttons on the lens for a nice smooth result at the fastest of the three available speeds.
Download the original file (Registered members of Vimeo only)
Above: For this second clip the camera was mounted on a tripod and the stabilisation was disabled. As before, I shot this clip in both 1080/50p 28Mbit/s shown here as well as in 4K 100Mbit/s UHD mode. Once again here I’ve used the zoom buttons on the lens barrel, this time set to the slowest of the three available speeds. The zoom is very smooth and stable – any movement you see is down to me pressing the zoom buttons. I later discovered that you can configure them to start and stop with a single press, which is a lot easier than keeping them pressed with cold hands!
Download the original file (Registered members of Vimeo only)
Above: For this low light panning clip I set the Lumix FZ2000 / FZ2500 to Aperture priority mode and selected F4 at 1600 ISO. This is the 1080/50p version, there’s also a 4K/25p version. The quality looks very good and not at all noisy, the contrast-detect AF has a bit of a wobble at the beginning, but soon settles down.
Download the original file (Registered members of Vimeo only)
Above:To test the continuous autofocus on the Lumix FZ2000 / FZ2500 I zoomed the lens in a little and opened the aperture as wide as it would go then panned from the coffee cup on the table up to the mirror on the far wall and back again. The FZ2000 / FZ2500’s contrast detect AF isn’t great at this, but it’s not terrible either.
Download the original file (Registered members of Vimeo only)
Above:Here’s a sample video filmed in Cinema4k at 24p. If you prefer to grade your footage I have a version in Cinelike D: Lumix FZ2000 / FZ2500 Cinema4k Cinelike D movie sample.
Lumix FZ2000 / FZ2500 shooting experience
Ergonomically, the FZ2000 / FZ2500’s updated control layout makes it not only a more capable model, but much more satisfying to use. You might expect the proliferation of programmable function buttons to add complexity to what was already a far from simple setup, but the positioning of three of the buttons on the lens in fact has the opposite effect.
In the default setup two of the three lens Fn buttons operate the zoom, and of the three on the rear panel, one operates the Q Menu and another toggles the viewfinder/screen display. Personally, I wouldn’t want to re-assign these and I’d probably also leave Fn4 on the top panel in it’s default exposure compensation mode too.
That leaves Fn3 on the lens (default ISO/WB) and Fn 6 on the rear (aperture and shutter speed display effects). There are already ISO and white balance buttons on the four-way controller so there’s not much to lose by reassigning Fn3 and personally aperture and shutter speed effects are a feature I’ve never found useful so the same goes for Fn6. Like all the other buttons, these two can be reassigned to any one of 21 options including Wifi, the level gauge display, 1 shot RAW+JPG, 1 shot spot metering, 4K photo, self-timer, auto bracketing, HDR, stabilisation, movie record format, silent mode, and peaking, to name just a few.

The touch screen adds a further five ‘soft’ Fn buttons which are also customisable. you can of course also use the touch screen to set the AF area and pull focus during movie recording as well as being able to silently change exposure settings and audio input levels.
Above: 5s, f4, 100 ISO ND 1/64, 29mm (79mm equivalent)
Often the introduction of a touch-screen results in a reduction of the physical controls but with the Lumix FZ2000 / FZ2500 the opposite has happened. I’ve already talked about the function buttons, the FZ2000 / FZ2500 also gains a second control wheel and a second ring on the lens.
The second control wheel means you no longer have to push the rear wheel in to switch between aperture and shutter speed in Manual mode, one dial controls Aperture and the other shutter speed – you can decide which way around you want them. In Aperture and shutter priority modes as well as Program auto they both do the same thing, which always strikes me as rather wasteful. However, on the FZ2000 / FZ2500 you can assign one of the dials to exposure compensation in these modes – and if you do that you can of course reassign the Fn4 button to do something more useful.
On the earlier FZ1000 the single lens ring could be used either for manual focus or zooming, set by a switch on the barrel. Now there are two rings a front narrow one for focus and a wider rear ring for zooming. I’m pleased to report that zooming on the FZ2000 / FZ2500 has been improved all-round. Firstly there’s the zoom ring which now smoothly and, if you want, swiftly, makes the journey from wide angle to telephoto in a single twist of the ring .
The zoom motor can operate at one of five speeds depending on which of the controls you use. The Fn1 and Fn2 buttons operate at the slowest speed (though they can be configured to one of the faster speeds), the ring has two speeds, and finally the fastest speed is not available during movie recording but works when you push the zoom rocker on the shutter button to its fullest extent. It’s a really useful range of options and having a constant steady slow zoom really makes a difference when shooting video.
Like its predecessor, the Lumix FZ2000 / FZ2500 employs a 100% contrast-based AF system with 49-area autofocus and face and eye detection. It also retains the defocus DFD technology first seen on the flagship Lumix GH4 which profiles the out-of-focus characteristics of the lens to better determine where the point of focus lies. Like the GH4, this allows it to quickly get close to the correct point of focus, before than using traditional contrast-based means to fine-tune it.
The autofocusing certainly feels fairly swift and confident, even given fairly low light levels it responds almost instantaneously, there’s still some searching particularly at longer focal lengths, but it happens only occasionally. Where there’s a slight, but perceptible lag with the Sony RX10 III, at least 90 percent of the time the FZ2000 / FZ2500 feels like it locks focus the instant you half-press the shutter.
The FZ2000 / FZ2500 can be operated using either its mechanical or electronic shutter. The range of the mechanical shutter is 60s to 1/4000 plus a bulb setting with a maximum of two minutes – and don’t forget you also have a built-in 6-stop ND filter for those long exposure effects. Switch to the electronic shutter and the top shutter is extended to 1/16000. The electronic shutter is automatically selected when the camera is used in Silent mode, which also turns off the flash, AF illuminator and all other sounds.
The other advantage the electronic shutter confers is faster continuous shooting speeds. As on the FZ1000, the Lumix FZ2000 / FZ2500’s fastest continuous shooting speed is 50fps using the electronic shutter at a reduced 5 Megapixel resolution. As with other modes that use the electronic shutter moving subjects are likely to suffer from rolling shutter effects – where vertical lines are reproduced at a slant – and that’s more likely to be in evidence with a subject that requires 50fps to capture its movement.
The fastest continuous shooting speed using the mechanical shutter is 12fps. Like the 50fps mode this fixes the focus and exposure on the first frame and there’s no live view available during shooting. For continuous autofocus and live view you’ll need to drop to one of the two slower continuous modes at 7 or 2fps.
The FZ2000 / FZ2500 provides excellent auto bracketing options for a bridge super-zoom with up to seven frame shooting at intervals from 1/3 to 1 EV. Auto bracketing has its own dedicated position on the drive mode dial and bracketed frames are shot individually or as a burst depending on the menu setup; you can even change the sequence order; white balance bracketing is also available.
The FZ2000 / FZ2500 outshines the Sony RX10 III in this respect, though the RX10’s bracketing is itself pretty good, it provides three frame bracketing at 0.3, 0.7, 1, 2 or 3EV increments, or five frames in 0.3 or 0.7 EV increments with white balance and DRO bracketing also available.
If you fancy some fun, there’s a Multiple Exposure mode which can automatically combine up to four images. You can retake them if they go wrong, or combine new ones with existing ones if desired. The Lumix FZ2000 / FZ2500 is also well catered for when it comes to time lapse sequences with the choice of a traditional interval timer (Time Lapse Shot mode) or one which lets you take photos manually as and when each frame is ready (Stop Motion Animation).

Above: 1/125, f2.8, 1600 ISO, 8.8mm (36mm equivalent) Focus stacking
Like other recent Lumix models with 4k video, the FZ2000 / FZ2500 supports Panasonic’s 4k Photo mode – a fun way of exploiting the fact 4k video captures an 8 Megapixel image up to 30 times a second. The FZ2000 / FZ2500 lets you easily capture bursts of video before scrolling through the footage and extracting the perfect frame as a JPEG image, all in-camera. You could of course frame grab from video externally but Panasonic has made it easy to perform the whole process in-camera.
There’s three options: Burst (which records video while the shutter button is pressed), Burst S / S (which starts recording with one press and stops with another), and 4K Pre-burst (which keeps a rolling buffer to avoid unwieldy clips to store and go through). 4k Photo isn’t only good for action though, if you’re filming a relatively slow or even static subject, it can give you a choice of compositions and poses.
Post Focus is another feature that uses the 4K shooting mode to focus-bracket a rapid sequence of images. When selected you can no longer set the AF area, but the PASM and other shooting modes can be set in the usual way as can the ISO sensitivity. The only limitation is the slowest available shutter speed which, as for other 4k shooting modes is 1/30. You can choose one of four 8M aspect ratios – 4:3, 3:2, 16:9 and 1:1.
When the shutter is pressed the FZ2000 / FZ2500 captures a short burst of 4k video while racking the focus from the closest to the most distant subject in the composition. It then takes a short while to process the results before displaying a composite on screen. You can then simply tap the screen to select the focus point. If a green rectangle appears, you’re in luck, if the rectangle is red then FZ2000 / FZ2500 didn’t record a frame with the focus set at that specific point. In practice, this doesn’t happen very often, and when it does there’s often another point in the image that was recorded where the focus was in the same plane.
The second option is to zoom in to an area you want in focus and drag a slider at the bottom of the screen which cycles through all of the bracketed frames. Once you’ve found a version you’re happy with, you can export it to the memory card as a JPEG.
The Post focus clips are also saved as MP4 video files so if you keep these you can always grab a frame later using video editing software, but it’s much simpler to do in the camera. You don’t have to edit immediately after shooting, you can activate post focus editing at any time in playback mode.
The Lumix FZ2000 / FZ2500 also adds a new post focus mode that stacks images to produce a composite with greater apparent depth of field than you’d get from an individual frame. It’s particularly useful when the lighting conditions force you to shoot with a wide aperture or in macro photography where the depth of field is always very shallow. Post focus is more than just a gimmick, like 4K photo it’s a feature that takes advantage of the 8 Megapixel resolution available in 4k video frames to improve your chances of getting a great still image that truly captures the moment.
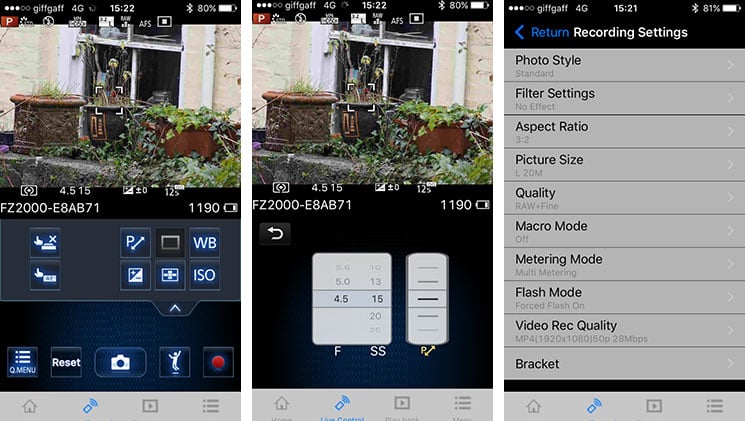
Moving on, the FZ2000 / FZ2500 has Wifi support allowing you to wirelessly transfer images from the camera and operate it remotely using a smartphone. Unlike many Panasonic models it lacks an NFC chip, though you can quickly establish a connection by scanning a QR code displayed on the screen. I tested the FZ2000 / FZ2500’s wifi features using my iPhone 6.
Wifi allows you to wirelessly browse the FZ2000 / FZ2500’s images on your smartphone screen, tablet or laptop, copy them onto these devices, upload them to online storage or social media services (either directly or via a smartphone), or become remote-controlled using the free Lumix Image app for iOS or Android devices.
Once your phone or tablet is connected, you can remote control the camera, browse photos and video – even 4k clips – direct from the memory card, copy them onto the handset and if desired send them onto various storage or sharing services. You can also set the app to make a GPS log for subsequent syncing and tagging, create a snap movie, or photo collage.
The remote control feature shows a live image on your phone or tablet’s screen allowing you to take a photo or start or stop a video recording. You can tap anywhere on the live image to set the AF area or directly take the shot. If the camera’s mode dial is set to Aperture or Shutter Priority, you can remotely adjust the aperture or shutter speed respectively, and in Manual you can change both.
You can adjust the ISO, white balance, exposure compensation or focus area, and there’s also a Q.Menu button which presents a list of additional options you can remotely change including the flash mode, aspect ratio, resolution, compression, metering mode, macro mode,photo style or movie quality.
There are two options for transferring images; Batch transfer provides a menu from which you can select options to transfer the current day’s images, or you can include the last 3, 7 or 30 days, or you can opt to transfer everything. Further options allow you to restrict transferred files to just photos or videos. If you want to browse the images on the card in the camera before deciding which to transfer, then Transfer selection is the option to go for.
To maintain a responsive experience which feels like the images are stored locally on your phone or tablet, the camera sends a lower resolution version. So you can pinch to zoom-in a little, but not as much as if you were viewing the original. When you see an image you like, just tap it and the Lumix Image app will let you save the original to your device or start uploading it to one of the social, sharing or storage services installed on your device. You can configure the app to provide shortcuts to two or three of your most used services which could include Dropbox and Instagram in addition to the more usual suspects. Or of course once the image is copied into your device, you could just exit the Panasonic app and handle it direct from whichever sharing or storage app you like via your phone’s gallery.
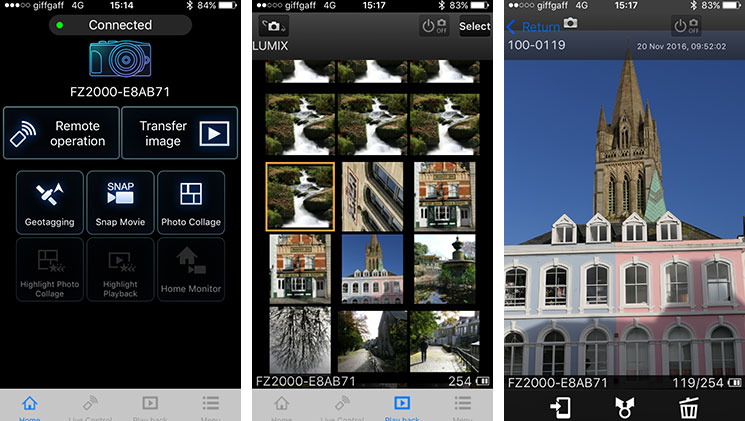
You can also choose whether to copy images in their original resolution, or in one of two smaller versions. It typically took about 5 seconds to copy an original JPEG from the camera to my iPhone 6 from a distance of about 1m; it’s not possible to copy RAW files though.
The Lumix FZ2000 / FZ2500 can also upload images directly to the internet by itself via a suitable Wifi connection. You can upload directly to Facebook, Twitter, Picasa, Youtube, Flickr, but there’s two gotchas. The first is the camera doesn’t have any kind of built-in browser to accept the terms and conditions of public hotspots, so you’ll mostly be using home or office-based Wifi. The second problem is before letting you upload anything directly from the camera you’ll first need to register for Panasonic’s free Lumix Club.
To be fair, the approach is not dissimilar to the way most other manufacturers implement direct uploads, but to me it makes more sense to just use Wifi to copy the image from the camera to a more capable device and upload from there instead.
Finally, the Lumix Image app allows the FZ2000 / FZ2500 to inherit the fun Jump Snap feature introduced with the GF7. This uses the accelerometer in your phone to trigger the shutter remotely as you jump in the air. It works surprisingly well too. Using the app you can remotely view the composition and refocus the camera if necessary, before then setting the sensitivity of the jump detection. After a little fine-tuning of the sensitivity you’ll be able to capture the perfect moment when you’re at the top of your leap. It’s a really fun way to exploit the technology in your pocket.
The Sony RX10 III’s Wifi implementation is broadly comparable with the FZ2000 / FZ2500’s. The RX10 III has NFC for quick and easy connections and provides remote control as well as upload to a smartphone. Out of the box its image transfer features are on a par with the FZ2000 / FZ2500’s. Its remote shooting out-of-the-box is fairly basic, but if you go to the trouble of updating the embedded app, you get manual exposure control and other features. Plus of course, the RX10 III’s ability to work with apps downloaded from the PlayMemories store means you can add new features like time-lapse and advanced bracketing.
[Check prices at Amazon, B&H, Wex. Alternatively get yourself a copy of my In Camera book or treat me to a coffee! Thanks!