Panasonic Lumix DMC-GX1
-
-
Written by Gordon Laing
Intro
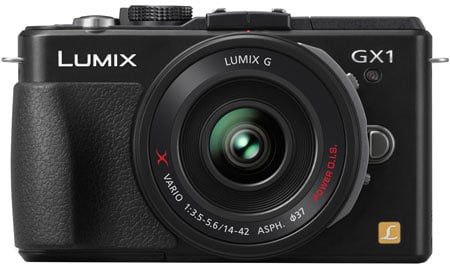
The Lumix GX1 is Panasonic’s fourth ‘pocketable’ camera to employ the Micro Four Thirds standard it co-developed with Olympus. Like all Micro Four Thirds models, it’s a mirror-less compact system camera, or CSC for short, which packs a DSLR-sized sensor into a relatively small body; in this case, the 16 Megapixel sensor of the Lumix G3. Rather than replace an existing model though, the new GX1 represents a new category in the Lumix G range aimed at enthusiasts.
In many ways the GX1 returns to the concept of the original Lumix GF1 by including both a hotshoe and mode dial. Indeed as Panasonic simplified the GF series with each generation, many owners of the earlier models grew frustrated they were being forced into the larger G or GH series if they wanted to retain lots of control and features when upgrading. Surely, they argued, there was a market for enthusiasts who wanted the maximum control and latest features, but in the smallest form factor? Well, the Lumix GX1 is that camera.
At first glance, the Lumix GX1 could be mistaken as a GF1 equipped with the sensor of the G3, but look a little deeper and you’ll realise it’s physically quite a different beast to the original GF model. The GX1 employs a brand new body with much higher quality build than the GF series. There’s also support for the new LVF-2 electronic viewfinder, faster autofocus than any G series to date, and it’s the first Panasonic camera to fully exploit the speed of UHS-I memory cards. In my full review, find out how the GX1 compares to rivals in practice and whether it’s the model for you!
 |
Panasonic GX1 design and controls
At first glance, the Lumix GX1 could be mistaken for the original Lumix GF1, an intentional decision by Panasonic as that model struck a chord with the same enthusiasts it’s targeting for an upgrade here. Measuring 116x68x39.4mm, it’s also similar in overall dimensions too: that’s 3mm narrower, 3mm shorter and 3mm thicker than the GF1. The GX1 weighs 318g including battery but no lens, compared to 341g for the GF1. Suffice it to say when both cameras are in your hands they feel roughly the same size and weight.
For reference, the Olympus E-P3 measures 122x69x34.3mm and weighs 369g including battery but no lens; the E-P3 is therefore wider and 51g heavier, but much the same height and actually 5mm thinner, impressive given the Olympus includes built-in sensor-shift stabilisation. Sony’s NEX-5N measures 111x59x38mm and weighs 269g with battery. Meanwhile, the Nikon V1 measures 113x76x43.5mm (slimming to 36mm at its thinnest point) and weighs 383g with battery but again no lens. In case you were wondering, Panasonic’s smallest ILC, the Lumix GF3, measures 108x67x32.5mm and weighs 264g with battery and no lens.
When comparing these measurements and weights, it’s also important to consider the impact of lenses on the overall package. Sony may have some of the smallest ILC bodies out there impressively sporting tilting screens and the biggest sensors to boot, but a big sensor needs a big lens and so far the company’s resisted developing a collapsing zoom. As such the standard 18-55mm NEX kit zoom is the biggest of all the standard ILC lenses, measuring a not insignificant 62x60mm (diameter x length) and weighing 194g.
Panasonic employs the slightly smaller sensor of the Micro Four Thirds standard, but its basic Lumix G 14-42mm kit zoom is roughly the same size as the Sony and doesn’t collapse either: it measures 61x64mm and weighs 165g. Olympus also employs the Micro Four Thirds standard, but has implemented collapsing lenses for some time, so its latest 14-42mm shrinks to 56.5x50mm and weighs 113g.
The standard Nikon 1 kit zoom, the 10-30mm, collapses to 58x42mm and weighs 115g, making it one third shorter than the Sony or Panasonic non-collapsing kit zooms, and 8mm shorter than the collapsing Olympus zoom. It may not be as small as you’d hope considering the smaller sensor behind it, but it’s not bad.
Panasonic – and therefore the Micro Four Thirds system as a whole – does however sport a trump card to play in the form of the latest 14-42mm power zoom lens, which collapses to an amazing 61x27mm and weighs just 95g. Indeed with the 14-42mm power zoom mounted on the Lumix GX1, the entire package is impressively smaller and noticeably lighter than the standard Nikon V1 kit, but to be fair, the Panasonic power zoom adds considerably to the overall kit price.
 |
The comparative size of the cameras and lenses is illustrated in the photo above, where it’s clear the tiny Sony body isn’t all that pocketable once you fit the kit zoom. In contrast, the GX1 in the middle, fitted with the 14-42mm power zoom, becomes the smallest operational ILC with a zoom lens. Although once again remember this lens does add to the overall price and it is of course also compatible with Olympus bodies.
I reviewed the GX1 with the 14-42mm power zoom and found them to be a highly compelling combination. This lens is roughly similar in size to Panasonic’s 20mm pancake prime and while it won’t match the bright f1.7 focal ratio of that lens, it does boast a 3x optical zoom range and the benefit of a smooth motorised adjustment for movies. It’s a key selling point for the Micro Four Thirds system and finally puts to rest the tradition that the overall portability of mirror-less ILCS was ultimately compromised by large standard zooms. Here’s a combination you can squeeze into a larger pocket with relative ease.
In terms of the GX1’s design, build and controls, it may physically resemble the original GF1, but there are a number of important differences. The GX1 is tougher than the GF1 (albeit still not weatherproofed) and finished to a much higher standard. It has an aluminium body and a deeper textured rubber grip. Look closely and even the fine details are well thought-out with high quality coating, labelling and even a mode dial furnished from a solid block. It feels like a very classy camera in your hands.
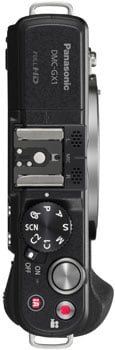 | |
The top surface looks superficially similar to the GF1 with a popup flash, standard hotshoe, mode dial and movie record button but again there’s a few key changes. The manual popup flash has a new spring-loaded mechanism which allows it to reach higher and further forward to clear larger lenses and reduce red-eye. The Guide number is 7.6 at 160 ISO, compared to 6 at 100 ISO on the GF1 and 6.3 at 160 ISO on the GF3. The built-in flash on the Olympus E-P3 has a Guide number of 10 at 200 ISO, while the Nikon J1 is 5 at 100 ISO. Balance the ISOs and the reach of each flash is roughly similar and fairly modest – these are close-range / fill-in flashes.
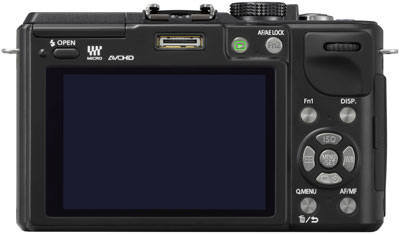
The hotshoe looks the same and can accommodate the optional DMW-FL220E, DMW-FL360E and DMW-FL500E flashguns. Just below the hotshoe on the rear surface there’s also still a proprietary accessory port designed to connect to an optional electronic viewfinder which slides onto the hotshoe. The port on the GX1 is however different to that on the GF1, and designed to support the new DMW-LVF2 finder, more of which later. The different connector means the LVF2 won’t work on the GF1 and conversely the LVF1 won’t work on the GX1. Like the older port though, the new one won’t support any other accessories other than the optional viewfinder, which continues to be a missed opportunity when there’s also no external microphone jack.
The absence of an external microphone jack and the inability to connect a microphone accessory to the port will infuriate movie-makers and certainly frustrated me, but some small consolation is the presence of half-decent stereo microphones in front of the hotshoe. I should also add, anyone wanting to capture high quality audio with a camera like this could always follow the route of the pros and simply use an external sound recorder like the Zoom H series, which start at the price of a good hotshoe mic anyway while having the benefit of being able to be placed close to the subject.
Moving-onto the mode dial, Panasonic has removed the Movie Mode and iAuto positions from the GF1, but rather than replacing them with anything, has simply spaced-out the remaining options – so the GX1 offers Program, Aperture and Shutter Priority, Manual, two custom modes, a SCN position to access 17 presets via an on-screen menu, and Creative Control, which offers eight special effects, again selected using the screen.
As for the Movie and iAuto modes missing from the dial, they’re now present on the far right of the top surface with a dedicated button for each; actually the GF1 also had a dedicated movie button, but the iA button is a new addition and like several other Panasonic cameras, it glows a rather satisfying blue when activated. I really like having the iA button as with a single press you can jump from a highly customised manual mode to complete foolproof auto for grabbing spur-of-the-moment shots or when handing over the camera to someone else. Then you simply press it once more to return back to your previous mode and settings.
Round the GX1’s mode dial is a rotary power switch, although sadly the similar switch for the drive modes on the GF1 is no longer present – you’ll now be pressing a button and going through the menus for those options.
 | |
 |
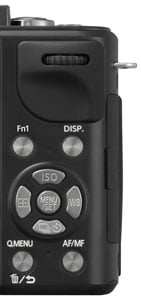
Round the back there’s the usual cross-keys, which share similar functionality to the GF1. So pressing up sets the ISO, pressing right sets the White Balance and pressing left sets the AF area / tracking. The only difference in this group is the down button on the earlier GF1 was a programmable Function key, whereas on the GX1 it’s now dedicated to the drive mode. The GX1 hasn’t sacrificed a Function button though; on the contrary, there’s now two. The first is above the cross keys on the left, and the second is below the mode dial. The latter is labelled AF/AE lock, but can be reconfigured from the menus into a function key. Both function keys have the choice of 25 different options to choose from, which the GX1 further complements with two on-screen ‘soft’ function keys. It all adds up to a lot of customisation which will be welcomed by enthusiasts.
Like some previous Panasonic touch-screen models, even the quick-access Q-menu is customisable. You can simply drag new functions onto it, or remove the ones you don’t use.
Panasonic has also fitted the GX1 with one of its push-dials in the upper right corner, where a press can change the function of the dial itself. In Aperture and Shutter Priority, the dial naturally defaults to adjust the f-number and shutter speed respectively, but push it in and it’ll subsequently adjust the exposure compensation. Push it in again and it reverts to adjusting the f-number or shutter speed. Pushing the dial in full Manual switches between adjusting the shutter speed and aperture. In Program it can be used to adjust the exposure compensation with a push, although unlike the earlier G3, I couldn’t use it for Program Shift – a strange and sad omission on an enthusiast-level body. This aside though, the push dial works really well, effectively doing the job of two physical controls.
On the grip side of the body you’ll find three ports behind a flap: AV / USB, Mini HDMI and a remote control jack. The latter works with the optional cabled DMW-RSL1E, but there’s no IR sensor for a wireless remote control. As mentioned above, there’s also no external microphone input, which in my view is a terrible missed opportunity for a camera aimed at enthusiasts which also sports a hotshoe. What makes it extra-specially infuriating is Panasonic’s own FZ150 sports the same jack for the same cabled remote control, but on that model it also doubles-up as a microphone input. Why couldn’t the GX1 share the same functionality?
As a brief side-note, the GX1 doesn’t have interval-timer features either, although a number of third parties produce intervalometers designed for use with Panasonic cameras which are compatible with the DMW-RSL1E cabled remote (such as the Studiohut models). In theory this should also make the GX1 compatible, but I didn’t have the chance to try any myself and some buyers of third party controllers have reported issues with some earlier G-series cameras.
Finally, in a single compartment under the body you’ll find the battery and memory card slot. The GX1 is powered by the DMW-BLD10E 1010mAh rechargeable Lithium Ion pack which Panasonic claims is good for 310 photos or 155 minutes of video under CIPA conditions. Note the earlier GF1 was powered by a 1250mAh pack good for 350 shots. The G3 shares the same pack as the GX1, but only squeezed 270 shots out of it.
I tested the GX1 over an extended period of two months, and in general use I could go several days or longer without recharging; I certainly never had the feeling it needed charging on a nightly basis. In terms of video, I did a test where I left the fully-charged GX1 recording 1080i with a freshly-formatted 16GB card; the battery ran dry after 122 minutes with approximately 90 seconds remaining on the card. This may be half an hour shy of the quoted recording battery life, but is still sufficiently long to record many concerts, shows or lectures. Indeed I did just that by recording a couple of school shows in their entirety with the GX1. Note you can’t record for more than half an hour per clip with European GX1s.
In terms of memory, the GX1 of course uses SD cards and Panasonic recommends using Class 4 or faster to support the HD movie mode. The GX1 is also Panasonic’s first camera to support UHS-1 memory cards and you can see if there’s any benefit in using them in the continuous shooting section.
Panasonic GX1 screen and viewfinder
The Lumix GX1 inherits the 3in touch-screen display of the G3, although unlike that model it’s fixed in place and can’t articulate to different angles. You might assume the lack of an articulated screen is understandable on a relatively slim body, but Sony offers vertically-tilting screens on its thinner NEX models, and Olympus has also squeezed one onto the E-PL3 in addition to sensor-shift stabilisation. As such it’s a shame not to find some degree of articulation on the GX1, especially as both that and an electronic viewfinder are included as standard on the cheaper G3.
 | |
The screen itself is bright and reasonably easy to view in direct sunlight. In very stark conditions with the Sun right behind you, the image inevitably becomes harder to view and you’ll also see some finger prints, but I never found myself unable to compose the shot. Those who regularly shoot in stark conditions though will appreciate the optional electronic viewfinder which I’ll describe in the next section.
The size, shape and resolution of the GX1’s screen match the G3 (and the GH2 before that) at 3in, 3:2 and 460k dots. When shooting photos in the native 4:3 aspect ratio, the GX1 shows thin black bars down either side of the image, with the active area measuring 2.7in on the diagonal. When shooting 16:9 content, such as HD movies, the GX1 shows thin black bars above and below the image, resulting in a 2.8in diagonal. Switch to cropped 3:2 shaped images on the GX1 and they’ll fill the full 3in diagonal of its screen.
The Olympus E-P3 also shares a 3in / 3:2 shaped touch-screen, although is slightly more detailed and brighter thanks to the 610k OLED panel. Sony’s NEX 5N also sports a 3in touch-screen, but it’s higher resolution still at 921k and as noted above, enjoys the benefit of tilting vertically. Like Olympus and Panasonic, Sony has also opted for a screen that’s wider than its native still photos. The 5N has a 3:2 shaped sensor, but the screen is 16:9 so you’ll still get thin black bars down the sides when shooting 3:2 stills, although HD video will at least fill the screen.
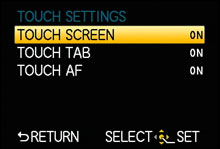
While touch-screens are new to the latest generation of Sony and Olympus ILCs, Panasonic has been deploying them for some time and its experience shows on the GX1. You can use it to control and adjust a broad array of features, including some neat navigational options, or if you prefer you can simply ignore it and use physical controls instead; indeed if you really don’t like it, you can choose to disable touch-focusing, the touch tab navigation or the entire touch-screen altogether.
 |
 |
 |
 |
When shooting stills you can tap on any part of the screen to set a new AF area, then use your finger to drag it to a different part of the image, or simply re-tap somewhere else. Dragging a slider on the right side of the screen also allows you to adjust the size of the AF area. With the AF area set to AF tracking (the default for touch-focusing in iAuto mode), you can simply tap on a subject, half-press the shutter release, then have the GX1 track it automatically. It all adds up to a quick and intuitive way to ensure the camera is focusing on (and if desired tracking) the exact thing you want and makes using buttons to position an AF area feel positively prehistoric.
The major downside is it’s easy to accidentally touch the screen as you’re handling the camera and inadvertently set a manual AF area when you’d prefer auto area or face detection instead. Indeed I found myself doing this frequently with the GX1, but it’s a complaint which equally affects other touch-screen cameras. Panasonic’s solution is to present an icon in the corner of the screen which appears during touch-focusing and simply reverts back to the previous AF setting. Tap the screen again though and the touch focusing returns. If you decide this is too annoying, you can go into a menu and switch off touch-AF or the touch-screen altogether, although it’ll apply to all modes including iAuto. This feels a bit heavy-handed to me, as I wouldn’t have minded disabled touch-AF in PASM, but leaving it active for iAuto.
As before, the Q Menu system is also touch-enabled, allowing you to not only tap on the desired setting to access its options, but also drag various icons in and out for a totally customised user interface.
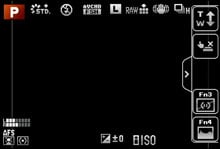
New to the GX1 is a touch-tab which nestles on the right hand side, waiting to be tapped, after which a vertical strip pops out with touch controls for the power zoom lenses and a pair of soft function keys. Touch-zooming, like touch-screen shutter releases, don’t appeal to me personally, but the soft function keys work well and it’s good to see Panasonic thinking about different ways to exploit the hardware.
For me though, the highlight of a good touch-screen system remains the ability to adjust the focus between subjects while recording video. I first saw this on a previous Lumix camera and it is of course present and correct on the GX1. So while filming, simply tap on the subject you’d like it to refocus on. Better still, you can set the camera to either focus continuously and make the adjustment as soon as you’ve tapped the new area, or to wait until you discreetly half-press the shutter release. I found myself using the latter technique more and more, especially when filming school shows.
| |
|---|---|
|
You can see it in action in the clip above where I tapped on the screen to ‘pull-focus’ between the lens on the far left, the white camera on the right, and the back of the room, before pulling back to the lens again and repeating. As you can see, the contrast-based AF system can’t help but search a little as it locks-on, but it is at least reasonably swift – and the lens focusing quiet too. I should note Sony’s NEX 5N also offers touch focusing during video, but the Olympus E-P3 strangely does not.
 |
 |
A phase-change AF system could avoid – or minimise – the searching of contrast-based AF, but so far the only two cameras which support it while filming video are the Sony SLT and Nikon 1 cameras, neither of which are equipped with touch-screens; yet.
So as its rivals play catch-up, the Lumix GX1 delivers what feels like the broadest and most capable touch-screen experience of its peer group, and I suspect even die-hard lovers of physical controls will find some aspect to like about it.
In terms of display views, the GX1 offers a live histogram, a variety of grids and guidelines, and new to this model, a dual-axis level gauge which reformats its position depending on landscape or portrait orientations. The gauge is toggled on and off as one of the views when pressing the DISP button, but like earlier Panasonic models, the histogram and guides are enabled via a menu and subsequently appear on all DISP views.
In a fun use of the touch screen, the histogram can be repositioned anywhere on the screen by simply dragging it with your finger, while one of the guide options allows you to reposition a horizontal and vertical line, again by dragging them. It’s really quick and effective.
Panasonic GX1 viewfinder
 | |
 | |
The Lumix GX1 supports the optional LVF-2 electronic viewfinder, which costs around $249 USD, slides onto the hotshoe and connects to the small proprietary port on the rear. This mounting process may be similar to the earlier LVF-1 on the Lumix GF1 and GF2, but the electronic port on the rear of the GX1 is different and incompatible with the LVF-1; conversely the GF1 and GF2 can’t use the new LVF-2 either.
Once slid-onto the hotshoe, the LVF-2 locks securely into place, and cannot be removed unless you first press and hold a small button on the side. Like most optional electronic viewfinders, you can tilt the unit by up to 90 degrees, allowing you to compose at angles, although you’ll still need your eye pressed against it. With the unit tilted upwards, you’ll notice a wheel to adjust the dioptre setting. Finally, a button on the rear, switches between the screen and viewfinder; there’s no sensors for automatic selection.
In terms of quality, the LVF-2 represents a significant upgrade over the LVF-1. The old 202k dot panel with 1.04x magnification has been swapped for the same 1440k dot / 1.4x magnification system as the Lumix G3, delivering a considerably more detailed, not to mention noticeably larger view. 1440k dots corresponds to 800×600 pixel resolution, compared to approximately 320×240 for a 202k panel. The boost in quality is reflected in the price: approximately $249 USD for the LVF-2 compared to $145 USD for the LVF-1.
The LVF-2 / G3 viewfinder panel is 4:3 in shape, which means still images composed (or played back) in the native aspect ratio of the sensor will fill the available area. When shooting or playing in 4:3, the image in the viewfinder is huge: the 1.4x magnification corresponds to 0.7x on a 35mm body with a 50mm lens, which means the LVF-2 / G3 viewfinder essentially matches the area of the viewfinder image on a full-frame DSLR. Shooting in 3:2 or 16:9 involves cropping the image vertically in the viewfinder for a smaller and less detailed view, but it’s still a great deal bigger than the optical viewfinders on all but professional DSLRs.
That’s one of the lesser-known benefits of an electronic viewfinder: most deliver a much larger image than the viewfinders of comparably-priced ‘cropped-frame’ DSLRs. Other benefits include 100% coverage and the ability to show Live View and movie composition, not to mention playback, all of which can only be achieved on the screen of a DSLR. Anything you see on the GX1’s screen can be replicated in the LVF-2, including a live histogram, various alignment grids, colour graphics, magnified focusing assistance and the new levelling gauge.
There are however downsides. First, the Field Sequential technology used to generate the image can sometimes ‘tear’ with a rainbow effect during fast pans or when glancing across the image. This seems to affect some people more than others, and unfortunately I personally fall into the ‘affected’ camp, especially if my eyes are a bit tired. For static shots it’s rarely if ever a problem, but when panning across fine lines, such as fences, the image can break-up in a manner I find quite distracting. But slow down or stop moving and it corrects itself immediately. It’s one of those things you really have to try out for yourself.
The other major downside is the fact you’re looking at an electronic image, rather than one which is simply passing reflected light straight through an optical system. As such in dimmer conditions when optical viewfinders remain quite usable, an electronic one can become noisier and suffer from reduced frame rates. It can also become a deal-breaker for action photographers, since the image between frames when shooting continuously at high speeds is not live but replayed. As such you’re watching where the action was a moment ago as opposed to where it is right now, which can make following fast-moving subjects tricky. Not impossible with practice, but certainly harder than the speed-of-light immediate feedback you get from an optical viewfinder.
Die-hard fans of optical viewfinders will almost certainly remain unconvinced. When using the GX1, you’re never in any doubt it’s an electronic image you’re looking at. It may deliver a large, high resolution image, but it has an electronic appearance and a finite amount of detail, not to mention limited dynamic range; it’s easy to find bright areas saturating into pure white which contained visible tonal detail through an optical viewfinder. Then there’s the tearing artefacts, battery drain and absence of live feedback when following action at top speeds which I’ll discuss in the continuous shooting section below.
But the counter-arguments are a much bigger apparent image than the often tiny optical viewfinders on budget DSLRs, 100% coverage and the benefit of super-imposed graphics and information. The important thing is to understand there’s pros and cons to both technologies, and as far as electronic viewfinders go, the LVF-2 is a big step-up from those on typical camcorders and super-zoom cameras.
Panasonic’s rivals also offer decent electronic viewfinder options. The Olympus VF2 sports the same 1440k dot resolution, albeit with a slightly lower 1.15x magnification. Olympus does however offer a cheaper alternative: the VF3 with a lower specification of 920k dots and 1x magnification. That said at the time of writing, there was little between their street prices: $200 USD for the VF2 versus $180 USD for the VF3. Meanwhile Sony’s opted for the higher ground with the optional EV1S ($349 USD) for the 5N boasting 2359k dot / 1024×768 pixel resolution; the same as the built-in viewfinders of the NEX-7 and A77.
While comparing specifications and prices, it’s important to remember the Lumix G3 effectively comes with an LVF-2 built-in, which coupled with its articulated screen and lower price makes it a bargain in my view. Indeed if you intend to use the GX1 with the LVF-2 fitted most of the time, you should seriously ask yourself if the G3 would be a more sensible choice.
Panasonic GX1 focusing
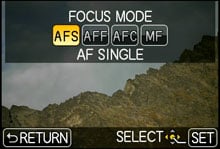
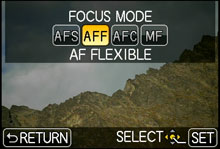
Like previous G-series cameras the GX1 employs a contrast-based AF system. Most of the options are inherited from the G3, although Panasonic has added a new AFF mode and claims the AF speed is now quicker than before.
Panasonic quotes the AF speed of the GX1 as 0.09 seconds, making it the quickest Lumix G model to date, although to be fair, the G3 and GF3 aren’t too far behind at 0.1 seconds. The GX1 achieves this by employing 120fps lens drive when you half-press the shutter to focus, compared to 60fps on the G3 and GF3.
 |
 |
 |
Numbers aside, the GX1’s AF certainly feels very responsive, generally locking-onto the subject by the time your finger feels any resistance on a half-press of the shutter release. Even when it searches, the process feels swift. Like the G3 before it, the GX1’s AF is quicker than the phase-change AF on a budget DSLR, and is a world-apart from the live view focusing options on those models. So in terms of the Single AF mode, the GX1 is a triumph.
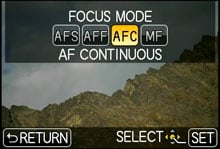
Contrast-based systems do however need to search a little to confirm the focus, so often struggle when it comes to continuous tracking. Set the GX1 to AFC and it’ll have a good stab at keeping a moving subject in focus, although the hit rate for fast action is inevitably not as high as a phase-change AF system. Don’t get me wrong, I grabbed some good shots of sports and action with the GX1 and a telephoto zoom, but enjoyed a greater success rate with the Nikon 1 cameras under similar conditions. The same applies to continuous AF during movies, where the phase-change AF systems of the Nikon 1 and Sony SLT cameras tracked more confidently with less visible searching.
 |
 |
 |
The new AF Flexible (AFF) mode is a nice addition which acts like a Single AF mode, but will refocus if the subject moves while you have the shutter half-pressed. This can work well for portraits where the shutter is normally half-pressed anyway, but now the camera can make minor adjustments if the person moves a little. I did however find it working better with some subjects than others, so would recommend experimenting with AFS, AFC and AFF, especially when photographing kids. Sometimes good old AFS coupled with a quick shutter speed can grab the moment without complication.
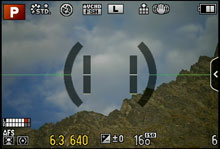
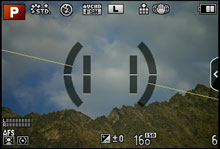
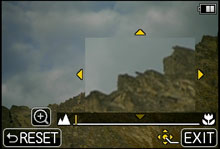
If you prefer manual focus, the GX1’s assist mode will present either a small movable window in the middle showing an enlarged view at 4x, or a full-screen view at 5x or 10x. These make it easy to ensure the subject is sharp.
 |
 |
 |
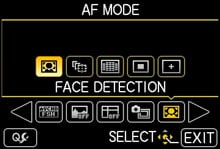
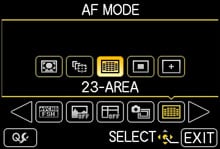
In terms of AF areas, you can choose from the same options as the G3 before it: Face Detection, AF Tracking, 23-Area, Single Area and Pinpoint. These integrate well with the touch-screen if enabled, allowing you to tap the location in the Single Area or AF Tracking modes, or select a small group of AF areas in the 23-Area option; the latter is essentially the same as Zone AF on the Canon EOS 7D, and allows you to concentrate the auto AF areas to a specific section of the frame without committing to a single area.
Pinpoint remains a highlight, temporarily magnifying the image by five times for a really close confirmation of the tapped area, while also letting you swipe the enlarged target area around with your finger until you settle on the desired part of the subject.
As I mentioned earlier, the touch-screen is a fantastic asset for AF, but equally can prove annoying if you accidentally tap the screen and find your manual ‘selection’ has over-ridden face detection or auto area at a spontaneous photo opportunity. Indeed I found myself doing this quite frequently while handling the camera. Panasonic does let you disable touch AF or even the touch-screen altogether, but it seems a shame there’s no cleverer way of ensuring it only works when you want it to. Perhaps being able to disable it in PASM modes, but having it always active in iAuto could be a good starting point.
As it stands though, the AF capabilities of the GX1 are excellent. the Single AF modes are very fast, there’s stacks of AF area options and the touch-screen integration works brilliantly – again so long as you watch for stray fingers and thumbs. The continuous AF also works very well for a contrast-based system, but if tracking fast action is an absolute priority, you may prefer a phase-change system of the Nikon 1, Sony SLT, or a traditional DSLR.
Panasonic GX1 shooting modes
The GX1 features the same shooting modes as the G3 on its main dial: the traditional Program, Aperture Priority, Shutter Priority and Manual, alongside two Custom modes, a SCN position with access to 17 presets via an on-screen menu, and Creative Control, which offers eight special effects, again selected using the screen.
Shutter speeds range from 1/4000 to 60 seconds, and there’s a Bulb option in Manual which can keep the shutter open for up to 120 seconds. Long exposure fans will be happy they can dial-in 60 second exposures without the need for a release accessory, but many will be disappointed by the two minute maximum in Bulb; it seems serious astro-photography continues to elude most mirror-less ILCs.
It’s also a little disappointing to find another enthusiast-level camera without built-in interval shooting facilities. I’d understand if Panasonic was protecting sales of an optional timer accessory, but as it stands there’s no standard timelapse facilities for the GX1. As mentioned earlier, there is a cabled remote socket which might support third-party interval timers, but it’d be so much nicer to have the facility built-in. To be fair, few cameras support this facility, but it’d be a nice addition for the Lumix range; I should note that interval timer facilities are built-into the Nikon 1 cameras, making them very appealing for timelapse photographers.
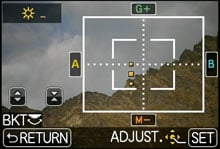
One thing Panasonic has got absolutely right on the GX1 though is exposure bracketing. Many companies are satisfied to offer nothing more than three-frame exposure bracketing on their non-pro products, or even none at all in the unforgiveable cases of Nikon’s 1 series or its entry-level DSLRs. Not so for the GX1 though which sensibly inherits the 3, 5 or 7 frame bracketing of the G3 in 0.3, 0.6 or 1EV increments. This makes the GX1 one of the most appealing ILCs for HDR fanatics who were previously forced to buy pricier DSLRs or special timer accessories to access more than three-frame bracketing.
Turn the mode dial to Creative Control and you can choose from eight special effects: expressive, retro, high key, low key, sepia, high dynamic, toy and miniature. That’s three more than the earlier G3 and in each case, a slider on-screen can be dragged to adjust the degree of the effect, or in the case of miniature, the position and size of sharp focus. Note the high dynamic option is only an effect applied to a single exposure, as oppose to a genuine multiple exposure composite mode. If it’s true composite modes you want, grab yourself a Sony.
Panasonic Lumix DMC-GX1 Sepia Creative Control Mode |
Panasonic Lumix DMC-GX1 Retro Creative Control Mode | |
 |
 | |
Panasonic Lumix DMC-GX1 Toy Control Mode |
Panasonic Lumix DMC-GX1 Miniature Creative Control Mode | |
 |  |
Each of the Creative Control modes can be applied to stills or video as you capture them. Like most miniature modes, the impact of processing each frame means the GX1 doesn’t record in real-time, but the pleasant side-effect is accelerated playback, in this case by about eight times. So if you record for four minutes, you’ll end up with 30 seconds of accelerated footage. The GX1 also supports miniature movies in Full HD 1080i. Here’s an example:
| |
|---|---|
|
 |
Turn the dial to SCN and you can choose from 17 on-screen presets, including the usual portrait, scenery, sports, macro and night options. Like earlier Panasonic models, there’s two Baby presets, which work in conjunction with the Face Recognition option to automatically identify one or two different children and imprint their name and or age on the photo if desired.
While it is possible to manually select a scene preset for the desired effect, many owners will instead reach for the fully automatic Intelligent Auto, or iA mode. Again like other recent Lumix cameras, this is no longer selected from the mode dial, but activated with a dedicated button. I like this approach as the iA button feels almost as if it should be labelled ‘Don’t Panic!’. If you’re ever in doubt what settings to use, are handing the camera to someone to take a picture of you, or simply spot a quick photo opportunity, you just press the button and relax in the knowledge the camera will do a pretty good job at capturing it. You can then press the button again afterwards to return to whatever obscure mode you may have been tinkering in. It’s like a temporary reset to Auto.
When taking still photos, iA can automatically choose from the portrait, scenery, macro, night portrait, night scenery, baby or sunset presets, and if you’re shooting video in iA mode, it can switch between portrait, scenery, low light and macro. With the GX1 set to iA, the tab on the right of the screen can be tapped out to present an additional ‘defocus’ control which lets you adjust the depth-of-field by dragging a slider on-screen. Set the GX1 to iA+ mode from the menu and you can additionally unlock touch-sliders for brightness (exposure compensation) and white balance. It’s a fun and easy way for beginners – or even experts – to explore options without worrying about the technicalities. I preferred using iA+ as sometimes the auto white balance was a little off for my liking on interior portraits, so the slider allowed me to adjust as required.
In use iA worked pretty well and coped admirably with most conditions I threw at it. It’s not shy at selecting high ISOs for portraits under dimmer conditions when it believes motion could otherwise blur them, and while that could mean noisier images than you were expecting, it’s better than having blur. This was a problem with the Nikon 1 cameras which are fairly noise averse and frequently attempted to use shutter speeds that were too slow for many portraits just to keep the ISO down. The GX1 does allow you to set the maximum ISO it can use, but this only applies when shooting in the PAS or Custom modes. In iA, you have to accept what it chooses.
The iA mode also liberally applies Panasonic’s iResolution and iDynamic as it sees fit, along with what I’m assuming is fairly enthusiastic noise reduction, and while some may appreciate their impact, I often found them resulting in images which looked a little smeared when viewed at 100%. Indeed over time, I ended up using Program for my ‘auto’ shots, where I could disable unwanted processing, set an ISO limit and lower the noise reduction. Luckily the GX1 gives you a wide range of shooting options and the ability to customise as much or as little as you like.
Panasonic GX1 sensor and processing
The Lumix GX1 inherits the same 16 Megapixel sensor as the G3 before it, making it the joint-highest resolution Micro Four Thirds camera to date. It’s actually a three-way tie with the GH2, although that model employs a different sensor to the GX1 / G3 with a neat trick where spare pixels around the edges are used to maintain the angle of view when shooting in different aspect ratios.
The GH2 achieves this by actually having an 18 Megapixel sensor with a fractionally larger surface area behind the scenes. This means the GH2 can not only maintain its angle of view as the aspect ratio is changed, but also minimise any loss of resolution. In contrast, the GX1, like most cameras, will crop its images when shooting at anything wider than its native aspect ratio – which in this case is 4:3 – and those crops will also gradually reduce the angle of view.
 |
 |
 |
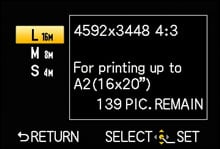
So set the GX1 to its maximum 16 Megapixel resolution and it’ll deliver images with 4592×3448 pixels, while 3:2, 16:9 and 1:1 images measure 4576×3056 (14 Megapixels), 4576×2576 (11.5 Megapixels) and 3424×3423 (again 11.5 Megapixels) respectively, each becoming increasingly cropped and slightly reducing the field of view. To be fair to the GX1, its cropping at wider aspect ratios is no different to most cameras, it’s just that the flagship GH series are cleverer in this regard.
Each aspect ratio on the GX1 is available in the choice of three resolutions and with either Standard or Fine JPEG compression; you can also record RAW data at the maximum resolution of each aspect ratio either by itself or accompanied by a Standard or Fine JPEG.
 |
 |
 |
The sensor may match the G3, but Panasonic describes the image processing as being different, and while the GX1’s base sensitivity remains 160 ISO, the maximum setting has been doubled from 6400 to 12800 ISO. There’s no composite noise reduction options though. You can see how the quality looks in my Panasonic GX1 noise results.
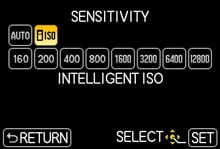
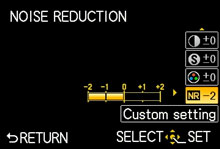
The GX1 lets you choose whether the sensitivity is manually set with 1/3 or 1EV increments, and offers two automatic ISO options along with the chance to set a limit between 200 and 3200 ISO if desired. Within the Photo Styles you can adjust the noise reduction from -2 to +2, and over time I preferred to dial this right down to minimise the slightly soft-looking output from the camera by default.
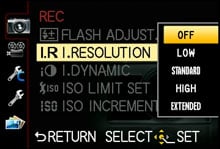
The Lumix GX1 also sports the same Intelligent Resolution options as the G3 and GH2. It’s applied automatically in iA mode, but disabled by default in the PASM modes, where you can manually choose between Off, Low, Standard, High and Extended. To see it in action, I shot my standard test scene again with each of the settings and have presented 100% crops from the same area below for comparison.
Panasonic Lumix DMC-GX1 Intelligent Resolution disabled |
Panasonic Lumix DMC-GX1 Intelligent Resolution Extended | |
 |  | |
100% crop, 1/1000, f5.6, 160 ISO |
100% crop, 1/1000, f5.6, 160 ISO | |
In the example above, Intelligent Resolution has done a good job of applying fairly significant sharpening while minimising the usual artefacts. It’s certainly delivered a punchier result than the somewhat laid-back style of the default JPEG processing, although you may prefer the result from RAW files, as seen in the results section.
Like the G3, the GX1 also features I.Dynamic, or Intelligent Dynamic Range control, which automatically adjusts the contrast when there’s a big difference between light and dark areas on the image. Again it’s applied automatically in iA, but off by default in the PASM modes, where you can choose between Off, Low, Standard and High. I didn’t find it making a huge impact on my test shots, but you may enjoy more mileage depending on the subject.
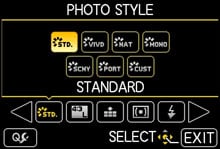
Contrast, Sharpness, Saturation and Noise reduction are all applied with a selection of customisable Photo Style presets: Standard, Vivid, Natural, Monochrome, Scenery, Portrait and Custom. The four settings can be adjusted on a scale of +/-2 steps, although there’s no filter effects for the Monochrome style.
As discussed elsewhere, I was fairly happy with the output from the Standard Photo Style, although I personally found it suffered from a little softness due to noise reduction; turning this down to -2 made the output look much better to my eyes.
 |
 |
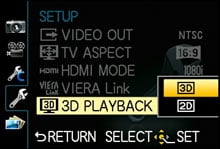 |
The Lumix GX1 also supports Panasonic’s H-FT012E 3D lens which employs two separate lenses to generate a 3D image on compatible cameras. When fitted with the lens, the GX1 can record 2D JPEGs with an accompanying MPO file containing depth information which can be interpreted by most 3D TVs to display a 3D image. The maximum resolution supported is 1824×1368 pixels in the ‘4:3’ aspect ratio. Note, the GX1 can only record still 3D photos with this lens, not 3D movies.
Panasonic GX1 movie mode
With the same sensor as the G3, it’s not surprising to find the GX1 inheriting similar movie options, although there’s a couple of small but important differences. But first the basics: like the G3 before it, the GX1 can capture Full HD 1080i video with continuous autofocus and stereo audio recorded from built-in mics, although again like the G3, Panasonic has been careful to limit the feature-set on the new model so as not to tread on the toes of the video flagship, the GH2.
 |
 |
 |
 |
 |
As such the GX1, like the G3, is lacking the external microphone input of the GH2, along with the ability to output a clean – or indeed any – signal over its HDMI port while filming, preventing the use of external monitors. There’s also no formal manual control over movie exposures on the GX1, nor the choice of adjustable frame rates, and while the GX1 does offer the tele-converter crop function of the GH2, it only does so at 720p (like the G3), not 1080. In addition, the sensor outputs 25p or 30p depending on region, which is then converted into 50p / 50i or 60p / 60i for 720 and 1080 AVCHD options, whereas the GH2’s sensor actually output 50 or 60p, giving it an encoding and AF advantage over the G3. So there’s still no 1080p AVCHD.
The features which are most important vary with each person, but of the above, I really missed an external microphone input on the GX1. I understand Panasonic’s decision to leave it out of the G3 to protect the similarly-styled but higher-end GH2, but the GX1 is a new model in the range aimed at enthusiasts. When questioned about it, Panasonic was keen to stress the GX1 was primarily about taking still photos, but for me a successful modern camera should excel at both photos and video, so by not equipping the GX1 with any means to connect an external microphone is a missed opportunity.
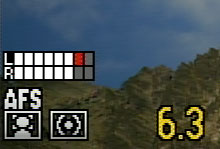
It doesn’t make sense either as one of the new video features over the G3 is the option to superimpose small but usable stereo level meters in the lower left corner of the screen. Surely this is something for people who take audio seriously, right? And the GX1’s standard hotshoe is just crying out for a Mic to be mounted. The absence of a mic input – or even a proprietary mic accessory – is a frustrating and risky decision which could drive video enthusiasts to rival models: Olympus offers a microphone socket adapter, Sony’s NEX 5N has a proprietary microphone accessory and Nikon’s V1 sports a standard 3.5mm jack. What makes it really daft is the fact Panasonic’s own FZ150 super-zoom has a hotshoe and mic input, making it a better choice for audio capture. To be fair, this won’t bother some buyers, while those who are really into movie audio will simply capture it with an external sound recorder, like those from Zoom, but for me the absence of a mic jack ultimately made the GX1 less useful than it could have been.
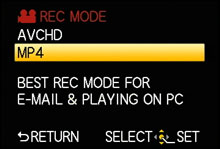
Moving on, the GX1, like earlier Panasonic cameras, offers the choice of two recording formats. The first is AVCHD, but in a departure from previous models, the alternative ‘editing-friendly’ option now becomes MP4 rather than Motion JPEG.
With the GX1 set to AVCHD you can choose from FSH (1080i encoded at 50i or 60i from 25 or 30fps sensor output depending on region), and SH (720p encoded at 50p or 60p again from 25 or 30fps sensor output). Both modes consume around 17Mbit/s. Panasonic recommends a Class 4 card or faster for AVCHD recording in either mode. Once again there’s no 1080p option in AVCHD, which marks it down a little compared to the Sony NEX 5N.
With the GX1 set to MP4, you can choose between FHD (1080p encoded at 20Mbit/s), HD (720p encoded at 10Mbit/s) and VGA (640×480 encoded at 4Mbit/s); each of the MP4 modes is encoded in a progressive format at 25p or 30p depending on region and matching the output from the sensor. These options are preferable to the previous Motion JPEG mode with topped-out at 720p and was limited to short clips.
You can start recording video in any shooting mode by simply pressing the dedicated record button to the right of the shutter release. A custom menu option lets you choose whether the screen shows the normal photo aspect ratio or 16:9 prior to filming, the latter allowing you to compose accurately for video before starting to film; although once you do start recording, the screen switches to 16:9 anyway and you can always trim unwanted padding during playback. Another custom menu switches the remaining memory between still photos and video time. It seems a bit convoluted to enter custom menus to view these options though when they could simply be included when cycling through the screen display options. For example, one of the screen options could show 16:9 framing and time remaining for video, or another view could show faint marks indicating the 16:9 frame and squeeze the remaining video time elsewhere on-screen.
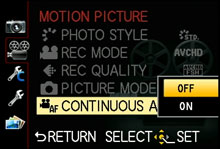
The GX1 inherits the G3’s two options for capturing still photos while recording video: Motion Picture Priority mode lets you capture up to 30 still photos at 2 Megapixel resolution without interrupting the video, while Still Picture Priority mode lets you capture up to eight images at the maximum resolution, although each will interrupt the video with a frozen image for about a second or so. Note all photos captured while filming video are in the 16:9 format, so the best quality Still Picture Priority mode will actually capture 11.68 Megapixel shots. If you want to capture high resolution still photos without interrupting HD video recording, you’ll need to go for a Nikon V1 or J1 camera instead.Â
Returning to the GX1, you’re looking at about 2 Megabytes per second using its best-quality AVCHD 1080i mode, and Panasonic quotes around one hour of video in this format can be stored on an 8GB card. The maximum recording time depends on where your GX1 originated: as always, models destined for the European market are limited to AVCHD clips lasting no more than 29 minutes and 59 seconds each, although you can of course start recording another clip almost immediately afterwards, or strategically stop it at an opportune break a little earlier before starting a new clip.
If your GX1 came from outside of Europe though, prepare for a treat as in the AVCHD mode it’ll keep recording uninterrupted until you run out of memory or battery life. I put this to the test by filming a school play lasting one hour with numerous adjustments to the power-zoom and focus. How long can it go on for? I recharged the battery, fitted a freshly-formatted 16GB card and started recording: 2 hours and 2 minutes later the battery died, coincidentally with about 90 seconds remaining on the memory card. The file was actually split into multiple 4GB files, but they ran together seamlessly. At the end of the recording the GX1 was warm to the touch, but the video quality wasn’t perceptibly noisier at the end than the start.
Maximum recording time is a key advantage the GX1 along with other Panasonic cameras have over the competition. Canon’s DSLRs will record 1080p for a maximum of 12 to 17 minutes depending on the model. Nikon’s D5100 and V1 / J1 will manage 20 minutes. Many others simply adopt the 29:59 limit even if they’re not destined for Europe. Not Panasonic though: get yourself a non-European GX1 and it’ll keep recording for up to two hours on a single charge if you minimise zooming and refocusing. This makes it ideal for recording longer, single events such as school shows, concerts, talks or lectures. Indeed I did just that filming several school events in their entirety while enjoying superior low light performance to those alongside with traditional camcorders.
Like the G3 before it, the GX1’s movie exposures are automatic. The camera chooses the ISO and shutter speed automatically, and also the aperture when the mode dial is set to Program or if iA is enabled. Under dimmer conditions, the GX1 will unsurprisingly open its aperture, allowing you to achieve shallow depth-of-field effects, but if you want complete control of the aperture under any conditions, you’ll need to use an older third-party lens with a manual aperture ring via an adapter, such as a Nikkor model.
 |
The typical buyer of the GX1 will however be much more interested in its continuous autofocusing capabilities, which like the G3 and GH2 before it, are very impressive. The Lumix GX1 delivers continuous AF while filming which is both quiet and fairly quick. Don’t get me wrong, it’s not perfect: as a contrast-based system, the GX1 can’t help but search back and forth in order to confirm focus, something the phase-change AF systems on Sony’s SLT and Nikon’s 1 series models mostly avoid in good light. But on the whole the Lumix GX1 locks-on fairly quickly, quietly and without fuss. In these respects it remains far superior to movie AF from traditional DSLRs like the Canon EOS T3i / 600D or Nikon D5100.
As described and demonstrated in the AF section above, the GX1 also inherits a neat option from recent Lumix models which allows you to simply tap on the subject you’d like the camera to refocus on, while you’re filming. This is great for pulling-focus between subjects without recomposing the shot. You can also have the camera attempt to refocus the instant you’ve tapped, or tap to fix a point before performing the refocusing later with a half-press of the shutter. I found the latter useful when waiting for a potential edit-gap in a performance. Either way, as seen in the sample video earlier on this page, there can still be some visible searching, but it remains a useful and enjoyable feature for those who don’t want to manually pull-focus.
If you do prefer though, you can put the GX1 into manual focus mode and make the adjustment yourself. There’s no magnified assistance as you do so, but it’s possible to get the focusing pretty close, while avoiding the over-reaching searching in AF. This can work particularly well with the 14-42mm power zoom which has a lever to adjust the motorised focusing.
Now for a selection of clips which demonstrate the GX1’s video capabilities.
| |
|---|---|
|
This first clip, above, was filmed handheld using the GX1 and the 14-42mm Power Zoom lens. I’ve started, as always, on the bright reflections in the water, which as you’d expect posed no issues for the (C)MOS sensor. I then panned the camera up and around by 180 degrees. The optical stabilisation on the lens has done a good job at ironing-out any wobbles and you can see an example of its motorised zoom at the end. Any issues to report? Well my first attempt was marred a little by the AF system hunting from time to time, so for this sample I disabled Continuous AF for movies. The most obvious problem though is with the wind noise. To be fair the GX1 is no more susceptible to this than any other camera I’ve tested, but sadly you cannot connect an external microphone with a wind muffler to improve the quality and cut the noise.
| |
|---|---|
|
For the second clip, above, I mounted the camera on a tripod with a fluid head and smoothly panned from left to right. As you can see there’s a lot of detail in the footage, although I should note that again this was my second attempt after the first had suffered from some unnecessary focus hunting. The moral as I discovered is to always disable continuous AF unless you know you need it – and in a situation like this with a distant subject and bright conditions allowing a large depth-of-field, it’s not required.
| |
|---|---|
|
In the third clip, above, I still have the GX1 mounted to a tripod and this time I’m testing the motorised zoom of the 14-42mm Power Zoom lens. Since the focus changes with focal length, I had continuous AF enabled for this video. Viewed full-screen you can see a number of times when the camera searches for focus, but while this is a little distracting, the GX1 does at least perform the process quickly. Listen carefully and you’ll hear the faint, but audible hiss of the zoom motor in operation, although the bigger issue is the slapping sound when you let go of the spring-loaded zoom lever; for critical work, let go of the lever very gently!
| |
|---|---|
|
In the fourth clip, above, I’ve switched to the 45-175mm Power Zoom lens, which revealingly is much quieter in operation than the 14-42mm version. As I zoom in and out, you can’t hear the motor above the ambient noise. The GX1 also does a better job at keeping the image in sharp focus, although this may be down to simply having larger, more defined shapes to lock-onto. You’ll also notice the 45-175mm avoids the slightly jerky start of the 14-42mm’s range when zooming, allowing the telephoto zoom to deliver a smoother overall appearance.
| |
|---|---|
|
For my fifth clip, above, I moved into the dimmer surroundings of a bar for a handheld pan. There’s no control over ISO on the GX1’s movie mode, so the camera automatically selected 1600 ISO here with the 14-42mm power zoom. There’s no obvious noise to worry about, although the image is a little less crisp than the earlier samples, implying the application of noise reduction. But the bottom line is it’s still a clean, detailed image in lower light. Note I disabled continuous AF for this clip to avoid unnecessary searching.
| |
|---|---|
|
My sixth clip, above, tested the continuous AF capabilities of the GX1’s movie mode. One again there’s no way to manually set the aperture in the GX1’s movie mode, but by filming in a dimmer environment and keeping subjects close, it’s possible to achieve a relatively shallow depth of field which will reveal the AF process. As I panned around the room and settled on various objects, the GX1 did a good job at refocusing without too much searching or fuss. It works pretty well, although over time I preferred to disable continuous AF and instead use the touch-screen to select the desired subject to refocus-on before gently half-pressing the shutter release. You can see an example of the touch-screen focusing in the AF section above.
| |
|---|---|
|
In the seventh clip, above, I tested the continuous AF performance with a steadily approaching subject, and to make it harder for the GX1, I fitted the 45-175mm power zoom and set it to 175mm. The Gondola / Cable car was approaching slower than usual, making it easier for the GX1 to track, but it’s still impressive to watch the camera steadily adjust its focus to keep the subject sharp. There’s a few minor searches, but nothing to be too worried about. This performance is about as good as you’ll get for tracking AF with a contrast-based AF system at the moment, and the only way to avoid the searching is to go for a phase-change AF system, which at the moment is only offered on the Sony SLT and Nikon 1 cameras for movies. Probably the bigger issue in this clip concerns the jello effect when the camera is shaken as people get out of the cable cars next to my filming position.
| |
|---|---|
|
In my final main clip above, you can see the GX1’s continuous tracking AF in action on a quicker subject, and again I used the 45-175mm power zoom at its maximum focal length. This time the camera’s struggled to keep the subject constantly in sharp focus and while it always locks back on in the end, there’s some annoying periods where the boat is out of focus for more than a couple of seconds. Once again this isn’t unusual for a contrast-based AF system and if you want to track faster action with less searching, you’ll need a phase-change AF system, which once again at the moment is only offered for movies on the Sony SLT and Nikon 1 cameras. You’ll also see the jello effect a little as the camera receives some sharp wobbles during this handheld pan.
 |
Finally, like the G3 before it, the GX1 offers a teleconverter option which crops an HD frame from the middle of the sensor, thereby delivering a magnified view without any loss of quality. The GH2 allowed you to do this for either 1080 or 720 video, delivering effective magnifications of 2.6 or 3.9x.
Sadly the GX1 inherits the G3’s limitation of not supporting the teleconverter for 1080 video, but it’s there for 720 if you’re interested, again delivering roughly 3.9x magnification with an area cropped from the middle of the frame. While it’s a shame the 1080 option is not available, it remains a useful facility. I should however note the Canon EOS T3i / 600D offers a similar movie crop feature for Full HD 1080 video.
Panasonic Lumix DMC-GX1 using 45-175mm at 175mm 720p footage with Tele Converter disabled |
Panasonic Lumix DMC-GX1 using 45-175mm at 175mm 720p footage with Tele Converter enabled | |
Download the original file (Registered members of Vimeo only) |
Download the original file (Registered members of Vimeo only) | |
To show the 720p teleconverter option in action, here are two clips of rare yellow-eyed penguins on a beach near Moeraki in New Zealand, filmed with the GX1 and 45-175mm Power Zoom from the same location just moments apart. The first shows 720p downsampled from the full sensor frame as usual, while the second shows the 720p teleconverter option which takes a 1:1 crop from the middle of the sensor and thereby also avoids any scaling / downsampling issues.
Panasonic GX1 continuous shooting
With the same sensor and similar processing to the G3, it’s not surprising to find the GX1 sharing similar continuous shooting specifications, although Panasonic claims a small boost in speed.
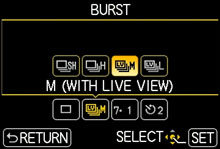
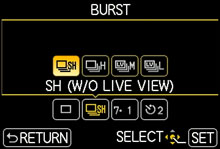
As such, the Lumix GX1 offers four continuous shooting speeds: Low speed shoots at 2fps, Middle speed at 3fps and High speed now at 4.2fps (up from 4fps on the G3), all at the full 16 Megapixel resolution, while the Super High speed mode drops the resolution to 4 Megapixels, allowing it to fire-off bursts at 20fps.
 |
 |
 |
As always I tested all the continuous shooting modes under real-life action conditions, photographing Queenstown’s famous Shotover Jet boats zooming past and performing 360 degree spins. You can see a sequence below taken at the 4.2fps High Speed mode.
| Panasonic GX1 with 45-175mm at 75mm (150mm equivalent): Continuous Shooting High (4.2fps) | ||||||||
 |
 |
 |
 |
 | ||||
 |
 |
 |
 |
 | ||||
Before discussing speeds in detail, it’s important to mention the difference between composing with a 100% live view system like the GX1 for action shots compared to a traditional DSLR: depending on the shooting mode, you may not see a live image between continuous frames. Instead the image you see between frames may simply be the last shot you took.
This causes a problem when the action requires panning, as you have no feedback as to where the subject is going, and therefore where to point or how fast to move the camera. Unfortunately by playing a series of images in place of a genuine live view, you’re effectively looking at what’s just happened, not what’s happening right now. So if your subject changes speed or direction, you won’t notice until it’s too late.
As such, panning during fast continuous bursts on live view systems involves a certain degree of blind anticipation and adjusting the camera further than the image you’re viewing might suggest. It’s something you do get used to, but it’s nowhere as intuitive or easy as the optical viewfinder in a traditional DSLR which thanks to the speed of light gives a brief but valuable glimpse of what’s happening between frames, allowing you to recompose as required.
If the GX1 is set to High or Super High Speed, the image between frames is the previous one played back, thereby suffering from the problems described above. Interestingly though, the Super High Speed mode is so fast that the gaps between frames is very small, giving you quicker feedback on any changes that need to be made. But in the High mode you will be guessing a lot of the time. Reduce the speed to the 3 or 2fps modes though and the camera has sufficient processing muscle to display a live image between frames.
Another important difference regards continuous autofocusing while shooting. The GX1 can do it, but even its quick contrast-based system isn’t as confident as a phase-change system when it comes to tracking fast action. Switch the GX1 to continuous AF and you’ll also find it slowing down if the subject is moving quickly.
Okay, now for the speeds and I started-off by fitting a freshly formatted 16GB SanDisk Extreme Pro UHS-1 card rated at 45MB/s. Set to Large JPEG, 1/500 shutter speed, AFS focusing, 400 ISO and High Speed mode, the GX1 fired-off 22 frames in 5.26 seconds, corresponding to a rate of 4.18fps. Under ideal conditions, the GX1 could keep shooting at this speed while memory remained, but at other times it would slow down a little after around 20 shots. Set to RAW, the GX1 captured ten frames in 2.25 seconds, corresponding to a rate of 4.4fps, but then slowed to about one frame every two seconds.
Set to Medium speed where you gain Live View between frames, the GX1 captured 60 Large Fine JPEGs in 21.42 seconds, corresponding to a rate of 2.8fps. The GX1 seemed happy to keep shooting at this speed as long as I held my finger on the shutter release.
Set to Super High Speed, where the resolution drops to 4 Megapixels, the GX1 captured 38 frames in 1.83 seconds, corresponding to a rate of 20.8fps.
| Panasonic GX1 with 14-42mm at 14mm (28mm equivalent): Continuous Shooting Super High Speed (20fps) | ||||||||
 |
 |
 |
 |
 | ||||
 |
 |
 |
 |
 | ||||
In terms of flushing the buffer, the GX1 took around 20 seconds to complete writing a burst of ten RAW files in the High speed mode using a UHS-1 card. During the writing process, you could still use the camera and fire-off more – albeit smaller – bursts, but resulting in a delay of the total writing time. Switching to a Class 6 SD card saw the burst reduce from ten to nine frames and the total flushing time extend to 23 seconds; this may not seem much longer than the 20 seconds with the UHS-1 card, but remember to factor-in an additional frame recorded for the quicker card. The different cards didn’t affect the actual speed of the initial bursts.
So it would appear the GX1 can exploit the additional speed of UHS-1 cards when it comes to flushing the buffer, but in the test above you’re only looking at a speed of around two seconds per image (after the burst) versus 2.5 seconds.
In terms of the actual burst speeds themselves, the GX1 performed pretty much as quoted, essentially delivering its top speed of 4.2fps in my tests, and confirming the speeds in the other modes too. By achieving 4.18fps in practice, the GX1 is also fractionally quicker than the G3, which in my tests delivered 3.9fps.
Interestingly, the least usable mode for me personally though was the top speed with the maximum resolution. Without Live View it proved tricky to follow fast panning or unpredictable action. Switching to the lower speed with Live View, or even the super high speed (which may not have had live view but gave quicker feedback with its faster frame rates) ultimately proved easier to use.
I like that Panasonic has given you the choice of continuous shooting modes, allowing you to decide where the compromise should lie, whether in feedback, resolution or frame rate. In this respect the GX1 is quite satisfying to use, but if you’re really into fast action, the quicker burst rates at the full resolution and more confident phase change AF of the Nikon 1 and Sony SLT systems remain those to beat in the non-DSLR market.
To see how the quality of the Panasonic GX1 measures-up in practice, take a look at my GX1 quality and GX1 noise results pages, browse the GX1 sample images, or skip to the chase and head straight for my verdict.


