The Olympus OMD EM10 Mark II is in many ways the perfect mid-range camera. With decent image quality, interchangeable lenses and stacks of shooting options, it offers sufficient control for those who want to pursue sophisticated photography, but its compact body, snappy focusing, built-in stabilisation and fool-proof processing means anyone can pick it up and start getting great results straightaway. This makes it ideal for beginners and ambitious enthusiasts alike. Don't get me wrong, the EM10 II is not without its weaknesses. The movie mode remains below what Panasonic offers on similarly-priced Lumix cameras. The continuous autofocus also struggles with faster subjects, so if sport and action photography are your thing, you'll find Sony's Alpha A6000 (or its successors) far superior. I also feel that when it comes to ultimate image quality in this bracket, Fujifilm's XT10 pips all these models to the post. But for general day-to-day photography, the OMD EM10 Mark II is hard to beat. It's an attractive camera that's enjoyable to use and delivers great results in most situations with ease, while offering plenty of room to grow.
Olympus OMD EM10 II review
-
-
Written by Gordon Laing
In depth
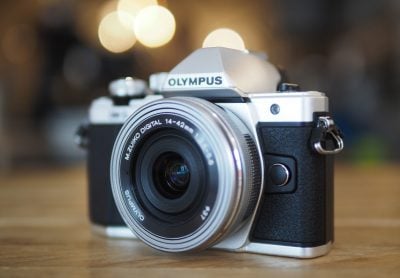
The Olympus OMD EM10 Mark II is a compact mirrorless camera, aimed at hobbyists who want a step-up in quality and flexibility without breaking the bank – or their backs. Announced in September 2015, it’s the fifth OMD body from Olympus, a range that’s differentiated from their PEN series by their built-in electronic viewfinders.
Successor to the popular OMD EM10, the Mark II becomes the new entry-level OMD with the EM5 Mark II and EM1 positioned above it. But while the original EM10 felt like a cut-down product in some respects, Olympus has been more generous on the feature-front with the second version. Most notably, the viewfinder is now larger and more detailed, and the earlier three-axis stabilisation has been upgraded to the five-axis system of the EM1. There’s also now a silent electronic shutter option, the control dials have been rearranged and the camera not only inherits many of the cunning modes of earlier OMDs but introduces a new one: focus bracketing which can capture multiple images for stacking in optional software to increase the depth of field on macro shots.
The upgrades make the EM10 Mark II a much more compelling camera than its predecessor, and for many photographers gives them all the features, control and quality they desire without having to go for a more expensive model. But it’s not without a number of equally compelling rivals, including Panasonic’s Lumix G7, Sony’s A6000 and Fujifilm’s XT10 on the mirrorless front, not to mention Canon’s EOS 750D / T6i or Nikon’s D5500 if you prefer a traditional DSLR. All are very capable cameras and in my review I’ll help you make the right choice!

Olympus OMD EM10 Mark II design and controls
The Olympus OMD EM10 Mark II is a very compact mirrorless camera that perfectly balances retro-styling with modern functionality. Measuring 120x83x46.7mm and weighing 390g with battery, it’s one of the smallest cameras with a viewfinder and interchangeable lenses. Olympus complements it with an equally tiny (and surprisingly respectable) collapsing kit zoom that adds just 22.5mm to the thickness and 93g to the weight.
To put it in perspective, here’s the EM10 II flanked by the Sony A6000 on the left and the Fujifilm XT10 on the right. The Sony’s actually a little smaller still, measuring 120x67x45mm and a tad lighter too at 344g for the body plus battery; its collapsing kit zoom also keeps the overall size down, although sadly the quality of this lens lets the body down. Meanwhile Fujifilm’s XT10 body is comparable in size to the EM10 II at 118x83x45mm, but the absence of a really small kit zoom makes the overall package larger. To be fair, it’s pictured here with the larger of the two ‘basic’ kit zooms, the XF 18-55mm f2.8-4, and most XT10s would probably be sold with the smaller and cheaper XC 16-50mm f3.5-5.6.
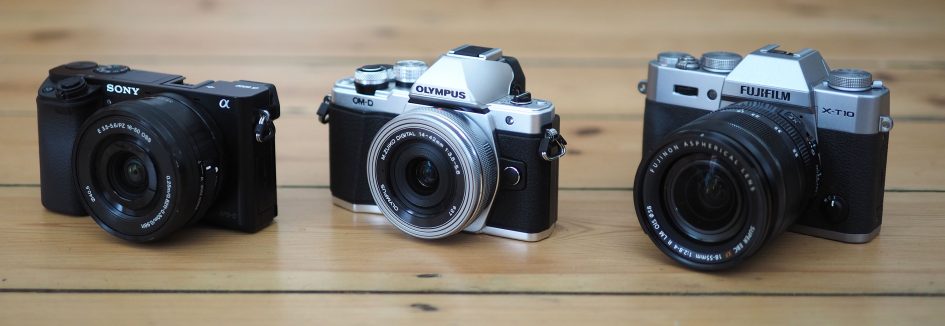
I should also mention the fourth camera you should be comparing these against, Panasonic’s Lumix G7, which measures 125x86x77mm and has a body-weight of 410g with battery. Panasonic offers the G7 with a kit zoom that may not be as small as the Olympus and Sony pancakes, but is still very compact while also delivering respectable quality – a great balance.
So all four are roughly the same width and thickness, and those with viewfinder humps are around the same height too. The flat-topped Sony A6000 manages to be a little shorter thanks to its corner-located viewfinder, but it has a shorter, wider screen as a consequence.
Of the four cameras, the OMD EM10 II has the smallest grip, and if you have larger hands you’ll almost certainly prefer the more substantial grips of the Sony and Panasonic. But I found the ridge on the front and the thumb rest on the rear offered surprisingly effective purchase of the EM10 II in my (admittedly fairly small) hands. If you love the Olympus – or indeed the Fuji XT10 – and wished they had bigger grips, then fear not for both companies sell optional accessories which screw on and boost their respective grips.
At this point I should also mention the DSLRs these cameras go up against in terms of specification and price: Nikon’s D5500 (124x97x70mm / 470g) and Canon’s EOS 750D / T6i (132x101x78mm / 555g). These are larger bodies all-round, and once you add their respective kit zooms the differences become even greater, especially for Canon who’s EF-S 18-55mm STM doesn’t collapse to save space. The flipside is these two DSLRs do give you more to hold onto, but I have no complaints with the feel of the four mirrorless models in my hands.
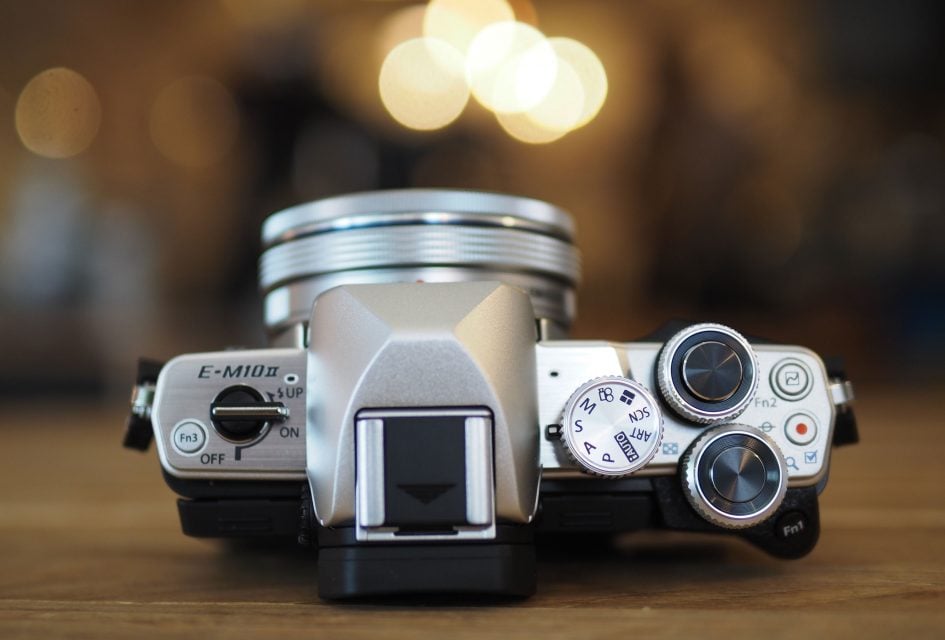
In terms of the styling, the OMD EM10 II adopts a mix of the old and new. I personally feel this is something Olympus has really nailed with its OMD Series, particularly the EM1 and now the Mark II versions of the EM5 and EM10. It’s easy to style a digital camera like an old film SLR, but doing so can often compromise modern controls simply for the sake of looks. With the OMD series there are plenty of respectful nods to the classic OM film SLRs – such as the power switch here on the EM10 Mark II – but by sticking with customizable twin control dials it doesn’t suffer from the functional limitations of dedicated aperture and shutter dials. Of course this is a very personal preference, but I love the look and approach of the OMD series.
I also appreciate how Olympus doesn’t employ tiny controls just because the body’s compact. Indeed some of the best upgrades of the EM10 Mark II over its predecessor are the chunkier dials on the upper right surface. Inspired by the EM5 Mark II, the two control dials are taller than before and offer very positive feedback when turned; their adjusted positions also make it easy to operate both while holding the camera single-handed.
Meanwhile the mode dial has shifted across to join the control dials in a satisfying threesome, leaving the upper left surface of the body clean for the power switch. Styled with a nod to the classic OM-1 film SLR, the switch turns 90 degrees to power the camera on, and in a modern touch, twisting it a little further pops-up the built-in flash. This is how to do retro on a modern camera.
On opposite sides of the upper surface you’ll find two of the three dedicated function buttons, the third one perched on a rear corner. As with all Olympus bodies, the EM10 Mark II isn’t short of customization – far from it with pages of menus dedicated to adjusting every aspect of the camera. It can be overwhelming even for those who are familiar with the system, but you don’t need to delve into them if you don’t need to and in my view it’s better to have them than not. It’s also possible to reassign the operation of the red movie record button, along with the cross keys on the rear, extending the effective number of physical function buttons.
By default, the cross keys on the rear of the camera fire-up a grid of AF areas on-screen, allowing you to quickly reposition the AF area without first entering any menus. Like other Olympus bodies, the screen is also touch-sensitive, so you can alternatively just tap where you’d like the camera to focus.
In an upgrade over previous OMDs – and no doubt inspired by a similar feature on Panasonic’s models – the EM10 II now offers an AF Targeting Pad option. This lets you use the screen to reposition the AF area by touch while composing through the viewfinder. It sounds a bit mad, but actually works very well in practice. I frequently take my eye from the viewfinder to reposition the AF area on-screen, but now I can do it without looking away. The implementation is also a little more sensible than Panasonic where your nose can inadvertently reposition the AF area, forcing you to either disable the feature out of frustration or flip the screen out to the side. On the OMD EM10 II, you need to drag the AF area in this mode with a prolonged and more conscious contact, allowing it to better differentiate between an accidental nasal nudge and a deliberate finger movement. Fortunate too since unlike the Lumix G7, the screen doesn’t flip to the side on the EM10 II.
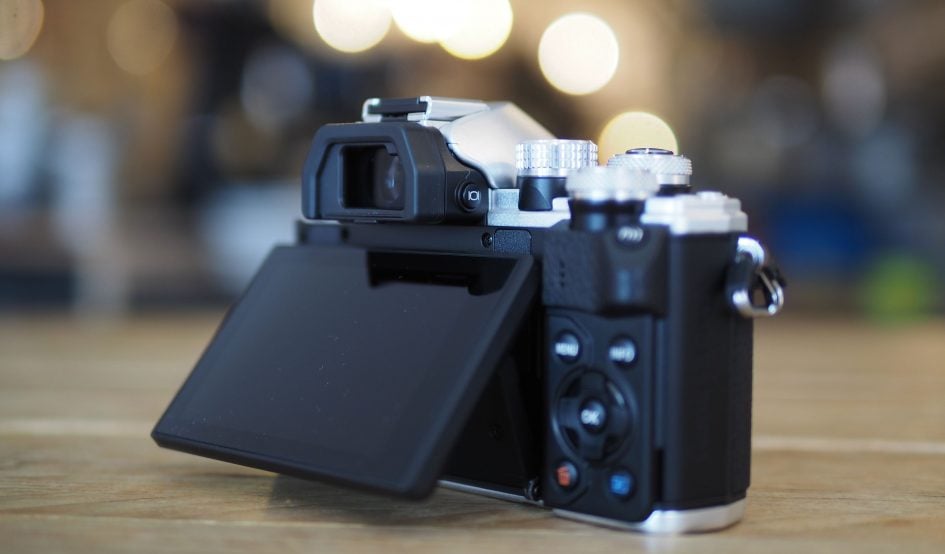
Speaking of the screen, the EM10 II is fitted with a 3in / 3:2 shaped LCD panel that’s touch-sensitive and can angle vertically upwards by about 90 degrees or down by about 45 degrees. The 3:2 shape means images composed or played-back in the native 4:3 aspect ratio are presented with thin vertical bars running down either side. The 1037k dot resolution delivers a detailed view and while, like all screens, it can become trickier to view in direct sunlight, you can angle it up or down a little to alleviate the issue. Ultimately though I prefer the greater flexibility of a side-hinged screen that can flip and twist to any angle whether shooting in the landscape or portrait orientation, and if this is important to you, consider either Panasonic’s Lumix G7 or the more expensive Olympus OMD EM5 Mark II.
Alternatively you can compose with the OMD EM10 II’s electronic viewfinder, which represents a decent upgrade over the Mark I version. So it’s out with the old 1.44 Million dot LCD and in with a 2.36 Million dot OLED panel that’s more detailed and vibrant, and with 0.62x magnification versus 0.58x, delivers a slightly larger image too. This ranks the EM10 II viewfinder in a similar ballpark to rivals, the Lumix G7 and Fujifilm XT10 in terms of panel type and resolution, although the Lumix G7 edges ahead on magnification (0.7x), presenting a larger image. All three however are considerably superior to the 1.44 Million dot viewfinder on Sony’s A6000 which is now showing its age.
I should also add that while the EM10 II and XT10’s viewfinder magnifications may be smaller than the Lumix G7, all deliver a considerably larger view than a comparably-priced DSLR. For example, the image presented in EM10 II is roughly one fifth wider and one third taller than that in the Canon EOS T6s / 760D’s optical viewfinder. Obviously there’s pros and cons to both viewfinder technologies, but when shooting side-by-side with mirrorless and DSLR cameras today it’s striking how much larger and more immersive the viewfinders are in the former. If you make the jump to the next grade-up to models like the Olympus OMD EM5 Mark II, Lumix GX8 and Fujifilm XT1, the magnification and difference becomes even larger still.
In terms of shooting information and guides, the OMD EM10 II cycles through a variety of views using its INFO button, overlaying a live histogram, dual axis leveling gauge, shooting information only, or a clean view. It’s also possible to overlay a selection of alignment grids and lines. In manual focus you can enable focus peaking with or without a magnified view which makes nailing the precise focus a doddle. I’ll discuss this more in the handling section later, but wanted to mention here that the wealth of information, views and guides exceed typical DSLRs and are also available when shooting with the screen or viewfinder.
Like earlier Olympus cameras, the EM10 II offers two very usable on-screen menu systems when you press the OK button: the simple Live Control and more sophisticated Live SCP (Super Control Panel), the latter sensibly set as the default for PASM modes. Live Control super-imposes a scrolling column of settings on the right side of the screen with the relevant options shown in a bar along the bottom; this interface is navigated using the cross keys. Meanwhile the Super Control Panel takes over most of the screen, presenting various options in a grid which you can navigate by touch or using the cross keys. Having the Super Control Panel on the main screen is a great complement to composing with the viewfinder
Pressing the menu button takes you into the main menus, arranged as five tabbed pages. Unless you’ve used Olympus cameras before though – and sometimes even if you have – the options are not always obvious or where you’d expect them. The image quality option for example may be on the first page, but it’s not the first option and rather being labeled ‘Quality’, it’s instead represented by an icon you may not be familiar with. I often find myself entering the menus to change something, then exiting to see if I can do it via the easier Live Control or Super Control Panel instead – which fortunately you can for many things.
In terms of ports, the EM10 II is equipped with just two behind a flap on the right side of the body: a Type-D HDMI Micro Connector and a USB-2 port, the latter (like other Olympus cameras) employing a non-standard socket, so make sure you don’t lose the supplied cable. Sadly for movie enthusiasts though, there’s no jack for an external microphone. It’s a slightly odd omission since the Lumix G7 and Fuji XT10 both have one, but I guess it’s another differentiator with the higher-end EM5 Mark II.
The EM10 II’s USB port doubles-up as a connector for the optional RM-UC1 remote control release, although you can alternatively control the camera by Wifi using an iOS or Android smartphone if preferred and I’ll detail this process later in the review. Note the USB tethering to a Mac or PC using Olympus Capture software is not supported on the EM10 II – you’ll need to go for the EM5 II or EM1 for that.
On the top of the EM10 II you’ll find a small popup flash, rated at a Guide Number of 8.2 at 200 ISO, along with a hotshoe to mount external flashguns. Other cameras in its class are also equipped with popup flashes and while they’re all small, I still find them useful for close-range use or fill-ins. I miss their absence on higher-end models like the OMD EM5 Mark II.
The EM10 II is powered by the BLS-50 Lithium ion battery pack which has a 1210mAh capacity, slightly more than the 1150mAh of the BLS-5 supplied with models like the Stylus 1 and earlier PENs. Both battery packs should work on the EM10 II if you have any of the older ones spare. Olympus reckons the charge on the BLS-50 should get you around 320 shots with IS enabled, under CIPA conditions. I found the EM10 II generally delivered close to that in mixed-use with some Wifi connections to my phone and a few movie clips.
Like previous Olympus OMDs though, the EM10 II resists the chance for its battery to be topped-up (or even fully-charged) in-camera over USB. Instead when you need to charge your battery, you’ll need the supplied charging unit and an AC socket to plug it into. I know this is the traditional (and still most common) way of doing things, but I find the option of recharging a battery in-camera over USB so much more convenient when I’m travelling or simply out and about as I don’t need to bring the charging unit, nor find an available AC outlet for it. Instead USB charging allows you to top-up using a portable battery, laptop socket, car adapter, or of course any number of AC to USB adapters you or anyone else might have to hand for other devices. Since mirrorless cameras with their 100% electronic composition chew through batteries at a fair clip, I think all should follow Sony’s lead by allowing in-camera charging over USB.
Olympus OMD EM10 Mark II lenses and stabilisation
The Olympus OMD EM10 Mark II employs a Micro Four Thirds sensor and lens mount which, like all OMD and PEN models before it (along with all Panasonic Lumix G cameras), results in a field reduction of two times relative to full-frame systems. So a 25mm lens delivers an equivalent field of view to 50mm on full-frame, and the effective depth of field compared to full-frame is also reduced by two times, so f1.4 on Micro Four Thirds will deliver a depth of field equivalent to f2.8 on full-frame.
Note when first launched the EM10 II suffered from an issue involving cheaper lenses with plastic mounts, but I believe this has now been resolved and models shipping since early October should be fine. I didn’t experience any issues with my sample, but then none of the lenses I used – including the kit zoom – had a plastic mount.
The Micro Four Thirds mount gives the OMD EM10 Mark II access to the broadest and most established native lens catalogue of all the mirrorless camera systems. Micro Four Thirds has over 40 lenses available from Panasonic and Olympus along with third parties including Sigma, Tamron, Samyang, Voigtlander and others. So while many rival mirror-less formats are struggling to offer even one lens in every category, Micro Four Thirds typically has two or more options available. Whether it’s Fisheye, ultra wide, fast aperture, macro, super-zoom or good old general-purpose, the Micro Four Thirds catalogue has it covered, and many of them are great quality too – find out more in my Micro Four Thirds lens guide.
Depending on region, the EM10 II is most commonly offered in a kit with the EZ 14-42mm f3.5-5.6 kit zoom. This is a collapsing model that measures just 22.5mm thick when powered-down, allowing the EM10 II to become a very compact working camera.
Switch the power on and the lens extends by a couple of centimetres with the camera ready for action in less than two seconds; it’s actually not much different to the cold power-up time with a prime or non-collapsing zoom. The zoom operation on the lens is motorised only, using a spring-loaded ring on the barrel – it’s not as tactile as a mechanically-linked ring, but that’s the price of miniaturisation. Meanwhile a thin ring at the end offers manual focusing and while it’s narrow, the damping makes it a lot more usable than the loose ring on the Sony 16-50mm kit zoom.
You’ll see in my results and gallery pages how it performs and inevitably there’s some compromise in the corners due to its size, but it’s a lot better than the Sony collapsing kit zoom. If you do fancy something classy that still keeps the size down, consider the Olympus 17mm f1.8. I used this lens a lot while testing the EM10 II and EM5 II and love the combination of small size with the chance to achieve shallow depth of field results, not to mention working in low light without bumping the ISO up too much. Anyway, here’s how the coverage looks with the 14-42mm kit zoom.
Above: Olympus 14-42mm at 14mm / 28mm equiv (left) and at 42mm / 84mm equiv (right)
The OMD EM10 Mark II, like all Olympus OMD and PEN bodies, features built-in sensor-shift stabilisation that works with any lens you attach. The earlier EM10 Mark I offered a basic three-axis system compared to the more sophisticated five-axis system of the higher-end EM5 and EM1 models. Now the EM10 Mark II inherits the five-axis stabilisation of the EM1, which in theory should offer four or five stops of compensation with almost any lens you mount. It’s a great upgrade on paper, but how does it work out in practice?
To find out I mounted an unstabilised 25mm prime lens (with an effective focal length of 50mm). According to photographic wisdom, this would normally require a shutter speed of at least 1/50 for handholding without camera shake.
On the day, I found I needed a shutter of just over 1/50 to handhold this lens without shake. With the stabilisation enabled, I could match the result a little slower than 1/6, corresponding to around 3.5 stops of compensation. Scale this to wide angle lenses and you can find yourself handholding shots approaching one second without shake, allowing you to shoot in low light without opening the aperture or bumping-up the ISO. As expected, this roughly matches the performance I measured from the OMD EM1 and is slightly-bettered only by the EM5 Mark II. Below are 100% crops from images taken at 1/6 without stabilisation (on the left) and with stabilisation (on the right).

Above: Olympus EM10 II stabilisation at 25mm / 50mm equiv and 1/6. Disabled (left), enabled (right)
The results are great-looking images in dim interiors or around the blue hours following sunset or before sunrise without the need for a tripod. Of course the ability to handhold a slow shutter speed isn’t going to help if your subject is moving, but for static subjects it’s an incredibly valuable capability. Panasonic and Sony may have begun to deploy sensor-based stabilisation on some of their latest bodies, but they don’t come close to matching this degree of compensation from the Olympus five-axis system in my tests. Here’s a shot I took at a slow shutter in extremely low light without having to worry about camera-shake.

Above: Olympus OMD EM10 Mark II handheld, 7-14mm at 0.4 seconds
Even if you’re shooting subjects that aren’t keeping still though, the stabilisation remains very useful for keeping the image steady as you compose. Even with mid-length telephoto lenses, the image floats eerily on the screen or in the viewfinder, allowing you to very accurately compose without any visible wobbling.
Note the stabilisation in the higher-end EM5 Mark II is even better still, giving it an additional stop of compensation in practice and also the ability to deploy the 40 megapixel composite mode. This is why the 40MP mode is not available on the EM1 or EM10 II.
I should finally add that sensor-based stabilisation is also available when filming video and in my tests it worked well – I have a clip in the movie mode section later in the review.
Olympus OMD EM10 Mark II shooting modes
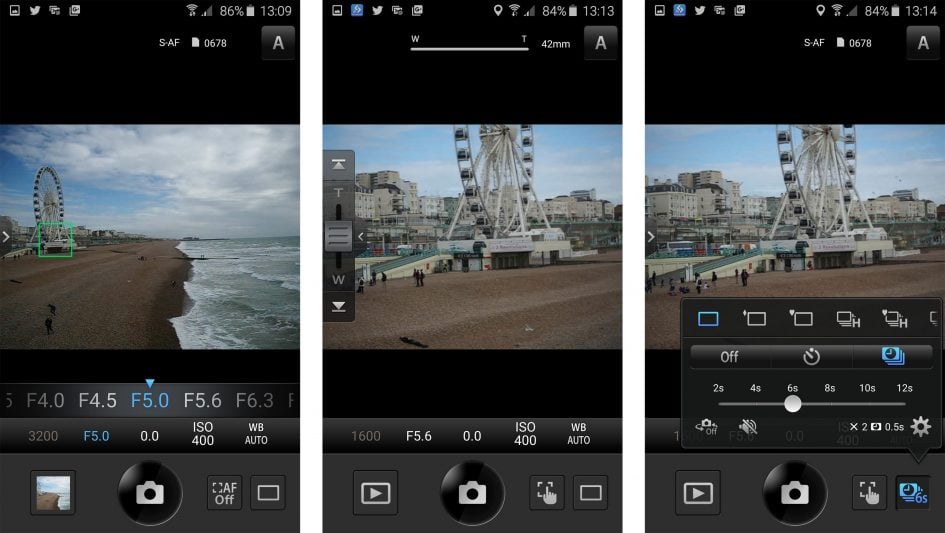
The OMD EM10 II has a tall and narrow mode dial with very positive clicks between positions. In addition to the traditional PASM modes you can choose iAuto, ART, SCN, Photo Story and Movie. I’ll cover each in this section, along with the other shooting options.
The EM10 Mark II offers the same mechanical shutter speed range as the EM10, from 60 seconds to 1/4000 and the shutter sound itself is a satisfying click that’s not too loud. By default the EM10 II employs a mechanical curtain at the front and end of exposures.
If you prefer complete silence you can enable the Electronic Shutter option, indicated by a heart icon on the Drive menu. In addition to operating silently, the electronic shutter extends the maximum shutter speed to 1/16000, giving you two more stops of exposure control over the mechanical shutter – handy if you’re shooting with large apertures under bright conditions or want to freeze the fastest action. Here’s an example shot at the fastest shutter speed for a shallow depth of field in broad sunlight.

Above: Olympus OMD EM10 Mark II e-Shutter, 25mm at f1.4 and 1/16000
Electronic shutters are great for silence and avoiding vibrations, but due to the readout speed of most sensors, they’re not suitable when the subject – or camera – are in motion as the image can suffer from undesirable skewing artefacts – something I noticed on the EM10 II with only modest motion. They can also suffer from banding under some artificial lighting, but if you’re careful they can still prove useful in discreet environments.
Like the EM1 and EM5 II, there’s also a variety of Anti Shock options which employ an electronic first-curtain shutter and a variety of delays to reduce the potential impact of the shutter causing unwanted vibrations. The shortest delay is zero seconds, which makes the Anti Shock mode practical for normal handheld use.
Note the Anti Shock mode can still suffer from skewing artefacts if the camera or subject are moving at speed (something I confirmed myself), so Olympus only offers it up to speeds of 1/320. Beyond this, shutter shock is no longer a big issue so the camera reverts to its mechanical shutter to avoid any potential artefacts. Ultimately like the full electronic shutter, I’d recommend experimenting with Anti Shock under a variety of situations to see where it could work for you and where the benefit is out-weighed by potential artefacts.
Moving on, Auto Exposure Bracketing is available on the EM10 Mark II at two, three or five frames at 0.3, 0.7 or 1EV apart, or for seven frames at either 0.3 or 0.7EV apart. Matching the models above it, this is a nice broad and deep range for HDR enthusiasts, although unfortunately you still can’t trigger an entire multi-frame burst with a single press of the shutter release or self-timer. Instead you need to fire each exposure separately. On the upside the built-in Wifi means you can at least trigger each frame remotely using your smartphone rather than having to buy a cable release accessory.
Alternatively you could use the in-camera HDR mode. This offers seven different options, starting with two presets which capture four frames and assemble them in-camera with mild or strong contrast effects; these two modes record a single composite image, but they can include a RAW in addition to a JPEG if desired. The remaining five modes capture multiple frames, but require you to assemble them yourself later. You can choose three or five frames at 2EV or 3EV increments, or seven frames at 2EV only, and again you can record JPEG, RAW or both for each frame.
Regardless which of the seven options you choose though, the drive mode is fixed to Continuous High, forcing the camera to fire-them off in a quick burst. This is fine, but annoyingly it prevents you from implementing the self-timer to avoid camera shake, and it’ll ignore any Anti Shock delays too. Again though you can trigger the burst remotely using your smartphone, and in practice this can work well. Here’s an example using the built-in HDR mode.

Above: Olympus OMD EM10 Mark II HDR (disabled, left / HDR 1 preset, right)
I should also add the EM10 Mark II offers bracketing for ISO, White Balance, Flash Level, ART effects, and now also Focus, which I’ll describe in a moment.
Sticking with the subject of multiple exposures, the EM10 Mark II lets you combine two images on a single frame. You can also have the camera adjust the gain and show the first as a ghostly overlay as you line up the second. One file is recorded after the second exposure.
Moving on, the EM10 Mark II inherits the interval timer of the EM1, offering up to 999 frames at intervals from one second to a second shy of 25 (yes, 25) hours, and with an initial delay again up to a second short of 25 hours. You can choose whether to record just the images, or have the camera additionally create a movie from them afterwards at 720p, 1080p or, new to the EM10 II, in 4k. Note you’ll need to set the photo aspect ratio to 16:9 if you’d like the camera to subsequently encode a widescreen video.
Unfortunately the maximum frame rates reduce the usefulness of the in-camera timelapse movie generation: at 720p, 1080p and 4k, the maximum frame rate offered is 30fps, 15fps or 5fps, so only the first will deliver truly smooth playback. Of course you could simply import the still images into software later to create a timelapse movie at the desired resolution and frame rate, but it’s a shame Olympus can’t generate a timelapse movie in 1080p and 4k at smoother frame rates – it’s something all recent Lumix G cameras can manage.
Above: Download the original file (Registered members of Vimeo only). Sample movie filmed with the Olympus OMD EM10 Mark II using its Timelapse mode. I set the camera to take 100 photos at one second intervals, then generated a 4k UHD video at 5fps in-camera afterwards – this is the smoothest frame rate available if using the 4k resolution. I shot with the Olympus 75mm in Aperture Priority at 200 ISO and f2.2. Note there isn’t an option to crop the photos into a 16:9 aspect ratio, so if you’d like this shape for your in-camera time-lapse videos, you’ll need to remember to set the photo aspect ratio to 16:9 first. I did this and also set the focus manually to eliminate possible searching during the sequence.
On the upside, the EM10 Mark II boasts a number of handy and unique options for long exposure fanatics. First is the ability to dial-in a shutter speed as long as 60 seconds in Manual, which is often long enough for basic long exposure work without the need for any accessories. Panasonic also offers this on its Lumix G cameras, and I find it invaluable.
Turn the exposure dial beyond 60 seconds in Manual mode and you’ll be offered Bulb followed by Live Time and Live Comp, the latter introduced on the EM5 Mark II. Bulb works the same as a normal camera with the shutter staying open for as long as you have the release held down. Live Time is more considerate for those without accessories as it opens the shutter with one press of the release and keeps it open until you press it again – so you don’t need to keep the button held down throughout the entire exposure.
Of course for the best results you’ll not want to touch the camera to start and stop a long exposure, but the EM10 Mark II cunningly lets you get around this without the need for additional accessories by first either implementing an Anti Shock delay or self-timer to start the exposure, coupled with a preset exposure length. Again, like the EM1 and EM5 II before it, you can set the maximum exposure time to be 1, 2, 4, 8, 15, 20, 25 or 30 minutes, after which the camera will automatically end the exposure. This allows you to take very long exposures without the need for a cable release accessory.
What makes the Olympus cameras even more unique though are their Live Bulb and Live Time options which let you take regular peeks at the exposure on the screen as it builds-up to see how it’s getting on. This lets you stop the exposure early if it’s already perfect, or perhaps not going to work out. The interval between updates can be set to 0.5, 1, 2, 4, 8, 15, 30 or 60 seconds, and the maximum number of peeks depends on the ISO value: 9, 14, 19 or 24 times for ISOs of 1600, 800, 400 or Low respectively. Once you’ve used up your allocation of peeks, there’ll be no more, regardless of the exposure length. You can find the options to configure this in Custom section E.
During a long exposure, the actual exposure time is displayed like a digital stopwatch whether the Live update is enabled or not. If the Live update is enabled, then the screen will also show the image gradually appearing – like a developing photo – along with a brightness histogram that provides accurate feedback on the tonal range as it builds. The histogram updates its graph for every scheduled peek and it’s great fun to see it gradually move from left to right, filling the shadows, then the mid-tones and finally the highlights during a long exposure. The histogram is useful because the screen – especially when viewed in the typically dark conditions of a long exposure – is not always an accurate representation of the image. If you’re remotely controlling the camera over Wifi you can even view the mid-exposure peeks on your phone’s screen.
The ability to peek at a long exposure while it’s being recorded is innovative, fun and genuinely useful, but be aware it can come at the cost of slightly increased noise levels. That said, the impact is minor and it’s also the type of noise that’s effectively reduced in post production if necessary.
Here’s a two minute long exposure with noise reduction disabled at 100 ISO, using a Lee three Stop ND filter and a hard grad filter. I found it was possible to avoid noise artefacts without noise reduction if I kept exposures at two minutes or below and at the lowest sensitivity. As soon as the sensitivity was increased to, say, 200 or 400 ISO, or the exposure increased to three or four minutes, noise speckles would creep-in. These can be eliminated if you have long exposure noise reduction enabled, but you’ll need to stick around while a matching ‘dark frame’ of the same exposure time is captured.

Above: Olympus OMD EM10 Mark II Long Exposure: 120 seconds at 100 ISO without NR
Further extending the Live Time concept on the EM10 Mark II is the Live Comp mode, which you’ll find after Bulb and Live Time in Manual. This addresses the problem of long exposure photography where one portion could become over-exposed before another has started to register, or even appeared at all. For example when shooting fireworks, you may want to have the background nicely exposed, but it could become over-saturated as you wait for the perfect explosion. The same thing can happen when you’re light-painting. Wouldn’t it be nice to effectively stop one part of the exposure while you wait to complete another part?
Photographers have traditionally done this by taking two or more exposures and compositing them later, but the Live Comp mode attempts to do this entirely in-camera. First it exposes for the background, then it waits for any new light to appear in the composition. When new light does appear, such as a fireworks explosion or a new light painting, the camera will resume the exposure, but crucially only in the area where the new light is. This allows the frame to record the new area of light, without affecting the existing exposure underneath.
Here’s an example of Live Comp used for light painting, which I took at an Olympus event using the earlier EM5 Mark II; the artists were Zolaq. The mode was set to a five second cycle at f8 and 100 ISO, and the entire process took about five minutes to complete.
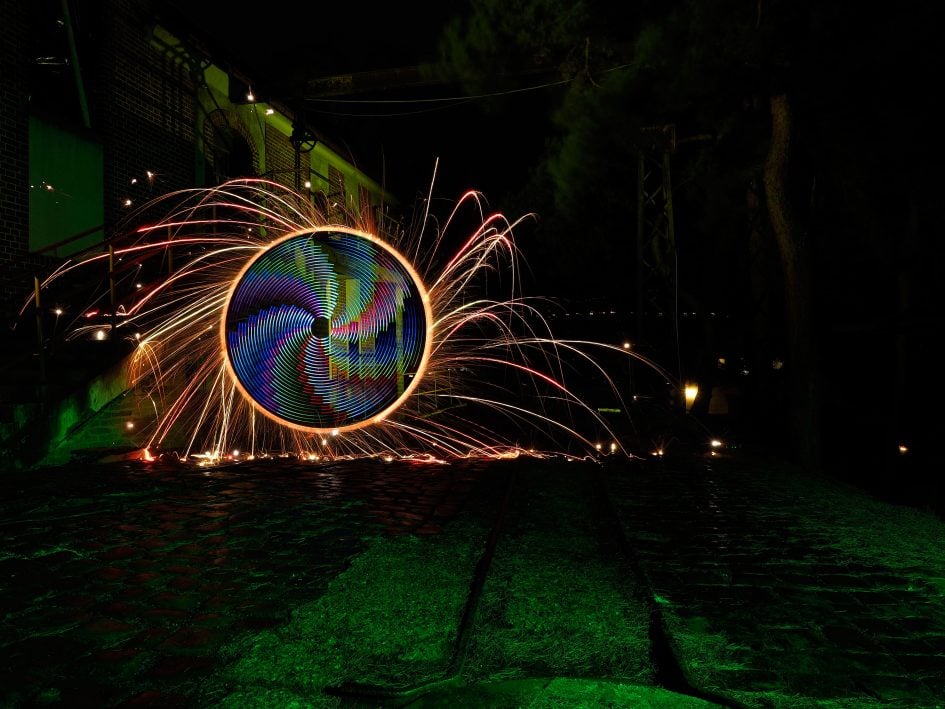
Above: Olympus OMD EM5 Mark II Live Comp
Switch the mode dial to SCN and you can choose from 25 different scene presets, three of which are designed for use with additional converter lenses. One of the presets is named Panorama, but this remains a panorama-assistance option which simply displays guides to help you line up each frame; unfortunately they still need to be stitched in separate software afterwards. Why is it such a challenge for Olympus and Canon to offer stitched panoramas in-camera? Sony and Panasonic have offered it for ages, and it feels very old fashioned to be forced to complete the process on your computer afterwards.
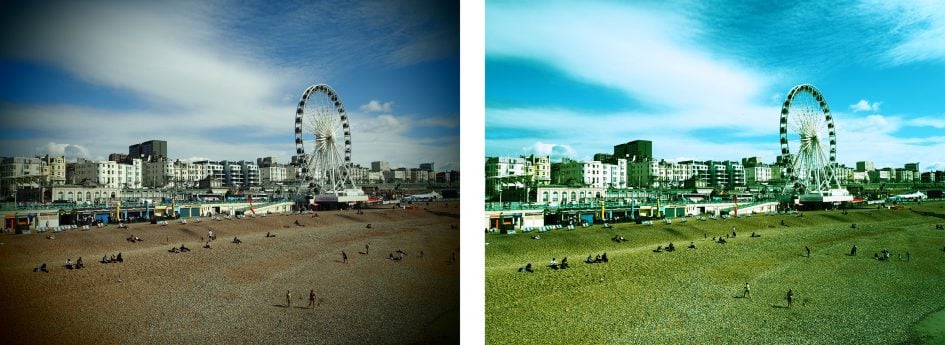
Moving on, the ART position on the dial lets you apply a selection of 14 different filters, and while Olympus may have fallen behind on auto-panoramas, it was one of the first to really dive into in-camera effects. You can choose from Pop Art, Soft Focus, Pale Light and Colour, Light Tone, Grainy Film, Pin Hole, Diorama (Miniature), Cross Process, Gentle Sepia, Dramatic Tone, Key Line and Watercolour, and new to the Mark II, Vintage and Partial Colour. Or as mentioned earlier, opt for the ART Bracketing mode which takes shots with all of them, or a pre-selected bunch. The good news is unlike many rivals, Olympus also supports recording in RAW+JPEG mode with ART filters, applying the effect to the JPEG, but leaving the RAW untouched in case you later decide for a different effect or none at all. Here’s some of the ART filters in action
Above left: Pop Art, above right: Grainy Film
Above left: Pin Hole, above right: Cross Process
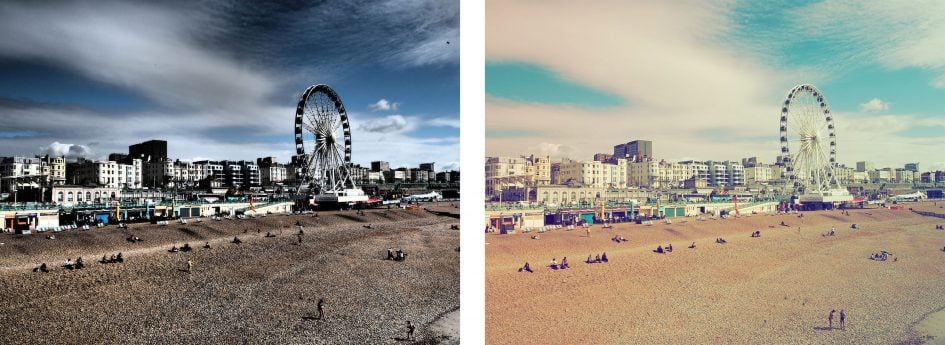
Above left: Dramatic Tone, above right: Vintage
Next there’s the Photo Story mode which arranges between two and five photos into frames on a single image. A selection of presets let you choose the frame layout, the final aspect ratio of the image, along with the style of the borders and the art filters applied to the photos within. Once you’ve chosen the desired preset, one frame at a time becomes live, allowing you to compose each shot in turn before then letting the EM10 Mark II composite them into a single image. Sensibly, if you’re shooting in RAW+ JPEG mode, the Photo Story effect is only applied to the JPEG, while the separate frames which make it up are saved as untouched RAW files, giving you the flexibility of using them without the effect later if desired. Here’s an example I took at Brighton’s Bond Street Coffee.
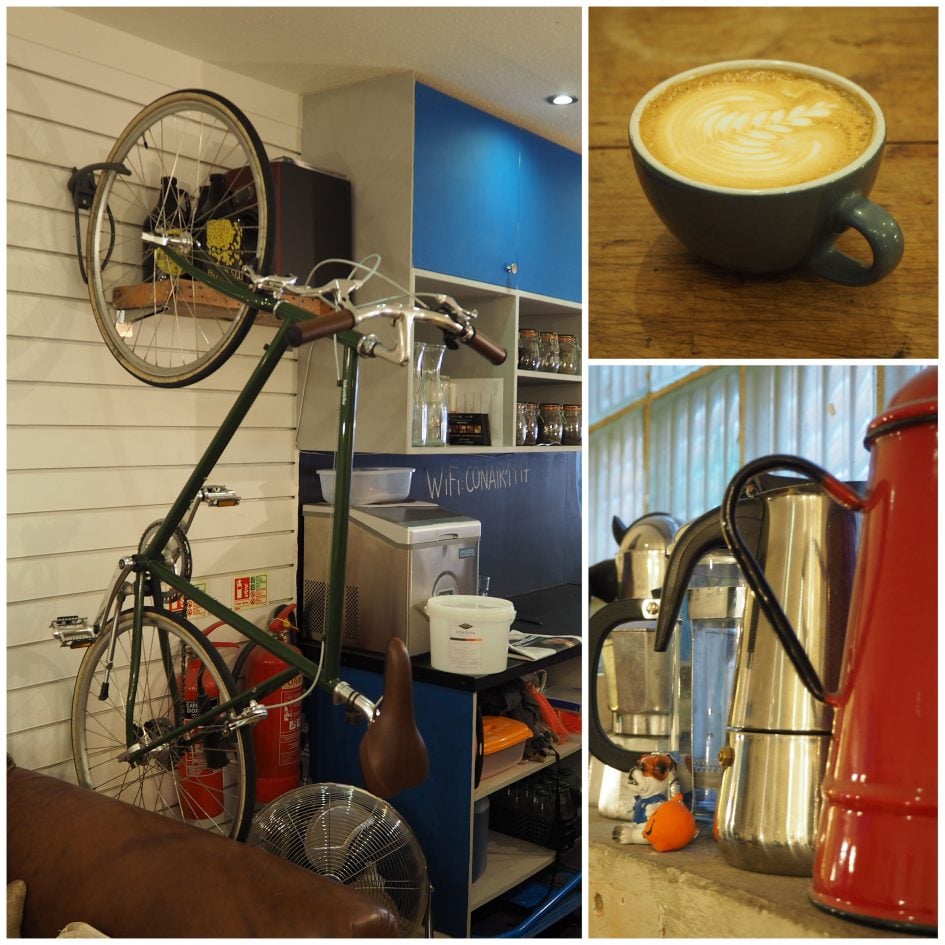
Above: Olympus OMD EM10 Mark II Photo Story
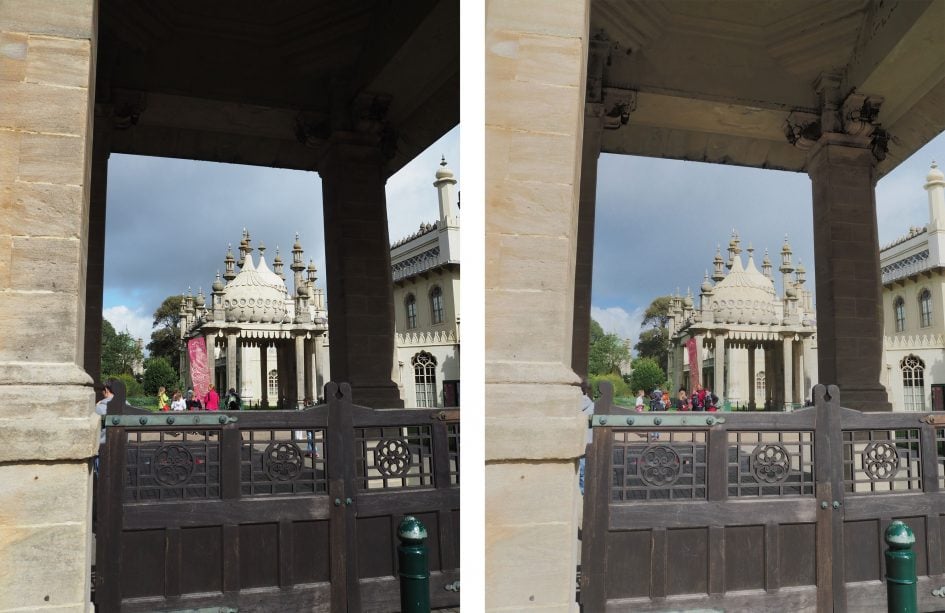
The EM10 Mark II also inherits the Keystone Compensation option of recent models which provides real-time correction of converging lines as you compose. There’s nothing stopping you from performing similar skewing after the event, but Olympus likes to offer the chance to do it in the field and I appreciate the chance. Inevitably there’s some cropping of the image and juggling of pixels, but it’s nice to be able to make these corrections in-camera as you compose. Here’s a handheld before and after shot to show you the kind of thing that’s possible with a wide lens pointing upwards.
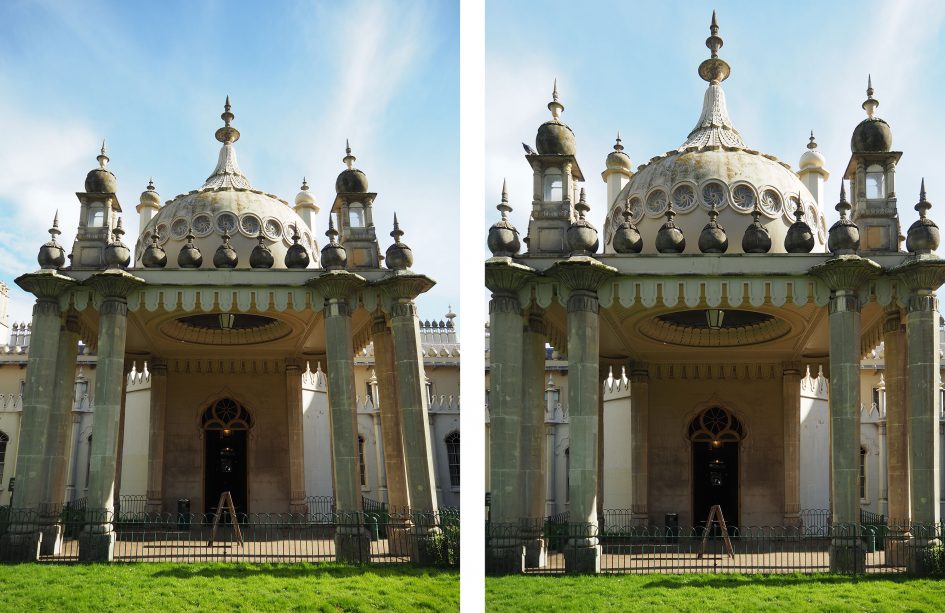
Above: Olympus OMD EM10 Mark II Keystone Compensation (disabled left, enabled right)
Olympus certainly enjoys finding new ways to exploit its hardware and develop innovative shooting options. The latest, debuted here on the EM10 Mark II, is Focus Bracketing which takes up to 999 shots at different focusing distances. The idea is to subsequently combine these in software to extend the effective depth of field. The process of focus bracketing and focus stacking is most popular in macro photography where at extremely close distances the depth of field is often too small to render the subject sharp from front to back. You could gradually close the aperture, but doing so will increase the effect of diffraction and may not even cover the desired range. But by capturing strips of sharp focus at different distances, focus bracketing and stacking can render the entire subject in sharp focus.
When you set the EM10 II to Focus Bracketing you get the choice of capturing between 3 and 999 frames at a focus differential of 1 to 10. The latter refers to how much the camera should adjust the focus and is proportional to the original subject distance – if it’s very close then the differentials are tiny, but if it’s more distant, then the differentials become broader. The goal is to use enough frames to cover the desired distance and to ensure the differential includes overlapping strips of focus so that the software can assemble a sharp image.
Once enabled, the Focus Bracketing mode switches the EM10 II to high speed capture and the electronic shutter. It starts at the current focus position and gradually focuses further away during the sequence, so you have to ensure you’re initially focused on the nearest part of the subject rather than its middle. A typical 100-frame burst takes about three seconds and during the capture you’ll see the band of focus gradually receding into the distance, hopefully reaching the end of your subject; some trial and error will be necessary. Also note the electronic shutter can be susceptible to banding from artificial lighting if you’re using shutters that aren’t evenly divisible by their frequency. Probably more annoying though is the fact you can’t trigger the process using a self-timer or over Wifi from the app, so to avoid touching and wobbling the camera you’ll need to use a cable release accessory.
Here’s three images I took of a simple macro still life arrangement using the EM10 Mark II and the Olympus 60mm f2.8 Macro lens; many thanks to Park Cameras in London for letting me try this out in their store. The first image is a single frame taken at f2.8 and the band of sharp focus is extremely narrow.

Above: Olympus OMD EM10 Mark II with 60mm Macro at f2.8, single frame, focused on middle
To increase the depth of field you can simply close the aperture down, but as you can see below, even at the minimum aperture of f22 the subjects aren’t sharp from front to back. Worse, the small aperture has resulted in softening of the overall image due to diffraction.
Above: Olympus OMD EM10 Mark II with 60mm Macro at f22, single frame, focused on middle
And so to the focus-stacked version below, consisting of 100 frames at a differential of two, while the lens was set to f2.8. I could have got away with fewer frames and larger differentials if the aperture had been closed to, say, f4 or f5.6, but I wanted to see what was possible with the aperture wide-open. I started each experimental burst with the focus reset to the nearest part of the subject and post-capture check the images to see if the rear was sharp in the final frames. I then imported the 100 frames into Helicon Focus (optional stacking software) and found the default Depth Map gave the best results.
Above: Olympus OMD EM10 Mark II with 60mm Macro at f2.8, Focus Stacked, 100 images
Focus Stacking is a fun addition to the EM10 Mark II and certainly a lot quicker and easier than adjusting a lens manually, not to mention more convenient than tethering a camera to a computer to perform the process for you. It’ll make the EM10 II attractive to macro and product photographers, although the facility will also be added to the EM1 and EM5 Mark II in a firmware update by the end of 2015; the EM1’s larger buffer will also allow it to perform a simple ten-frame stack in-camera too.
Olympus OMD EM10 Mark II focusing and continuous shooting
Like its predecessor, the OMD EM10 Mark II exclusively employs a contrast-based AF system. Like other recent Micro Four Thirds cameras from both Olympus and Panasonic, the single AF performance is excellent with the camera snapping-onto subjects extremely quickly and confidently, even in low light or at large apertures with a very shallow depth of field.
The EM10 Mark II’s contrast-based AF system, inherited from the EM1, can pick from a 9×9 array of 81 AF areas which cover most of the frame. You can have the camera automatically choose the most appropriate AF area or pick it yourself either individually or from a 3×3 zoned group.
As before you can adjust the size of a manually-selected AF area if desired, on the EM10 II between 5x, 7x, 10x or 14x. Like the EM1, you can also reduce the AF area size for pinpoint accuracy, although beware like the models before it the AF system can slow down with smaller AF areas.
Like all OMD cameras, you can alternatively tap the touchscreen to move the AF area wherever you like, again within a region that extends across the entire frame. I personally find this incredibly useful and as described earlier a new AF Targeting Pad option lets you use the touch-screen to reposition the AF area while composing through the viewfinder. Since this demands a prolonged drag, it avoids the problem on Lumix G models where a brief tap of your nose can inadvertently move the AF area. You can disable this if preferred or indeed eschew the touchscreen altogether, instead adjusting the AF area by hand by pressing the four cross keys – this feature is enabled straightaway, so there’s no need to go into a menu first, a bug-bear I have with many rival cameras.
A highlight of the Olympus contrast-based AF system is the face detection which goes beyond the usual framing of a human face to also lock-onto the eye and focus on that. As before you can have the camera go for the left eye, the right eye, or best of all, the nearest eye in the shot. And you know what? It really works. I use the nearest eye detection for all my people shots with Olympus cameras and even when using bright primes with a very shallow depth of field (such as the Nocticron 42.5mm f1.2), it almost always nails it; the only times it misses slightly are when the subject moves or blinks as you take the shot. It’s brilliant for taking shallow depth of field shots of impatient kids too.
So far so good, but like previous OMD bodies, the contrast-based system struggles when it comes to continuously tracking a subject approaching or receding at speed. It doesn’t matter whether you manually position an AF area over the subject or use the CAF with Tracking option to lock-on and follow it – the problem is the AF system just can’t refocus very quickly.
I tested the OMD EM10 II with a variety of lenses, including the kit zoom and the 45mm f1.8 and 75mm f1.8 primes, and found it could handle subjects moving at a leisurely speed towards or away from you when set to its lower continuous shooting speed of 4fps; think jogging or slow cycling. But any faster and it struggled to keep them in focus for more than a few frames in a burst.
This continues to be a challenge for Micro Four Thirds cameras from both Olympus and Panasonic. In my tests the Depth by Defocus technology of Panasonic’s latest Lumix G bodies, like the G7, delivered slightly more confident performance, but still falls below systems with embedded phase-detect AF points, like Sony’s A6000 and A5100, or Fujifilm’s XT10 (the latter only in the middle though). Conversely, Sony’s and Fujifilm’s AF system isn’t as quick as Olympus or Panasonic in Single AF, nor as good in low light, so there’s no perfect system. As always it pays to buy the model that best-suits your subjects and style of photography.
In terms of Continuous Shooting, the EM10 II offers two speeds: High at 8.5fps and Low at 4fps, with Olympus quoting a maximum of 22 RAW files or JPEGs limited by memory only.
To put it to the test I fitted the EM10 II with a freshly-formatted UHS-I card and set the shutter to 1/500 and the sensitivity to 400 ISO. Set to Continuous High and Large Fine JPEG, I fired-off 41 shots in 4.84 seconds for a rate of 8.47fps before the speed slowed. Set to RAW, I managed 18 frames in 2.02 seconds for a rate of 8.91fps before the buffer needed to clear.
So the EM10 Mark II can certainly deliver a high frame rate and over a sufficient period to satisfy most situations, but again it’s let down by modest Continuous autofocusing capabilities which, as explained above, don’t even deliver a full hit-rate at the slower burst speed. This rules it out – or at least makes it frustrating – when photographing subjects moving towards or away from you at speed, but it’s fine for subjects where the action takes place at roughly the same distance – such as skateboard, bike, board or acrobatic tricks.
If you like to manually focus, or use lenses from other systems, the EM10 Mark II offers a number of tools to make your job easier. First is magnified assistance which can be set to kick-in as soon as you turn the manual focusing ring on native Olympus or Panasonic lenses; once in magnified view you can adjust the magnification to 3x, 5x, 7x, 10x or 14x, and also scroll around the frame if required.
The EM10 Mark II also inherits focus peaking from earlier models which surrounds the subject in focus with a red highlight, allowing you to quickly identify whether the lens is focused correctly or not. It’s particularly helpful when also working in the magnified view, and it also works fine with third party lenses. Note when using non-native manual focus lenses, you’ll need to assign peaking to one of the function buttons as it won’t start automatically as it does with native ones.
The EM10 Mark II also offers AF / MF hybrid modes where the camera autofocuses with a half-press of the shutter, but allows you to make manual focusing adjustments (again with a magnified view and or peaking if enabled) with a turn of the focusing ring. I found the Single AF + MF mode worked well, using the AF to quickly find the subject before allowing you to fine-tune or confirm if necessary.
It all adds up to a very satisfying manual focusing experience, and while peaking is not available in different colours I am pleased to report Olympus allows you to use it while filming video – a very useful upgrade over older models which didn’t offer it.
Olympus OMD EM10 Mark II Wifi
The EM10 Mark II is equipped with Wifi which allows you to wirelessly transfer images and remote control the camera using a free app on iOS or Android smartphones, or tag photos with a GPS log, again made by the app on your phone. The implementation, as far as I could see, was the same as on the EM5 Mark II.
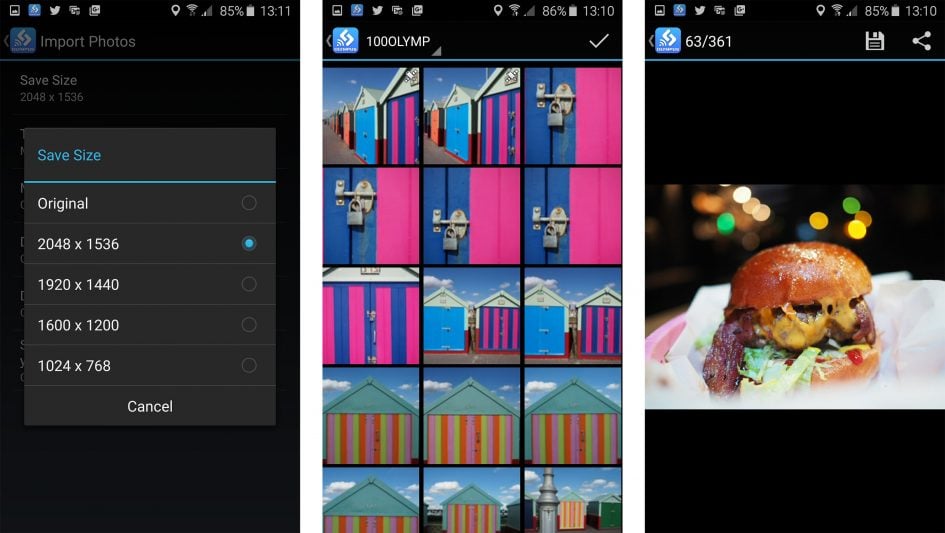
To get started, install the free Olympus Share app on your phone or tablet; it’s available for iOS or Android devices and I tested the latter on my Samsung Galaxy S6. Next tap the Wifi icon in the top right corner of the screen (you may need to press the info button to see it), then the EM10 Mark II will display a QR code on-screen.
If the camera and phone have not yet been paired, then simply start the Olympus app and point the phone’s camera at the camera’s screen to scan it – I’m impressed at how quickly this works with the app getting the information it needs just as you begin to point your phone at the QR code. From this point on the scanning process shouldn’t be necessary. Starting the Olympus app will fire-up Wifi and look for the signal from a camera it’s already paired with and simply connect to it. I’d previously been impressed by the touch-pairing of NFC on Panasonic and Sony cameras, but this is as easy and possibly quicker too.
Once connected the app offers four main options: Remote Control, Import Photos, Edit Photo and Add Geotag. I’ll cover each in turn. Tapping Remote Control lets you see a live image from the camera and refocus it by tapping on your phone or tablet’s screen. Impressively you can remotely change the exposure mode between Program, Aperture Priority, Shutter Priority, Manual, iAUTO, ART and movie without touching the camera’s mode dial. Depending on the selected mode, you can then tap to adjust the shutter speed, aperture, exposure compensation, ISO and white balance, along with changing the drive mode, and of course triggering the exposure. If desired you can also dial the shutter speed in Manual all the way to Live Time and if previews are enabled on the camera you can view the peeking during the exposure on your handset’s screen.
The app also allows you to configure a basic interval timer or trigger a movie recording. The interval timer is more like an advanced self-timer, taking no more than ten shots at intervals no greater than 12 seconds, but it’s still a handy update, and you can also configure it to capture bursts or movies instead if preferred. If you choose to record movies remotely with the camera you can’t touch the screen to reposition the AF area or pull-focus – something that is possible on Panasonic Lumix G cameras.
The second option on the app is to Import Photos and pressing it displays a thumbnail view of the card’s contents which you can scroll through. Tapping a photo displays it full-screen, after which you can pinch to zoom-in for a closer look, albeit not at the maximum resolution. If you like what you see you can save the image to your handset by tapping the floppy disk icon, or share it using the sharing icon alongside – of course once it’s saved onto your handset you can also share it later. In the separate settings page you can choose to import images for saving or sharing at 1024×768, 1600×1200, 1920×1440, 2048×1536 or their original resolution. I had no problem copying JPEGs from camera to phone, although RAW files aren’t displayed in the thumbnail view; note movie clips are shown and fofer a download option, but I never got the process to work with my S6.
Choosing Edit Photo lets you perform a number of adjustments on images that have already been copied onto your handset. You can apply Art Filters, superimpose text, logos, even signatures written on your phone’s touchscreen, and play around with composite Photo Story arrangements.
Finally the Add Geotag option does what it says on the tin by tagging photos with positional information recorded by your phone. For this to work, you first need to switch on the Geotag feature from the app, and if desired, change the logging frequency from the default 60 seconds. After that the app will dutifully record your position at the preset intervals until you’re ready to sync them with the images on the camera.

The actual tagging is a very easy process: if it’s enabled the app will actually offer to tag your photos as soon as the phone and camera are next connected over Wifi. The process is fairly quick too, and the app can additionally plot a log on a Google map, although you may need to disconnect from the camera to load the map details from the internet.

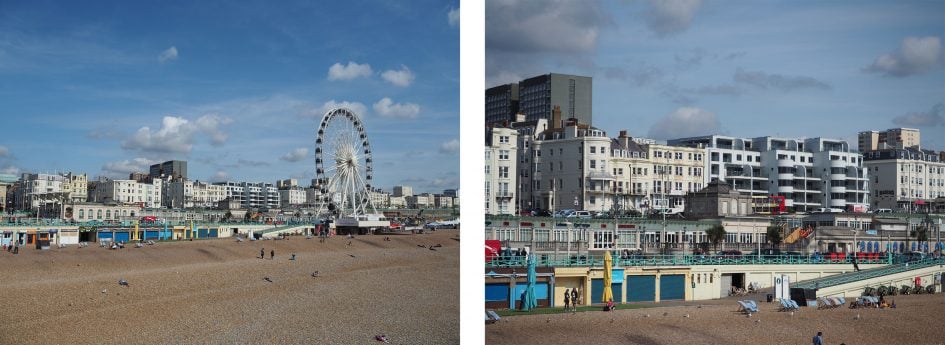
In the example above I embedded the position of these beach huts in Hove using the Geotag option, then entered the co-ordinates into Google maps. Like other GPS solutions which rely on your phone, you’re at the mercy of the accuracy of that device – I found my phone generally maintains an accurate position when carried in my pocket, but for absolute accuracy during a shoot you may prefer to keep your phone in the top of a backpack.
Olympus OMD EM10 Mark II movie mode
The Olympus OMD EM10 Mark II inherits most of the movie capabilities of the EM5 Mark II, which in turn makes it more capable than the original EM10. Previously you could only shoot 1080p at 30fps. Now the EM10 Mark II offers the choice of 24, 25, 30, 50 or 60p frame rates (regardless of region). Support for 4k is limited to the Timelapse mode which only offers UHD at 5fps, but at least there’s now more than one frame rate for 1080p.
You can film in Program, Aperture and Shutter Priority or full Manual. In PAS modes the ISO is set automatically, but in Manual you can set the sensitivity yourself; note there isn’t an Auto ISO option when the movie exposure mode is set to Manual though.
Taking a leaf from Panasonic, a pop-out tray on-screen allows you to make silent adjustments to the aperture, shutter, ISO, audio levels, or zoom on lenses which are motorised. The options change depending on your selected exposure mode.
You can set the focus to single or continuous, the latter supporting focus-pulling using the touch-screen. Focus peaking is also supported while filming which makes manual focusing much easier.
Audio is recorded using the built-in microphone sonly – sadly there’s no external microphone input on the EM10 II, nor a port on any of the optional accessories.
Stabilisation is available from the five-axis sensor-shift system, supplemented if desired by additional digital stabilisation, albeit at the cost of some cropping. Speaking of which, if you’re filming without stabilisation or with sensor-shift stabilisation only, there’s no crop when comparing the coverage of video and stills. Which now leads me to a selection of clips showing the performance in practice.
Above: Download the original file (Registered members of Vimeo only). Sample movie filmed with the Olympus OMD EM10 Mark II. I also have a version filmed with the higher quality Lumix 25mm f1.4 prime – see my Olympus OMD EM10 II with 25mm sample.
Above: Download the original file (Registered members of Vimeo only).
Above: Download the original file (Registered members of Vimeo only). Sample movie filmed with the Olympus OMD EM10 Mark II. I also have a versions filmed at 3200 and 6400 ISO, see my Olympus OMD EM10 II sample movie at 3200 ISO and Olympus OMD EM10 II sample movie at 6400 ISO.
Above: Download the original file (Registered members of Vimeo only).
Above: Download the original file (Registered members of Vimeo only).
Above: Download the original file (Registered members of Vimeo only).
Olympus OMD EM10 Mark II sensor and processing
The Olympus OMD EM10 Mark II is equipped with a 16 Megapixel sensor that’s described as being similar to its predecessor, although details of any differences are not published. The resolution’s certainly the same, as is the absence of an optical low pass filter and the continued absence of embedded phase-detect AF points.
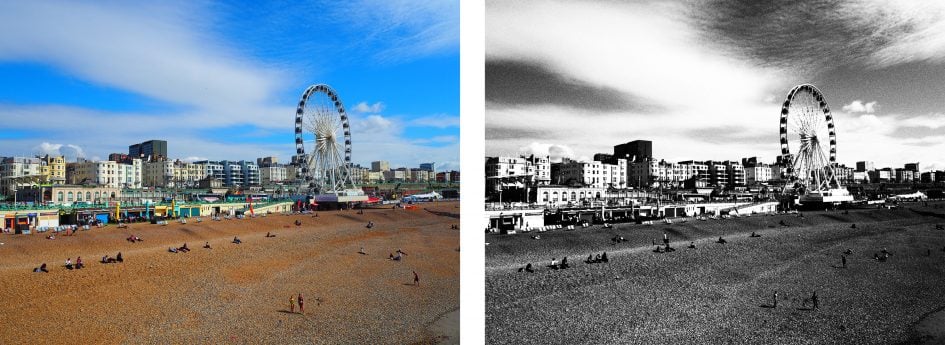
So yet another generation Olympus has stuck with 16 Megapixels as its native resolution, which continues to rank Micro Four Thirds amongst the lowest resolution of all the current system cameras. Is this a problem? Personally speaking I’m completely at peace with this resolution, having shot most of my personal photography with 16 Megapixel Micro Four Thirds bodies for many years now. Not once have I wished for higher resolution files or had anyone commenting on their lack of detail – indeed most seem to notice the sharpness in the corners due to excellent optics before anything else. But at the same time I know it proves off-putting for owners of higher resolution models who are considering a switch. It may involve a reduction in ultimate resolution and equally implies this is as far as the format is going in this respect. It’s something you’ll have to decide for yourself, although again if it offers any reassurance, I find the combination of 16 Megapixels and the excellent Micro Four Thirds lens catalogue a very satisfactory combination. Indeed I typically resolve more detail with an OMD fitted with a decent lens than a 24 Megapixel APSC camera fitted with an average lens.
In terms of image quality options, the EM10 II lets you record JPEG files at one of four quality settings. The clever part is you can configure the quality settings of these four options from a choice of three resolutions (Large, Middle, Small) and four compression levels (Super Fine, Fine, Normal, Basic); so if you like, all four JPEG options could be at, say, the maximum resolution but with different compression levels, or you could go for different resolutions, but all with the mildest compression applied. You can even customise the resolution of the Middle and Small options, with the choice of four for the former and three for the latter. As I’ve said throughout, Olympus doesn’t skimp on the degree of customisation.
Suffice it to say you can also record RAW files with or without an accompany JPEG, although RAW files are always at the maximum resolution and there’s no compression options for them. Using the default settings, Large Fine JPEGs typically measure between 6 and 8MB each, while RAW files weigh-in at around 15MB each.
The native aspect ratio is 4:3, so squarer than the 3:2 shape of most rival formats. You can alternatively record in 3:2, 16:9, 1:1 or 3:4 shapes if preferred, although all involve cropping the original image. I’m fond of the native 4:3 shape as it’s a close match for the classic 10x8in print size, and also works very well when composing in the portrait orientation.
The Picture Mode menu applies the contrast, sharpness, saturation, gradation and any monochrome filters as a series of presets or custom options. I used the default Natural mode for most of my test shots and found the typical Olympus colour is alive and well – indeed and I found out-of-camera JPEGs from the EM10 Mark II to be extremely satisfying, so much so I rarely processed RAW files unless I wanted to change the white balance, significantly modify the exposure or achieve an unusual effect. The concept of relying on JPEGs may be abhorrent to some enthusiasts for whom RAW seems to be the only option, but Olympus processes them better than most, and if you opt for minimal compression the EM10 II, like its predecessors, simply records great looking images with little or no intervention. You can see a broad range of examples in my samples page.
As with all Live View systems, any image parameters can be previewed immediately on-screen. In terms of White Balance there’s Auto, seven presets, four one-touch options and the ability to manually set the colour temperature from a scale of 2000-14000K. Highlights and shadows can be adjusted using a tone curve.
Finally, the sensitivity is available between 200 and 25,600 ISO, with an additional Low option, equivalent to 100 ISO. While the base sensitivity remains 200 ISO – and that’s the best option to record the broadest dynamic range – I welcome the inclusion of a Low option. If you’re shooting under bright conditions and want to open the aperture or select slower shutters to blur motion, a lower sensitivity option is always helpful.
Right, that’s enough talk, it’s time to check out my results and comparisons. Check out my quality and samples pages, or skip back to my verdict.