The D5200 is a solid upgrade to Nikon's upper entry level model and a real advance in a number of key areas. Its AF and metering systems were previously only available on the next model up the range - the D7000 and it has a brand new 24 Megapixel sensor that defies expectations where noise performance is concerned, delivering superior results to its main competitor, the Canon EOS Rebel T4i / 650D.
Nikon D5200 review
-
-
Written by Ken McMahon
Intro
The Nikon D5200 is the company’s latest ‘upper entry-level’ DSLR, aimed both at beginners and those looking for a step-up from a basic budget model. Announced in November 2012, it comes just over a year and a half after its predecessor, the D5100. It’s positioned between the entry-level D3200 and the mid-range D7100, and goes head-to-head against Canon’s EOS T4i / 650D.
Externally the D5200 is virtually indistinguishable from its predecessor, with the only control change being a new drive mode button on the top surface. Like the D5100 before it, the main screen remains fully-articulated and hinged on the side, sporting the same 3in / 921k panel.
The big changes take place under the hood. The D5200 is equipped with a 24 Megapixel CMOS sensor, not the same Nikon-designed sensor as in the D3200, but a newly designed chip from Toshiba, something we’ve not seen before in a Nikon DSLR. The D5200 inherits the D7000’s 39-point AF system with nine cross-type sensors, along with the same 2016 pixel RGB metering system with scene detection. It also features 1080p movies with a new 50/60fps interlaced mode, built-in stereo mics, 5fps continuous shooting, a two-shot in-camera HDR mode, and additionally supports the optional Wifi and GPS accessories.
Nikon describes the D5200 as being for ‘advanced amateurs’ and it’s pretty astonishing what you get in a ‘one up from basic’ DSLR like the D3200. But the Canon EOS Rebel T4i / 650D is similarly priced and offers a comparable level of features and handling with some notable differences that go beyond the obvious resolution and AF system. Read on to discover which of these two advanced entry level models provides the balance of handling, features and value for money.
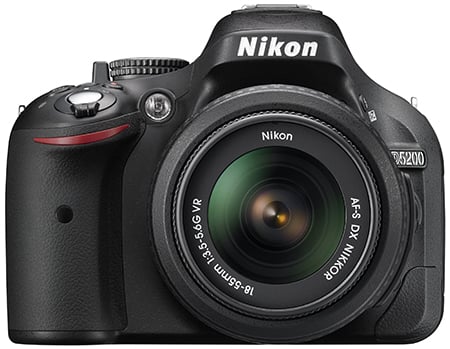 |
Nikon D5200 design and controls
The D5200 bears more than a passing resemblance to the D5100 it replaces and from a casual glance you’d be forgiven for assuming they were identical. In fact there are some minor differences to the D5200 body styling, which looks a little more sculpted. The D5200 is available in black, red or brown and though I’m not a fan of the glossy plastic finish it looks stylish if not particularly durable.
For a DSLR, the D5200 is relatively compact. For the record, the dimensions are 129x98x78mm and it weighs 555g without the lens attached but with the battery and an SD card fitted. That’s no more than a millimetre difference in any dimension than the D5100 and only 5g heavier. The Canon EOS Rebel T4i / 650D measures 133x100x79mm and weighs 575g including the battery and a card; though it’s a little heavier and marginally larger I actually preferred the feel of the EOS body in my hand. It has a more ergonomic design, particularly at the rear where there’s a much larger thumb space providing a better grip. This is, of course, a personal view and as always it’s a good idea to get some hands on time with both models before committing yourself to a purchase.
Add the respective kit lenses and the size and weight difference is further exaggerated. Of course for a smaller, lighter and cheaper package, not to mention a fairer comparison, you could alternatively buy the T4i / 650D with the EF-S 18-55mm kit lens, but as a non-STM model it lacks the quick and quiet movie AF of the EF-S 18-135mm STM and 40mm STM models.
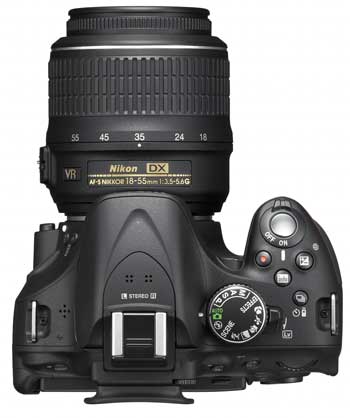 |
The control layout of the D5200 is almost identical to that of its predecessor, with only one significant exception and that’s the addition of a drive mode button, or as Nikon calls it, release mode button, to the right side of the top panel. There’s no change to the triumvirate of buttons – movie, exposure compensation and info – immediately behind the shutter release and the new button neatly occupies the space immediately behind them. Press it and the release mode menu provides access to continuous shooting, self-timer and remote functions. Compared with the Canon EOS T4i / 650D the D5200 feels under-equipped with options for direct access to settings like image quality, white balance and ISO sensitivity, though the redesigned menu system has resulted in some improvement. I’ll talk about that in more detail in the handling section a bit later. The other thing it lacks by comparison with the EOS T4i / 650D is a depth of field preview button.
The other tell-tale difference between the D5200 and its predecessor when viewed from the top is the presence of two small grilles located forward of the hotshoe and behind the pop-up flash unit. Marked L and R these are the D5200’s built-in stereo microphones.
The rear of the D5200 looks virtually identical to its predecessor and is mainly occupied by the same 3 inch 921k dot articulated LCD screen. As before, this is side-hinged allowing flexible positioning in any direction including forwards facing for self-shooting and folding inwards for protection when not in use.
Otherwise the control layout is identical with a slight redesign of the rear ‘Multi-selector’ control which is more dished in shape with eight, rather than four cardinal points. Unlike the EOS T4i / 650D, this eight-way controller lacks secondary direct functions. Its only job in addition to menu navigation is selecting the AF area. As before, the D5200 has two IR remote receivers, one on the back next to the menu button and one mounted in the front grip.
On the right side of the body (as it’s held for shooting) you’ll find an SD memory card slot that’s compatible with SDXC standard in addition to SD and SDHC. Cards rated as Class 6 or faster are recommended for movie recording.
 |
On the left side of the body are four ports behind a large flap. Like its predecessor you’ll find a combined USB and analogue AV output, a Mini HDMI port, a 3.5mm jack to connect an external microphone and the proprietary connector for the optional MC-DC2 wired remote and GP-1 GPS. The D5200 also accepts the WU-1a wireless mobile adapter which attaches to the USB port. The WU-1a allows you to control the D5200 remotely and transfer images using a smartphone. I tested it with the D5200 and you can find out how I got on with it in the Wi-Fi section below.
In a compartment underneath the body you’ll find the rechargeable EN-EL14 Lithium Ion battery pack first introduced with the D3100, rated at 1030mAh and good for around 500 shots under CIPA conditions. Though fewer than the 660 of the D5100 it still comfortably out-reaches the Canon EOS T4i / 650D with 440 shots.
These figures don’t however take Live View, movie recording, continuous AF, VR lenses or even RAW recording into consideration, In general-use I found I could easily deplete the battery after a good day’s shooting; heavy use of video in particular drained the battery as did using the WU-1a wireless mobile adapter, although to be fair, the D5200 is no different to most in this regard. Battery life is shown on-screen using a three segment indicator, but unlike higher-end models in the range, there’s no menu showing a precise percentage of remaining charge. If you want to carry extra power with you the options are limited to popping a spare in your camera bag; Unlike the Canon EOS T4i / 650D the D5200 doesn’t offer a battery grip as an optional extra.
The Nikon D5200 is equipped with both a popup flash with a Guide number of 12 and a hotshoe for external flashguns; the maximum sync speed is 1/200. Flash compensation and power level is adjustable, and you can also choose from red-eye, slow-sync and rear-curtain options. The built-in flash Guide number increases to 13 with manual control, which matches that of the Canon EOS 650D / T4i. The D5100’s built-in flash can either popup automatically or by pressing a button on the side of the head, and once you’re finished with it, you can just push it back into place. If you mount a compatible flashgun like the SB-400, SB-600, SB-700, SB-800 or SB-900, the D5100 can support the Nikon Creative Lighting System (CLS) which offers iTTL and wireless control.
Nikon D5200 viewfinder and screen
The Nikon D5200 employs a penta-mirror optical viewfinder with the same specification as its predecessor and the D5000 before that: 95% coverage with a relatively small 0.78x magnification. The Canon EOS T4i / 650D shares the same coverage, although a larger 0.85x magnification. This sounds like a clear win for the Canon, although thanks to its fractionally smaller sensor, the difference isn’t as great as it at first sounds. With both cameras side-by-side you will notice the EOS T4i / 650D’s optical viewfinder delivers a slightly larger image area.
 |
The D5200’s AF system has been upgraded from its predecessor’s 11-point system to the same 39-point system used in the earlier ‘higher end’ D7000. In use AF points are indicated by square markers and the on demand grid display, which was dropped on the D5100, is reintroduced.
Below the screen the exposure information is indicated with green seven-segment LED style graphics. As before, the remaining card capacity is indicated by default with the option to switch it for a more useful ISO readout. With the increasing availability of relatively inexpensive high capacity SD cards I think most people will be happy to live without the permanent display of the number of shots remaining.
The D5200 is equipped with the same 3 inch 921k dot LCD as its predecessor. It’s the same size as the 1040k dot screen on the EOS T4i / 650D (albeit a squarer 4:3 shape) and is likewise hinged at the side so you can flip it upwards, downwards, forwards or in on itself for protection when not in use. But the D5200 screen lacks a couple of very important features which have a major impact on handling. The first is that it isn’t touch sensitive and there’s simply no arguing with the fact that the touch-screen on the EOS T4i / 650D makes it a much better camera from the handling perspective. Given Nikon’s often inaccessible menu structure and the D5200’s relative lack of button access to features a touch screen could have had a similar positive impact on handling.
The lack of a proximity sensor on the viewfinder is another shortcoming as the info display remains on and visible in your peripheral vision when you have your eye to the viewfinder. It’s pretty distracting even in good light and worse indoors and at night. It’s possible to turn off the auto info display from the menu, but then every time you want to check your settings you have to press the info button to display them, then again to turn it off – a lot of faffing around compared with the EOS T4i / 650D which automatically kills the LCD display when you put your eye to the viewfinder.
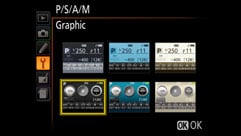
On a more positive note, the info display itself has undergone a major revision with the both the design and navigation now more readable and more accessible. There’s still the option of classic or graphic displays in a choice of three colours, but the layout has been revised with the main control settings arranged in a grid along the bottom rather than a long list up the side. ISO sensitivity is also added to the exposure controls in the centre of the display which is a big improvement. I’ll go into more detail about the info display and menu settings in the handling section below.
Nikon D5200 lens and stabilisation
The Nikon D5200 has an F-mount which can accommodate most Nikkor lenses, with the DX-format sensor resulting in their field of view being reduced by 1.5 times; so the DX 18-55mm VR kit lens delivers an effective focal range of 27-83mm.
As with all Nikon DSLRs, you’ll need recent lenses to support the full focusing and metering modes. There’s a compatibility chart on page 199 of the D5200 manual (a paper booklet rather than the more usual PDF) or specification sheets, but just briefly you’ll need a Type G or D AF (including AF-S and AF-I) Nikkor to support all functions including the most sophisticated 3D Colour Matrix Metering II system.
Nikon D5200 AF-S Nikkor 18-55mmcoverage wide |
Nikon D5200 AF-S Nikkor 18-55mm
 coverage tele | |
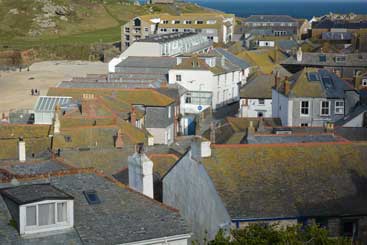 | ||
| 18-55mm at 18mm (27mm equiv) | 18-55mm at 55mm (83mm equiv) |
Like the D3000, D3100, D3200, D5000 and D5100 before it, the D5200 does not feature a built-in motor required to auto-focus older lenses. These lenses will still work on the D5200, but they become manual-focus only. The D5200 will only auto-focus with AF-S or AF-I CPU lenses from the Nikkor range. If you want autofocus from third party lenses, look for models with built-in focusing motors like Sigma’s HSM series.
Like its predecessors, Nikon omitted the AF motor to save size, weight and cost, and while its absence will frustrate enthusiasts who want to use older lenses, it’s less of an issue for the D5200’s target audience which will mostly buy newer AF-S models. The Nikon D5200 is typically sold in a kit with the Nikkor DX 18-55mm VR lens. The VR stands for Vibration Reduction and provides the lens with anti-shake capabilities which you can see through the viewfinder, although with a longest equivalent focal length of 83mm, any wobbling isn’t that obvious.
To test the effectiveness of the 18-55mm kit lens’s VR stabilisation on the D5200 I zoomed it to its maximum 83mm equivalent telephoto focal length and took a sequence of shots in Shutter priority mode at progressively slower shutter speeds first with stabilisation off and then turned on. As you can see from the 100 percent crops below, the Vibration Reduction system is capable of eliminating camera shake down to 1/10th – about three stops slower than conventional wisdom suggests.
Nikon D5200 VR
 Off/On | ||||
 | ||||
100% crop, 18-55mm 100 ISO 1/10th VR. Off. | 100% crop, 18-55mm 100 ISO 1/10th VR. On. | |||
Nikon D5200 shooting modes
The Nikon D5200 shares the same exposure modes as its predecessor; the main dial offers the traditional PASM modes, along with direct access to five scene presets, flash off, full Auto (with scene detection in Live View, see screenshot right), a SCENE position which presents access to 11 further presets, and an EFFECTS mode, first introduced on the D5100. There’s no movie mode position on the dial as you can start shooting in any mode by simply entering Live View then pressing the red button by the shutter release.
The D5200 offers shutter speeds between 1/4000 to 30 seconds with a Bulb option in Manual; Program Shift is also available. Exposure compensation is available in a broader than average range of +/-5EV, and basic bracketing is offered with three frames in steps between 0.3 and 2EV, but at least it is available as the D3200 has none. White Balance and Active D-Lighting bracketing is also available.
The Nikon D5200 shares the same three metering modes as the D3200 and D5100 before it: Spot, Centre-weighted and 3D Colour Matrix II, the latter employing the same 2016 pixel RGB sensor used in the D7100. This is an upgrade from the 420-segment RGB sensor used in its predecessor and also in the D3200.
Like most settings on the D5200, these are adjusted through the main information screen system. Note you’ll need a type G or D lens to deliver distance information for the 3D system, otherwise the D5200 falls back on Colour Matrix Metering II. I found 3D Matrix metering on the D5200 delivered consistently accurate exposures, and refreshingly unlike many Nikon DSLRs I’ve tested, wasn’t fooled by extremely bright scenes like our outdoor resolution test.
Active D-lighting, has six positions, Off, Auto, Low, Normal, high and Extra high, compared with just two positions on the D3200, It enhances the tonal range to retain detail in the shadow and highlight regions. D-Lighting can also be applied by post processing images in-camera via the Retouch menu in which case you have the choise of three settings. As you can see from the sample images below, with ADL off on the left and set to Extra high on the right, Active D-lighting enhances shadow detail in scenes with a wide tonal range and, to a lesser extent, reduces blown highlights, but the effect is quite subtle, even on the Extra high setting. As such I can’t see any reason you wouldn’t leave it in the default Auto position, unless noise was a factor.
Nikon D5200 Active D-lighting off / Extra high | ||||
 |  | |||
Program Auto 100 ISO f4 1/60th ADL off. | Program Auto 100 ISO f4.5 1/80th ADL Extra high. | |||
 |  | |||
Regardless of your shooting mode, the D5200 is a very friendly camera. Like its predecessor, the D5200 has sensibly retained the context-sensitive help system which displays handy hints on the current setting or menu whenever you press the Question mark button. Sometimes you’ll see the question mark blinking in the corner of the screen, in which case the D5200 believes something’s wrong and wants to make a suggestion, such as to use the flash. If only all cameras were this friendly.
Like the D5100 before it, the D5200 is equipped with an interval timer for shooting time-lapse sequences. The Interval Timer triggers the camera at pre-set intervals; you can choose the number of shots, the interval between them, and also delay the starting time if desired. I wish all cameras had this built-in. If you want Intervalometer facilities on the Canon EOS T4i / 650D, you’ll need to connect it to a laptop and use the supplied EOS Utility. So while the EOS T4i / 650D can be interval-timed free-of-charge by the supplied EOS utility, you’ll need to have a laptop connected, whereas it’s all built-into the D5200 without any accessories required.
Nikon D5200 HDR mode | ||||
 |  | |||
Off | Normal | |||
 |  | |||
High | Extra High | |||
The D5200 has a new HDR mode which combines two exposures to produce a single image with a wide range of tones for high contrast subjects. As with Active D-lighting there’s a choice of Low, Normal, High, Extra High and Auto settings. Above you can see my church test scene shot at 100 ISO first with a single exposure then in HDR mode at the Normal, High and Extra high settings. HDR manages to retrieve some highlight detail but at the higher settings it’s the shadows that benefit the most.
Nikon D5200 movie modes
The D5200 inherits the 1080p and 720p modes of its predecessor at 24, 25 and 30fps and introduces a new 1080i mode at 50 or 60fps (depending on region) which uses a central crop of the sensor area. As on Canon DSLRs the 24fps options are always available, but you’ll only see either 25 or 30fps options depending on whether you’ve got the video mode set to PAL or NTSC.
The D5200 also lets you choose between two compression levels for each of the quality settings above. Each of the 1080p frame rates consumes 24Mbit/s with the quality set to High or 12Mbit/s when set to Normal, so in real money, you’re looking at about 3 Megabytes per second in the best quality 1080p mode. The maximum recording time is 20 minutes, even at the best quality setting, you can film 1080p for 20 minutes and still make it under the additional 4GB file limit. As before clips are saved in QuickTime format using the H.264 codec as on the EOS T4i / 650D.
It’s interesting to note that the EOS T4i / 650D encodes HD video at much higher bit rates than the D5200; from a comparison of the 1080p25 modes I can’t see that the image quality from the EOS T4i / 650D is visibly better than the D5200, but you pay the price all the same in terms of card capacity consumed. On average, same size HD clips from the EOS T4i / 650D take up around twice as much card space as those from the D5200.
The D5200 doesn’t have a movie shooting position on the mode dial, you must first put the camera into Live view mode before pressing the movie record button. The live view switch is on the mode dial and superficially this looks like a similar arrangement to that on the EOS T4i / 650D’s where the on/off switch has a third position for movie shooting which puts the camera into Live view mode and displays a 16:9 view on the screen. On the D5200 though, the display remains in 3:2 mode until you press the record button, though pressing the info button switches to the ‘Show movie indicators overlay which places dark bands top and bottom to indicate the 16:9 movie area as well as displaying the movie mode, time remaining and audio level indicators.
The D5200 sets the shutter speed, aperture and ISO sensitivity automatically for movie shooting, but setting manual movie settings to On in the Shooting menu allows setting of the shutter speed and ISO when the mode dial is set to the M position. You can even adjust the shutter speed and ISO during filming so long as you’re happy to put up with the clicking of the command dial which is easily picked up by the built-in mics. What you still can’t do though is change the aperture for the movie mode – as before, the movie mode inherits the aperture value from Live View, so the best you can do is preset the aperture before entering Live View, then start the movie mode. While this falls short of the complete Manual exposure control available on the EOS T4i / 650D, it remains a big improvement on the D5100 which had no dedicated manual exposure mode but simply inherited the currently selected aperture when switched to Live view.
The D5200 features built-in stereo mics, an upgrade from the D5100’s mono microphone and it also has a 3.5mm jack for an external mic such as Nikon’s ME-1 microphone which mounts on the hotshoe. Finally, film makers will be delighted to dicover that the D5200 outputs video at all resolutions including 1080i and 1080p over its HDMI port without any graphics overlays, so you can drive an external monitor or capture the HDMI feed using an external device.
| |
|---|---|
| |
| |
| |
|---|---|
| |
| |
| |
|---|---|
| |
| |
| |
|---|---|
| |
| |
Nikon D5200
handling
The addition of a dedicated drive mode button and the redesign of the info display has resulted in a genuine improvement to the handling qualities of the D5200. On the D5100 to access the drive modes, or ‘release’ modes as Nikon calls them you needed to access the shooting menu where they were all listed on a sub page. The less expensive D3100 provided a lever on the mode dial and this transformed to a button on the D3200, so it makes sense that the more sophisticated D5200 offers an equivalent physical control for drive mode selection and, while it lacks the directness of the earlier switch, it’s a move (back) in the right direction.
The other issue with the D5100’s handling was the lack of direct controls for ISO, white balance, AF mode and the like. This has been partly resolved with the redesign of the Info display. As before, there’s the option of Classic or Graphic displays with the latter being the default. But on the D5200 ISO has been added to the main display along with shutter speed and aperture, all three exposure parameters having animated graphic displays making it much easier to see exactly what’s going on at a glance.
Shooting mode, drive mode and battery life are displayed above the graphics with the AF area indicator and number of shots remaining below it. At the very bottom of the screen is a two-row grid with other settings. On the top row, quality, bracketing, HDR, Active D-Lighting, White balance and ISO, with Picture control, Focus mode, AF-Area mode, Metering mode, Flash mode, Flash compensation and Exposure compensation on the bottom.
 |
 |
 |
 |
 |
 |
 |
 |
 |
The control pad is used to navigate the grid, then a click of the OK button takes you to the menu for changing settings, also navigated with the control pad. This is an improvement on the dog-leg layout of the D5100 with a long list of settings down the right side of the screen, but It’s still a two-click process (not including the control pad navigation) before you get to actually change something. It would all work more simply, quickly and directly if, having pressed the i button to make changes you could use the the command dial to change settings directly (You can do this, but only with the function assigned to the Fn button). That’s how it works on the EOS T4i / 650D, plus you have the added bonus of a touch-screen, making the whole process of changing settings much quicker and more direct than on the Nikon D5200.
Just a couple of other points worth noting where the D5200 improves on the handling performance of its predecessor. As I mentioned in the introduction, the viewfinder grid overlay makes a welcome re-appearance as do the AF points, this is a major difference to the EOS T4i / 650D which has no grid and permanently etched AF points with a central LED that blinks when the AF is activated. The D5200’s viewfinder is less cluttered with the AF area lit up on activation – much more visible when needed and less obtrusive at other times.
The other improvement is in the Auto ISO program. Though you can’t directly set Auto ISO in PASM modes, enabling Auto ISO sensitivity control will allow the D5200 to override the manually set ISO sensitivity if the situation demands it. When this happens an indicator flashes both on the LCD screen and in the viewfinder to warn you. The maximum sensitivity can be set, as can the minimum shutter speed at which the sensitivity will be adjusted in P and M modes. By setting this latter option to auto the D5200 can adjust it according to the lens in use. For example, if you’re using a wide angle lens the shutter speed will go much slower before the ISO is raised than if you have a telephoto fitted. If you find the D5200 is being too cautious or reckless with the auto minimum shutter speed you can adjust it in either direction. This is a really clever feature that allows you keep control of your ISO sensitivity setting while at the same time providing a safety net to ensure you still get good shots in poor light.
Nikon D5200 Wi-Fi
The D5200 is one of three Nikon DSLRs currently compatible with Nikon’s WU-1a wireless mobile adapter; the other two are the D3200 and the D7100. The WU-1a provides a Wi-Fi link between the camera and a smartphone or tablet and Nikon currently provides apps for Android and iOS devices. I tested the WU-1a with my iPhone 4S.
The adapter itself is tiny, but it does mean the flap on the left side of the camera body that protects the ports has to be left open while you’re using it. Its tiny proportions make it an easy thing to lose, something Nikon’s has clearly considered as it provides a carry case and tether with which you can attach it to your camera strap.
The WU-1a plugs into the USB / A/V port and, providing you’ve got Wireless mobile adapter set to on all you need to do to set it up is press the WPS button on the side. Then you just to need to select the camera SSID in the Wi-Fi connection setup on your phone, launch the app and you’re in business. It’s the most straightforward, trouble-free Wi-Fi setup I’ve encountered on any connected camera.
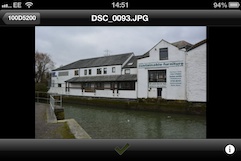
The iOS app is functional, though quite limited and design clearly wasn’t a priority for Nikon. The top menu consists of two options – Take Photos and View photos. Select the former and camera is immediately switched to Live view with the display showing what you’d normally see on the camera’s LCD screen, but with a more limited info display. The camera’s screen is blank and remains so while the WU-1a is plugged in and active, that means you can’t switch to Live view on the camera, or playback images, but you can change settings and access the menus.
Once you’ve entered the shooting mode in the iOS app control of pretty much everything passes to your phone, but here I’m using everything in its more limited context of focussing and releasing the shutter. The wireless remote app provides Live view touch focussing – you can tap anywhere on your phone screen and the D5200 responds immediately, adjusting the focus for the selected area. This is great, and it’s just a shame that this is the only way in which the app extends the camera’s functionality, in virtually every other respect what you get is a very restricted mode of operation.
With your iPhone in portrait orientation basic exposure settings are displayed below the Live view and if the camera was set to Program mode before you entered shooting mode you’ll see the aperture and shutter speed change as you move the camera and the metering responds to the changing light. But it’s not possible to use program shift or exposure compensation to change the exposure.
Further investigation revealed that once you’re in shooting mode with the app, none of the camera controls is functional. This is a pretty serious limitation given that the app itself doesn’t provide any exposure or other controls beyond touch focus and shutter release. This applies to all the shooting modes so, bizarrely, in manual mode the exposure settings are fixed to whatever was set before you entered remote shooting mode. To change them, you have to select camera from the app settings menu, which turns off live view, change the settings on the camera, then select ‘WMU’ to turn Live view back on. In Aperture and Shutter priority modes, the auto element will adjust but again, to change the manual element (i.e. the shutter speed in Shutter priority mode) you have to hand control back to the camera via the app’s setting menu, make the change then re-enter remote shooting mode from the app.
And while the app has a two-second self-timer feature, you can’t use the D5200’s ten second self timer, or either of the continuous shooting modes. As there’s no way of holding down the shooting button on the app you get a burst of about three frames and that’s it.
The second top menu option on the app allows you to view images on the camera card and download them to your phone. There’s no option to downsize images, the full-sized image file, be it a JPEG or RAW file is sent to your phone and while this works reasonably quickly (it took just under 20 seconds to transfer a large fine JPEG) you might want to think carefully about how much time and capacity you’ve got before sending a whole card full.
 |
 |
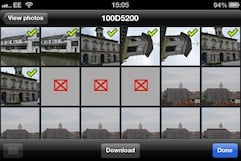 |
Once the images are on your phone you can then do what you like with them including posting to sharing sites, emailing them or whatever. One thing you probably won’t want to do is keep 24 megapixel images on your phone too long. For iPhone owners, one option is to sync them to Photo Stream from where you can retrieve them via Aperture or iPhoto. But this highlights one of the shortcomings of the WU-1a which is that it needs a smartphone connection – you can’t wirelessly transfer a folder of images to your Macbook or PC laptop. Allowing the WU-1a to connect to a wireless network, or to act as an access point would make it it a lot more useful.
As it is, it’s cool to be able to operate the camera remotely and great to be able to focus by touch and let’s not forget that the Canon EOS T4i / 640D doesn’t have anything similar. Just the same, it’s difficult not to be disappointed by the lack of control offered by the WU-1a and the iOS app, particularly in light of what Panasonic has achieved with the Lumix GH3. I didn’t test the D5200 with the Android app from according to reports it provide a similar level of functionality to the iOS app.
Nikon D5200 Autofocus
The D5200 sees a major upgrade in its AF system from the 11-point TTL phase detection system of its predecessor to a new 39-point system. This uses the same Nikon Multi-CAM 4800DX autofocus sensor module with 39 focus points (including 9 cross-type), as the earlier higher end D7000. In AF terms, this places the D5200 right where you’d expect it, between the the D3200 with 11-point, and the D7100 and D300s with 51 point systems.
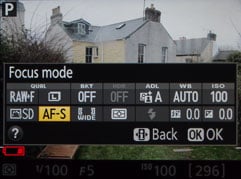
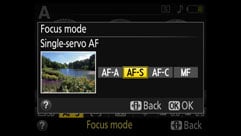
There are three main AF modes: AF-S (Single Servo AF), AF-C (Continuous Servo AF) and AF-A (an Auto mode which selects between them depending on whether the subject is in motion). These are selected from the main information display screen, where you’ll also be offered a Manual focusing option.
Like the D5100 before it, there’s four AF Area modes: Single Point, Auto Area, Dynamic Area, and 3D Tracking (the latter only available in AF-A and AF-C modes). In Single and Dynamic Area, you can manually adjust the focusing point using the rocker control, with Dynamic Area also considering surrounding focus points if the subject moves. Due to the increased number of AF points Dynamic Area AF is available in three variants – 9-point, 21-point and 39-point. 9-point dynamic Area AF is recommended for subjects like runners or race cards that move predictable, 21-point for unpredictable movement such as football players and the full 39-points for difficult to frame quick-moving subjects like birds.
Like its predecessor, the D5200 exclusively relies on contrast-based AF in Live View, with the choice of four modes: Normal Area, Wide Area, Face Priority and Subject Tracking. Also Inherited from the D5100 is the choice of AF-S (Single) or AF-F (Full-time Servo) in Live View, where the latter attempts to continuously autofocus, plus there’s also the option to focus manually in Live view.
In practice the D5200’s AF is a marked improvement on the 11-point system of its predecessor. The only caveat is the supplied DX 18-55mm VR kit lens which as we’ve seen before is neither the quickest nor the quietest focuser in the range. If you demand snappier performance, or something quieter when recording movies, you’ll need to upgrade to a better model.
Nikon D5200 Continuous shooting
The D5200 offers seven release modes, Single frame, Continuous L, Continuous H, Self-timer, Delayed remote (ML-3), Quick-response remote (ML-3), and Quiet shutter release, accessed via a menu displayed when the release mode button is pressed. The two remote options work with the optional IR controller.
With the release mode set to Continuous L, the D5200 shoots at 3fps and on Continuous H the rate increases to 5fps – an improvement on the 4fps continuous mode of its predecessor. If you set the AF mode to continuous the D5200 will focus between shots but the rate slows by such a degree you’re better off setting S-AF, in which case the focus is fixed on the first shot.
To put it to the test I fitted the D5200 with a freshly formatted 16GB Sandisk Extreme Pro SD card rated at 95MB/s. With the D5200 set to 200 ISO and 1/500 and Large Fine JPEG I fired off a burst of exactly 100 frames before the camera stopped shooting. I timed the 100-frame burst at 19.8 seconds making a frame rate fractionally over 5fps. Set to RAW the D5200 fired off eight frames before slowing appreciably. The first eight frames took 1.4 seconds – 5.7fps after which it slowed to a fairly steady 3fps. After shooting the 100 JPEG burst I timed how long it took for the buffer to empty – a whopping 58 seconds, however, after only a second or two you can shoot another 100 frame burst at the same 5fps rate. Which begs the question, why does the D5200 take so long to clear the buffer if you choose not to take a subsequent burst.
Nikon D5200
Sensor
The D5200 has a new 24.1 Megapixel sensor which produces images with maximum pixel dimensions of 6000 x 4000. Though it shares the same resolution this isn’t the same sensor as is in the D3200 which is an in-house Nikon design, but a new chip from Toshiba. As such it’ll be interesting to see how the still image and video quality compares.
Image data is saved as JPEG files at one of three compression ratios, fine (1:4) normal (1:8) and basic (1:16). Large Fine JPEGs are typically around 10-12Mb in size, RAW data can also be recorded in .NEF files. The ISO sensitivity range runs from 100 to 25600 ISO and the shutter speed range is 30s to 1/4000 plus bulb.
To see how the quality of the Nikon D5200 measures-up in practice, take a look at my Nikon D5200 quality and Nikon D5200 noise results pages, browse my Nikon D5200 sample images, or skip to the chase and head straight for my verdict.