 It would be surprising if there were no issues in a first generation model and with the X-Pro1, focusing is its Achilles heel. There's no avoiding the fact that if you're used to fast AF on a high end DSLR you're going to be in for a frustrating time and that's going to present some challenges for the X-Pro1 in what could be one of its most natural markets: street photography.Focusing shortcomings aside, the X-Pro1 is a beautiful camera that reaffirms the best traditions of what used to be called miniature photography. It's well-built, functional and a joy to use, and even with focusing issues is thoroughly deserving of a Cameralabs Highly Recommended award.
Fujifilm X-Pro1 review
-
-
Written by Ken McMahon
Intro
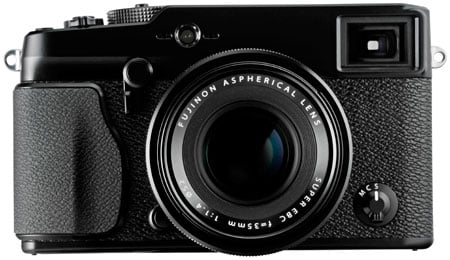
Announced in January 2012, the Fujifilm X-Pro1 is the company’s first interchangeable lens compact system camera. Like the earlier fixed lens X100, it has rangefinder styling and an abundance of analogue controls going even further into the retro aesthetic than the vintage-styled Olympus PEN range. But this is about more than mere looks. The X-Pro1 features a large APS-C sensor with a newly developed architecture which Fujifilm claims can out-perform even full frame sensors. The hybrid optical electronic viewfinder first seen on the X100 has been further developed to accommodate the varying focal lengths of interchangeable lenses and three prime lenses are launched with the camera, with the promise of six more on the way.
If that isn’t enough to tell you who this camera is aimed at, the name puts it beyond doubt and establishes the X-Pro1’s claim as the first small system camera intended for professional and high end enthusiast use. Most compact system cameras to date have been targeted at beginner and intermediate users trading up from high-end compacts or looking for a small lightweight DSLR alternative.
The Sony NEX-7, one of the most advanced mirrorless ILCs on the market, seeks primarily to attract enthusiast photographers with its abundant gadgetry. The X-Pro1 adopts an entirely different ethos, favouring conventional analogue controls and putting lens quality and sensor performance to the fore and eschewing scene modes, 3D, built-in flash and, other frivolities. In fact it’s clear that the camera Fujifilm would most like the X-Pro1 to be compared with, in terms of size, performance and general photographic ethos (though not price) is Leica’s M9. That’s some goal, so in my review, let’s see how it measures-up.
 |
Fujifilm X-Pro1 Design and controls
Compared with other small system cameras, perhaps the most striking thing about the Fujifilm X-Pro1, aside from its styling, is its size. If the compact in the term ‘compact system camera’ defines a range of sizes, the X-Pro1 is at or near the top of it. Its dimensions are 139.5 x 81.8 x 42.5 and the body with card and battery weighs 450g (about a pound). With the 18mm (27mm equivalent) f2 lens attached the depth increases to 84mm and the weight to 566g.
In comparison the Sony NEX-7 body measures 120 x 70 x 42.6mm x 25.3mm and weighs 350g including battery. With the 18-35mm zoom attached the depth increases to 98mm. A fairer comparison might be with the 30mm (45mm equivalent) f3.5 lens where the depth increases to around 80mm and the weight to 488g, while adding the 36mm equivalent 24mm f1.8 lens takes the total depth to around 100mm and the weight to 575g.
 |
For the record, the Leica M9 measures 139x80x37mm and weighs 585g with battery; add the 28mm equivalent f2 lens and the depth and weight increase to 78mm and 855g. This makes it very similar in overall dimensions to the X-Pro1, although the M9 is heavier, at least with the 28mm f2 lens, although to be fair it is corrected for a full-frame sensor.
The two-tone textured and matt black finish with engraved white labelling adds to the X-Pro1’s iconic retro appearance and is also very practical. This feels like a camera that will last a lifetime. The dimpled plastic on the lower half provides an excellent grip and this is aided by a moulded grip on the right side. There are two controls on the front panel; a three-position focus mode dial on the bottom left and a sprung toggle switch at the top right of the lens for switching the viewfinder between EVF and OVF modes.
 |
The most prominent feature on the Magnesium alloy top panel is the huge shutter speed dial with speeds ranging from 1/4000 to 1 second plus T (up to 30 seconds) B and A positions. When in the A position for Shutter priority shooting a locking mechanism engages so you can’t move the dial back to manual shutter speed selection without first pressing a button in the centre of the dial. It’s a shame the same system wasn’t adopted for the exposure compensation dial which, despite being partially recessed, I managed to accidentally move a number of times.
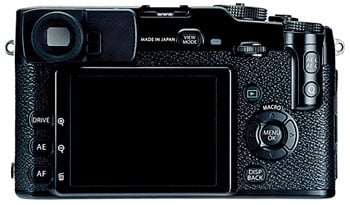
The shutter release is threaded so will take an inexpensive cable release and is surrounded by the on/off switch. Just to left of it is a Function button which can be assigned to a number of custom functions. Moving round to the back of the camera, one of the advantages of the X-Pro1’s generous proportions immediately becomes apparent, there’s a lot of space between the buttons, so less chance of pressing the wrong one, even if you keep your eye to the viewfinder and rely on touch alone.
The top-mounted exposure compensation dial protrudes at the rear and a cylindrical bulge extends downward the camera back on which are mounted the AE-L/AF-L and Q (quick menu) buttons. This also provides some useful additional grip to stop your thumb sliding off the right edge. Also on this side of the rear panel you’ll find a four-way controller, playback button and display mode button.
On the opposite side of the 3 inch LCD panel are three buttons; the topmost selects the drive mode and there are dedicated buttons for AF area selection and metering mode. At the top of the rear panel there is the viewfinder, about which more in a moment, a view mode button for toggling between the screen and viewfinder and a command dial used for menu selection and manual focus magnification.
A PC flash sync socket is located on left side of the camera body and a plastic door on the right side protects the USB and mini HDMI ports. On the base of the X-Pro1 the tripod bush is offset from the lens axis, close to the door to the combined battery and SD card compartment; had it been centrally located you could have switched cards without removing the camera from a tripod, or as is more likely to be the case with users of the X-Pro1, also removing a quick-release plate from the camera base. The X-Pro 1 takes SD cards including HC and XC variants and is compatible with UHS-1 cards. See the continuous shooting section to find out how much of a difference using a UHS-1 card makes to buffer write times on the X-Pro1.
Fujifilm X-Pro1 Viewfinder and Screen
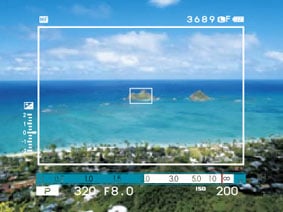
Composition is a highlight of the X-Pro1 with the camera sporting an enhanced version of the hybrid viewfinder first seen on the X100, along with a superb screen. The hybrid viewfinder really is unlike anything else on the market. At first glance it’s a simple optical viewfinder, but if desired you can superimpose electronic guides like a proper heads-up-display.
 |
This means the X-Pro1’s viewfinder can indicate coverage with a thin frame, along with exposure and focusing details, while still benefitting from the brightness and low power consumption of an optical system and its real-life view.
One of the big issues of an optical rangefinder though is how to support the coverage of different focal length lenses. The super-imposed frame could indicate the actual coverage, but for longer lenses, the frame would get smaller and smaller and harder to compose with. This wasn’t a problem with the X100 with its fixed lens, but is an issue for the X-Pro1.
Fujifilm’s solution is to offer a magnified optical view when the 35mm or 60mm lenses are mounted. The magnification increases when the 35mm is mounted so the active framed area is roughly the same size as when using the 18mm. There is however only one magnified option, so when longer lenses, like the 60mm, are fitted, the composition frame becomes steadily smaller.
As for wider lenses, there’s some padding around the active frame when using the 18mm lens which suggests a larger frame could indicate the coverage of shorter focal lengths. But while padding, the magnified view and superimposed frame cleverly get around classic rangefinder issues, the X-Pro1 has an additional trick up its sleeve.
Like the X100 before it, you can switch the optical viewfinder for an entirely electronic system if preferred, delivering 100% coverage with any lens, absolute focusing confirmation and a live histogram. It’s not a half-hearted EVF either, boasting 1.44 Million dots. The combination of an optical rangefinder with superimposed guides or an EVF effectively resolves most of the issues anyone would have with this system.
| Fujifilm X-Pro1 OVF | Fujifilm X-Pro1 EVF | |
 |
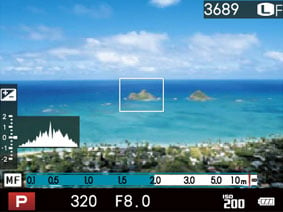 | |
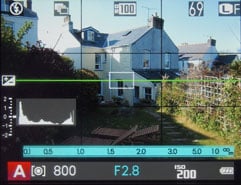
So how does all this work in practice? Let’s first look at the optical viewfinder (OVF). My initial impression when looking through the OVF was very positive indeed. Although there’s been a lot of progress with electronic viewfinders recently, the brightness and immediacy of looking directly at the scene in front of you with only a piece of glass intervening can’t be beat. And the ability to overlay the optical view with exposure and focus data, framing grids an electronic level and histogram is outstanding.
In true rangefinder style the image frame sits well within the physical bounds of the OVF providing the advantage of being able to see ‘outside the frame’ and compose accordingly. It’s also not untypical for such guides to underestimate the frame boundary so that you capture a slightly larger area than indicated. This is fine, it just takes a little getting used to.
|
Fujifilm X-Pro1 OVF with 18mm lens |
Fujifilm X-Pro1 OVF with 35mm lens |
Fujifilm X-Pro1 OVF with 60mm lens | ||
 |
 |
 | ||
The X-Pro1 cleverly overcomes the parallax problem (the lens and the viewfinder views diverge as the subject gets closer to the camera) by linking the framing and focussing and offsetting the frame down and rightward to compensate. The same thing happens with the AF area.
On the whole the X-Pro1’s OVF handles parallax and changing focal lengths very well and is a very clever piece of engineering design. One thing that doesn’t work out so well, though, are the ‘frame guides’ that divide the screen into either 9 or 24 rectangular areas. These fill the entire viewfinder rather than just the frame boundary. With the 18mm lens attached they are slightly cropped by the fame, attach the 35mm lens, though, and the cropping is more severe, so that with the 9 area guide the 3×3 rectangular grid is more like 2 ½ x 2 ½. Attach the 60mm and you’re reduced to little more then the central rectangle. So the framing guidelines are only really effective with the 18mm lens when using the OVF.
Of course, you always have the option of switching to the EVF by sliding the front mounted lever. Do this and you get a 100 percent view with accurately positioned framing guides. The X-Pro1’s EVF is a 0.47 inch LCD panel with 1,440,000 pixels. It’s a large, bright viewfinder and compares very favourably on those terms with the Sony NEX-7, but it can’t match the NEX-7s resolution and refresh speed and, particularly when panning, the image lags and looks a little pixellated. Having said that, for when accurate framing is required, using long lenses, macro shooting, and for previewing film simulations, it’s a very useful alternative to the optical viewfinder. For all its high tech cleverness, Fujifilm has overlooked some of the basic requirements of a viewfinder, though, and the addition of a rubber eyecup like the one on the NEX-7 would be a big improvement as would built-in dioptre correction.
The viewfinder system is so clever and addictive that it’s easy to forget the X-Pro1 also has a very respectable screen, employing a high resolution 3in panel with 1230k dots. The camera can be configured to use either the screen, or viewfinder, or to switch between them when your eye is detected in close proximity to the viewfinder by the sensor mounted just to the right of it.
In a camera that places so much emphasis on the viewfinder (not to mention classic rangefinder design), the fact that the screen isn’t articulated probably won’t be a major concern. From a practical perspective the rear screen is most useful in detail mode when it displays no image, just exposure and focus information and other camera settings. But you can, of course use it as an alternative to the viewfinder and for this it works very well with a bright contrasty image that is easy to see at a wide range of horizontal and vertical viewing angles.
Fujifilm X-Pro1 Lenses
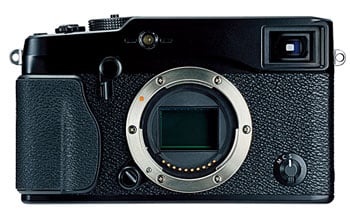
Fujifilm has developed a new X Mount for the X-Pro 1. This exploits the absence of a low-pass filter to achieve a very short flange back-distance of 17.7mm, along with a wide opening allowing very deep mounting of the lenses. Indeed the distance between the sensor and the rear element of the widest of the three launch lenses is just 11mm. Shortly after launch, Fujifilm confirmed the X-Pro1 would be the first in a series of X Mount cameras.
The X-Pro1 may be retro-styled and the lenses feature an aperture ring, but communication between the lens and body is entirely electronic. There’s no mechanical couplings at all, so the aperture and manual focusing rings on the lenses are actually electronic ‘fly-by-wire’ controls.
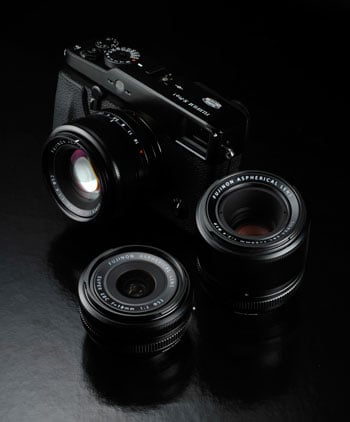 |
Fujifilm launched the X-Pro1 with three fixed focal length prime lenses, all of which boast respectably bright focal ratios with rounded aperture blades and metal construction. Each lens also features focusing and aperture rings, the latter with 0.3EV increments. Due to the APS-C size of the sensor, the field of view is effectively reduced by 1.5 times. Note none of them are optically stabilised.
The widest of the three lenses is the XF18mm f2 R which has an equivalent focal length of 27mm, a maximum aperture of f2.0, closest focusing distance of 18cm and a 52mm filter thread; it measures 65x51mm and weighs 116g. The ‘standard’ lens of the threesome is the XF35mm f1.4 R which has an equivalent focal length of 53mm, a maximum aperture of f1.4, closest focusing distance of 28cm and a 52mm filter thread; it measures 65x55mm and weighs 187g. Finally, the longest of the initial three is the XF60mm f2.4 R Macro which has an equivalent focal length of 91mm, a maximum aperture of f2.4, closest focusing distance of 26.7cm (for 0.5x reproduction) and a 39mm filter thread; it measures 64x71mm and weighs 215g.
All three lenses include metal lens hoods, and though the 18mm and 35mm hoods are squared they nonetheless intrude a little further into the bottom right corner of the optical viewfinder. In addition to front caps, both these lenses are also provided with square push-on caps that go over the lens hoods; a nice attention to detail and actually very useful as it’s almost impossible to fit the lens caps with the hood in place.
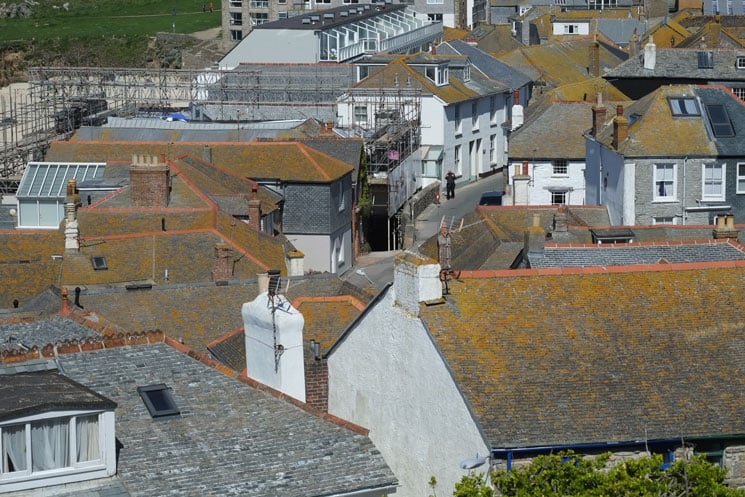
With any of the lenses attached, the X-Pro1 feels well balanced and comfortable. The aperture rings have positive detents at third of a stop intervals and, though the X-Pro1 isn’t the easiest of cameras to focus manually, even the narrow focus ring on the 18mm f2 lens is easy to locate by touch alone. The quality of all three lenses is extremely good and, given that the combined purchase price of all three will cost more than the X-Pro1 body, you’ve every right to expect it to be. The sample images below show the coverage of each lens.
Fujifilm X-Pro1 with Fujinon XF 18mm f2 R |
 |
Fujifilm X-Pro1 with Fujinon XF 35mm f1.4 R |
 |
Fujifilm X-Pro1 with Fujinon XF 60mm f2.4 R Macro |
 |
One of the drawbacks of any new system is the initial lack of a range of lenses to go with it. At the time of writing, Sony’s NEX E-mount now boasts three primes and three zooms as well as a range of third party adapters for other mounts, while the Micro Four Thirds standard offers a much wider range. For its initial offering Fujifilm has made sensible choices and there’s the promise of more to come with six new lenses including three stabilised zooms by 2013.
Note that the X-Pro1 body lacks any kind of stabilisation system and none of the current lenses is stabilised either. To a degree, the bright maximum aperture of all three primes, combined with the X-Pro1’s excellent high ISO performance makes this less of an issue than it might otherwise be, but the fact remains, hand-held shooting at the slow shutter speeds we’ve become used to on stabilised systems isn’t really an option.
Arguably, the larger body size of the X-Pro1, compared with other compact system cameras, and use of the viewfinder, should make it possible to handhold at quite slow speeds. To test it out I attached the 60mm f2.4 lens and shot a sequence of images in shutter priority mode at successively slower shutter speeds. As you can see from the examples below it’s just about possible to get sharp results with this lens at a 60th, but not at a 30th. To be on the safe side I’d stick with the photographer’s maxim of one over the focal length and select nothing slower than a 90th when shooting with this lens.
Fujifilm X-Pro1 with Fujinon XF 60mm f2.4 R macro handheld | ||||
 |  | |||
100% crop, Fujinon XF 60mm f2.4 macro, 200 ISO, 1/30 | 100% crop, Fujinon XF 60mm f2.4 macro, 200 ISO, 1/60 | |||
Fujifilm X-Pro1 shooting modes
The X-Pro-1 has a conventional shutter speed dial with an A position that sets the shutter speed automatically. Likewise, setting the lens Aperture ring to the A position sets the aperture automatically. Selecting A for both the shutter and aperture sets Program AE completing the full PASM set. There’s no exposure mode selection as such, it’s determined by the position of the aperture and shutter speed rings and the old school simplicity of this approach has a lot to recommend it.
Normally at this point in the review I’d be talking about scene modes, creative filters, stacking modes for HDR and the like, but if you’re hoping for those kinds of features in the X-Pro1 you’ll be disappointed. In their place is a choice of film simulation modes that references some of Fujifilm’s film stock. The default colour rendering mode is Provia, replicating Fujifilm’s colour slide film stock, there’s also Velvia – a high saturation transparency film popular with landscape photographers, and Astia (for portraits). Other film simulation modes include Pro Neg Hi, Pro Neg Std, Monochrome, several filtered monochrome options and finally sepia.
If you’re not familiar with, or even a fan of Fujifilm film stock, these film simulation modes may strike you as little more than self-indulgence on Fujifilm’s part. Looked at another way, they’re really just scene modes for grown ups and I’d guess that professionals and photo enthusiasts would far rather these than the alternative toy camera, miniature, and 3D modes favoured by much of the competition.
Fujifilm X-Pro film simulation modes | ||||
 |  |  | ||
Film Simulation Provia (Standard) |
Film Simulation Velvia (Vivid) |
Film Simulation Astia (Soft) | ||
Which is not to say the X-Pro1 is entirely without gadget modes – it has a Motion Panorama mode similar to the Sweep Panorama mode on the NEX-7 and many other Sony compacts. It takes a series of shots as you pan the camera and then stitches them together. You can shoot panoramas with the camera in landscape or portrait orientation with a maximum resolution of 7680 x 1440 or 2160 x 7680 respectively. The size is determined by the horizontal angle of view which at its widest setting can capture a 180 degree view with the 18mm lens.
| Motion panorama: 3.36MB, Program auto, 1/220, f11, (-0.33EV), 200 ISO, 18mm (27mm equiv) |
 |
| Click image to access original at Flickr |
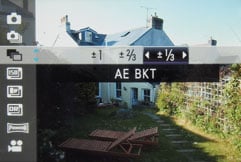
Motion Panorama mode is selected from the Drive menu which in addition to continuous shooting and movie modes offers a range of bracketing options including AE, ISO, film simulation and dynamic range bracketing. AE bracketing shoots three shots at up to plus or minus 1 EV at 1/3rd EV increments, so not the best tool for HDR enthusiasts.
There is, however, a dynamic range setting which can be moved from its default 100% position to 200% or 400% increasing detail recorded in the shadow and highlight tonal ranges. Dynamic range mainly affects highligh detail and it’s not as effective at improving tonal reproduction as Sony’s DRO on the NEX-7. Another drawback is that you can’t select the 200 percent DR setting below 400 ISO and for 400 percent the lower ISO limit is 800 ISO. In the examples below you can see a little more detail in the blown out stained glass windows progressing from left to right, but the shadow detail appears unaffected.
Fujifilm X-Pro Dynamic Rangemodes | ||||
 |  |  | ||
18mm f2 800 ISO Dynamic Range 100% |
18mm f2 800 ISO Dynamic Range 200% |
18mm f2 800 ISO Dynamic Range 400% | ||
Fujifilm X-Pro1 movie modes
The X-Pro1 shoots HD video at 1080p resolution and 24 frames per second. Video is encoded using the h.264 codec at an average bitrate of around 15Mbits/s and saved in a QuickTime .mov file. There’s also a lower resolution 720p24 HD mode. Stereo sound is recorded via twin mics located either side of the AF illuminator on the front panel. When you put the X-Pro1 into movie mode the shutter release is used to start and stop recording, there’s no dedicated movie button; you can assign the Fn button to switch to movie mode, but you still need to press the shutter release to start recording. A second press of the Fn button returns you to the still image capture mode – not the mode you were previously in. For example if you’re continuous shooting and you decide you want to shoot a short video clip you must first press the Fn button, then press the shutter release to start and stop recording. Pressing the Fn button a second time returns you not to continuous shooting drive mode, but to stills capture mode, so if you want to carry on in continuous drive mode you have to reselect it from the Q menu. This is one of a number of quirks that could easily be addressed by a firmware update.
Prior to recording you can set the aperture, exposure compensation, white balance and film simulation. The X-Pro1 automatically selects continuous AF in movie mode unless you have manual focus selected. With all three prime lenses the AF during movie shooting is reasonably sure footed, but it has a tendency to hunt in low light and this combined with noisy AF can result in clips that are all but unusable. The maximum single clip recording time on my UK review model was 29 minutes and this limit is also specified in the US manual so looks to be universal.
| |
|---|---|
|
Despite the lack of stabilisation, when using the viewfinder you can get reasonably steady results with the 18mm lens. continuous AF has a couple of hesitant episodes, but generally manages pretty well with the motorcyclists.
| |
|---|---|
|
For this tripod mounted panning shot the X-Pro1 handles the exposure well but the constant hunting of the continuous AF and the associated frame jitter spoils the clip.
| |
|---|---|
|
The X-Pro1’s continuous autofocus isn’t happy during this panning shot and doesn’t settle down until the last few seconds when the frame is more or less static. The lack of stabilisation is also more obvious in this clip.
| |
|---|---|
|
This clip provides a more positive demonstration of the X-Pro1’s continuous autofocus in action. Moving from the coffee cup to the menu holder and then on to the bar and back again, there’s a little bit of focus hunting going on, but it eventually gets a lock on the subject.
Fujifilm X-Pro1
handling
The X-Pro1 is ready to shoot within about a second of turning it on, although the autofocus may delay the capture moment a while longer. If you feel the need for speed you can activate Quick Start mode and/or turn off Power Save mode which reduces the the startup time to half a second, though with pretty drastic consequences for battery life. With the choice of optical and electronic viewfinders, power management on the X-Pro1 is something you have to think carefully about. The 300 shot CIPA figure doesn’t convey the fact that even when you’re not taking shots the camera consumes power and you can find yourself running low after just a few hours. The simple answer of course is to pack a replacement, though if you’re frugal, and stick to the OVF, you can squeeze an impressive 1,000 shots out of a single fully charged battery.
In terms of general handling, the X-Pro1 is a real delight to use and anyone who has used a true rangefinder or even a film SLR will quickly feel at home. But this isn’t just about retro nostalgia. Fujifilm has put a lot of thought into the ergonomics of the X-Pro1 and the layout and design of the external controls feels very intuitive. I was in the process of listing the controls which are particularly well positioned when I realised I’d included pretty well all of them. From the EVF/OVF selector on the front panel to the thumb-positioned AE-L/AF-L and Q-menu buttons, everything seems to be exactly where you’d expect to find it without the need to take your eye from the viewfinder to check.
 |
 |
 |
 |
 |
 |
The menu system too is very straightforward to navigate, partly as a consequence of not being cluttered with too many ‘features’. I like the way the drive modes, including continuous shooting, bracketing and movie mode are all on a single menu and the Q Menu layout which closely follows the style of the Super Control Panel on Olympus PEN models does exactly what it should, providing quick access to common settings avoiding the need to access the main menu.
Fujifilm X-Pro1 Focusing
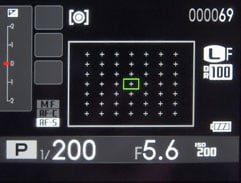
If the X-Pro1 has one weak spot it is its contrast detect AF system. There are three focusing modes selectable from a front mounted switch: Manual, Continuous and Single AF. You can let the X-Pro1 select the AF area automatically or choose it yourself by pressing the AF button on the left side of the rear panel. Using the OVF there are 25 areas to choose from, with the EVF that number increases to 49 and you can also change the size of the AF area with the command dial.
In the best of conditions the X-Pro1’s AF is adequate, locking onto the target in a fraction of a second, but in low light and with some subjects it can become erratic. There were occasions when it hunted back and forth interminably at close range before finally discovering the subject in the far distance. Others when it confidently whirred, beeped and focussed on infinity ignoring the subject in the centre of the frame a metre from the lens. These occasions were few, but enough to make me doubt the X-Pro1’s reliability for critical subjects.
In manual focus mode the lens focus ring is used to control focus but, as I mentioned earlier, there’s no mechanical coupling and focus is an all electronic ‘fly-by-wire’ affair. Clicking the command dial magnifies the view for precise focus control (activating the EVF if you’re not already using it) but this isn’t always helpful as even in manual modes the lens chooses its own arbitrary aperture for previewing, rather than the selected setting (if you watch the iris you’ll see it constantly adjusting). That means that the depth of field is inaccurate and something that may appear sharp when you focus on it could well be out of focus if your selected aperture is wider than the preview aperture. When you half press the shutter the aperture changes to the selected setting, but the viewfinder also reverts to the normal view so you’re unlikely to notice if there’s a problem.
Several turns of the focus ring are required to cover the range and while this provides for plenty of fine adjustment control it’s a time-consuming pain if you have to go from a few feet to infinity, though you can speed the whole process up by pressing the AF-L button to autofocus, before fine tuning manually. Additionally there’s a focus distance scale at the bottom of the screen that can be set to display either feet or metres. All in all, manual focusing with the X-Pro1 is a far cry from the simple direct process of manual focusing on the Sony NEX-7 with its focus peaking feature.
Fujifilm X-Pro1 Continuous shooting
The X-Pro1 has two continuous shooting speeds: 3 and 6fps, and in both modes the focus and exposure are locked on the first frame. To test the X-Pro1’s continuous shooting performance I fitted it with a freshly formatted Sandisk Extreme Pro 8GB UHS-1 card and set the best quality Fine JPEG mode. In both the 3 and 6fps modes the X-Pro1 maintained the quoted speeds. It was able to sustain 3fps for 28 frames before slowing and becoming erratic. At 6fps it managed a burst of 18 frames before slowing appreciably once the buffer filled. The full buffer took 14 seconds to write to the UHS-1 card, substituting a slower Sandisk Extreme speed class 10 card resulted in an increase to 21 seconds, so it’s certainly worth investing in the faster card should you plan to do a lot of continuous shooting. Shooting RAW +JPEG the buffer write time increases to 42 seconds.
One other thing that’s worth mentioning is that, though the 6fps top speed may not be the fastest continuous shooting speed in the compact system camera world, coupled with the optical viewfinder it’s a lot more effective as you can see the subject 100 percent of the time – there’s no interruption from a mirror as you’d get with an SLR or a shutter closing as you’d get with live view on a screen or EVF.
Fujifilm X-Pro1 Sensor
For the X-Pro1, Fujifilm has developed a new 16.3 Megapixel APS-C sized CMOS sensor which the company calls ‘X-Trans’. The key difference between it and conventional sensors is the colour filter array.
In a traditional digital camera sensor, each photosite is covered by a coloured filter arranged in a repeating pattern.The most common pattern uses a two-by-two square array with one red, one blue and two green filters; this is known as the Bayer pattern after the Kodak engineer who invented it. Software then interprets this data to generate a full colour image in a process known as de-mosaicing.
The problem with the Bayer pattern is that very fine details can cause undesirable colour artefacts known as moiré. The solution on traditional camera sensors is to slightly blur the fine detail using a low-pass filter placed in front of the sensor. This effectively reduces moiré, but at the cost of losing the finest details.
| Bayer pattern: 2×2 | X-Trans pattern: 6×6 | ||
 |
| ||
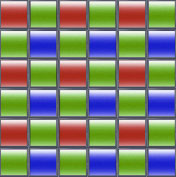
Fujifilm’s new X-Trans sensor claims to avoid moiré by employing a different pattern of filters which more closely resembles the random nature of film grain. So instead of the traditional two-by-two Bayer pattern, the X-Trans sensor employs a six-by-six repeating pattern with a less regular arrangement of coloured filters within. You can see how this looks in the diagram opposite, reproduced from the Fujifilm brochure.
Fujifilm reckons this new pattern is so effective that moiré is reduced to an extent that eliminates the need for a low-pass filter altogether. This means the full resolution of the sensor is unlocked and the company claims the 16 Megapixel X-Trans will match or even out-perform full-frame sensors.
The more complex pattern does, however, require a more intensive de-mosaicing process to generate a full colour image, and to cope with the number-crunching, Fujifilm has equipped the X-Pro1 with its new EXR Processor Pro. A new and complex pattern will also need more involved RAW processing, at the time of writing support for the X-Pro1’s RAW files is still not yet available in Adobe Lightroom and Camera Raw or other third party RAW processing apps and currently the only option for processing the files is to use the Silkypix derived application supplied with the camera.
Moving onto the actual photos, the X-Trans sensor delivers 3:2 shaped images with a maximum resolution of 4896×3264 pixels. 16:9 and 1:1 cropped aspect ratios are also available, and each shape is additionally offered at two lower resolutions if desired. Images can be recorded as JPEGs, RAW files or RAW plus JPEG. The sensitivity ranges from 200-6400 ISO and is expandable down to 100 ISO and up to 25600 ISO. Auto ISO can be limited to a maximum of 400 to 3200 ISO.
The X-Pro1 is fitted with a mechanical focal-plane shutter with a range of 30 seconds to 1/4000 and a flash synch speed of 1/180. The Bulb mode can support exposures up to 60 minutes long, and once again you can use a cheap mechanical cable release. Exposure compensation is available from +/-2EV and 3-frame bracketing in 0.3, 0.7 or 1EV increments.
To see how the quality of the Fujifilm X-Pro1 measures-up in practice, take a look at my Fujifilm X-Pro1 quality and Fujifilm X-Pro1 noise results pages, browse my Fujifilm X-Pro1 sample images, or skip to the chase and head straight for my verdict.


