 Features missing that you could expect from a mid-range model include a bigger brighter optical viewfinder, faster continuous shooting, auto exposure bracketing, an optical depth-of-field preview, live histogram and a focusing motor to drive older non-AF-S lenses. Not everyone who wants an inexpensive DSLR needs those kinds of features though, and Nikon has a track record of accurately predicting what customers want. The D3200 will undoubtedly build on the success enjoyed by it's predecessors and not just because of it's headline-grabbing resolution. Like the D3100 before it, it remains an excellent choice for discerning beginners with a little more to spend and throughly deserving of a Cameralabs Highly recommended award.
Nikon D3200 review
-
-
Written by Ken McMahon
Intro
The Nikon D3200 is the company’s latest entry-level DSLR. Announced in April 2012, it replaces the best-selling D3100 and like that model, makes a number of key improvements. The headline upgrade is pure resolution with the new D3200 boasting nothing less than 24 Megapixels, a whopping ten more than its predecessor – indeed it subsequently becomes the highest resolution DX-format body in the Nikon range, let alone the highest entry-level model.
Alongside the higher resolution sensor the processor has been upgraded to the Expeed 3, and while the D3200 retains its predecessor’s 3in fixed screen, the display resolution is increased to 921k pixels. The movie mode also gets a upgrade, but it’s not what you might expect. The 1080p24 mode remains but is supplemented by 1080p25/30. You can now also control exposure during movie shooting and Nikon has added a socket for an external mic. Not only that, audio recording levels can be adjusted with the help of built-in stereo audio level meters, all of which makes the D3200 a much more attractive option for shooting movies than its predecessor. Nikon has also marginally improved the continuous shooting capabilities of the D3200 with a top speed of 4fps, reintroduced the front and rear IR remote receivers and included the option to attach the Wu-1a wireless dongle which can transmit images to compatible phones or tablets and use them to remote control the camera.
Normally we’d compare the entry-level Nikon DSLR against the latest entry-level Canon DSLR, but at the time of writing, Canon hadn’t updated its entry-level models for some time. As such prices have fallen and the nearest rival for the D3200 from Canon in terms of price is the EOS Rebel T2i / 550D, as oppose to the entry-level EOS Rebel T3 / 1100D. The T2i / 550D is actually a good match in both current price and feature-set, so despite being two years older, that’s the main model I’ve used for comparison here. I’ve also included tests comparing the D3200 against the Sony NEX-7, not because they’re similar in price or features – on the contrary they’re completely different cameras aimed at very different markets – but because both share 24 Megapixel APS-C sensors. Indeed I believe they’re the same chip behind the scenes, so it’s revealing to see how two companies handle such a high pixel density. So read-on to discover how Nikon’s latest entry-level DSLR measures-up!
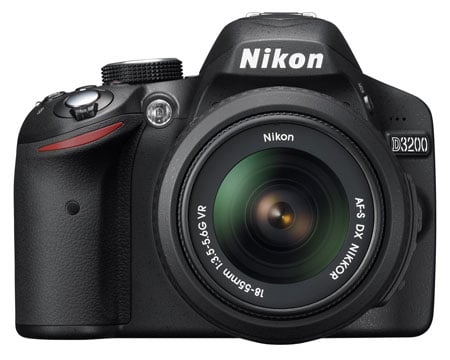 |
Nikon D3200 Design and controls
The Nikon D3200 looks remarkably similar to the D3100 it replaces, but there are some differences I’ll note in a moment. The body with card and battery weighs 505g and measures 125 x 96 x 76.5mm, that’s the same weight as the D3100 and just 2mm deeper. At 527g with battery and card, the EOS T2i / 550D is a tiny bit heavier and measures 128.8 x 97.3 x 62, but isn’t 14.5mm slimmer as these dimensions suggest, they are more or less exactly the same depth, Canon and Nikon just do their measuring at different points. The Nikkor AF-S 18-55mm kit lens looks a little bulkier than the Canon EF-S 18-55mm, but in fact is only 2mm wider in diameter and weighs 5g more. So in terms of operational size and weight there’s really not much in it.
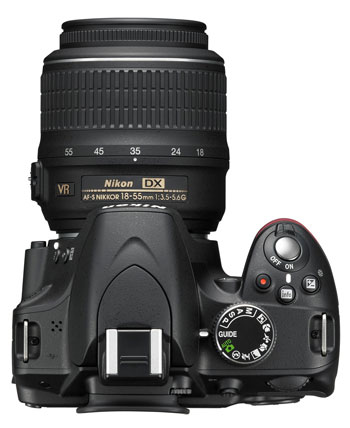 |
The D3200 is a comfortable camera to hold, it has a slightly deeper, more contoured grip than the T2i / 550D and with your palm on the base of the body the lens zoom ring is a more natural fit for your left hand. The top plate looks similar to the D3100, but there are some significant differences. The Exposure compensation and info button (which toggles the rear info display) have been joined by a dedicated movie record button which replaces the combined Live view/movie recording Lever/button on the rear panel of its predecessor. And the mode dial loses its continuous shooting lever, but otherwise looks the same and has the same positions as the earlier model.
The front is unchanged with a programmable function button which provides direct access to image quality/size, ISO sensitivity, white balance or Active D-lighting settings. The flash button both pops-up the built-in flash and, when held down, allows flash mode selection using the command dial. It’s a little disappointing to discover there’s still no optical Depth of Field preview – a feature that the entry-level Nikon DSLR has long lacked, but which Canon offers on the EOS T2i / 550D.
On the other side of the lens mount in the recess is the AF assist lamp/Red-eye reduction lamp and on the handgrip itself you can just make out one of two IR receivers for remote operation using the ML-L3 – the other one is on the rear to the left of the viewfinder. It’s good to see this feature making a comeback on the D3200 after it was dropped on its predecessor.
Moving round to the rear panel, the screen is flanked on the left side by a row of five buttons – playback, menu, zoom in, zoom out and information edit. The zoom out button doubles up as a help display button and the information edit ‘I’ button allows you to change settings on the information display. I’ll talk about how that works in more detail in the handling section later.
On the right side of the screen the four-way controller is flanked top and bottom by the Live view and drive mode buttons plus a delete button. I’m not sure this arrangement is an improvement on the D3100’s layout, particularly the replacement of the combined Live View lever and record button with two separate buttons. You can see the logic in Nikon’s thinking placing the movie record button next to the shutter release, but it only works if you’ve first entered Live view so combining these controls also makes sense. Likewise with the Drive mode lever which has moved from the mode dial to a button on the rear panel.
 |
On the left side of the body a soft plastic flap runs almost the entire height of the body and protects the camera’s ports. The video out port has been replaced with an external 3.5mm microphone socket so you don’t have to rely on the D3200’s built in mono microphone. Below that there’s a combined USB/AV out, so you can still connect the D3200 to a standard definition TV, but there’s also a mini HDMI connector which is a better bet for those with HD TVs. The USB connector also takes the new Wireless Mobile Adapter WU-1A which allows control via a smartphone (Android now and iOS later) which I hope to test in the near future. Lastly, there’s the accessory terminal to which you can connect a cabled remote or the GP-1 GPS receiver.
The D3200’s memory card slot is located separately from the battery on the right side of the camera body, which makes changing cards possible even when the camera is mounted on a tripod. The D3200 is compatible with SD, SDHC and SDXC and UHS-1 cards and uses the same EN-EL14 battery as its predecessor. This is located in the handgrip and accessed via a door on the bottom plate which can be opened when the camera is tripod-mounted. The battery provides enough power for a very respectable 540 shots, though if you use Live View a lot that figure will drop. Remaining battery life is indicated by a three-segment icon, but there’s no percentage readout as on higher end models in the range.
The D3200 has a popup flash with a Guide number of 12 and a hotshoe for external flashguns. Flash compensation and power level is adjustable, and you can also choose from red-eye, slow-sync and rear-curtain options. The built-in flash Guide number increases to 13 with manual control, which matches that of the Canon EOS T2i / 550D. The D3200’s built-in flash can either popup automatically or by pressing a button on the side of the head, which, if you hold it down, lets you quickly set the flash mode using the command dial. Once you’re finished with it, it just pushes back into place.
Nikon D3200 Viewfinder and Screen
The D3200’s screen is a fixed 3in LCD but its resolution has increased dramatically from the 230k pixels of its predecessor to 921k pixels which puts it almost on a par with the 1040k pixel 3in screen of the EOS T2i / 550D. It’s an excellent screen and a big improvement on what went before, but if you put the two cameras next to each other the Canon screen just looks more detailed. The reason is due to the shape of the screens: the D3200’s is 4:3 shaped while the T2i / 550D’s has slightly wider 3:2 shape. Since the native shape of the images from both cameras is 3:2, they fill the screen on the Canon, exploiting all the pixels, whereas they’re displayed smaller on the Nikon with a black band at the bottom. Nikon fills this space with shooting information which must be superimposed over the image on the Canon, but there’s no denying images displayed on the Canon screen look bigger and more detailed. I really noticed the difference on fine detail like the decking outside my studio where the D3200 display suffered from visible moire whereas the Canon did not.
 |
On the D3100 switching to Live View initiated a 30 second countdown timer which made you feel under a certain amount of pressure. That ‘feature’ has now been abandoned in favour of the more conventional approach of adding a Live View option to the Auto off timers page on the Setup menu. This provides three catch-all presets of short, normal and long plus a custom setting that lets you set individual custom auto-off delays for Playback/menus, image review, Live view and the standby timer that turns off the display in all other situations.
Strangely though, the shortest delay you can set for live view is a lengthy 5 minutes. Neither can you disable the image review – the shortest time you can set for that to be displayed is 4 seconds (though a half press of the shutter release dismisses it). While battery life on the D3200 is quite respectable, it’s a little bit irritating not to have more control over power management than the current timers provide.
The Nikon D3200 shares the same viewfinder specification as its two predecessors: a penta-mirror system delivering 95% coverage and 0.8x magnification. Compared with the EOS T2i / 550D which also has 95 percent coverage but 0.87x apparent magnification with a similar crop factor, on paper at least, the Canon gives a bigger view. This is borne out when you compare the view through the viewfinders of the two models, the T2i / 550D’s is a little larger. If the size of the viewfinder is important to you, though, you’ll need to think about a more expensive pentaprism equipped model like the D7000 or the classic D90, although both shoot much lower resolution images: 16 and 12 Megapixels respectively.
Nikon D3200 lens and stabilisation
The D3200 is typically sold with the AF-S Nikkor DX 18-55mm f3.5-5.6 G VR Kit lens. The VR at the end stands for Vibration Reduction, Nikon’s lens-based image stabilisation system. The D3200 body has no built-in stabilisation so whether or not you have this feature depends on the lens you use. The DX format Sensor results in a 1.5x reduction the field of view, so the effective range of the kit lens is 27-83mm.
The D3200’s F-mount can accommodate most Nikkor lenses, but only recent lenses (i.e. type G, D, AF-S and AF-I) will support the full focussing and metering modes. Like its predecessor, the D3200 doesn’t have a built-in AF motor so older lenses can only be used with manual focus. If you want to know if you can use your older Nikkor lenses with the D3200 there’s a full compatibility chart in the manual which you can download from the Nikon website. Given the market for the D3200 it’s more likely that buyers will stick with the kit lens or buy new AF-S lenses and the range is constantly growing with recent additions including a raft of new f1.8 primes: the Nikkor 28mm f1.8G, Nikkor 50mm f1.8G and Nikkor 85mm f1.8G; click each link to see our full reviews! The 50mm is particularly good as a portrait lens for the D3200.
For those who are likely to use the kit lens either predominantly or solely it’s worth knowing that the Nikkor 18-55mm looks and feels like a more expensive lens than the Canon EF-S 18-55 kit lens. The construction feels sturdier, the zoom ring has a smoother action and the AF motor is quieter, though not, as you’ll discover, quiet enough for use during movie recording.
Nikon D3200 with AF-S Nikkor 18-55mm coverage wide |
Nikon D3200 with AF-S Nikkor 18-55mm coverage tele | |
 |  | |
| 18-55mm at 18mm (27mm equivalent) | 18-55mm at 55mm (83mm equivalent) |
To test the effectiveness of the 18-55mm kit lens’s VR stabilisation on the D3200 I zoomed it to its maximum 83mm equivalent telephoto focal length and took a sequence of shots in Shutter priority mode at progressively slower shutter speeds first with stabilisation off and then turned on. As you can see from the 100 percent crops below, the crop on the right is a little soft, but the Vibration Reduction system is capable of eliminating camera shake down to 1/10th – about three stops slower than conventional wisdom suggests.
Nikon D3200 with AF-S Nikkor 18-55mm VR On / Off | ||||
 |  | |||
100% crop, 18-55mm at 55mm 100 ISO 1/10th VR off. | 100% crop, 18-55mm at 55mm 100 ISO 1/10th VR on. | |||
Nikon D3200 shooting modes
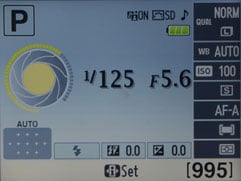
The D3200 Shares the same exposure modes as its predecessor. A quick glance at the mode dial reveals PASM exposure modes helpfully corralled with a white outline, followed by six dedicated scene mode positions, flash off, full Auto (with scene detection in Live view) and finally Guide mode which I’ll talk more about in the handling section.
There are three metering modes, the default Matrix metering uses a 420 pixel RGB sensor to meter a wide area of the frame and set exposure according to tone distribution, colour, composition and, with G and D lenses, distance. The other options are centre-weighted and spot, the latter using the AF area to spot meter.
In Program AE mode I found the Matrix metering had a tendency to overexpose a little in bright conditions, sometimes by as much as 2/3 EV which on a camera without a live histogram is problematic to say the least. Even if there were a histogram, on a consumer camera it’s fair to suppose that many people would be unaware of its presence or function.
One option for more reliable exposure in bright conditions would be to choose Full Auto exposure mode. Generally speaking I found that in full auto mode the D3200 selected an exposure around a stop darker than in Program Auto. Note we’ve found most earlier Nikon DSLRs also had a tendency to over-expose in very bright conditions.
The D3200 provides exposure compensation up to a generous +/-5EV but Nikon continues to deny its entry-level DSLR customers any form of auto bracketing, so if you were hoping to use the D3200 for HDR work you’ll be disappointed. Of course there’s nothing to stop you manually bracketing exposures, but it’s really hard to understand Nikon’s motivation for persisting to deny users a feature that’s commonplace on entry-level DSLR models from Canon, Sony and other manufacturers.
Active D-lighting, which has just two positions on the D3200, On and Off, is on by default and enhances the tonal range to retain detail in the shadow and highlight regions. D-Lighting can also be applied by post processing images in-camera via the Retouch menu in which case you have the choise of three settings. As you can see from the sample images below, Active D-lighting significantly enhances shadow detail in scenes with a wide tonal range and, to a lesser extent, reduces blown highlights. As such I can’t see any reason you wouldn’t leave it in the default On position, unless noise was a factor. Accordingly, Active D-lighting was left in the Default on position for my outdoor real life resolution tests, but turned off for the high ISO noise testing.
Nikon D3200 JPEG, Active D-lighting disabled |
Nikon D3200 JPEG, Active D-lighting on (default) | |
 |  | |
 |  | |
1/30 f5.6 200 ISO |
1/30 f5.6 200 ISO |
Nikon D3200 movie modes
The D3100 was the first entry-level Nikon DSLR to offer Live View and video recording. The D3200 builds on its predecessor’s movie capabilities introducing new 1080p25 and 1080p30 modes to add to the earlier 1080p24. At the lower 720p resolution the same 24, 25 and 30fps rates are available. As on the EOS T2i / 550D, which offers the same HD recording modes, 25fps modes are selectable when the video mode is set to PAL, switch to NTSC and you have access to the 30fps modes; the 24fps option is available whether the video mode is set to PAL or NTSC.
Video is encoded using the H.264 codec. At the 1080p25 setting files are encoded at an average bitrate of 24Mbits/s. The maximum continuous shooting time has been extended from 10 to 20 minutes, which will produce a file around three and a half Gigabytes in size – within the maximum 4GB file size limit of FAT32 formatted SD cards. Nikon recommends a speed class 6 or faster card for movie recording with the D3200.
Like it’s predecessor, the D3200 has a built in mono mic but, unusually for an entry-level SLR it also has an external mic socket. Another novelty is the built-in audio level meters which appear on screen when you switch to Live view. Without the means to adjust audio levels, though, the meters wouldn’t be all that useful and I’m pleased to report that the D3200 allows manual adjustment of audio levels prior to recording – they can’t be adjusted once you’ve started recording though.
Audio levels aren’t the only thing that can be adjusted, the D3200 provides partial exposure control in Manual mode when you turn Manual movie settings on in the Shooting menu. This allows you to adjust the shutter speed and ISO sensitivity prior to as well as during the recording, but not the aperture which remains stuck steadfastly on the value selected before entering Live view. If you want to change the aperture, you must exit live view, change it, then turn Live view back on. Not an ideal arrangement by any means, but an improvement all the same.
Like it’s predecessor, the D3200 offers continuous focussing during movie recording. While this is a great feature to have on a DSLR it’s somewhat marred by the often frantic continuous focussing adjustment which is not only visually distracting but noisy. While this may not be such a problem with all lenses, on an entry level camera it’s one that most people are going to have to put up with. One solution to this would of course be to make use of the external mic socket, but to be honest, I found the simplest solution was to avoid it altogether and use single AF (AF-S) or manual focus for movies.
| |
|---|---|
|
The first thing you’ll notice in this hand-help panning shot is the continual adjustment of the AF in Full-time-servo AF mode. You could reduce the noise problem by using an external mic, but even without the noise the continual refocussing is visually distracting. The 18-55mm kit lens’s stabilisation does a reasonably good job of holding things steady but, though better than many kit lenses in this respect, it’s still very difficult to produce a smooth manual zoom.
| |
|---|---|
|
For this tripod mounted panning shot I set the focus mode to the default single-servo AF (AF-S) mode which produces a much better result devoid of the frenetic focus-seeking of the previous clip. The mono mic pics up quite a lot of wind noise but at least you have the option of fitting an external shielded one if you want.
| |
|---|---|
|
Initially I tried this clip in the D3200’s AF-F mode, but it was unusable, the mirror in the middle of the pan causing it particular distress. AF-S mode works a lot better. For a low lioght shot, the noise quality is good and the auto exposre and white balance react without stepping.
| |
|---|---|
|
This clip should provide a more straightforward test of the D3200’s continuous focussing capabilities in Live view with a nice big coffee cup virtually filling the frame to begin with, then a pan up to a bill holder then ten the bar before returning to the coffee cup. But even when the D3200 does get the subject in focus it’s not content to leave things be, then it seems to give up without even trying to focus on the bar. Clearly continuous AF for movies continues to elude DSLRs and anyone wanting continuous movie AF with a large sensor camera will be better off with a mirrorless CSC or one of Sony’s SLTs.
Nikon D3200
handling
The D3200 is a swift starter ready to shoot well within a second of turning it on. In fact you can take a shot in the time it takes to move your index finger from the on switch to the shutter release and press it, provided you don’t have to wait for the autofocus.
The menu system isn’t as simple and intuitive as it could be though. Like Sony, Nikon goes in for a tabbed menu system with long pages that need to be vertically scrolled. The problem with this is that if you’re hunting for something that’s ‘below the fold’ you need to scroll to find it. This takes a lot more time and effort than on the Canon EOS T2i / 550D which doesn’t fit more items on the screen than can be displayed without scrolling.
For most of the everyday settings, though, you don’t need to go to the main menu because they’re available on the information display and can be changed by pressing the ‘I’ button. Even this could have been made easier than it is though, by enlisting the command dial to change settings once selected with the four-way controller. As it is you have to press the OK button to select the setting then make a further selection from a menu.
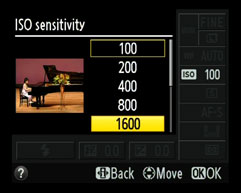
In addition to that there’s a programmable function button on the front left of the camera below the flash button that can be set to image quality/size, ISO sensitivity, white balance or Active D-lighting settings.
 |
 |
 |
 |
 |
 |
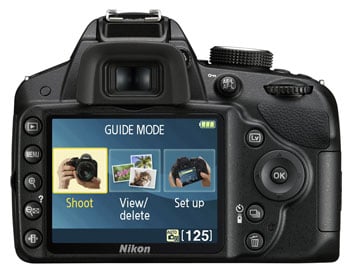
For novices there’s a much better way to find out what’s what on the D3200 and how to make the best use of its features and that’s by setting the Guide position on the mode dial. This mode guides you step-by-step through shooting scenarios offering advice and selecting the appropriate settings for you. Initially there are three options to choose from, but View/delete and Set up are really little more than simple menus, the Shoot option is where the action is. And it’s divided on two paths – Easy and Advanced operation.
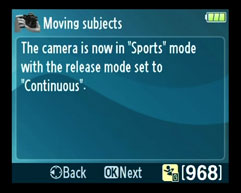
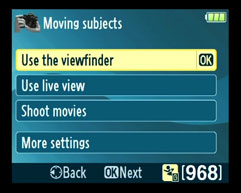
Take the Easy option and you’re presented with nine choices from close-ups to distant subjects via sleeping faces, landscapes and moving subjects. Select one and the D3200 selects the appropriate scene mode and asks if you want to use the viewfinder, Live view, or shoot movies.
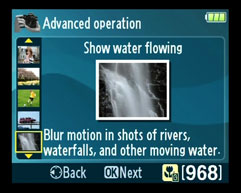
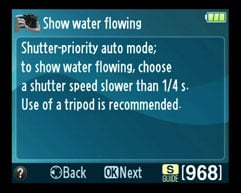
The advanced route offers more interesting creative possibilities including shallow and extended depth of field, freezing people motion, freezing vehicle motion and showing water flowing. Select the latter and the camera sets shutter priority mode and gives you some advice about appropriate shutter speeds and tripods before giving you the option to select one along with a thumbnail to demonstrate the likely results. To get back to the initial Guide mode menu you can press the menu button at any time – the normal menus aren’t accessible in Guide mode.
 |
 |
 |
 |
 |
 |
Guide mode isn’t new, and it isn’t perfect. For example, if you tell it you want to shoot moving vehicles it puts the camera in Shutter prioroty mode and advises you to set a speed faster than 1/1000, but then sits back and does nothing if you select anything slower. But while it won’t suit everybody, as a way to help novice DSLR users get the most from a more sophisticated camera than they’re probably used to while at the same time learning a little about basic photography concepts, its a really good idea that won’t do anything to hurt Nikon’s chances of selling to compact upgraders.
Nikon D3200 Continuous shooting
The D3200 has extended the continuous shooting capabilities of its predecessor from 3fps to 4fps. The drive mode selection lever has been replaced with a more conventional button on the rear panel which activates a menu with the continuous shooting mode alongside self timer and remote options. There’s only one 4fps mode with focus locked on the first frame but exposure metered between shots.
To test the D3200’s continuous shooting I fitted it with a freshly formatted Sandisk Extreme Pro UHS-1 card. With the D3200 set to Large Fine JPEG mode, I fired-off 100 frames in exactly 25 seconds with no sign of the camera slowing – this corresponds to a rate of exactly 4fps. Set to RAW, I managed 14 frames in 3.4 seconds before the camera stalled, which corresponds to 4.1fps. Finally in RAW + Fine JPEG I fired-off 9 frames in just over two seconds, again corresponding to a fraction over 4fps. In each case I shot at 100 ISO and the buffer took around 12 seconds to completely clear. Swapping the UHS-1 card for a Sandisk Extreme card with a speed class 10 rating made no difference to the buffer write times, so although you can use UHS-1 cards in the D3200, there’s no speed advantage to be gained.
Nikon D3200 Sensor
The D3200’s 24 Megapixel CMOS sensor produces images with a maximum size of 6016×4000 pixels. This is a major upgrade with an extra 10 megapixels over its predecessor and makes the D3200 the highest resolution DX body in the Nikon Range.
Files are saved as JPEGs with one of three compression settings, Basic, Normal or Fine. At the best quality Fine setting file sizes are typically around 8-12MB. This is widely believed to be the same sensor as used in Sony’s NEX-7 CSC as well as the SLT-A77 and A65 and so there’s hope and expectation that the D3200 will match the NEX-7’s excellent image quality and high ISO noise performance – take a look at the results pages to see if it fulfils that promise.
The D3200’s shutter speed range is from 1/4000 to 30 seconds plus bulb and its ISO sensitivity range is 100 to 6400 plus hi (12800). To see how the quality of the Nikon D3200 measures-up in practice, take a look at my Nikon D3200 quality and Nikon D3200 noise results pages, browse my Nikon D3200 sample images, or skip to the chase and head straight for my verdict.


