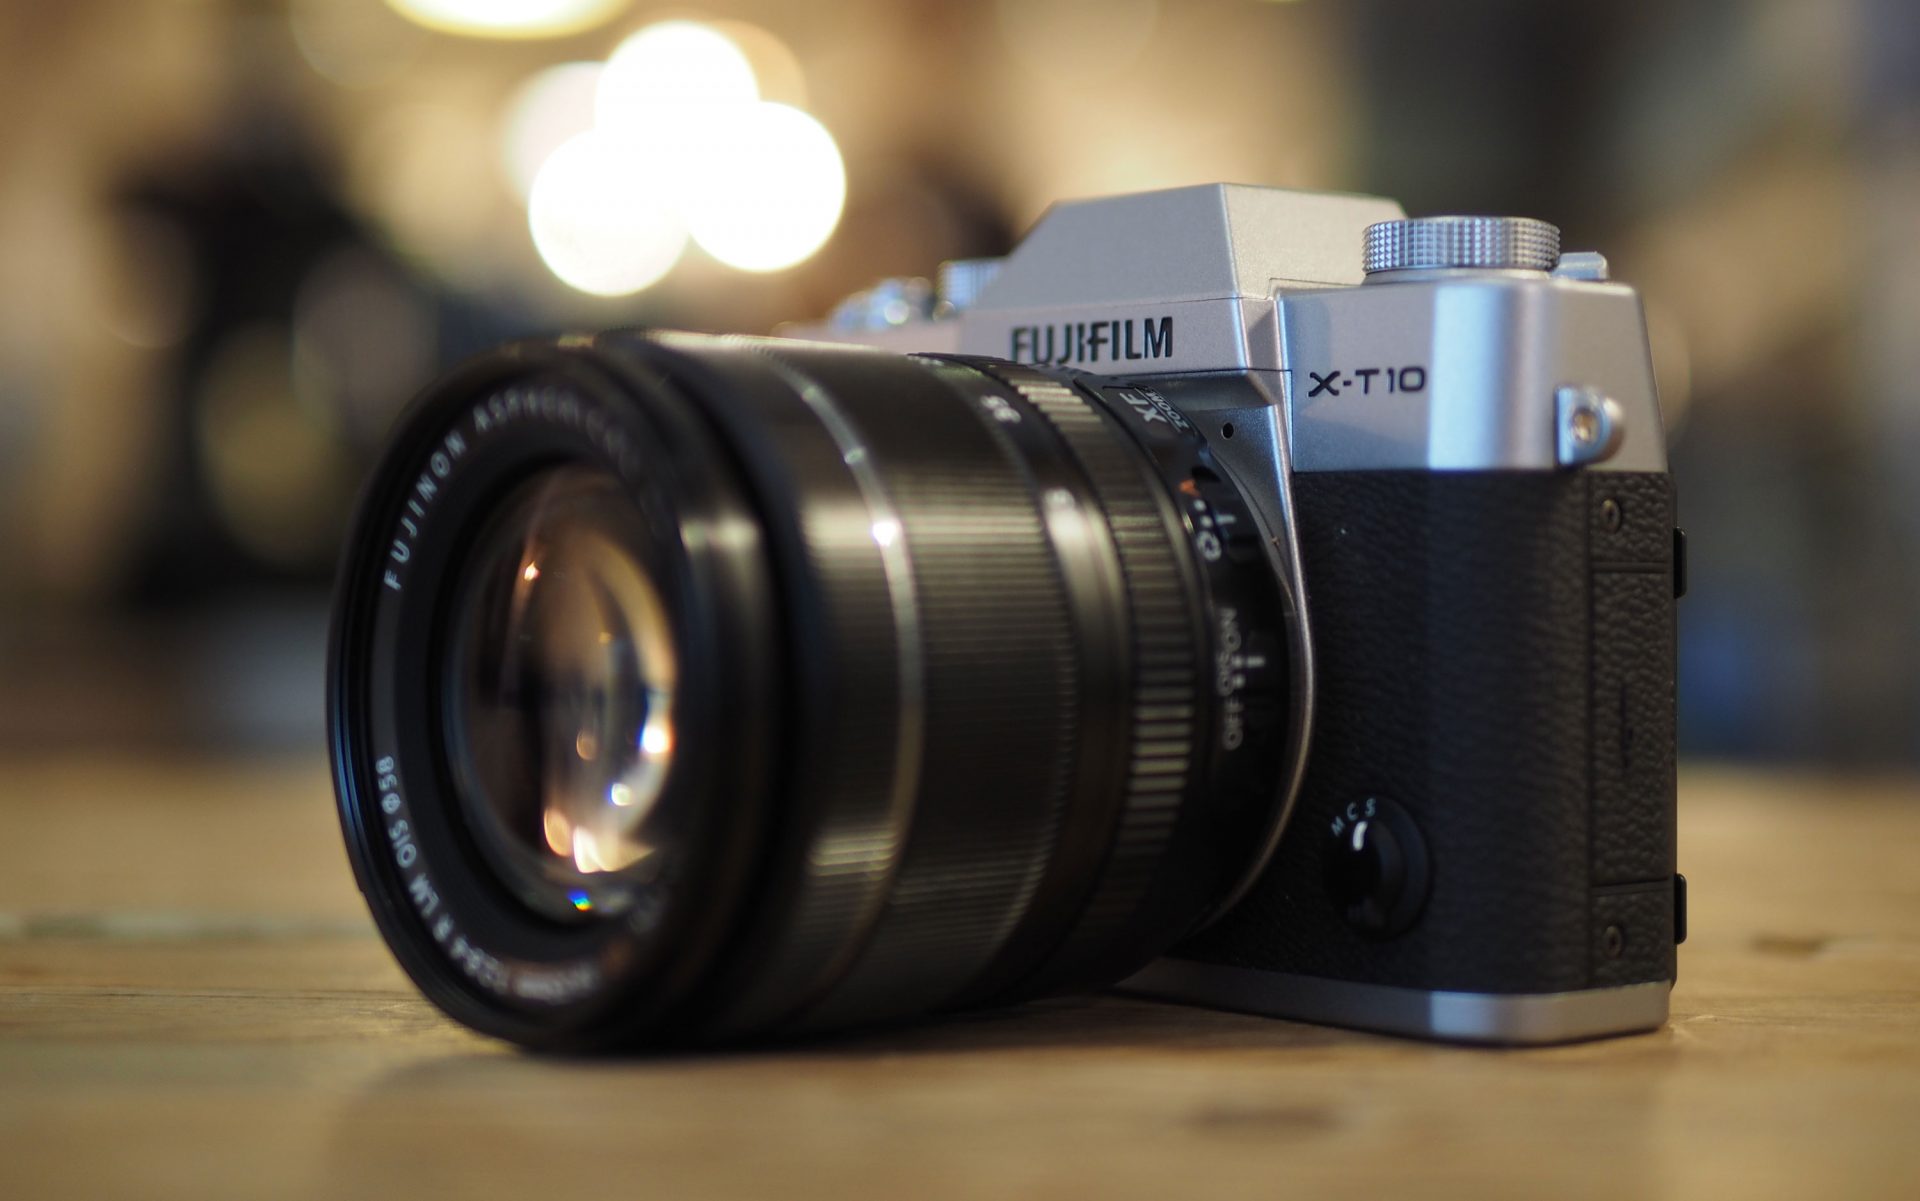
 Fujifilm's XT10 brings the superb image quality of the higher-end XT1 to a smaller, lighter and much more affordable body. The combination of Fujifilm's unique sensor, faithful image processing and superb lenses makes it easy to capture great-looking images straight-out-of-camera without modification. It also boasts an excellent OLED viewfinder, 3in tilting screen, built-in Wifi, a silent electronic shutter option and embedded phase-detect AF for surprisingly respectable continuous AF (at least in the middle of the frame). Look amongst its key rivals and you'll find superior movie quality, smaller (albeit sometimes lower quality) kit zooms, in-camera timelapse videos, deeper bracketing, and on specific models, touch-screens, built-in stabilisation or better continuous shooting. But while the XT10 lacks these features, it delivers the best photo quality in its class and remains the mid-range camera for those who prioritise stills over movies and other frills.
Fujifilm XT10 review
-
-
Written by Gordon Laing
In depth
The Fujifilm XT10 is a mid-range mirrorless camera, aimed at enthusiasts who want the quality and flexibility of the X-system, but in a smaller, lighter and more affordable package than the flagship XT1. Announced in May 2015 it represents a new category in the line-up, although shares a great deal with the XT1 running its latest firmware updates.
As expected, the XT10 shares the same 16 Megapixel X-Trans sensor of the XT1 (and other recent models) and the mount which allows it to accommodate any of the growing range of X-mount lenses. With the same image processor behind the scenes, the image quality is the same as the XT1. Like the XT1, the sensor features an array of embedded phase-detect AF points in the middle which support confident continuous focusing – so long as the subject doesn’t stray out of the phase-detect region. The XT10 also features the new zoning AF options introduced on the most recent XT1 firmware update.
The screen also shares the same resolution and vertical tilting mechanism as the XT1. The viewfinder too employs an OLED panel with the same resolution and refresh as the XT1, albeit with a slightly lower magnification. Continuous shooting is 8fps (for eight frames) or 3fps while memory remains, there’s 1080p video at 24, 25, 30, 50 or 60p, an optional silent electronic shutter up to 1/32000, and built-in Wifi. It’s another strong mid-range mirrorless option, so in my in-depth review I’ll compare it closely against its rivals from Sony, Olympus and Panasonic to help you make the right choice!

Fujifilm XT10 video review
Fujifilm XT10 design and controls
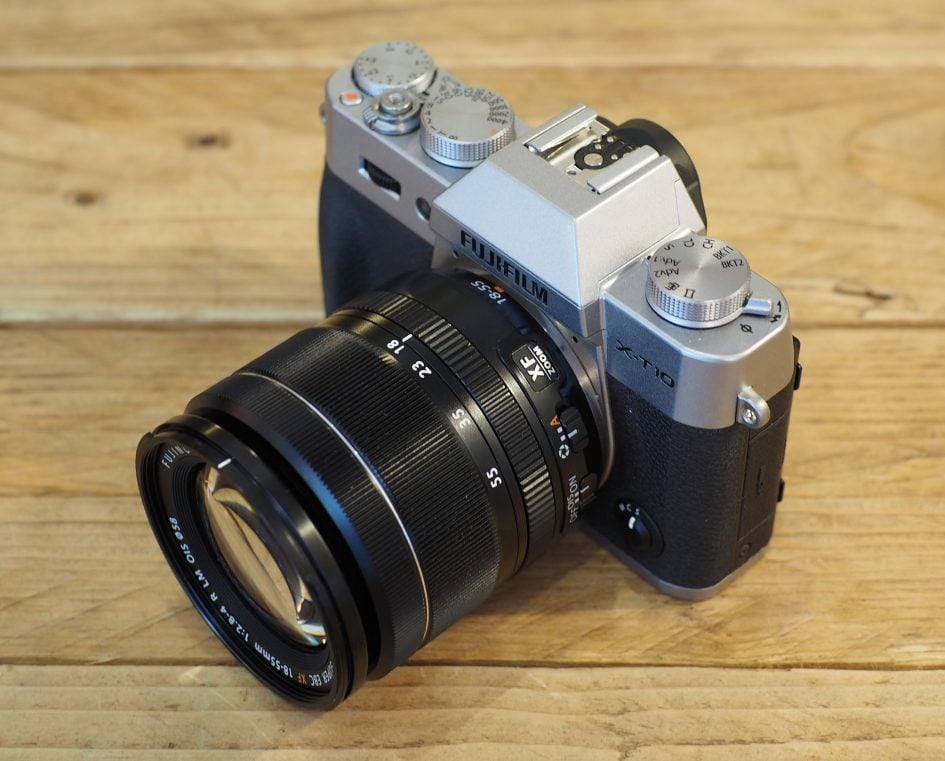
The Fujifilm XT10 is a compact retro-styled camera that resembles a slightly smaller version of the flagship XT1. Measuring 118x83x45mm and weighing 381g with battery, it’s a little shorter and narrower than the XT1 and slightly lighter too. This puts the XT10 in the same ballpark as the Olympus OMD EM10 Mark II, making them two of the smallest cameras around with interchangeable lens mounts and viewfinders housed in a DSLR-styled hump on top of the body.
It is of course important to take lenses into consideration when comparing operating size and weight, and the XT10 is typically sold in a choice of two kits with the cheaper XC 16-50mm f3.5-5.6 (adding 62mm to the thickness and bringing the total weight to 576g) or the mid-range XF 18-55mm f2.8-4 (adding 70mm to the thickness and bringing the total weight to 691g).
Compare this to the EZ 14-42mm kit zoom for the Olympus which, thanks to a collapsing design, adds just 23mm to the thickness and brings the operational weight to 483g.
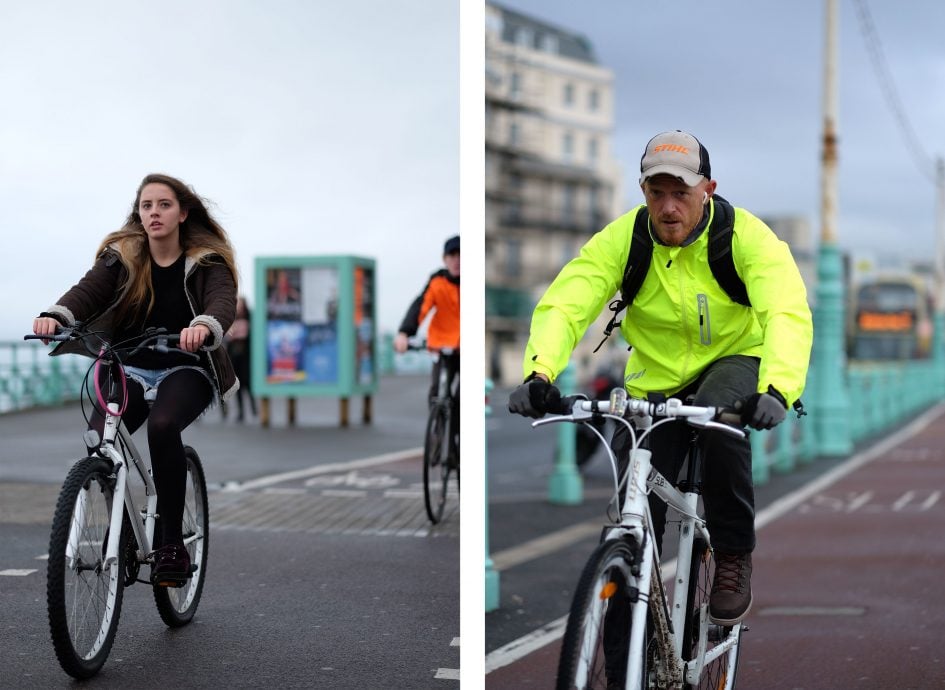
To put it in perspective, here’s the EM10 II flanked by the Sony A6000 on the left and the Fujifilm XT10 on the right. The flat-topped Sony body’s actually a little smaller still, measuring 120x67x45mm and a tad lighter too at 344g for the body plus battery; its collapsing kit zoom also keeps the overall size down, although sadly the quality of this lens lets the body down. Meanwhile Fujifilm’s XT10 body is pictured here with the larger of its two kit zooms, the XF 18-55mm. Clearly the Fujifilm XT10 fitted with its kit zoom is the largest and heaviest of the bunch and unlike the smallest combinations won’t squeeze that comfortably into a coat pocket. But it’s still a lot smaller and lighter than a comparable DSLR and the flipside of having a non-collapsing kit zoom is superior optical quality as you’ll see in my results pages.
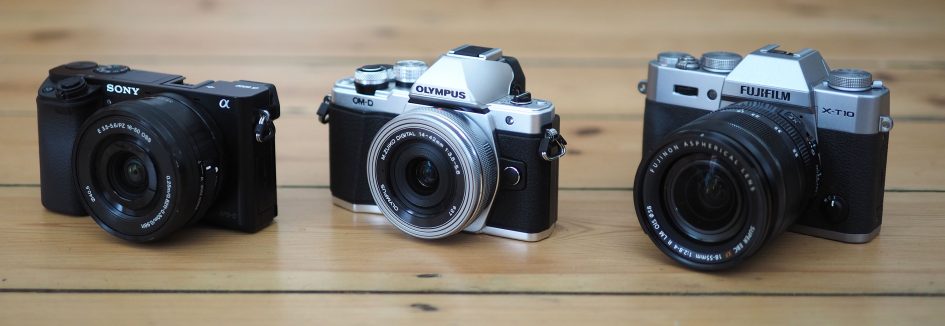
I should also mention the fourth camera you ought be comparing these against, Panasonic’s Lumix G7, which measures 125x86x77mm and has a body-weight of 410g with battery. Panasonic offers the G7 with a kit zoom that may not be as small as the Olympus and Sony pancakes, but is still very compact while also delivering respectable quality – a great balance.
So all four share roughly the same body width and thickness, and those with viewfinder humps are around the same height too. The flat-topped Sony A6000 manages to be a little shorter thanks to its corner-located viewfinder, but it has a shorter, wider screen as a consequence.
Of the four cameras, the OMD EM10 II has the smallest grip, closely followed by the XT10, and if you have larger hands you’ll almost certainly prefer the more substantial grips of the Sony and Panasonic. But I found the ridges on the front and the thumb rests on the rear of both the Fuji and Olympus offered surprisingly effective purchase in my (admittedly fairly small) hands. If you love the Fuji and Olympus bodies but wished they had bigger grips, then fear not for both companies sell optional accessories which screw on and boost their respective grips. If you’re coming from the higher-end XT1, perhaps looking at the XT10 as a backup body, then you’ll notice the grip is less pronounced on the XT10.
At this point I should also mention the DSLRs these cameras go up against in terms of specification and price: Nikon’s D5500 (124x97x70mm / 470g) and Canon’s EOS 750D / T6i (132x101x78mm / 555g). These are larger bodies all-round, and once you add their respective kit zooms the differences become even greater, especially for Canon who’s EF-S 18-55mm STM doesn’t collapse to save space. The flipside is these two DSLRs do give you more to hold onto, but I have no complaints with the feel of the four mirrorless models in my hands.
None of these mid-range mirrorless or DSLR cameras are weather-sealed. For that you’ll need to spend more on a semi-pro body, like the XT1. That said, I have used all of the cameras mentioned here in inclement conditions without any issues.
In terms of controls, the XT10 shares a similar philosophy with the XT1, although with a number of adjustments and in some respects even improvements. Like the XT1, there’s no mode dial on the XT10; instead both cameras adopt the approach of older film cameras with a dial for the shutter speed at the top of the body that’s coupled with an aperture ring on the lens.
The exposure mode is subsequently defined by the position of these dials. With both set to A, the XT10 is put into Program mode and will set both the aperture and shutter speed automatically. Leave the shutter dial at A and turn the aperture ring (or set the switch on the barrel away from A) and you’re in Aperture Priority. Leave the aperture ring at A and turn the shutter dial and you’re in Shutter Priority. Turn both away from A and you’re in Manual.
It’s an approach that will be familiar to anyone who’s come from older film SLRs, but newer digital-only photographers may find it unusual not having a mode dial with PASM options. You’ll also notice the shutter dial offers shutter speeds in increments of 1EV between the top mechanical shutter of 1/4000 and one second. If you want faster shutter speeds up to 1/32000 (with the optional electronic shutter) or slower ones up to 30 seconds for long exposures, or indeed would like to access shutters at 1/3 EV increments, then you’ll need to set the closest value on the shutter dial, then use the finger dial on the front to fine-tune or extend. To me this is overly complicated and arguably a case of retro for retro’s sake. Is the shutter dial really making life easier, or is it there for style and nostalgia? XT1 owners might enjoy this approach, but is it the best system for the target market of the XT10?
To be fair Fujifilm has made a small but useful change to the T mode on the shutter dial which previously accessed exposures of 2 to 30 seconds on the XT1 via the finger dial, but now on the XT10 lets you set any of the shutter values from 30 seconds all the way up to 1/4000 (with the mechanical shutter only) or 1/32000 (when the electronic shutter is enabled). In this way it’s possible to avoid the shutter dial altogether, although again this questions why it’s there in the first place.
Fujifilm has also made the XT10 more beginner-friendly than the XT1 with a switch around the shutter dial which overrides everything and sets the camera to fully automatic – this works like a ‘Don’t Panic!’ button and is great if you quickly need to take a photo or hand the camera to someone else.
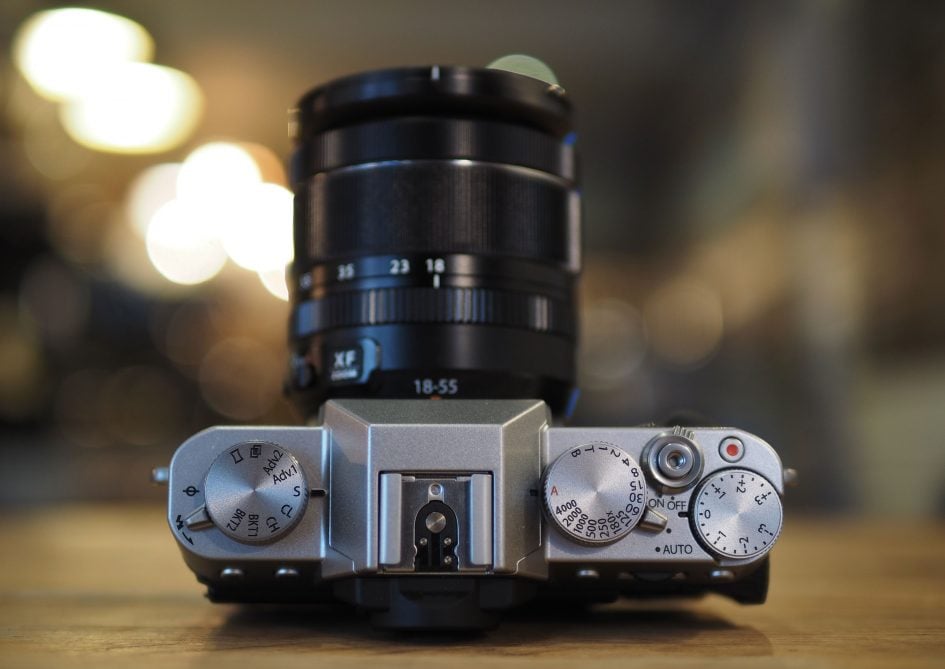
To the right of the shutter dial on the XT10 is a dedicated exposure compensation dial with a range of +/-3EV; this matches the XT1 and while the dial is a little smaller, it’s also a little stiffer to turn which resolves an issue I had with it turning by accident on the XT1. The shutter release is positioned between the two dials, but unlike the XT1 is threaded for an old-style mechanical cable release accessory. As someone who grew up with film SLRs, I appreciate this nod to the past, but again wonder how relevant it is to modern photographers; indeed while I have a bunch of vintage cable releases that’ll work with the XT10, I’m not sure how easy they are to get hold of nowadays. You can however alternatively remote control the XT10 via its USB port or Wifi if preferred.
To the left of the viewfinder hump on the XT10 you’ll find a dedicated drive mode dial with a lever around the left side which pops-up the built-in flash. This means the XT10 lacks the dedicated ISO dial of the XT1, but it’s easy to customise a button on the rear to access the sensitivity. The drive mode dial lets you select the continuous shooting options, along with panorama, bracketing and special effects, the latter chosen in a menu but deployed via the dial.
The rear controls of the XT10 closely match the XT1 in layout and function, although I’m pleased to report the buttons are now a little more raised than before which makes them a lot more positive to press; it’s little things like this which make a big difference in use. It’s possible to customise the function of the four cross keys, along with the dedicated Function button in the lower right corner along with the movie record on the top.
The XT10’s finger and thumb dials also feature a push-click function, giving them greater flexibility than the XT1. The thumb dial’s push-click function is locked to providing focus-assist (replacing the dedicated button for it on the XT1), but the front finger dial’s push-click can be customised – for example I set mine to adjust the ISO sensitivity.
Pressing the Q button presents 16 settings on-screen (in a four by four array) which can be quickly adjusted using the cross keys and dials. It’s possible to customise which settings are presented here and in which order, allowing you to easily access the things you need. I added the Face Detection option to the Q menu for quicker toggling on and off than going through the normal AF menu.
The 16 options with their chunky icons are ripe for control using a touch-interface, but sadly Fujifilm has continued to resist adopting this technology. It’s a shame as I find it so easy to use the touchscreen on the Olympus and Panasonic bodies to quickly reposition the AF area or navigate quick menu options. I think it would have enhanced any of the X-series bodies, but particularly models like the XT10 which are partly aimed at upgraders of devices which almost certainly had touchscreens.
Staying with the screen, the XT10 is equipped with a 3in / 920k dot / LCD panel that can tilt vertically upwards by about 90 degrees and angle down by about 45 degrees. In this respect it shares similar flexibility to the screens on the Olympus EM10 II and Sony A6000, although Panasonic’s Lumix G7 enjoys the greater flexibility of a side-hinged fully-articulated screen. Of these four, only the Olympus and Panasonic have touch-sensitive screens. As I mentioned earlier, I find touch-screens invaluable for repositioning AF areas and navigating quick menu interfaces – I think the XT10 would have benefitted from having one.
The electronic viewfinder employs the same 2360k dot OLED panel as the flagship XT1, although in-line with other mid-range cameras, couples it with a lower magnification than the top models. So while the XT1 boasts an industry-leading 0.77x magnification, the XT10 offers 0.62x – so the image has the same detail and style, but looks a little smaller through the viewfinder.
But compared to rivals, it’s in the right ballpark. The XT10, OMD EM10 II and Lumix G7 all share the same viewfinder resolution and panel technology, and the image magnification on the XT10 and EM10 II is roughly the same. The Lumix G7 takes a lead on viewfinder magnification though with a larger than average image for its price point. Meanwhile the Sony A6000 is showing its age with a smaller and lower resolution viewfinder.
The XT10 viewfinder inherits a trick from the XT1 which separates it from most other cameras though: when you turn the camera to the portrait (or tall) orientation, the shooting information is repositioned to the bottom of the frame and turned to remain upright. This is brilliant if, like me, you shoot a lot in this orientation. No more do you need to read the exposure details on their side. It’s such an obvious and useful trick, you wonder why so few cameras with electronic composition offer it. Shame the formatting trick isn’t replicated on the screen though.
In terms of shooting information, the XT10 shares essentially the same customisable views as the XT1. So you can enable a single-axis levelling gauge, live histogram, a scale indicating focus distance and a choice of three alignment grids. These can all be shown in the viewfinder or on-screen, and the DISP button makes it easy to switch to a clean view if preferred. Meanwhile a sensor below the viewfinder can switch between it and the screen automatically, or you can force one to stay active using the View Mode button to the right of the viewfinder (slightly repositioned compared to the XT1).
In terms of ports, the XT10 is equipped with the same three as the XT1 behind a flap on the left side of the body: a USB 2 port, 2.5mm jack and Type-D HDMI Micro Connector (a smaller version than the Type-C HDMI port on the XT1). Like the XT1, you can use the 2.5mm jack to connect an external microphone or a cable release, and again the USB port can also accommodate the optional RR-90 cable release accessory. Having a 2.5mm jack for an external microphone isn’t ideal as most employ 3.5mm plugs that will obviously require an adapter, but if you’re using the Fuji system, movies are unlikely to be a priority for you. As mentioned earlier, the XT10 is also equipped with Wifi, allowing you to also use an iOS or Android device as a remote control and I’ll detail that later in the review.
I used my Triggertrap cable accessory with the XT10, using the same USB connector as the XT1. I’m pleased to report the XT10 seems to be better-sealed against light leaks and unlike the original XT1 models, there’s no obvious leaks when the port door is opened. I confirmed this with long exposures lasting several minutes in broad daylight.
Moving on, the XT10 is powered by the same NP-W126 battery as the XT1, X-Pro1, XE1, XE2, XM1 and XA1, allowing you to use spares from any previous X-mount body – thanks Fujifilm! Like the XT1, Fuji reckons it’s good for around 350 shots which seems fair given my own usage, although like other cameras if you start to regularly shoot movies or use Wifi, you’ll find the battery life depleting much faster.
Fujifilm supplies the XT10 with a traditional AC charger, although I’d sooner they – and everyone else – follows Sony’s strategy of allowing in-camera charging over a USB connection. That way I can top-up the camera wherever I am, even if there’s no AC outlet nearby. I regularly top-up or even completely recharge my Sony cameras using portable USB batteries, car adapters or simply a port on my laptop and it’s so much more flexible than having to remember an AC charger and finding an outlet for a couple of hours.
One final note: the XT10, like other mid-range cameras, houses its SD slot alongside the battery under the camera. This differs from most higher-end models, like the XT1, which house the SD slot in the grip on the side of the body. Since the XT10’s tripod thread is positioned next to the battery compartment, you’ll block access to it and the card slot when mounted on a tripod. This may not impact many people, but it’s worth noting.
Fujifilm XT10 lenses
The XT10 is fitted with Fujifilm’s X-Mount which, with the APS-C sensor behind it, applies a 1.5x field reduction factor to lenses – so the XC 16-50mm and XF 18-55mm kit zooms deliver an equivalent field of view of 24-75mm and 27-83mm respectively.
Fuji’s X-series may be younger than Micro Four Thirds and Sony’s E mount, but in just under five years they’ve launched 20 quality models, and there’s several others from third parties, covering most bases. Importantly all of the Fujifilm lenses I’ve tested so far have been of a very high standard.
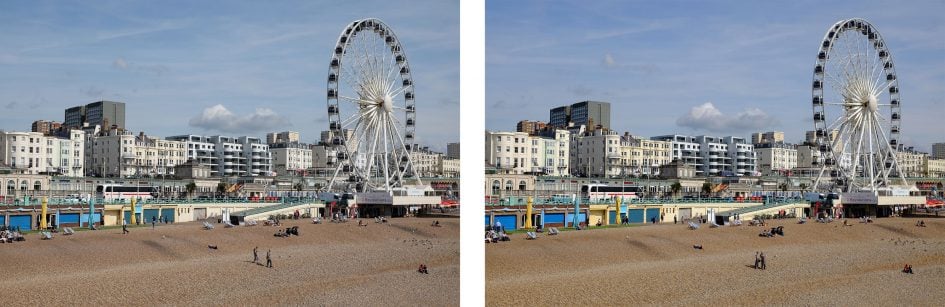
As noted above, the XT10 is typically supplied in a choice of two lens kits with either the budget XC 16-50mm f3.5-5.6 or the higher-end XF 18-55mm f2.8-4. Fujifilm supplied my XT10 with the latter for testing as it offers a noticeable step-up in quality over most kit zooms, along with a greater chance to deploy shallow depth-of-field effects. Although as seen in the physical comparisons earlier, it also adds to the size and weight of the package, not to mention the cost. Here’s the coverage it delivers in practice.
Above: Fujifilm XF 18-55mm coverage. Left at 18mm (27mm equiv), right at 55mm (83mm equiv)
If you’re using Fujifilm’s own lenses, the XT10 offers a very neat enhancement first seen on the XE2: Lens Modulation Optimiser, or LMO for short, attempts to counteract the blurring introduced by diffraction when shooting at smaller apertures, and also corrects softening towards the edges and corners of the image.
Fujifilm has extensively profiled all of its X-Mount lenses, and by default LMO is enabled on the XT10 when you fit one of them. Note LMO is only applied to JPEGs, so if you’re a RAW shooter you can move along. I did some comparisons with and without LMO enabled at small apertures around f16 and found the versions with LMO enabled were crisper, especially towards the edges, but equally never felt over-sharpened. It’s this kind of clever, balanced processing which makes the out-of-camera JPEGs from modern Fujifilm cameras a dream. I rarely found an out-of-camera JPEG which I could improve upon by starting with the RAW file instead. Admittedly I’m not into extreme HDR or tonal adjustments, but I do feel Fujifilm’s in-camera processing is the best in the industry.
As for the kit zooms, both offer optical image stabilisation, with the XF 18-55mm claiming four stops of compensation, To put it to the test I shot a still-life scene with the lens set to 55mm, where traditional camera wisdom would recommend a shutter speed of 1/80 or faster to avoid camera shake without stabilisation.

Above: XF 18-55mm at 55mm and 1/5. OIS off (left), OIS enabled (right)
On the day I required a shutter of 1/40 to handhold the 18-55mm at 55mm without stabilisation and found I could achieve the same result at 1/5, corresponding to three stops of compensation.
Fujifilm XT10 shooting modes
The Fujifilm XT10 doesn’t have an exposure mode dial. Instead, like earlier X-mount cameras, it adopts the same technique used by older film SLRs for many years. The body has a shutter speed dial and (most of) the lenses have aperture rings, and both offer an A position. Set both the shutter speed dial and the lens to A and the XT10 enters Program mode. Set the shutter dial to A, but turn the aperture ring and you’ll be in Aperture Priority. Set the lens to A, but turn the shutter speed dial and you’ll be in Shutter Priority. And finally if you turn both the shutter speed dial and aperture ring away from A, you’ll be in full Manual. If you’ve used this system before it feels natural, but even if you’re coming from a system with a PASM mode dial, it’s easy to get to grips with.
In a welcome upgrade over the XT1, the XT10 alternatively offers a fully automatic mode by simply flicking a switch around the shutter dial to AUTO. This is great for beginners or when handing the camera to someone to take a shot, or simply when you’ve been experimenting with unusual settings and spot a quick photo opportunity. A single flick sets the camera to full Auto, and one more takes you right back to where you were before.
The XT10 offers the same shutter speed range as the XT1, with exposures from 1 second to 1/4000 in 1EV increments directly accessible from its shutter speed dial; the fastest flash sync speed is 1/180 and there’s a dedicated position for it on the dial. If you’re in Shutter Priority or Manual mode, it’s possible to fine-tune these values using the front soft dial by +/-0.6EV in 0.3EV increments. If you set the shutter speed dial to T, you can use the front dial to choose from the entire shutter speed range of 1/4000 to 30 seconds, an enhancement over the original XT1 which limited you to choosing between two and 30 seconds from the T position.
There’s also a B option on the shutter dial for Bulb exposures which can last up to 60 minutes so long as the shutter release is kept pressed by hand or using an optional cable release; sadly it’s not possible to trigger exposures longer than 30 seconds remotely using the smartphone app even if the camera’s in Bulb mode. I used the same Triggertrap cable as on my XT1 for long exposures on the XT10.
The XT10 also offers an electronic shutter option as standard, a feature added to the earlier XT1 via a firmware update. If the mechanical and e-shutter option is enabled, the XT10 uses the mechanical shutter for speeds up to 1/4000, after which it switches to the electronic shutter for speeds up to 1/32000; an impressive top speed when rival e-shutters generally stop at 1/16000.
Above: 1/10000, f1.4, 200 ISO, 16mm
Like all electronic shutters, there can be issues with skewing if the camera or subject are in horizontal motion while the sensor is still being read, but under the right conditions the faster shutters offered by an electronic shutter can be useful for exploiting bright apertures in equally bright conditions without the need for ND filters. Above is an example I took at a speed of 1/20000. They also allow silent shooting in discreet environments. As for the mechanical shutter sound, it’s a fairly quiet double-click on the XT10, a tad quieter than the OMD EM10 II, but not by a significant margin.
Auto Exposure Bracketing (AEB) is available but surprisingly modest with just three frames at 0.3, 0.6 or 1EV increments, making it little more capable than a point-and-shoot for HDR fanatics. There’s also no in-camera HDR for those who prefer an automatic life. The only positive aspect is that the entire three frame AEB sequence can be triggered with a single press of the shutter release or the self-timer, allowing the camera to grab all the frames without further presses. This makes it all the more annoying there isn’t five or seven frame bracketing, or broader increments available. Note both the Olympus OMD EM10 II and Panasonic Lumix G7 offer seven-frame AEB.
ISO, Film Simulation, Dynamic Range and White Balance bracketing are also available, but strangely the XT10 subsequently switches off any RAW recording and becomes JPEG only. This is odd since each of the modes allows RAW or RAW+JPEG shooting in the non-bracketing modes.
The Multiple Exposure option on the dial lets you take two shots and have the camera combine them into one. If you don’t like the shots as you take them, you have the chance to retry, but other than that there’s no other options.
Turn the drive dial to ADV and you can deploy one of eight Advanced Filter effects: Toy Camera, Miniature, Pop Colour, High Key, Low Key, Dynamic Tone, Soft Focus and Partial Colour (with six sub-options to pass red, orange, yellow, green, blue or purple, leaving the rest of the image in monochrome). The effects deliver the usual results, but sadly you can’t apply them to video – they’re just ignored as soon as you press the red record button, so no chance of capturing a miniature movie with the XT10. Annoyingly the XT10 also won’t record a RAW file when using the Advanced filters – I’d have preferred the Olympus approach where in RAW+JPEG mode, the effect is applied to the JPEG, leaving an untouched RAW as a backup to the JPEG with the effect applied.

Above left: XT10 Toy effect, above right: XT10 Miniature effect

Above left: XT10 Dynamic Tone effect, above right: XT10 Soft Focus effect
At the end of the drive dial is the Panorama mode, which lets you choose from medium and long, with panning in any of four directions. Like Sony and Panasonic, but unlike Olympus, the XT10 will capture multiple images during the pan and stitch them together in-camera for you. The stitching works quite well as demonstrated in the examples below which have avoided the banding in the sky I experienced with the XT1 previously. Note my horizontal and vertical pans measured 9600×2160 and 6400×2160 pixels respectively.

Above: Fujifilm XT10 Panorama (horizontal)

Above: Fujifilm XT10 Panorama (vertical)
Delve into the menus and you’ll find an interval timer, with up to 999 frames captured at intervals between one second and 24 hours. You can also set a delay up to 24 hours before the sequence begins, although the camera still won’t assemble them into a timelapse video afterwards, something both Olympus and Panasonic now offer as standard, the latter even offering it at 4k resolutions up to 30fps.
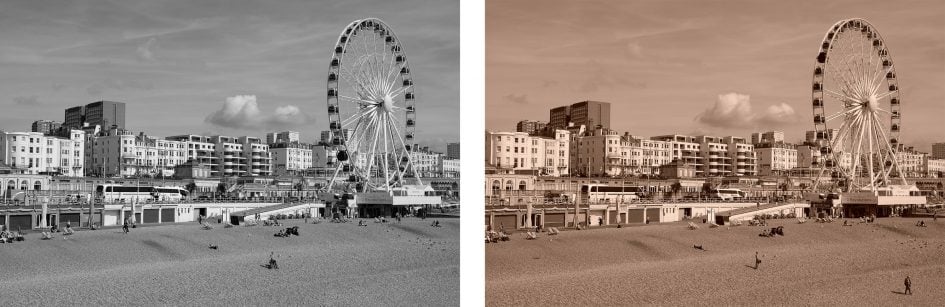
A further set of picture effects are available with the XT10’s Film Simulations which emulate classic Fujifilm film stock. The default setting is Provia, and that’s what you’ll see in all my sample images unless otherwise stated; it delivers a good balance of contrast and colour without being too punchy or saturated. If you fancy something more vivid, then choose Velvia, which coincidentally was always my favourite colour film for shooting landscapes. If you prefer a more subdued look, go for Astia, while portrait photographers may like Pro Neg Hi and Standard. For a classy vintage look, try Classic Chrome or Sepia or one of the four monochrome modes, three of which feature yellow, red and green filters. I enjoyed using the Monochrome Red option which really darkened blue skies and brought out cloud detail.
Above left: Provia Film Simulation, above right: Velvia Film Simulation

Above left: Astia Film Simulation, above right: Classic Chrome Film Simulation
Above left: Monochrome Film Simulation, above right: Sepia Film Simulation
The Film Simulations are another part of the equation behind the lovely output from Fujifilm’s cameras. I find I can achieve the mood I want using these subtle but effective processes, rather than resorting to often heavy-handed filters on other systems. Here’s some examples in practice.

Above: Velvia: 1/600, f1.4, 400 ISO, 16mm

Above: Classic Chrome: 1/680, f1.4, 400 ISO, 16mm
Fujifilm XT10 focusing and continuous shooting
The Fujifilm XT10 is equipped with the same hybrid AF system as the flagship XT1, employing both contrast-based and embedded phase-detect technologies. The AF system is split into 49 or 77 areas (depending on mode) which stretch to almost the edge of the frame, although the phase detect region is limited to a small area of nine points in a 3×3 grid in the middle.
The XT10 can also display a useful distance scale across the screen or viewfinder with the focused subject distance marked by a bar which changes thickness to indicate the effective depth of field depending on distance, focal length and aperture. It’s really fun to use.
Under the AF Setting menu you can choose between Single Point, Zone, or Wide / Tracking. Single point lets you choose one of the 49 areas manually from a 7×7 grid. Zone and Wide / Tracking employ a finer array with 77 areas in an 11×7 grid. Zone groups a small bunch of these AF areas (5×3, 5×5 or 3×3) then lets move them anywhere across the entire array – handy for concentrating the camera’s attention to a particular area, but still letting it automatically select within that region. Finally, Wide / Tracking hands over AF area selection to the camera from the entire array.
The XT10 also offers Face Detection, enabled again from the AF Setting menu. Once enabled you can deploy additional eye detection with options to lock-onto the left, right or closest eye. If a face is not detected, the XT10 reverts to the previously selected AF mode and area – a nice upgrade over the original XT1 firmware which didn’t support manual single area positions once Face Detection was enabled.
In terms of AF modes, a small dial on the front surface switches the XT10 between Single, Continuous and Manual modes. In Single AF using the 18-55mm f2.8-4 zoom or 56mm f1.2 prime, the XT10 felt quite swift, generally locking-onto the subject in good light with only a minimal pause; in lower light it searched a little but normally found the focus within a second. It’s not quite as quick as the Single AF modes on the Panasonic and Olympus cameras, but it’s getting close which is a huge improvement over earlier X bodies.
In terms of Continuous AF the experience can be very good, but it depends a great deal on the subject’s position on the frame, the AF area mode and which lens you’re using. As noted earlier, the XT10 features a small bunch of phase-detect AF points concentrated in a 3×3 array in the middle of the frame. You’ll want to use these for effective continuous AF; indeed when the drive mode is set to high and the focus to continuous, you’ll only be able to use these points.
In tests with approaching cyclists, I enjoyed the most success when using the Zone mode rather than the single AF or Wide area modes. Even when the single AF area was kept consistently over the subject, the XT10 often struggled to correctly lock-on for more than a couple of frames in a burst. The wide area mode may be able to identify a subject moving across the frame, but if it’s outside the central phase detect region the camera struggle to keep it in focus. Switching to Zone AF (with the central area) though proved much more successful and in bursts of ten frames, I generally enjoyed six to eight that were in sharp focus.
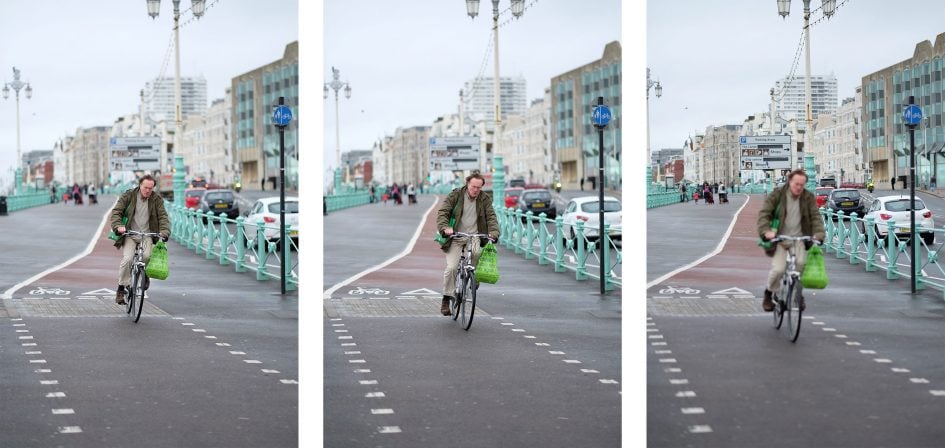

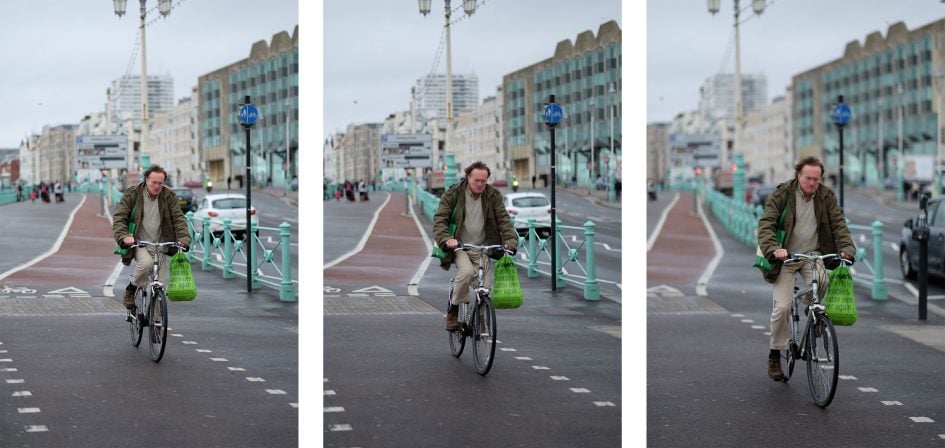


Of the sharp frames, most or even all were at the end of the burst when the subject was closest and the camera was in no doubt what to focus on. The failed images were generally towards the start of each sequence as the camera struggled to identify the desired subject. Again I tried some tests with the Single AF area to be more specific, but with a lower hit rate still. Zone AF is the way forward for action photography on the XT10 – and XT1.
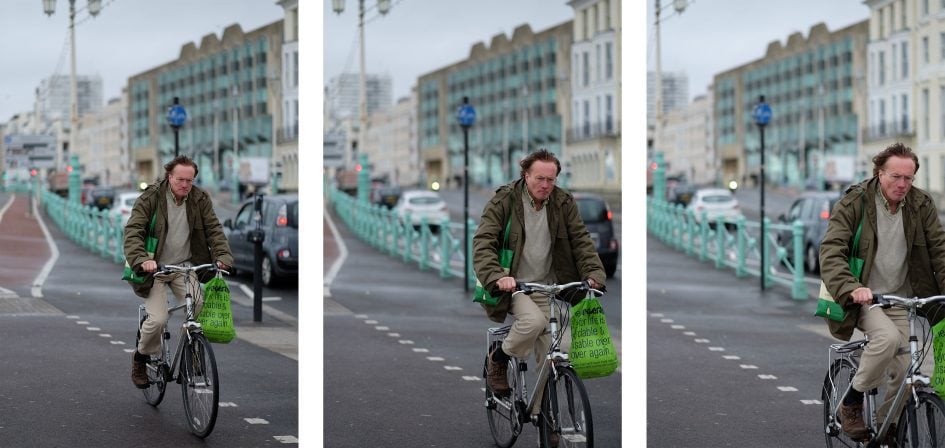
I mentioned having the right lens earlier as the focusing speed can vary quite considerably within the X-series. I enjoyed the greatest success with the XF zooms and the least success with the primes. There are exceptions – I found I could achieve a 60 to 80% hit rate with the XF 56mm wide-open at f1.2 with the right subject – but in general anyone into action should aim for the zooms. Revealingly when Fujifilm promotes its X-series AF capabilities, it invariably pairs bodies with the XF 50-140mm f2.8; indeed its AF guide to the XT1 and XT10 almost only recommends zooms over primes for continuous autofocusing. But then to be fair most systems ensure their bright telephoto zooms focus nice and fast.
Above: Fujifilm XT10 Continuous AF with XF 56mm f1.2
At this point I should mention the competition: Panasonic and Olympus may have slightly faster Single AF acquisition and the ability to keep focusing in lower light (not to mention having the benefit of touch-screens for easy repositioning of AF areas), but they fall down on continuous autofocus. Panasonic is slightly better than Olympus in this regard, but I found the XT10 to be superior – at least when using zone focusing with the central area and a lens that can keep-up. For the best continuous AF experience of all at this price point though, Sony’s A6000 remains King with its broad array of embedded phase-detect AF points, fast continuous shooting and deep bursts. It may not be as desirable in other respects, but for sports and action it’s the best choice.
Moving on, the manual focus mode, inherited in its entirety from the XT1, is one of the best around, offering a wide choice of focusing aids which really allow you to nail the shot. These are all based around the Focus Assist control assigned to the rear dial push. Press it once and the XT10 magnifies the selected AF area to fill the screen for immediate confirmation – this also works in the AF modes, and the view remains magnified until you press it again.
Press and hold the Focus Assist button for a moment and you can choose one of two display views enhanced for manual focusing. One is Focus Peaking, which surrounds subjects in focus with a highlight – this is especially useful when used in combination with a magnified view, again by pressing the Focus Assist button. The second enhanced view offers a digital split image, which draws inspiration from the split image focusing screens employed by most manual focus film SLRs. On the XT10, a small window in the middle of the frame is turned black and white and split into five strips. When the image is out of focus the strips shift in relation to each other, showing the subject chopped-up a little. As the image comes into focus, the strips shift back into place, and when the subject is no longer disjointed in the window, you know it’s sharp.
The digital split image is a very clever way of presenting focusing, and will delight anyone who used similar systems on older film cameras, but like those it works best when the split image crosses well-defined lines. Direct it at more organic shapes and it’s often hard to see whether the strips are aligned or not. I personally found the focus peaking more useful, again especially when used in conjunction with a magnified view.
And if at any time while manually focusing you think, ‘oh sod it, I wish the camera could just autofocus this one’, you can simply press the AF-L button and it’ll do the job for you, assuming of course you’re using a lens with AF.
Overall the focusing on the XT10 is very good. The Single AF may not be quite as quick as the latest Olympus and Panasonic models, but it’s at least as fast or faster than other rival cameras, and the face detection works very well. The Continuous AF may require a zoom and the subject to remain in the middle of the frame, but it can track approaching or receding subjects with greater success than any mirrorless camera with a largeish sensor apart from Sony’s. And finally the manual focusing aids work so well that even die-hard autofocusers will look forward to using them.
Fujifilm made great improvements to its AF technologies when the XT1 was launched and its latest firmware updates have addressed many of the remaining issues. The XT10 enjoys the benefit of all this experience to date, delivering the same AF and MF capabilities of the flagship model, apart from the dual view.
Moving onto continuous shooting, the Fujifilm XT10 offers two modes, Continuous Low at 3fps and Continuous High at 8fps. The speeds are the same as the XT1, but a smaller buffer on the XT10 means the 8fps option is only available for bursts of up to eight frames. If you want unlimited bursts on the XT10, you’ll need to switch to the slower 3fps option.
Continuous AF is available for both shooting speeds, but in both cases you’ll be looking at the last image captured in the viewfinder or on-screen as oppose to a live image. This is par for the course for a mirrorless camera at the top speed, but disappointing the XT10 couldn’t squeeze out a live feed for the slower 3fps mode. As noted earlier, the 8fps mode also has an additional limitation in that AF is only supported for the nine central phase-detect AF areas.
To put the continuous shooting to the test I fitted a fast SD card, set the shutter to 1/500 (using the mechanical shutter), the sensitivity to 400 ISO and timed a series of bursts. Set to Continuous High and Large Fine JPEG, the XT10 captured 14 frames in 1.71 seconds for a speed of 8.1fps. After this burst, the camera slowed to an erratic rate between 3 and 5fps. Setting the XT10 to RAW allowed me to capture seven frames in 0.72 seconds for a speed of 9.72fps, after which the camera kept shooting but at a much slower speed of just under 2fps.
So the XT10 performs roughly as quoted, speed and buffer wise, which means you’ll enjoy a short but fast burst of frames. As such it’s possible to capture action with it, especially with the continuous AF capabilities, but with only a second or two in the buffer, you’ll need to get your timing right, or of course switch to the slower 3fps mode.
Fujifilm XT10 Wifi
The Fujifilm XT10 is equipped with Wifi, allowing you to wirelessly transfer images and remote control the camera with an iOS or Android smartphone, or transfer images to a Windows or MacOS computer via a mutual router. I tested the free Camera Remote app on my Samsung Galaxy S6 and the experience was identical to the Xt1 before it. Upon starting the app, you’re offered four main options: Remote Control, Receive, Browse Camera and Geotagging. I’ll cover each in turn.
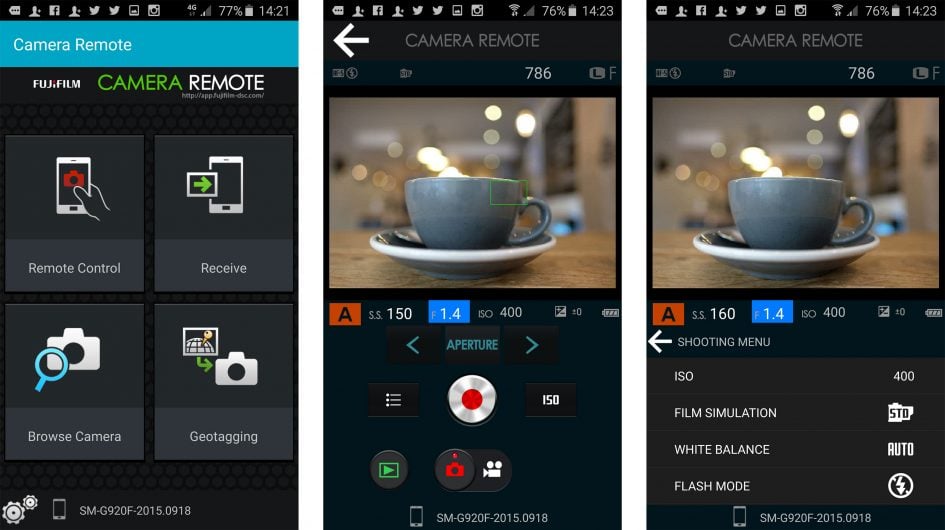
The Remote Control option shows a live image from the camera, surrounded by shooting information and a selection of buttons underneath. A slider at the bottom lets you choose between shooting stills or filming video, after which pressing the big red and silver release button above will trigger your choice. Once you’re recording a movie, the live image changes to 16:9, but annoyingly it won’t do this prior to filming for composition.
Gratifyingly you can tap anywhere on the live image to reposition the AF area, and the XT10 will refocus straightaway. This makes up in some small part for the absence of a touch-screen on the camera itself. Sadly you can’t tap to refocus when filming video though, or even when composing prior to filming video – it only works when the app slider is set to take still photos.
A button to the right of the release lets you choose the ISO, while one on the opposite side lets you change the Film Simulation, White Balance, Macro Mode, Flash mode, Self timer, and, er, ISO again. If you’re in Aperture Priority you can adjust the aperture on-screen by tapping the value below the live image. Same for the shutter speed in Shutter Priority, or indeed either of them in Manual, but you can’t change the actual exposure mode remotely, nor can you effectively hold down the release button for Bulb exposures. You also can’t change the image quality or the exposure compensation remotely, although the current setting for each is shown on your device.
The remote control view also has a play button which presents a series of thumbnails with the chance to tick the ones you’d like to import into your handset. Bucking the trend for remote control apps, the choice of quality is actually set within the camera, not the app – you can choose the original image size or a reduced one at 3 Megapixels. Like rivals, you’ll only be transferring JPEGs, not RAW files.
This leads me to the second option of the app, named Receive. This initiates playback on the camera, with the option to send a photo as you browse through them. Received images are graphically shown on your handset’s screen like stacked paper photos. An option to Receive may seem redundant when you have various thumbnail views for importing on the app, but it’s actually very useful. There’s many times I’ll have gone through a series of almost identical images on the camera in playback, then got completely lost when viewing them all as thumbnails on a remote control app – which was the one I liked best? Was it third or tenth along from the end of that sequence? But Fujifilm’s Receive mode solves this by letting you initiate the transfer from the playback mode of the camera and push them to the handset.
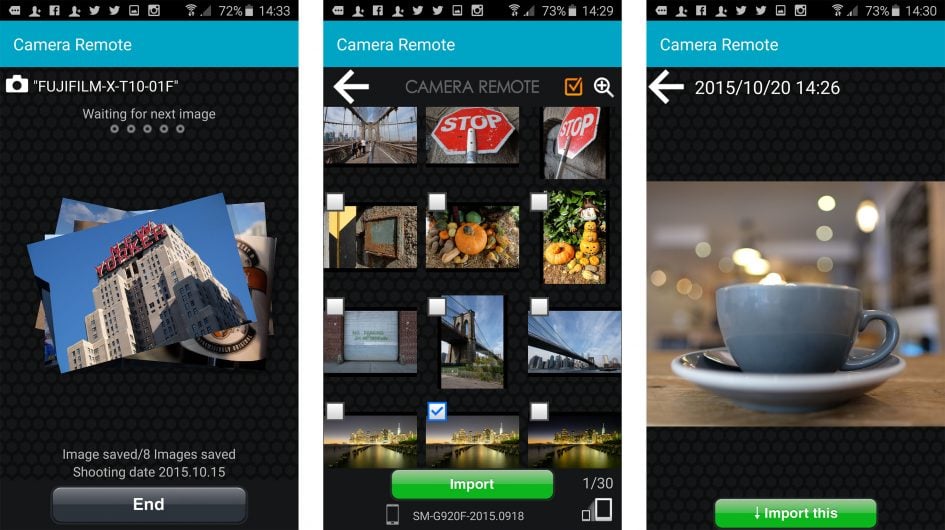
The third option is Browse Camera, which presents exactly the same thumbnail view as tapping play in the Remote Control option described earlier. Like that option, you can view thumbnails in two different sizes, tap to enlarge for a closer look and choose to import if desired. You can import JPEGs at either 3 Megapixels or the original size, but again not RAW files. The app also allowed me to import movies, but I couldn’t find them on my phone afterwards.
The fourth and final option on the app is Geotagging which as its name suggests, uses your handset’s GPS to deliver co-ordinates which are embedded on your photos. However Fujifilm goes about this in a different way to rivals. Rather than having your handset store a GPS log which is later synced with the images in the camera, the XT10 actually imports the co-ordinates as you compose and take the photo, so there’s nothing for you to do afterwards.
Choosing Geotagging on the app presents an almost bare page indicating that it will now make GPS co-ordinates available for the next 60 minutes; returning to it during this time shows how long you have left. If you now initiate Wifi on the XT10 it’ll connect to your handset and a few seconds later report that its searched your device and (hopefully) knows where it is in the World. Returning to composition on the camera, you’ll now see the actual GPS co-ordinates can be displayed on-screen, while a small icon of the World indicates a successful and active connection. You’re now free to put your phone in your pocket and shoot as normal on the XT10; you can even turn the camera off and on again, and it should quickly re-establish the connection with your phone by itself. Meanwhile every image you take is automatically embedded with the GPS co-ordinates delivered by your phone.
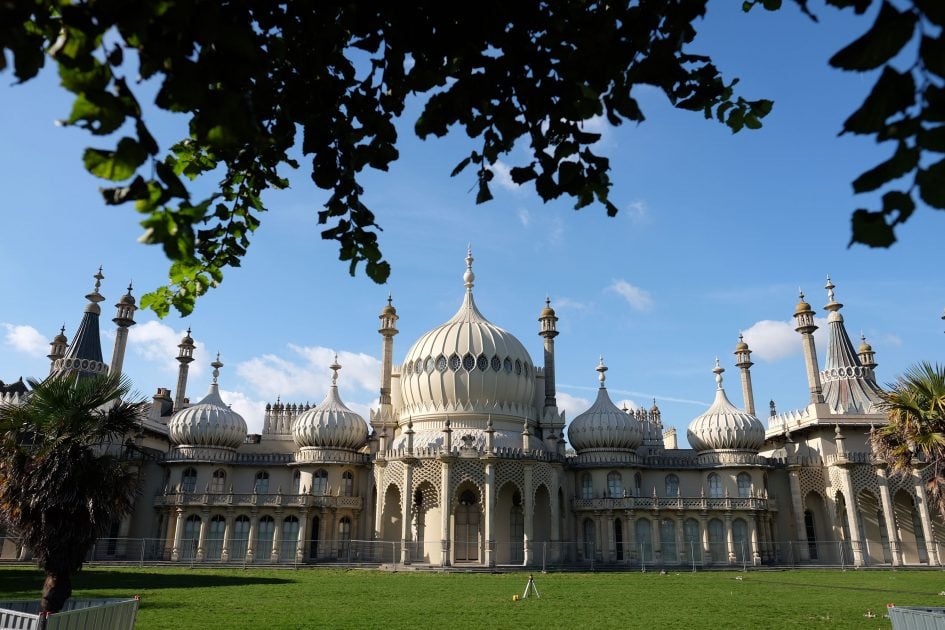
After the 60 minutes are up – or if you cancel the process manually on the app – the World icon turns red and flashes on the camera to indicate it’s no longer receiving positional data. If you want to continue shooting with GPS data, just start the Geotagging process again within the app and you’re good to go. Here’s an image I took with the XT10 in Brighton, with the GPS co-ordinates synced from my Galaxy S6 phone; I entered the co-ordinates into Google Maps and took a screenshot of the position below, which is accurate.

In practice it works very smoothly, and I loved the fact my images were already tagged the moment I took them, eliminating the syncing process later. As always the accuracy was also good so long as your handset had a decent view of the sky. The downside to Fujifilm’s implementation is there’s regular Wifi communication between the camera and phone and while I don’t know how clever they are about power saving, I can tell you that the batteries on both definitely depleted faster than normal when Geotagging was in operation – so be warned.
Fujifilm also offers PC Autosave software for both PCs and Macs which allows the camera to connect to a computer or laptop and wirelessly transfer images as you take them. Annoyingly though like most camera to computer software I’ve come across, it requires a wireless router / hub in the middle which limits it to office, home or studio environments and rules out ad-hoc connections in the field. It’s also not possible to remote control the camera from a computer or laptop.
In this respect Fujifilm’s Wifi implementation is a lot like its rivals, where remote control and ad-hoc image transfer is mostly limited to smartphones and tablets. If transfer to a computer or laptop is available, it’s never ad-hoc and instead requires an existing network to connect into.
Fujifilm XT10 movies
The Fujifilm XT10 inherits the movie capabilities of the XT1 running its latest firmware update. As such you can film 1080p or 720p at 24, 25, 30, 50 or 60fps, when previously the original XT1 only offered 30 or 60fps. There’s no 4k video though.
Exposure is mostly automatic, although you can manually select the ISO sensitivity and adjust exposure compensation as you film. Fujifilm recommends setting the aperture prior to filming, but I found you could adjust it during filming if desired. With a bit of fiddling you can generally instruct the XT10 to use the exposure you want for movies, but it’s nowhere near as flexible in this regard as the Lumix G7, Olympus OMD EM10 II or Sony A6000.
Focus is either Continuous or Manual, and although it’s not possible to select an AF area for the camera to focus on, you can enable face detection and have the camera attempt to track a human subject. If the subject is in the middle of the frame, the camera does a reasonable attempt at pulling-focus during a movie.
No effects can be applied while filming and there’s no slow motion or time-lapse options either. You can attach an external microphone if you like, but it’ll almost certainly need an adapter to fit into the 2.5mm jack. And finally you can adjust the audio recording levels to one of four steps with level meters to help gauge the volume.
While Fujifilm has thankfully added a variety of frame rates with the XT10, the movie capabilities remain a step below the competition and thanks to the unique structure of the sensor, there can be undesirable artefacts too. Don’t get me wrong, it’s fine for filming short, casual clips, but if video quality and control are paramount to you there are definitely better options. For me in this price bracket the Lumix G7 is the one to beat with full manual control and support for 4k video.
As always though, it’s a case of managing expectations, so here are a selection of movie clips to show what sort of quality you can expect in practice.
Note: during testing, I found a strange incompatibility between my XT10 and XF 18-55mm samples which caused a wobbling artefact, almost like when characters would reminisce in Scooby Doo. When switching to other lenses this issue disappeared, leading me to believe it was a problem with the sample lens.
Above: Download the original file (Registered members of Vimeo only). Sample movie filmed with the Fujifilm XT10 and XF 56mm f1.2, set to f5.6. There’s lots of detail in this composition but the XT10’s movie mode fails to capture it without artefacts. There’s jagged lines and moire all over the image. The XT10’s movie rendering feels more at home with organic shapes without fine details.
Above: Download the original file (Registered members of Vimeo only). Sample movie filmed with the Fujifilm XT10 and XF 18-55mm at 18mm and at 800 ISO. Here the stabilisation in the lens keeps the subject fairly steady, while the continuous AF does a reasonable job at keeping things in focus, although there is occasional drifting.
Above: Download the original file (Registered members of Vimeo only). Sample movie filmed with the Fujifilm XT10 and XF 18-55mm at 55mm f4 and at 400 ISO. Here the continuous autofocus does a fair job at racking between subjects, but despite using the center area which should be in the phase-detect array, there’s still some searching to confirm the point of focus.
Above: Download the original file (Registered members of Vimeo only).
Fujifilm XT10 sensor and processing
The XT10 is equipped with Fujifilm’s Advanced X Trans II CMOS sensor, an APS-C sized sensor with 16 Megapixels. It’s exactly the same sensor as the XT1 which, in combination with the same image processing, means the quality is identical.
Like earlier X Trans sensors, this employs a unique colour filter array which avoids moire and eliminates the need for an optical low pass filter. This allows the sensor to deliver very crisp images, while the APS-C size and sensibly modest resolution means it also enjoys low noise at high sensitivities. The version II refers to embedded phase-detect AF points, first seen on the XE2 and which, as detailed earlier in my review, allow the XT10 to successfully track subjects in motion even when shooting at the top speed of 8fps – so long as the subject’s in the middle of the frame and you’re using a zoom lens.
You can choose to record JPEG images in three different resolutions, each available in three aspect ratios, 3:2, 16:9 and 1:1; note all but 3:2 are cropped. You can then save these images with the choice of two JPEG compression levels, or as a RAW file, either by itself or accompanied by a JPEG at any quality or aspect ratio; note RAW files are always recorded at the full image size. Large Fine JPEGs typically ran between 4 and 7MB each, while RAW files, clearly uncompressed, weighed-in at a hefty 33MB each.
The sensitivity runs from 200 to 6400 ISO with extended options offering 100 ISO at the Low end, and 12800, 25600 or 51200 at the High end. Two Auto ISO options are available with customisable default ISO, maximum sensitivity and minimum shutter speed.
Like the XT1 before it, the extended sensitivities of 100, 12800, 25600 or 51200 ISO are available for JPEGs only. If you want to shoot in RAW or RAW+JPEG, you’ll need to use the 200 to 6400 ISO range.
The absence of RAW at 100 ISO can be frustrating for long exposure photographers who often deploy the lowest sensitivity to maximise their exposure times. But doing so on the XT10 means recording a JPEG only, so you’d better be sure to get your white balance and processing options right out-of-camera.
On the upside though, the XT10, like the XT1 before it, delivers very clean images for long exposures even when long exposure noise reduction is disabled. This is a big deal since long exposure noise reduction takes a second image with the same exposure as the first in order to create a ‘dark-frame’ to subtract noise. That’s fine when your first exposure is only a few seconds, but when it’s a few minutes you could find yourself waiting around for it to complete as the conditions change around you.
I took many exposures between one and four minutes using the XT10 all without long exposure noise reduction, and all were very clean and usable without retouching. This is one of the reasons why so many long exposure photographers choose Fuji X as it behaves so well compared to other systems. Here’s a two minute exposure without noise reduction.
Above: 120 seconds with Lee ND filters, f11, 200 ISO, 16mm. Noise Reduction Disabled
Finally, there’s a wide variety of image processing parameters you can adjust. Along with Film Simulation and Dynamic Range, the XT10 lets you adjust the colour saturation, sharpness, highlight tone, shadow tone and noise reduction each in a +/-2 step range; you can also set up the Q Menu to deliver direct access to each if desired. I used the default 0 settings for each of the parameters during my tests and as I’ve noted throughout the review found the image quality to be very pleasing indeed. Crisp, colourful, detailed, natural, just right. I honestly believe Fujifilm’s imaging pipeline of lenses, sensor and processing deliver the best-looking images out-of-camera without modification.
Now it’s time to see how the quality compares in my results and samples pages.


