 Canon's EOS 5D Mark IV is the long-awaited fourth model in the enormously popular series of full-frame DSLRs. Coming over four years after the previous EOS 5D Mark III, the Mark IV boosts the resolution to 30.4 Megapixels with a new full-frame sensor that supports Dual Pixel CMOS AF for confident refocusing during Live View and movies. It accelerates continuous shooting from 6 to 7fps, inherits the 61-point AF system and 3.2in touch-screen of the EOS 1Dx Mark II, and can film 4k movies (in the DCI Cinema format) up to 30p, along with 1080 / 60p and 720 / 120p. The body shares essentially the same control layout as before so will be immediately familiar to owners of the Mark III, but now features improved weather-proofing along with a built-in GPS and Wifi with NFC. It represents a significant step-up from the Mark III, but high-end videographers will be frustrated by the tight crop and high bit-rate when filming 4k, and the lack of Log profiles, peaking, zebras and 4k on the HDMI output; indeed if you're only into shooting 4k video, I'd recommend Sony's A7s Mark II for full-frame or the A6300 for APSC. But Canon is keen to retort the Mark IV is more about stills and it does these very well. It's undoubtedly a powerful all-rounder, just no longer the no-brainer the Mark III was for video.
Canon EOS 5D Mark IV review
-
-
Written by Gordon Laing
In depth
The Canon EOS 5D Mark IV is the successor to the EOS 5D Mark III, and builds on the success of this enormously popular series of full-frame DSLRs. When the original EOS 5D was launched in October 2005, it became the first ‘affordable’ full-frame DSLR. Three and a half years later, the Mark II almost doubled the resolution and became the first DSLR to really embrace the potential of video recording. A further three and a half years later, the Mark III improved the speed, build and handling and became the most successful in the series to date. Announcing the latest 5D Mark IV in August 2016, Canon kept us waiting for well over four years, during which time Sony launched no less than six full-frame mirrorless bodies, so it’s fair to say anticipation has ramped-up to new levels for the new full-frame EOS.
The EOS 5D Mark IV boosts the resolution to 30.4 Megapixels with a new full-frame sensor that supports Dual Pixel CMOS AF for confident refocusing during Live View and movies. It accelerates continuous shooting to 7fps, inherits the 61-point AF system of the EOS 1Dx Mark II and can film 4k movies (in the DCI Cinema format) up to 30p, along with 1080p up to 60p and 720p up to 120p. The body features improved weather-proofing along with a built-in GPS receiver and Wifi with NFC. Also inherited from the 1Dx Mark II is a 3.2in touch-sensitive screen.
Making its debut on the EOS 5D Mark IV is Canon’s Dual Pixel RAW mode which exploits the fact each ‘pixel’ on the sensor actually consists of two photo-diodes. This design is what allows each to double-up for phase-detect AF for Dual Pixel CMOS AF, but Canon’s worked-out the fractionally different viewing angle within each pair can allow small adjustments in focus, bokeh perspective and ghosting in post using the Digital Photo Professional software. Find out if the Mark IV is the camera you’ve been waiting for in my in-depth review which includes a wealth of samples and comparisons! I hope you find it useful!
Canon EOS 5D Mark IV video review – overview of the movie features
In the video below I’ve demonstrated all the new movie capabilities of the EOS 5D Mark IV, along with comparing its 4k quality against the Fujifilm XT2 and Sony A6300.
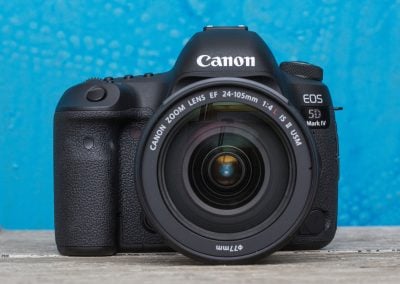
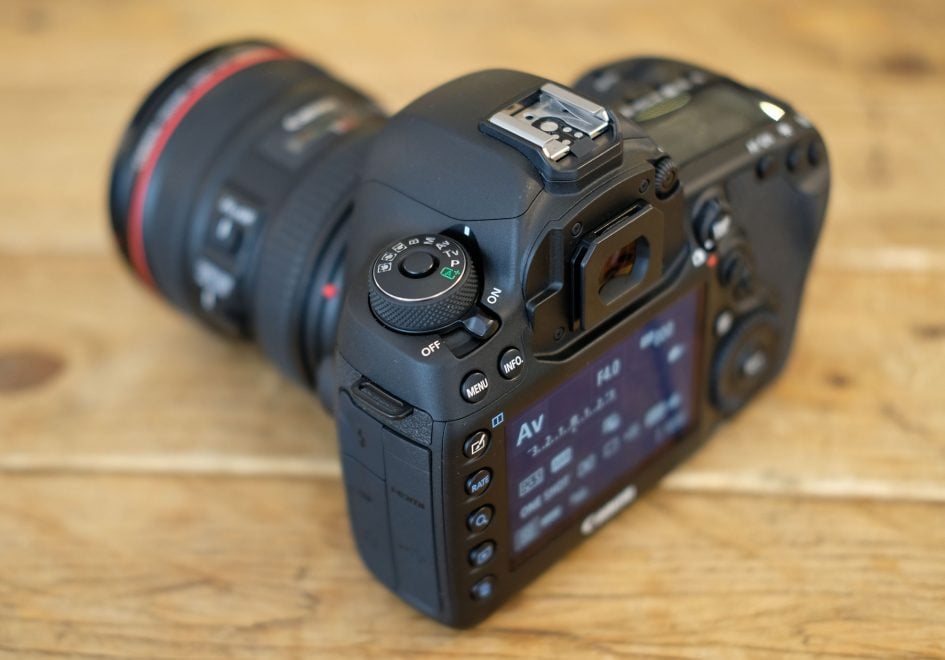
Canon EOS 5D Mark IV design and controls
The EOS 5D Mark IV will be immediately familiar to existing owners of earlier bodies, or indeed any enthusiast-class Canon DSLRs. The body, design and physical controls are essentially the same as the Mark III, but with a few tweaks and enhancements.
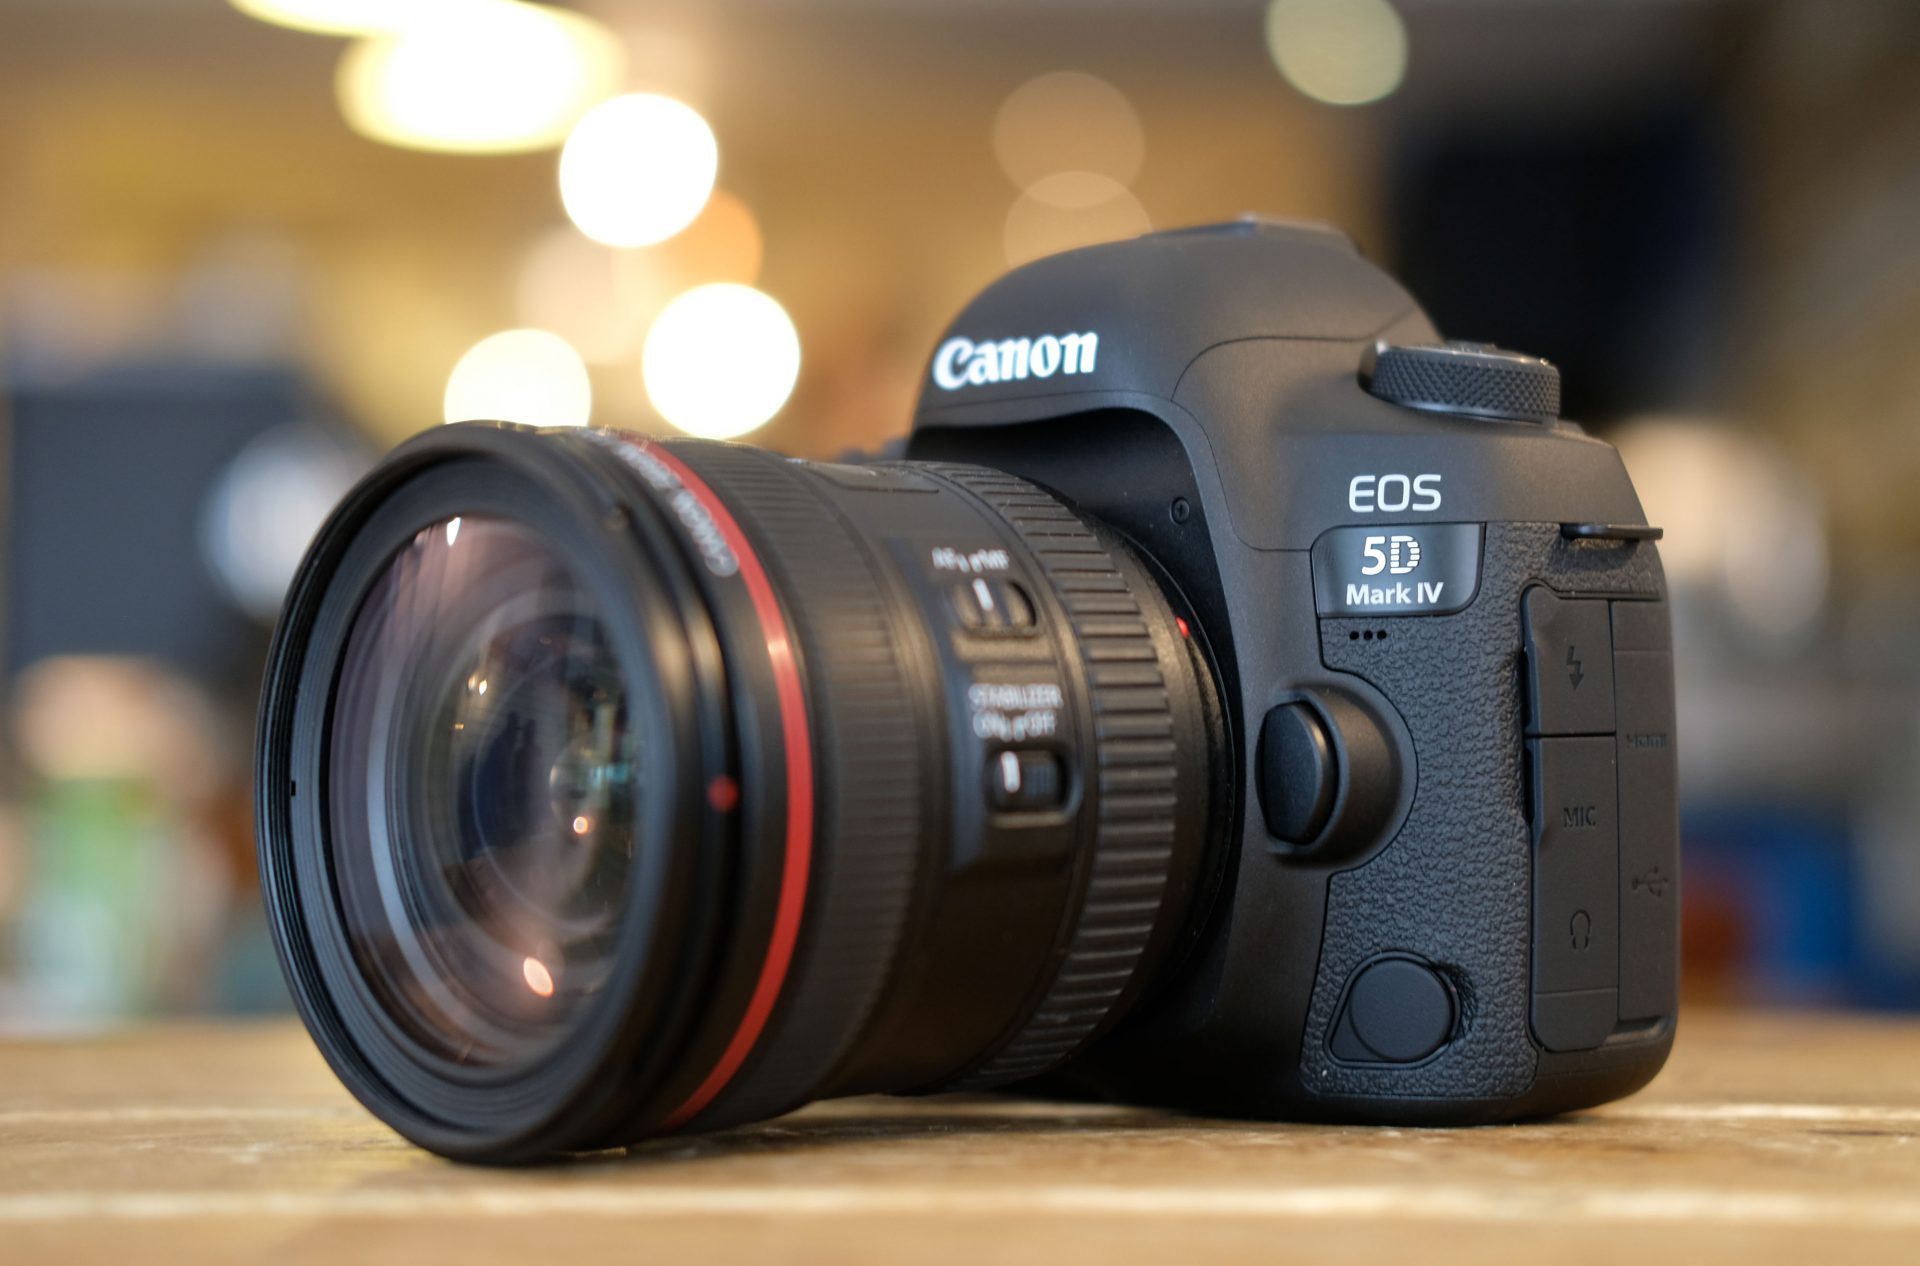
The body may look familiar from the outside, but Canon’s improved the weather-resistance over the Mark III and now describes it as being at a similar level to the EOS 7D Mark II. This is important as I’ve known several owners of earlier 5D models come unstuck in poor conditions. Now while the 5D Mark IV – and 7D Mark II – may not match the tank-like build of the 1Dx series, they should both be able to handle drizzle, dust and mild splashes. Nothing too extreme, but any better protection than before is always welcome.
The body itself feels very robust and confident in your hands with a substantial grip, pronounced thumb rest and satisfyingly grippy surface. In terms of size, it’s essentially the same as its predecessor, measuring 151x116x76mm and weighing 890g with battery.
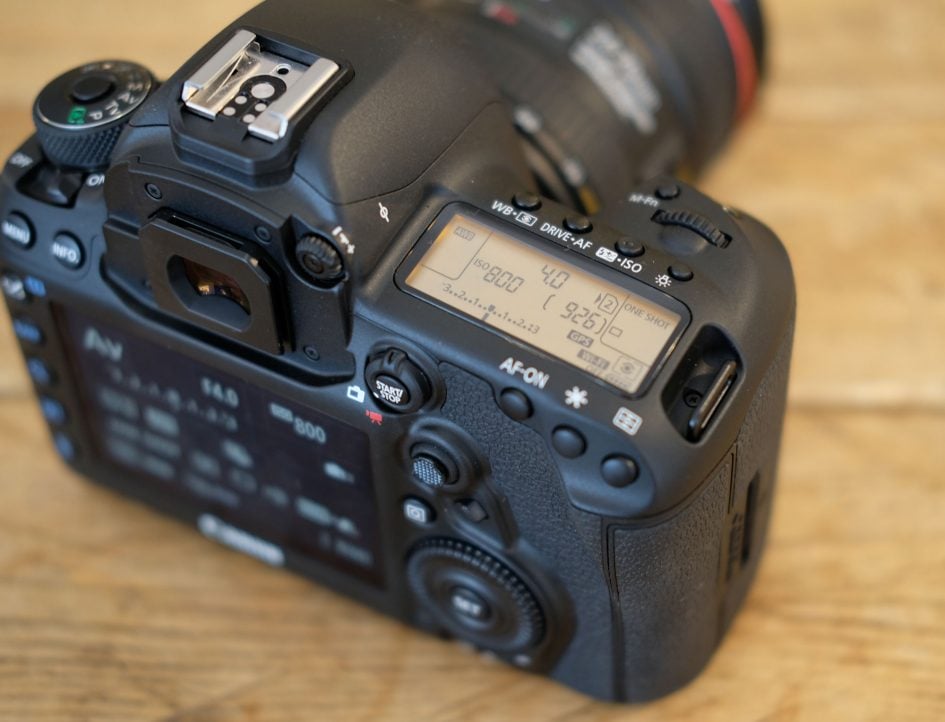
As mentioned above, the 5D Mark IV shares virtually the same control layout as its predecessor, so I’ll stick to the highlights and minor differences. Like other semi-pro Canon bodies, the control highlight for me remains the rear thumb wheel: a wide diameter disc with decent-sized ridges and an enormously satisfying click as it turns. Canon may have nailed this control years ago, but it still doesn’t diminish from the joy of spinning it to dial-in exposure values, scroll down menus or whiz through images in playback. It’s one of my favourite things about shooting with a semi-pro Canon body.
Interestingly between the 5D Mark III and Mark IV, Canon developed an enhanced version of the rear thumb wheel which supported silent adjustments during movies with gentle taps on the inner ring. This capability was present on the 7D Mark II, but not implemented on the 5D Mark IV due to its touchscreen which I’ll describe in a moment. So silent-ish operation is still possible during movies with the 5D IV, just not with the rear wheel.
I’ll also take this opportunity to give a respectful nod to the Live View / Movie lever with the button in the middle. Again it’s long become standard on higher-end Canon bodies, but it simply feels good and works very well. I’m also pleased to find a locking button on the Mode dial which needs to be pushed down to allow it to turn – again it’s nothing new in Canon’s range, but it is an enhancement over the earlier 5D Mark III.
A new control making its debut on the 5D Mark IV though is the AF Area Selection button to the lower right of the AF area joystick. This wedge-shaped button cycles through the various AF area modes, such as Single Point, Expansion and Zone, and is positioned conveniently next to the joystick for adjusting the actual position. If you’re an existing Canon owner you may be thinking this new button appears to replicate the default setting of the M-Fn button by the shutter release – and you’d be right. By default they do exactly the same thing, but the difference, apart from their position on the body, is the new button can be customized to directly cycle through the area options without having to first press the Area button in the upper right corner. I actually appreciate this shortcut and configured it as soon as I discovered it. So bonus points to the 5D Mark IV even if this new button is in fact simply a redesigned version of the AF joystick collar first seen on the 7D Mark II.
A genuine control upgrade over the 5D Mark III – and 7D Mark II – is the presence of a touch-screen. I’m so happy to see this implemented on the 5D Mark IV, especially when partnered with the Dual Pixel CMOS AF sensor. Most obviously it lets you tap to reposition the AF area in Live View or movies, or to select a subject for tracking or priority. I’ll discuss this further in the AF and movie sections of the review.
It’s so intuitive and works an absolute treat, but it also allows the 5D Mark IV to inherit the excellent touch interface deployed on earlier models like the EOS 80D. Press the Q button or tap the Q icon in the corner of the screen (whether shooting in Live View or not) and you can tap your way through a wealth of adjustments including Shutter, Aperture, ISO, exposure compensation, Picture Style, White Balance, metering, focus, drive mode and quality; you can even tap your way around the customisation of buttons. Indeed pretty much everything apart from the actual shooting mode itself. Press the Menu button and you can tap your way with surprising ease through the main options, and of course in playback you can swipe through images and pinch to zoom.
If you’ve never used a touchscreen on a camera before you may be sceptical, but believe me it’s more than a novelty and even if you only end up using touch for a handful of functions, you’ll still appreciate its presence. Canon’s also been very careful to let you access it easily without it ever getting in the way and if you really don’t like it, you can still operate everything using the physical switches, dials and buttons. But if you do any kind of video or shooting in Live View, it’s truly transformational.
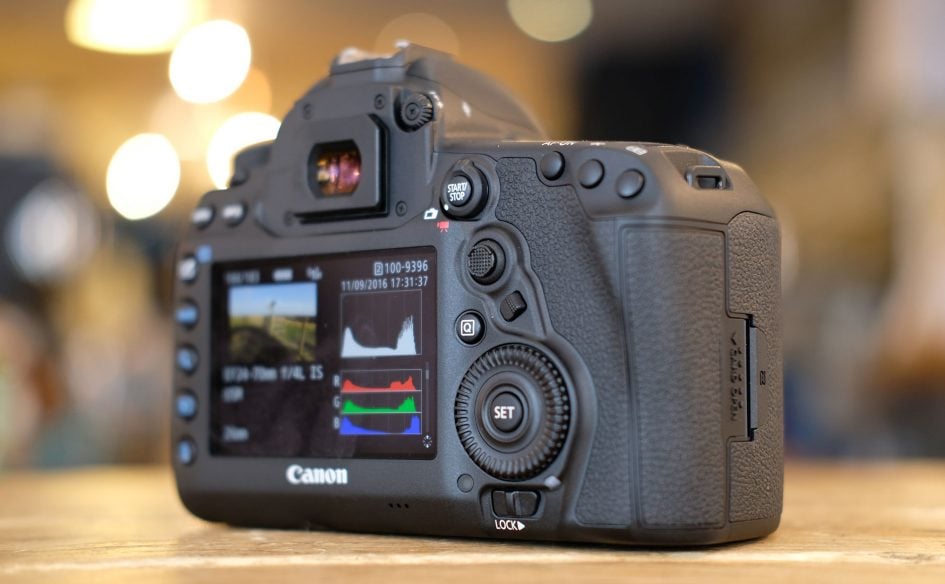
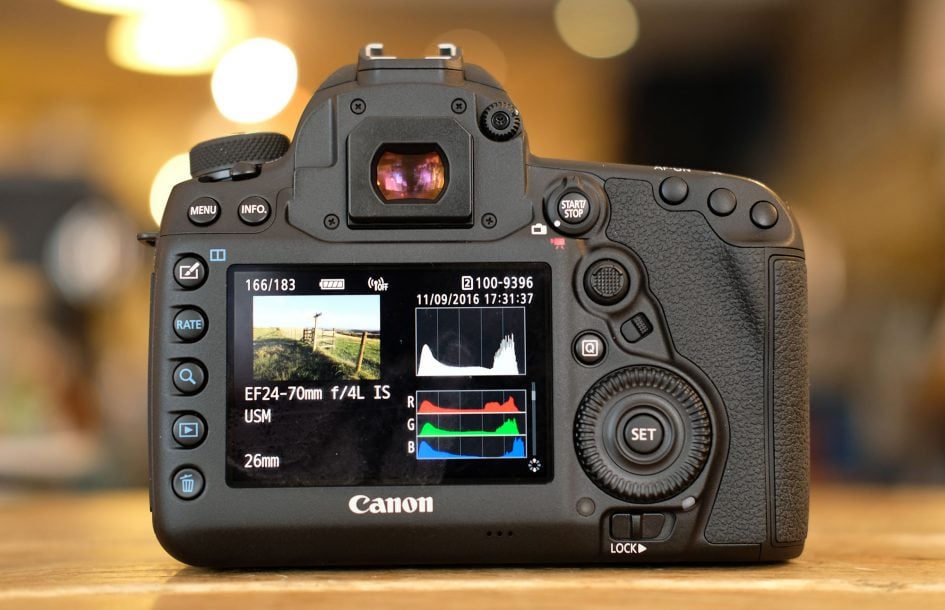
As for the screen itself, Canon’s fitted a 3.2in / 1620k dot / 3:2 shaped Clear View LCD II, I believe the same panel as the 1Dx Mark II and it looks fabulous – large, detailed and bright, although when filming movies or shooting in Live View, I did wish it sported some degree of articulation. Sadly on the 5D Mark IV, the screen remains fixed in position, leaving the 80D as the highest-end EOS to sport a fully-articulated screen. Again this is a downside compared to most mirrorless rivals which generally boast screens that either tilt vertically or are side-hinged for full-articulation.
Since the native aspect ratio of the sensor matches the 3:2 shape of the screen, images in Live View or during playback fill the panel, exploiting its full size and resolution without letterboxing. The difference in size is quite noticeable when you compare it to 3:2 shaped images displayed on a 4:3 shaped screen as used by much of the competition. The downside though is without any letterboxing to squeeze information onto, all exposure details must be super-imposed on top of the image. It can get quite busy if you have everything turned on, but I still prefer Canon’s approach to match the screen to the sensor shape.
Pressing the Info button while not in Live View cycles through several pages of information and a useful dual-axis levelling gauge. In Live View you can also choose to overlay a wealth of shooting information including, if desired, a live histogram and again a dual-axis levelling gauge. In Live View it’s also possible to choose alternative 4:3, 16:9 or 1:1 aspect ratios which are displayed with appropriate letterboxing above and below or at the sides, albeit still not enough to squeeze any useful information into without overlapping onto the image. A choice of three alignment grids are also available, but from their own menu, so they appear in all the info views as you cycle through them; there’s a 3×3 and 6×4 grid, along with a 3×3 and diagonal option.
The optical viewfinder employs a penta-prism with 100% coverage and 0.71x magnification; in this respect the Mark IV matches the Mark III before it, and like its predecessor it also offers on-demand grid lines and a selection of icons, for example to warn you when the camera is set to a monochrome mode. The Mark IV’s transmissive LCD viewfinder screen has however moved-on and now offers dedicated graphics at the top for an optional dual-axis levelling gauge (rather than using existing graphics), along with a row of icons along the bottom to indicate battery life, exposure mode, white balance, drive mode, AF mode, metering, quality, digital lens optimiser, Dual Pixel RAW and Flicker reduction. You can customise exactly which of these, including the grid and levelling gauge, appear in the viewfinder.
So in terms of a traditional DSLR optical viewfinder, it’s up there with the best in size, coverage and features, but it would be remiss of me not to mention how electronic viewfinders compare. The top mirrorless models typically deliver a larger view with Fujifilm’s XT2 and Sony’s A7r Mark II boasting magnifications of 0.77x and 0.78x respectively, and side-by-side their viewfinder images genuinely look bigger and more immersive. An EVF also supports movie composition (no need for a screen loupe here), playback of stills or video, a variety of focusing assistance (including magnification and focus peaking), a live preview of any white balance or picture styles (no chance of forgetting you’re in monochrome), and a wealth of guides including live histograms. On the downside, they can become slower to refresh or slightly noisy in low light and there can also be some lag when panning to follow action. In contrast, an optical viewfinder remains clean, noise-free, delivers instant feedback and consumes much less battery power. The choice ultimately boils down to personal preference, but I always like to point out the pros and cons of both technologies.
In terms of wired connectivity, the 5D Mark IV unsurprisingly loses the composite AV output of its predecessor, and swaps the USB-2 port for a full-size USB-3 port. As before, there’s also microphone and headphone jacks, a Type-3 Mini HDMI port (which can output 1080p (sadly not 4k) / 4:2:2 / 8-bit), a PC Sync port and an N3-type remote jack.
I’m genuinely delighted to report the EOS 5D Mark IV now includes built-in Wifi with NFC (the chip located by the hinge in the memory card door). You may assume the presence of Wifi has been mandatory for some time, but I never assume anything when Canon’s involved. But at last the 5D series gains the ability to wirelessly transfer images, upload them directly to social accounts or FTP servers, along with offering wireless remote control, whether with a smartphone or laptop. It also sports a GPS receiver in the head, allowing you to tag images with their location or record a log for mapping later. Both represent important upgrades over the Mark III, and I’ve gone into their capabilities in detail later in the review.
Finally, the 5D Mark IV inherits the twin memory card slots of its predecessor, one supporting UHS-I SD cards and the other UDMA-7 Compact Flash cards. As before you can configure the camera to automatically start on card two when card one is full, or to record identical images on both cards for backup, or to record one quality setting to one card and another to the other – for example RAW to one and JPEG to the other.
This flexibility is wonderful, but I’m a little disappointed Canon didn’t take the opportunity to upgrade the actual slot interfaces. In particular, having a UHS-I slot prevents the Mark IV from exploiting the speed of the latest UHS-II cards, which in turn means you’ll almost certainly experience problems when filming 4k with the camera’s epic bit rate. Even fitted with SD cards rated comfortably quicker than the 4k data rate, I found the 5D Mark IV often stalled after just ten seconds or so. Sometimes it would record for longer, but most of the time it experienced buffering issues. The only consistently reliable solution for recording 4k video on the 5D Mark IV was to use Compact Flash instead. But even then you wonder how much better it could have been with C.Fast or XQD in addition to a modern UHS-II slot.
In terms of power, the 5D Mark IV employs an LP-E6N Lithium Ion pack, rated for around 900 shots with the optical viewfinder, although of course if you shoot in live View, film movies or exploit Wifi or GPS, you’ll see the camera burn through it faster. That said, even with heavy use of all the features, I found the 5D Mark IV still enjoyed comfortably longer battery life than its smaller mirrorless rivals – as you’d expect. But conversely most mirrorless cameras now support the convenience of USB charging in-camera, whereas the LP-E6N unsurprisingly sticks to the external supplied AC adapter for charging duties – you’re looking at about two and a half hours for a full charge from empty.
I was interested to see how long a fully-charged battery would last for video recording, and also the impact it would have in terms of heat generated. I fitted a 32GB Compact Flash card which, when formatted, was good for just over eight minutes of C4k footage on the Mark IV. With a fully charged battery I filmed eight minutes worth and measured the battery life afterwards at 92%, while the body wasn’t warm at all. I reformatted the card and started recording again. The next eight minute clip reduced the battery to 84% and still the body was cool to touch. The next clip reduced it to 77% with the body now just the slightest bit warm. After the next eight minute clip, the battery read 69% and now the base of the camera felt a little warm, but still far from hot. Another eight minute clip later and the battery read 61% with a slight increase in warmth. The next clip reduced the battery to 53% with the body getting warmer, but still not hot by any means. Next 45% and slightly warmer. Then 36%. After this, 28% and still only a little warm. Then 20%. Then 11%. Then 3% and still only slightly warm.
I ended up recording just over 12 C4k clips lasting eight minutes each, or just over an hour and a half in total, and the body was only the slightest bit warm by the end. In stark contrast, most mirrorless cameras I test under the same conditions become quite hot after even half an hour of 4k recording and ideally require some cool-down time afterwards. So while I may personally find traditional DSLRs cumbersome compared to modern mirrorless rivals, there’s no denying the benefits of a larger body when it comes to heat dissipation. It’s something you need to be aware of on most mirrorless cameras, but it was a non-issue when I was testing the 5D Mark IV. Of course that’s not to say the 5D IV won’t overheat, but it’ll do it long after a mirrorless has become very hot to the touch.
Oh and if you want more life from the 5D Mark IV, the optional BG-E20 grip allows you to use two batteries while also providing portrait controls. An AC adapter and DC coupler are also available if you want to power the camera directly from a mains source.
Canon EOS 5D Mark IV lenses
The 5D Mark IV is equipped with an EF lens mount which gives it access to Canon’s huge lens catalogue, while the full-frame sensor means there’s no field-reduction. The only restriction regards Canon’s EF-S lenses, designed for its range of DSLRs with smaller APS-C sensors; these remain incompatible with its full-frame bodies, which is a shame since the crop employed for 4k video on the Mark IV is within the APS-C imaging circle.
The 5D Mark IV is typically sold body-alone or in a bundle with the new EF 24-105mm f4L II zoom, the second version of the lens which was originally launched alongside the first EOS 5D. Like its predecessor, the 24-105mm provides a useful general-purpose range from wide to short telephoto, with a constant f4 focal ratio, weather-sealing and image stabilisation. This lens wasn’t available at the time of testing, so I shot most of my 5D Mark IV sample images with the EF 24-70mm f4L IS USM.
As a full-frame camera, it’s great to enjoy lenses with no reduction in their field-of-view, but on the Mark IV this only applies to still photos and 1080p video. If you film 4k video with the Mark IV, you’ll have to accommodate a fairly severe crop which is roughly similar to shooting with an APS-C sensor. This in turn means you’ll need shorter focal lengths to achieve wide coverage, although again physical incompatibilities sadly rule out Canon’s own EF-S lenses. While there’s plenty of third-party alternatives, those who prefer to stick with canon’s own lenses will almost certainly gravitate towards the EF 11-24mm. It’s wide enough to deliver decent coverage when filming in 4k, while also of course capturing a huge field-of-view when shooting stills or 1080p.
Canon EOS 5D Mark IV shooting modes
The 5D Mark IV mode dial offers the traditional PASM options, along with B for Bulb, three Custom positions and green Auto+. In this respect it’s identical to the EOS 5D Mark III and 7D Mark II. As a ‘semi-pro’ Canon body, the 5D Mark IV also lacks any separate Scene presets, although Auto+ can deploy scene detection during Live View composition with the current preset indicated in the corner of the screen.
Shutter speeds between 1/8000 and 30 seconds are available, along with Bulb for longer exposures. The shutter makes a motorized but sharp CLACK sound that comes across as eager to shoot again, but isn’t exactly the quietest around especially when firing continuously. Like most Canon DSLRs, the 5D Mark IV offers two alternative ‘silent’ drive modes. These certainly dull the sharp sound of the mechanical shutter, but they’re far from completely silent, instead turning a single CLACK into a slower KER-CHICK – if you’ll indulge my sonic descriptions.
When shooting in Live View you have the choice of two further ‘silent’ options, but these again simply draw a single sound out into two discernable steps with a delay inbetween; the first mode inserts a small delay while the second mode delays the resetting of the mechanism until your finger lifts from the shutter release. Again both are noticeably quieter than the normal shutter, but they’re not silent.
This may seem reasonable if you only use DSLRs, but there are truly silent alternatives available. For example, most mirrorless cameras offer optional electronic shutters which can operate in genuine silence. Yes, there can be rolling shutter artefacts to beware of when shooting movement with an electronic shutter, but it is certainly nice to have the option to not only shoot silently, but also with the bonus of super-fast shutter speeds, typically up to 1/32000. So while the silent shutter options of the 5D Mark IV certainly quieten it down, sensitive event or street shooters may prefer something that’s genuinely silent. It does make you wonder why Canon doesn’t offer a truly silent electronic shutter option in Live View – presumably the sensors suffer too much from rolling shutter.
In a welcome update, the 5D Mark IV now offers a Bulb timer option which lets you preset the desired exposure length, eliminating the need for a cable release or remote control accessory; the camera offers a range of one second to 99 hours, 59 minutes and 59 seconds, although obviously power will be a consideration for longer exposures. Here’s a shot I took using the Bulb timer to capture a two minute exposure.
Above: Canon EOS 5D Mark IV Bulb Timer: 120 seconds
Auto exposure bracketing is available in 2, 3, 5 or 7 frames up to 3EV apart, even for seven frames. You can change the order of the bracket, and also have the camera capture the entire sequence with a single press or a timer release. So if you’re into HDR you could use the self-timer to capture a complete seven-frame sequence hands-free without the need for additional accessories.
The 5D Mark IV also supports HDR capture and assembly in-camera. The HDR mode captures three frames at +/- 1, 2 or 3 EV increments (or Auto), before automatically combining them into one using a choice of five effects. You can also choose to have the camera auto-align the images, capture them in a continuous burst and or also record the individual source images. There’s also an HDR movie option I’ll show you later, but for now, here’s some examples of the HDR stills mode in action – beware, some are rather overcooked.

Above: Canon EOS 5D Mark IV HDR mode: Left: Disabled, Right: Enabled
Above: Canon EOS 5D Mark IV HDR mode: further effects
Above: Canon EOS 5D Mark IV HDR mode: further effects
Like other recent Canon DSLRs, the 5D Mark IV also offers Highlight Tone Priority (preserving detail in highlights) and Auto Lighting Optimiser (adjusting the levels); the former is disabled and the latter set to Standard by default, so unless otherwise stated, these are the settings I’ve used for my tests and sample images.
The 5D Mark IV also features a built-in Interval Timer which lets you capture one to 99 (or an unlimited number) of images at intervals between one second and 99 hours, 59 minutes and 59 seconds. This may now be a fairly standard feature on Canon’s latest DSLRs, but it’s important to remember it wasn’t present on the previous Mark III, so it’s a useful upgrade here. Some cameras struggle with recording shots at truly regular one second intervals, but I timed the 5D Mark IV capturing JPEGs or RAW files at one second intervals for 99 frames and it did so in exactly 99 seconds without stuttering or any buffering issues.
I’m also pleased to report the 5D Mark IV can generate timelapse movies in-camera, with the same choice of intervals as the Interval Timer (one second to a second shy of 100 hours), although only for a maximum of 3600 shots. These are then assembled automatically into a 1080p (All-I / MOV format) video at 30p (if set to NTSC) or 25p (if set to PAL), so the longest videos you’ll be able to generate will last about two minutes or 2:20 respectively. It’s a shame there’s no 4k timelapse video option in-camera given it’s long been standard on Panasonic’s Lumix cameras, but it’s still fun to generate a 1080p timelapse without extra effort; if you do want a higher resolution timelapse, simply use the interval timer to capture stills, then assemble them later into a video using third party software. Here’s an example of the in-camera Timelapse Movie mode, and I have another in the movie section later.
Above: Download the original file (Registered members of Vimeo only). Sample movie filmed with the Canon EOS 5D Mark IV in its Timelapse movie mode, encoded in-camera at 1080 / 25p, using the Monochrome style. I set the camera to take 500 images, at three second intervals. I used the EF 24-70mm f4 IS USM at 24mm.
A Multiple Exposure mode is also available, allowing you to combine 2 to 9 frames into one, and like the HDR mode there’s the option to save the individual source images.
In a neat upgrade inherited from the sports models, the 5D Mark IV can also now recognize the presence of flickering fluorescent lamps and deliberately delay the shutter to avoid the times when the light is effectively off or at its dimmest. This can particularly affect anyone who shoots fast continuous bursts of action under artificial light, where some of the frames will be darker due to the pulsating frequency of the bulb. By default the flicker reduction is disabled, but if you enable it in the menus, the camera detects the light’s frequency and avoids the dimmest part of the sequence; it may result in fractionally longer shutter lag depending on the cycle, but it remains a useful tool for those shooting bursts under artificial light alone.
The camera’s metering system enjoys a significant upgrade from the 63 zone iCFL system of the earlier 5D Mark III to a 150,000 pixel / 252 zone system on the Mark IV, that shares some of the technologies from the flagship 1Dx. In particular the 5D Mark IV sports Canon’s Intelligent Tracking and Recognition which combines information from the metering sensor and AF system to figure-out what you’re trying to shoot; behind the scenes, face detection is also deployed to prioritise faces for focusing and metering.
It all comes together when you select evaluative metering, and in use it works very well. On the earlier 5D Mark III I remember the metering being far from foolproof and often requiring intervention, but now the Mark IV, like the 7D II and 1Dx II, feels much more confident at evaluating a variety of scenes and lighting conditions. I very rarely found myself turning to exposure compensation when shooting with the Mark IV, and you can see this in action on my sample images page.
If you prefer to meter a more considered area, there’s the choice of Centre-weighted, Partial (6.1% of the viewfinder central area) and Spot (1.3%) metering. Spot metering still remains linked to the central AF point, rather than the active AF point, so if you’re using the AF system to track a subject moving across the frame, the spot metering won’t ‘travel’ with it. This annoys many wildlife and sports photographers who often prefer to spot-meter their subjects against a tricky background. That said, evaluative metering on the 5D Mark IV is much better than before and does take the active AF area into account, so it could be worth giving it a try in conditions where it previously struggled. I certainly managed to shoot perfectly exposed images of birds in flight against bright overcast skies using evaluative metering. As it stands though, if you want spot metering that’s linked to the active AF area on a Canon body, you’ll need to splurge on the 1Dx series.
Less critical but worth noting is the continued absence of any picture effects or panorama options. Canon doesn’t think the former are relevant on a semi-pro body, and doesn’t seem interested in auto panoramas on any model. Some may think this is reasonable, but I believe both can be fun and useful even in a high-end body. There are the usual Picture Styles which include monochrome options, but nothing like the ART filters or Film Simulations of Olympus and Fujifilm models. So while Canon’s out-of-camera JPEGs are fine, I still personally prefer the JPEG output from Fujifilm.
Canon EOS 5D Mark IV autofocus and continuous shooting
The EOS 5D Mark IV’s viewfinder AF system employs a phase-detect module with 61-points, 41 of which are cross-type. At first glance, this sounds identical to its predecessor, but now the entire 61-point array works at f8 as oppose to just the centre point, and 21 of those remain cross-type at f8 too – great news for those shooting with tele-converters. The centre point also now works down to -3EV compared to -2EV which is good news in low light. The array also enjoys broader vertical coverage than its predecessor.
It’s actually the same AF module employed by the flagship EOS 1Dx Mark II, although as with the 5D Mark III the internal housing is different: the spectacle lenses for image separation are made of plastic instead of the moulded glass used in the 1Dx Mark II. But the bottom line is the 5D Mark IV inherits the AF module of the company’s top-end pro sports camera, along with its wealth of area options and customised response.
The 65 AF areas can be selected automatically or manually, and there’s a bunch of expansion and zoning options. You can choose a single area (spot or square), or the more forgiving AF Point Expansion which also considers four or eight points around it. To handle greater motion, there’s two Zone options, dividing the AF array into nine or three areas for the camera to consider. As explained in the controls section of the review, you can use either the M.Fn button or new AF lever on the rear to cycle through the area options, along with the joystick for moving them around.
The 5D Mark IV also inherits the six AI Servo AF ‘cases’ of the 1Dx, 5D Mark III and 7D Mark II which offer preset combinations of tracking sensitivity, acceleration / deceleration tracking, and AF point auto switching. In other words, should the camera ignore objects that pass in front of the subject, how quickly should it respond to changes in speed, and how erratically will the subject be moving around.
As before, Canon presents each case in a sporting example with icons straight out of a 1970’s Olympic Games. Case 2 for example tracks subjects while ignoring obstacles and is suggested for tennis, while Case 4 is ideal for subjects that speed up or slow down suddenly, like football players. This is all very helpful if you are a sports photographer, but I’d have welcomed some non-sport examples, such as birds in flight. The key of course is experimentation, trying different combinations of tracking cases and AF areas with your desired subject until you find one that works. A good starting point is the general Case 1 combined with auto selection of the entire 65-point AF system, then tweak as required.
Like the EOS bodies which share the same AF options, I found what works with one type of subject may not work so well with another, so it’s important to try as many combinations as you can. As you’d expect, the single AF area and AF Point Expansion options are best for ensuring the camera really knows what you want to focus-on, and these will invariably become your preferred choices for subjects which move fairly predictably. Once the subject motion becomes more erratic though, the larger Zoned options come into their own. I’ll discuss the performance in a moment.
In terms of continuous shooting, the EOS 5D Mark IV enjoys a mild boost over its predecessor from 6fps to 7fps with Canon quoting a buffer of 21 RAW files or unlimited JPEGs while memory remains. The speed edges it ahead of Sony’s A7r Mark II which shoots at 5fps, albeit handling almost 50% more pixels with every frame.
To test the speed, I fitted the EOS 5D Mark IV with a freshly-formatted UHS-II card, set the shutter and sensitivity to 1/500 and 400 ISO respectively, then timed a number of bursts at different quality, focusing and compositional settings.
Composing through the viewfinder first in One Shot Single AF mode, the 5D Mark IV captured 100 Large Fine JPEG images in 14.12 seconds for a rate of 7.08fps, and it seemed happy to continue shooting at this speed while I had memory remaining. Keeping the settings, but switching to RAW, allowed me to capture 19 frames in 2.61 seconds for a rate of 7.28fps, after which the camera slowed significantly to about 2fps.
Switching to Live View, I fired-off 108 Large Fine JPEGs with One Shot AF in 16.03 seconds for a rate of 6.74fps, and again the camera seemed happy to keep shooting at this speed while memory remained. Switching to RAW in Live View, again with single AF One Shot, I fired-off 18 frames in 2.35 seconds for a rate of 7.66fps.
So when shooting with One Shot / Single AF focusing, the 5D Mark IV generally delivered its quoted 7fps frame rate (or close to) whether recording JPEGs or RAW files and whether you were composing with the viewfinder or screen in Live View. Meanwhile the RAW buffer I measured came close to Canon’s quotes when I used an SD card; you may be able to squeeze a couple more with a faster CF card. Or if you want to shoot unlimited images, just switch to JPEG.
In terms of the AF performance in One Shot / Single AF mode, it is, as you’d expect very quick. The 5D Mark IV locked onto pretty much anything I pointed it at with ease under a variety of lighting conditions. The Live View AF also worked very well – confident in low light (indeed lower than the viewfinder system if you have a bright lens) and also supporting face detection across the entire frame.
Of course most cameras perform well for Single AF these days, so the real test is how well they can continuously autofocus during bursts. So to test the action capabilities of the 5D IV, I took it to the streets of Brighton and photographed cyclists and birds in flight; many thanks to my friend Ben Harvey for his riding on-demand! Unfortunately at the time of testing I only had access to two lenses: the Canon EF 24-70mm f4L IS USM and EF 85mm f1.8 USM. Neither are ideal for action shooting, so I intend to re-test the 5D IV at a later date with something more appropriate like the EF 70-200mm f2.8L IS USM II and will update this review with my results.
But for now, here’s what I found with the two lenses I had to hand, first using the viewfinder AF system and the camera set to AI Servo / Continuous AF. When shooting anything that starts small and distant, I enjoyed the most success with single AF areas or AF Point Expansion. If the subject occupies a larger portion of the frame though, Zone can work well and will accommodate more erratic motion. When shooting cyclists from a distance, I generally used AF Point Expansion, but when shooting birds in flight, I often chose Zone and waited for them to get closer before I started tracking. Again it’s all about experimenting and adapting in the field.
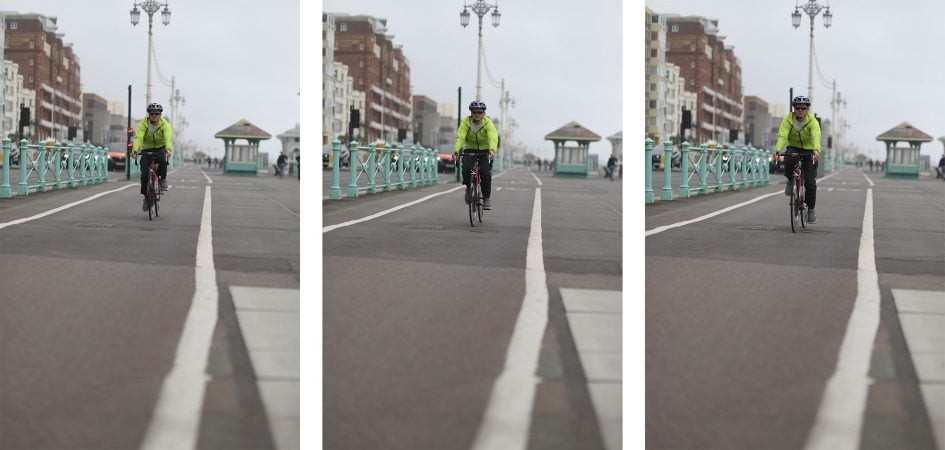
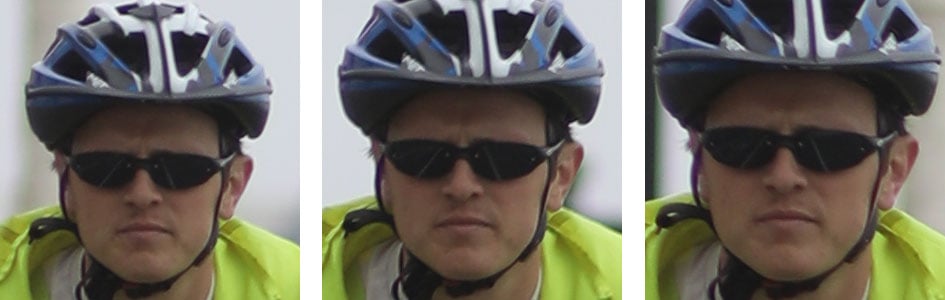
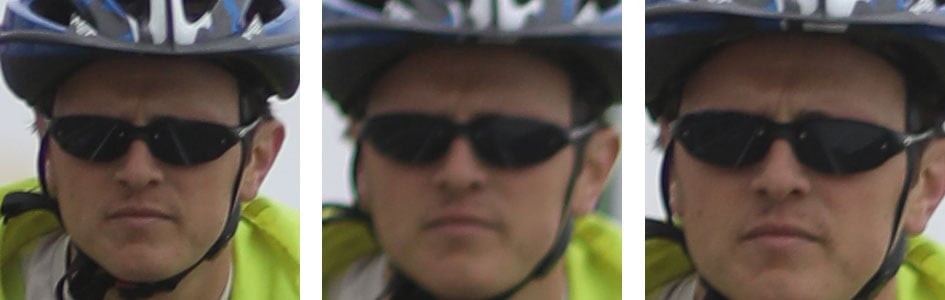
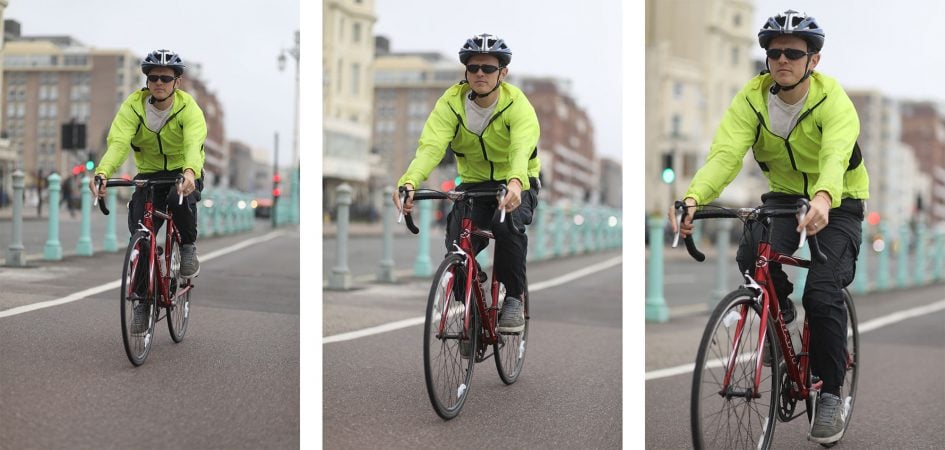
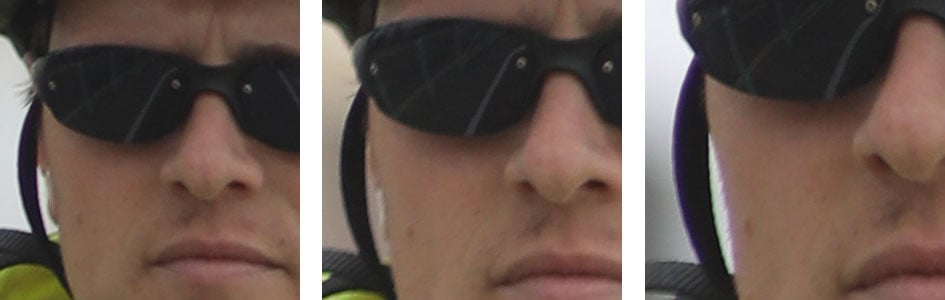
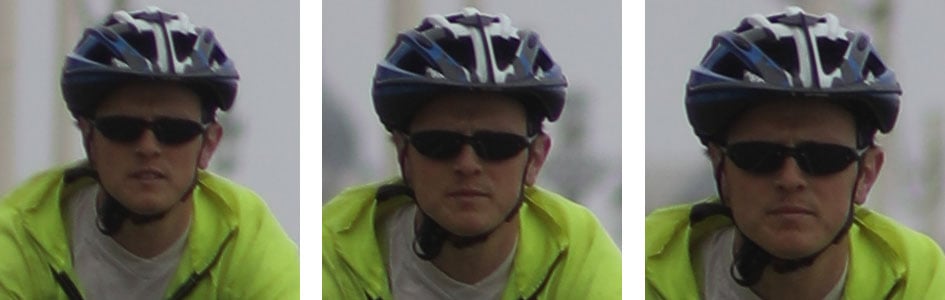
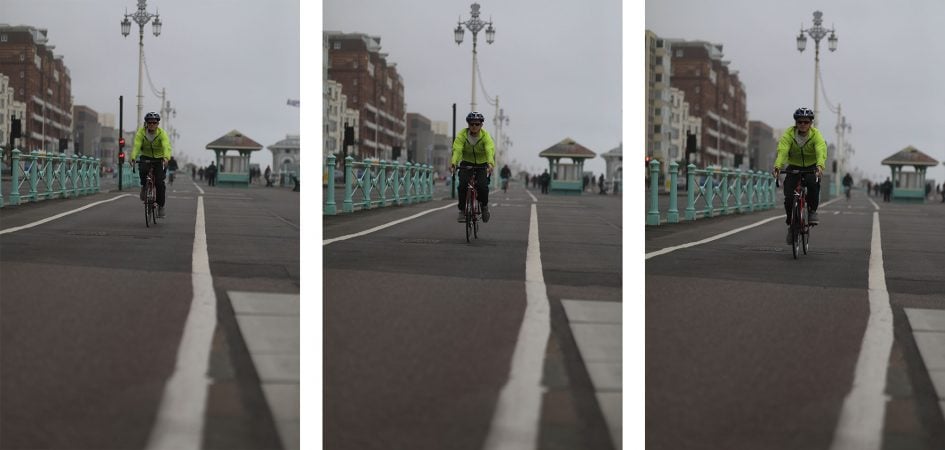
When shooting approaching cyclists using either the EF 24-70mm f4 at 70mm f4 or the EF 85mm f1.8 at f1.8, I found the 5D Mark IV could maintain its 7fps top speed, but never attain a 100% hit-rate of focused images. With either lens, it was closer to 80% in a burst that were sharp, with several being a little soft. I repeated the tests with all the AF area modes and tried adjusting other AF settings, but the hit-rate remained similar. Here’s an example of 12 frames from a typical sequence with the EF 85mm f1.8 at f1.8; the crops are reproduced at 100%.
Canon EOS 5D Mark IV Continuous at 7fps using EF 85mm f1.8 at f1.8

The 5D Mark IV becomes the first full-frame Canon DSLR which can continuously autofocus in Live View while shooting a burst. I had fairly low expectations for the Servo AF mode, especially as it slowed the burst speed, but it actually delivered a fairly high hit rate. Object tracking is possible, but I found the best results when shooting on-coming cyclists or birds was to simply select a single area and try to keep it over the subject.
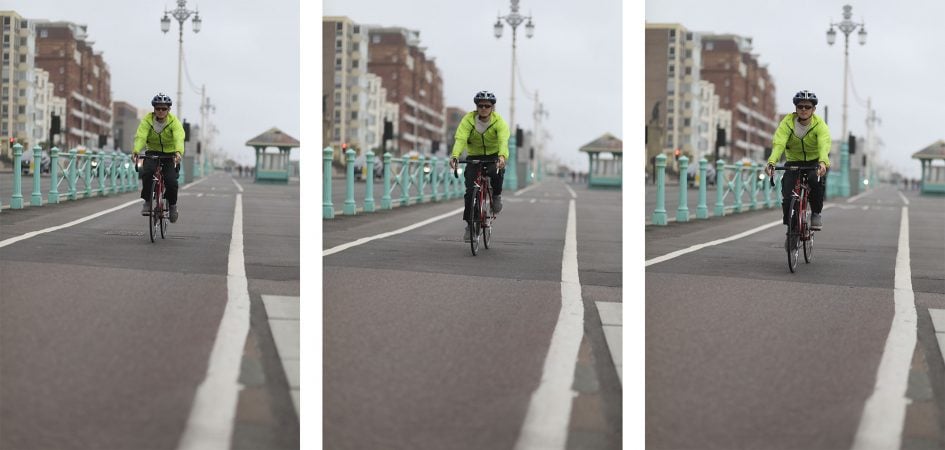
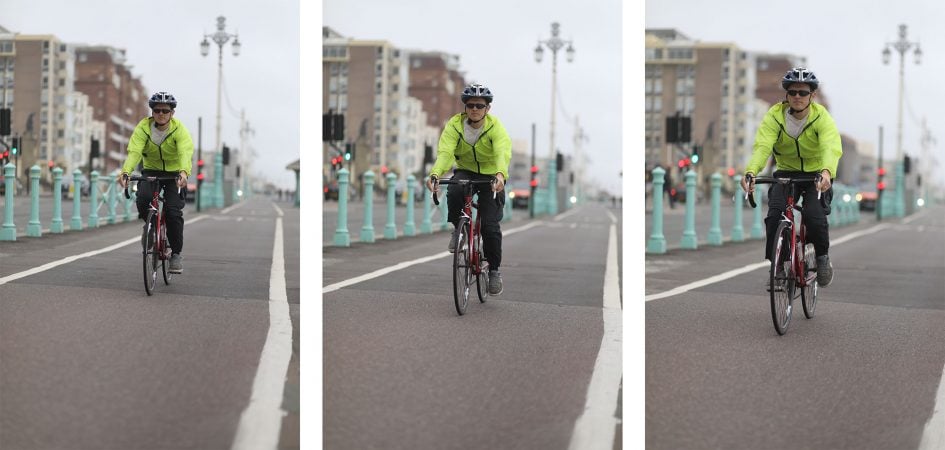
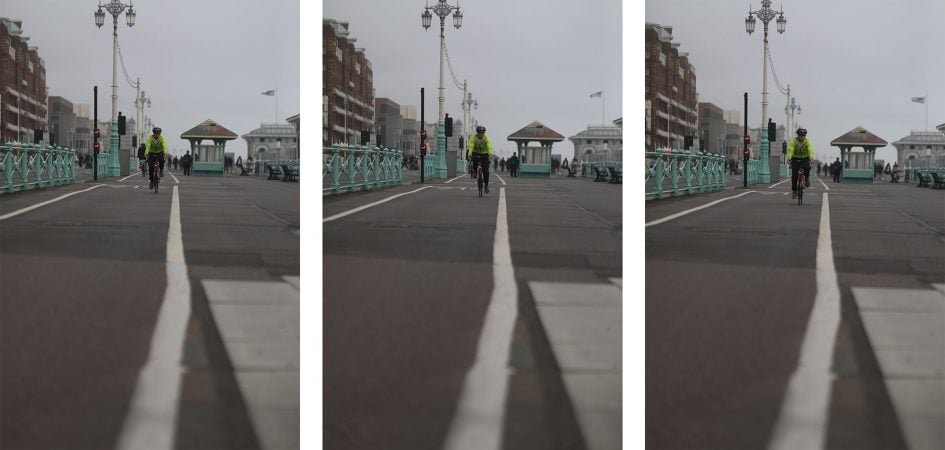
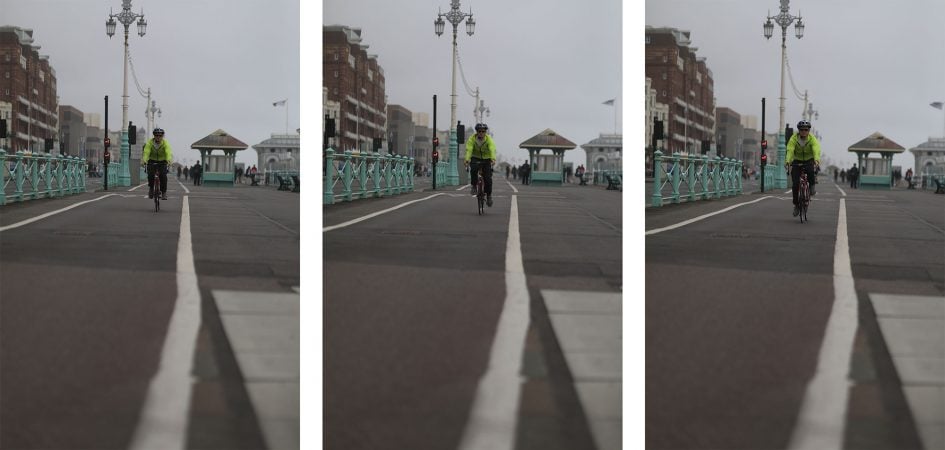
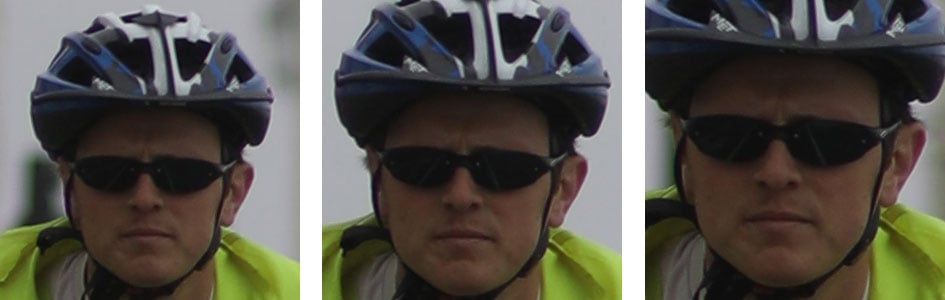
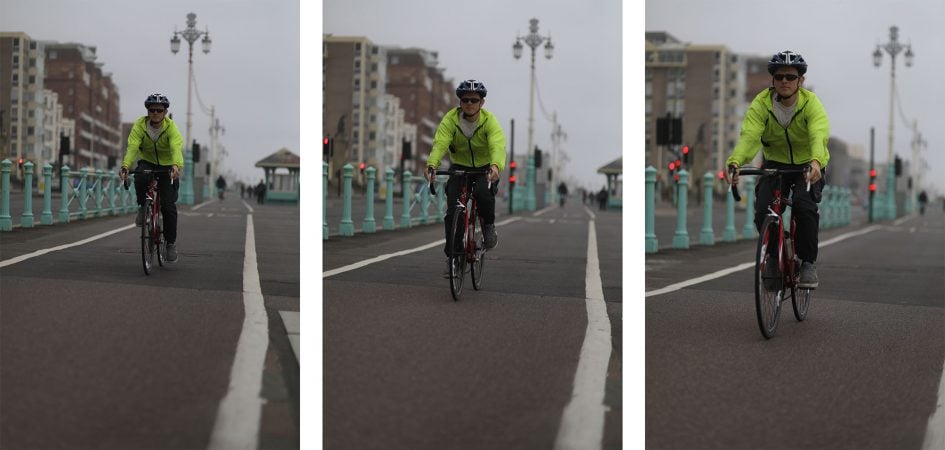
In my tests, Servo AF slowed the burst speed to four to five frames per second, but did a respectable job at keeping the subject sharp on each frame – and with no perceptible blackout between frames either. Here’s another sequence of Ben cycling towards me, again with the EF 85mm f1.8 wide-open and while the 12 frames clearly represent a longer period than the viewfinder sequence earlier (approximately three seconds versus 1.7 seconds), it’s also clear more of them are in focus, at least until the subject becomes very close.
Canon EOS 5D Mark IV Continuous in Live View / Servo AF with EF 85mm f1.8 at f1.8

Ultimately I expected more decisive performance from the 5D Mark IV’s viewfinder autofocus, especially given the module is the same as the 1Dx Mark IV. I do however believe the problems were with my lenses at the time of testing, neither of which are particularly quick focusers. As noted earlier, I will re-test the 5D Mark IV’s continuous AF with a more appropriate telephoto zoom and will report back. I fully expect it should deliver similar AF tracking performance to the 1Dx Mark II when used with the right lenses, it’s just that I haven’t personally tested an ideal pairing yet. Watch this space!
As for Live View AF, the Dual Pixel CMOS AF sensor does a great job with confident focusing and minimal (if any) blackout, although it’s worth remembering four to five frames per second with continuous AF is within the capabilities of most higher-end mirrorless cameras. Fujifilm’s XT2 will do it at 5fps with no viewfinder lag, while Sony’s A6300 will do it at 8fps without lag, or 11 if you can accommodate a lack of live feedback – both are of course APS-C cameras, but come in at under half the price of the 5D IV. I used the A6300 with the FE 70-200mm f4 telephoto at the Tour de France this year, shooting cyclists approaching at high speed, and found it a very confident camera for capturing action. Once again I hope to try the 5D Mark IV in the future not just with longer lenses, but also in more challenging sporting environments.
Canon EOS 5D Mark IV Wifi
The EOS 5D Mark IV is equipped with built-in Wifi, accompanied by NFC to aid the initial negation with compatible handsets or Canon’s Connect Station storage device. Wifi has become a standard feature on modern cameras, but I never take anything for granted from Canon, so I’m delighted to find it here; it’s an important upgrade over the earlier Mark III.
The Wifi capabilities are similar to recent Canon DSLRs. You can wirelessly remote control the camera with a Mac or Windows computer (using the EOS Utility) or with an iOS or Android smartphone using the Camera Connect app). You can wirelessly transfer images to a variety of devices including smartphones, computers, printers and compatible cameras, or view them on DLNA devices like a Wifi-equipped TV.
Alternatively you can connect the camera directly to the internet and share images on various networks via Canon’s Image Gateway, or set up an automatic FTP transfer – ideal for sending images from an event or for automatic backup as you shoot.
I’ll concentrate on the smartphone and computer remote control here, starting with the former and the Camera Connect app which must first be installed on your handset. I tested the Android version on my Samsung Galaxy S7.
Once installed, owners of NFC handsets – like my Galaxy S7 – need only touch the two devices together (ensuring the NFC logos on each are close to initiate a connection – it’s on the grip side of the 5D Mark IV alongside the memory card door). If you don’t have NFC, just choose ‘Connect to Smartphone’ from the Wifi Function menu on the camera for the 5D IV to broadcast a network for your phone to connect to manually.
Once connected to the 5D Mark IV, the Camera Connect app shows four options: Images on Camera, Remote Shooting, Location Information and Camera Settings. Selecting Images on Camera fires-up a thumbnail view of the images on the camera’s card, including JPEGs and movies but not RAW files. You can then tap a thumbnail to view a full-screen version with basic shooting information, then save it to your phone if desired. You have the choice of saving the original JPEG image without resizing if desired, or go for a resized version which, on my phone, measured 1920×1280 pixels. You can set a preference going forward or go for an option which prompts you to choose a resized or original version each time you transfer an image.
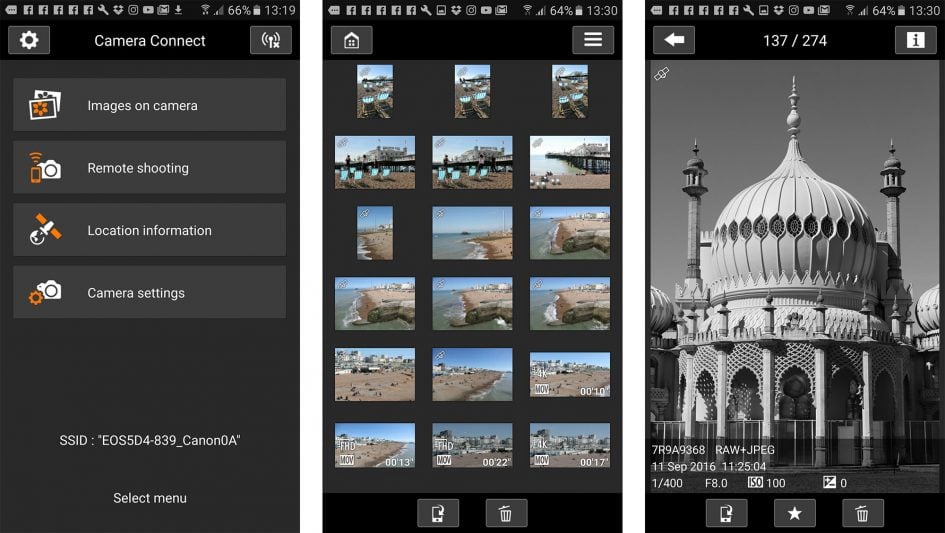
It’s also possible to access movie files which were recorded in the MP4 format, and copy them across too in their original format. I tried this with a number of 1080p movies which played-back fine on my Galaxy S7 and were also happy to be imported directly into Instagram for sharing. Unfortunately while the Camera Connect app will show thumbnails of movies recorded in the MOV format, it can’t copy them over, which rules-out accessing 4k movies, along with timelapse videos or those recorded in the High Frame Rate modes.
Select Remote Shooting from the main app menu and you’ll see a live image from the camera on your phone, with the chance to tap anywhere on the frame to refocus if desired (a double-tap presents a magnified view for further confirmation) – note you may need to tap the smaller circular ‘button’ on screen to activate the AF. The Camera Connect app also offers full exposure control depending on the mode set on the camera’s dial. If the mode dial is set to Manual, you’ll be able to remote control the shutter, aperture and ISO all from your phone, then tap the remote shutter release to take a shot.
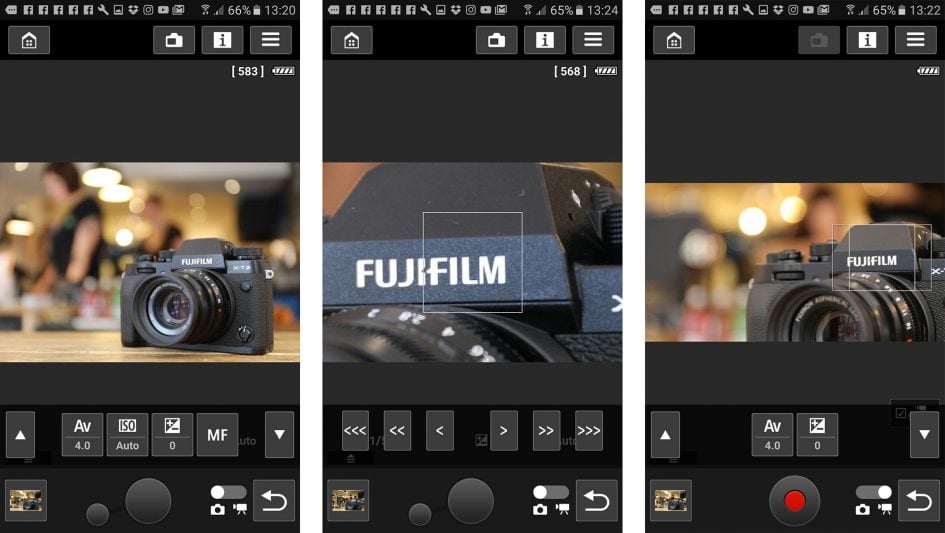
A slider at the bottom of the app lets you switch the camera into movie mode. Doing so reframes the live image in 16:9 and lets you remotely control the exposure and keeps the touch-AF active. This allows you to remotely pull-focus by tapping the phone’s screen as you film a video, although as noted earlier you’ll only be able to subsequently copy it onto your phone if you filmed in the MP4 format.
The third option on the Camera Connect app is Location Information which simply lets you start recording a log using your smartphone’s built-in GPS, then send location information to the camera over Wifi to tag relevant images. Of course this is redundant on the 5D Mark IV since the body already features a built-in GPS receiver, but it’s interesting to see it available here since it’s often disabled when connecting to EOS DSLRs for some reason. I’ll describe the built-in GPS features in a moment. The fourth and final option on the Camera Connect app accesses camera settings, but these are simply related to the clock and area, allowing you to adjust them remotely or sync them with the phone.
Moving on, the EOS 5D Mark IV allows you to connect the body directly to a network and share images without going through your phone or computer. As before, your images are actually uploaded first to Canon’s Image Gateway service which then shares them onto third party networks (after you’ve granted it access) including Facebook, Twitter, YouTube, Flickr, Google Drive and or email. Most of the services are configured before-hand by connecting the camera to your computer over USB, then using the Web Services application and the Image Gateway website itself. So when you come to share directly from the camera, there’s little more to do other than select the desired Web Service on the 5D Mark IV’s menus. I tried it with Facebook and Flickr and found it typically took about 45 to 60 seconds to send a 5MB JPEG via a home cable internet service direct to Canon’s Gateway which subsequently shared them as requested.
It works, but the initial setup is more than a little complicated and while the touch-screen on the 5D IV makes it fairly easy to tap out a caption, I still much prefer sharing images socially with my phone. So if it were me, I’d use the Wifi to simply copy the desired images from the 5D IV onto my phone first, then share from there.
The 5D Mark IV’s Communication menu also offers an FTP option which can be configured to upload JPEG or RAW files (in a choice of two sizes) either at a push of a button, or automatically going forward. The ability to upload images automatically as you shoot is a feature that’ll be welcomed by sports, news or event shooters. So long as the camera is connected to a network, most typically via a phone’s hotspot or a venue’s Wifi, then you could use the FTP feature to backup and share as you shoot, unattended if desired.
I run several web servers, each with FTP access, but frustratingly I couldn’t get the 5D Mark IV’s FTP client to connect to any of them. I suspect this may be more my fault than the camera though, with the error perhaps down to a mistake in formatting or a limitation of my router. I believe it should all work like the previous Wifi adapters, so it should be possible, but it’s something I’ll have to try again when I get the camera back for further testing at a later date.
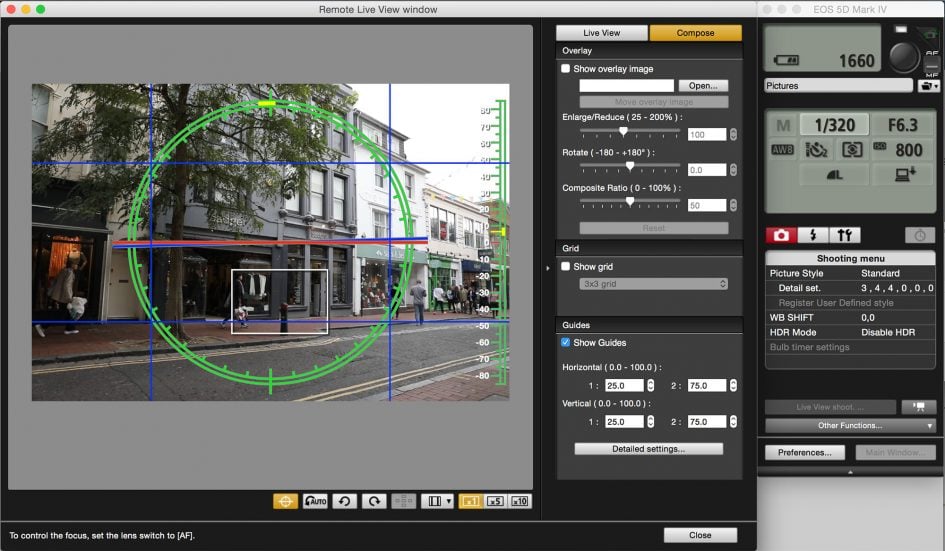
As mentioned earlier, you can also use Wifi to wirelessly remote control the EOS 5D Mark IV using the free EOS Utility application for Windows and MacOS computers. The EOS Utility is one of the lesser-known highlights of owning a Canon DSLR. With the camera connected to your computer, whether wirelessly or over USB, the EOS Utility lets you remote control pretty much any function or setting of the camera that doesn’t involve turning a physical switch or dial.
As before you can fire-up a large Live View window with a high resolution live image, remote focus (manually nudging it back or forth of going for auto and clicking the desired region with the computer’s mouse), take photos and have them recorded to the computer, camera or both, or trigger movie recording, although videos are still only recorded to the internal memory card. You can also set up an interval timer, although the 5D Mark IV also offers the facility in-camera. In Live View Shooting you can overlay a wealth of guides, grids, lines and there’s also a leveling gauge.
On older generations if you wanted to control the DSLR over Wifi using the EOS Utility, it had to be via a router or hub, which limited wireless operation to home, office or studio use. But since the 70D, it now also works with a direct peer-to-peer connection between camera and computer. This means you can wirelessly remote control the 5D Mark IV directly with a laptop alone, literally in the field. I tried it in my house, remote controlling the camera from different rooms or even floors with my MacBook Pro, although understandably as the range increased, the live view refresh and speed of transferring images (if enabled) reduced. So while wireless control is cool, you should still use a USB cable for the best and most responsive experience – especially now the camera supports the faster USB-3 interface. I’d also love to see an option to program a series of shots, not just at preset intervals but also with preset exposure values that could be different for each shot if desired.
As mentioned earlier, the EOS 5D Mark IV is not only equipped with Wifi and NFC, it also features a built-in GPS receiver in the viewfinder head. This allows the camera to embed your location details onto images if desired, with no effort other than enabling the feature in a menu – so much easier than recording a log with your smartphone and syncing it later.
There’s three options: Disable which completely turns off the GPS, Mode 1 which keeps the GPS active even when the camera’s switched off (for the quickest positioning, but at the cost of increased battery life), and Mode 2 which turns the GPS off when the camera’s off (resulting in slower acquisitions from cold, but without the increased battery hit of Mode 1); note Mode 2 will still receive GPS signals if the camera powers-down to sleep as oppose to being physically turned off.
If enabled, you can set the GPS to update the camera’s clock automatically, which is very handy when you’re travelling between different time zones. You can also set the interval between position updates from every second, every five seconds, ten seconds, 15 seconds, 30 seconds, every minute, every two minutes or every five minutes. It’s also possible to record a GPS log for use externally. A GPS icon flashes while the camera finds its position and stays on once the location is determined.
There’s little more to say really other than it all works as you’d expect, and the process is seamless unlike syncing logs made with smartphones. Mode 1 is of course the most responsive, generally indicating the position is known (with the fixed GPS icon) at all times; you certainly don’t have to wait more than a few seconds if it’s flashing unless you’ve significantly changed location, such as after a flight.
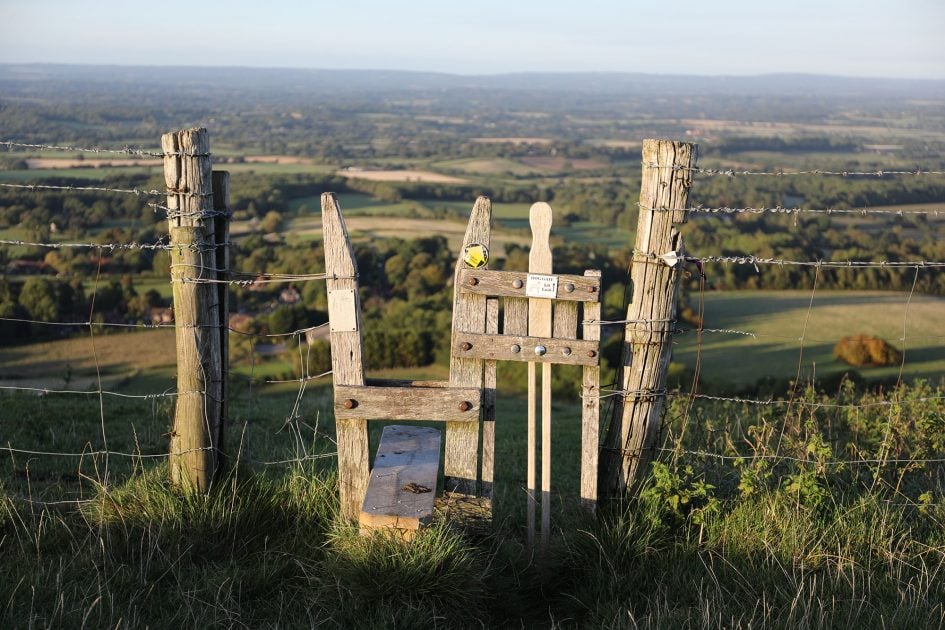
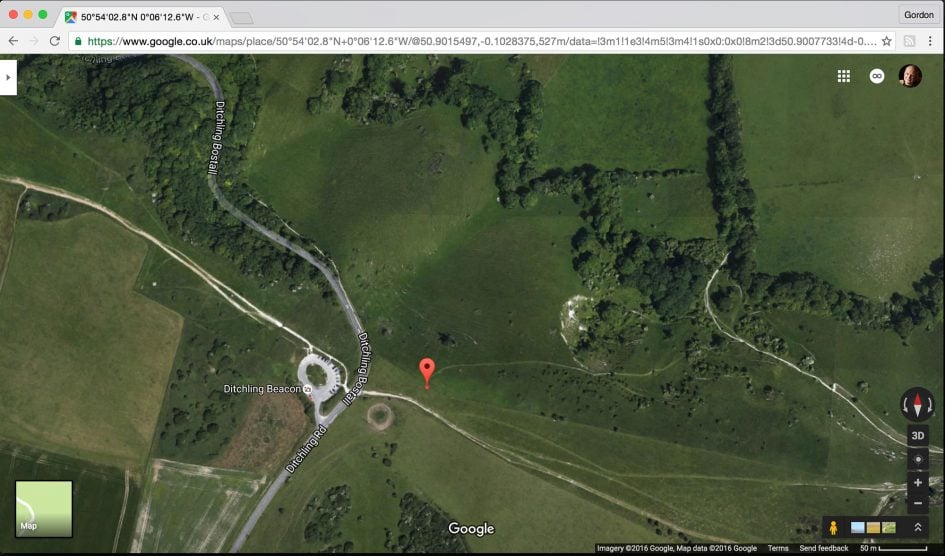
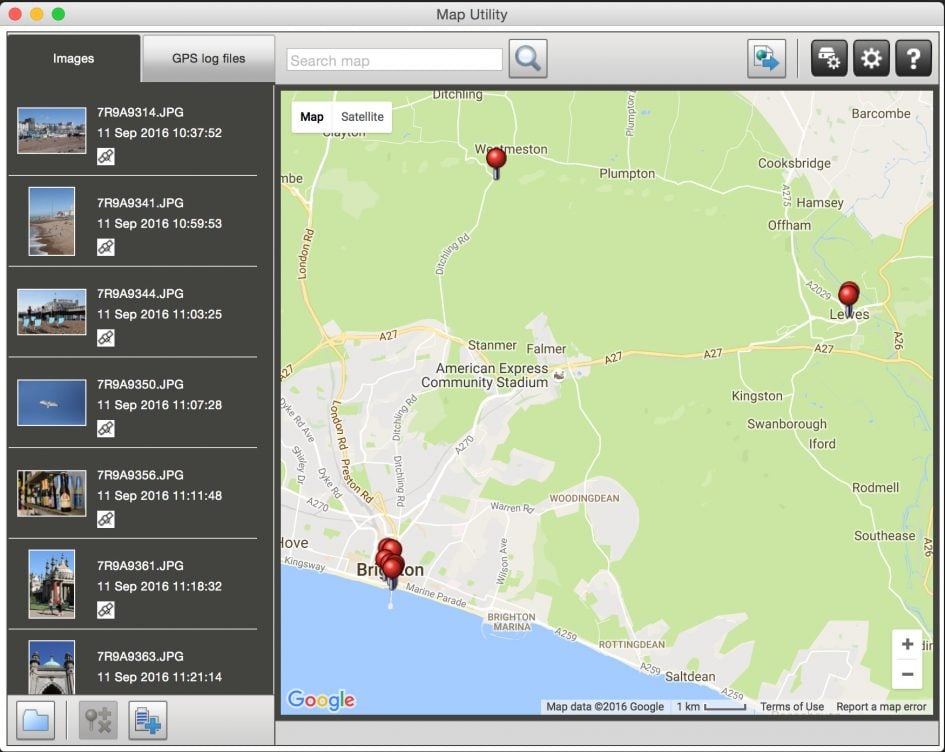
That said, I generally left the Mark IV in GPS Mode 2 to maximise battery life and while this can extend a location acquisition from cold to about 40 seconds, that’s not too long if you’re composing and adjusting – and if you haven’t moved too much, a subsequent acquisition from cold could be closer to 20 seconds. I also liked how Mode 2 would regularly update when the camera went to sleep as this reflected how I’d normally shoot, leaving it on standby if I anticipated taking a shot soon afterwards, but only physically turning it off when I was sure I’d finished for a while. Many of my sample images are tagged with GPS positions; here’s one with the location loaded into Google Maps.
Canon EOS 5D Mark IV image with GPS position and Log map
In terms of increased battery consumption, I certainly wasn’t aware of it running lower than normal when using Mode 2, but if you’re concerned you can of course disable it. Oh, and a quick word of warning – if enabled, the GPS will also embed a location on video files (based on the position at the start of recording) as well as stills, so if you’re concerned about privacy, remember to disable it.
Canon EOS 5D Mark IV movie mode
Video was a huge part of the success of the earlier Mark II and Mark III bodies, so it’s not surprising to find Canon upgrading the capabilities on the Mark IV. Most importantly, the 5D Mark IV now gains the ability to capture 4k video and like the 1Dx Mark II, it’s in the slightly wider Cinema 4k format which measures 4096×2160 pixels. There’s no UHD option, but it’s simple to crop Cinema 4k footage horizontally from 4096 to 3840 pixels to deliver standard 16:9 / UHD if preferred.
Like the 1Dx Mark II, 4k video is made by taking a 1:1 / 4096×2160 pixel crop directly from the middle of the sensor which means no scaling artefacts to worry about. However the relatively high resolution of the 5D IV’s sensor means it’ll be taking a 4096×2160 pixel crop from a frame measuring 6720×4480 pixels, which in turn means a fairly severe field reduction of 1.64x horizontally.
Sensor geeks will recognise this is actually a tad smaller than APS-C, which means when filming 4k on the 5D Mark IV, you could actually – in theory – use APS-C lenses without compromising the quality. Unfortunately though you won’t be using any of Canon’s own EF-S lenses on the Mark IV as some extend deeper into the mount and would interfere with a full-frame mirror – even if all it was doing was getting out the way to film video. The decision to crop an approximately APS-C sized area for 4k should also make you question whether you need a full-frame body, if all you’ll be doing is filming 4k video. I’ll come to that later.
Also inherited from the 1Dx Mark II is the decision to encode 4k video using Motion JPEG, although at a lower bit rate of 500Mbit/s compared to 800Mbit/s on the 1Dx II. That’s still an enormous data rate though compared to the 100Mbit/s employed by the XAVCS codec on Sony’s A7r Mark II or A6300 for 4k. Indeed not only will the Canon 5D Mark IV burn through your memory five times faster than a Sony body when capturing 4k, but you’ll also need a pretty fast card to cope with the high data rates – and there’s a catch. There may be SD cards sufficiently quick to handle these speeds, but the decision to equip the 5D Mark IV with a slower UHS-I SD slot prevents them from operating at their maximum potential. I enjoyed some success shooting 4k with the 5D Mark IV using my fastest SD cards, but while I occasionally managed to record clips of a minute or so, more often than not they’d stall after only a few seconds. The only way I could guarantee reliable uninterrupted recording was to use a fairly recent Compact Flash card instead.
Even with the right card though, it’s scary how fast you’ll go through it. A formatted 32GB card is good for only around eight minutes of 4k footage – that’s roughly 4GB per minute. So while in theory the 5D Mark IV can record clips up to a second shy of half an hour, you’ll need a 128GB card to accommodate just one of them.
So why use a codec like Motion JPEG with such mild compression? Well for starters it’s quicker and more responsive to edit, but more importantly it’s easier to extract good quality still photos from, and following Panasonic, Canon now lets you generate 8 Megapixel stills from 4k footage in-camera. It’s a doddle to do so during playback too – simply pause the video at (or close to) the desired point, shuffle back and forth a frame at a time if necessary again using the touch controls, then finally tap the icon by itself above the transport controls on the right side. The camera then asks if you’d like to save a still image, although these are always the same wide (1.9:1) aspect ratio as the C4k footage. In contrast, Panasonic’s 4K Photo modes can generate stills in a variety of less wide aspect ratios if preferred. But the quality from the Canon is good as you can see below.
Above: Canon EOS 5D Mark IV: in-camera frame-grab from 4k footage
Above: Canon EOS 5D Mark IV: in-camera frame-grab from 4k footage
In terms of frame rates, the 5D Mark IV misses out on the 4k / 50p / 60p options of the 1Dx Mark II and only allows 4k frame rates of 23.98, 24, 25 and 29.97fps. I believe the lower frame rate and bit rate for 4k compared to the 1Dx Mark II is at least partly influenced by the choice of storage media with the 5D Mark IV missing out on the option to use quicker C.Fast cards.
If you prefer to film Full HD 1080p, the 5D Mark IV will capture the full-frame width without any field-reduction, but with a non-integer scaling factor that could run the risk of artefacts; at least it’s a fairly friendly 3.5x though. Again due to bandwidth, whether on the sensor or card or both, the 5D Mark IV misses out on the 1080 / 120p option of the 1Dx Mark II and instead only allows you to film 1080 up to 60p. A 100p / 120p option is available on the 5D IV, but only at 720p – same as the A7r II. Full HD 1080p is encoded with H.264 in All-I (at 90 or 180Mbit/s depending on frame rate) or IPB (at 30 or 60Mbit/s again depending on frame rate). The 720 / 100p / 120p mode encodes in All-I at around 160Mbit/s. Regardless of the video quality, the longest recording time is 29:59. Here’s a clip filmed in the 720 / 100p mode, which the camera conforms to 25p, resulting in a four-times slowdown.
Above: Download the original file (Registered members of Vimeo only). Sample movie filmed with the Canon EOS 5D Mark IV in its High Frame Rate movie mode, capturing 720 at 100p and encoded in-camera at 25p for a four-times slow-down. I used the EF 85mm f1.8 at f11.
The HDMI port outputs 1080p in 4:2:2 / 8 bit, but annoyingly there’s no 4k output. At least the high bit rate for internal 4k recording offers some consolation. Note Sony’s A7r II and even the A6300 also output 4:2:2 / 8 bit over HDMI, but in a crucial advantage for anyone using external recorders, both will also output the signal in 4k.
Like earlier Canon DSLRs, you can film with fully automatic or manual exposure control, although there’s also now the option to film in the semi-automatic shutter and aperture priority modes too. It’s also possible to adjust the settings while you film, either with the control dials, or by tapping on-screen icons. Unlike some earlier Canons, the 5D IV may not be able to configure its thumb wheel for silent operation, but you can achieve a similar result by tapping the aperture, shutter or ISO boxes on-screen, before tapping the left and right arrows to adjust them. If you’re gentle it can be fairly effective, although the increments are in third EV steps which can be visible; that said, I used it to adjust the ISO to compensate for changes in brightness when going from outside to in and back again, and it worked quite well. See below.
Above: Download the original file (Registered members of Vimeo only). Sample movie filmed with the Canon EOS 5D Mark IV in its 1080 / 25p mode and the Standard Picture Style; I adjusted the sensitivity between 100 and 10000 ISO using the on-screen touch controls while filming to correct the exposure between outside and in. I used the EF 24-70mm f4 IS USM at 24mm.
That said, if you’re happy letting the camera work out the exposure, I’d recommend filming in Manual with a fixed shutter and aperture, but leaving the ISO set to Auto to handle changes in brightness. Here’s a clip again going from outside to in and back out again, but this time with Auto ISO and the ramping up and down looks much smoother. I wonder if Auto ISO can access finer increments? Either way, it’s preferable to tapping the screen constantly.
Above: Download the original file (Registered members of Vimeo only). Sample movie filmed with the Canon EOS 5D Mark IV in its 1080 / 25p mode and the Standard Picture Style; I fixed the shutter and aperture manually, but set sensitivity to Auto ISO to see how it would handle moving from outdoors to indoors and back again. I used the EF 24-70mm f4 IS USM at 24mm.
As mentioned earlier, the Dual Pixel CMOS AF sensor allows the EOS 5D Mark IV to confidently refocus while filming with minimal hunting or over-shooting. Coupled with the large 3.2in touch-screen, it’s easy to pull focus by simply tapping the desired subject, or you could allow the camera to track a subject, including with face detection if preferred. If you’re using one of the two FlexiZone AF modes, you can adjust the speed and response of the focusing, allowing the camera to rack slowly or quickly, and either ignore temporary obstacles or react to them straightaway. If you enable Face tracking though, these options are greyed-out and the camera operates at a fixed speed; that said, I found the face tracking was sufficiently quick to track me striding towards the camera (at least once it had locked-onto me), even when filming with the EF 50mm f1.8 STM lens wide-open in dusky conditions. I’ll show the face-tracking clip soon, but in the meantime here’s three showing touch-screen focus-pulling in action, the first at the default speed, followed by the fastest and slowest options; not it’s not possible to adjust the refocusing speed when face tracking is enabled.
Above: Download the original file (Registered members of Vimeo only). Sample movie filmed with the Canon EOS 5D Mark IV in its C4k / 25p mode at 1/50, 800 ISO and the Standard Picture Style. I used the EF 24-70mm f4 IS USM at 50mm f4 and tapped the screen to pull focus; the speed was set to the default 0. Here’s are versions with the speed at the slowest -7 and with the speed at the fastest +2.
Of course it’s still possible to manually focus while filming – albeit annoyingly with a continued lack of focus peaking – but the addition of confident and convincing autofocus makes the 5D Mark IV a much easier camera to use at events, and a World-apart from the Mark III which lest we forget was manual focus only for video. It’s just a shame the screen is still fixed in place and can’t articulate to more comfortable angles – again something that’s possible on almost all mirrorless rivals. I did miss this capability when filming with the 5D Mark IV, although you could of course connect an external monitor to the HDMI, or even use a Wifi-connected phone as a remote screen, and if using the latter you can still pull-focus by tapping it instead.
Audio is recorded using a built-in mono microphone, or an external mic connected to a standard 3.5mm jack. Canon has also provided a 3.5mm headphone jack for monitoring audio. It’s possible to adjust audio levels before or during recording if desired.
If you’re into grading footage, you’ll be disappointed to discover there’s no Log profile on the Mark IV, so you’re next best bet is to use a Neutral profile with all the parameters turned down and hope it’s sufficiently flat; I have a sample below. I should again note Log profiles are available on many Sony bodies from the A6300 upwards. On the plus side though, Canon’s standard picture profiles can at least be deployed with the full ISO sensitivity range down to 100 ISO, making them more practical under bright conditions than most Log profiles which can start at 1600 ISO or even higher. There’s also no zebra patterns for gauging exposure, so if you want zebras and peaking (for focus assistance), you’ll need to connect an external monitor.
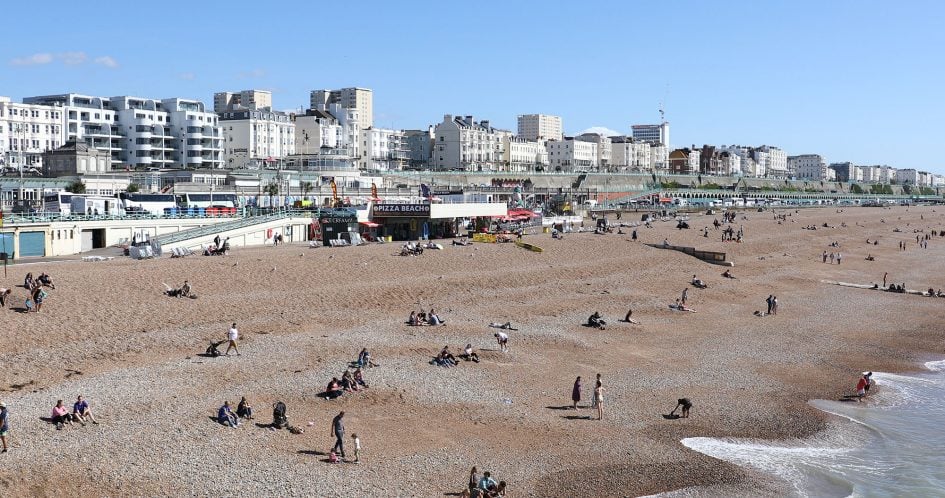
Just before looking at the quality of the footage, a brief mention of the timelapse and HDR movie modes, described in the Shooting section earlier. You can capture up to 3600 frames at intervals between one second and a second shy of 100 hours, then have the camera encode them into a 1080p movie at 25p or 30p depending on the video region. I showed an example of the Brighton i360 Tower earlier, so here’s one showing people on the beach, captured at one second intervals.
Above: Download the original file (Registered members of Vimeo only). Sample movie filmed with the Canon EOS 5D Mark IV in its Timelapse movie mode, encoded in-camera at 1080 / 25p. I set the camera to take 500 images, at one second intervals. I used the EF 85mm f1.8 at f11.
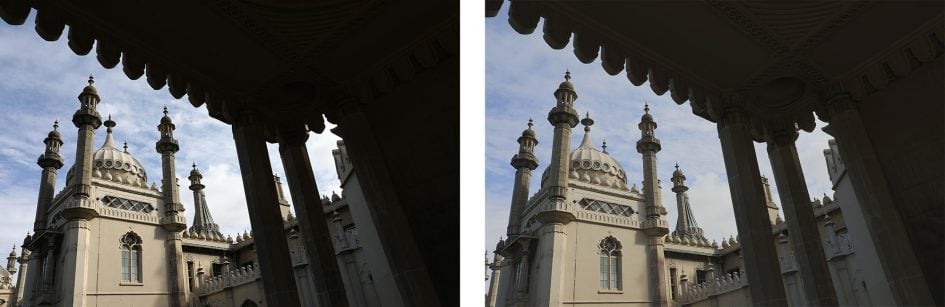
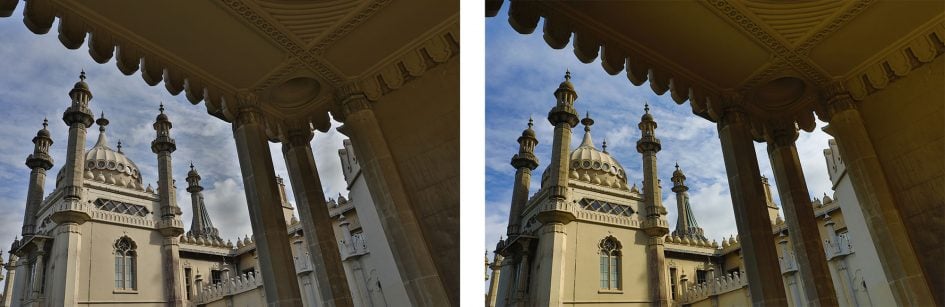
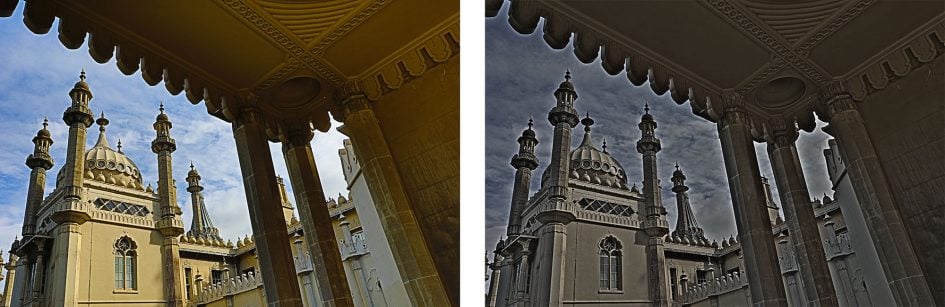
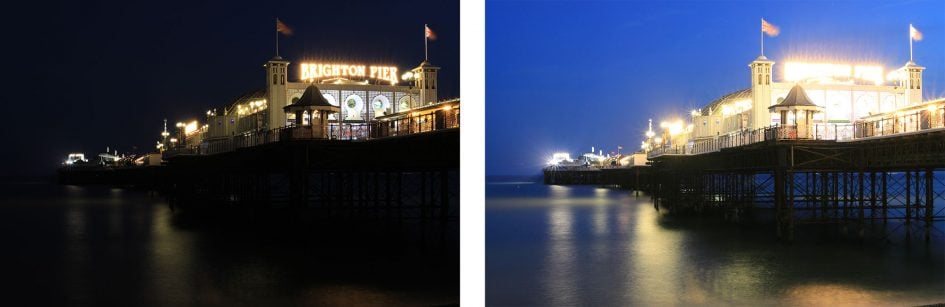
Next-up the HDR movie mode, only available for 1080p footage at 25p or 30p depending on region. To test it I filmed the Brighton Pavilion against an overcast sky with and without HDR. I took frame-grabs and made histograms of the clip without HDR on the left and with HDR on the right for comparison. The version with HDR definitely retains some highlight and shadow detail lost on the non-HDR version.
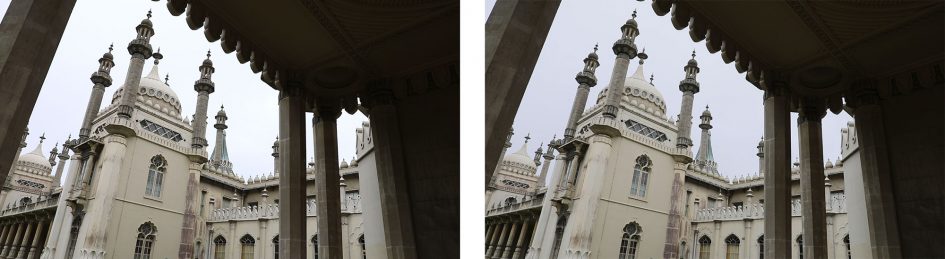

Above: Canon EOS 5D Mark IV HDR Movie mode: Left: Disabled, Right: Enabled
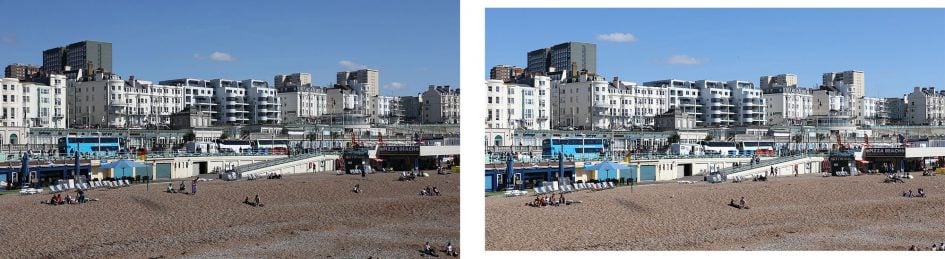
Ok, now onto quality. The first thing to discuss is the coverage difference between 1080p and 4k video. To illustrate this I filmed two clips with the 5D Mark IV using the EF 24-70mm f4L IS USM at 24mm, one in 1080p and the other in 4k, both at 24p. I’ve taken frame-grabs from both and over-layed the 4k grab over the 1080p one below; the outer edge of the red border represents the 4k capture area, while the full image represents the 1080p capture area – again when both are using the same focal length.
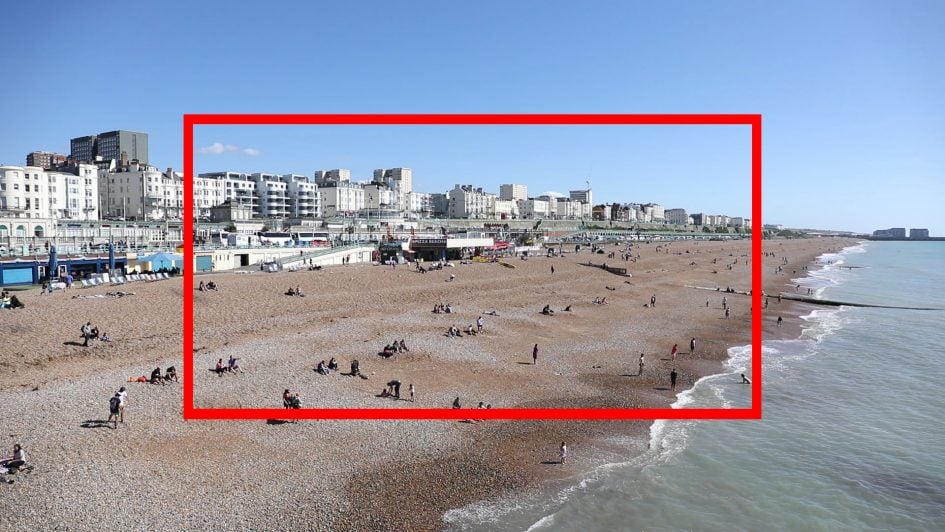
Above: Canon EOS 5D Mark IV movie coverage. Full image is 1080p, red frame indicates 4k crop
It’s pretty evident from the composite image above the dramatic difference in coverage between filming in 1080p versus 4k on the 5D Mark IV. The crop for 4k is sufficiently tight that capturing a wide view will require a very short focal length lens, something that could get expensive within the Canon system given EF-S lenses are not physically compatible with the full-frame bodies. If you want to film 4k with a 24mm field-of-view, you’ll need a lens close to 14mm in focal length. An ideal lens for wide-angle 4k videography on the 5D Mark IV would be Canon’s EF 11-24mm f4L, a superb, albeit rather large and expensive model. Here are the frame-grabs from the 24mm focal length one more time, positioned side-by-side for comparison.

Above left: 1080p coverage at 24mm, above right: 4k coverage at 24mm
In order to compare the quality between 1080p and 4k footage on the 5D Mark IV, you’ll need to match their field-of-view which means using a longer focal length for the 1080p clip. In the following clips and frame grabs I used the EF 24-70mm f4L IS USM at 50mm for the 1080p clip and approximately 35mm for the 4k version, fine-tuning the focal length to match the field-of-view. Here’s how the full frame grabs look, with 1080p on the left and 4k on the right.
Above left: 1080p coverage at 50mm, above right: 4k coverage at 35mm
Below you can see 100% crops from the middle of each frame grab, again 1080p on the left and 4k on the right. It’s immediately evident the 4k version on the right is resolving significantly greater detail, particularly in the fine grills. Revealingly these grills are also exhibiting some moire / false colour on the 1080p crop.
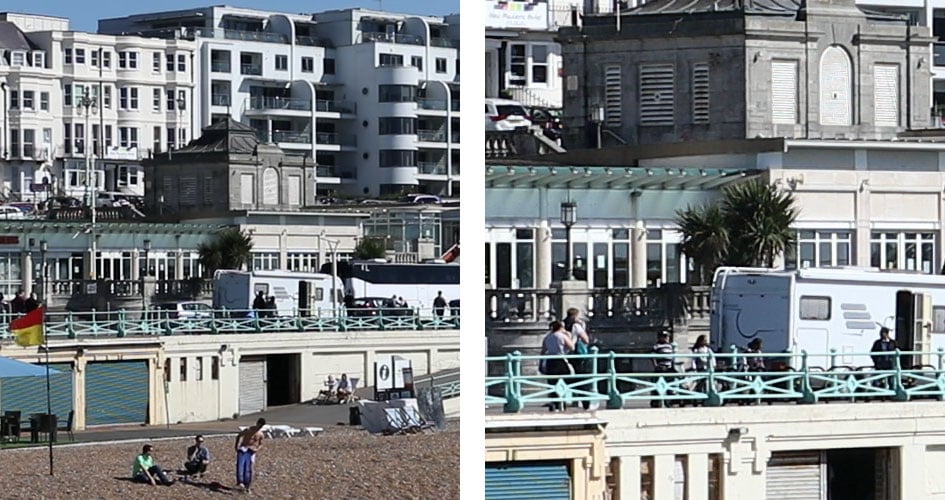
Above left: 100% crop from 1080p footage, above right: 100% crop from 4k footage
So the 5D Mark IV, as you’d hope, can deliver far better quality in 4k than it can in 1080p and like many other cameras even if you intend to output in 1080p, you may prefer to capture in 4k. The only downsides to filming in 4k though are again the tight crop and extremely high bit-rate.
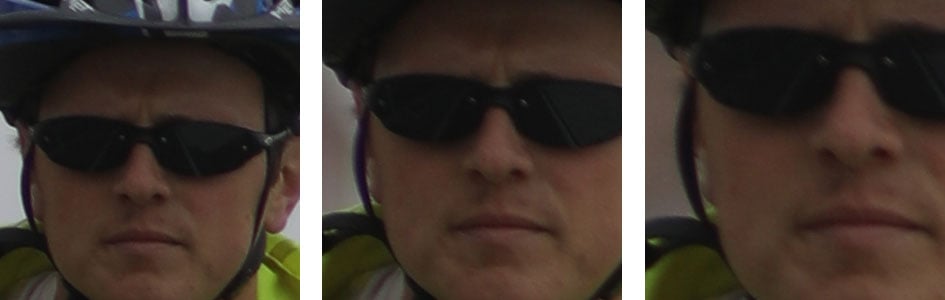
The approximately APS-C sized crop for 4k on the 5D Mark IV also made me wonder how the camera would compare to actual APS-C cameras with 4k capabilities. So I filmed a series of clips at high ISOs using the 5D Mark IV, Fujifilm XT2 and Sony Alpha A6300 moments apart to see how they’d compare. If you’re interested, check out my Canon EOS 5D Mark IV movie quality results page!
The results from my comparison with APS-C cameras proved they delivered very similar quality to the 5D Mark IV, especially in 4k, which should have you wondering why you’d want to invest in a larger, heavier and more expensive body. Certainly in terms of 4k video quality there’s not much between them, and while you could argue the full-frame sensor of the 5D Mark IV will give you broader coverage in 1080p, it does come at the disadvantage of a significantly different field-of-view when switching between formats. In contrast, the XT2 only employs a fairly mild crop for 4k, while the A6300 keeps the field-of-view the same for 1080 and 4k, so long as the 4k is in 24p or 25p.
While testing the 5D Mark IV alongside the Fujifilm XT2 though, one thing did become apparent. The larger body of the DSLR was much more effective at dissipating heat and even after half an hour of recording 4k clips, the 5D IV was barely warm compared to the XT2 which was issuing over-heating warnings; the larger battery in the 5D IV also allowed it to film for longer (90 minutes of 4k on a single charge in my tests), although I should note Fujifilm’s XT2 battery grip not only extends that model’s life by three times, but also improves its heat management, while still coming in smaller, lighter and cheaper overall than the 5D IV.
When you take everything into consideration, mirrorless rivals really do hold most of the cards for movie shooting, delivering similar quality 4k with similar field reduction from a smaller, lighter and cheaper body with an articulated screen, better focusing and exposure aids, the chance to film and review video with the viewfinder, log profiles (albeit not internal on the XT2), and 4k HDMI output too. The Canon still enjoys the edge on refocusing and also sports the convenience of a touch-screen, but the days when the latest 5D body was by far the best choice for movie shooters is now over.
That said, while I personally feel mirrorless bodies like the A6300 are the superior choice for movies these days, it doesn’t take away from the fact the 5D Mark IV can still capture great-looking video footage. Here’s a bunch of examples.
Above: Download the original file (Registered members of Vimeo only). First to compare the coverage again, here’s a video filmed in 1080 / 24p using the EF 24-70mm f4L IS USM at 24mm f8. When filming in 1080p, the 5D Mark IV uses the full sensor width, so this video shares the same horizontal coverage as a still photo shot at this focal length. Compare this to the video below filmed in 4k using the exact same focal length from the same position.
Above: Download the original file (Registered members of Vimeo only). Here’s a clip filmed in the Cinema 4k / 24p mode using the same lens focal length from the same position as the 1080p clip above. The difference in the field-of-view is quite obvious and illustrates how even 24mm no longer delivers that wide a field of view when filming in 4k on the 5D Mark IV – thanks to the severe crop, you’ll need really short focal length lenses to capture wide views.
Above: Download the original file (Registered members of Vimeo only). Sample movie filmed with the Canon EOS 5D Mark IV in its C4k / 24p (24.0) mode at 1/500, 100 ISO and the Standard Picture Style. I used the EF 24-70mm f4 IS USM at 35mm f8. I filmed another version in 1080 / 24p, adjusting the zoom to match the horizontal field of view. See my Canon EOS 5D IV 1080 24p IPB sample movie and Canon EOS 5D IV 1080 24p All-i sample movie.
Above: Download the original file (Registered members of Vimeo only). Sample movie filmed with the Canon EOS 5D Mark IV in its C4k / 24p (24.0) mode at 1/500, 100 ISO and the Neutral Picture Style with Sharpening at 0 and Contrast, Saturation and Colour Tone at -4. I used the EF 24-70mm f4 IS USM at 35mm f8. I also have a clip filmed in 1080p with the same Picture Control style – see my Canon EOS 5D IV 1080 24p Neutral sample movie.
Above: Download the original file (Registered members of Vimeo only). Sample movie filmed with the Canon EOS 5D Mark IV in its C4k / 25p mode at 1/50 and 1600 ISO. I used the EF 24-70mm f4 IS USM at 24mm f4.
Canon EOS 5D Mark IV sensor
The EOS 5D Mark IV is equipped with a new full-frame CMOS sensor with 30.4 Megapixels, capturing files with 6720×4480 pixels in the native 3:2 aspect ratio; cropped 4:3, 16:9 and 1:1 aspect ratios are also available in Live View. Processing is performed by DIGIC 6+ which supports in-camera processing of RAW files in playback, although at the time of writing, the new Dual Pixel RAW files could only be processed in Canon’s Digital Photo Professional software on a Mac or PC – more about them in a moment.
The resolution is a comfortable boost from the 22.3 Megapixels of the EOS 5D Mark III which captured 5760×3840 pixels, allowing you to reproduce images over 3in wider and 2in taller at 300dpi.
If you’re into detail, there are of course higher resolution bodies available. There may not be much real-life difference between the 30.4 Megapixels of the 5D Mark IV and the 36 of the Nikon D810, but there certainly is with the 42 Megapixels of Sony’s A7r Mark II and the 50 Megapixels of Canon’s own EOS 5DS(r) bodies which capture files with 7952×5304 pixels and 8688×5792 pixels respectively. Then on the other side, there’s Canon’s EOS 1Dx Mark II sporting a lower 20.2 Megapixel resolution with 5472×3648 pixel files.
So clearly the EOS 5D Mark IV is attempting a balance between resolution and noise / dynamic range performance, slotting roughly between the EOS 1Dx Mark II and EOS 5DS(r) in Canon’s own range. But why choose 30.4 Megapixels? I believe the earlier decision of 22.3 Megapixels on the EOS 5D Mark III was selected as the sensor width of 5760 pixels was exactly divisible by 1920 pixels, allowing a clean scale and no cropping when filming 1080p video. But with 6720 pixels across, the 5D Mark IV now has to convert 3.5 of them to deliver 1080p frame width, and while the 4k movie mode employs a clean 1:1 crop from the middle with no subsequent scaling, it does so with a pretty tight 1.64x horizontal field-reduction. I asked Canon about this and was told the 5D Mark IV is a stills camera first, and the customer demand was for increased resolution, dynamic range and lower noise.
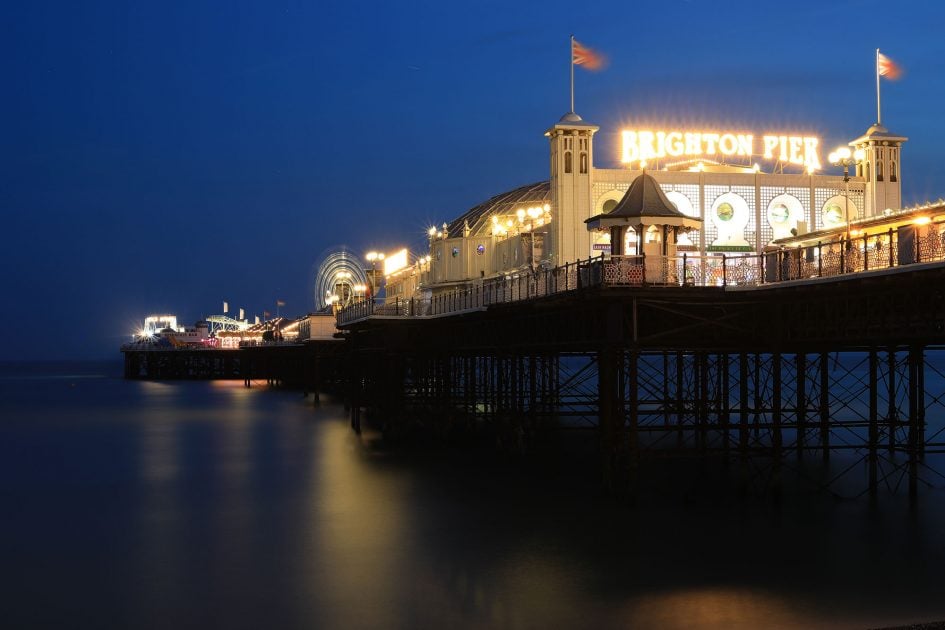
I was interested to see how far I could push RAW files on the 5D Mark IV to retrieve shadows or highlights, so deliberately under and over-exposed some long exposure images to see what was possible. When shooting Brighton Pier one night, I found I needed up to two minutes for a well-exposed image at f20 and 100 ISO. So I deliberately under-exposed by three stops with a 15 second exposure, and that’s what you can see below left with the histogram beneath it illustrating how the tonal range is bumped up to the left side. Note I had long exposure NR disabled for my long exposure tests. I then opened the RAW file in Canon’s Digital Photo Professional software and increased the exposure by the maximum three stops, and the result is below right, again with its histogram.

Above: Canon EOS 5D Mark IV RAW Dynamic Range. Left: original image, Right: +3EV boost in DPP
Examining the pushed image at 100% reveals a fine texture of noise, but this was more due to the mild NR and crisp sharpening settings applied in DPP by default; applying greater NR smoothed this out nicely and delivered a very usable result considering the original under-exposure. More importantly, there’s no evidence of banding here and plenty of retrieved detail in the shadow areas.
The new sensor is about more than just increased resolution though: it features Canon’s Dual Pixel CMOS AF technology, which employs pairs of photodiodes for each ‘pixel’ location. These can be used to deliver confident on-sensor phase-detect autofocus in Live View or when filming video cunningly without needing to permanently devote pixels to the task. In contrast, Sony’s A7r Mark II may feature 399 AF points embedded on the sensor, but they’re forever devoted to phase-detect AF and can’t be used for imaging.
The 5D Mark IV becomes Canon’s second full-frame body with Dual Pixel CMOS AF after the 1Dx Mark II and the effective continuous autofocus on both models literally transforms their usability for video; lest we forget, most 5D III owners pull-focus manually. The addition of a touch screen perfectly complements Dual Pixel CMOS AF as it now allows the 5D Mark IV to smoothly pull-focus with a tap on the screen. The 5D Mark IV also supports effective continuous AF when shooting stills in Live View, and I’ve covered all of this in earlier movie and autofocus sections of the review.
The 5D Mark IV introduces a new feature that further exploits the twin photo-diode design of the sensor. Previous bodies with Dual Pixel CMOS AF would only use data from each separate photo-diode to deliver phase-detect autofocus, before then combining the pairs into single ‘pixels’ to generate the image. With the 5D Mark IV though, a new Dual Pixel RAW mode allows the camera to record the data from each photo-diode separately. This of course doubles the size of the RAW files, but allows compatible RAW converters to exploit the additional information.
Since each diode is effectively looking in fractionally different directions, there’s the opportunity to make very minor adjustments to the parallax. So in addition to the usual colour, tone, sharpening and NR options when processing RAW files, Dual Pixel RAW also lets you make minor shifts to the bokeh, reduce ghosting and perhaps most intriguingly, subtle changes to the plane of sharpest detail. It is however important to manage your expectations: Dual Pixel RAW is nothing like the Light Field adjustments of the Lytro files or the Post Focus mode of Panasonic’s 4K Photo cameras. The adjustments are very subtle and in some instances almost invisible.
At the time of writing, Dual Pixel RAW files could only be opened in Canon’s own Digital Photo Professional (DPP) software; it’s unknown how third party converters like Adobe Camera RAW will handle them and whether they’ll simply combine the pairs and ignore the extra information, or offer further adjustments. As for DPP, files recorded with Dual Pixel RAW show a DPR icon in the thumbnail view and clicking them allows you to select a new ‘Start Dual Pixel RAW Optimizer’ option in the Tools menu. Here’s what you’ll see.
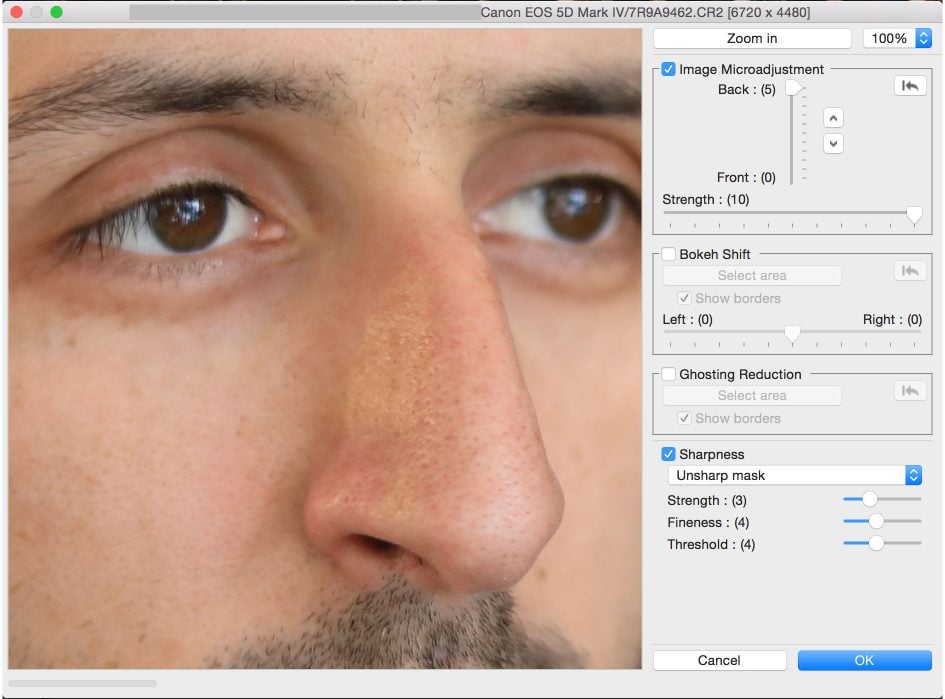
Digital Photo Professional’s Dual Pixel RAW menu offers options to tweak the Image Micro Adjustment, Bokeh Shift or Ghosting Reduction, in addition to further sharpening options. Note since each of the main three adjustments is effectively using the same data, you can only apply one to an image.
To see what’s possible with Micro Adjustment, I took a number of portraits using the EF 50mm f1.8 STM lens wide open and focused on the right eye of the subject. In the back of my mind I pictured the ability to shift the focus from one eye to another or at the very least correct the focus on one if it was a little off. But upon opening the Dual Pixel RAW files in Digital Photo Professional, it became clear the extent of the adjustments would be very subtle to say the least. In some of my portraits, I literally couldn’t see any difference when the Micro Adjustment slider was positioned at one end or the other, even when viewing the image at 100%. On others though the effect was visible, but extremely slight. Here’s an example where, believe it or not, the effect was more obvious. I’ll start with the full image, a portrait of Steve from Bond Street Coffee in Brighton, again taken with the 5D Mark IV and EF 50mm f1.8 STM at f1.8, with a single AF area positioned over his right eye.
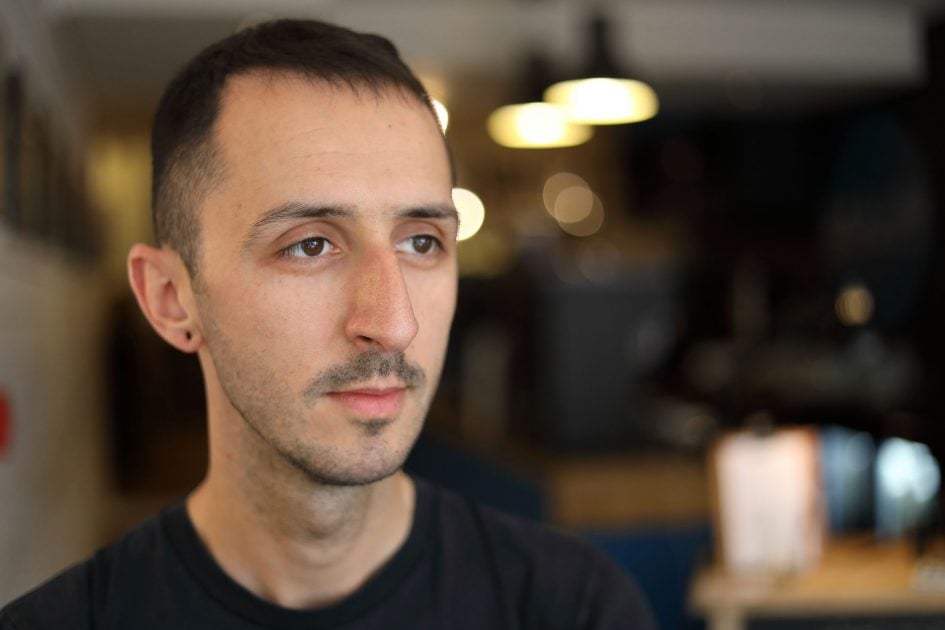
Above: Canon EOS 5D Mark IV: portrait in Dual Pixel RAW mode
I then opened the Dual Pixel RAW file in Digital Photo Professional and made three different JPEGs from it: the first was with Image Micro Adjust set to the maximum front value with maximum sharpness, the second with the maximum back value, again with maximum sharpness, and finally one with no micro adjustment at all. Below you can see 100% crops taken from the focused eye, from left to right: maximum front adjustment, no adjustment, and maximum back adjustment.
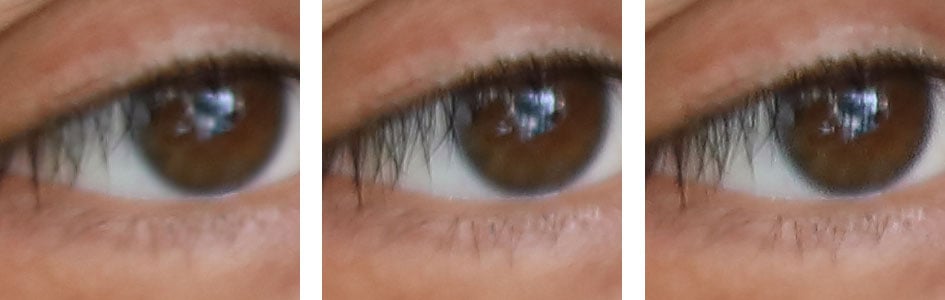
So the crop in the middle was my original, unmodified image, and it looks pretty sharp. Setting the Image Micro Adjust to the maximum front value in the first crop has clearly nudged the focus off, while the third crop, where Image Micro Adjust is set to the maximum back value, is arguably a fraction sharper on the eyelashes than the original. It’s pretty subtle, but at least the crop on the left shows how much the adjustment could work in your favour if your focus was a tad-off. But really only a tad.
This got me thinking about macro photography and how Dual Pixel RAW might be used for nailing the focus on a shot which was fractionally off, so I photographed this menu (at Brewed in Brighton) and focused on the word bacon in the middle, again using the EF 50mm f1.8 STM at f1.8. Here’s the full image.
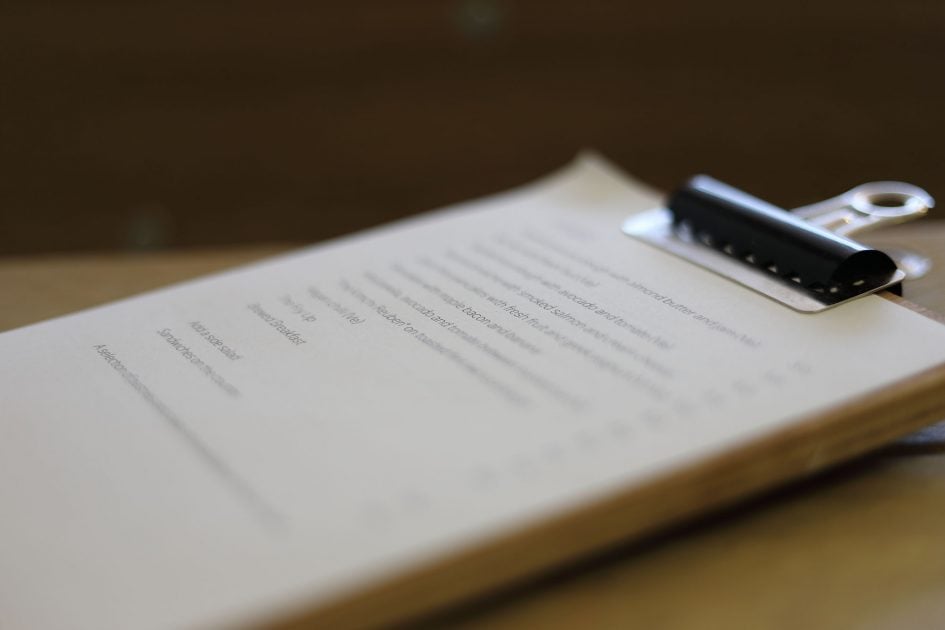
Above: Canon EOS 5D Mark IV: macro in Dual Pixel RAW mode
And now here are the crops of the focused area, and like above the original is in the middle, with the maximum front adjustment on the left and the maximum back adjustment on the right. See any difference? Nope, me neither. This result was not unusual for many of my Dual Pixel RAW tests.
But Dual Pixel RAW is about more than the Image Micro Adjust option. As noted earlier it also allows you to effectively shift the bokeh effects left or right in a landscape-oriented image. So here’s another shot of Steve from Bond Street, again with the EF 50mm f1.8 STM at f1.8. I’ve made two versions in DPP, adjusting the bokeh shift to the maximum values on either side and generated an animated GIF to illustrate the effect.
Above: Canon EOS 5D Mark IV: animated GIF showing extremes of Bokeh Shift in Dual Pixel RAW
In the example above, the effect is much more obvious than Image Micro Adjust, but whether it’s actually useful is another question entirely. I was happy with the positioning of the bokeh elements on the original, so shifting them from side to side doesn’t really enhance it. But watch the GIF for more than a few seconds and it’s clear it could be used to create some kind of stereoscopic result with depth. So perhaps a third party developer could generate some kind of 3D simulation using Dual Pixel RAW files. It remains to be seen. But for now I’d say Dual Pixel RAW is one of those features that while technically interesting, may be of limited use in practice. I’d love to hear what you think. Oh and I should add that while there are several Canon DSLRs with Dual Pixel CMOS AF sensors, Canon has not announced any intention to equip them with Dual Pixel RAW recording capability in the future – right now this is for the 5D Mark IV only.
Ok, now it’s time to examine the 5D Mark IV’s image quality in detail. Head onto my Canon EOS 5D Mark IV quality page or Canon EOS 5D Mark IV sample images, or if you’ve seen enough, skip to my verdict.
Check prices on the Canon 5D Mark IV at Amazon, B&H, Adorama, or Wex. Alternatively get yourself a copy of my In Camera book or treat me to a coffee! Thanks!