Shooting pro-cycling with mirrorless
-
-
Written by Gordon Laing
TL:DR? Of all the cameras I’ve tested, the Sony A6300 becomes the best for sports photography at its price point, whether DSLR or mirrorless; indeed you’d need to spend comfortably more on a DSLR to match its confidence. But the earlier Sony A6000 comes close in many regards, making it a bargain for budget action shooters. See my Sony A6300 review and Sony A6000 review for more details.
The Tour de France takes place every July: a three-week contest pitting the World’s greatest road cyclists against the picturesque and challenging Gallic landscape. While every stage has its drama, the most exciting days for me take place in the big mountains during the final week typically around the Alps or Pyrenees.
One of the many wonderful things about the Tour de France, not to mention the other grand tours, is the absence of tickets or bookings: you simply turn up at the side of the road and take in the spectacle as the World’s best racers fly by literally a few feet away. I’ve been doing just that for the past few years, catching the final mountain stages with my family at the start of the school Summer holidays. In 2016 we caught the final four stages in the Alps before the Tour headed North to conclude in Paris and we headed East into Italy to continue our travels. (You can see all my travel photos on Instagram @cameralabs).
I prefer the mountain stages not just because you really see the riders working as hard as they can, but because it slows their pace sufficiently for a good look or photo opportunity. Normally the hills also stretch out the riders into several bunches, especially towards the end of a stage, giving you multiple opportunities to view, shoot and adapt your camera technique. Even better if you’re on one of the hairpin bends where they slow down further.
The Gear
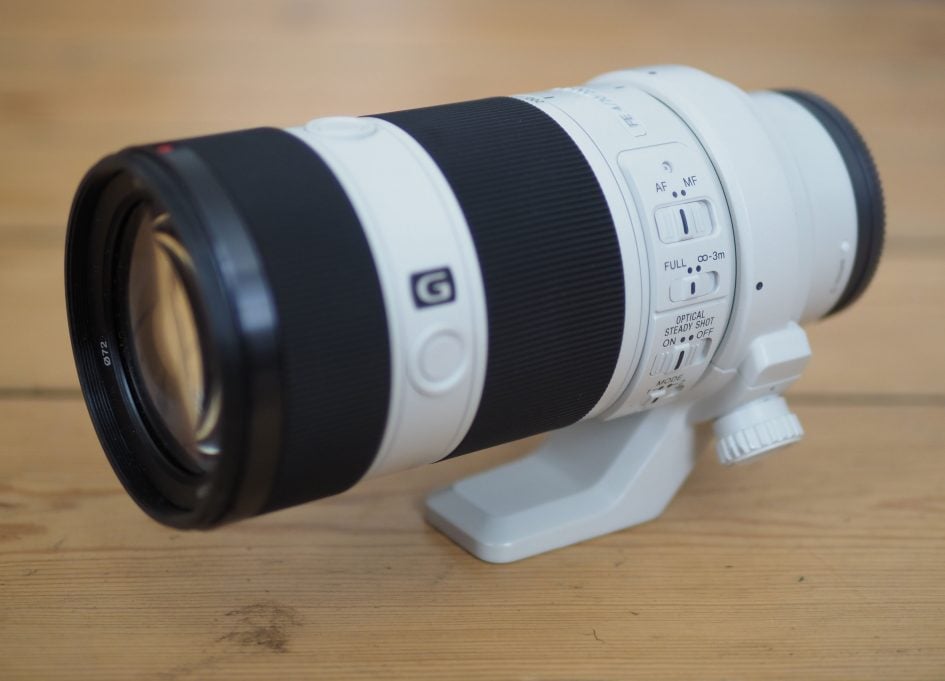
Back in 2014 I discovered Sony’s Alpha A6000 mirrorless camera boasted sufficiently confident autofocus and fast bursts to successfully shoot the riders of the Tour de France – indeed I found this compact and affordable camera could take-on pro sports DSLRs costing considerably more and in some situations, such as tracking towards the edges of the frame, actually take the lead. The A6000 and FE 70-200mm f4 OSS zoom performed so well for me in 2014 that I brought them back for the 2015 Tour. Mirrorless really had come of age for serious sports photography.
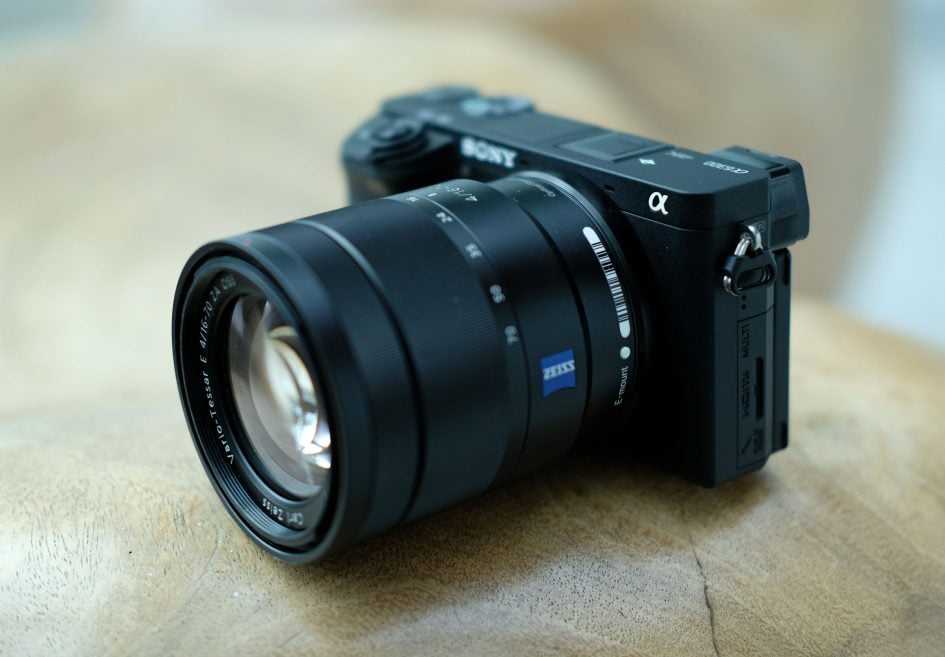
While I knew the pair would perform equally well for the 2016 Tour, Sony had recently introduced upgraded version of both models and I was naturally curious to see how they’d measure-up in the same tough conditions. The new Alpha A6300 camera was equipped with a more sophisticated AF system sporting a higher density of embedded phase-detect AF points on the sensor, not to mention a greater variety of zoning and tracking options. Meanwhile the new FE 70-200mm f2.8 OSS boasted an extra stop of aperture over my original f4 model, allowing a shallower depth-of-field and the use of either faster shutters or lower sensitivities under the same lighting. I really wanted this lens for the greater separation it could provide between the riders and the support vehicles driving very close behind, but sadly it wasn’t quite available in time. While frustrating, I did however manage to source an A6300, which coupled with my older FE 70-200mm f4 OSS would at least allow me to make like-for-like comparisons against the success rate of my old A6000 fitted with the same lens. I hope to do more pro bike shooting with the f2.8 lens when I get hold of it.
I also had the Fujifilm X-Pro2 with me for shooting stills on the rest of my trip, but while the company’s AF has improved significantly with this model, none of the XF lenses I had with me were quick enough for this kind of action. I did however use the X-Pro2 a few times to shoot wide shots from very close range with the focus fixed manually and you’ll see a couple of examples later. In the future I hope to try the XT2 with the XF 50-140mm f2.8 zoom at this kind of event to see if the system can match what Sony’s achieved with the A6300.
Great expectations
Before I dive-into the reality of shooting an event like this with the A6300, here’s what I expected would be the main benefits over the A6000 based on my previous experiences with both cameras.
First is the new High speed burst mode which slows down the top speed of 11fps to 8fps to allow the camera to briefly display a live image between frames. This in turn should make it easier to follow a moving subject – something which was a challenge with the A6000, not to mention the majority of mirrorless cameras (or DSLRs in live View) when shooting fast bursts. Thanks to the investigative work of dpreview, we know the ‘live image’ on the A6300 in this mode is in fact a still, but it remains better than playing the previous image back between frames which is what most live view systems offer in bursts.
Second is the denser array of phase-detect AF points embedded on the sensor and the additional AF area options. I hoped these would better allow the camera to track on-coming riders than the A6000. Previously on the A6000 I’d use either a single AF area or Zone AF and wait until the rider was sufficiently close for the camera to confidently identify and track them over closer areas like the ground or handlebars. The A6300 offers both options but I had high hopes for its new Expand Flexible Spot mode for locking-onto them from further distances. I also hoped the Lock-on AF version might even follow the rider if they moved around the frame. The AF system’s greater sensitivity should also help.
Third, the viewfinder’s upgraded resolution should make shooting – not to mention reviewing – more pleasant than the comparatively coarse finder on the A6000. And fourth, the A6300’s claims of weather-sealing should make me feel more confident about shooting with it in inclement weather.
These were all benefits I’d enjoyed when originally reviewing the A6300 several months earlier, but my normal testing conditions aren’t as tough as shooting the Tour.
Tour de France 2016: Stage 17
For my first stage of the 2016 Tour, I was based in Chamonix, close to the final two climbs just over the border in Switzerland. I planned on driving onto the route in the morning, parking up by the side of the road and waiting for the riders to arrive, but upon arriving in Chamonix the night before I discovered the road was scheduled to be closed to non-official vehicles at 6am, and my proposed shooting location was about an hour’s drive away. An earlier start than I’d anticipated beckoned.
This is typical of the Tour. The route, complete with detailed maps and mountain profiles may be available the best part of a year in advance (at letour.com), but the actual road closures are rarely announced until the day before, and even then normally only on signs at the side of the roads as you arrive in the vicinity. For the mountain stages you should expect the route to be closed early in the morning, even if the riders aren’t due until late afternoon, and if it’s an iconic location like Mont Ventoux or Alpe D’Huez, the route could be closed days before.
Of course if you’re staying on the route itself, be it in a hotel, B&B or one of the ubiquitous campervans, you can just arrive in time and wait. The problem comes when you’re staying away from the route. If you want to drive onto the route on the day and park at a good viewing location, you’ll need to get up early. If not you’ll just have to drive as close as you can, find somewhere to leave your car, then walk or bike the rest of the way. Note the closures are for non-official vehicles only. You can walk or bike the route pretty much up until the last minute. It is however very convenient to have a vehicle with you for supplies, seating and shelter from weather, good or bad.
Since I wanted to park my car on the route, I set my alarm for 4am and set-off. I arrived on the route in good time by 5am and opted for the second last climb, near the top of the Col de la Forcaz at the 20km-to-go marker. I chose it over the final climb up to Finhaut as it allowed me to exit towards Martigny after the race had gone by. If I wanted to travel in the opposite direction back towards Chamonix, the road blocks would have kept me until 10pm – another consideration you’ll need to make if you want to make it to your next accommodation much before midnight. I now had about ten hours to kill, so slept for half and worked on reviews for the rest. I also brewed-up a couple of Aeropress coffees while I waited.
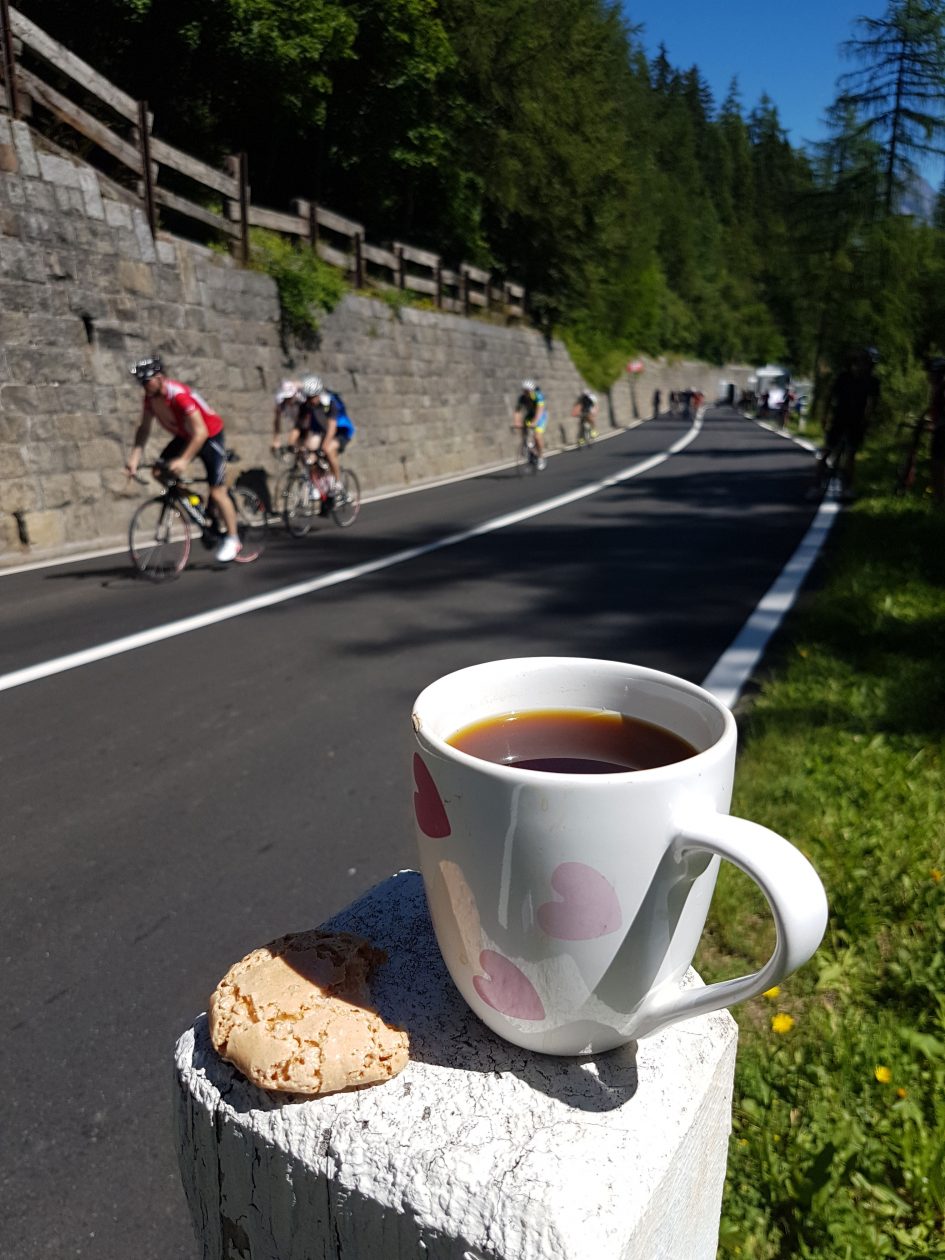
Above: Watching the amateur riders before the race with an Aeropress coffee
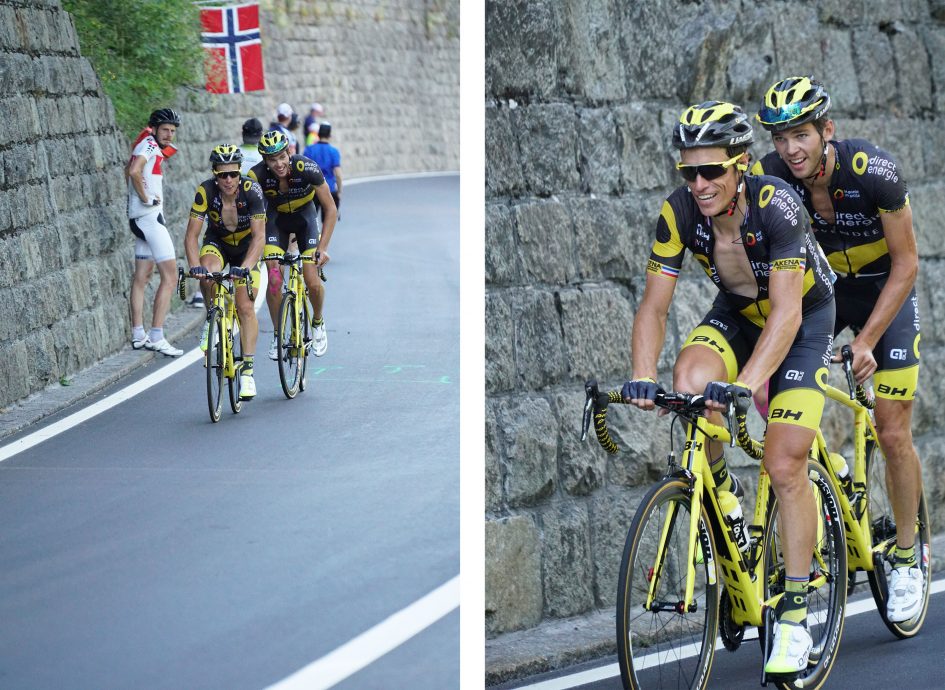
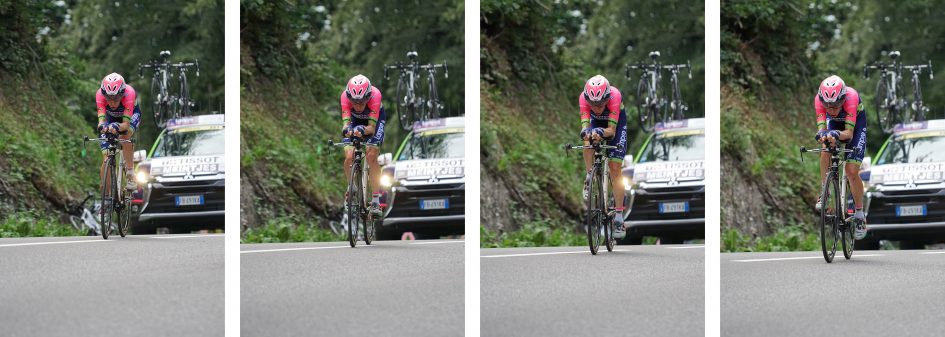
As you can see in the photo above (with amateur cyclists riding past prior to the main race), my location provided a good long view looking down a steep uphill section of the road. This should have provided a great opportunity to shoot the riders cycling straight up towards me, but when the first breakaway bunch arrived, it was clear they were aiming for the opposite side of the road. This may not sound like a big deal, but as they get close, you’ll be shooting almost sideways-on, and I much prefer a face-on view. Here’s a couple of shots from my original viewpoint where it’s clear the riders would be side-on by the time they got much closer.
Above: Sony A6300 and FE 70-200mm f4 at 200mm f4, 1/2500, 6400 ISO
So after they’d rode past, I nipped across the road and found a new position wedged against a natural wall. Looking down, the painted line marking the edge of the road was about one foot from the wall – tight, but should be okay.
The only problem was I was on a slight bend which meant I didn’t have much notice of the approaching riders, apart from, of course, the cheering fans on the other side of the road. As groups of riders split by the climb sailed past, I had a comfortable-ish gap between me and them, but when a larger group arrived, they were riding very close to the edge. The edge where I was. And who was leading the charge, but an Astana rider with a stern look who, I later realized, was Italian rider and former Tour winner Vincenzo Nibali.
This was serious deja-vu. One year ago on Stage 18 of the 2015 Tour de France, Vincenzo Nibali rode straight at me as I was pressed up against a wall of stone taking photos; he gave me a justifiably stern look, as although I was frozen to the spot, a mere inch or two could have caused a collision. Today it happened again!
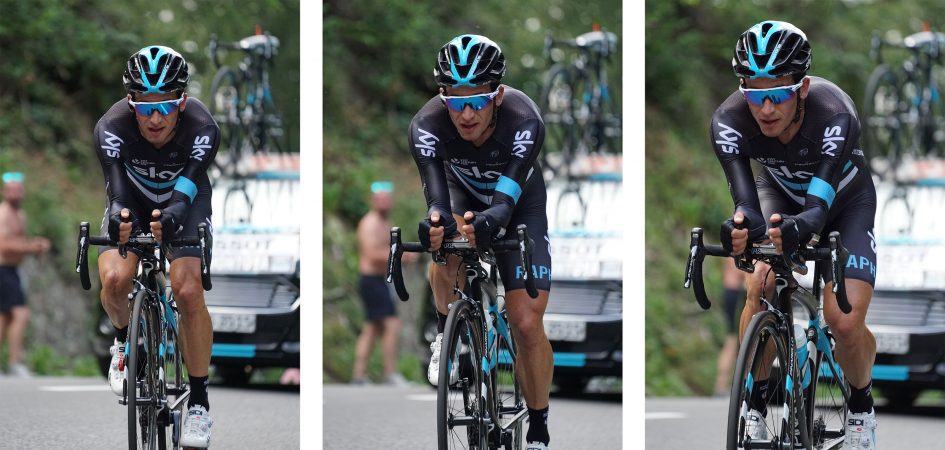
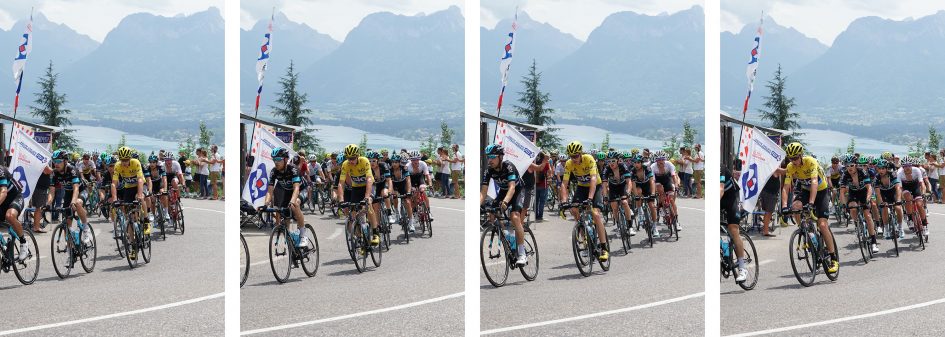
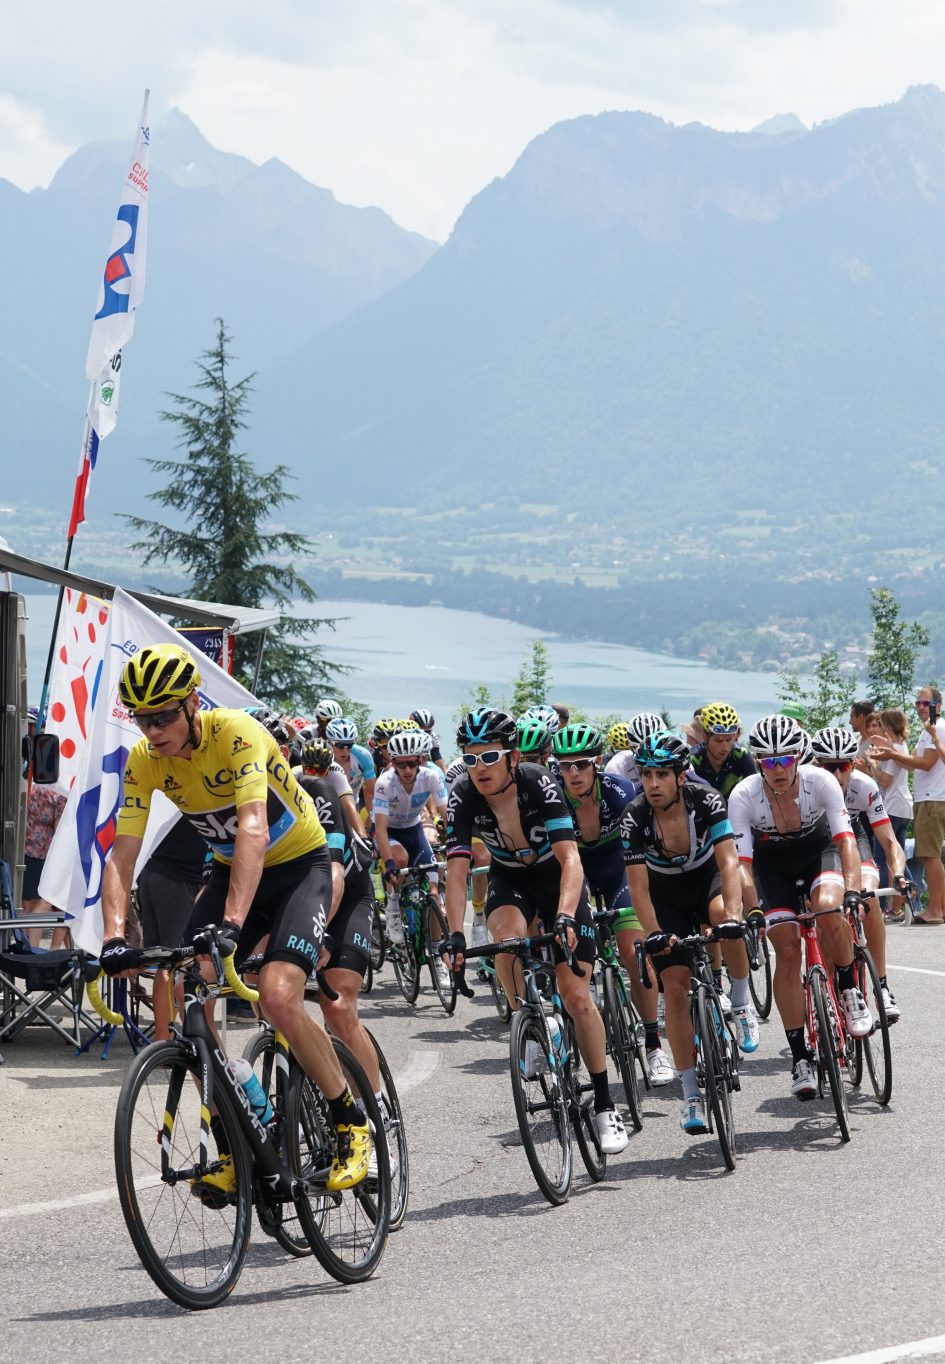
As before, I fired-off a bunch of shots before putting my camera down – I definitely do not want to be the guy who causes problems on the race. At the time I took the photo I was concentrating on the man at the front and hadn’t even noticed I’d also captured Chris Froome, leader of the Tour in the yellow jersey a few riders back, surrounded by Sky teammates. I do remember him riding past and turning slightly to me as I cheered him on – literally about one foot away.
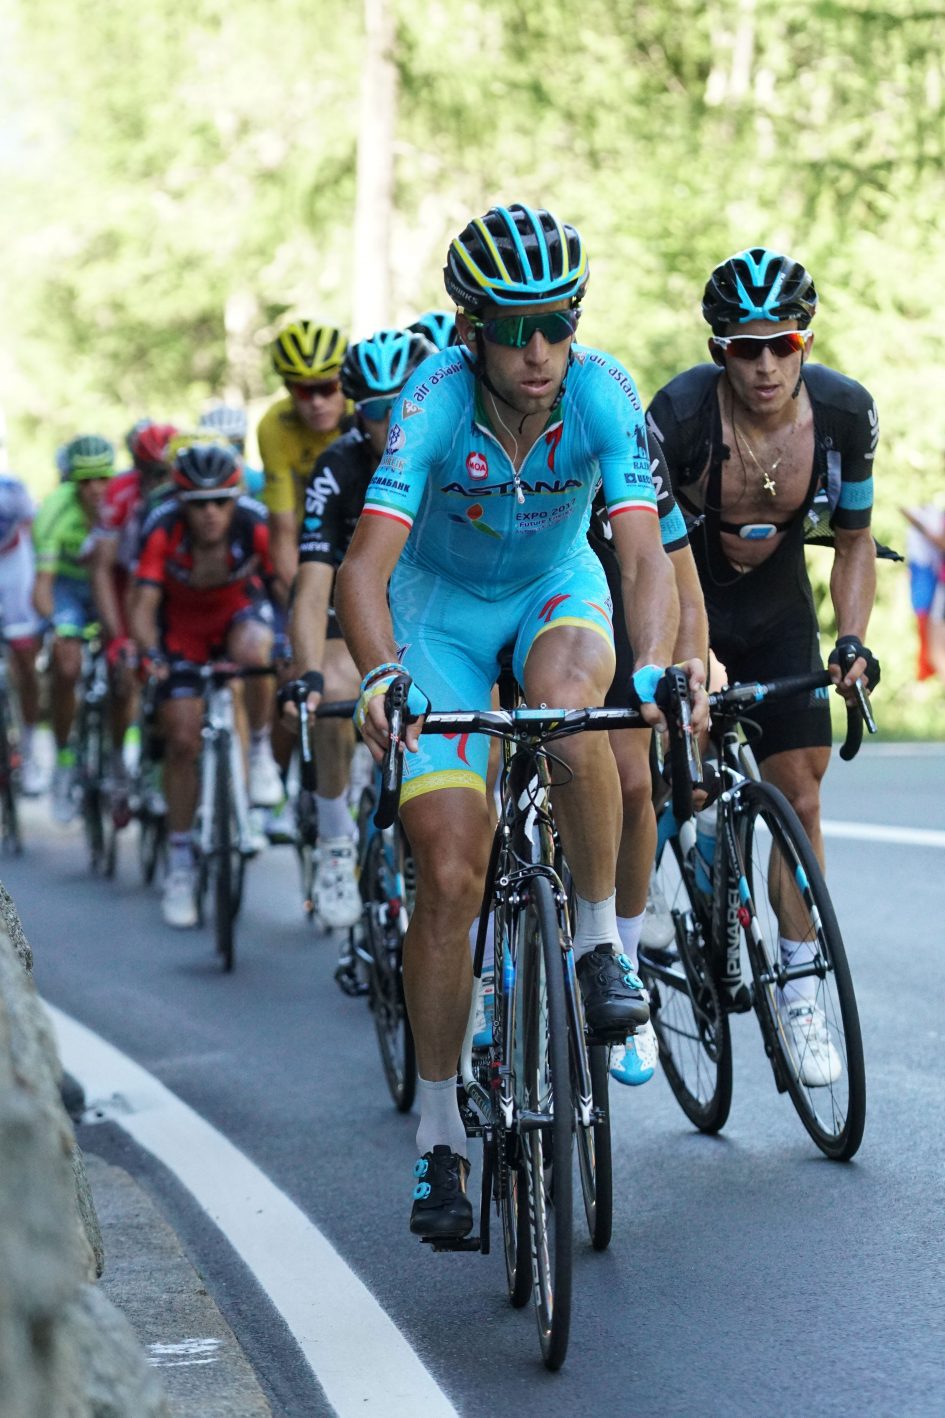
Above: Sony A6300 and FE 70-200mm f4 at 133mm f4, 1/2500, 4000 ISO
I took this with the Sony A6300 and FE 70-200mm f4 at 135mm for a 200mm equivalent field of view. I had the exposure set to Manual at 1/2500 and f4 with Auto ISO working out the rest – it was a very bright day, but in the shade here the camera had to ramp the sensitivity up to 4000 ISO. In terms of autofocus I was using Expand Flexible Spot in a fixed position and trying hard to keep it over the front rider’s face. I also had the drive set to High, which provided the live update between frames.
As the riders appeared round the corner, they were already large enough on the frame to give the AF system a decent target to lock-onto. There wasn’t enough time to activate any AF area tracking, so I stuck with the fixed area and again tried to keep it over the face of the leader. Their fairly predictable motion meant it wasn’t too hard to follow them between frames of bursts, but I noticed immediately how much easier it was with the semi-live feedback than the A6000. The higher resolution viewfinder also provided more detail during composition. I’d say the overall hit-rate on this day was similar to the A6000, but it was definitely easier to follow the action.
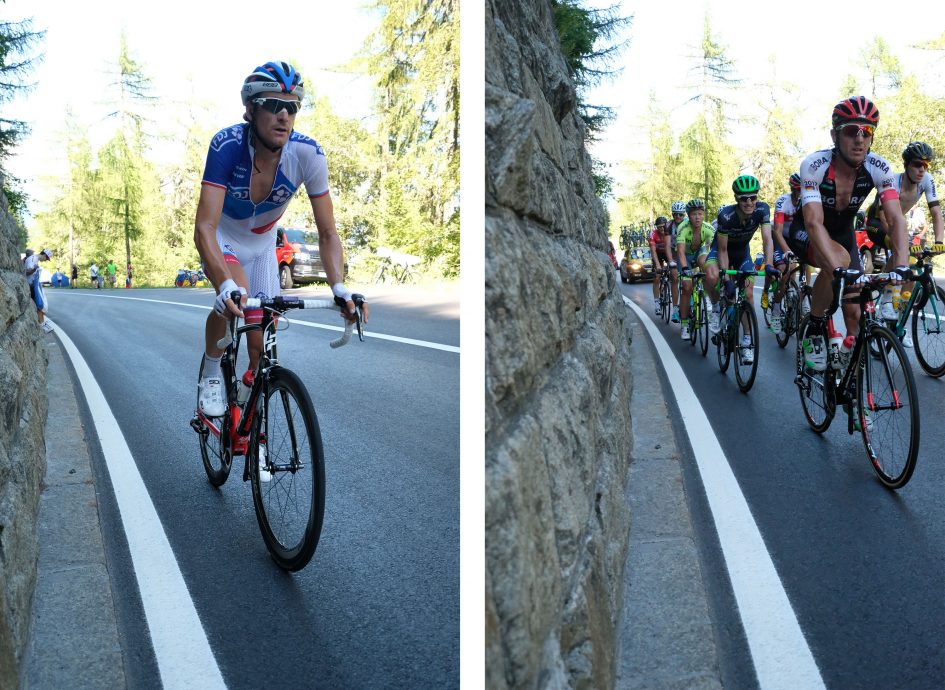
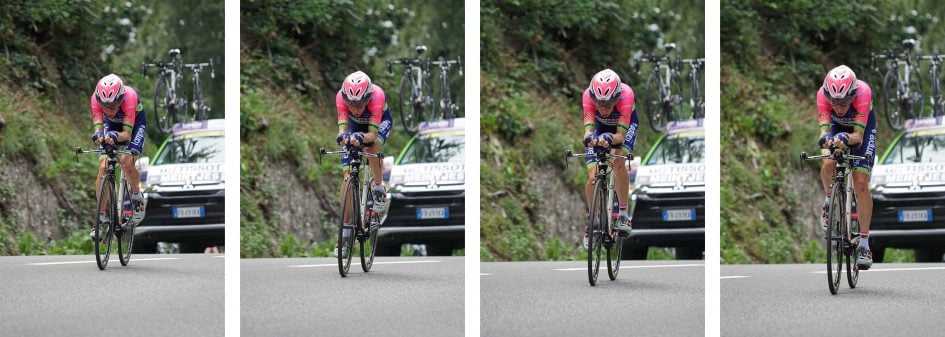
Here’s another shot from the same position and again you can see just how close to the side of the road they ride.

Above: Sony A6300 and FE 70-200mm f4 at 113mm f4, 1/2500, 6400 ISO
I also experimented with some wide views from the same position using the Fujifilm X-Pro2 and XF 10-24mm. Here’s two images I took at 24mm for a 36mm equivalent field-of-view. The wider view meant I had to wait until the riders were virtually next to me before shooting, at which point it’s safest to use manual focus, locked to a position just in front of you.
Above: Fujifilm X-Pro 2 and XF 10-24mm at f4, 1/1250, 2000 ISO
Tour de France 2016: Stage 18, Trial by Time!
I was really looking forward to Stage 18, the first Mountain Time Trial in a long time. I’ve never been much of a fan of Time Trials on TV, but in person they provide a constant stream of photo opportunities, easy identification and chances to hone your technique before the big names ride past. In a Time Trial, each rider sets-off individually on a fairly short course in reverse-order, separated by a few minutes. Since the starting order is based on the overall times to date, you can easily get hold of a list and know exactly who’s coming next. And with the best-part of 200 riders in the race you’ll not only have lots of chances to adjust your settings, but also try different viewing locations throughout the day – from the first to the last, or rather the last to the first, you’re looking at about five hours of action at regular intervals.
Once again the route was closed early, but rather than another pre-dawn rise, I’d noticed a number of access roads where I might park and walk the final few hundred meters. On the day I got close, but not as close as I’d hoped and hundreds of meters turned into a couple of km, but within half an hour I’d hiked to a good position by the side of the road where I had a fairly clear view of approaching riders. I say fairly since you never know who may arrive later on and block your view, or simply jump out in excitement or wave a giant flag. So you have to be fairly flexible and accept you may have to change location if necessary.
The long approach gave me good opportunity to start focusing on the riders when they were small on the frame – I had about three seconds between them first appearing and sailing past, which may not sound long, but count it out in your head while imagining a cyclist peddling as fast as they can and you’ll realise it’s a fair distance covered.
On a normal stage where I might only see a handful of groups, I’d rely on tried-and-trusted settings, but arriving at the start of the Time Trial with almost 200 riders due to sail past individually at predictable intervals, I decided to take the opportunity to experiment with AF modes.
I started with Expand Flexible Spot, which lets you manually position a small AF area almost anywhere on the frame, but which also considers points immediately around it to be a little more tolerant. As on previous stages, I was framing vertically in the portrait orientation and wanted the rider’s face to be in the top third, or even the top quarter, so I fixed the AF area there.
Normally I’d try and keep the AF spot positioned over the rider’s face as they approached, but early-on during Stage 18, I tried out the Lock-on AF version which attempts to follow the subject around the frame once it’s been selected with a half-press of the shutter. Even with a decent approach distance though, it was clear this AF mode on the A6300 wasn’t going to deliver the hit rate I desired. Maybe it was the speed, or the lighting, or insufficient differentiation between the subject and background, but Expand Flexible Spot with Lock-on AF struggled to keep the rider’s face in focus and either fell behind or focused on different parts of the bike instead.
So my next experiment was to try Zone AF which essentially allows the camera to focus on what it thinks is the subject, but from a smaller area than the whole frame. I positioned the zone to the upper portion of the frame and enjoyed watching the camera scatter bunches of tiny AF points over the bike and rider as they approached. Through the viewfinder – or on screen – everything looked fine, but upon reviewing afterwards, I again found a poor hit rate, at least in terms of the rider’s face. The trouble with Zone AF is it generally focuses on whatever’s closest to the camera in the zoned area, and for a cyclist, that’s rarely the face. More commonly it’s the handlebars, or in worse-case scenarios, the road in front. To be fair, this didn’t come as a surprise as on earlier models I’ve found Zone AF can often be fooled by the surface in front of the subject, be it road, turf or water. It’s great for birds in flight which are typically the closest subject in the Zone, but in situations where there’s even closer things, it can often be fooled.
A smaller zone concentrated over the rider’s face would be more specific, but this is in effect what Expand Flexible Spot offers, so from this point on I returned to that mode, switching between it and the plain single area option. As with previous stages, I fixed the AF area’s position on the part of frame where I’d like the face to be and simply moved the camera to keep the AF area over the rider’s face.
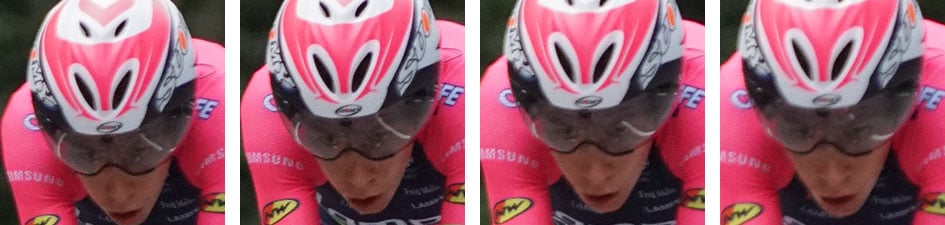
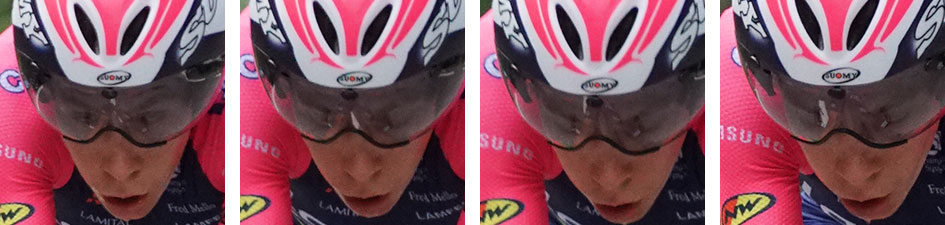
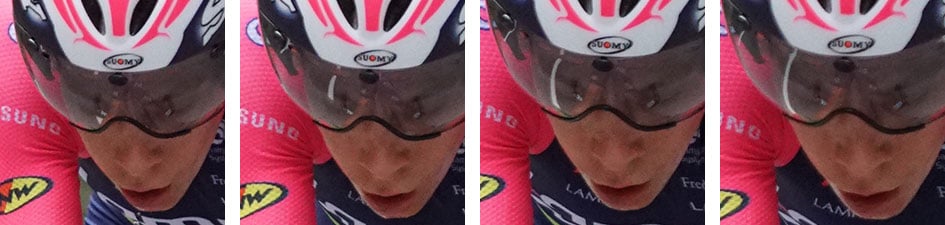
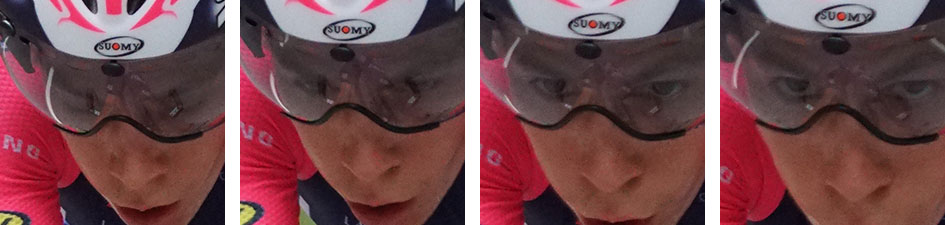
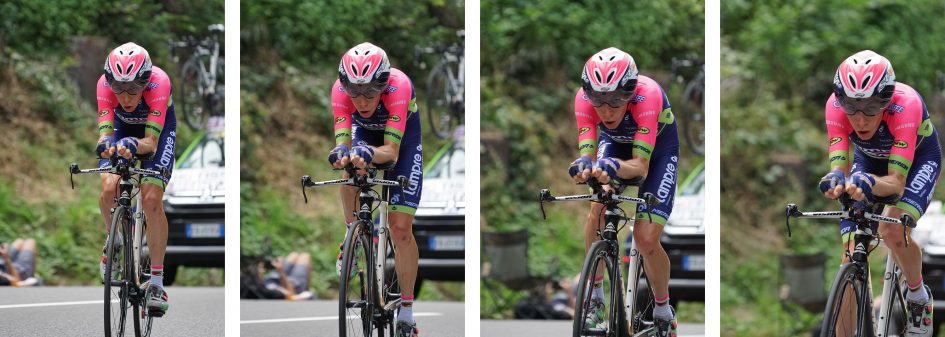
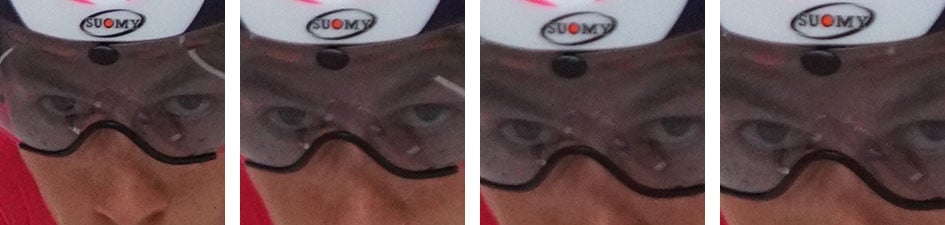
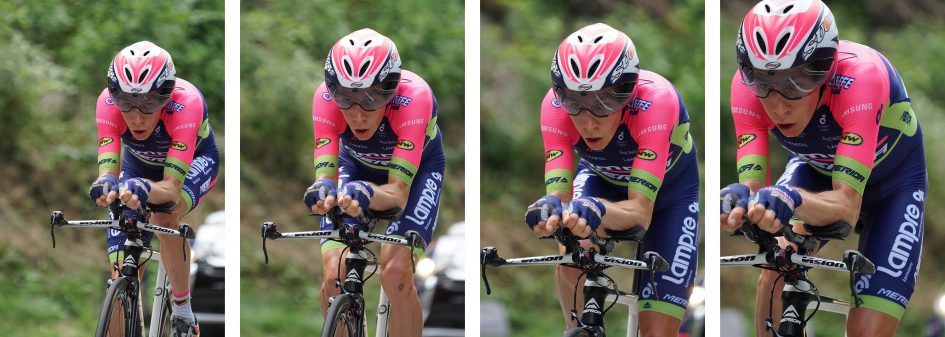
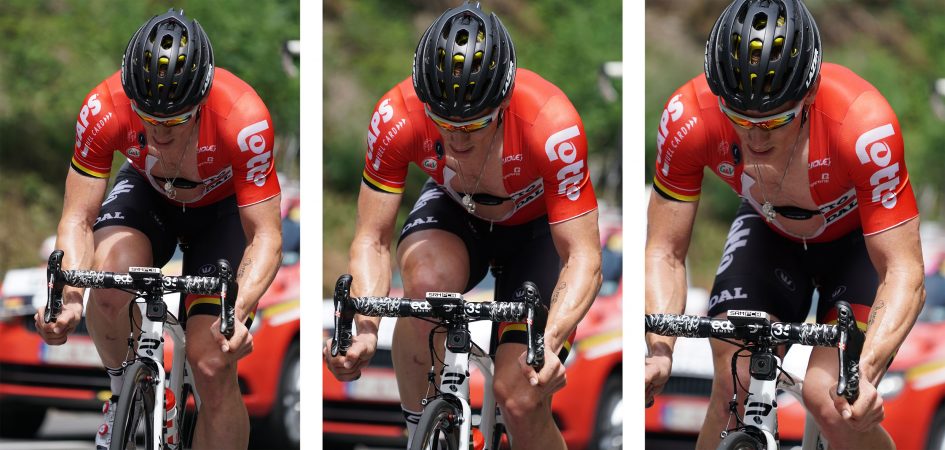
Here’s a sequence I took with Expand Flexible Spot, fixed to a position halfway across the frame and about three quarters of the way up; as described above, I found this delivered good-looking portraits of the riders whether showing the full bike or a knee-upwards view as they drew closer. The rider here is Louis Meintjes from Lampre, and in a burst of 30 shots (representing just under four seconds of action at 8fps), I’d say 24 in total are very good when viewed at 100%, of which 16 are pin sharp. Of the remaining six, they’re slightly off when viewed at 100%, but still acceptable when viewed at lower reproductions. Certainly none are completely off, or unusable. I’d say that’s a very respectable hit-rate, and one I consistently enjoyed throughout the stage. Remember we’re talking about 24 Megapixel images here, so even when viewed at 50% you’re seeing a large amount of detail. I’ve shown 50% crops below as at 100% the area was too small to be meaningful.
Louis Meintjes: Sony A6300 and FE 70-200mm f4 at 200mm f4, 1/2000, 1250 ISO
Uncropped full images followed by crops reproduced at 50%
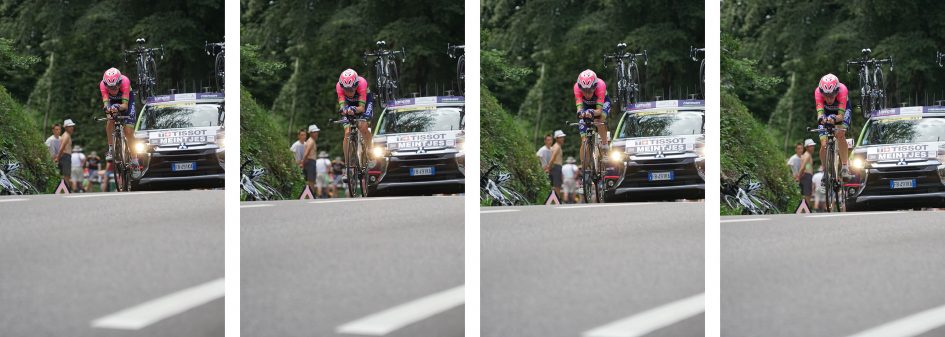

Compared to the earlier A6000, it was again much easier to keep the single AF area positioned consistently over the rider’s face using the 8fps mode which provides better feedback. On the A6000 it’s much harder as the view you see is what’s just happened, not what’s happening right now. So if the rider even slightly adjusts their course, at this speed you’ll inevitably miss a few frames while repositioning them on the frame. If the subject was slower, you could rely on the Lock-on AF to track them as they moved around, but as I mentioned earlier, this didn’t prove sufficiently successful on the day. When the subject was distant, I also enjoyed having the higher resolution viewfinder as this in turn made it easier to accurately position the AF area where I wanted it.
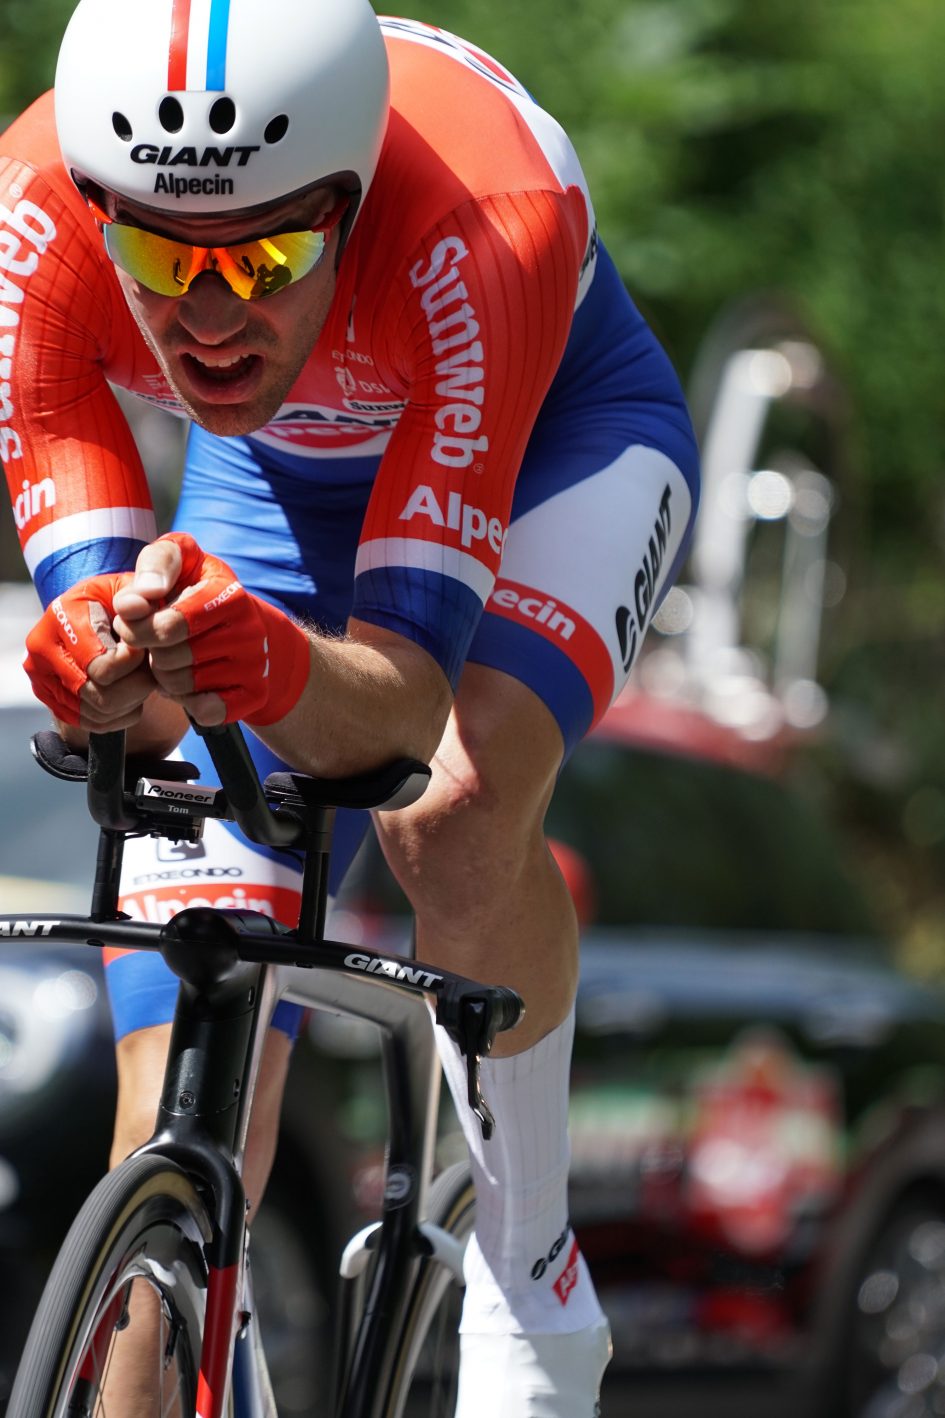
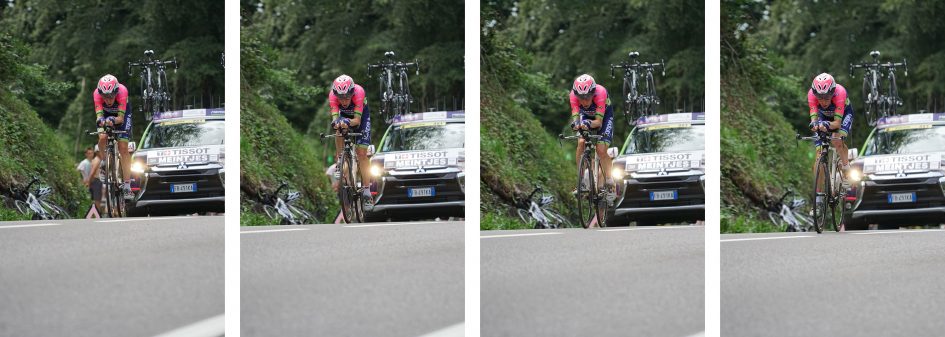
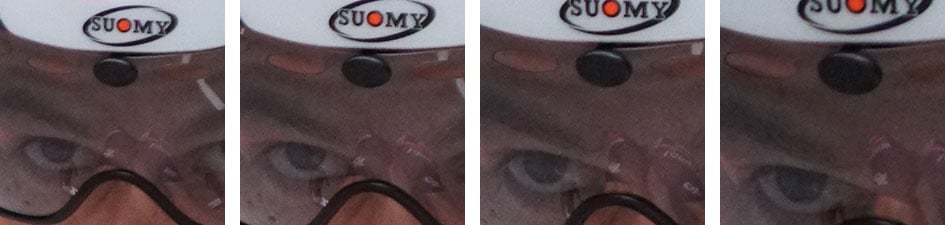
Above: Tom Dumoulin: Sony A6300 and FE 70-200mm f4 at 200mm f4, 1/2000, 400 ISO
But like the A6000 before it, I found the A6300 was most confident at tracking an oncoming subject when it was fairly close. When the subject was distant and the AF box (even set to small) essentially surrounded it, rather than pin-pointing a specific part, the results were inevitably the least successful. Indeed of my earlier 30-frame burst, the majority of the slightly mis-focused images occurred at the start of the sequence. Once the subject got closer and it was possible to position the AF area over the exact part you wanted the camera to focus on though, I enjoyed much greater success. As with previous tours, I increasingly found myself waiting until the subject was fairly close before starting a burst. All of the images here are uncropped unless otherwise stated.

Above: Marcel Kittel: Sony A6300 and FE 70-200mm f4 at 200mm f4, 1/2000, 400 ISO
Anecdotally, I’ve found the same applies to birds in flight. Cameras like the A6300 do an amazing job when the subject is fairly close, even when it’s moving very quickly relatively speaking, but when it’s very small, it doesn’t seem as confident as a traditional DSLR. It’s as if the AF points on the DSLR are smaller and easier to place more precisely, although the density Sony quotes would certainly imply those on the A6300 and even the A6000 are very small. Maybe it’s the type and accuracy of an AF point as DSLR companies quote cross-type and dual-cross-type sensitivity for certain points, whereas mirrorless companies skip the types and just concentrate on quantity and coverage. I can’t say as every time I ask about the tech, the companies shy away from the details. All I can tell you is how they perform in practice and in my experience, DSLRs seem to fare better when the subject is small and distant, but once closer, cameras like the A6000 and A6300 can track as well as anything I’ve tested.
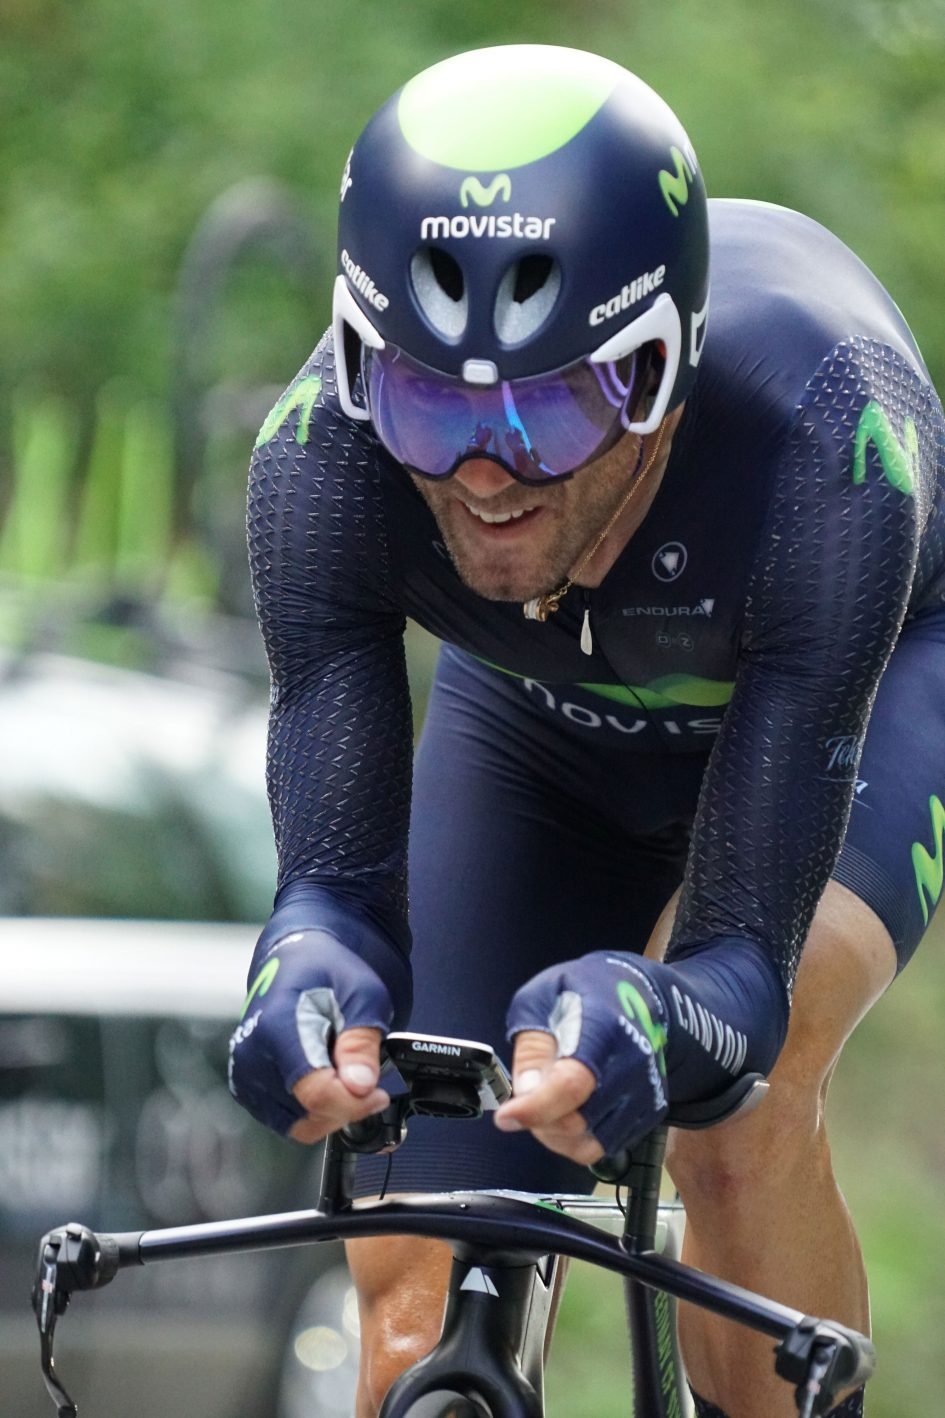
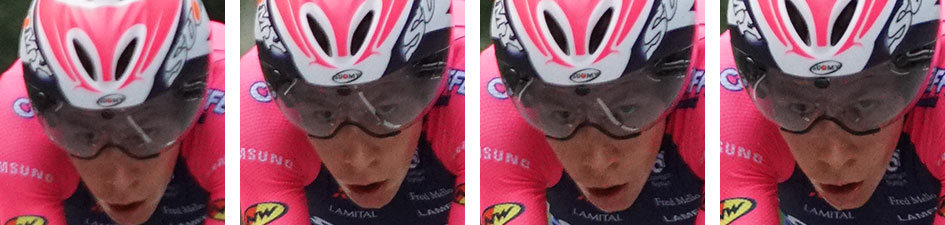
Above: Alejandro Valverde: Sony A6300 and FE 70-200mm f4 at 200mm f4, 1/2000, 400 ISO
But back to the time trial. As you’ll remember, the riders were going past three to five minutes apart. At each pass I was firing-off about 30 JPEG frames at 8fps, then immediately reviewing them through the viewfinder. As a side-note, I love being able to playback images through the viewfinder on bright days when the screen becomes hard to see – for me it’s a key advantage of mirrorless over DSLRs which can only playback on their screens. Once I saw I photo I liked, I held the camera against my Samsung phone to use their NFC to fire-up the Wifi and transfer the image. I then posted the image on-location seconds later using my phone, tagging the team and rider. You can see the images I posted that day on my Twitter and Instagram feeds from the end of July 2016. By the time I’d researched the tags and posted the image, it was time for the next rider to go past.
Above: Andre Greipel: Sony A6300 and FE 70-200mm f4 at 200mm f4, 1/2000, 400 ISO
It was great fun shooting and posting live from the event before the riders had even crossed the finishing line – proper sports reporting! But after doing it for an hour or so, the A6300 flashed-up an overheating warning icon. To be honest I hadn’t noticed in the excitement, but the body had grown very warm, especially around the battery grip and behind the screen. I switched it off, angled the screen out to improve airflow, and temporarily removed the battery. After a minute or so, I popped the battery back and the camera seemed happy to continue, but after each burst I’d consciously open the screen again and power-down once I’d finished reviewing or copying images.
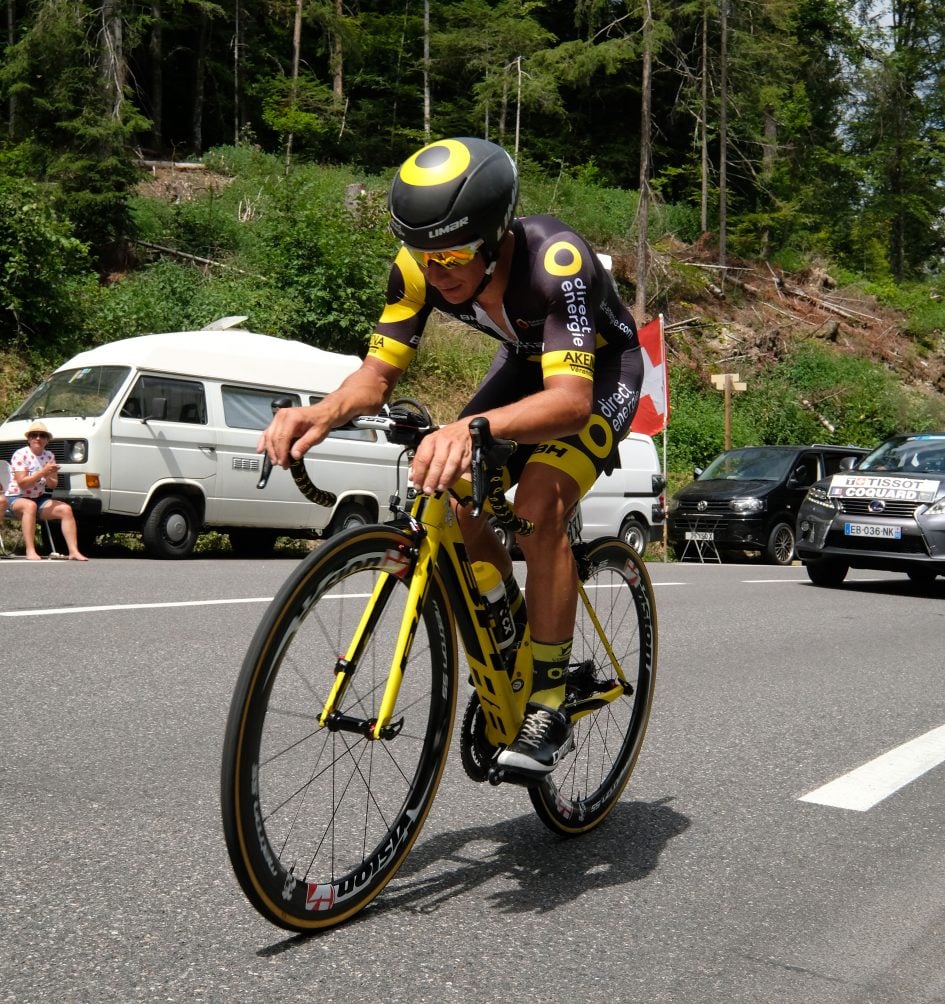
Above: Sergio Hanao: Sony A6300 and FE 70-200mm f4 at 200mm f4, 1/2000, 2500 ISO
To be fair, it was a very warm day, with the ambient temperature well above 30 degrees Celsius, but the camera wasn’t in direct sunlight and it wasn’t exactly Death Valley, Egypt, or even Las Vegas in Summer. I’ve found many cameras warm-up when being used heavily, and it understandably affects smaller bodies more than larger ones, simply because there’s less opportunity to dissipate the heat. It also affects those which are working particularly hard, whether shooting very fast bursts, filming 4k video, transmitting Wifi and or stabilizing in-camera.
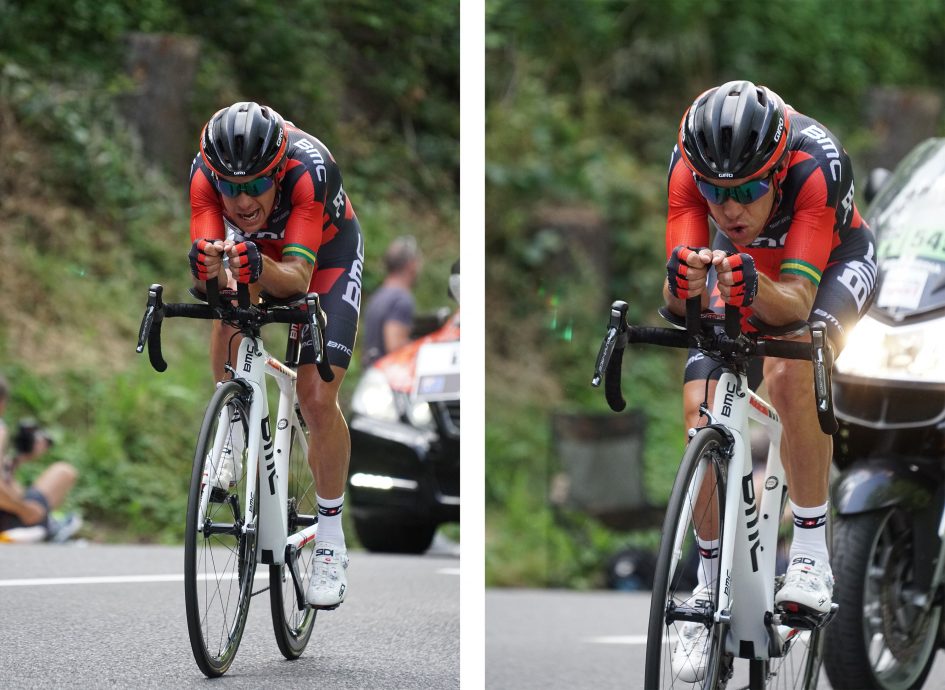
Above: Richie Porte: Sony A6300 and FE 70-200mm f4 at 200mm f4, 1/2000, 2500 ISO
Of all the brands I’ve tested I’ve found Sony seems to suffer more than most from over-heating, but equally their cameras generally boast higher-performance features than their rivals, packed into particularly compact bodies. You can’t have everything, and if you’re intending to shoot long bursts at high speed, or film long clips of 4k video, you’ll need to accept a small body may suffer from over-heating. In my case, I managed the situation by temporarily switching the camera off and angling the screen out to improve airflow, and in more extreme circumstances, temporarily removing or swapping the battery. Within a few seconds, the camera had cooled sufficiently to continue shooting again.
I can only report and comment on my own findings, but revealingly Sony released a firmware update for the A6300 in early August which claimed to address over-heating when shooting stills. Sadly my own A6300 loaner had already been returned to Sony, so I didn’t get a chance to re-evaluate it at the Tour, but I hope to try it with more cycling in the future and will of course report back.
Finally, for some variety, here’s a wide shot I took with the Fujifilm X-Pro2 and XF 10-24mm with the focus set manually.
Above: Fujifilm X-Pro 2 and XF 10-24mm at 24mm f11, 1/1000, 1000 ISO
Tour de France 2016: Stage 19, The Lake View!
Stage 19 of the 2016 Tour started alongside one of my favourite locations in the World: Lake Annecy in France. It rode along one side of the lake before climbing away from it then passing through a selection of mountains and ski resorts. The route towards the end of the day looked fantastic, but almost all the roads had been closed early-on and a meeting in the early evening meant I couldn’t be trapped in the mountains waiting to find a way out. So a combination of road access and my fondness of Annecy secured my location towards the lake near the start of the stage. I even managed to find a parking space at the side of the road about 100m from the route itself.
So far, I’d been happy with the shots of the riders I’d taken on the two previous stages, but disappointed none of them showed their surroundings. I’d driven and hiked into the mountains, but there was little evidence of them in the photos. Nice action portraits, but no context.
I noticed the same problem in the 2015 Tour: you work hard to find a great angle on the riders, but it’s tough to also include any meaningful landscape to put them into context. Heavy forestation on the lower mountains means trees block the views, and even above the tree-line, the switchbacks mean you could find yourself shooting towards a cliff wall rather than an expansive view. But for Stage 19, I was positioned above a picturesque lake surrounded by mountains, so it represented my best chance of including some scenery around the riders.
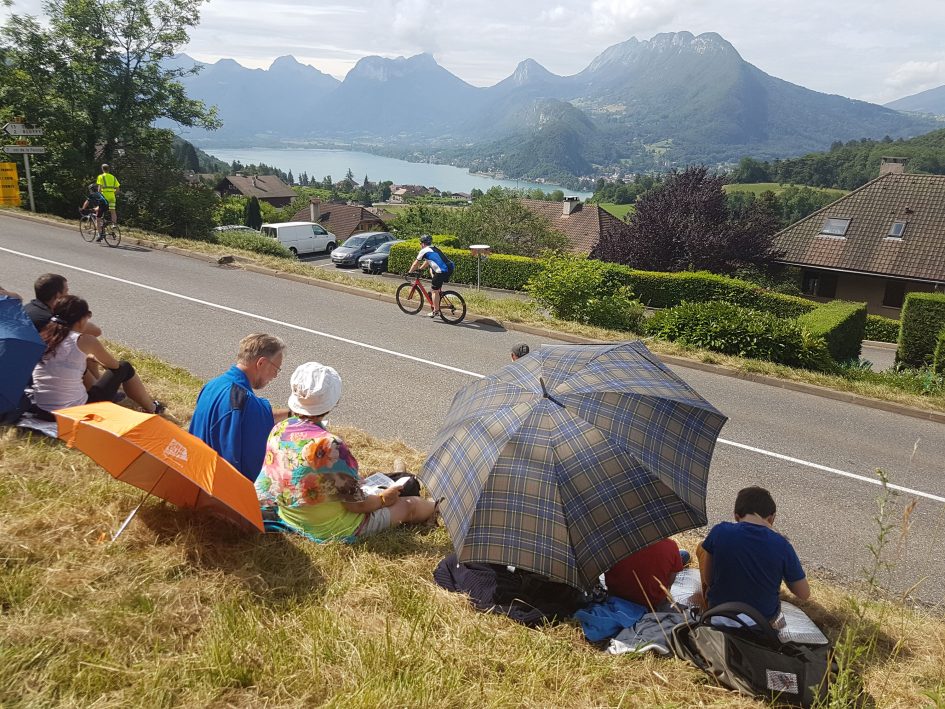
Above: At the side of the Stage 19 route, looking towards Lake Annecy. Samsung Galaxy S7
I’d ear-marked two switchbacks during the early climb from the lake which I knew would provide good angles on the riders, but while the background also looked great all along the route, the question was whether I’d actually see any of it when pointing my camera at the riders. Consider a road running parallel to a lake’s edge; if you want to see the lake, you have to shoot perpendicular to the road, which means a side-view of anyone cycling along it – see photo above from the route. I much prefer a face-on view of the riders which, on a straight stretch of road, would mean shooting up or down it and missing the lake view to the side. The solution then is to shoot as the riders turn a corner, allowing you to capture them when they’re directly facing you and away from the view. This way you catch the rider as they momentarily face you, while the view is visible behind.
In practice there’s a degree of guesswork to predict where the riders will take the corner (typically on the inside), followed by a fair amount of shuffling left and right until their predicted location lines-up with the view you’d like behind them. Then just as you’re approaching the ideal spot, a group of trees or a tall building goes and gets in the way, forcing a rethink. Then of course there’s the ever-present threat of spectators getting in the way, especially in the heat of the moment. After watching a few stages you get better at spotting the likely troublemakers, but it’s frustrating when they’re the only impediment to an otherwise great position. But then if someone dressed as Superman or King Henry VIII is likely to jump in front of you waving a giant flag, you’re better-off sacrificing the otherwise ideal viewing location for somewhere a bit more sensible.
In the end I found a good spot about three quarters of the way around the outside of a 180 degree hairpin. Drawing a line between me and the inside of the corner where I expected the riders to come around would also include the desired scenery in the background. Sure, I was shooting a bit too much towards the Sun and I also needed to crouch down to include the tops of the mountains, but I had my position sorted.
Next was the exposure and rather than trying to isolate the riders with a shallow depth-of-field, I wanted something deeper to cover at least one half of the road in case riders came out from the very inside. After doing some tests I found closing the aperture to f8 would cover the desired range of focus and as before I selected a sufficiently quick shutter speed in manual (1/1600) and left the camera to balance the light with Auto ISO. Rather than relying on continuous AF, I locked the focus roughly in the middle of where I expected the riders to be, knowing my depth-of-field would cover pretty much everyone in the group, near and far.
With the location, focus and exposure sorted, I had time to brew an Aeropress and chat with the people on either side of me. I always like to have a chat, not least because we’re all like-minded fans, but to also as it gets everyone on-side and to look out for each other. If someone’s spoken to you, they’re much less likely to wander in front or get in the way. They’ll often even defend your position and view from others. The only potential problem was an old man and woman who inexplicably kept walking up and down the hairpin, in front of everyone right up to the last minute, and even in front of me as the police bikes leading the main group drove past. Luckily they’d cleared my frame just as the first bunch of riders came into view.
As much as I wanted to zoom-in for a tighter view of the riders and follow them around the corner, I knew I had to maintain my position and focal length to keep the composition I’d worked so hard to figure out. So I simply kept the camera still and shot long bursts for each group that rode past. Often the most famous riders are hidden within groups, so rather than only capture the leaders of a pack, I kept shooting until everyone had passed by. I even managed to look up a couple of times as I kept shooting – if I’d had my tripod with me, I could have even locked the camera down and pressed the shutter without looking through the viewfinder for entire bursts. Again this was not about following the action, it was about maintaining a fixed view.
Above: Sony A6300 and FE 70-200mm f4 at 70mm f8, 1/1600, 640 ISO
While glancing-up during the second group of riders, I noticed a bunch in black surrounding one in yellow – the familiar group of Team Sky, accompanying race leader Chris Froome. I knew I’d have a few frames with them in as I was still firing a burst as they rode past, but I was delighted when Froome kept to the outside. Above is a series of shots showing Froome take the corner, followed by my favourite below with him leading some teammates. I know the riders aren’t as dominant as on my previous portraits and also that the lighting on the mountains and lake isn’t ideal either, but I do love seeing the surroundings – you’re in no doubt this is a race heading uphill from a lake into the high ground. Mission accomplished.
Above: Sony A6300 and FE 70-200mm f4 at 70mm f8, 1/1600, 640 ISO
Oh and in terms of performance, my approach to this stage was a straightforward one for any camera, so it posed no problem for the A6300. To give you some more flavour of the moments above, here’s a video i filmed using the Fujifilm X-Pro2 positioned on the floor.
Tour de France 2016: Stage 20, Wet wet wet!
Stage 20 of the 2016 Tour was the last in the mountains, once again passing through a number of ski towns, not to mention having sections close to the Time Trial two days earlier. We aimed for the final climb of the day, staying at the nearby resort of Les Gets. As before the route was closed early, as were many of the roads accessing it, but most ski towns keep their chair lifts running for mountain biking in the Summer and these often provide easy access to the Tour’s route. Indeed a lift near to our hotel would take us to the top of one run, leaving a short hike to the final peak of the 2016 Tour.
It all sounds so easy, but without a vehicle atop a mountain, you’re exposed to the elements and the weather report looked ominous with heavy rain forecast between 12 and 5pm. There’s not a lot you can do though, other than wear your best coat and wonder why you didn’t pack an umbrella. The manager at the hotel looked at us with a combination of pity and confusion as he settled down to watch it on the telly while we packed our bags and headed out the door.
The weather stayed dry on the way up and even long enough for me to brew a couple of Aeropress coffees at the side of the route. Despite being the last climb of the 2016 Tour, there were also plenty of great viewing locations whether looking down a final stretch, cheering at the summit, witnessing the last descent, or even hiking higher up the hill to take in more of the spectacle.
But by the time the Caravan arrived around 2pm, tossing their sponsored nick-nacks, the heavens opened and as advertised, continued to empty their contents until roughly 5pm, or about when the last rider rode past.
It was proper torrential rain too, quickly soaking everyone, even those with umbrellas. A small café on the summit was the only refuge and became increasingly packed with bedraggled spectators attempting to get a little respite. After some brief shelter I decided to brave the rain again but as the roadside had become jam-packed, opted to climb my way up a steep and soggy hill for a slightly elevated view about 20 feet above. My plan was to shelter under one of the evergreen trees, but sadly those pine needles aren’t particularly effective at keeping the rain off. The ground itself had also become extremely slippy, with a number of well-oiled revelers tumbling down to cheers from those at the roadside. I could barely even balance, let alone take my backpack off to access my camera, and yet I still thought maybe this could be a great test for weatherproofing.
As the first riders finally approached, I took the A6300 and FE 70-200mm out of my backpack and into the downpour. They were immediately covered by a lot of rain water, but kept operating without complaint. Trouble was, I could barely see through the viewfinder with the rain, the composition wasn’t fantastic and neither was my balance, so to avoid falling, I put the camera away and just enjoyed the spectacle with my eyes. In retrospect I should have gone for an easier view of the descent and next time a shot of the riders really leaning over as they take tight corners downhill is on my bucket list, but to be honest I felt happy not sliding down that muddy hill into the ditch below and the view in person remained enjoyable throughout. Then as I clambered down to the road, the rain of course stopped. Here’s one of the shots I took before putting my camera away.
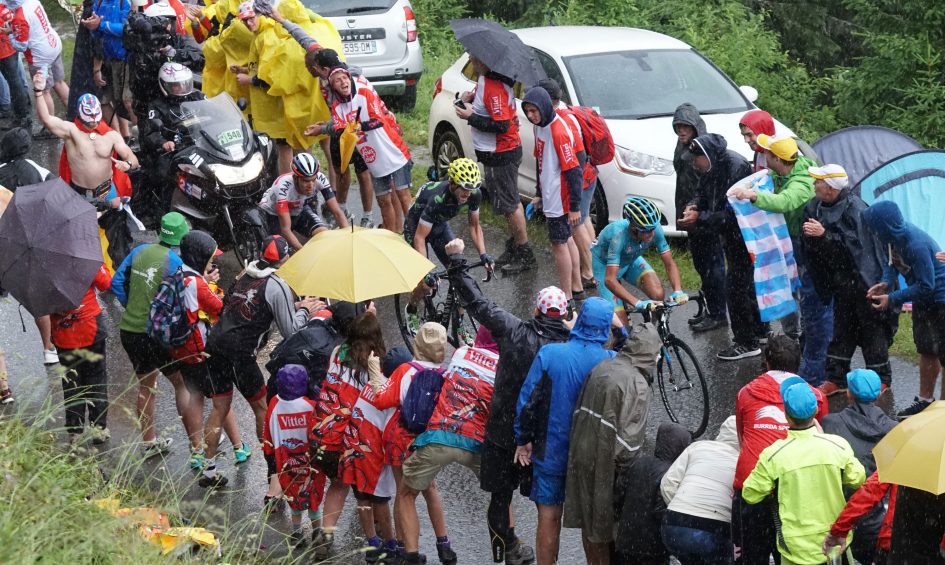
Above: Sony A6300 and FE 70-200mm f4 at 70mm f5.6, 1/800, 2000 ISO
Sony A6300 in-the-field verdict
The Sony A6300 unsurprisingly takes the crown from the A6000 as the best mirrorless camera for sports photography I’ve tested to date, not to mention better than a DSLR at the same price point. You’d need to invest comfortably more in a Canon EOS 7D Mark II or Nikon D500 to out-perform the A6300 in a sporting environment and of course also have to accommodate a considerably larger and heavier body too.
My experience over four stages at the 2016 Tour de France may not have been completely without hiccups, but the A6300 consistently delivered a very high rate of focused images under often tough conditions. Of all the upgrades over the original A6000, the most significant during the Tour was the ability to display a ‘live’ image between frames; the speed may reduce from 11fps to 8fps when doing so, but the ability to respond to subject movement in real-time makes it so much easier to keep the action in the frame; it also makes it much easier to keep a fixed AF area over the subject.
The higher resolution viewfinder also made framing and reviewing more enjoyable, and again easier to position the AF frame precisely when the subject was distant and small. The improved weather-proofing also meant I could confidently shoot in the rain on my final stage, albeit only briefly due to my precarious position.
Disappointingly though the A6300’s improved AF system made little difference to shooting the on-coming cyclists than the original A6000. Lock-on AF may have proved effective when shooting more modest subjects back home, but it failed to deliver a decent hit rate with the pro cyclists, at least during the conditions and surroundings of the day. I’d hoped the addition of Expand Flexible Spot over the A6000 would allow me to more accurately place a smaller AF area over the subject when distant, but whether through technology or personal failings, it too failed to impress. So despite the addition of a new AF system and modes, I found myself enjoying most success with the A6300 when using a small, fixed single AF area, positioned as accurately as I could over the rider’s face – and as with previous years, the best success was when the rider was close-enough for the entire AF area to cover the face or better still, part of the face.
When the riders were less than, say, 15m distant, the A6300 performed like a dream, keeping them sharply focused right up to the closest-focusing distance of the lens itself. This allowed me to capture surprisingly tight portraits with the FE 70-200mm f4G OSS at 200mm, which often looked like I’d cropped them, but hadn’t. Given the 24 Megapixel resolution, there was loads of detail to make a large print.
But this was also possible with the A6000. Indeed I’d say my hit rate, using a small single AF area, was much the same on both bodies. As explained above I couldn’t get the A6300’s new AF modes to work effectively for me on the conditions of the day, leaving the major benefits of the new model over the old one as the live feedback when framing, more detailed viewfinder image and better weather-proofing. To be fair, I’ve found Expand Flexible Spot, Zone and Lock-On AF on the A6300 all provided benefits in other environments and with other subjects, just not during my time at the 2016 Tour.
Then there’s that issue with over-heating I experienced during the Time Trial. As explained in the main article, I was driving the A6300 quite hard, shooting burst after burst for several hours in very warm conditions, and using the viewfinder and Wifi inbetween to review and send images. But the fact is, after a while of this, the A6300 did need to cool-down between bursts. I’m not going to dwell on it any more as Sony has since released a firmware update which claims to address over-heating when shooting stills, so I need to re-evaluate the camera under similar conditions to see if it’s been resolved. I think the bottom line though is shooting and writing multiple bursts of 24 Megapixel images at 8 to 11 fps using electronic composition, before then using the same EVF to review images and built-in Wifi to send the best to a smartphone is going to make any camera hot – and if it’s a small body, you’ll have to accept over-heating may occur as a consequence. At the Time Trial I was able to manage the situation and never missed any action, and I’d still sooner carry a small, light body than a large and heavy pro DSLR. But you have been warned.
TL:DR? The Sony A6300 becomes the best camera for sports photography at its price point, but the earlier A6000 comes close in many regards, making it a bargain. See my Sony A6300 review and Sony A6000 review for more details. Also see my Sony A6500 review to find out more about the latest model launched after the A6300.
Check prices at Amazon, B&H, Adorama, eBay or Wex. Alternatively get yourself a copy of my In Camera book, an official Cameralabs T-shirt or mug, or treat me to a coffee! Thanks!