Sony Cyber-shot HX200V review
-
-
Written by Ken McMahon
Intro
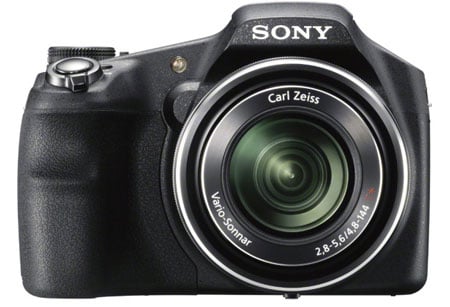
The Sony HX200V is an 18.2 Megapixel super-zoom camera with a 30x stabilised optical zoom lens and an articulated 3 inch LCD screen. Launched in February 2012 it replaces the HX100V.
Apart from an additional 2 million pixels over its predecessor, the HX200V features a faster AF system, improved battery life and Clear Image digital zoom which extends the range by a factor of two to an equivalent maximum of 1620mm.
The HX200V has a 3 inch flip-up LCD which, with 921k pixel resolution provides a highly detailed view and a 0.2in, 201k dot electronic viewfinder. As you’d expect from Sony it’s not short on gadgets and features and as well as two intelligent auto modes, 3D shooting, Sweep Panorama and 3D panorama, it also offers a range of stacking modes designed to get good results in low light. Finally, it’s fitted with a GPS receiver to automatically tag images with geopositional data.
The HX100V marked Sony’s return to the super-zoom market following a two year gap after the introduction of its first super-zoom, the HX1. The HX100V has proved a popular model , but does it’s successor add enough to the mix to keep it in contention with competing models from Panasonic and Fujifilm? I’ve tested it alongside the Panasonic Lumix FZ60 / FZ62 and the Fujifilm FinePix HS30 EXR.
 |
Sony Cyber-shot HX200V Design and controls
The Cyber-shot HX200V is virtually unchanged from the 100V in terms of design and styling. At 122 x 87 x 93mm the body is exactly the same dimensions and only weighs a few grams extra at 583g including card and battery. That makes it comparatively small and light, a little taller and nearly 100g heavier than the Lumix FZ60 / FZ62 but substantially smaller and lighter than the FinePix HS30 EXR. The HX200V is also one of the best-looking super-zooms and feels very comfortable in the hand.
The HX200V’s plastic body has a matt speckled finish which looks good and provides a tactile grip. There’s room for three fingers on the grip with your right index finger resting comfortably on the shutter release and your left hand supporting the camera, SLR-style, beneath the lens.
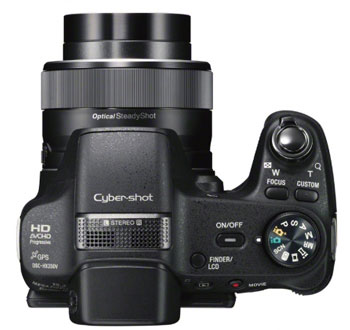 |
Behind the shutter release is a custom button to which you can assign various functions and another for changing the focus mode. Behind those on the right side of the top panel are the mode dial, on/off button and an override button for manually switching between the electronic viewfinder and LCD screen. Ordinarily the HX200V uses a sensor to switch to the EVF when you put your eye to it.
On the back panel there’s a slightly angled top section with a playback button and a dedicated video record button. I prefer the location of the movie recording button here, where you can press it with your thumb, than on top of the handgrip as on the FZ60 / FZ62. There’s less chance of pressing the wrong button (on the FZ60 / FZ62 it’s right next to the continuous shooting button) and of causing a sideways lurch at the beginning of the clip when you press down.
The rear panel is mostly taken up with the 3 inch articulated screen which I’ll say more about shortly. To the right of it is the four-way controller, menu button, and a button for displaying the in-camera Guide. The only remaining control on the rear panel is a thumb-wheel located on the top tight corner which is used to change exposure settings. I’ll talk about these controls in the handling section near the end of this page.
The output ports are protected by a hinged hard cover on the left side of the camera body which opens to reveal a USB 2.0 port for off-loading images and clips and below that a mini HDMI port for connecting the camera to a suitably equipped TV or monitor. A smaller door below accesses the DC in port by which the battery is charged in the camera using the supplied charger.
The HX200V is fitted with the same NP-FH50 info-lithium battery as its predecessor, but Sony has managed to squeeze extra life from it with a claimed 450 shots – nearly 150 more than the HX100V. Obviously that’s going to depend on your usage of the LCD but if you stick to the EVF Sony reckons you can increase that to 490 shots. The remaining time is indicated in minutes rather than the more usual segmented battery graphic that you’ll find on the screens of the Lumix FZ60 / FZ62 and FinePix HS30 EXR. The battery is charged in the camera using the supplied charger and an external battery charger is available as an optional extra.
The HX200V’s built-in flash has a maximum distance of 12.4 metres at 1600 ISO at the wide angle lens setting. At 100 ISO that distance will reduce to just over three metres, which isn’t massively powerful and while the lack of guide numbers make it difficult to make comparisons it looks to have a similar output to the Lumix FZ60 / FZ62 and the FinePix HS30 EXR. It’s certainly powerful enough to function as a fill in and indoors for illuminating reasonably close subjects and small spaces.
The Flash has four modes, Auto, On, Slow Synchro, and Rear Slow Synchro (2 curtain). Flash mode is set using the four-way controller and the flash pops up automatically – when you’ve finished with it you just push it back down into the closed position.
Sony Cyber-shot HX200V Viewfinder and Screen
The Sony HX200V has a 3 inch LCD screen with 920k pixels. Its 4:3 proportions mean that the entire screen area is used for composition and playback of still images with black bars appearing top and bottom for HD movie recording. It’s a bright contrasty screen which displays a high level of detail with no visible pixellation and it provides a reasonably good view in bright light. In sunny conditions, like most screens it becomes very difficult to see, but the fact that you can flip it up or downwards does at least provide some options for keeping it out of direct sunlight as well as being useful for shooting from low and high viewpoints.
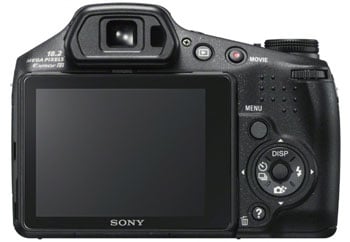 |
The other nice thing about a high resolution screen is that the display overlays and graphics are sharp and finely detailed. The Sony overlay information not only looks better than on the 460k screen of the Lumix FZ60 / FZ62, they’re easier to read at a glance.
The EVF is bright, though visibly pixellated, but it is a useful alternative for sunny conditions and has the added advantage of dioptre adjustment for those who wear glasses. This is the same 0.2in 201k dot LCD screen as used in the HX100V and terms of size and resolution it’s fairly average. It’s very similar to the electronic viewfinder in Panasonic’s Lumix FZ60 / FZ62 which is also retained from an earlier model – the FZ47 / FZ48. With Sony’s track record on electronic viewfinders – the NEX-7 small system camera has one of the highest resolution most advanced EVF’s around – I can’t help but be a little disappointed that they haven’t upgraded this feature on the HX200V. Fujifilm’s decision to fit the FinePix HS30 EXR with a 0.26in 920k EVF makes a huge difference to that camera’s handling, and the EVF in Panasonic’s high-end FZ200 is even more detailed with 1312k dots.
Sony Cyber-shot HX200V lens and stabilisation
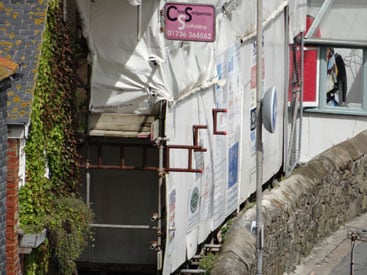
The Sony Cyber-shot HX200V is fitted with the same 4.8-144.mm f2.8-5.6 zoom lens as its predecessor. This has a 35mm equivalent range of 27 – 810mm which is as long as you’re likely to need but at the wide angle end of the range the 27mm equivalent focal length doesn’t match the super-wide field of view that you’ll get from the 25mm Lumix FZ60 / FZ62 or the 24mm FinePix HS30 EXR. Of course, neither of those models can match the HX200V’s 810mm telephoto; if you want a lens that outreaches the HX200V at both ends of the zoom range you’re looking at the Canon PowerShot SX40 HS with its monster 24-840mm range.
The HX200V’s zoom is motorized and can be controlled in one of two ways; using the compact-style zoom rocker surrounding the shutter release, or by twisting the ring on the front of the lens barrel. The zoom ring is an electronic coupling, twisting it activates the zoom motor and, like the rocker, it has two speeds. It takes a little getting used to and doesn’t have what you’d call a natural feel. If I’m honest, given the choice I’d use the rocker every time, though the ring can be useful for making fine adjustments. If you flick the switch mounted on the lens barrel to the MF position the ring can be used for manual focussing in modes that support it.
Cyber-shot HX200Vcoverage wide |
Cyber-shot HX200V
 coverage tele | |
 | ||
| 4.8-144 at 4.8 (27mm equivalent) | 4.8-144mm at 144mm (810mm equivalent) |
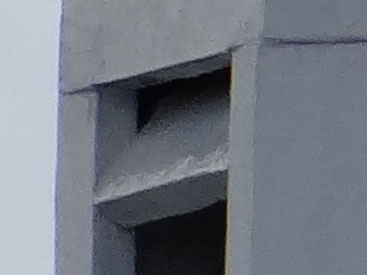
If 840mm just isn’t enough of a telephoto for you, the HX200 now offers the Clear Image digital zoom feature which applies a 2x increase giving a maximum equivalent focal length of 1680mm at the full 18 Megapixel resolution. Clear Image Zoom was debuted on the Cyber-shot TX55 compact and has since appeared in the SLT-A57 and the RX100. Basically it takes a crop from the centre of the frame and uses interpolation to bring it up to the full resolution. While the interpolation is more sophisticated and produces better result than some digital zooms, it still falls well short of the quality you’ll get from the HX200V using only the optical zoom. That, said for far-off subjects that you simply can’t get any closer to it’s a handy feature to have. The 100 percent crops below show a section of the scene I use for stabilization testing with the 30x optical zoom on the left and the 60x Clear Image zoom on the right.
Cyber-shot HX200V30x optical zoom |
Cyber-shot HX200V
 60X Clear Image zoom | |
 | ||
| 4.8-144 at 144 (810mm equivalent) | 4.8-144mm at 288mm (1620mm equivalent) |
The Cyber-shot HX200V features the Optical SteadyShot image stabilisation system which shifts the lens elements to compensate for camera movement. Optical SteadyShot is activated by default, can’t be turned off and has no optional settings other than for movie shooting (see the movie section below). In place of my usual before and after shots then, the 100 percent crop shown below right is from the red area indicated on the full frame on the left. This was shot in manual mode with a shutter speed of 1/20th, which is more than five stops slower than the photographer’s 1/focal length rule of thumb would suggest is safe at the HX200V’s 810mm maximum zoom.
Without being able to turn SteadyShot off, it’s impossible to know how slow you could take hand-held shots without it, but this is a pretty impressive result regardless. Just to note I normally do these test in the early morning or late evening when the light is fading in order to be able to achieve the slow shutter speeds required. However, I was able to take these shots in bright sunlight by making use of the HX200V’s built-in ND filter. This easily overlooked feature comes in very handy, and not just for testing the stabilisation. It allows you to introduce subject blur, for example with moving water, or blurring the background while panning, in bright conditions where, even at the smallest aperture of f8 the shutter speed would normally be too fast.
Sony Cyber-shot HX200V Optical SteadyShot | ||||
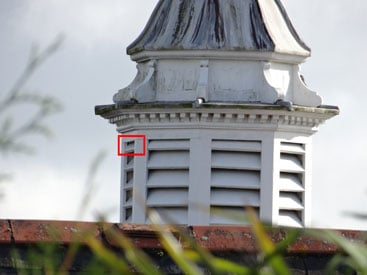 |  | |||
Full frame, 4.8 – 144mm at 144mm, 100 ISO, 1/20th. | 100% crop, 4.8 – 144mm at 144mm, 100 ISO, 1/20th. | |||
Sony Cyber-shot HX200V shooting modes
A glance at the mode dial provides a quick overview of the Cyber-shot HX200V’s available shooting modes. Starting with the PASM modes followed by a Memory recall mode for one of three custom setups. Then there’s the iSweep panorama position. In addition to the Standard and Wide panorama modes available on earlier Sony compacts, HX100V has a the HR mode introduced on the HX100V which produces truly stunning high resolution panoramas measuring 10480 x 4096 pixels.
Skipping past the Movie mode position for now, next up is the 3D position which provides, appropriately enough, three options; 3D still image and 3D Sweep Panorama produce 3D images that can be viewed on a 3D TV, Sweep Multi Angle produces a 3D image that you can view by tilting the camera screen. Though surprisingly effective, I doubt most people will use the last one more than once or twice as the novelty of viewing a 3D image on a 3 inch screen quickly fades.
The Cyber-shot HX200V has 16 scene modes, the most notable of which are the composite options that shoot a burst of images and combine them to produce a better result than would be possible with a single exposure. Hand-held Twilight and Anti Motion Blur will be familiar to owners of recent Sony compacts with the Exmor-R CMOS sensor that makes these modes possible. Backlight Correction HDR shoots three frames to capture detail in the shadow, mid-tone and highlight areas of a scene with a wide tonal range and Background defocus uses two exposures to simulate shallow depth of field.
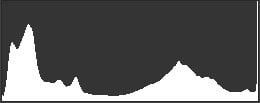
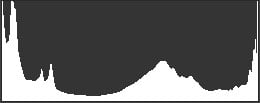
Below I’ve shown an example of Backlight Correction HDR compared with program mode. Both of these shots were taken within a few moments of each other, the one on the left in Program auto mode and the one on the right in Backlight correction HDR mode. The HX200V chose the same exposure for each, 1/80th at f2.8 at 100 ISO. The top row shows the full frame from each shot, below that I’ve shown the clipping areas as indicated by Aperture and in the third row the Photoshop RGB histograms.
Visually, the Backlight Correction HDR shot looks to be holding more detail in the highlights and three quarter tones, but the door on the right of the frame is darker and I wonder if, in these circumstances at least, -1EV exposure compensation wouldn’t have produced an equally good result. The clipping areas and histograms pretty much confirm what you can see, there’s a little more highlight detail, but at the expense of some loss of detail in the shadows. Nevertheless, Backlight Correction HDR is a worthwhile option to have for scenes such as this.
HX200Vprogram Auto 100 ISO |
HX200V Backlight Correction HDR
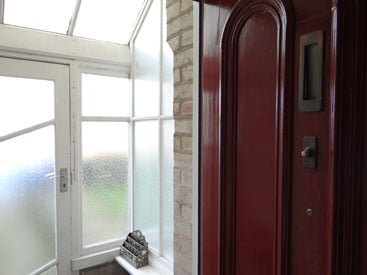 100 ISO | |
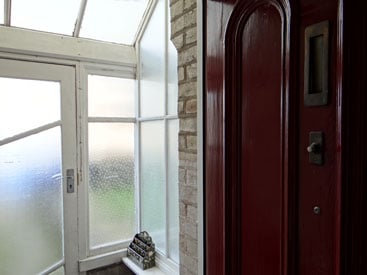 | ||
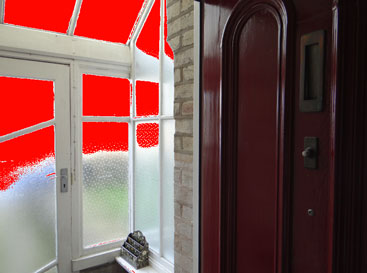 | 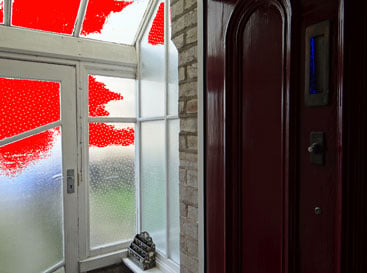 | |
 |  | |
1/80 f2.8 100 ISO |
1/80 f2.8 100 ISO |
You can of course use the HX200V in fully automatic mode, and there are in fact two automatic point-and shoot options. Intelligent Auto employs scene recognition to identify the subject and set an appropriate scene mode. The HX200V can tell if the camera is on a tripod allowing longer exposure times or if there’s motion in the frame in which case it will increase the ISO sensitivity and use a faster shutter speed to arrest the movement. In Advanced mode scene recognition takes two shots using different settings so you can choose the best result. For Backlit portraits for example, one shot is made using the flash and a second with the brightness and contrast of the face and background adjusted.
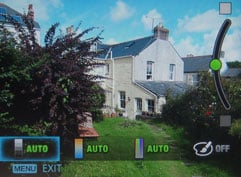
For those who don’t feel ready to venture into PASM territory unguided, pressing the down button on the four-way controller while in Intelligent Auto mode accesses the Photo Creativity modes. These provide a simple slider interface for adjusting brightness (exposure) colour (white balance) and vividness (saturation) as well as another route to the Picture Effect filters.
I should also mention here that the HX200V has a built-in GPS receiver. As well as tagging images with Lat and Long co-ordinates it also records altitude information and the direction of view. All of this can be used by software to map your photos to the location where they were shot. While it lacks the fancy mapping and location database features of some GPS-equipped compacts, it’s nonetheless a useful feature to have. Generally, I found that the HX200V was pretty reliable at picking up satellite links and the positional data was accurate to within a few meters, at least in the mainly rural locations where I was using it.
Sony Cyber-shot HX200V movie modes
The Cyber-shot HX200V has four movie quality modes encoded using the AVCHD format. The best quality HD format is 1080p50/60 (region dependent) which is encoded at an average bit rate of 28Mbps. There are two interlaced options, 1080i50/60, at average bit rates of 24 and 17Mbps respectively and finally a 1440 x 1080i50/60 option at 9Mbps. If you switch from AVCHD to MP4 encoding the options become 1440×1080, 720×1080 and 640×480 all at 25fps (or 30fps in NTSC regions).
Pressing the dedicated movie record button in any stills shooting mode starts video recording in the selected quality setting with automatically determined exposure and ISO sensitivity settings. This is great for when you want to grab a quick clip, but it’s difficult to properly frame your shot because immediately you press the movie record button black bars appear at the top and bottom of the 4:3 proportioned screen to correctly display 16:9 format HD video.
The answer to this is to set the mode dial to the Movie mode position. Not only does this allow you to frame your shot properly, you can choose from Intelligent Auto or one of seven scene modes including soft snap, Landscape, Night Scene, High Sensitivity and Fireworks.
SteadyShot image stabilisation is automatically enabled for movie recording and, as for stills, you can’t turn it off. Why would you want to? Well, while the HX200V doesn’t display some of the artefacts that stabilisation sometimes produces there is a degree of ‘creep’ during panning. What I mean by that is that is that when you stop panning the frame moves a small distance back in the opposite direction before stopping. You can see this in some of the panning examples below. In addition to Optical SteadyShot for movies you can also enable Active SteadyShot which provides additional stabilisation to iron out the kinds of shakes and wobbles that occur when you shoot while walking.
You can take still photos during movie recording with the Cyber-shot HX200V. Pressing the shutter release while recording captures 16:9 still images at 4896 x 2752 pixels in all but the highest quality video mode.
| |
|---|---|
|
The quality of the Cyber-shot HX200v’s 1080p50 video is hard to fault and the stabilisation does an excellent job on this hand-held panning shot. Even with stabilisation, it’s impossible to keep things steady at the 810mm maximum zoom range, but SteadyShot smooths out any movement and there’s none of the jumpiness you often get with movie stabilisation at long focal lengths.
| |
|---|---|
|
The exposure here is good and the autofocus is very stable and doesn’t wander during the zoom. Even though this clip was shot with the HX200V on a tripod, SteadyShot image stabilisation wasn’t deactivated because, well, you can’t turn it off. One consequence of this, which you can also see in the previous hand-held clip is that at the end of the pan the frame drifts back in the opposite direction.
| |
|---|---|
|
The continuous autofocus manages reasonably well on this indoor panning shot which was shot in Program auto mode. Despite the low light, the clip doesn’t look particularly noisy and the exposure and white balance copes well with the changing light levels.
Sony Cyber-shot HX200V
handling
The most irritating thing about the HX200V is its lens cap, which attaches to the outer ring of the lens barrel, rather than the inner, extending section with the result that if you turn the camera on with the cap in place it obstructs the lens. Rather than risk damage to the powered lens assembly I did without the lens cap. I can’t understand why Sony persists with this design and doesn’t take a leaf from Panasonic’s book, the FZ60 / FZ62’s lens cap fits to the extending section of the lens barrel.
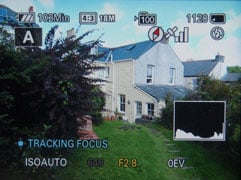
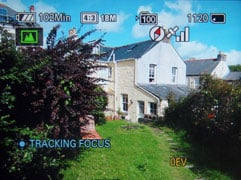
In most other respects the HX200V is a pleasure to use. I’ve already mentioned the benefit the high resolution screen delivers in terms of the detailed information display, but if you prefer and uncluttered view you can turn the display overlay off. Two other options provide detailed info with a live histogram and an electronic level, but unfortunately you can’t combine these features, for example to create a detailed info display with a level, but switching between them using the top button on the four-way controller only takes a second.
In Manual mode the thumb wheel is used to set aperture, shutter speed and ISO sensitivity, pressing it in cycles between the three options with the selected one displayed enlarged and yellow on the screen. In PAS modes the third option becomes exposure compensation.
Unlike the FinePix HS30 EXR and the Lumix FZ60 / FZ62, the HX200V lacks a dedicated AE lock button but you can assign the single custom button to either AE lock, white balance, or the HX200V’s built in ND filter. Generally speaking though, the HX200V provides less opportunity for customisation than either of those two models.
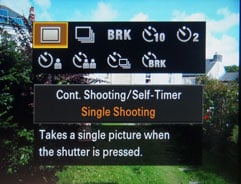
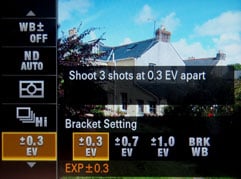
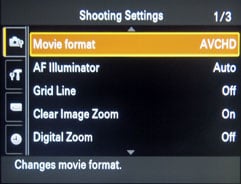
The Menu system on the HX200V takes a little more effort to find your way around than on most of the competition, primarily due to the lack of any kind of quick menu. To be fair, most of the controls you’d often find on a quick menu – ISO sensitivity, focus mode, continuous shooting modes and flash settings can be accessed fairly directly using buttons on the the HX200V. But there are also plenty that aren’t, for example, image size, white balance, metering mode, bracketing, movie modes, and for these a trip to the main menu is required.
The main menu is basically a long list, so you’ll have to keep scrolling until you get to what it is you’re looking for, which is fine when you’re familiar with the order, but even then can be tedious. Sony could make a big improvement to menu navigability by breaking things up and organising settings in a more accessible way.
 |
 |
 |
 |
 |
 |
For novices and those who need a little help finding their way around the HX200V’s various settings and features a button on the rear panel labelled with a ? accesses the In-Camera Guide which provides fairly comprehensive instructions on most aspects of the HX200V’s operation. The guide is divided into four sections, a Shoot/playback guide, Operation guide, Troubleshooting and Icon guide. The last of these works interactively – highlighting any of the on-screen icons provides a brief description of its function. The Guide will also allow you to directly access the functions it explains, so once you’ve read about, say, Smile shutter, you’re given the option to activate it
The information is brief, but to the point. On focussing, for example it tells you how the AF works and how to hold the shutter button in the half-pressed position to lock exposure and focus, but it doesn’t go into the various focussing modes or explain about face detect. Given that most people are probably just looking for the basic information they need to take a shot, I think Sony’s got the balance about right and the In-Camera Guide is a really helpful addition to the HX200V’s menu system.
Pressing the HX200V’s Focus button provides three options, the default Multi-AF, Centre AF, and Flexible spot AF. There’s also an AF tracking mode which is initiated in the modes that support it by pressing the centre button of the four-way controller once to activate it and a second time to lock the AF target onto the subject. The HX200V also has Face detect AF.
Sony has improved the speed of the HX200V’s AF system with claimed speeds of 0.13 seconds. There’s no doubt that in good lighting conditions the AF is very swift, the double-beep indicating that focus has been achieved occurs almost the instant you half-press the shutter release, but then the HX200V’s predecessor wasn’t exactly a laggard in this respect.
In less than optimal lighting conditions, and by that I mean the kind of low light interior that I use for High ISO noise testing, the HX200V’s response becomes much slower. In these situations switching to centre or flexible spot AF usually provides the answer and in situations where the light levels are too low for any of the AF options to function well there’s always manual to fall back on. Having said that, despite its 920k pixel resolution LCD I didn’t find manual focussing with the HX200V to be the easiest of tasks in low light environments and found myself wishing that Sony had thought of incorporating the focus peaking feature introduced on the NEX range of mirrorless CSCs to the HX200V.
Sony Cyber-shot HX200V Continuous shooting
Though unchanged from it’s predecessor, the HX200V’s continuous shooting capabilities remain among the best compared with what the competition has to offer. There are two burst modes at 10fps and 2fps both of which fire off a ten-frame burst.
To test the HX200V’s burst shooting I fitted it with a freshly formatted Sandisk Extreme Pro UHS-1 card and set it first to the Lo (2fps) burst shooing mode. Holding the shutter down the HX200V fires a burst of ten images and then stops while the images write to the card, which takes just under 6 seconds. The total time for the burst was 4.5 seconds – a little faster than the published 2fps rate. At the Hi 10fps setting the time taken for the full 10-frame burst was 0.9 seconds, so again marginally faster than the 10fps published rate.
Replacing the UHS-1 card with a Sandisk Extreme speed class 10 card made no appreciable difference to the timings, so while you can use UHS-1 cards in the HX200V you’ll get no continuous shooting or buffer write time performance increase over slightly slower and less expensive cards.
Sony Cyber-shot HX200V Sensor
The Cyber-shot HX200V’s 18.2 Megapixel EXMOR back-illuminated CMOS sensor produces images with a maximum size of 4896 x 3672 pixels. Images are saved as JPEG compressed files with a file size of around 4 to 7MB. The ISO range is 100 to 12,800. The shutter speed range is 30s to 1/400 (in manual and shutter priority mode).
To see how the quality of the Cyber-shot HX200V measures-up in practice, take a look at my Sony HX200V quality and Sony HX200V noise results pages, browse my Sony HX200V sample images, or skip to the chase and head straight for my verdict.
