 The Sony NEX-6 is a pretty remarkable camera. Though it isn't the flagship NEX model, I can quickly see it overtaking the NEX-7 in popularity at the top end of the NEX range. There are those for whom anything less than 24 Megapixels just won't do and who love the control that three-dial operation provides, but, beyond a tougher body, mic input and a few other refinements there's little else to justify the higher cost of the NEX-7. Give up those headline features and, for less money, you not only get the benefit of improvements including hybrid AF, a standard hotshoe that also accepts Sony accessories, a wider ISO range and improved handling, but the promise of future feature additions and enhancements via downloadable apps, not forgetting the other benefits of a networked camera like remote operation and picture sharing.
Sony Alpha NEX 6 review
-
-
Written by Ken McMahon
Intro
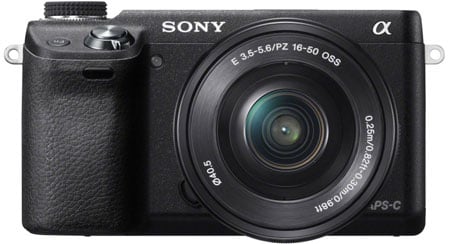
The Sony Alpha NEX-6 is the latest addition to the NEX range of mirrorless compact system cameras. Announced in September 2012 alongside the more consumer-orientated NEX-5R, the NEX-6 sits just below the Flagship NEX-7 in the product line-up and shares the same body shape and styling as well as many of the flagship model’s features, though not its 24 Megapixel sensor. The NEX-6, like the NEX-5R has a 16.1 Megapixel sensor with on-board phase-detection pixels providing a hybrid AF system similar to that used by Fujifilm, Nikon and Canon.
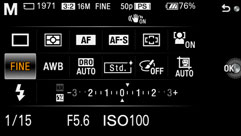
The NEX-6 has a conventional mode dial – a first for an NEX model, two control wheels, and a dedicated programmable function button. The NEX-7’s proprietary hotshoe is replaced with an ISO standard one which can also accommodate Sony accessories and the pop-up flash is also retained.
The NEX-6 features the same 2.3 million pixel OLED electronic viewfinder as found on the NEX-7 as well as its 921k pixel flip-up LCD screen. The screen lacks the NEX-5R’s ability to face forward though and it’s not touch-sensitive either. This is something of a drawback given the NEX-6’s connectivity features. Like the NEX-5R it has built-in Wi-Fi, opening up a range of network features including smartphone remote control, image sharing and direct uploading to social networks. With the NEX-5R and NEX-6 Sony also introduces downloadable apps, a new and more flexible way to manage optional features and updates than the more conventional firmware update.
E-mount lenses have tended to be on the large side compared with Micro Four Thirds equivalents, but Sony has redressed the balance with the launch of a new collapsing 16-50mm f3.6-5.6 powered zoom which is substantially smaller and lighter than the 18-55mm kit zoom of the earlier NEX models and similar in size and weight to Panasonic’s 14-42mm f3.5-5.6 power zoom. With the new lens attached the NEX-6 has a much more compact profile and the power zoom is better suited to video shooting.
Carrying a sub-$1000 price tag with the power zoom, the NEX-6 looks like a very attractive alternative to the more pricey NEX-7 and is bound to impact sales of the latter. If 24 Megapixel resolution isn’t important to you and you can live without refinements like a third control dial, AF/MF switch, an external mic socket and more robust construction, the NEX-6 has more sophisticated AF and much more to offer in terms of connectivity.
Even so, the NEX-6 is positioned at the pricier end of the compact system camera market. In this review I’ve compared it with Panasonic’s new Lumix G5. The successor to the popular G3 is one one of the best value mirroless cameras around and features a 16.1 Megapixel sensor, a 3 inch touch screen, fast continuous shooting and a range of art effects. With the 14-42mm f3.5-5.6 power zoom it’s around 25 percent cheaper than the NEX-6, but does it compare with the more expensive NEX-6 on features and performance, or is it case of you get what pay for? Read my full review to find out.
 |
Sony NEX-6 design and controls
Superficially at least, the NEX-6 body closely resembles the NEX-7 in terms of its physical appearance. Both cameras share the same dimensions: 120 x 67 x 43mm and are within a few grams in terms of weight; the NEX-6 weighs 346g including card and battery. The body shape is identical, but the construction of the NEX-6 is metal and polycarbonate, compared with the all metal construction of the NEX-7; despite that the NEX-6 feels solid and the rubberised grip which extends round the back to the moulded thumb rest provides a secure and comfortable grip.
Compared with the Lumix G5 it’s not so much the differing dimensions as the body styling that sets the two models apart. For the record, though, the G5 measures 120 x 83 x 71mm – the same width, slightly taller and quite a bit thicker – and weighs 396g with card and battery. The measurements suggest the G5 is significantly bigger and heavier, and because of its SLR styling it does look ‘fuller’, but to hold in your hand and stuff in a raincoat pocket, there’s not that much difference. In fact, with it’s rubber eyecup fitted, the NEX-6 is a lot more snag-prone.
And then there’s the respective lenses. Adding the older 18-55mm f3.5-5.6 manual kit zoom to an NEX body had the effect of transforming it from a sylph-like thing into, well, something not wholly deserving of the term ‘compact’. Only the 16mm f2.8 pancake lens truly complemented the sleek NEX form. But alongside the NEX-6 and NEX-5R Sony has introduced a compact 16-50mm f3.5-5.6 powered zoom. This is undoubtedly a direct response to Panasonic’s 14-42mm f3.5-5.6 power zoom which provided most Micro Four Thirds bodies with a size and weight advantage the NEX range just couldn’t match. The new Sony power zoom is only three millimetres longer than the Panasonic 14-42 lens and 21 grams heavier.
 |
Even though the NEX-6 lens mount extends out from the body by nearly 10mm, with both cameras side by side aligned along their back edges, the front edge of both lenses are almost exactly aligned. That’s because the Lumix G5’s grip extends further at the front and its viewfinder extends by around 20mm at the back. The NEX-6 has fewer protrusions (the eyecup sticks out, but that isn’t included in the measurements) but the overall thickness is surprisingly similar.
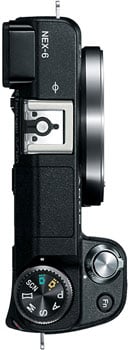
Another departure from NEX norms is the inclusion of a conventional mode dial mounted on the top right corner. This has positions for the PASM shooting modes plus Intelligent Auto, Superior Auto, Scene and Sweep panorama modes. Beneath it, recessed into the top plate and operated at the rear with your thumb is the control dial which is used for exposure control and menu navigation.
In most other respects, viewed from the top, the NEX-6 is pretty near identical to the NEX-7. The top of the grip is home to the, now silver, rather than black shutter release button surrounded by the on/off switch and next to it a button, now labelled Fn which has a similar role, but improved design, to the NEX-7’s Navigation button. Moving left across the top is the built-in flash then the hotshoe. Sony has finally given up on its proprietary hotshoe connector and opted for what it calls a ‘Multi Interface shoe’ Effectively this is an ISO standard hotshoe with a proprietary connector strip under the lip at the front for Sony accessories.
Moving onto the rear panel, the NEX-6 sports the same 2.3 million pixel viewfinder as the flagship NEX-7, located on the left side of the body. Moving back across to the right are buttons above the LCD screen for activating the pop-up flash and selecting playback mode and the NEX-7’s combined AF/MF/AEL selector is replaced with a programmable AEL button.
Next, is the dedicated movie record button. In response to criticism about the ease with which the NEX-7’s button could be accidentally pressed, Sony has moved it ’round the corner’ on the NEX-6 and recessed it. It’s now quite difficult to start movie recording, even when you want to, I’m not sure whether that counts as an improvement, but there you are.
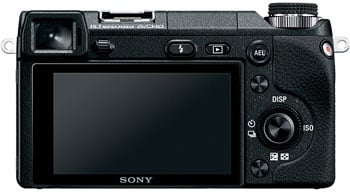 |
The rear four-way control wheel is flanked top and bottom by two buttons. As on the NEX-7, Sony refers to these as ‘soft buttons’, (but only the lower soft button B is programmable). The four cardinal points on the controller are now hard wired to Display overlays, ISO, exposure compensation and drive modes.
The NEX-6’s connectors are located behind a properly hinged door on the left side of the camera body. As you’d expect, there’s a mini HDMI socket as well as a combined A/V / USB port, but the NEX-7’s 3.5mm audio input for an external mic is absent.
The tripod bush is centrally located under the lens mount axis, well away from the door to the combined battery and card compartment under the grip, so you can swap card and batteries with the camera on a smaller tripod or with a quick-release plate attached. The NEX-6 is compatible with SD (HC and XC), Memory Stick Pro Duo and Memory Stick Pro-HG Duo cards.
Like earlier NEX models the NEX-6 takes the Sony NP-FW50 Info-Lithium battery which provides enough power on a full charge for 360 shots if using the LCD screen, dropping to 270 if you exclusively use the EVF. That’s down considerably from the 430/350 shots quoted for the NEX-7, doubtless mainly due to the power zoom. As it’s an Info Lithium battery as well as the four-segment graphic power remaining indicator you also get a percentage readout. The battery is charged in the camera, an approach which has its pros and cons. The pros are that you can charge the battery in the camera either by connecting it the supplied USB mains charger, or simply by connecting it to the USB port of your computer, so if you’re travelling with a laptop you don’t need a separate charger. The downside is you can’t use the camera and charge a spare battery a the same time. You can however buy an optional mains recharger for the battery if preferred.
Like the NEX-7, the NEX-6 has a small built-in flash unit and shares the same guide number of 6 in Metres at 100 ISO. That gives it an effective range of under 2 metres at 100 ISO – around five and a half feet, which sounds a bit weedy, but is comparable with other CSC flash units. The PEN flash accessory is a little more powerful with a GN of 7 and the Lumix G5’s built-in flash is slightly more powerful again with a GN of 8 metres at 100 ISO. In practice, it’s fine for close subjects and fill in, but stuggles in even a moderatley sized room.
That’s not so much of an issue now that the NEX-6 has an ISO standard hotshoe. Except it’s a bit more than that. Sony calls it a ‘Multi Interface shoe; from the top it looks like a standard hotshoe, but peer into from the back and underneath the lip at the front you’ll see Sony’s connector strip which means that the the NEX-6 will work with Sony’s proprietary accessories including the HVL-F58AM, F43AM and F20AM Sony external flash units. There’s currently no external microphone accessory for this new hotshoe, but I’d be surprised if Sony doesn’t produce one or we don’t see an adaptor from a third party that allows you to connect an external mic via a 3.5mm jack with an adaptor.
Sony NEX-6 viewfinder and screen
The NEX-6 shares the same 2.4 million pixel OLED electronic viewfinder as the NEX-7. When it was introduced on the NEX-7 this was the best EVF around both in terms of specification and performance and it remains so. This EVF not only provides a much more detailed view than we’re used to seeing on cameras this size, it’s bigger and brighter. If you’re used to shooting with an APS-C DSLR, you’ll be pleasantly surprised to discover that the NEX-6 provides a bigger (though not brighter) view, closer in size to that of a full-frame DSLR.
In use, the EVF is a real delight and offers several advantages over the LCD screen or an optical viewfinder. It has a proximity sensor which automatically toggles between the EVF and panel when you raise the camera to your eye, although there’s a fraction of a second delay. Unlike the 16:9 LCD screen, the EVF matches the 3:2 shape of the sensor’s images, with exposure information displayed along the bottom and other info on top. There are two overlays – an electronic level gauge and a live histogram. Obviously, the EVF is much easier to see, particularly in bright sunny conditions, than the screen, and a detachable rubber eyecup is also supplied. If you’re left-eyed you’ll find the screen gets a fair smearing but, on the plus side, with the camera pressed to your face stability is greatly improved.
In low light the EVF performs at least as well, and in some cases better than an optical viewfinder. Yes, it can get quite noisy, but there’s no discernible lag and with focus peaking enabled it’s possible to manually focus in situations where you’d struggle with an optical system. The only real issue I had with the NEX-6’s EVF was that it’s quite difficult to make out the shadows in high contrast subjects, for example when shooting against the light; in such a situation your eyes via an optical viewfinder are always going to be able to outperform an electronic sensor.
One other advantage of an Electronic viewfinder over an optical one is that it gives an indication of how your shot will look with the currently selected settings, so you can see if your exposure or white balance is off and preview effects. If you prefer a ‘straight’ view’ you can turn this off.
With 2.4 million pixels the NEX-6 EVF provides a higher resolution view than any other compact system camera on the market. The Lumix G5, along with other viewfinder-equipped Lumix G models, the Olympus E-M5 and the VF-2 accessory EVF, and Nikon’s V1 all have a 1.4 million dot resolution and the difference is noticeable. Less so in good light with a static subject, but when panning and with moving subjects the view through the NEX-6 EVF is more detailed and stable. But while the Lumix G5’s EVF may lack the resolution of the NEX-6 it is a little brighter and, although there probably isn’t a big difference in overall size, because of its 4:3 proportions it also appears bigger.
Of course you’re not restricted to the EVF as the NEX-6 also has a 3 inch 921k pixel LCD panel. As on the NEX-7 the panel flips up, the only difference being it has a cantilevered hinge at the bottom to keep it out of the way of the viewfinder. Despite this, with the panel in the 90 degree ‘waist shooting’ position the viewfinder does obscure the top left corner of the screen, more so with the eyecup attached, but this can be avoided by tilting the panel back a few degrees so it isn’t a major problem.
Unlike the NEX-5R and the older 5N, the NEX-6’s display isn’t touch-sensitive. That rules out touch-focussing which is a real shame as touch focussing and the hybrid AF system would have made a potent combination, allowing you to quickly, smoothly and accurately switch focus from one subject to another with just a tap on the screen. A bigger issue is that it’s often necessarry to enter textual info to connect to Wi-Fi hotspots, enter passwords, and add captions to photo uploads. A touch screen would have made this much, much easier.
Sony NEX-6 lens and stabilisation
The NEX-6 is available as a kit with the new E PZ 16-50mm F3.5-5.6 OSS power zoom lens. This is one of the most exciting additions to the E-mount range since its launch with the NEX-3 and NEX-5 back in the Summer of 2010. And the cause of all the excitement is, mainly, its diminutive size. The lens weighs 116 grams and measures 65mm in diameter and 30mm in length when retracted. That makes it marginally bigger and heavier than Panasonic’s equivalent Lumix G X Vario PZ 14-42mm f3.5-5.6 Power O.I.S lens which is 61 x 27mm and weighs 95 grams.
Though Sony’s lens both looks and feels a little larger than Panasonic’s it’s not a big difference and, in any case, that’s not really the point. Until now, the NEX system, despite the miraculously small size of the camera bodies, has been unable to really compete with Micro Four Thirds and other mirrorless compact system cameras on size and weight because of its comparatively large heavy lenses. The new power zoom changes all that and means that you can comfortable slip the NEX-6 with a zoom lens attached into your coat pocket.
Sony NEX-6 E PZ 16-50mm F3.5-5.6 OSScoverage wide | Sony NEX-6 E PZ 16-50mm F3.5-5.6 OSScoverage tele | |
 |  | |
| 16-50mm at 16mm (24mm equiv) | 16-50mm at 50mm (75mm equiv) |
The 16-50mm power zoom is of plastic construction, it look and feels well constructed but lacks the reassuring heft of a metal-bodied lens. Looked at another way, it is comparitively light. When you turn on the camera the lens extends quietly to 52 mm in length which, with the NEX-6’s trademark protruding mount adds up to 61mm from the front of the camera.
There are two zoom controls – a sliding switch on the left side of the lens barrel marked w_t is pushed upward to zoom in and down to zoom back out at a single speed. There’s also a zoom ring at the front of the lens which provides variable speed control via an electronic linkage and can also be configured for manual focus.
The 16-50mm zoom provides a 3x range equivalent to 24-75mm. That’s a very useful range for a ‘standard’ zoom, including a super wide angle perfect for landscapes and interiors and extending to just about encompass a portrait focal length. However, with the f5.6 maximum aperture at the longer end of the range, shallow depth of field isn’t one of its strengths, for that you’d be better of with the 35mm f1.8. But as a ‘standard’ all-purpose zoom, the 16-50mm’s main advantages are its compactness, light weight and suitability for video.
Compared with the 14-42mm (28-84) powered zoom of the Lumix G5 the Sony 16-50mm offers a more useful wide angle, there’s a significant difference between 24mm and 28mm equivalent which is further exaggerated by the NEX-6’s 3:2 aspect ratio compared with 4:3 proportions of the G5. At the other end of the range the Lumix G 14-42mm offers an 84mm equivalent telephoto compared with 75mm on the Sony lens. Though that will get you slightly closer it’s arguably much less useful than the wide angle advantage enjoyed by Sony lens.
Though Optical Steady Shot (OSS) stabilisation is built into the lens and not the body you can turn it on and off from the NEX-6’s setup menu. As on earlier models, there’s still no quick way to disable stabilisation and it’s one of the few settings that still necessitates a trawl through the lengthy setup menu.
To test the stabilisation performance of the 16-50mm power zoom with the NEX-6 I zoomed it to its maximum 50mm (75mm equivalent) telephoto position and took a series of hand-held shots in Shutter priority mode at a range of shutter speeds with OSS enabled and turned off. As you can see from the crops below, OSS can produce blur-free shots down to 1/10, the equivalent of three stops better than conventional wisdom dictates.
Sony NEX-6 E PZ 16-50mm F3.5-5.6 OSS Off/On | ||||
 |  | |||
100% crop, 16-50mm at 50mm 100 ISO 1/10th OSS Off. | 100% crop, 16-50mm at 50mm 100 ISO 1/10th OSS On. | |||
While the performance from the Sony 16-50mm is remarkable considering its size, the lens unsurprisingly involves some optical compromises, especially when zoomed-out. To look at the JPEGs from the NEX-6, you wouldn’t know though as some significant correction is taking place in-camera. Start viewing uncorrected RAW files though and you’ll immediately see what the NEX-6 is doing behind the scenes. I first noticed this when browsing RAW+JPEG combinations in Adobe Bridge and was shocked to see the degree of distortion and vignetting on the RAW versions which had simply been digitally corrected on the JPEGs. To be fair, we’ve seen digital corrections on many smaller lenses before, but we always like to report it when we can, so here’s two examples which illustrate what’s going on with the 16-50mm power zoom before and after correction.
Sony E PZ 16-50mm F3.5-5.6 OSS | Sony E PZ 16-50mm F3.5-5.6 OSS | |
 |  | |
| 16-50mm at 16mm (24mm equiv), in-camera JPEG | 16-50mm at 16mm (24mm equiv), uncorrected RAW file | |
 |  | |
| 16-50mm at 16mm (24mm equiv), in-camera JPEG | 16-50mm at 16mm (24mm equiv), uncorrected RAW file |
As you can see in both examples above in the right column, the 16-50mm power zoom suffers from quite severe barrel distortion and vignetting when uncorrected RAW images are viewed. But the NEX-6 wrangles them back into shape with significant geometric correction and digital brightening in the corners, not to mention some cropping for in-camera JPEGs, see the left column. This digital correction is remarkably effective, and interestingly appears to take place in real-time as you compose the shots. Certainly, the views I remember framing-up were those recorded in the JPEGs and I was quite surprised to discover the larger area captured in the RAW files.
I did however notice when fitting the 16-50mm onto a NEX-7 running firmware v1, the corrections were not taking place either when composing or recording, and the in-camera JPEGs were recording the larger uncorrected images. This isn’t surprising since the v1 firmware of the NEX-7 predates the 16-50mm lens. But it does illustrate that owners of NEX models preceding the NEX-5R and NEX-6 who are interested in the 16-50mm power zoom may want to check if their cameras will perform the corrections, perhaps with a firmware update. If not, they should know their JPEGs and RAW files taken at the widest focal lengths will exhibit significant distortion which will need correction afterwards.
Sony NEX-6 shooting modes and Wifi / apps
The NEX-6 is the first NEX model to feature a dedicated mode dial. In addition to the PASM modes there are positions for the two fully auto modes – Intelligent Auto and Superior Auto – as well as SCN for scene modes and a dedicated slot for Sony’s Sweep Panorama feature.
Though the mode dial provides a more direct and convenient method for selecting shooting modes on the NEX-6, what’s available differs little from the NEX-7. However, the NEX-6’s ability to install downloadable apps effectively provides open-ended potential for the expansion of shooting modes and other features. If you want to know more about the NEX-6’s core shooting modes, take a look a the relevant section in my Sony NEX-7 review. Here I’ll focus on what features the existing apps add to the NEX-6 and how they work in practice.
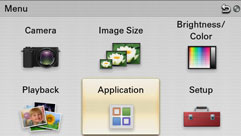
The NEX 6 becomes Sony’s second mirrorless camera to feature built-in Wifi, just like the NEX 5R shortly before it. Being Sony though, the Wifi-equipped NEX cameras have a grander vision than simply pushing images wirelessly to nearby devices. The NEX 5R and NEX 6 actually support downloadable apps which extend the capabilities of the camera, both online and off.
The apps are delivered using an extension of Sony’s PlayMemories Online services. The new Camera Apps section was launched with the NEX 5R, but everything on there is fully compatible with the NEX 6, and I also assume future Wifi-equipped Sony NEX cameras. Once connected to the internet, the NEX 5R and NEX 6 can use a simple built-in browser to access the Camera Apps page and download the desired components. If you don’t download any extras, the only thing you’ll be able to do by default is push images to a compatible iOS or Android device.
The first thing you’ll need to do is connect to a Wifi network. Delving into the NEX 6 setup menu lets you select and setup the desired SSIDs, enter passwords and agree to terms and conditions where necessary. It all sounds straightforward until you actually come to enter any text. As you already know, Sony foolishly chose not to equip the NEX 6 with a touch-screen, so all text-entry has to be done using an on-screen keyboard and laboriously moving a highlighter one character at a time using the arrow keys, somewhat reminiscent of entering a high score name on an old arcade machine. This wouldn’t be so bad if Sony had chosen a more sensible colour scheme for the on-screen keyboard, but as it stands, the highlighter employs a thin yellow outline which is barely visible against the white background on the keys. As such you’ll be struggling to see exactly which characters are actually highlighted – a daft design decision when the entire key could have been highlighted. Let’s have an app to modify that, eh Sony?
Once you’ve selected a network and entered a password, you’re good to go on most home networks or personal hotspots. If you’re using a public hotspot though, there’s normally a page of terms and conditions you need to agree to first. To do this, go to the Hotspot menu and the NEX 6 will fire up a mini mobile browser, allowing you to tick the appropriate box. After the long-winded approach of entering passwords, this process is actually very quick and easy. During my testing, I successfully connected the NEX 6 to a home Wifi system, a personal mobile hotspot via a smartphone with tethering, and onto several public hotspots, including those at Disneyworld Florida and various supermarkets.
Once the camera’s connected to the internet, you can download apps from Sony’s PlayMemories store, but you’ll first need to sign up for an account via a laptop, tablet or smartphone first, a process you can’t do from the camera itself. Okay, now you’ve laboriously entered your password for the network, agreed to terms, signed-up for Play Memories via another device, then logged into the service using the camera, well now you’re good to go. Honest.
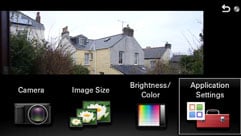
Apps can be purchased and installed over Wi-Fi using the Application menu which also provides access to your existing installed apps. At the time of writing in early 2013 there were eight apps available, not including the various international keyboard layouts. Of these, four are free and the others range in price from $4.99 to $7.99 in the US or £3.99 to £7.99 in the UK.
The free apps are Smart Remote Control, which allows you to use a smartphone or tablet to control the camera, Direct upload – to Facebook or Sony’s Playmemories online site, Photo Retouch, and Picture Effect+.
Starting with the paid-apps, Bracket Pro, Cinematic Photo and Multi Frame Noise Reduction each cost $4.99 (£3.99). Despite the pro tag it’s a little disappointing to discover that Bracket Pro offers a maximum of three frames although it is flexible in other respects, providing bracketing of aperture, shutter speed, focus or flash.
Cinematic Photo is an effects mode that creates a video in which the majority of the frame is a still image, with a single animated element. You can find examples on the web, frequently referred to as cinemagraphs. The NEX-6 and 5R are not the only cameras with this feature which was introduced on the Nokia Lumia 920 SmartPhone in September 2012.
Cinematic photo works in any of the PASM modes, as with all apps on the NEX-6, you access it via the Application button on the main menu. You’re then provided with two options, to take a cinematic photo or review ones you’ve already shot. Installed apps save images and video to dedicated subfolders on the card – so you won’t find them in along with all your regular shots. Selecting the shoot option sets the camera to continuous shooting mode and disables the drive mode button on the control wheel, but you can still adjust exposure settings, change the ISO sensitivity, select Picture Effects and so on.
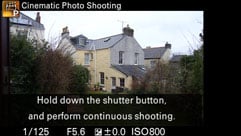 |  |  |
When you press the shutter Cinematic photo shoots a fast burst of about 18 frames and then provides brush tools so that you can select the area to be animated. This is yet another situation in which you find yourself wishing the NEX-6 had a touch-screen, but it is possible, if a bit fiddly, to paint the area using the control wheel. Once that’s done you’re shown a preview of the finished clip and given the option to revise your painting. You can also elect to have the animation loop, or run forwards then in reverse, which provides a more seamless blend for some subjects.
When you’re happy with the result the video clip is saved to the card as an AVI file. It’s a shame you don’t get to specify the kind of movie you want to create. As it is Cinematic photo creates a 640 x 360 pixel 16:9 video of around 20 seconds length, so if you want something longer, or that loops indefinitely you’d have to edit the resulting video clip yourself to achieve it. But despite those shortcomings it’s simple, can produce some very compelling results and is relatively inexpensive.
| |
|---|---|
| |
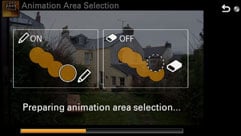
At $9.99 (£7.99) Time Lapse is the the most expensive of the apps, but provides a fairly sophisticated interval timer that automatically combines a sequence of images into an HD movie for you. It provides a range of presets that will help you get good results even if you’re not sure of the best settings to use for a given situation. There are six presets – Sunrise, Sunset, Night Scene, Night Sky, Cloudy Sky, Miniature and Standard; each of which sets the video format, self-timer delay, interval and total shooting time. There’s also a custom option so you can choose your own settings.
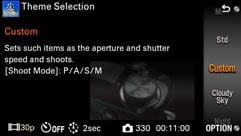 |  | 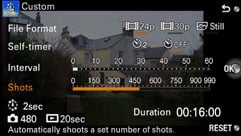 |
While the preset options are great to have, the custom setting provides the most control (though you can, in fact, change the settings for any of the presets). Firstly, you can choose between 24p and 30p HD encoding, then you select the shooting interval and the number of shots. If you don’t want your shots automatically compiled into a movie you can choose to save the individual still frames to the card, in which case you can also choose size and quality settings including RAW.
Once these are set, the NEX-6 works out and displays both the duration of the shoot and the playback time of the movie – saving you the bother of having to work it out. It’ll even adjust the playback time if you decide to switch between 24 and 30p encoding. This calculator is one of the most useful things about the app, but although it saves a lot of working out, it won’t tell you what settings are best for a particular subject and that’s where the presets come in handy.
Below I’ve included two examples using the presets, the first was shot using the cloudy sky preset and the second with the mini preset which applies blur to the top and bottom of the frame to produce a faux tilt-shift effect. This is more versatile and produces quite different results to the miniature video effects available on some other compact system cameras due to the slower frame rate and faster playback. Note though, that you can’t adjust the focus area and the shortest interval available using any preset is 1 second – resulting in 24x or 30x playback speed depending on the selected video mode.
| |
|---|---|
| |
| |
| |
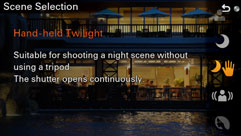
One of the disappointments of the NEX-7 was that it didn’t include Sony’s Multi Frame Noise Reduction feature which takes a rapid burst of frames and combines them to produce a low noise composite image. The key advantage of MNFR is that, unlike Hand-held Twilight mode, it can be used at any ISO sensitivity setting and you also have access to other exposure controls such as exposure compensation and white balance. However with the NEX 6 and 5R, you can now buy and download a Multi Frame Noise Reduction app which equips either camera with the capability.
The Multi Frame Noise reduction app works in much the same way as on Sony SLT models and the RX100, except that, like all the other apps it’s accessed from the Applications button on the main menu rather than being included as an option on the ISO sensitivity menu. This isn’t really that much of a drawback as you can use it in any of the PASM modes and you still have access to camera settings including focus mode, AF area, exposure compensation and white balance via the App’s menu.
Although you get to it in a slightly different manner, in all other respects it seems to function in the same way as on earlier models. A burst of six shots is combined and processed to produce a single low-noise composite. You can see how well it works in my Sony NEX 6 Multi Frame Noise Reduction page.
If you’re looking for auto exposure bracketing the NEX-6 has it fairly well covered offering three shot auto bracketing in 1/3, 2/3, 1, 2 and 3EV increments. The Bracket Pro app offers a little bit more, extending the exposure range to +/-5EV, but unforgiveably still limited to three frames. So, you get wider latitude, but not more frames. However, Bracket Pro is about more than just exposure bracketing. It also has focus bracket and flash bracket options. Focus bracketing takes three shots with different focus points – you can narrow or widen the gap between the three – and flash bracketing takes two shots in Program mode, one with, and one without flash.
At $4.99 Bracket Pro isn’t expensive, but even at that price I don’t think it’s going to be massively popular. This is an app that’s only likely to appeal to advanced users and I’d guess most of those would prefer to see 5 or even 7-frame exposure auto bracketing, in preference to the focus and flash bracketing features. As it’s an app though, there’s always the possibility that the frame count will be increased in future versions.
All of the free apps are worth downloading, after all, you’ve got nothing to lose and they all add features that are worth having – if you find you don’t use them much you can always delete them later. The apps use, on average around 3MB of the total app storage memory of 90MB, so there’s plenty of room.
Picture Effect+ provides enhanced versions of some existing Picture Effects filters with additional controls. For example, the Toy Camera+ effect is similar to the existing Toy Camera effect but provides the choice of three vignette effects. Miniature+ expands on the existing Miniature effect, letting you combine it with either Toy Camera or Retro Photo effect. The Picture Effect+ app also adds the watercolour and illustration effects shown below.
 |  |  |
| Toy Camera medium | Illustration | Watercolour |
As with the other apps, Picture Effect+ is accessed via the Applications button on the main menu. This doesn’t mean there are now two places to go to for Picture Effects though, as all the existing ones are added to the new App’s list. But it does highlight the separateness of apps from the core camera functions. To return to ‘normal’ operation, you need to quit the app. This is inevitable really, given the specialist functions that apps provide, but it does limit them to providing bolt-on feature additions, rather than extensions to the camera’s functionality in the way a firmware upgrade would. I think it’s unlikely that we’ll see, for example, extended ISO sensitivity, or enhanced continuous shooting from an app. Likewise it seems unlikely that an integral feature like focus peaking will be migrated to an app.
But probably the most exciting of the free apps is Smart Remote control, which allows you to view the NEX-6’s output on a smartphone or tablet and activate the shutter. Smart Remote Control works over Wi-Fi; with the NEX-6 configured as an access point, communication is handled by the Playmemories mobile app which is available for iOS devices and Android. I tested it on my iPhone 4S and iPad and, once I worked out how to use it (Sony really needs to work on the user interface and help messages) it worked pretty flawlessly. Gordon didn’t have as much success with his Android devices though: “My Samsung Galaxy S3 smartphone (running Android 4.1.1) would connect to the camera, but almost always just then sat there doing nothing. My Google NEXUS 7 tablet (running Android 4.2) had more luck, as did my Apple iPad (running iOS 5.1.1), but none of them would work all of the time.”
To use Smart Remote Control, you’ve first got to connect to the NEX-6 over Wi-Fi, the camera tells you the SSID and password so connecting is straightforward, then you just launch the Playmemories app and you can see what’s on the NEX-6’s screen on your smartphone or tablet. The NEX-6 screen and viewfinder remain active and you can still take photos using the camera’s shutter release even in the Smart Remote Control App.
But the whole point of it is, of course to take the shot using your phone or tablet and again, that’s pretty straightforward, on the iPhone or iPad you simply tap the camera button, and the NEX-6 meters, focuses and takes the shot, exactly as if you’d pressed the shutter release on the camera.
It’s a bit of a shame, but that’s about all it can do. You can’t zoom the lens, change the shooting mode, or adjust the ISO sensitivity, for example. It’s also not possible to shoot video remotely. The iOS app does allow you to set exposure compensation if the camera is set to Aperture Priority or Program Auto mode and there’s also a 2-second self-timer, but that’s about as far as it goes. As with other apps, you can, however, set the focus mode, and some exposure controls, but only directly on the camera.
Smart remote works in the PASM modes and with the mode dial in the SCN and Intelligent Auto positions, but you can’t use Superior Auto or, for obvious reasons, sweep panorama. Neither can you run two apps at once, so you can’t, for example, remotely monitor a time-lapse sequence. Full resolution images are saved to the camera’s card in the usual way, and a downsampled version is saved to the device, in the case of the iPhone to the camera roll.
As far as it goes it’s a useful and practical remote, but it would be nice to have some additional control, at least over exposure and ISO settings. It makes little sense to have a remote app that you can use in manual and semi-auto modes that provides no way to change exposure settings.
Like Smart Remote Control, the Direct Upload app is free and provides basic functionality that only whets your appetite for something more versatile. Direct upload allows you send pictures from the camera directly to Facebook or Sony’s own Playmemories site. When uploading to Facebook you can add a comment and select an album. It’s great if you post a lot of photos to Facebook, other than the tedium of having to write your comment using the on-screen keyboard with the control wheel, but I expect many NEX-6 owners will, like me, be more frustrated by it’s limitations than impressed at its capabilities. What of Flickr, Instagram, Twitter, and once the API is opened, Google+?
Whilst Sony’s enthusiasm for it’s own photo sharing site and the most popular social networking site on the planet is understandable, it’s misplaced and this is another missed opportunity. The NEX-6 is a camera for enthusiasts and what enthusiasts want to do is upload their photos to photo sharing sites. Let’s hope that Sony either extends the reach of Direct Upload, or releases a new app that allows upload to a wider range of sites soon. And remember it will be Sony that needs to do this, as at the moment, the API of the NEX operating system is well and truly closed, so don’t expect any third party app development.
In the interim though, you can wirelessly push images from the camera to your smartphone or tablet, at which point you can of course publish or share them onto any system. Do however note that by default images are transferred at a reduced resolution of 2 Megapixels and you’ll need to adjust a setting in the Sony PlayMemories app on your smartphone / tablet to acquire images at their original size if preferred. I should also note that when uploading direct from the camera to Facebook, the images are also sent at 2 Megapixels by default, and I couldn’t find any way to change that. As an example of the system in practice, here’s a photo Gordon took with the NEX-6 at Disney World Florida and then uploaded direct to Facebook using their free public Wifi.
Sony NEX-6 movie modes
The NEX-6 provides the same movie modes and features as the NEX-7, with full HD 1080p video recording with stereo sound and continuous autofocus, albeit now with the addition of on-sensor phase-detect AF assistance. You can shoot video in any recording mode using the dedicated movie recording button, repositioned and recessed on the right corner below the control dial. Another ‘feature’ that’s unfortunately retained is partial use of the screen when shooting HD video. Instead of using the entire 16:9 screen area, when you press the movie record button the 3:2 photo shape is cropped at the top and bottom to the wider 16:9 shape, wasting a great deal of space. You can fill the NEX-6’s screen with video, but you’ll need to select the wide image full screen option from the setup menu first; this really ought to be the standard setting. Those who aren’t prepared to delve into the nether regions of the setup menu may never discover this and end up shooting all their movies using about 60 percent of the available screen area. It doesn’t arise if you use the EVF though, which uses the full width with black bars top and bottom.
The NEX-6 provides full control over exposure during movie shooting. You can record movies in any mode and adjust exposure and ISO sensitivity during recording. You can also use any of the view overlays for movie shooting and switch between them while recording.
The NEX-6 has continuous AF during movie recording and you can also control the focus area during shooting. I detailed my attempts to use this feature in my NEX-7 review and my experience with the NEX-6 was similar, except that having moved the AF area I found it necessary to refocus by half-pressing the shutter release. This is far from ideal and, as with many aspects of the NEX6’s handling you again can’t help but feel life would be so much easier with a touch-screen.
The Lumix G5’s touch-screen makes this kind of thing simple, but while it provides a best quality 28Mbps 1080p50/60 HD mode and can record in PASM modes, unlike the NEX-6, it doesn’t allow you to change the exposure settings during recording.
Like the NEX-7 the NEX-6 can encode movies in MP4 or AVCHD2 formats, and the available frame rates are dependent on region. In AVCHD mode video quality options are 1080i (at 50i or 60i) and encoded at 24 or 17Mbps, 1080p (at 50p or 60p) and encoded at 28Mbps, and 1080p25 encoded at 24 or 17Mbps. Switch to MP4 recording and you have 1440×1080 and VGA (640 x 480) at 30fps. All of the sample videos below were recorded in 1080p50 mode. These are essentially the same as the NEX-7 video modes though the 1440 x 1080 mode at 24fps has been dropped.
| |
|---|---|
| |
| |
| |
|---|---|
| |
| |
| |
|---|---|
| |
| |
| |
|---|---|
| |
| |
| |
|---|---|
| |
| |
Sony NEX-6
handling
Overall, the NEX-6 is a great camera from a handling perspective, there are one or two quirks and niggles, but they’re things you could probably learn to live with over time, rather than deal breakers. One of the strengths of the NEX-7 is that its ‘Tri-Navi’ physical interface provides three dials allowing you full control over aperture, shutter speed and ISO sensitivity. But while the NEX-6 lacks the NEX-7’s third dial it doesn’t feel like a huge compromise has been made and in fact the addition of a proper mode dial more than makes up for it.
In contrast to earlier NEX models, all the positions on the rear control wheel are ‘hard wired’ for display overlays, ISO sensitivity, Exposure compensation and drive modes, and only only the lower of the two soft keys, soft key B is programmable. As well as the usual functions – Quality, ISO, White balance, Metering mode and so on, you can also assign this and the programmable AEL button to any of your downloaded apps.
The Fn button next to the shutter release activates a function menu overlay to which you can add six custom functions. The defaults are Focus mode, AF mode, White balance, Metering mode and Picture effects. So, between them, the three programmable buttons provide plenty of scope to accommodate your personal preferences and provide quick access to frequently used features. Sony has also re-introduced the Quick Navi menu which provides an overview of camera settings. Like the Super Control Panel on Olympus PEN models, you can select and change individual settings, in this case by first pressing the Fn button, then navigating using either control dial.
 |  |  |
 |  |  |
 |  |  |
The niggles? I’ve already mentioned the movie record button; Having been criticised for being too easy to accidentally activate on the NEX-7, Sony has made it very difficult to operate at all. It’s quite deeply recessed into the rounded corner of the camera and you have to press quite hard to activate it. Once you know this, though, you get used to it quite quickly. For the ultra-cautious, Sony has also provided a menu option to disable the movie record button all together, which is not only over-the top, but a missed opportunity to provide another custom button.
The other issue which, again, I learned to avoid, it that it’s very easy to inadvertently activate the zoom rocker on the lens barrel. The ability to use the front ring for focussing when manual focus is set is nice, but, given my experience with the AF in low light, I found myself longing for the NEX-7’s MF/AF switch.
I’ll also mention again the inconvenience of using the rocker to laboriously navigate the on-screen keyboard to enter text, made even more difficult thanks to the inexplicable choice of a thin yellow outline over a white ‘key’ for highlighting. This makes the entry of passwords and other text in the apps very difficult.
Sony NEX-6 Autofocus
The NEX-6 and NEX-5R are the first NEX models to provide combined phase detect and contrast detect AF systems. A similar system is used in the Nikon 1 mirrorless compact system cameras, but where the Nikon system switches between phase and contrast detect systems depending on the lighting conditions, the NEX-6 uses both together. 99 phase detect AF points on the sensor detect the subject’s distance and direction, then the 25-point contrast detect AF system fine tunes the focus.
In practice the system works very well under good lighting conditions, acquiring the subject rapidly; the AF area indicators light up and the beep confirmation sounds a short fraction on a second after you half press the shutter release. The NEX-6 isn’t quite as fast as the Lumix G5, but the gap, in good lighting conditions, is very slim.
Once the light starts to fade though, or you’re working indoors, the AF speed often reduces quite dramatically and I often encountered situations where the NEX-6 failed to achieve accurate focus at all. For the High ISO noise testing in the church I had to use manual focussing and during my session at the races on a dull and drizzly day I missed a number of shots due to the slow response of the AF.
Despite that, the hybrid AF is an improvement on the contrast detect AF of earlier NEX models. The main benefit, however, is when shooting in Speed Priority Continuous mode and when recording movies.
Sony NEX-6 Continuous shooting
Like the NEX-7, the NEX-6 has two continuous shooting modes, Continuous Shooting and Speed Priority Continuous, the latter at a rate of 10fps. On the NEX-7 the faster rate fixed the focus on the first frame, but the NEX-6 can shoot at this faster rate with continuous AF, putting it on a par with the Nikon V1 and J1, though it lacks those models’ faster fixed AF speeds.
To test the NEX-6 I fitted it with a freshly formatted 16GB Sandisk Extreme Pro UHS-1 SD card. In continuous shooting mode with the quality set to fine JPEGs, the NEX-6 continued to shoot for over 100 frames and probably would have continued until the card filled, had I not stopped shooting. The first ten frames were shot at a rate of just under 3.5fps and the average for the hundred frames was just over 3fps.
Switching to Speed Priority continuous, with the AF set to single the NEX-6 managed a burst of 12 frames at exactly 10fps, thereafter the frame rate dropped to around 3.5fps. That’s the same speed as the NEX-7, but a shorter burst – the NEX-7 can fire a burst of 17 large Fine JPEGs.
Finally, I switched to continuous AF mode and, with a moving subject the NEX-6 fired of 12 frames at exactly 12fps before slowing to just under 3.5fps. I did a few more tests with moving subjects and while the NEX-6 didn’t always complete the full 12-frame burst before slowing, in good light, with reasonably predictable movement it managed it nearly every time. Switch to RAW mode and the NEX-6 maintains 10fps for 10 frames and in RAW+JPEG it will manage a very respectable 9 frames. The nine frame sequence below was shot in RAW-JPEG mode with Continuous AF. Though the light wasn’t great – I had to shoot at 800 ISO to get a 1/500th shutter speed – the NEX-6 has done a good job keeping the subject in focus throughout the sequence.
 |  | |  |  | ||||
 |  |  |  | |||||
Sony NEX-6 Sensor
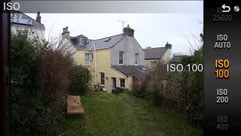
The NEX-6 has a new 16.1 Megapixel CMOS sensor with built in phase detect AF sensors. It has a sensitivity range of 100 – 25,600 ISO. Images can be saved as RAW files in Sony’s ARW RAW format or as JPEGs using one of two compression settings, Fine and Standard. There’s also a RAW+JPEG mode which saves a fine quality JPEG in addition to the RAW file. Fine quality JPEG compressed files are around 4 to 6MB in size. The shutter speed range is 1/4000 to 30 seconds plus Bulb.
To see how the quality of the Sony NEX-6 measures-up in practice, take a look at my Sony NEX 6 quality and Sony NEX 6 noise results pages, browse my Sony NEX 6 sample images, or skip to the chase and head straight for my verdict.


