Sony Alpha NEX 6 review
-
-
Written by Ken McMahon
Quality
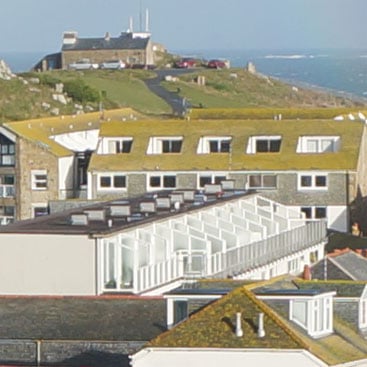
Sony NEX-6 vs Panasonic Lumix G5
|
Sony NEX-6 | Panasonic Lumix G5 | |
 |  | |
f5.6, 100 ISO | f5.6, 160 ISO | |
 |  | |
f5.6, 100 ISO | f5.6, 160 ISO | |
 |  | |
f5.6, 100 ISO | f5.6, 160 ISO | |
 |  | |
f5.6, 100 ISO | f5.6, 160 ISO |
Sony Alpha NEX-6 results : Quality / RAW quality / Noise / RAW Noise
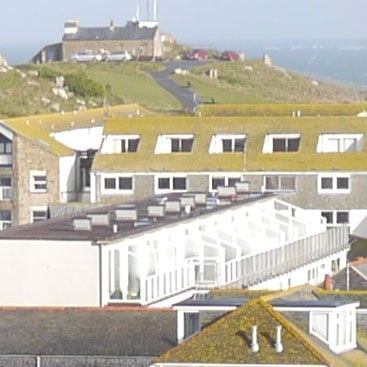
Sony NEX-6 vs Panasonic Lumix G5 RAW quality
|
Sony NEX-6 | Panasonic Lumix G5 | |
 |  | |
f5.6, 100 ISO | f5.6, 160 ISO | |
 |  | |
f5.6, 100 ISO | f5.6, 160 ISO | |
 |  | |
f5.6, 100 ISO | f5.6, 160 ISO | |
 |  | |
f5.6, 100 ISO | f5.6, 160 ISO |
Sony Alpha NEX-6 results : Quality / RAW quality / Noise / RAW Noise
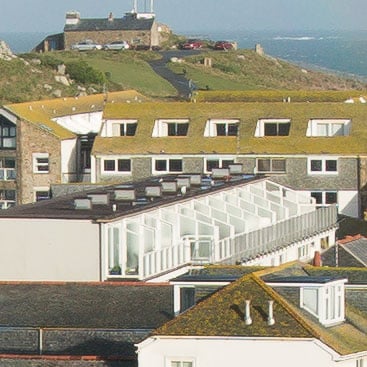
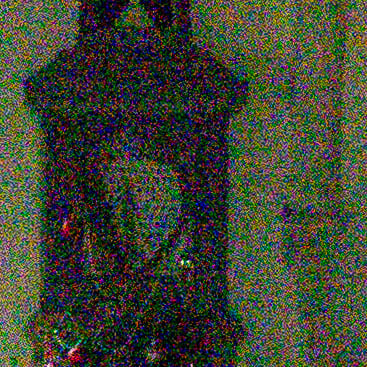
Sony NEX-6 vs Panasonic Lumix G5 Noise JPEG
The image above was taken with the Sony Alpha NEX-6 with the 16-50mm f3.5-5.6 power zoom.. The sensitivity was manually set to 100 ISO and the NEX-6 was set to Aperture priority exposure mode with the aperture set to f4. The metering selected an exposure that would have resulted in underexposure of the church interior, so to achive a better exposure more closely matched to the Lumix G5, I applied 1.3EV exposure compensation, resulting in a shutter speed of half a second. I processed both sets of files in Adobe Camera RAW using identical settings: Sharpening at 70 / 0.5 / 36 / 10, Luminance and Colour Noise Reduction both set to zero, and the Process to 2012 with the Adobe Standard profile. To further reduce any distracting visual differences between the crops I also set custom white balance to 4500K and tint to 0. These settings were chosen to reveal the differences in sensor quality and isolate them from in-camera processing. The high degree of sharpening with a small radius enhances the finest details without causing undesirable artefacts, while the zero noise reduction unveils what’s really going on behind the scenes – as such the visible noise levels at higher ISOs will be much greater than you’re used to seeing in many of my comparisons, but again it’s an approach that’s designed to show the actual detail that’s being recorded before you start work on processing and cleaning it up if desired. These RAW files are further confirmation of the excellent noise performance of the NEX-6’s sensor. As with the JPEGs on the previous page, the base 100 ISO crop shows very little evidence of noise but, in the absence of any noise reduction, straight away at 200 ISO there’s a quite significant difference, with noise texture across the entire crop. Likewise at 400 ISO, there’s another, broadly equivalent rise in noise levels. So, while the noise performance of the NEX sensor at these lower ISO sensitivity settings is very good indeed, the in-camera JPEGs are also getting help from the processing to keep things noise free. At 800 ISO there appears to be a significant increase not just in overall noise levels, but the colour noise particuarly, and it’s that combination that proves difficult to manage for the noise reduction algorithms used for the JPEGs. Despite increasing noise, though, even at 3200 ISO the detail is still there and the text is still readable. Interestingly, the comparison with crops from the Panasonic Lumix G5 shows less of a difference than the JPEGs on the previous page. Certainly up to 800 ISO it’s hard to say there’s a difference in the overal noise levels. The Lumix G5 crops actually look to be sharper with more detail than those from the NEX-6. It’s too close to call at 1600 ISO, but I think past that point the G5 crops look slightly noisier. So, if you’re processing RAW files, there’s very little to recommend one over the other, but Hand-held Twilight mode and the option to add the Multi Frame Noise Reduction App put the NEX out in front when it comes to low-light performance. Speaking of which, check out my Sony NEX 6 Multi Frame Noise Reduction results, or if you’ve seen enough, head over to my Sony NEX-6 sample images to see some more real-life shots in a variety of conditions, or head straight for my Verdict.
|


|
Sony NEX-6 Multi Frame Noise Reduction
The image above was taken with the Sony Alpha NEX-6 with the 16-50mm f3.5-5.6 power zoom.. The sensitivity was manually set to 100 ISO and the NEX-6 set to Aperture priority exposure mode with the aperture set to f4. The metering selected an exposure that would have resulted in underexposure of the church interior, so to achieve a better result I applied 1.3EV exposure compensation, resulting in a shutter speed of one second. The Multi Frame NR shots were also shot in Aperture Priority mode at f4 with the same level of exposure compensation. In practice, the Multi Frame Noise Reduction app works in much the same way as on models where it is a ‘core’ feature. The main difference is that on models like the RX100 it’s selected from the ISO sensitivity menu, on the NEX-6 you select it from the app menu and from thereon in any other settings, like exposure compensation are applied from menu selections within the app, rather than in the usual way. One exception to this is that you can still use the right button on the rear control wheel to change the ISO sensitivity. Looking at the crops, the results from the app are very simlarly to what we’ve seen from Multi Frame noise reduction on other models. At the lower ISO levels there’s really no advantage and all that’s achieved is a slight softening of the detail, but from around 800 ISO up, there’s a marked reduction in noise levels in the MFNR crops compared to the single-frame crops. The maximum impact is achieved at the 1600 to 6400 ISO settings, where the softening is preferable to the increased noise at those sensitivities, but MFNR continues to produce improvements right the way up to the maximum 25600 ISO setting. Now head over to my Sony NEX-6 sample images to see some more real-life shots in a variety of conditions, or head straight for my Verdict.
|


|
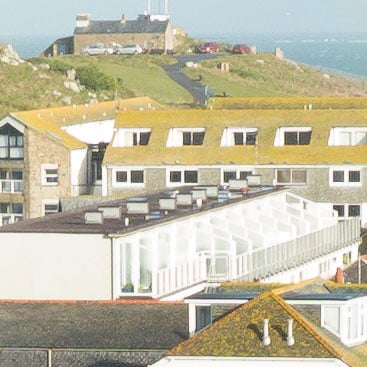
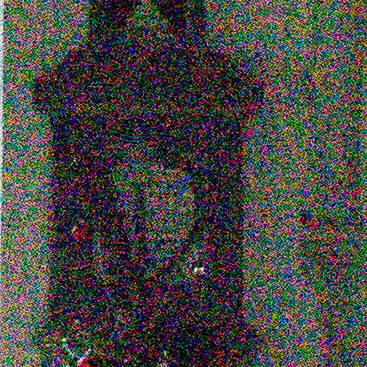
Sony NEX-6 vs Panasonic Lumix G5 Noise JPEG
The image above was taken with the Sony Alpha NEX-6 with the 16-50mm f3.5-5.6 power zoom. The sensitivity was manually set to 100 ISO and the NEX-6 was set to Aperture priority exposure mode with the aperture set to f4. The metering selected an exposure that would have resulted in underexposure of the church interior, so to achieve a better exposure more closely matched to the Lumix G5, I applied 1.3EV exposure compensation, resulting in a shutter speed of half a second. The NEX-6’s 100 ISO crop looks clean crisp, and noise free, which is exactly what you’d expect. You could say the same thing about the 200 ISO crop and the 400 one as well, there’s actually very little difference between them. This will come as no surprise to owners of older NEX models with the 16 Megapixel sensor, the NEX-C3 and 5N, both of which provided virtually flawless results in the low to mid ISO sensitivity range. If you look very closely, particularly at the text, you can in fact see a slight increase in noise, but unless you’re pixel peeping, you’re unlikely to notice any quality difference between the base 100 ISO sensitivity and 400 ISO. At 800 ISO the noise visibly increases so that the finer detail is a little fuzzier and there’s some texture beginning to appear in flat areas of colour, but you still need to be pixel peeping to notice it. It’s fair to say that you could could use any of the sensitivity settings up to 800 ISO on the NEX-6 without giving a second thought to the consequences for noise or image quality. At 1600 ISO there’s quite a significant hike in the noise, bigger than the jump from 400 to 800 ISO. Now, the noise isn’t something even a casual observer would miss, but the overall image quality is still pretty good. Yes, the finer details are beginning to go and edges are softening up, but you can still read the text in the memorial panel and you might even get away with a full sized print from this. At 3200 ISO the noise is now everywhere and meduim sized image detail is beginning to break up. This image still looks very good at smaller sizes though, the contrast, saturation and colour balance are all holding up well. And while the noise levels from 6400 to 25600 ISO look extreme in these 100 percent crops, on a laptop screen they actually look OK. Certainly good enough to try for those must-have low-light shots. The Panasonic Lumix G5, compares very favourably with the NEX-6. The G5’s Four Thirds sensor is slightly smaller then the APS-C sized sensor in the NEX-6 but its 160 base ISO setting, compared here alongside the NEX-6’s 100 ISO crop, looks every bit as good. What’s more, the G5 manages the NEX-6’s trick of keeping the noise at bay as you progress up the sensitivity range. Except that it can’t quite keep up and by 800 ISO it’s looking just a bit noisier. Despite that, it doesn’t lose any more ground and remains close, if a little behind the NEX-6 right through to its maximum 12800 ISO setting. But in addition to a further 25,600 ISO setting, the NEX-6 can boast a Hand-held Twilight composite mode plus, if you’re willing to pay a little extra, the more versatile Multi Frame Noise Reducton app. The final crop shows what the NEX-6 can do in its composite Hand-held Twilight composite scene mode in which it fires a short burst of images and creates a low-noise composite. Or rather, it shows one of the shortcomings of this mode, which is that you can’t select the sensitivity or control the exposure. Whilst the result may be less noisy than the single exposure at an equivalent sensitivity setting, it’s so dark it’s hard to tell. But if you’re willing to part with a few dollars, you can install the Multi Frame Noise Reduction App. See the Multi Frame Noise Reduction results to find out how it compares. To find out how much of a role processing plays in keeping noise at bay in these crops take a look at my NEX-6 RAW noise results page to see just how much noise is present behind the scenes. Or head over to my NEX-6 sample images to see some more real-life shots in a variety of conditions.
|


|