Sony Alpha DSLR-A550
-
-
Written by Gordon Laing
Sony Alpha DSLR-A550 design, controls, screen and live view
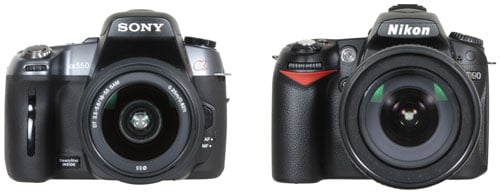
Sony has sensibly gone for a more traditional shape with the Alpha A550, following the somewhat unusual body of the earlier A230, A330 and A380 models with their uncomfortable sawn-off grips. The A550 is still clearly identifiable as a Sony DSLR though, with a relatively chunky body and familiar control system. We’ve pictured it below alongside Nikon’s D90, a DSLR which may predate it by a year, but which is still likely to be one of its biggest rivals. Both bodies cost roughly the same at the time we wrote this review and are targeting the same upper mid-range market. The D90 kit price is higher thanks to a longer and classier lens.
| ||||||
 |
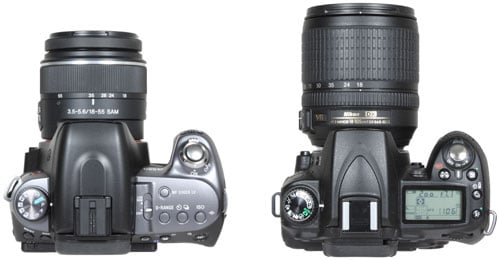
Measuring 137x104x84mm, the Alpha A550 is comfortably larger than the Alpha A380: 9mm wider, 7mm taller and a considerable 13mm thicker. It’s also comfortably larger than any of its closest rivals: 8mm wider, 6mm taller and 22mm thicker than Canon’s EOS 500D / T1i, 10mm wider and 4mm thicker than Nikon’s D5000, and 5mm wider, 1mm taller and 7mm thicker than Nikon’s D90. Much of the thickness is due to the articulated screen and built-in stabilisation, although it should be noted the Olympus E-620 also features both while coming in noticeably smaller overall at 130x94x60mm.
In terms of weight, the Alpha A550 is also heavier than most rivals at 677g including battery. Compare that to the Olympus E-620 at 521g, the Canon EOS 500D / T1i at 530g and the Nikon D5000 at 611g, all including batteries. Of this group, only the Nikon D90 body is heavier, and just by a mere 23g. Add their respective kit lenses though and there’s bigger differences with Nikon’s D90 coming in heaviest thanks to its DX 18-105mm VR adding 420g to the overall weight, albeit of course with almost double the telephoto length of the others. The A550 with battery and DT 18-55mm SAM kit lens weigh 887g in total.
 |
When comparing the bodies (plus batteries) alone though, the A550 (like other Alpha bodies) is larger and heavier than most of the competition – although actually feels quite light in your hands thanks to a relatively low density. The thick body and fair-sized grip certainly gives your right hand plenty to wrap around, although those with smaller hands may find Canon’s EOS 500D / T1i or the Olympus E-620 more comfortable to hold. While the A550’s grip and thumb rest allow you to hold the body securely, we ultimately preferred Nikon’s ergonomics with the hooked inner grips of the D5000 and D90. But it’s still a big improvement over the ergonomically disastrous sawn-off grips on the A230 / A330 / A380.
The A550’s build quality is roughly similar to the Canon 500D / T1i, Nikon D5000 and Olympus E-620, but the Nikon D90 feels like a step-up over all four. Sony’s also opted for a smooth and shiny finish over much of the A550’s body which can’t help but give it a cheaper plasticky appearance, as oppose to the mottled matt finish of the D90. Again it’s all down to personal preferences, but the D90 looks and feels to us like a more serious camera, despite sharing roughly the same body price as the A550.
The controls share a similar strategy to the recent A230 / A330 / A380 over the original Alpha models, with large, clearly labelled buttons, and lesser-used options like SteadyShot sensibly relocated to the menus.
 | 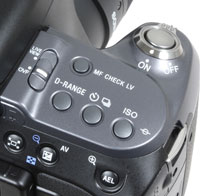 | |
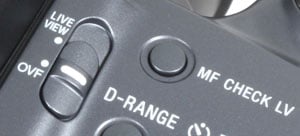
The main mode dial remains on the upper left surface, although unlike the A230 / A330 / A380 it’s not recessed. The mostly bare upper right surface of the entry-level models is also now home to a number of large buttons offering direct access to the D-Range Optimizer, Drive modes and Sensitivity, along with one which fires-up the new Manual Focus Check Live View mode. These join the Live View / OVF switch of the A330 and A380 models, along with a similar shutter release with rotary power switch. There’s a finger dial facing-out at the front of the grip, but no separate thumb control.
Turing to the rear, the A550 unsurprisingly features more buttons than the entry-level models: in the upper left corner are Menu and Display buttons and to the right of the viewfinder are buttons for the Teleconverter (digital zoom in Live View), exposure compensation and exposure lock.
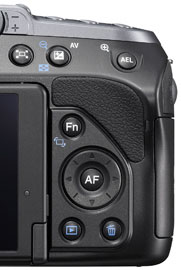 |
To the right of the screen are the same Function, Play and Trash buttons of the entry-level models (albeit with the latter pair now side-by-side), and an eight-way rocker with an AF button in the middle. Since there are now dedicated buttons for the sensitivity, drive mode and display (albeit not one for the flash), the rocker is freed-up for navigation or selecting the AF point in the Local AF area mode. The Function button provides access to a wide variety of settings and we’ll detail these later on this page.
The buttons on the rear all fall within range of your thumb – at least when holding the camera with two hands – although we couldn’t easily reach the dedicated buttons on the upper surface without first tilting the body. Since there’s no upper screen (unlike the Nikon D90), this means you’ll be tilting the body to reach these buttons before tilting it back again to adjust them on-screen.
It’s a minor quibble and one which may not be relevant to those with bigger hands, but important to note many of its rivals (including the entry-level Alphas) have these controls alongside the screen, allowing potentially quicker adjustment. Of course, this complaint only applies when framing with the optical viewfinder; if you’re using Live View with the screen tilted upwards, it’s not an issue at all. Interestingly this is one of several aspects where the A550 appears to pay greater attention to operation in Live View than with the traditional viewfinder.
Finally, despite its higher-end aspirations, the A550 (like the entry-level Alphas) still does not feature an optical depth-of-field preview button. As for the cheaper Alpha A500, it’s externally identical to the A550.
Sony Alpha DSLR-A550 flash
 |
| ||

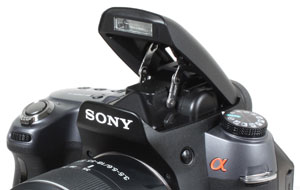
The Alpha A550 is equipped with a popup flash and like the recent entry-level models, Sony’s learnt from previous mistakes and hinged it much further back, allowing it to raise to a decent height – around 60mm above the top of the lens mount to match Canon’s EOS 500D / T1i. The flash itself is also slightly more powerful than the Sony entry-level models with a Guide number of 12, only a tad below the 13 of the Canon.
The flash pops-up when required in Auto modes, or can be popped-up manually using a button to the side of the head. Annoyingly though, rather than simply using this button to adjust the flash mode, you’ll need to enter the Function menu and scroll down to the flash options there.
Once selected, you can choose flash off, Auto, Always-on, Slow Sync, Rear Curtain or Wireless options. The flash is also flickered for AF assistance, although this can be disabled if preferred.
On top of the A550’s head you’ll find a hotshoe for an optional flashgun and like other DSLRs at this price-point, there’s no PC sync port for external lighting. The A550’s flash synch speed is 1/160 whether you’re using SteadyShot or not.
Sony Alpha DSLR-A550 viewfinder
The Sony Alpha A550 is equipped with a penta-mirror optical viewfinder with 95% coverage and 0.8x magnification. The magnification is an improvement over the paltry 0.74x of the entry-level Alphas which results in a slightly larger apparent image size through the viewfinder.
Canon’s EOS 500D / T1i features what sounds like a comfortably bigger 0.87x viewfinder magnification, but when its sensor dimensions are taken into account, it only works out fractionally larger – certainly not visibly so. Likewise for the Nikon D5000 which comes up fractionally smaller. But Nikon’s D90 delivers a noticeably bigger apparent image through its viewfinder with 0.94x magnification, not to mention slightly broader 96% coverage.
Another point worth noting is the D90 is equipped with a penta-prism viewfinder, as oppose to the penta-mirrors of the A550, 500D / T1i and D5000. This may add weight to the body, but also delivers a brighter image through the viewfinder. If you’re into composing with the viewfinder and manual focusing, you’ll definitely find the D90 preferable in this regard.
The reason the A550’s viewfinder has a relatively low magnification is because Sony’s squeezed an additional sensor in there in order to deliver its innovative Live View system (described below). This also physically prevents the use of a penta-prism. If you want Sony’s quick and fuss-free Live View system, then it’s a compromise you’ll just have to live with, although again at least the magnification is better than the entry-level Alphas and now becomes roughly equivalent to most rival DSLRs.
 |
Running below the frame in the A550’s viewfinder is the same basic exposure information as the entry-level models: aperture, shutter speed and an exposure compensation scale, complemented by a five bar scale on the right side indicating how hard the SteadyShot system, is working (if enabled); remember as a sensor-shift system you won’t see the stabilising effect though the viewfinder, so this scale is the only indication of what’s happening behind the scenes. Sadly there’s no indication of the ISO permanently shown in the viewfinder – a shame since most rivals offer this useful information at all times.
The information underneath the frame may be the same as the entry-level Alphas, as are the positions of the nine AF points, but the actual AF indicators have changed. The earlier A230 / A330 / A380 employed traditional focusing screens with etched squares and dots in the middle of each which illuminated red when active. In contrast, the A550 employs a transmissive LCD system, where the AF squares can be made to disappear completely when not in use.
When looking through the A550’s viewfinder, you’ll see all nine AF points indicated by squares, but when the system locks-onto a subject with a half-press of the shutter release, only the active points remain visible. This makes for a much less cluttered view, and crucially for Sony’s unique Live View system which effectively films the focusing screen, it means the AF points are no longer permanently visible. This was a problem facing the A330 and A380, along with the A300 and A350 which preceded them.
The use of a transmissive LCD focusing screen is therefore a neat upgrade for the A550, but there are two downsides to the implementation. First, unlike Nikon’s D90 (and Canon’s EOS 7D), Sony has strangely resisted the opportunity to include other switchable LCD graphics like an electronic alignment grid in the viewfinder. Secondly, and again unlike the D90 and 7D, you can actually see faint horizontal lines connecting each AF square to the side of the viewfinder when pointing at bright flat colours, like the sky or a white wall. The line to each point is only visible when the point itself is active, so once the camera’s focused, most lines will disappear, but they can still be a little distracting for some photographers. It’s yet another aspect where the A550 has been designed more with Live View in mind.
Finally, sensors below the viewfinder automatically switch the screen off when your eye approaches, and like earlier Alphas can also be configured to fire-up the AF system so the camera’s ready for action. Eye sensors are also fitted to the Canon 500D / T1i (albeit only to switch the screen off).
Sony Alpha DSLR-A550 Screen and Live View
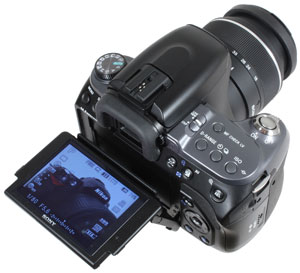 |
The Sony Alpha DSLR-A550 is equipped with a 3in / 920k screen which can tilt 90 degrees up or down for easy composition at high or low angles in Live View. The screen itself matches the 640×480 pixel resolution of models like the Canon EOS 500D / T1i and Nikon D90, although it’s worth remembering Sony was one of the first companies to start using VGA screens on its A700.
VGA screens display much finer detail than typical 230k / 320×240 monitors, and while this won’t improve the quality of your final image, the extra detail sure looks nice when composing in Live View or playing back images, not to mention allowing smoother fonts and graphics for the menus. The screen resolution is also one of the few differences between the A550 and its more affordable sibling, the A500. Both screens are 3in sized and both also share the same tilting mount, but the resolution of the A500’s panel is a more conventional 230k, or 320×240 pixels.
In use the A550’s screen is fairly vibrant and viewable in bright light, although its shiny surface is quite susceptible to finger prints – and these can become quite distracting with direct sunlight shining on the screen. A small sensor in the lower right corner of the screen measures ambient conditions and adjusts the brightness as necessary. If preferred, you can manually set the screen brightness by +/-2 levels, to avoid any exposure surprises from the default automatic adjustments.
Like the A330 and A380 models, the A550’s screen is mounted on an adjustable platform which allows vertical adjustments. Where the A330 and A380 could either face directly up or tilt down by 55 degrees though, the A550’s screen can face directly up or directly down, the latter making it as easy to frame over-head at high angles as it is at waist-level or low angles. While this system doesn’t offer the same degree of flexibility as the fully-articulated monitors on the Nikon D5000, Olympus E-620 and Panasonic G1 / GH1 which can twist round to face the subject or even back on themselves for protection, it still allows you to shoot more comfortably at high or low angles in Live View than cameras with fixed screens – like the Canon EOS 500D / T1i and Nikon D90.
It’s also worth noting the A550 becomes the first DSLR to feature an articulated screen with a 3in / 920k panel. Nikon’s D5000 and the Olympus E-620 both have smaller and lower resolution 2.7in / 230k screens, while the biggest and most detailed articulated screen up to this point had been the 3in / 460k monitor on Panasonic’s G1 and GH1. So a respectful nod to Sony for delivering size, detail and articulation, albeit only in the vertical axis.
 |
| ||

Sony’s equipped the Alpha A550 with not one, but two Live View systems. The primary system employs a secondary sensor located just above the optical viewfinder in the penta-mirror chamber. A small mirror within this chamber can be used to direct the light either through the optical viewfinder, or to this sensor to provide a live feed to the screen.
The really clever part is the Live View switch (on the upper right surface of the body) doesn’t just tilt this internal mirror, but also closes a shutter in the optical viewfinder during Live View to prevent stray light from entering. It’s mechanical and as such even works when the power’s off.
It’s also very quick in operation. With traditional Live View systems, we’ve become used to the sound of the main mirror and shutter opening, not to mention the small delay before the live image appears. But with the A550 (and the A380 / A330 before it), Live View is quietly activated about a second after pushing that switch. And better still, because the traditional phase-change AF system isn’t being bypassed, the camera will autofocus as quickly in Live View as it does when you’re composing with the optical viewfinder – and unlike most other Live View systems you’ll also be able to use continuous autofocus to track moving subjects – see the AF and Continuous shooting sections for more details on using this in practice.
When using this primary Live View mode the A550 displays the nine AF squares over the image with basic exposure information running below the frame, while pressing the Display button cycles through a choice of additional details superimposed over the image. In this respect it’s the same as the A380 and A330 before it, and like those cameras, the A550 is essentially just filming its main focusing screen. The big difference though is the AF squares are now LCD-driven and can be switched-off to become invisible when not required. Of course should you scratch the focusing screen or have a hair settle on it, these will also become visible in Live View, but at least you no longer have the nine AF squares etched into the A330 and A380’s focusing screens permanently in the way.
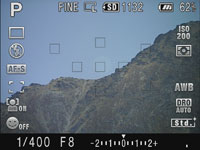 | 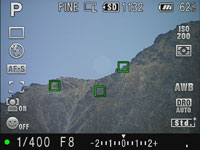 |
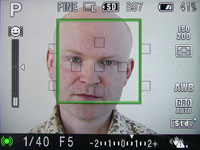
Like the viewfinder, you’ll see squares for all nine AF points when composing, but when the AF system locks-onto a subject with a half-press of the shutter release, only the active points remain visible, this time indicated with a green square. Setting the lens (not the body) to MF will make all but the centre point disappear.
The primary Live View system also supports face detection and Sony’s Smile Shutter mode which actually waits until the subject looks sufficiently happy before taking a shot. Smile Shutter is about as gadgety as it gets, but is surprisingly fun and effective in use, while also allowing you to adjust the sensitivity in case your subjects favour demure smiles over big toothy grins. You can see a demonstration in our Sony A550 video tour.
Face detection on the A550 is also very quick thanks to the camera using its phase-change AF system. This makes it much more usable in practice than the slow contrast-based face detection on other DSLRs – indeed the A550 is the first DSLR which offers face detection with a phase-change system.
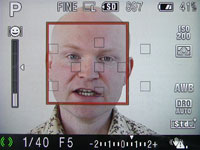 |  |
There is however one caveat, and that’s a necessity for the face to fall over one of the nine fixed AF points before the camera will focus on it. As a consequence, the face detection process can be slightly misleading as while you’ll see white squares happily track faces across the entire frame, the A550 will only focus on them when they fall over one of the AF points. You’ll know when this is possible because the white square around the face will turn orange. Half-press the shutter release without an orange square and the camera will simply use the closest AF point instead, which may not be in the correct plane of focus for the desired face.
To be fair, we’ve all successfully taken photos of people using a fixed AF point system, and it has to be said you’ll need a distant subject at the very edges of the frame to prevent their face from falling over one of the AF points. So while the phase-change face detection won’t absolutely focus on a face anywhere on the frame like a contrast-based system can, the sheer speed of operation and relatively high hit-rate make it more usable overall.
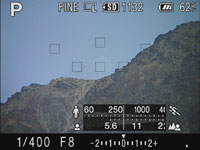
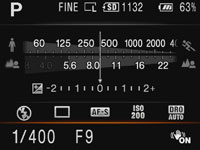
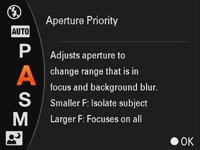
Pressing the DISP button cycles between four views with various details super-imposed over the main image. First a beginner-friendly view with graphical scales indicating both the shutter speed and aperture. The shutter speed scale has icons of a still person on the left and a runner on the right, while the aperture scale has icons of a person on a blurred background on the left and a sharp background on the right, explaining their impact on the final image.
 |
|
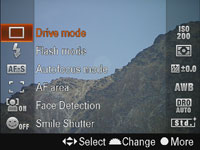 |
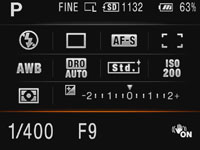
Press the DISP button again and the scale is replaced by icons running down the left and right sides indicating a variety of settings: on the left are the drive, flash and AF modes, AF area, face detection and smile shutter modes, while on the right are the sensitivity, metering mode, flash compensation, white balance, DRO mode and Creative Style. Pressing the Fn button highlights one of the settings after which you can press the AF button in the middle of the rocker to directly adjust it, or move the highlighter to a different option – we’ll detail this lower on the page.
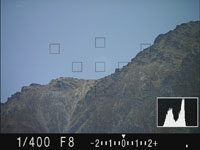
Press the DISP button a third time and you’ll see a simple histogram in the lower right corner. Press DISP a fourth time and all superimposed graphics disappear, leaving a clean image with only the basic exposure details running underneath.
You’ll note there’s still no alignment grid option in the primary Live View system which seems a shame now the LCD AF squares no longer get in the way – but all is not lost as we’ll explain in a moment.
 |
 |
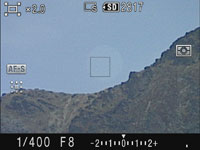 |
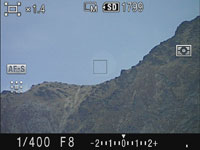
Finally, like the A330 and A380 before it, the Teleconverter button can magnify the image first by 1.4 times, then by 2 times. This isn’t to check the focusing though. It’s acting like a digital zoom to deliver images at the A550’s Medium and Small resolutions of 7.4 and 3.5 Megapixels respectively. Unlike those models, the A550’s VGA screen is also less forgiving on the detail captured by the primary Live View sensor, as the image becomes fuzzier during composition with the Teleconverter; at least you don’t get the A330 and A380’s magnified view of all nine AF squares when using the Teleconverter on the A550 though.
The primary Live View system also has several other issues. By using a secondary sensor to deliver the live feed, what you see on the screen is not absolutely what you’re going to get when you take the photo. Traditional Live View systems, which use their main sensor to deliver the feed, can show 100% coverage, while the A550’s Live View only shows 90% on-screen – that’s even less than the 95% of the optical viewfinder, so you may be surprised to capture more than you bargained for. It’s also lacking the highly magnified 1:1 views to confirm precision manual focusing and avoid errors with the phase-change system. And as discussed earlier, that clever optical system in the penta-mirror chamber also has a negative impact on the optical viewfinder magnification.
|
|
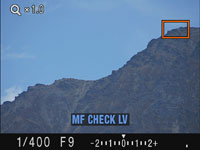
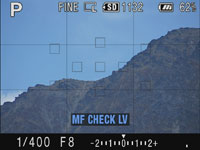
But hang on, we mentioned not one, but two Live View systems earlier. Unlike the A330 and A380 before it, the A550 now offers an alternative ‘MF Check LV’ mode, complete with a dedicated button on its upper right surface.
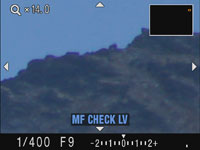
Press this and the mirror flips-up and the shutter opens to reveal a live image generated by the main sensor itself. Unlike the main Live View system, this delivers 100% coverage, an optional alignment grid, and crucially, the option to magnify the view by 7 or 14 times to confirm the absolute focusing.
 |
 |
 |
 |
 |
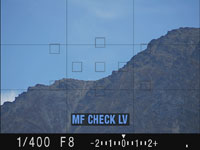 |
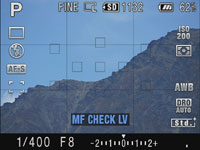
Pressing the DISP button now cycles through three views: the first with basic information running along the top, the second showing the settings icons running down either side, and the third clearing these details for a cleanish view. We say cleanish because the nine AF squares are still always shown, which seems even more odd now the focusing screen is no longer in the light-path; it would have been nice if these could have been switched off entirely with the DISP button, although again some relief can be had by switching the lens (not the body) to Manual Focus, after which you’ll only see one AF square in the middle. Note there’s no live histogram option in this second Live View mode, nor face or smile detection.
| 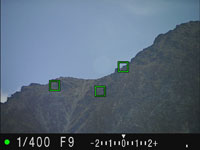 |
This second Live View mode may also be labelled MF for Manual Focus, but it still offers autofocusing capabilities. Sony’s resisted a contrast-based option though, with the A550 instead continuing to rely on its traditional phase-change AF system. Annoyingly for a user-friendly camera, a half-press of the shutter release won’t do anything in this mode, so you’ll need to press the AF button instead. This temporarily flips the mirror down, briefly interrupting the image to take an AF reading, before lifting again to continue the live feed. Like other phase-change Live View systems, this process sounds like a couple of photos have just been taken. Once the image returns and the lens has locked-on, you’ll see the active focusing points again indicated in green with the others disappearing from view.
In use the primary Live View system is much faster in operation. It starts more quickly, auto-focuses much faster and also supports continuous AF for tracking a subject, not to mention quick face and smile detection. It’ll be the Live View mode most people will use with the A550 for general photography, but it’s great to now have an alternative option which uses the main sensor to absolutely confirm the focusing and coverage.
Sure we could complain about the lack of an alignment grid on the primary system and the absence of a depth-of-field preview on either mode, not to mention a slightly compromised viewfinder experience as a result of Sony’s implementation, but it really seems churlish when the A550 arguably delivers the best of both Live View worlds. If you’re into framing with the screen, you’ll love the A550.
As a postscript, it’s revealing to note this dual Live View system is in effect the same as Olympus offered all those years ago with the E-330, although this model split the light path to feed its secondary sensor, resulting in a dimmer viewfinder. Either way, the E-330 was clearly a pioneering camera, influencing others to this day.
Sony Alpha DSLR-A550 shooting information and menus
Like most DSLRs, the Alpha A550 uses its main colour monitor to display all shooting information, and following previous Alphas, these details rotate by 90 degrees clockwise or anti-clockwise when you’re holding the camera in a portrait orientation; it’s a nice feature which means the text is always upright.
 |
 |
|

The Alpha A550 offers the choice of two presentation styles for its shooting information, selected by the DISP button. Pressing this button a third time switches the screen off, although the A550 can automatically do this as you bring your eye to the viewfinder.
Like the A230, A330 and A380 before it, the first style employs a graphical approach to help DSLR beginners better understand the relation the aperture and shutter have on the image. Sandwiched between a row of shooting information at the top and two along the bottom are a pair of graphical wedges representing the shutter speed and aperture scales, with icons at each end indicating what impact they’ll have on your photos. The shutter speed scale has an icon of a still person on the left side representing slower exposures, while on the right side is an icon of a person running representing quick exposures.
In a similar style, the left side of the aperture scale with the smaller f-numbers shows an icon of a sharp person with a blurred mountain behind them, while on the right side with the bigger f-numbers is an icon where both the person and the background are sharp. Both graphically illustrate which end of the scale you’ll need to use to achieve these effects without having to explain depth-of-field or shutter speeds.
Sony’s also tweaked the graphics over the entry-level models so the scales scroll as the exposure is updated, while a vertical line through both indicates the effect of exposure compensation. The details are also finer thanks to the VGA screen. Overall, the idea behind the scales may be the same as the A230, A330 and A380, but the implementation looks much classier here, and again the whole presentation rotates as the camera’s turned on its side. More experienced users can press the DISP button to lose these graphics and fill the space with larger icons and additional shooting information.
Unlike most rival models, Sony’s continued to resist the temptation to highlight these icons on-screen for direct adjustment, and instead offers its Function menu, accessed by pressing the Fn button. But this has become considerably more sophisticated than the entry-level Alphas. Where the A230, A330 and A380 simply divided the screen into six areas to adjust the six most common settings, the A550 offers a wider variety of settings running along columns on the left and right side of the screen, with a helpful explanation of each in the middle.
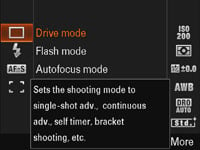 | 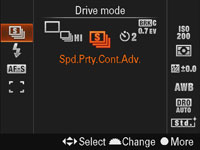 |
On the left side are icons for the Drive, Flash and AF modes along with the AF area options, while on the right are those for the Sensitivity, Metering, Flash Compensation, White Balance, Dynamic Range Optimizer and Creative Style. One of these icons will already be highlighted orange, allowing you to directly adjust it using the finger dial, or press the centre button on the rocker to bring up a dedicated menu instead. Alternatively the rocker can be used to highlight other icons to adjust those settings instead.
This broader choice of settings is an improvement over the entry-level Alphas, and to be fair to Sony, the system actually involves the same number of button presses as Canon’s, where you first need to push a button or joystick to start highlighting options.
But where the Sony system falls down a little is in consistency of presentation. Rival systems fill their screens with icons, and allow you to directly highlight and adjust the desired one. In contrast, Sony’s system may start with a similar screen-full of icons, but before letting you highlight and adjust them, they’re redesigned and forced to run down the left and right sides as if keeping the centre free for something more important. While the A550 uses this space for explanations along with a curved row of icons as you turn the finger dial, the redesign is primarily to make room for the image in Live View, where the two columns of icons are superimposed over the frame.
What previously looked a little uncomfortable makes much more sense with a live image behind it. This presentation is also more consistent in Live View as one of the display options shows the same icons running down the sides, ready to be highlighted and adjusted at a press of the Fn button. Once again it’s another aspect of the A550 which looks and works best in Live View rather than when composing with the optical viewfinder.
 | 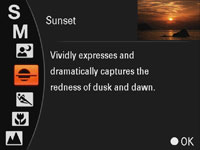 |
On the upside, the text-based explanations of highlighted options are helpful, and there’s also an explanatory page when changing the main shooting mode.
These make the A550 very approachable for beginners, although more experienced users can switch them off if preferred.
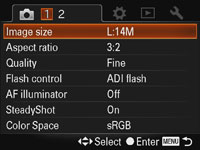
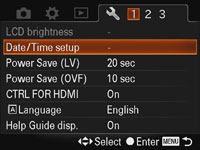
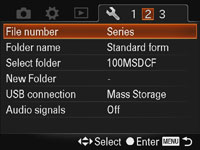
For all other settings you’ll need to dive into the main menu system, divided into seven tabbed pages which don’t scroll: two for Record, one for Setup, one for Playback and three for Configuration. These menus are essentially unchanged from the entry-level Alphas, albeit looking nicer thanks to the higher resolution screen, and while this again makes them approachable for beginners, more advanced owners may miss the degree of customisation offered by other cameras at this price-point, not to mention that of the earlier A700.
 |
 |
 |
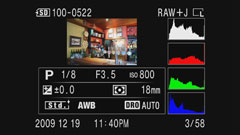
In playback you can switch between a clean view of the image, one overlaid with basic shooting information, and a thumbnail view with flashing highlights alongside red, green, blue and brightness histograms; the details look great on the VGA screen, although the earlier A700’s view with five tiny thumbnails of previous images running along the top is unavailable.
At least taking a closer look at images during playback is easier than the entry-level Alphas thanks to separate buttons for zooming-in and zooming-out. For images taken at the A550’s full resolution, the maximum zoom in playback is 14x, which almost corresponds to a 200% view. This allows you to very easily check focusing, although for a pin-sharp 1:1 view on the screen, you’ll need to step back to around 7x. Pressing the Fn button during playback allows you to rotate images if desired, with slideshows activated from the main menu system. All the menus in this review were grabbed over HDMI using an Intensity Pro card, although during playback, the signal formats itself to the 16:9 aspect ratio, hence the wider images below.
 |
 |
 |
In a missed opportunity, given the built-in orientation sensors and rotating shooting information, portrait images still don’t turn to fill the screen when the camera’s rotated by 90 degrees – shame.
Sony Alpha DSLR-A550 Battery and connectivity
|

Prior to the A230, A330 and A380 models, all Sony Alpha DSRs were powered by the same NP-FM500H Info Lithium battery pack. The A230, A330 and A380 broke from this tradition by using the company’s smaller and lower-powered NP-FH50, which resulted in shorter battery life, not to mention an inability to show the exact charge remaining.
 |
We’re therefore pleased to report the Alpha A550 returns to the original NP-FM500H which boasts almost double the capacity of the NP-FH50, while also allowing the camera to indicate its remaining charge as an exact percentage. Sony estimates a full charge is good for around 950 images composed with the optical viewfinder or 480 in Live View; the former figure is almost double that of the A380.
Enthusiasts will also be pleased to learn that unlike the entry-level models, there’s an optional battery grip available for the A550: the VG-B50AM can accommodate two NP-FM500H packs, doubling the battery life while also providing portrait controls. This puts the A550 in line with the Canon EOS 500D / T1i, Olympus E-620 and Nikon D90, all of which also offer battery grips; the Nikon D5000 is the only one of the A550’s main rivals which does not offer a battery grip, at least from Nikon anyway.
 | 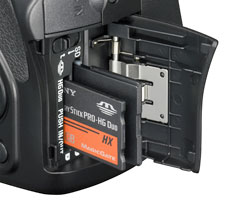 | |
Like the A230, A330 and A380 models, the A550 can take either SD or Memory Stick Pro Duo cards. Unlike the entry-level Alphas though, the card slot is more conventionally located on the right hand side of the body, but there’s still a switch to select the desired media type. Note like the entry-level Alphas, the A550 is unable to write to both cards at the same time.
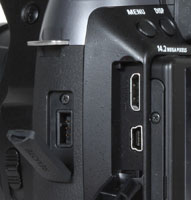
On the left side of the body you’ll find two thin flaps: behind one is a port for the optional RMS1AM / RM-L1AM remote commander, while behind the other are a standard USB port and a mini HDMI port. Following the entry-level Alphas, there’s no standard analogue TV output, so if you have an older (or cheaper) set without HDMI, you won’t be connecting the A550 to enjoy any slideshows. Finally, behind a small flap on the right side of the body is a DC input.
Now let’s take a look at the A550’s features, including the lenses, stabilisation, sensor, image processing and drive modes.


