If you're looking for a mirrorless camera that's great at sports and action shooting, as well as delivering superb video, look no further than Sony's Alpha A6000 series. There's three models, the original A6000, the recent A6300 (which adds 4k video, weather-proofing and even better AF), and the latest A6500 (which takes the A6300 and adds a touch-screen and built-in stabilisation). All three are great choices, but if you don't need 4k video or weather-proofing, the original A6000 is simply hard to beat for value. It packs a 24 Megapixel APS-C sensor, electronic viewfinder, tilting screen, Wifi with NFC, 1080p movies up to 60fps and a hotshoe / accessory mount into a tiny body. Most exciting of all is the hybrid AF system which embeds phase-detect AF points across almost the entire sensor area, allowing it to confidently track fast-moving subjects wherever they may be
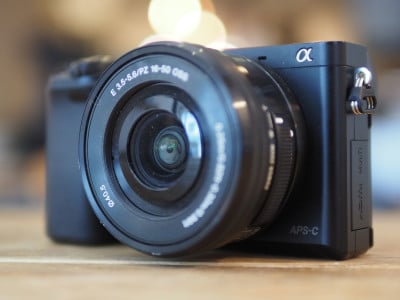
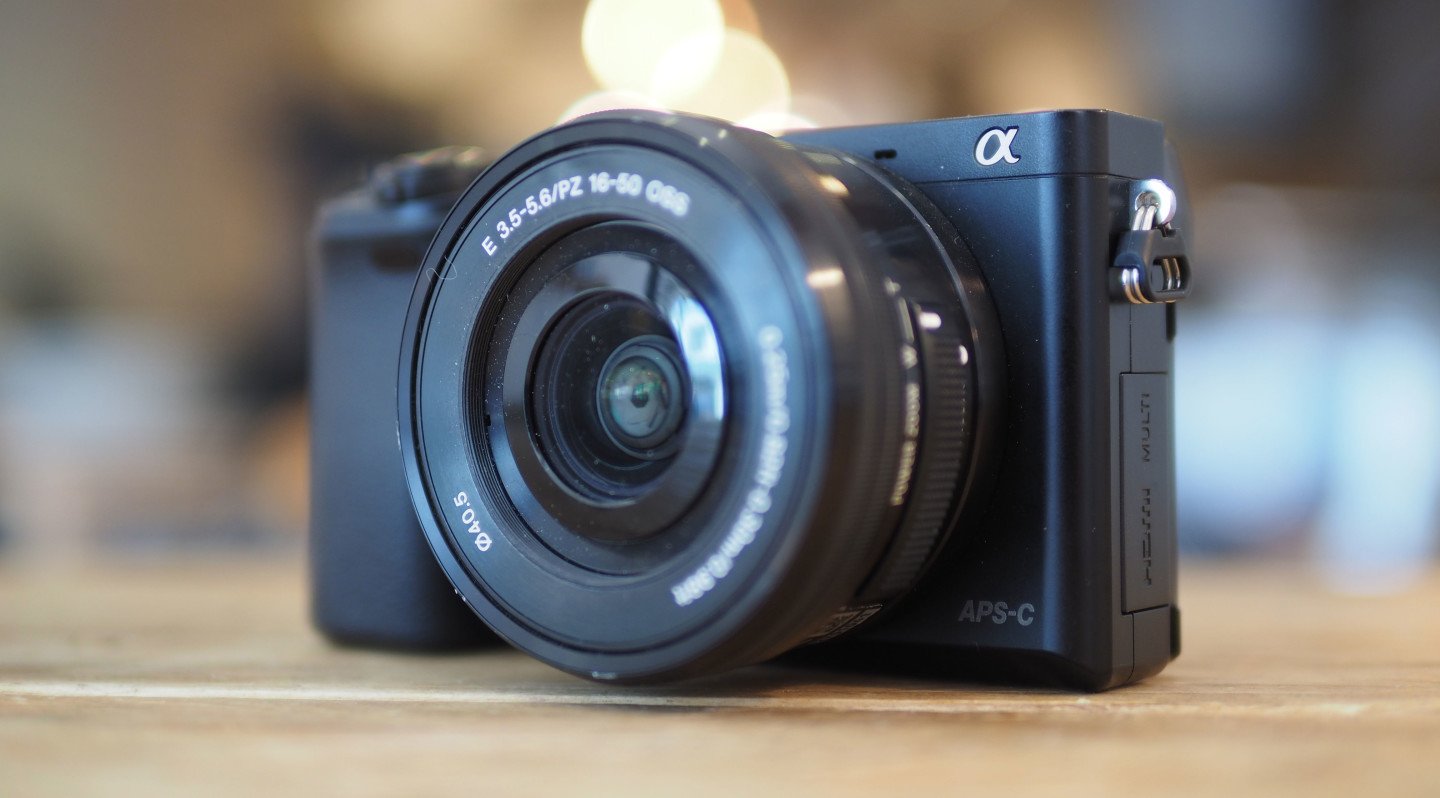
Sony Alpha A6000 review
-
-
Written by Gordon Laing
Intro
The Sony Alpha A6000 is a mid-range mirrorless camera with an APS-C sized sensor. Announced in February 2014 and positioned between the NEX-5T and Alpha A7, it’s officially the successor to the NEX-6, although in some respects it could also be seen as an update to the NEX-7.
The A6000 sports a new 24.3 Megapixel APS-C CMOS sensor with gapless microlenses and photosites which are angled inwards towards the corners. It features a hybrid AF system which combines a 25 area contrast-based system with 179 embedded phase detect AF points (up from 99 on the NEX-6), delivering what Sony describes as the World’s fastest AF (so long as you’re measuring Single AF mode for an APS-C camera).
It also features a 1.4 million dot / SVGA OLED viewfinder, a tilting 16:9 shaped screen, 1080p video at 24p / 60p for NTSC or 25p / 50p for PAL regions, Sony’s latest BIONZ X processor which allows 11fps continuous shooting with continuous AF, a built-in flash, no fewer than seven buttons which can be customized, and built-in Wifi with NFC. The A6000 also supports Sony’s downloadable PlayMemories apps which in 2014 will include new Star Trail and Sync to Smartphone apps. It’s an impressive specification for a mid-range system camera but as always up against tough competition from the likes of the Olympus OMD EM10 on the mirrorless side and the Nikon D5300 representing traditional DSLRs. Find out if the A6000 is the right camera for you in my review below!
Sony Alpha A6000 design and controls
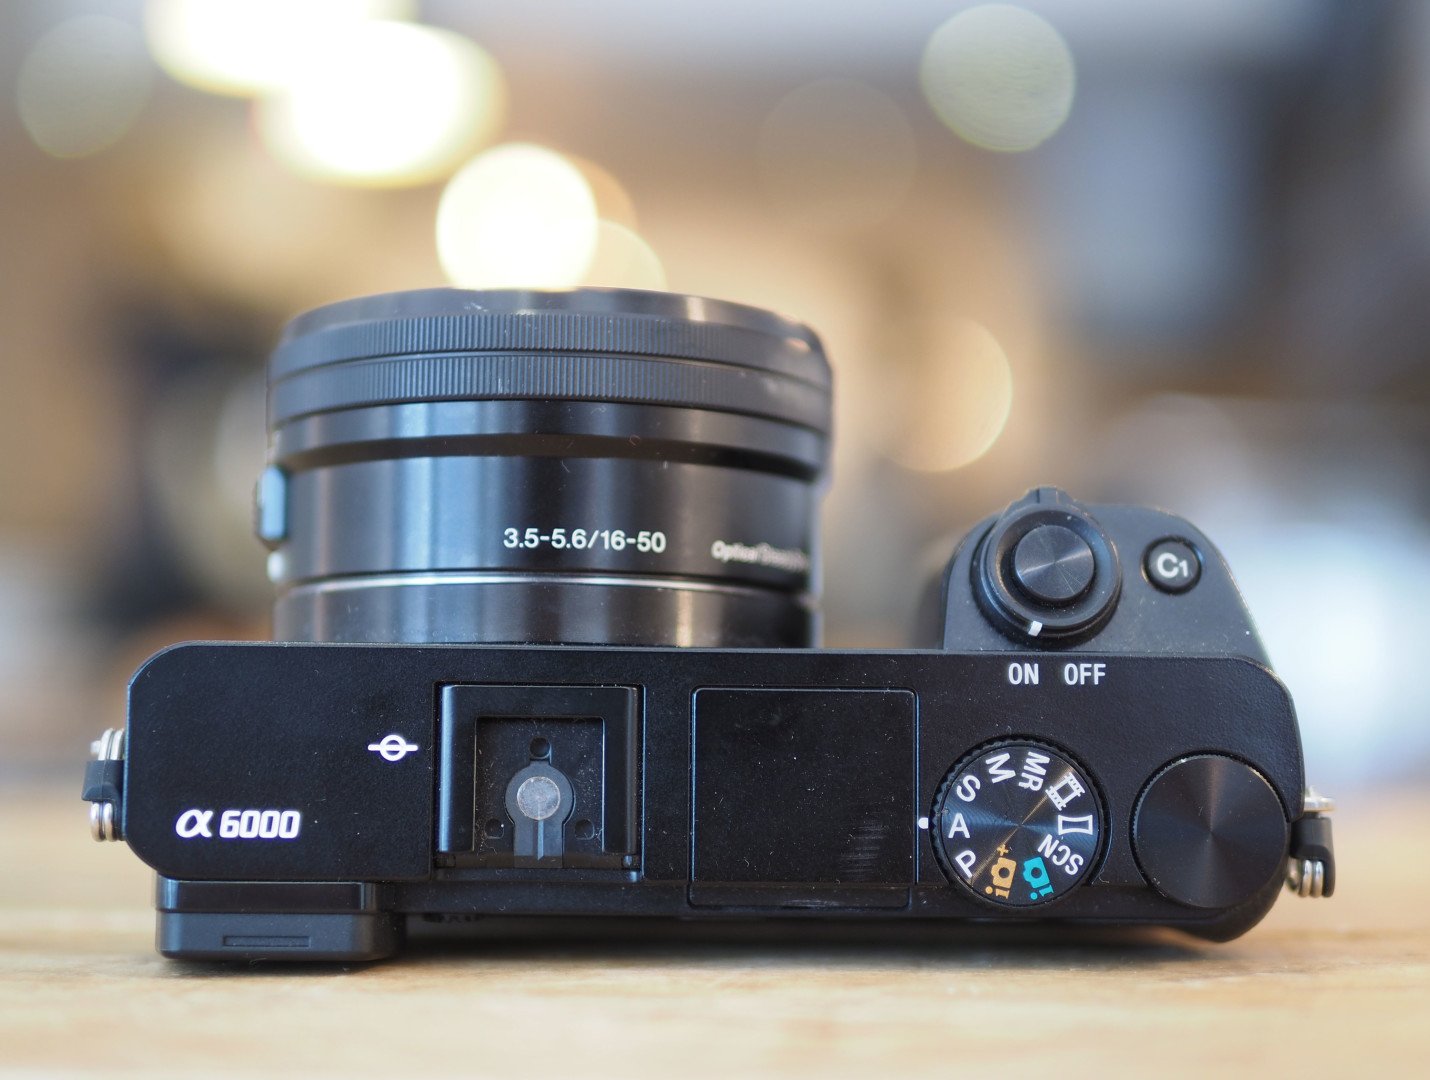
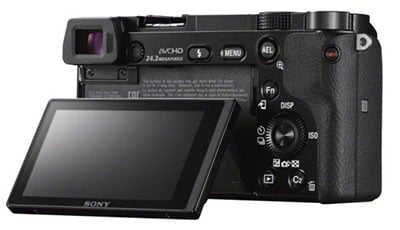
The A6000 looks and feels a lot like the NEX-6 it replaces. Both share essentially the same body shape, with a top panel featuring a popup flash, hotshoe (with accessory port) and the same protruding grip. The main physical difference concerns the control dials: there’s still two on the top surface, one soft and the other a dedicated mode dial, but rather than being on top of each other like the NEX-6, they’re now positioned alongside each other, and flush with the upper surface, more like the NEX-7 in style. Meanwhile, the second control dial, a thumb operated wheel, remains on the rear surface.
With its viewfinder squeezed into the corner, the A6000 enjoys a smooth flat top surface, avoiding the upper bulge of models which adopt a more traditional DSLR-style, like the Olympus OMD EM10. It’s not like the A6000 has a larger body overall either, it’s almost exactly the same size as the EM10, but with the viewfinder head shaved off. For the record, the A6000’s body measures 120x67x45.1mm (34mm without the grip) and weighs 344g with battery. Add the 16-50mm kit zoom and the thickness increases to 65mm and the overall weight to 460g. Note the 16-50mm is one of the smallest lenses in the E system though so if you’re thinking of fitting other lenses, be prepared for a larger and heavier combination than the kit.
In comparison the Olympus OMD EM10 body measures 119x82x45.9mm (38mm across most of the body) and weighs 396g including battery, making it almost the same width and thickness, but taller thanks to the viewfinder head and 52g heavier too. Add the 14-42mm II kit zoom and the thickness extends to 95mm and the overall weight to 509g.
If you’re considering a DSLR at a similar price point, Nikon’s D5300 body measures 125x98x76mm and weighs 530g with battery. Add the 18-55mm VR kit zoom and the weight increases to 725g.
Clearly the A6000 is the smallest, lightest and most portable of the group. It’s not surprising it’s smaller than a traditional DSLR like the D5300, but it is impressive to be more compact than the OMD EM10, and in your hands I wouldn’t say Sony has compromised comfort. The A6000’s grip is much chunkier than the EM10, giving you more to hold onto and feeling more secure for one-handed operation if that’s your thing.
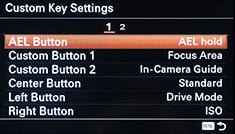
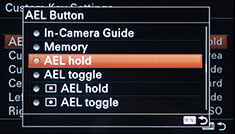
As I mentioned earlier, Sony’s rearranged some of the controls from the NEX-6, separating the mode and soft dials, and also adding a couple of extra buttons. As such the A6000 now sports a mode dial, a finger dial, a thumb wheel and two custom buttons, although in a very welcome move almost all of the buttons are actually now customizable via the menus, including the four-way rocker wheel.
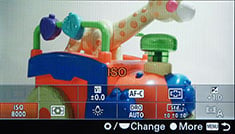
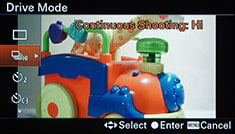
If you leave the camera in its default configuration though, the four-way rocker provides direct access to the display views, ISO sensitivity, exposure compensation and drive modes.
 |  |  |
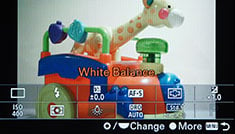 |
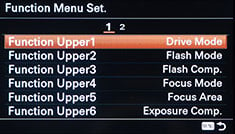
Pressing the Function button fires-up a super-imposed menu over the live image, providing quick access to further settings, by default in Program offering drive mode, flash mode, flash compensation, AF mode, AF area, exposure compensation, sensitivity, metering, white balance, DRO mode and Creative Style. This Function menu is also completely customisable. After the minimal customisation of the earlier NEX-6 it’s great to see you can reassign almost any button along with customise the UI on the A6000.
Sony’s equipped the A6000 with a small but useful popup flash with a Guide Number of 6 at 100 ISO (compare with the EM10’s Guide Number of 8 at 200 ISO and the D5300 of 12 at 100 ISO). There’s also a standard hotshoe with contacts buried at the end to operate as a proprietary accessory shoe. Sony offers the F20M external flash, HVL-LEIR1 video light and XYST1M stereo microphone accessories for the ‘multi-interface shoe’.
Behind a flap on the side of the camera you’ll find two ports, a Micro HDMI (Type D) and a USB port which doubles as another accessory connector. Sony offers the RM-DSLR2 cabled release which connects here. Note there is no standard 3.5mm microphone jack on the A6000, so if you want to upgrade the audio recording you’ll need to go for the XYST1M accessory which mounts on the accessory shoe at the top – not much good if you want off-camera microphone recording, but then the EM10 is in the same boat. The A6000 also offers built-in Wifi with NFC, more of which later in the review.
The NP-FW50 Lithium Ion battery pack is good for 310 shots when using the viewfinder or 360 when using the screen; as an Info Lithium pack, the A6000 can display an accurate percentage remaining on-screen. This is roughly comparable to the Olympus OMD EM10 which can squeeze about 320 images per charge, although if you want more from a single battery you could go for a DSLR and compose with the optical viewfinder alone at which point models like the Nikon D5300 should give you around 600 shots per charge.
The A6000’s battery is recharged in-camera over USB and while Sony supplies an AC-USB adapter, you can use any other USB adapter you have handy, or simply connect the USB cable to a laptop or vehicle port. I know there are those who think in-camera charging is inconvenient, as it of course prevents you from using the camera while the charging takes place, but I personally prefer the convenience of not lugging around countless AC chargers and being able to top up the charge pretty much anywhere I can find a USB port. I rate it as an advantage over those models which employ external chargers. That said if you still hate the idea of charging in-camera, Sony offers an optional external AC charger, the BC-TRW.
Sony Alpha A6000 lenses
The Sony A6000 is equipped with an E-mount, which with the camera’s APS-C sized sensor, applies a 1.5x field reduction to all lenses. At the time of writing Sony offered 15 native E-mount lenses (nine zooms and six primes) with focal lengths between 10 and 210mm (15 and 315mm equivalent); note three of the 15 lenses are variations of the popular 18-200mm though. In addition you can mount any of the five native FE lenses designed for the full-frame Alphas without an adapter, although again with the 1.5x crop factor.
As a mirrorless camera, the A6000 has a short flange to sensor distance which allows you to squeeze in adapters to mount lenses from pretty much any other system, albeit with restrictions on AF and metering. The most capable adapting unsurprisingly comes when mounting Sony’s A-mount lenses via the optional LA-EA4, which offers autofocus via its own SLT phase-detect AF system. If you’re happy with manual focusing and manual exposures though, you can adapt a wealth of other formats including Canon FD, Nikon F, Pentax K, Olympus, Leica M and many more. Once again any lens you mount has its field reduced by 1.5 times.
The Alpha A6000 is typically sold in a kit with the SELP1650 16-50mm f3.5-5.6 Power Zoom lens, the same model introduced with the NEX-6. This is a retractable design which when powered-down collapses to just over 30mm thick. Combined with a light weight of just 116g, this allows the A6000 to enjoy a compact form factor that’s much more portable than when fitted with the earlier 18-55mm kit zoom. The 16-50mm also offers a more useful equivalent range of 24-75mm: the difference between the telephoto (75mm vs 83mm) end is negligible, but at the wide-end, 24mm captures a noticeably bigger field than 27mm. You can see an example of the coverage below.
Sony Alpha A6000 with 16-50mm coverage wide | Sony Alpha A6000 with 16-50mm coverage tele |
 |  |
| 16-50mm at 16mm (24mm equivalent) | 16-50mm at 50mm (75mm equivalent) |
As a power zoom, the 16-50mm enjoys motorised control over its focal length using a slider on the side of the barrel. If the camera is set to AF, the single ring on the barrel can alternatively be used to adjust the zoom. If the camera is set to manual focus this ring switches its function to focusing, leaving the slider as the only means to adjust the focal length.
A motorized zoom allows smooth adjustments of focal length while filming movies, but I found the slider control could often be nudged by mistake as I held the camera, resulting in unexpected jumps in focal length. The ring control was also very sensitive when configured for zooming, causing the lens to lurch back and forth without much finesse, and I also found there was a little too much play when manually focusing.
Shrinking the lens down has also resulted in some optical compromises. At the wide end there’s significant distortion that’s corrected in-camera and by compatible RAW converters (including recent versions of Photoshop and Lightroom), but the image quality looked a little soft and lacking bite throughout the range. I also found I needed to stop the lens down to f8 to avoid any softness towards the edges at any focal length, which in turn often meant shooting with slower shutter speeds or higher ISOs than I wanted.
In short, while the 16-50mm offers a portable configuration for the A6000, it’s not the World’s best lens by a long margin. If you want to avoid its distortion, softness and enjoy the potential of the A6000’s 24 Megapixel sensor, you’ll need to fit a higher quality option sooner rather than later, and in most cases that means carrying a bigger, heavier lens. You can see how the 16-50mm performs in my results and sample images pages, and in the former, it’s clear how it’s holding the camera back.
Sony Alpha A6000 viewfinder and screen
The Sony Alpha A6000 employs 100% electronic live-view composition and is equipped with a large viewfinder and a 3in screen which tilts vertically. The A6000’s electronic viewfinder employs an OLED panel sporting 1.44 million dots and a magnification of 0.7x in 35mm equivalence.
1.44 Million dots equates to a panel resolution of 800×600 pixels which is below the 2.3 million dot / 1024×768 resolution of many higher-end mirrorless cameras these days including the Olympus OMD EM1 and Fujifilm XT1, not to mention the earlier Sony NEX 6 and 7. But while the A6000’s panel resolution is a step-down from the model it replaces, 1.44 Million dot viewfinders are becoming the standard for mid-range mirrorless cameras, with the Olympus OMD EM10 (along with the earlier EM5) employing the same resolution.
 |
For me though, resolution is only part of the story. Another important factor in the viewfinder experience is the apparent image size. The A6000’s viewfinder is quoted as having a 35mm equivalent magnification of 0.7x. Compare this to 0.77x for the Fujifilm XT1, 0.74x for the OMD EM1, 0.73x for the NEX-6 / NEX-7, and 0.71x for the Alpha A7 / A7r. It’s smaller than all of them, again including its predecessor, but larger than the 0.58x of the Olympus OMD EM10 and its predecessor, the EM5.
Now to read all those numbers, you’d think the A6000’s viewfinder image was small, and the Olympus EM10’s even smaller, but the reality is both are actually quite large and compare very favourably with most DSLRs at this price point. Look through the A6000 viewfinder in isolation and you’d find it delivers a large and detailed image, just not as big or detailed as the most expensive mirror-less models out there. Admittedly it is less detailed and a tad smaller than its predecessor, the NEX-6, but I’d still rank it as a decent experience.
Another important viewfinder specification is the panel shape and how that relates to the presentation of the image. All the mirrorless cameras mentioned above employ 4:3 shaped viewfinder panels, but only the Olympus and Panasonic models actually have a 4:3 shaped sensor; this means only those models will fill their viewfinders with an active image when shooting in the native and best quality resolution. The Sony and Fujifilm cameras employ sensors with a native 3:2 shaped image, which is wider than 4:3 and therefore needs to be letterboxed in their viewfinders with black bars above and below. This reduces the overall image size, which in turn makes the A6000 and EM10 viewfinder sizes closer than their numbers suggest. View both side-by-side and the A6000’s active image is wider than the EM10 thanks to its greater magnification, but the crop means the image height is actually roughly the same. But where the Olympus has to superimpose all shooting information over the image, the Sony can accommodate many of the basics in the black stripes above and below the active image. I should also note the Sony viewfinder looked a little noisier in very low light than the Olympus, so there’s pros and cons to both.
As for the screen, Sony has fitted the A6000 with a 3in / 920k dot panel that tilts vertically up by 90 degrees and down by about 45 degrees. In this respect it sounds very similar to the OMD EM10 with its 3in / 1040k dot tilting screen, but there are important differences.
The A6000’s screen is actually 16:9 in shape which means the camera’s native 3:2 shaped photos are composed and viewed with black vertical bars running down each side. Meanwhile the EM10’s screen is 3:2 shaped, which means the camera’s native 4:3 shaped photos are also composed and viewed with black vertical bars running down each side. But a 4:3 crop of a 3in / 3:2 screen delivers a bigger image than a 3:2 crop of a 3in / 16:9 screen. Placed side by side, the screen image on both cameras is roughly the same width, but this time the EM10’s is taller for a noticeably bigger view. When the A6000 is shooting 16:9 video, the image naturally fills the screen and looks larger than when shooting stills. In contrast the EM10 has to letterbox 16:9 material, but interestingly the overall image size is only a tad smaller than the A6000 in 16:9.
So when shooting still photos in their native resolutions, the A6000’s viewfinder delivers a bigger image than the EM10, but the EM10’s screen delivers a bigger image than the A6000.
Swings and roundabouts, but the EM10 enjoys one major advantage over the A6000 regarding the screen in my view: it’s touch-sensitive, whereas the A6000’s is not. Now you can argue all day about the merits or otherwise of swiping through and pinching images on playback or tapping menus, but there’s no denying the sheer ease with which a touchscreen can reposition an AF area anywhere on the screen – you just tap on the EM10, along with other Micro Four Thirds cameras, and you’re done. In contrast, repositioning the AF area on the A6000 requires you to enter the Focus Area mode, select Flexible Spot and only then use the tilting wheel to reposition the target. Even if you assign Focus Area to a custom button and never change the mode from Flexible Spot, you’ll still need to laboriously push the rear wheel to reposition it as desired. Had Sony employed a touch-screen, this would have required a single tap, and don’t forget touch-screen haters, you can always turn the feature off if you really enjoy making life more difficult for yourselves.
As you’d expect a sensor can detect if you bring your eye to the camera and automatically switch from the screen to the viewfinder. Annoyingly though this can easily be triggered when shooting with the screen flipped-up and in many situations, especially filming video, I found myself disabling the eye sensor from the menus. It would have been much better if the sensor was temporarily disabled when the screen was flipped-out, as implemented on some rivals. I should also add the screen, using the standard settings, often becomes hard to view in bright conditions, so you may need to manually boost the brightness or choose the Sunny Weather option and accept a lower battery life.
 | 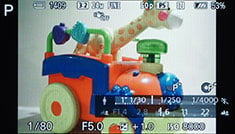 | 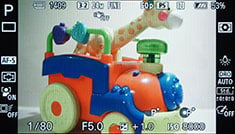 |
Pressing the DISP button cycles through a selection of up to four different information views (for the screen or viewfinder), each super-imposed onto the live image: you can have three different views of the shooting information from detailed to none at all, along with an extra page showing a live histogram although sadly there’s no leveling gauge.
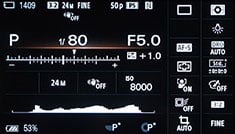 |  | 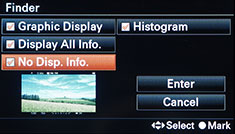 |
The DISP option in the menus lets you choose which of the four views you’d like enabled, and very neatly you can separately configure them for the screen and viewfinder – there’s no restrictions. The main screen also offers an extra view which replaces the live image with a page full of shooting information including a larger live histogram – sadly unlike the full-frame A7 and A7r though, there’s still no leveling gauge. Compare this to the Olympus OMD EM10 which offers both a live histogram and a dual axis leveling gauge.
 | 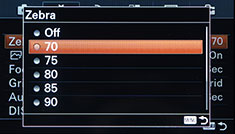 |  |
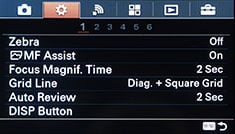
The A6000 also offers a selection of super-imposed guidelines, along with zebra patterns in a range of 70 to 100+ to help identify regions of specific exposure.
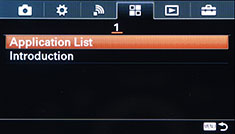
In terms of the menus, Sony has thankfully abandoned the six icon main page which drove the NEX-6 and earlier models and instead equipped the A6000 with a similar tabbed page system to the A7 and A7r. Press the menu button and you’ll be presented with six main tabs at the top, covering main recording options, configuration, Wireless, Apps, Playback and Setup, each letting you access seven, six, two, one, two and six pages respectively. Each page has no more than six options on it and there’s no scrolling vertically.
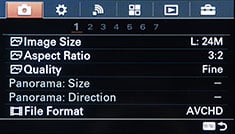 |  |  |
It’s a very welcome improvement over the earlier NEX menus which were unnecessarily laborious in comparison. That said there’s still room for improvement: while browsing pages you’ll notice various options are greyed-out because you have another option enabled somewhere else, for example Picture Effects are greyed-out when shooting in RAW or RAW+JPEG quality, and panorama options are greyed-out unless the mode dial is actually set to Panorama. But surely this is daft. I often change settings in advance of using them, such as various quality options, and I dislike not being able to do this unless I am in the correct mode first.
 |  |  |
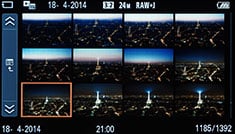
In playback there’s three views: a clean full image, one superimposed with basic shooting information, and a third which shrinks the image to a thumbnail to accommodate additional RGB and Brightness histograms. Annoyingly portrait images don’t rotate to fill the screen during playback when the camera’s turned on its side though.
 |  |  |
On earlier Sony cameras you had to choose whether to view stills or movies during playback, which could get pretty annoying if you wanted to jump from one to another; instead you’d have to select, say, stills, or video from a tab in playback. While this option is still available on the A6000, Sony thankfully now lets you view photos and videos together by default, like everyone else. Phew.
Sony Alpha A6000 shooting modes
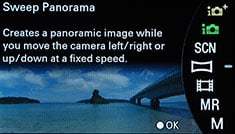
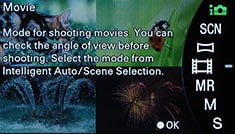
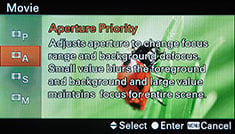
The Alpha A6000 mode dial offers the usual PASM, along with two Auto modes, SCN, Sweep Panorama, Movie and Memory Recall. You can start filming video in any relevant mode by simply pressing the red record button, but by first putting the camera into the Movie mode, it’ll preview the appropriate composition frame and offer access to the dedicated movie options.
 | 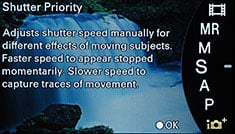 | 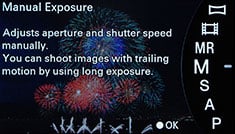 |
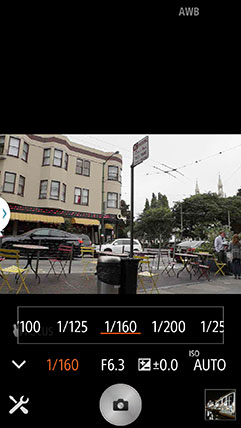
The A6000 offers shutter speeds between 1/4000 and 30 seconds with a Bulb option and a fastest flash sync of 1/160. The top speed of 1/4000 is normal for a camera in this price bracket although it would have been nice to have a 1/8000 option; I guess to be fair though, this tends to only come-in on higher-end models like the Panasonic GX7, Olympus OMD EM1 and Sony’s own A7 series. At the long exposure end, 30 seconds is also normal, although I should note Panasonic and Olympus offer 60 second options on most of their models, while Olympus additionally offers a Live Time capability which keeps the shutter open for up to 30 minutes with a single press and even lets you peek at the exposure as it builds and stop it if necessary.
If you want exposures longer than 30 seconds on the A6000, you’ll need to buy a separate remote accessory, either the RM-DSLR2 wireless remote or the RM-VPR1 wired remote. Here’s an example taken at the maximum 30 seconds; note this was taken with long exposure noise reduction enabled (the default setting), which takes a dark frame afterwards lasting the same time as the exposure.
|

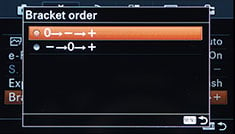
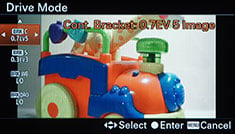
Auto Exposure Bracketing is available on the A6000 for three frames at 0.3, 0.5, 0.7, 1, 2 or 3EV increments, or for five frames in 0.3, 0.5 or 0.7 EV increments. You can set the drive mode to Single or Continuous for any of these bursts, although for the latter you will need to keep the shutter release held; it’s a shame the entire sequence can’t be captured with a single press or self-timer. White Balance and DRO bracketing is also available. The OMD EM10 offers two, three or five frame AEB up to 1EV apart, or seven frames up to 0.7EV apart, giving it a deeper overall exposure range.
 |  |  |
The A6000’s picture effects are greyed-out if you’re shooting RAW or RAW+JPEG, which is daft as it’d be nice to only have the effect applied to a JPEG and keep a RAW as backup. Olympus does this much more sensibly with its ART filters, which are only applied to JPEG files, leaving the RAW file (if enabled) as a backup, and even lets you grab all (or a selected bunch) of the ART filters in one go with ART filter bracketing.
Anyway, back to the A6000. With RAW disabled, you can choose from Toy Camera (with five different filters), Pop Colour, Posterisation (in Colour or Black and White), Retro, Soft High Key, Partial Colour (with the choice of red, green, blue and yellow), High Contrast Mono, Soft focus (with the choice of Low, Mid or High), HDR Painting (with the choice of Low, Mid or High, or as I like to call them, awful, horrendous or appalling), Rich Tone Mono, Miniature (with the stripe of focus variable between Auto, Top, Middle Horizontal, Bottom, Right, Middle Vertical or Left), Watercolour, or Illustration (with the choice of Low, Mid or High). Here’s how a bunch of them look given the same real-life subject.
Sony Alpha A6000 Toy Camera | Sony Alpha A6000 Retro |
 |  |
Sony Alpha A6000 High Contrast Mono | Sony Alpha A6000 Partial Colour (Blue) |
 |  |
Sony Alpha A6000 HDR Painting (High) | Sony Alpha A6000 Illustration (High) |
 |  |
The D-R menu is where you’ll find the Dynamic Range Optimiser (DRO) and in-camera HDR options, the former available in Auto or set Levels of one to five, and the latter available as Auto or in increments of one to six EV. The HDR mode actually takes three images at the desired interval and combines them in-camera into a single JPEG file, and you can trigger it with a single shutter press or a self-timer. If you have RAW or RAW+JPEG selected, the HDR options are greyed-out.
Sony Alpha A6000 DRO and HDR mode off | Sony Alpha A6000 DRO Level 5 | Sony Alpha A6000 HDR 6EV |
 |  |  |
 |  |  |
DRO / HDR off, f4, 1/30, 800 ISO | DRO Level 5, f4, 1/30, 800 ISO | HDR 6EV, f4, 1/30, 800 ISO |
The SCN mode on the dial lets you choose from nine presets, including the usual suspects like Portrait, Landscape and Sunset, but also including the composite Handheld Twilight and Anti Motion Blur modes which take a burst and combine them to reduce shake and noise.
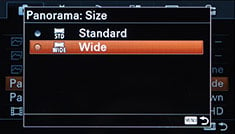
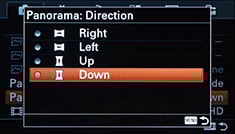
The Sweep Panorama mode enjoys its own dedicated position on the mode dial, and selecting it unlocks two options on the first menu page (although why Sony doesn’t let you set things in advance while you’re in other modes remains beyond me). Like previous Sony cameras you can choose between Standard and Wide for the size, and Right, Left, Up or Down for the direction.
 |  |  |
After that it’s just a case of holding the shutter release button down as you pan the camera in the selected direction, sometimes being told to do it again in case you were too slow or fast. Note unlike Sony’s fixed lens cameras, you can adjust the optical zoom on your lens before shooting a panorama, but be warned the camera becomes fussier about your technique as you zoom-into longer focal lengths. Here’s two examples with the 16-50mm kit zoom at 16mm, first a horizontal pan and secondly a vertical pan.
| ||||||


Like other Sony cameras, the Sweep Panorama works fairly well and gives the A6000 a fun advantage over many rival system cameras. You often need to refine your technique and I’d recommend taking a couple at each attempt to make sure but it remains a fun and effective way of grabbing panoramic views.
Finally there’s the two Auto modes, Intelligent Auto which employs scene detection, and Superior Auto which additionally exploits the composite presets to reduce blur or noise where necessary or desirable. I understand Sony’s decision to only offer the composite modes on one of the Auto options as the camera suddenly firing multiple exposures may alarm those who aren’t expecting it!
The A6000 also offers Sony’s Auto Object Framing feature, which makes a duplicate image that’s cropped and effectively recomposed. This only works under certain conditions and modes though, and you also have to enable the feature. In practice I found it generally kicked-in when shooting people in the Auto modes. In this situation the camera would recognize people’s faces and switch into a portrait scene mode. Knowing where the face or faces were in the scene, it would then create a duplicate image, cropped to offer an alternative composition, then scaled back up to 24 Megapixels. If one person were in a wide view, the A6000 normally cropped-in for a head-and-shoulders view in the portrait orientation. If there were two or more faces, again in a wider view, it would normally maintain the landscape shape, but again crop-in for a closer look. Whatever the crop, the final image would be scaled / interpolated up to 24 Megapixels.
When playing back images I was often surprised to find these tighter views when I’d shot wide portraits in the Auto modes, but invariably I found the recompositions were actually quite pleasing. That said, they had of course cropped-out any of the background, eliminating the context of many travel photos, and by making a crop they were also lower resolution than the original, despite the scaling-up at the end.
But remember they’re not replacement images, they’re recorded in addition to the originals. Experienced photographers may still feel uncomfortable with the idea regardless, but I think it works well for those who perhaps don’t get close enough to their subjects in portraits and small group shots. The feature gives you a smartish scaled-up crop along with the original for good measure.
Sony Alpha A6000 focusing
The Sony A6000 is equipped with a hybrid AF system which employs both contrast-based and phase-detect autofocus systems, the latter embedded into the imaging sensor. Sony also describes the A6000’s AF as the fastest around, although there are, of course, caveats involved. I’ll discuss the AF for photos here and for video in the movie section lower on the page.
Like its predecessor, the A6000’s contrast-based system splits most of the frame into 25 areas using a five-by-five array, but there’s been a significant upgrade in both the number and the spread of phase-detect points. The previous NEX-6 offered 99 phase-detect AF points spread over around 50% of the frame, whereas now the A6000 employs 179 phase-detect AF points spread over around 92% of the frame. In short, where the NEX-6 reverted back to contrast-based AF as the subject went outside the central phase-detect zone, the A6000 can exploit phase-detection almost up to the very edges of the frame. This should mean effective tracking of a subject almost wherever it is on the frame.
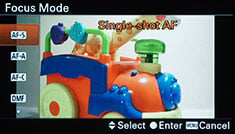 | 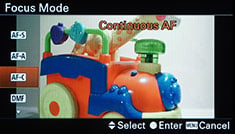 |  |
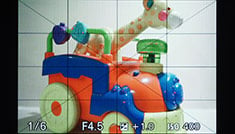
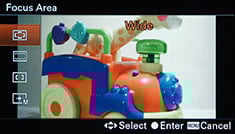
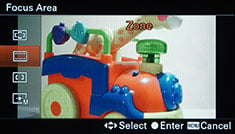
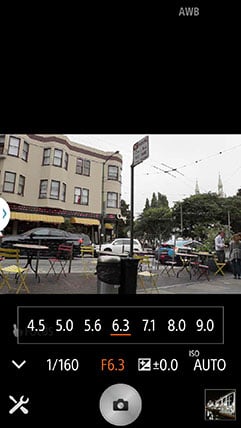
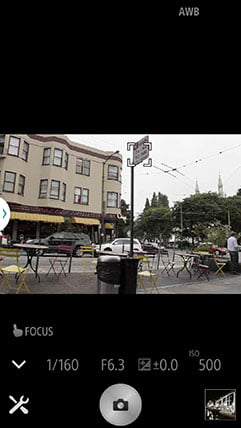
The A6000 offers AF-S (Single), AF-C (Continuous), AF-A (automatically choosing depending on the situation), DMF (Direct Manual Focus) or MF (Manual Focus) modes. In terms of AF area selection you can choose between Wide (where the camera chooses any of the 25 AF areas on-screen), Zone (where the camera chooses from a reduced group of nine AF areas, but you get to choose where they are on the frame), Center, and Flexible Spot (where you can manually position a single AF area almost anywhere on the frame in much finer steps than the 25 area grid, and where you can also adjust the area size between Large, Medium and Small).
 |  |  |
Manually repositioning the AF area on the A6000 could have been quicker though. You first need to enter the Focus Area mode, select Flexible Spot and only then use the tilting wheel to reposition the target. Even if you assign Focus Area to a custom button and never change the mode from Flexible Spot, you’ll still need to laboriously push the rear wheel to reposition it as desired. Had Sony employed a touch-screen, this would have required a single tap.
 |  |  |
So how does it all come together in practice? First of all, the speed in AF-S mode. I tested the A6000 with the 16-50mm kit zoom and found it could certainly focus very quickly for single AF acquisitions. It’s hard to know what combination of technology it’s using when set to AF-S, but there’s minimal to no hunting, and in good conditions the lock is almost instant. The Pre-AF option, enabled by default in the menus, also means the camera has generally already focused on the subject if you dwell on it for more than a second or so.
Tested side-by-side in AF-S mode against rivals, it’s certainly quicker than the more expensive Fujifilm XT1, suggesting Sony may be right about its claim of the fastest AF for a mirrorless camera with an APS-C sensor. But it’s certainly not the fastest mirrorless camera of any format. I tested the A6000 alongside the most recent Micro Four Thirds models from Panasonic and Olympus, and both were quicker than the Sony. I should also add as the light levels became lower the A6000 (like the XT1) slowed down and in dim conditions often struggled to lock-on, whereas the latest Olympus and Panasonic models continued to autofocus successfully even in very low light. For comparison, Sony quotes the A6000 AF works down to 0 EV whereas the latest Panasonics will still operate at -4 EV (both at 100 ISO with f2.8 lenses).
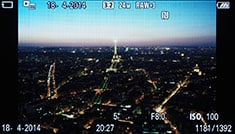
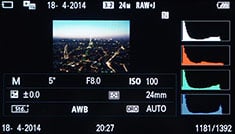
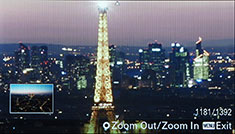
In a real-life scenario shooting the Paris skyline from the Montparnasse Tower, I found the OMD EM1 had no problems at all focusing, but the A6000 had to be put into manual focus; focus peaking and a magnified view let me get the shot with the A6000, but it took me much longer than the Olympus which just auto-focused without fuss.
| |||

To be fair I’d still rank the single AF performance in good light with the A6000 as very good – indeed arguably better than other APS-C mirrorless cameras I’ve tested – it’s just not quite as fast as the best Olympus and Panasonic models, nor as successful as they are in low light.
Switch the A6000 to AF-C continuous autofocus though and Sony’s hybrid system really shines. Previously I’d found Fujifilm’s XT1 offered very usable continuous AF tracking even when shooting continuously at 8fps. In my tests if I kept the subject within the XT1’s central cluster of phase-detect AF points, I could enjoy a success rate of at least 80%. At the time this was the best continuous AF performance I’d experienced from a mirrorless camera with a fairly large sensor.
So imagine my delight when one month later I can tell you the A6000 is even better. Not only does the continuous AF work over a much broader area across almost the entire frame (allowing you to track subjects close to the edges equally well those as in the middle), but it’ll also work at a faster top continuous shooting speed of 11fps and in my tests delivered a very high success rate.
I initially tested the A6000 with the 16-50mm kit zoom and found it could successfully track a variety of moving subjects. I tried it with kids running or scootering towards me. I tried it with adult cyclists approaching head-on at reasonable speed. I tried it with the subject in the middle, or pressed up against the edge of the frame. In each case, almost every shot in the sequence was sharp even when shooting at the top speed of 11fps.
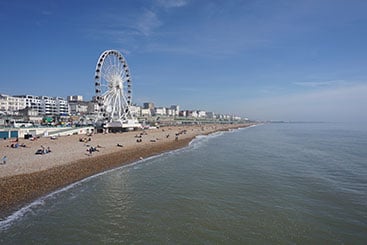
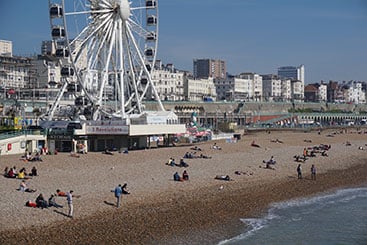
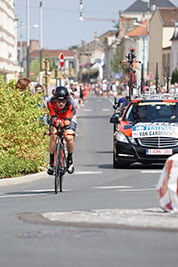
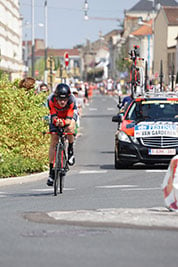
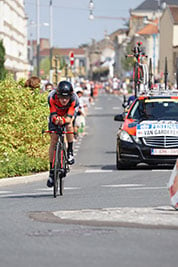
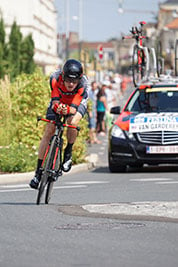
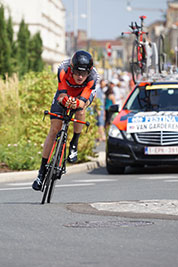
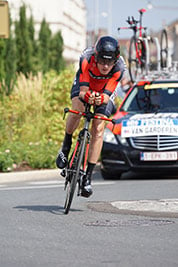
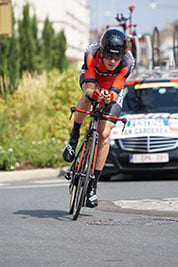
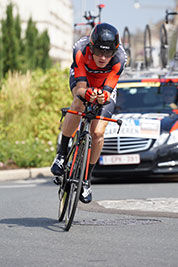
Of course the important caveat here is the lens: even fully zoomed-in, the kit lens meant I wasn’t testing the A6000 with anything more challenging than 50mm at f5.6. The results may have been good, but equally the conditions weren’t that tough. So as soon as Sony launched its native FE 70-200mm f4G OSS telephoto zoom, I knew this would be the lens to give the A6000 a good workout. I started with a brief but promising day on Brighton seafront, shooting cyclists with Guy from Hireacamera in the UK as they went past. We marvelled at how well it worked, and also how face detection often locked-onto riders, tracking them anywhere on the frame – but these were mostly normal folk out for a casual spin. What I really wanted to do was test the A6000 and 70-200mm at a pro sporting event, and I got my chance at the 2014 Tour de France. I shot with the A6000 over five stages, concentrating on the mountain passes of the Pyrenees and the subsequent individual time trial, and the Sony combination proved very effective throughout. I’ve detailed my experiences in a separate article: shooting sports with mirrorless, but for now will detail one particular sequence from the time trial.
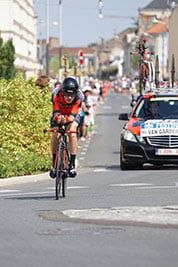
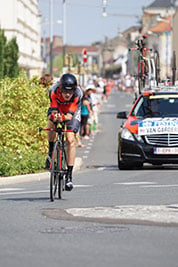
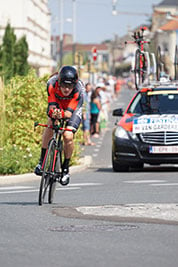
I photographed about 80 riders during the time trial, for bursts of 10-30 frames each. I varied my location, my angle to the action and the position of the AF area many times during the day, but enjoyed pretty consistent results throughout. To take a closer look at the A6000’s AF performance, I’ve picked the number five rider in the race, American Tejay Van Garderen, who let me assure you was not hanging around as he approached me on one of the first roundabouts of the course. Here’s one frame from the sequence for starters.
| |||
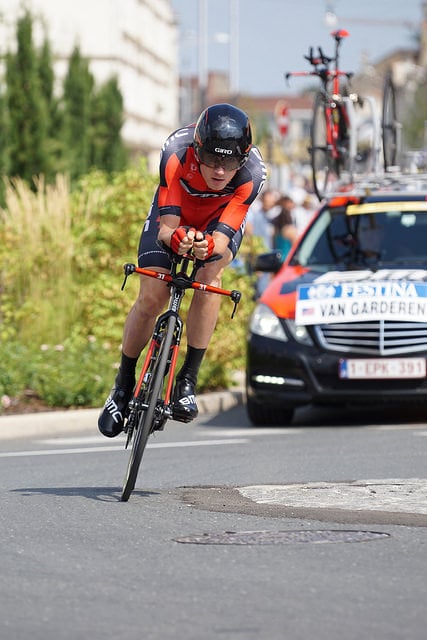
I set the AF area to medium and positioned it just left of centre, allowing me to position Tejay a little to the side and away from the team car in many of the images. I zoomed the lens to the maximum 200mm, for a 300mm equivalent field of view with the crop sensor, and set the aperture to f4 in Aperture Priority. At 200 ISO with +0.3 EV compensation, the camera metered 1/1600, but while handling the camera, the aperture was accidentally nudged closed a third of a stop to f4.5, reducing the shutter to 1/1250 for this sequence. It’s just fast enough to freeze the action, although in some other sequences on the day, motion blur was a small issue at times; this however was user-error as I should have used shutter priority or even manual with Auto ISO.
| Sony Alpha A6000 Continuous AF with Continuous High Drive mode using FE 70-200mm at 200mm f4.5 | ||||||
 |  |  |  | |||
| Full image above, 50% crop below | Full image above, 50% crop below | Full image above, 50% crop below | Full image above, 50% crop below | |||
 |  |  |  | |||
 |  |  |  | |||
| Full image above, 50% crop below | Full image above, 50% crop below | Full image above, 50% crop below | Full image above, 50% crop below | |||
 |  |  |  | |||
 |  |  |  | |||
| Full image above, 50% crop below | Full image above, 50% crop below | Full image above, 50% crop below | Full image above, 50% crop below | |||
 |  |  |  | |||
 |  |  |  | |||
| Full image above, 50% crop below | Full image above, 50% crop below | Full image above, 50% crop below | Full image above, 50% crop below | |||
 |  |  |  | |||
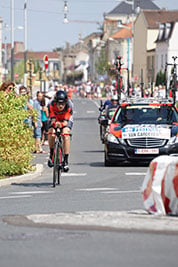
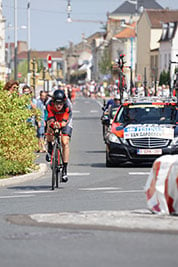
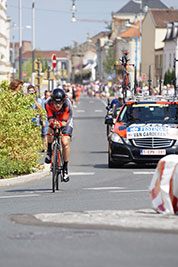
Above are 16 images from a burst of 20 representing about two seconds of action. For presentation here I’ve reduced rhe original images to show the complete frame, accompanied by a 50% crop of TJ’s face; I inititally prepared 100% crops, but with 24 Megapixels and the small tables here, the area was too small to be interesting.
Of the 16 images above, I’d rate 10 as essentially perfect and four as only fractionally-off, but still very respectable. This leaves just two which aren’t 100% sharp: frames three and four, interestingly near the start of the sequence, and of these, frame three is actually not that bad if used at a smaller size; even frame four is acceptable for online use. So over 87% were perfect or very good, which is a very decent hit-rate, especially for a camera of its price, regardless of the AF and composition technology.
What makes it even better is we’re talking about 87% at 10fps, which roughly translates into nine out of ten very usable images for every second of action. When shooting at slower speeds, say 3-5fps, it’s easy to miss a decisive moment even with the same hit-rate as you’re simply not getting as many usable frames per second. But with around nine good shots every second on the A6000 in this test, you’re not going to miss a thing. Even when the camera under-performed slightly, or I made an error, I was still getting over five perfect frames a second.
Ultimately that’s the wonderful thing about the A6000’s continuous AF: it’s coupled with burst shooting that’s so fast that even if half the images are out of focus, you’re still getting five good ones every second. And once again in my tests the camera generally delivered many more than that. Better still you can enjoy this AF tracking anywhere in the frame, not just within the central diamond pattern enforced by DSLRs. Plus, since it’s natively live view, you can also exploit an articulated screen to compose at unusual angles – at an earlier stage of the Tour I composed with the camera held out, but I also used it during the time trial to compose over the heads of crowds, all while still shooting with uncompromised AF and burst performance.
To have 11fps with effective continuous AF in a sub-$1000 camera that can squeeze into a large pocket is pretty amazing, as the A6000 is far from a Canon 1Dx or Nikon D4s in size, weight and price. Of course the Canon and Nikon pro bodies can keep firing for much longer (including in RAW) and track even faster action, plus they’re weather-proof and pretty much indestructible. But the A6000 has more than price and size as an advantage over the big boys: its AF system will track anywhere on the frame, not just in a golden diamond in the middle. Even better it can exploit face detection; indeed when I was photographing cyclists without sunglasses or helmets (naughty!), the A6000’s face detection locked onto their faces and tracked them wherever they went on the frame. All automatically, and all with the same high success rate. Sports photographers, especially parents with active kids, take note! The A6000 has to be the best camera for continuous AF until you get to semi-pro DSLRs costing two to three times the price. It’s also great that Sony has deployed the same AF system in the recently announced and cheaper A5100.
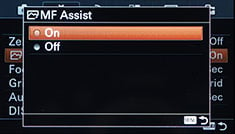 | 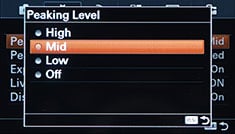 | 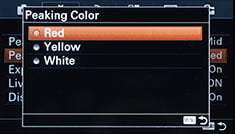 |
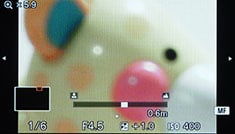
Moving onto Manual Focus, the A6000 offers a selection of aids which help you nail the shot. First of all, there’s an optional magnified view at 5.9x (not quite 1:1) which appears (when enabled) as soon as you turn the focusing ring on the lens (when shooting stills, not video). Secondly there’s focus peaking which surrounds subjects of high contrast with a coloured fringe, available at three sensitivity levels and in three colours. For a belt and braces approach you can have both running at the same time (albeit only for stills) which really helps you confirm the focus. There’s also an on-screen distance scale although it’s pretty basic compared with the one on the Fujifilm XT1 and unlike that model the scale doesn’t adapt to reflect the depth of field at different apertures. But with magnified assistance and focus peaking you’ll still find manual focusing with the A6000, whether with a native or legacy lens, very easy.
Sony Alpha A6000 movies
The Alpha A6000 can record 1080p movies with full exposure control and supports continuous autofocus using the hybrid AF system. Audio is recorded using the built-in stereo microphones and while there’s sadly no external microphone input using a standard 3.5mm jack, there is at least the chance to slide-on an optional Sony microphone onto the accessory / hotshoe.
 |
 |
 |
 |
 |
 |
 |
 |
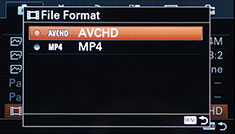
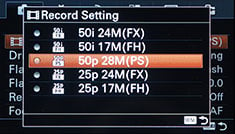
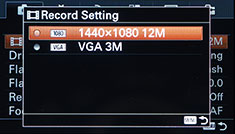
With the A6000 set to AVCHD encoding, you can choose 1080 at 50p or 60p (depending on region) at 28 Mbit/s, 1080 50i or 60i (depending on region) at 24 or 17 Mbit/s, or 1080 25p / 24p (depending on region), again at 24 or 17 Mbit/s. Switch the A6000 to MP4 encoding and you can choose between 1440×1080 at 12 Mbit/s or VGA at 3 Mbit/s both at 30fps regardless of region.
In a very welcome tweak over the earlier NEX-6, the A6000 sensibly fills its 16:9 screen when composing, recording or playing video; bizarrely on the NEX-6, video was displayed in a cropped window unless you changed a menu option. While the 16:9 shaped screen on the A6000 means still photos are displayed fairly small, it understandably looks great for widescreen video.
You have full control over the aperture, shutter and ISO before and during filming, although since none of the dials are completely silent, you will hear clicking in your footage as you make adjustments – another reason why an external microphone option which wasn’t mounted on the camera would have been useful.
You can also apply some but not all of the Picture Effects. Toy Camera, Pop Colour, Posterisation, Retro, High Key, Partial Colour and High Contrast Mono are all available for movies, but the more processor intensive Soft Focus, HDR Painting, Rich Tone Mono, Watercolour, Illustration and Miniature are not allowed. I’m not bothered about any of these apart from one: Miniature. Yep, for all their gadgetry and frills, Sony does not let you film a movie with the miniature tilt-shift effect on the A6000. There’s also no slow motion options, but then that’s par for the course for a system camera at the moment.
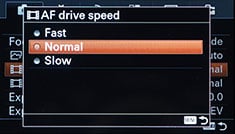
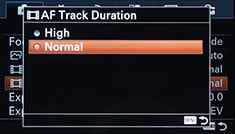
Moving on, the good news is the A6000 will exploit the hybrid AF system to deliver very effective continuous AF while filming. The broad and dense array of on-chip phase detect AF sensors already makes the A6000 unique against rivals, but Sony takes the continuous AF sophistication further with the option to adjust the Movie AF Drive Speed and AF Tracking Duration.
The AF Drive Speed, as its name suggests, sets the speed with which the camera refocuses while filming, and you have the choice of Slow, Normal or Fast. The AF Tracking Duration sets the response before the camera re-evaluates the scene for a potential refocus, and you have the choice of Normal or Fast.
With three AF Drive Speeds and two AF Tracking Durations, there are potentially six combinations to choose from, so to illustrate their differences I filmed six clips showing how the A6000 reacts when pointed back and forth between two objects at different distances. I then filmed six more clips showing how the A6000 reacts when continuously moved towards and away from an object.
You can see all 12 clips below, but just briefly here the Slow, Normal and Fast AF Drive Speeds resulted in refocusing (between near and far objects) that typically took just over a second, just under a second and almost instantly, respectively. Meanwhile the AF Tracking Duration typically required a slight pause to refocus when set to Normal, or no pause at all when set to Fast. As such when tracking a subject in constant motion you’ll want the AF Drive Speed and Tracking Duration both set to Fast, but when panning and refocusing between two subjects, I preferred the more relaxed look of the Normal or Slow Drive Speeds and definitely the Normal Tracking Duration. If you use Fast Tracking Duration when panning, the camera will instantly refocus on everything it passes, which might be what you’re after, but can be distracting if you just want a slow refocus between two subjects.
It’s great to have the option to adjust these settings (not to mention unique in the system camera market), but the problem with the A6000’s movie AF is that it’s continuous or nothing, and by continuous I really mean working all the time – it literally never rests. I often yearned for a slower Tracking Duration option that gave a little more time before a refocus was initiated. Instead I’d often have to pan between subjects a bit faster than I’d have liked to avoid the camera refocusing too soon. I also found once the camera had settled on a target it couldn’t rest for long and often hunted a tiny amount back and forth. To be fair this hunting was very minor and essentially invisible when viewed on the camera’s screen, but if you watch the clips on a larger TV or even computer screen, very slight focus breathing is often visible when the camera dwelled on a static subject.
Both issues could have been solved if the A6000 offered an AF-S mode for movies, which only refocused when you told it to, say with a half-press of the shutter release. This way you could deploy the confident refocusing as and when you needed it, but prevent undesirable searching when you didn’t. One way around this would have been to let you choose when to refocus with a gentle half-press of the shutter release. This would have been possible with an AF-S mode, but sadly the only autofocus mode the A6000 offers for movies is AF-C – which again is continuous and operates all the time. Had the A6000 offered a touch-screen there’d also have been the chance to tap to refocus without recomposing. This is possible with the Panasonic and Olympus cameras, although to be fair their contrast-based continuous AF doesn’t have anywhere near the speed, confidence, lack of hunting or configuration options of the A6000.
If you want to take control over the A6000’s movie focusing, you have to switch to Manual Focus, the only other option available. There’s no magnified focusing assistance during or even before filming, but there is the option to enable focus peaking which remains active while filming. You can choose Low, Mid or High Peaking levels, and from red, yellow or white for the fringe colour. Peaking obviously helps a great deal when manually focusing for movies, but I’d have preferred to also have a magnified view to be really sure.
Before discussing my clips, there’s two other things I’d like to mention and that’s actually transferring the files from the camera to your computer. I normally prefer to remove the memory card from the camera and use a card reader to get the files onto my computer, but the A6000 doesn’t let you do this for AVCHD video clips. As always, AVCHD files are hidden away in a section of the card labeled PRIVATE, but rather than finding a single MTS file for each clip as with other models, the A6000 bundles them all into one huge file simply labeled AVCHD. When you playback movies using the camera, you’ll see them as separate files, but when you browse the card using a computer, you’ll only see one file.
To get hold of the individual movie files you’ll need to connect the A6000 to your computer using the supplied USB cable and use Sony’s PlayMemories application to import them. I personally find this nannying a real pain and what makes it worse is the import process (on my MacBook Pro) took much longer than it would have done to simply copy individual files from a card. I’m guessing Sony opted for this approach to eliminate support calls from people who couldn’t find the MTS video files hidden away on the cards, or who did find them, but accidentally mucked-up the indexing somehow, preventing them from playing back on other devices. Obviously it’s also a non-issue for anyone who’d connect the camera with a cable anyway to transfer data – and it doesn’t affect still photos or MP4 video files, both of which can be copied direct from the card or via the application, but again I personally found Sony’s approach for accessing AVCHD files inconvenient.
Okay, short rant out of the way, here’s how the camera performs in practice. All of the movies were filmed at the 1080 / 50p mode unless otherwise stated.
| |
|---|---|
| |
| |
| |
|---|---|
| |
| |
| |
|---|---|
| |
| |
| |
|---|---|
| |
| |
| |
|---|---|
| |
| |
| |
|---|---|
| |
| |
| |
|---|---|
| |
| |
| |
|---|---|
| |
| |
| |
|---|---|
| |
| |
| |
|---|---|
| |
| |
Sony Alpha A6000 Continuous AF AF Track Duration Normal | Sony Alpha A6000 Continuous AF AF Track Duration Fast | ||
| AF Drive Speed Slow (Download the original file) | AF Drive Speed Slow (Download the original file) | ||
| AF Drive Speed Normal (Download the original file) | AF Drive Speed Normal (Download the original file) | ||
| AF Drive Speed Fast (Download the original file) | AF Drive Speed Fast (Download the original file) | ||
| |||
Sony Alpha A6000 Continuous AF Dolly AF Track Duration Normal | Sony Alpha A6000 Continuous AF Dolly AF Track Duration Fast | ||
| AF Drive Speed Slow (Download the original file) | AF Drive Speed Slow (Download the original file) | ||
| AF Drive Speed Normal (Download the original file) | AF Drive Speed Normal (Download the original file) | ||
| AF Drive Speed Fast (Download the original file) | AF Drive Speed Fast (Download the original file) | ||
| |||
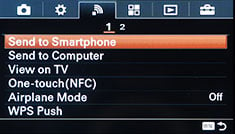
Sony Alpha A6000 Wifi
The Sony Alpha A6000 has built-in Wifi with NFC to aid negotiation with compatible devices. Wifi on the A6000 allows you to wirelessly browse and transfer JPEG images onto an iOS or Android smartphone using a free app, and also remote control the camera with your phone or tablet. The A6000 can additionally download apps directly to extend its capabilities, a feature first introduced on its predecessor, the NEX-6, and a feature that remains unique to Sony (if we’re not counting Android-powered cameras from the likes of Samsung).
I’ll start with transferring images from the A6000 to a smartphone and for my tests I used my Samsung Galaxy S4, onto which I’d previously installed Sony’s free PlayMemories app. Like other recent Sony cameras with Wifi, a dedicated wireless section in the A6000’s menus starts with an option to Send to Smartphone. Choosing this then gives you the choice of either selecting the desired image on the camera, or browsing the camera’s memory using your handset.
 | 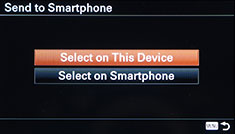 | 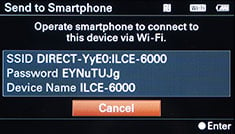 |
Selecting either configures the A6000 as a Wifi access point which your phone needs to connect to. Next you’ll need to fire-up the PlayMemories app on your phone and connect to the camera. If you have an NFC-equipped device, such as my GS4, you can simply touch the phone and camera together and they’ll work out the SSID and password and make the connection for you. If you don’t have NFC, or for some reason it doesn’t work, you’ll need to connect to the A6000’s Wifi network manually and enter the password that’s displayed on the camera’s screen.
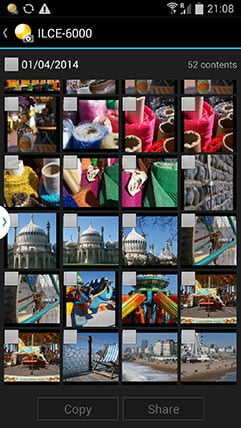
If you opt to select the image on the camera, it’ll then be sent straight to the phone. If you select the option to choose with your smartphone, you’ll see the camera’s memory presented in a thumbnail view – just select the desired image and again it’ll be copied over. A menu in the PlayMemories app lets you choose whether the image is sent in its original 24 Megapixel format or resized down to VGA or 2 Megapixels. Full sized 24 Megapixel JPEGs take about five to ten seconds to copy over; like most Wifi camera apps, you can’t transfer RAW files.
The second option in the Wifi menu lets you send images to a computer. To do this you’ll need to download the free Wireless Auto Import utility onto your Mac or PC, then briefly connect the camera so that it can be configured with your computer’s details. After this you can disconnect the cable and wirelessly send selected images from the camera to the computer, although both will need to be connected to the same wireless access point. Sadly there’s no direct peer-to-peer option, and while both devices could be connected to the same Wifi hotspot on a phone, you can’t use it as a bridge or router. This limits the wireless transfer to situations where you’re connected to a home or office network, although to be fair this is no different from most other manufacturer’s camera to computer Wifi services. It would seem unless you go down the Eye-Fi route, the only peer-to-peer connection is between camera and phone or tablet.
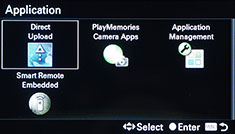
Next I’ll cover remote control which requires the Smart Remote app to be installed on the camera – as luck would have it, Sony embeds this into the A6000 to get you started in the World of apps, no doubt in an attempt to get you comfortable with the idea and possibly purchase some more in the future. If you select the Smart Remote from the App menu on the A6000, it’ll again set the camera up as an access point for the PlayMemories app on your phone to connect to. Alternatively if you have a phone with NFC, you can just start PlayMemories and hold it against the camera for Smart Remote to automatically startup.
 |  |  |
The recently updated PlayMemories app extends the very basic remote control of previous versions to full control over exposure and more. So long as the camera’s set to the appropriate mode, you can adjust the aperture, shutter speed, ISO sensitivity and White Balance, along with tapping the live image to move the single AF area.
 |  |  |
So far so similar to the Wifi capabilities of other cameras, but what really sets Sony apart from the rest is being able to connect to the internet and download apps to extend the capabilities. A year and a half on from the NEX-6, Sony now offers 13 apps (plus four keyboard options) which are compatible with the A6000, some free of charge, some costing up to $9.99. There’s also a selection of apps in Beta which are free to download. I believe the API for creating your own apps is now open, but I don’t know of any third party apps, such as support for Twitter or Instagram.
The first step to downloading a new app starts by creating an account on the PlayMemories site at playmemoriescameraapps.com. You have to do this using a computer or smartphone, and it also gives you the chance to buy credit to purchase apps later, although you don’t need to if you’re only downloading free apps.
Once you have an account set up there are two ways to browse and download apps. You either can do it using a free download tool running on your computer with the camera connected over USB, or you can do it direct from the camera itself. If you’re going for the direct approach from the camera, you’ll first need to connect it to the internet via an access point. Manually entering SSIDs and passwords using a non-touchscreen can be laborious to say the least, but once entered the camera can remember them and connect with a click at a later date; I store my phone’s Wifi hotspot and home networks for instance. Impressively Sony also remains the only camera company to let you connect to public hotspots which require a web-based logon or a tick in a box to agree to terms – it does this using a mini browser on the camera’s screen which works surprisingly well and allowed me to connect to several public services.
 |  |  |
Once the camera is connected to the internet you can use the dedicated Apps menu to login to your PlayMemories account and browse and download available apps; again any which aren’t free require you to have previously credited your account using your computer or phone. Once an app is downloaded and installed, it’s added to the list in the Apps menu on the camera. Some apps require access to the internet, say to upload images, and again the camera will connect via any previously configured access points. Others extend the functionality of the camera and have their own menus.
You already know about the pre-installed Smart Remote app. The next app most people will install is the free Direct Upload app, which lets you upload images direct from the camera to various online services. At the time of writing it only supported three services: Sony’s own PlayMemories site (of course), along with Facebook and Flickr, the latter added by installing an additional free app. When uploading to any of the services it’s possible to add a caption, although again it’s a laborious process using the cross keys to enter text on the on-screen keyboard – this would have been so much easier with a touch screen. It all works though and also appears to go direct to the service as oppose to most other manufacturers who share images via their own services. I just wish there were more services available, such as Twitter and Instagram, not to mention a quicker way to enter captions. As it stands, it’s easier and much more flexible to just wirelessly copy an image to your phone, tap out a caption and share it to any service you like.
Of the apps you have to pay for, there’s a few which you’d hope the camera would include as standard. For example Timelapse ($9.99) and Multiple Exposure ($4.99) are features built-into many cameras, but which will cost you just under $15 to add to the A6000. At least Multi Frame NR is now built back into the A6000.
There’s also a few missed opportunities. The A6000 has pretty average auto exposure bracketing for example, so that’s something an app could improve, and lo-and-behold there’s the Bracket Pro app for $4.99. But inexplicably this doesn’t equip the A6000 with better exposure bracketing. Instead it ignores the chance to improve AEB and instead offers shutter, aperture, focus and flash bracketing. I don’t know about you but I’ve never felt the need to bracket any of those things, and while I’m no fan of HDR myself, I know there are many photographers who would have happily paid for the chance to improve the camera’s AEB capabilities. Bizarrely this was something myself and many other reviewers commented on when Bracket Pro was first introduced over a year ago, yet there’s still no dedicated toolbox app for HDR photographers. Maybe it’s up to third parties to develop one? C’mon Trey Ratcliff, you’re a Sony owner now, please create an HDR / bracketing app for your disciples!
So while I like the idea of expanding the capabilities of a camera using downloadable apps, I feel the concept is far from fulfilled on the A6000 and other Sony cameras. Smart Remote may have got better in a recent update, but Bracket Pro desperately needs deeper AEB, Direct Upload should really include at least Twitter and Instagram, and things like Timelapse and Multiple Exposure should arguably already be included on a camera of this class. There should also be an official means to tag images with a GPS log made by your phone, a feature absent here but present on almost every other camera with Wifi these days.
Just before wrapping-up I should mention it’s also possible to remote-control the camera with a free utility for a Mac or PC which offers much more options than the smartphone version. Although sadly this is only supported with a direct USB connection between camera and computer, not over Wifi.
Sony Alpha A6000 continuous shooting
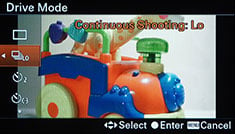
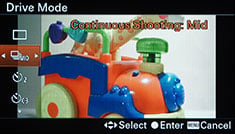
The Sony Alpha A6000 offers three Continuous shooting modes, Lo, Mid and Hi, the latter boasting a top speed of 11fps. Sony doesn’t quote buffer sizes, so to put the A6000 to the test I fitted it with a Sony UHS-1 32GB SD card rated at 94MB/s, set the Shutter to 1/500 in Shutter Priority and the sensitivity to 400 ISO, before timing a series of bursts.
 |  |  |
With the A6000 set to Fine JPEG, I fired-off 49 frames in 4.65 seconds, corresponding to a speed of 10.54fps. This is only a fraction below the quoted top speed of 11fps, and in shorter bursts the A6000 can indeed deliver it, but if you keep your finger pressed on the shutter release for longer bursts there’s a tiny inconsistency which fractionally slows down the overall speed. After 49 frames the camera kept shooting, but at a slower rate of around 2fps.
With the A6000 set to RAW, I fired-off 23 frames in 2.61 seconds, corresponding to a speed of 8.81fps. Once again after the buffer was filled, the camera kept shooting, but slowed down to about 2fps. I should also mention after the buffer was filled, the A6000 took quite a while to completely flush it to the card, preventing playback for about half a minute at times, although again you could continue shooting at a slower speed if desired.
To put the A6000’s continuous shooting into perspective, the Olympus OMD EM10 can shoot at up to 8fps for 20 RAW frames, or an unlimited number of JPEGs; I’ve yet to test this model, so I can’t confirm or deny the numbers yet. But what I can tell you is you’ll only be shooting fairly static subjects with the Micro Four Thirds models like the EM10, as none of them at the time of writing offered truly compelling continuous AF. In contrast, the Sony A6000 not only shoots at almost 11fps in practice for JPEGs, but it can also continuously autofocus at the same time, allowing you to track and capture action. As noted above, I’ve now tried this with both the 16-50mm kit zoom and the new FE 70-200mm f4G OSS telephoto zoom, both with a very high degree of success. 11fps is very fast, the 50 frame burst size in my tests covers several seconds of action, and the AF system will ensure most or even all of the images are sharp. Well done Sony for upping the game on mirrorless cameras.
As a final aside, I’ll add that Nikon’s D3300 and D5300 DSLRs offer just 5fps, and only offer continuous AF through the viewfinder, and even then just concentrated towards the middle. So Sony’s not just raising the game for mirrorless cameras, but all cameras at this price point.
Sony Alpha A6000 sensor
The Sony Alpha A6000 is equipped with a 24 Megapixel APS-C sized sensor, which gives it a 50% higher pixel count than its predecessor, the NEX-6. Indeed it now becomes the joint highest resolution APS-C camera from any manufacturer, sharing the same image size and pixel pitch as Nikon’s latest DX-format DSLRs and the earlier top-of-the-range NEX-7.
Like other 24 Megapixel APS-C models, the A6000 delivers images measuring 6000×4000 pixels, which at 300dpi can be printed at 20×13.3in. Compare that with the NEX-6, who’s 16 Megapixel images contain 4912×3264 pixels, letting you make a print measuring 16.4×10.9in at 300dpi. Meanwhile, the Olympus OMD EM10’s slightly squarer, but still 16 Megapixel, sensor delivers 4608×3456 pixels, allowing 15.4×11.5in prints at 300dpi.
Looking at the numbers, the 24 Megapixels of the A6000 certainly look like beneficial when it comes to making prints compared to 16 Megapixel models, but when you actually compare the real-life detail on-screen at 100%, there’s not as big a difference as you’d imagine. You can see for yourself in my Sony A6000 quality and Sony A6000 noise results where I’ve compared the quality against the Olympus OMD EM5. Certainly at this level a great deal of the end result boils down to the quality of the optics, and in my tests the Sony 16-50mm kit zoom rarely delivers the detail the sensor deserves.
I should also mention the A6000 may share the same sensor size and resolution as the earlier NEX-7, but it uses a brand new sensor. The NEX-7 has no embedded phase-detect AF points on its imaging sensor, whereas the A6000 has 179 spread over 92% of the frame. As I described earlier, these equip the A6000 with excellent continuous AF tracking capabilities for stills and videos, wherever the subject is on the frame, and Sony’s further enhanced the system by letting you fine-tine the AF speed and response time for movies. So even if you’re not getting the full benefit of the 24 Megapixel resolution with the kit lens, you will at least enjoy the great continuous autofocusing performance.
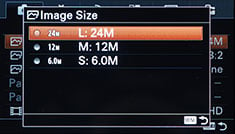 |  | 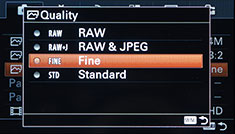 |
In terms of image files, the A6000 can record JPEGs with Standard or Fine compression, or RAW files with or without an accompanying JPEG. Fine JPEGs typically measure between 5 and 7MB, while RAW files weigh-in at just over 25MB each.Â
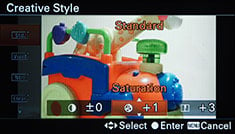
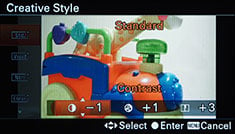
The A6000’s sensitivity runs from 100 to 25600 ISO, or up to 51200 ISO when you’re using Multi-Frame Noise Reduction. Sharpness, contrast and saturation are applied using a selection of Creative Styles, all of which can be adjusted as desired. I used the default Standard Creative Style for all my sample images which delivered the usual punchy style of a Sony consumer camera, although again you can tone it down or bump it up if preferred.
 |  |  |
So how does the A6000’s 24 Megapixel sensor perform in practice? Can it significantly out-resolve a 16 Megapixel Micro Four Thirds model, and how about comparing them for noise levels? Find out in my Sony A6000 quality and Sony A6000 noise results, or check out my Sony A6000 sample images, or skip to the chase and head to my verdict.