 The FE 20-70mm f4G is a compelling general-purpose lens for Sony owners who value extra-wide coverage. It takes the classic 24-70 range of models like the previous Zeiss f4, but widens it at the short-end making it not just ideal for capturing larger views, but also more suitable for the needs of video creators. Vloggers in particular will appreciate being able to apply Active stabilisation and still end up with a wide view even after the crop. The optical quality is decent with the aperture wide-open, sharp across the frame at the wide-end and only a tad soft in the corners at 70mm, but improved at f5.6. The minimum focusing allows useful close-ups at 70mm, albeit less so at the wide-end, the focusing is fast and quiet, and while there’s some breathing at 20mm, it can be corrected by the latest bodies without reducing the field of view. With so many options, you have to carefully think about which range, aperture and price best suits your needs. Consider Sony’s own 24-105 f4 G, 20 f1.8 prime and Tamron’s 20-40 f2.8 to name just three. If you’re after the flexibility of a general-purpose zoom though, the 20-70 f4 G becomes a key contender, and as a fan of wider-angles I’d now choose it over the 24-105 as a walkaround lens for a full-frame Sony mirrorless.
Sony FE 20-70mm f4 G review
-
-
Written by Gordon Laing
Intro
The Sony FE 20-70mm f4 G is a general-purpose zoom for Sony mirrorless cameras. Announced in January 2023, it widens the range from typical 24-70 models, making it more attractive to vloggers or anyone who wants to capture large views.
It’s not the first general-purpose zoom to reach 20mm at the wide end – Panasonic introduced a 20-60 kit zoom almost three years earlier, albeit for L-mount bodies only. However towards the end of 2022, Tamron launched a 20-40mm for the Sony mount which boasts a bright f2.8 aperture at a lower price. But the Tamron really is a wide zoom only, concentrating on shorter than standard focal lengths, so is more of an alternative to, say, a 16-35 than a true general-purpose lens.
In contrast, Sony’s 20-70 may be a stop slower and more expensive, but it reaches almost twice as far at the long-end, making it more of a lens you could leave on your camera for general use. It’s great for urban and natural landscapes and perfect for people too, whether you’re exploiting the wide-end for handheld vlogging, or shooting portraits or presentations with shallow depth of field effects at the long-end. In my video review below I’ll show you everything it can do, but if you prefer to read the written highlights, keep scrolling!
The new 20-70 f4 G is arguably the successor to the old Zeiss-branded 24-70 f4 ZA, maintaining its constant aperture, but widening its coverage and modernising its autofocus, albeit losing the optical stabilisation. Measuring 79x99mm and weighing 488g, the new 20-70 is 6mm wider, 4mm longer and 62g heavier than the old Zeiss model, but once mounted on a body and in your hands, you’re unlikely to notice any difference in size.
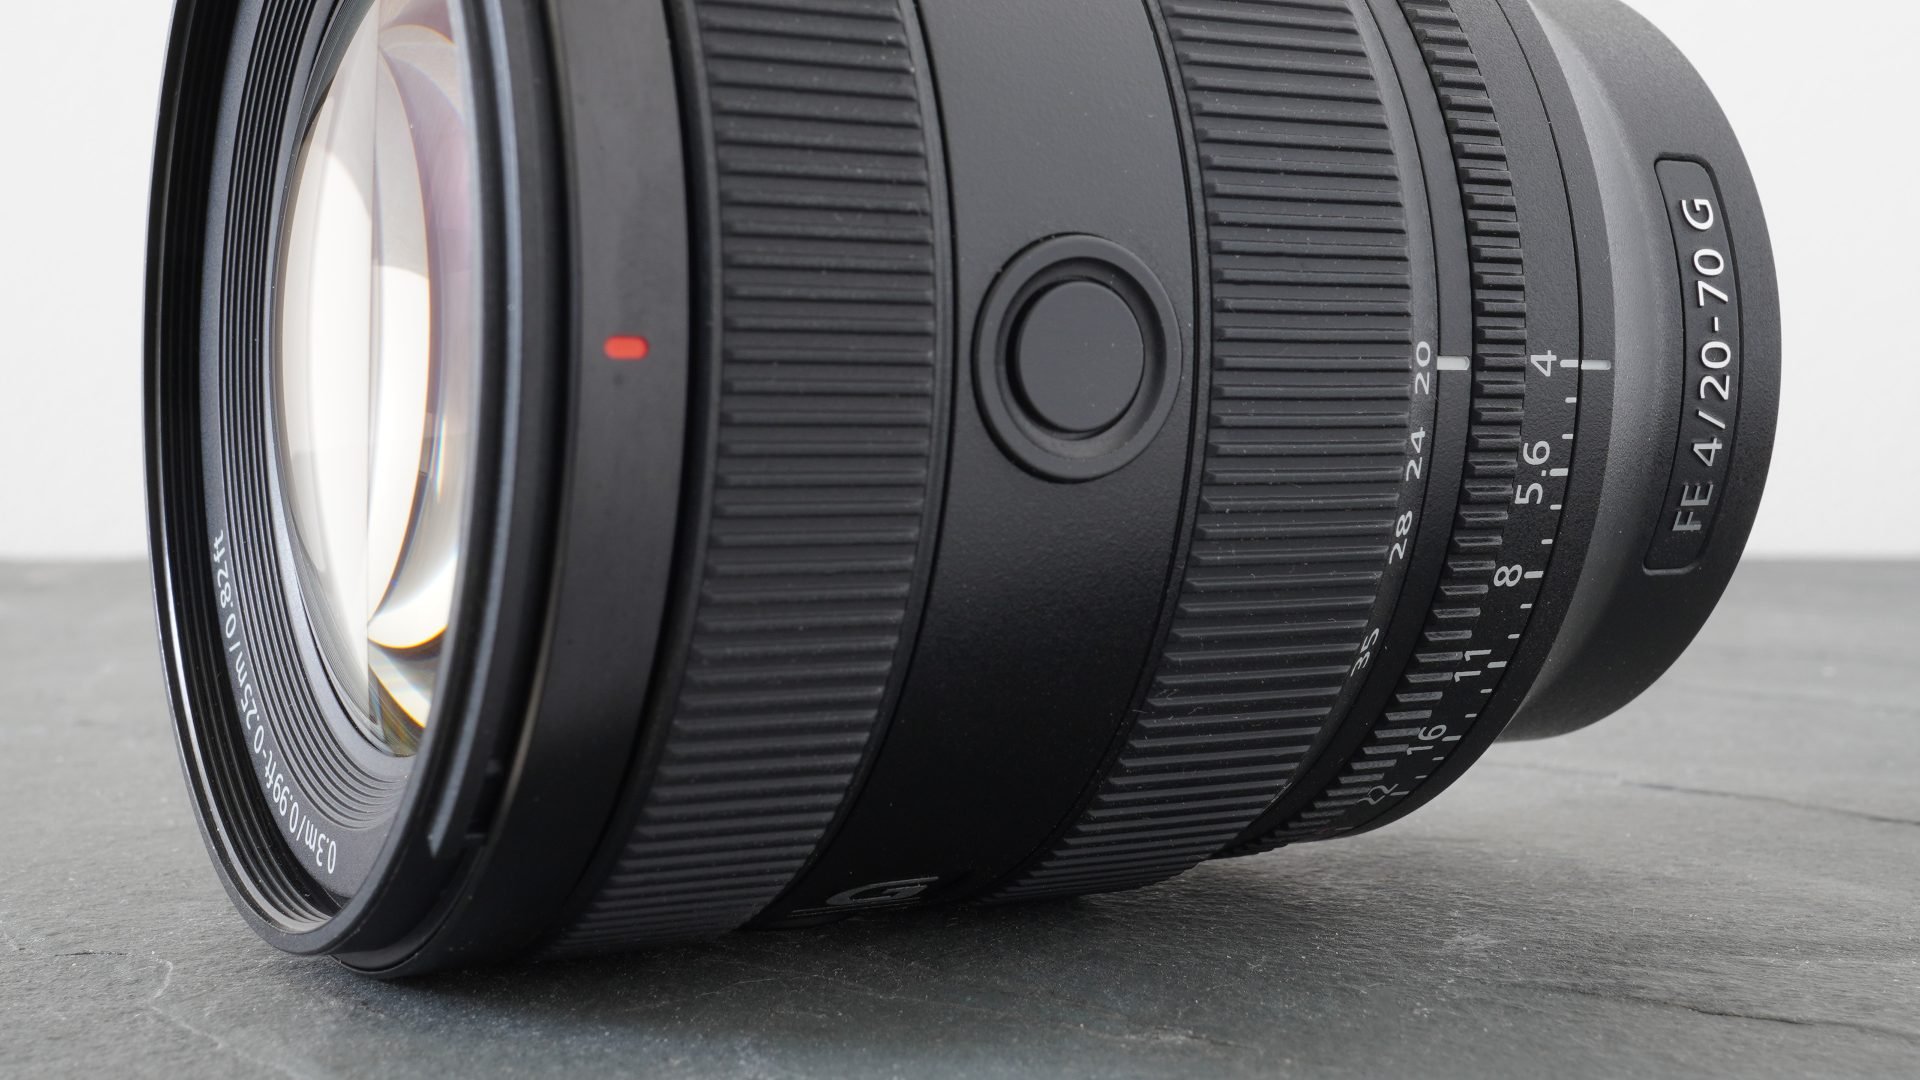
While the old Zeiss lens simply had a zoom and focusing ring, the new 20-70 is packed with the controls of other modern Sony lenses. So starting at the lens mount there’s a manual aperture ring from f4 to f22 with the option to declick for smoother and silent video work, and a lockable A position for body-based control. The first ring operates the zoom, smoothly extending the barrel by around 40mm when set to the longest focal length. Next is a switch for auto and manual focus and a pair of customisable focus-hold buttons, one on the side and the other on top for use in portrait orientation, and finally a very smooth and freely-spinning manual focusing ring with linear response.
At the end of the barrel is a 72mm filter thread and Sony supplies a petal hood that twists on with a bayonet mount. At the other end of the barrel is a rubber grommet, with Sony describing the lens as being dust and moisture-resistant.
Optically, the new lens employs 13 groups in 16 elements, has a nine-blade diaphragm system, and focuses down to 30cm with autofocus or 25cm in manual, delivering up to 0.39x magnification. Again unlike the older Zeiss 24-70, the new zoom does not feature optical stabilisation of its own, instead relying entirely on body-based systems to iron-out any wobbles.
The minimum focusing distance of the 20-70 may be fine for closeups with the lens at 70mm, but a little modest when used at the wide-end. So if you’re filming product presentation videos at around 20-24mm where you’re in the frame and holding small objects up to the camera, you may be better off with a lens that can focus closer.
To be fair, it is a little better than the 24-105 f4G in this regard, but if you need smaller objects to fill more of the frame when set to the wide-end, you should be looking for a lens that can focus down to around 15 to 20cm.
Sony’s 20 f1.8 fares better, focusing down to 19cm, while the Tamron 20-40 will allow you to get even closer at 17cm – every cm makes a big difference to the size of the subject on the frame. Alternatively just film your piece to camera at wide-angle before capturing separate b-roll close-ups with the lens at 70mm.
Moving on, like most modern mirrorless lenses, the 20-70 exploits software profiles to compensate for geometric distortion and these are applied as standard for JPEG. Depending on your RAW converter though, you may be able to disable the profile and take a peek at how much correction is taking place.
I photographed this view at 20mm in RAW+JPEG mode and as I toggle between them you can see how the uncorrected RAW reveals some distortion as well as a fraction of the imaging circle in the corners, before the profile drags it into shape on the JPEG. There’s a little loss in coverage, but what you end up with is the same as other 20mm lenses, so you’re not missing out.
Meanwhile at the long-end, there’s less wrangling taking place, but still some correction to the geometry. I like to show what’s going on behind the scenes, but for lenses like these it’s academic since the profiles are applied automatically for in-camera JPEGs and should be available for RAW converters too. So you’re unlikely to ever see the uncorrected versions.
To test the optical quality for landscape subjects, I photographed Brighton Pier from around 140m away and angled the view so that details run into the corners.
I’m starting here with the lens at 20mm f4 and taking a closer look in the middle – where I focused this image – shows the usual crisp details of a modern Sony lens. I’ve no complaints here and there’s no benefit to stopping-down in terms of detail.
Heading into the corner shows the detail becoming a tad less defined, but only in the extremes, and nothing to be concerned about. There is some corner darkening due to vignetting at the maximum aperture, but this quickly reduces if you close the aperture.
Here’s the view at the other end of the range, at 70mm f4, again focused in the middle of the image in order to judge field-flatness. Obviously if your main subject is in the corner, you’d be focusing there instead.
Taking a closer look at the middle of the frame again reveals those crisp details out of the gate at the maximum aperture with little to no benefit to sharpness if you stop-down.
Heading into the corner though reveals some softening to the ultimate detail as well as some darkening due to vignetting. Closing the aperture just one stop to f5.6 greatly improves both respects, sharpening the corner details and lifting that darkness, and closing one stop further can provide further improvements.
So while the detail at 70mm in the middle of the frame or wherever you’re focused is excellent at f4, if you want to maintain that sharpness across the whole frame, I’d recommend stopping-down at least to f5.6.
Now let’s take a closer look at opportunities for blurring in the background, starting with a portrait shot at 70mm f4. Like the Zeiss lens before it, you’re not going to get a hugely blurred background at 70mm f4, but there’s still some subject separation and the rendering here looks well-behaved with no distracting busy-ness. As you’d hope, there’s also very crisp details on the subject.
To examine the rendering in more detail, here’s my ornament test at 70mm f4 with the lens near to its minimum focusing distance of about 30cm. This in turn has produced quite large bokeh blobs. Look closely and you’ll notice some faint onion-ring textures within some of the blobs, which isn’t ideal rendering, but it’s not too distracting and also not unusual for zoom lenses. To avoid or reduce this you’d either need to spend more on a higher-end zoom like the 24-70 G Master II, or use a prime lens instead.
As I close the aperture one stop at a time, you’ll see the outer blobs become more rounded, albeit as usual taking on the shape of the nine-bladed diaphragm system, which becomes more obvious at the smallest apertures. While I wouldn’t describe the rendering style as anything to write home about, the lens will take reasonable close-up shots when zoomed to 70mm and I’ll have more examples for you later in the review.
If you’re chasing diffraction spikes, here’s an example of what you’ll see at 20mm with the aperture closed to f22. The conditions were a little hazy, so they’re not the sharpest spikes, but still a fair result for a zoom.
Now let’s take a look at focusing, starting with single autofocus and a single area at 70mm f4 on the A7 IV body. Sony’s employed two of their XD linear motors here, claiming faster performance than the old Zeiss lens, and the focusing is certainly very quick in this test.
The modern motors also promise smooth and quiet video focusing, so here’s the same test filmed in 4k, where the result looks pretty good, and the motors were essentially inaudible.
Sticking with video autofocus, here’s a couple of examples of face-tracking with the lens again at 70mm f4, which not only show Sony’s prowess at this sort of thing, but also the potential for background blurring indoors and out.
While the longer-end of the zoom range can be good for presenting pieces to camera from a tripod, many video creators will be understandably more excited about the shorter-end.
So for starters, here’s that outdoor setup again, but this time filmed at 20mm. Like all wide lenses, you have to be careful about distortion, especially if your face is positioned towards the edges, but there’s no arguing with the broad coverage.
As an interesting side-note, filming with very wide lenses also provides greater flexibility for making vertical crops later for multiple platforms. That said, it would be even better if Sony equipped its cameras with open gate modes that recorded the full height of the sensor to start with. But that’s a body complaint, not the fault of the lens.
Now for some vlogging tests, as this will undoubtedly be one of the popular applications for this lens. I’ll start with a coverage comparison to illustrate how big a deal 20mm is for handheld pieces to camera versus longer lenses.
So let’s start with the lens set to 28mm, held at arm’s length and using IBIS alone for stabilisation. While you could hold the camera out a little further when one-handed, 28 really is too long for handheld vlogging.
So next here’s the lens at 24mm, arguably the longest focal length most of us would consider for handheld vlogging. It’s still verging on being too tight though, especially when held with both hands, and becomes even tighter if you’re applying extra digital stabilisation. And that’s a crucial thing to consider.
So now here’s the zoom at its widest coverage of 20mm, again with IBIS alone, so this is the full uncropped view. Now I’ve become a much more reasonable size on the frame with more of my surroundings visible for context. Crucially it’s now also wide enough to accommodate the crop of digital stabilisation without too much compromise.
So here’s a clip filmed at 20mm but this time with Sony’s Active Stabilisation working alongside standard IBIS on the A7 IV. Active Stabilisation applies a crop, so the field-of-view here is more like 22 to 24mm equivalent, but crucially it’s still wide enough for handheld vlogging, while enjoying the benefit of reduced camera shake.
Let’s now see it all working together while walking, starting at 20mm with no stabilisation at all where the view is understandably wobbly.
Next for the 20mm with IBIS alone, so this is sensor shift stabilisation only. I find this can be pretty effective at ironing out the wobbles, but can result in some warping towards the edges.
So now here’s the result with both IBIS and Active Stabilisation, obviously incurring that mild crop you saw earlier, but still delivering suitable coverage for handheld vlogging with the benefit of improved stabilisation. In fact I can just about hold the camera out in one hand and still keep the image reasonably steady. Your mileage will of course vary.
Let’s return to the start of that clip again and note it was filmed at the maximum aperture of f4, which is obviously only going to mildly blur the background.
So now let’s switch to Sony’s earlier 20mm f1.8 prime lens, opened to f1.8 here and again filmed with Active Stabilisation. This is a popular choice of vloggers who love the wide coverage, but desire greater background blur, with the added benefit of being able to film at lower ISOs too.
Here they are side-by-side, with the 20-70 at 20mm f4 on the left and the 20 1.8 prime on the right at f1.8 and both with Active Stabilisation on the A7 IV. The latter comes in a little cheaper at around $900, but obviously you’re trading the flexibility of a zoom range for that brighter aperture. Which would you prefer?
And before my verdict, one final test for focus breathing. Here’s the lens at 20mm, manually focusing from infinity to the closest distance and back again. Notice how the field of view actually broadens when focused close, like I’m zooming to a wider angle, which could be distracting in a product presentation.
Next here it is at 70mm where the lens is far better behaved when focusing from infinity to the closest distance and back again. There’s a minor variation in magnification, but nothing you’d notice in real-life.
But the latest Sony bodies feature compensation for focus breathing, so here’s that test again at 20mm with the standard version on the left and one with breathing compensation enabled on the right using the A7 IV.
Notice how the latter shows much less change in magnification as the lens is focused across the same range. Obviously it’s cropping the image to maintain the coverage at closer focusing, but this does at least mean the lens will deliver much the same field of view it would at infinity. As such I’d say it’s worth enabling the feature for wide-angle product presentations.
Check prices on the Sony FE 20-70mm f4 G at B&H, Adorama, WEX UK or Calumet.de. Alternatively get yourself a copy of my In Camera book, an official Cameralabs T-shirt or mug, or treat me to a coffee! Thanks!


