 Sony's A9 is a supremely confident full-frame camera that successfully takes on established high-end DSLRs for pro sports and event photography. It'll accurately focus almost anywhere on the frame and shoots long bursts of 24 Megapixel images at up to 20fps in complete silence, without any vibrations, and with no viewfinder blackout either. The silence in particular is invaluable for shooting discreetly at events and weddings, but also opens up shots at quieter sports too. The handling is so assured, it's easy to forget the A9 additionally sports built-in stabilisation, decent 4k video, 1080p at 120fps, and effective Wifi with Bluetooth. Sony also used the A9 to debut better controls and a much improved battery that banishes issues with older models. Sure, it's not perfect: there's no Picture Profiles for video, the touchscreen is underused, there's no built-in intervalometer or bulb timers, and the use of SD cards with only one slot that exploits UHS-II is under-specced compared to pro DSLRs. But overall the A9 remains a very impressive camera that even a year after launch still feels revolutionary. Pro sports and event shooters should consider it very seriously.
Sony A9 review
-
-
Written by Gordon Laing
In depth
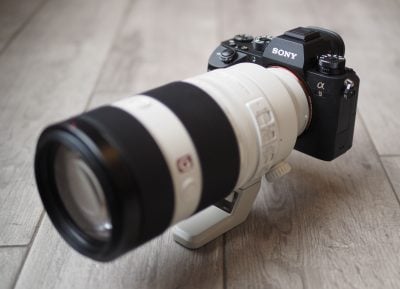
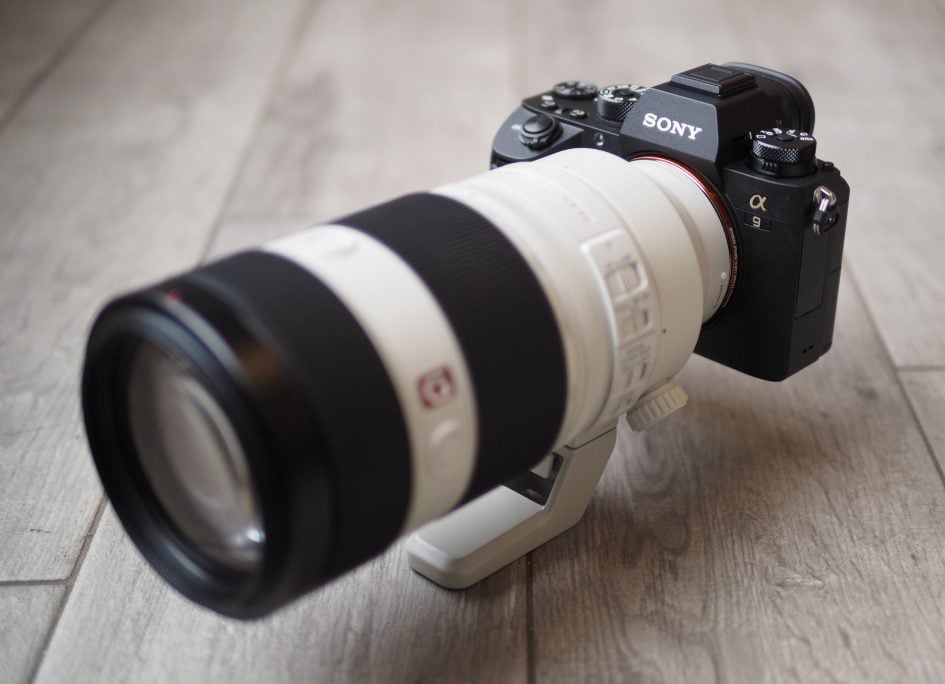
The Sony Alpha A9 is a professional 24.2 Megapixel full-frame mirrorless camera, aimed at professional sports photographers. Announced in April 2017, it features the first full-frame stacked CMOS sensor which includes integrated memory and 20 times faster data readout compared to previous full-frame sensors. This allows the A9 to shoot at 20fps with autofocus for up to 241 RAW files or 362 JPEG images.
The A9 employs a fully electronic shutter to allow fast, silent and vibration-free shooting, shutter speeds up to 1/32000, and electronic composition with no blackout. Meanwhile faster speeds allow the A9 to deploy an anti-distortion shutter which claims to eliminate rolling shutter artefacts which have previously plagued electronic shutters. The embedded phase-detect AF system features 693 AF points spread across 93% of the frame, and operates at 60fps; Sony describes the AF speed as 25% faster than the A7r II.
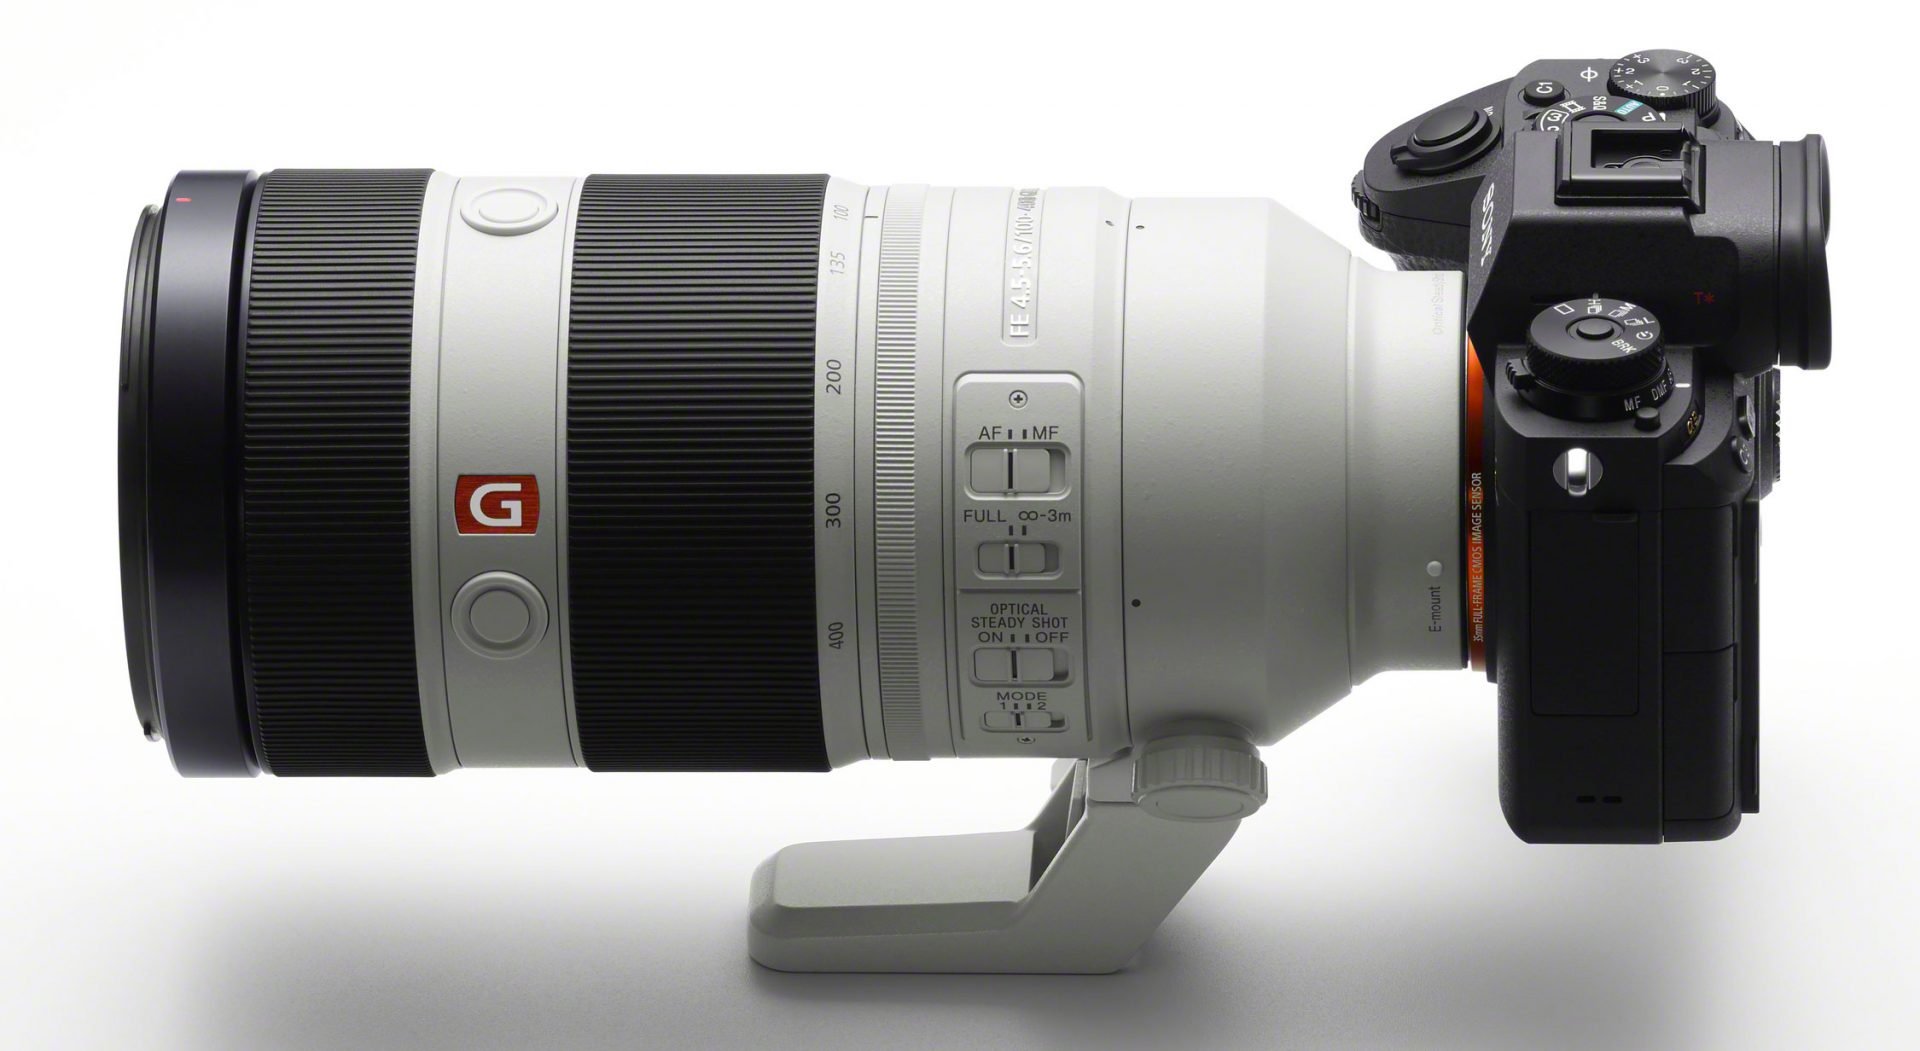
The body becomes the first full-frame Sony mirrorless with dual SD slots (one exploiting UHS-II speed), and now features a new Z-series battery with 2.2x the life of W batteries, an AF joystick and touchscreen, along with dedicated drive mode and focus mode dials, an AF ON button, Ethernet port and a higher resolution quad-VGA (1280×960 pixel / 3686k dot) OLED electronic viewfinder with a 60 or 120fps refresh and again no blackout while shooting. Meanwhile there’s built-in 5-axis stabilisation with five stops of compensation that works with any lens you attach, along with 4k video using the full-frame or Super 35 frames, or 1080p at up to 120fps. For my in-depth review, I tested the A9 at multiple events over a period of one year to see what it could deliver in practice, and crucially see how it compares to its established pro rivals from Canon and Nikon. I’ll start with my podcast review with Doug Kaye, presented as a video below, or in audio-only version below it.
Before going any further, a quick note on Sony’s full-frame Alpha mirrorless range: there’s four models, and while each is very capable at a variety of tasks, they’re targeted at different specialities. The A9 is aimed at professional sports and events and is the most expensive body in the range; the A7r (currently in version III) delivers the highest resolution images for the best photo quality; the A7s (currently in version II) is designed for the best quality video, especially in low light; leaving the A7 (currently in version III) as the most affordable all-rounder. See my Sony A7r III review, Sony A7 III review and Sony A7s II review for more details. Now on with my A9 review!
Check prices at Amazon, B&H, Adorama, eBay or Wex. Alternatively get yourself a copy of my In Camera book, an official Cameralabs T-shirt or mug, or treat me to a coffee! Thanks!
Sony Alpha A9 design and controls
The Alpha A9 is unmistakably recognizable as a Sony mirrorless camera, sharing many design characteristics with the earlier A7 Mark II series bodies. But thankfully Sony has responded to criticisms and feedback over those models, enhancing a number of physical aspects from controls to storage and power to connectivity.
Measuring 127x96x63mm and weighing 673g including battery, it’s extremely close in size and weight to the A7r Mark II – indeed the same width and height, less than 50g heavier, and only a few millimeters deeper. The additional weight and depth is almost entirely down to the new battery and the grip which accommodates it, more about which later.
In your hands it unsurprisingly feels a lot like the A7r Mark II: compact but solid with enough of a grip and thumb rest to hold it securely and sufficient use of rubber surfaces to prevent slippage. Sony’s upgraded the build quality a little with greater use of magnesium alloy (now also in the grip), as well as employing six rather than four screws on the lens mount to better-handle large lenses. In terms of weather-proofing, Sony describes the A9 as being dust and moisture resistant, although wouldn’t be drawn over specifics or whether it was superior to the A7 Mark II series in this regard. Judging from the body and in particular the port doors, I’d say it’s essentially the same as the A7 Mark II bodies in terms of sealing; the flimsy port doors remain a potential weak spot with fiddly plastic flaps that clip into place, although at least the new memory card door seems fairly substantial.
Compared to other mirrorless bodies, I’d say Olympus still comes across as most confident against the elements with the OMD EM1 Mark II, and the company is happy to demonstrate it receiving significant splashes of dirt and water. But of course Sony isn’t pitching the A9 against the EM1 Mark II; with an asking price of over twice the Olympus and professional aspirations to boot, it sees the Canon EOS 1Dx Mark II and Nikon D5 as its peer group.
One look at the 1Dx Mark II or the D5 shows they’re physically completely different beasts. With their built-in portrait grips and giant batteries, both bodies are considerably larger, presenting an almost square front, and weigh over double the A9. For the record, the EOS 1Dx Mark II measures 158x168x83mm and weighs 1340g, while the D5 measures 160x159x92mm and weighs 1405g, making them both wider, deeper, much taller and considerably heavier.
So the Alpha A9 is smaller, lighter, more portable and certainly easier to squirrel-away in a bag or even a large coat pocket. But while the pro Canon and Nikon bodies are considerably heftier, they also feel more physically confident in your hands. I would have to leave each out in a shower to really see for sure, but I’m pretty sure the 1Dx Mark II and D5 are better sealed and more likely to survive a fall or hard knock too. Some photographers will also appreciate their larger grips and find their heft reassuring, especially when coupled with larger lenses. You can boost the A9’s heft by fitting the optional battery grip, but it remains a much smaller camera.
Only you can decide if the A9’s smaller size and weight are a good or a bad thing. Personally speaking I’m over the days of lugging around a heavy pro DSLR and much prefer operating with a more nimble system, but equally I know many seasoned sports pros who won’t be parted from their 1Dx Mark II and D5 bodies. I reckon Sony could have gone for a slightly larger and heavier body if it enabled the A9 to sport a particularly comfortable grip and superior toughness, but I also appreciate the company is trying to deliver a different proposition here. I’ll be making many more comparisons between the A9 and rival bodies throughout this section and the review, but there’s no doubt it’s a different tool to a traditional pro DSLR and depending on your outlook and preferences that again could be a good or a bad thing.
But while Sony hasn’t mucked about too much with the build and design of its full-frame mirrorless, it has made a number of necessary and very welcome changes to the controls and day-to-day handling of the camera.
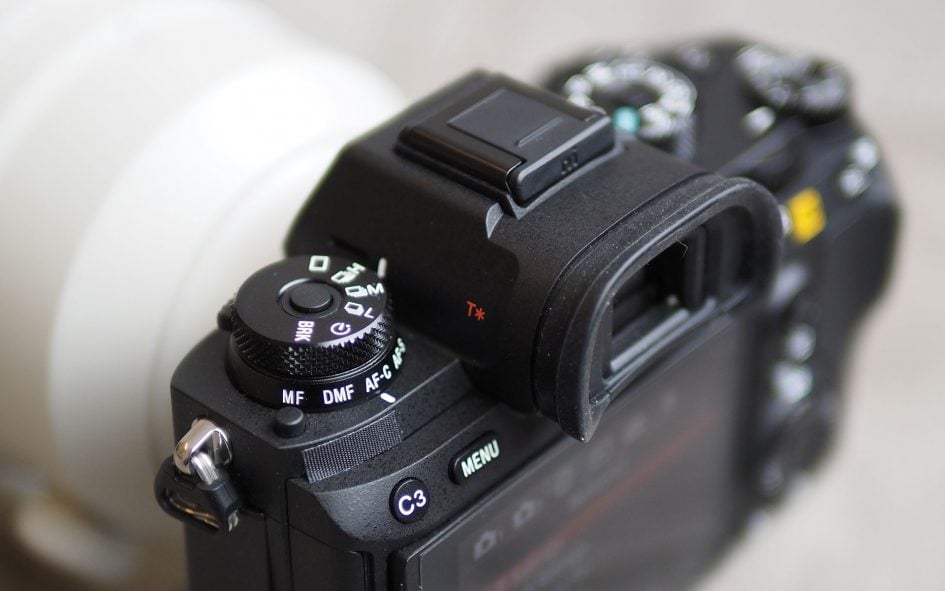
First that upper surface to the left of the viewfinder hump which previously lay empty on all A7 bodies is now home to new dedicated dials for the drive and autofocus modes. Finally you can directly dial between single AF, continuous AF or manual focus (as well as DMF), or between single drive, self-timer, bracketing or the three continuous burst modes. As you merrily switch between them, it’s easy to forget the almost unforgiveable approach of the earlier A7 bodies where you’d need to scroll through a menu. If I had to make a complaint, it’d be that the locking buttons – which need to be held in order to turn the dials – are a bit fiddly, especially the one for the AF mode. But don’t get me wrong, this is a serious upgrade in usability, albeit one that should have always been there on the A7 series.
The upper right surface of the A9 remains close to the A7 Mark II bodies with a lockable mode dial (albeit now lacking frivolities like panorama or scene presets), a shutter release with a power collar (I’d have preferred a chunkier switch on a ‘pro’ body), a dedicated exposure compensation dial (still not lockable and still easily turned when pulled out of a tight bag), and a pair of custom buttons. The finger and thumb dials remain.
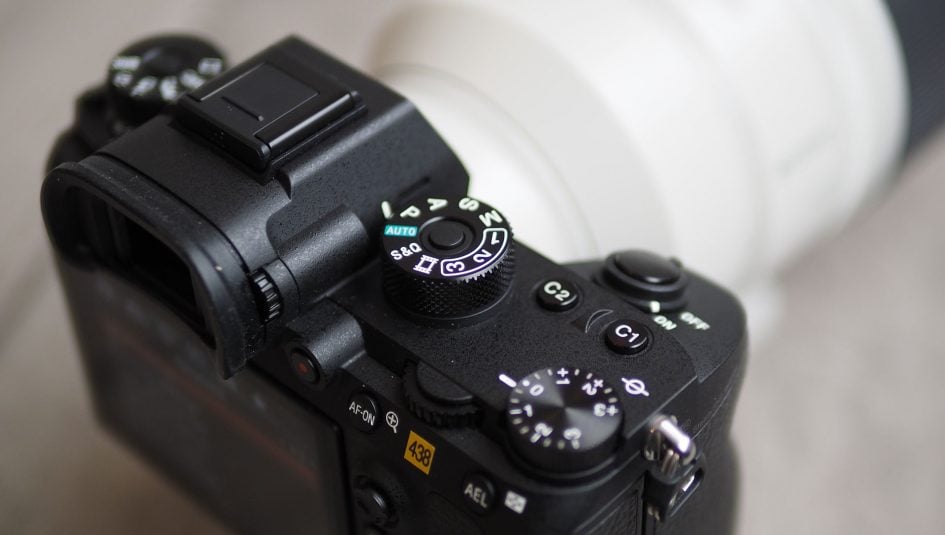
Round the back there’s been more significant changes. The sloping surface between the vertical rear side and the flat top is now steeper, making it easier to access the buttons. More importantly the C3 custom button now joins the Menu button on the left side to make room for a repositioned movie record button and the very welcome addition of an AF-ON back focus button. While it takes some getting used to the new position for the movie button, I much prefer its new home, and I know pro sports photographers will love having an AF-ON button.
For me though, the real excitement starts just underneath: a new joystick for positioning the AF area. It’s not quite as pronounced as that on, say, the Fujifilm XT2, but I’m delighted to find it here as it makes positioning the AF area so much easier than clicking through the menus of previous models – and there’s more I’ll describe in a moment. Below this is a tilting thumb wheel, but it’s a new design that provides much better clickable feedback than before. No, it’s still not as nice as the more substantial wheels on the back of Canon’s larger EOS bodies, but it’s still a big improvement over the A7 bodies. Indeed the buttons all-round feel better than before, although I feel they could be even larger still and as always I’ll also put in a request for backlit buttons – something that should be standard on any higher-end body in my view.
But with the drive and AF mode dials, the AF joystick, AF-ON button and improved thumb wheel, the A9 really has raised its game compared to the A7 series. Again it was something that needed to happen, but it makes the A9 so much more pleasant to shoot with than the models which preceded it.
I should also add the four Custom buttons (three dedicated, one shared with the Trash button) can support a really handy feature called ‘Recall Custom Setting during Hold’. This allows you to assign a number of settings to a custom button that are deployed as you hold it, but these can include the exposure, AF and drive mode, even specific shutter, aperture or AF area settings. I find this invaluable as I frequently find myself switching between groups of settings – for example going from Wide Area AF with Continuous AF to Flexible Spot with Single AF, or for having a backup set when another isn’t working as hoped in a particular situation. Now I can assign up to four groups of settings and deploy them immediately by simply holding-down a custom button. Finally Sony is beginning to understand how photographers work and include operational features that really help them. Many thanks to Rishi Sanyal of dpreview for alerting me to this feature on the A9.
Moving onto composition, the A9 appears superficially similar to previous A7 Mark II bodies, but there’s two important upgrades: the viewfinder is now higher resolution and the screen is now touch-sensitive. Yes, an AF joystick and a touchscreen – I could almost hug you Sony, although again both have been a long time coming.
The electronic viewfinder delivers the same 100% coverage with a large 0.78x magnification as the A7r Mark II, but the OLED panel now features ‘Quad VGA’ resolution, boosting the detail from 1024×768 to 1280×960 pixels. The difference can be subtle, but look closely at the finest details, especially on text or distant grill patterns, and you’ll notice the A9’s viewfinder is crisper and better avoids any kind of moire, fuzziness or other electronic artefacts. The end result is an image that looks more real, while still enjoying the large immersive nature of its predecessors. You also get the wealth of shooting aids including a dual-axis leveling gauge, live histogram, alignment grids, magnification, zebra patterns and focus peaking.
The refresh is fast and smooth too: 60fps as standard, boostable to 120fps in a menu if desired. When shooting continuously, the viewfinder refresh falls back to 60fps to match the speed of the AF system, but the detail remains high and importantly when shooting with the electronic shutter, there’s no lag or blackout. This is a really big deal for the A9 as previous mirrorless cameras often suffered from lag between frames, but now both it and any blackout between frames has been eliminated. This makes it easy to follow action even as it moves erratically and also gives the A9 an advantage over the mechanical shutters of rival DSLRs which can’t help but present momentary blackout between frames.
The screen remains a 3in / 4:3 panel that can tilt up by roughly 90 degrees or down by roughly 45; I wish it were side-hinged and fully-articulated like the OMD EM1 II or GH5, but Sony continues to resist. In a surprise upgrade though, the A9’s screen becomes the first full-frame mirrorless camera from Sony to be touch-sensitive – hallelujah! Amazingly Sony is also playing catch-up with traditionalists Canon and Nikon in this regard as both the EOS 1Dx Mark II and D5 sport touchscreens – and with larger 3.2in panels too, albeit fixed in place.
On the Alpha A9 you can now tap to reposition the AF area if desired, tap to pull-focus in movies, or double-tap an image in playback to enlarge it before pushing it around. Sadly there’s little else that’s touch-sensitive though: you can’t swipe through full images in playback, you can’t tap any of the menus despite the chunky icons of the superimposed Function menu being ripe for it, there’s no way to tap the on-screen keyboard to enter copyright details or make quiet adjustments while filming video, and there’s no AF touchpad facility either (although to be fair when composing through the viewfinder, the AF joystick is a more preferable way to adjust the AF area).
I should also mention screen brightness. Previous Sony cameras really benefitted from boosting the screen brightness for outdoor use with the Sunny Weather option, but this was greyed-out when filming 4k or 1080 at high frame rates. Now on the A9 I am delighted to report the Sunny Weather option remains available when shooting 4k or high frame rate 1080p – a very important improvement.
In terms of connectivity, the A9 shares a number of ports with the A7r Mark II: behind one flap you’ll find 3.5mm microphone and headphone jacks, and behind another are a Micro USB for output and charging and a Type-D Micro HDMI port. Like the A7r Mark II you can not only charge the camera over USB, but also power it for live shooting – something that’s unique to Sony. Sadly though Sony’s not taken the opportunity to upgrade the USB port speed from 2 to 3.
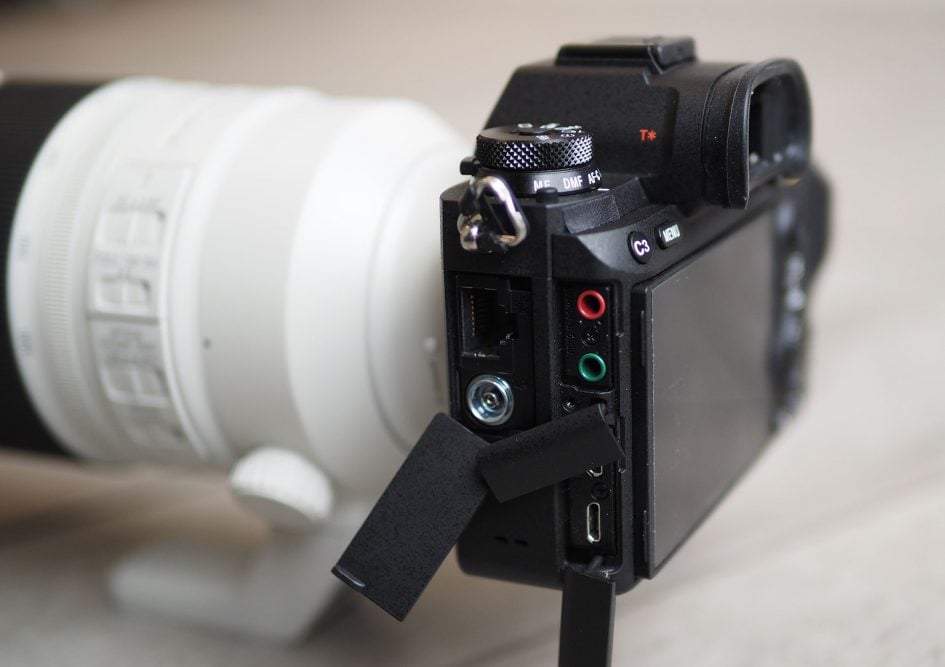
In a first for a Sony mirrorless though, the A9 features a third flap, behind which you’ll find a PC Sync port for connecting to external lighting and an RJ-45 wired LAN port. Both are standard features on the 1Dx Mark II and D5, so necessary additions here, but it’s still nice to welcome them. In case you were wondering, the LAN port allows very quick file transfer at Gigabit Ethernet speeds and also supports secure FTP connections; LAN ports have also become a common way for pro sports photographers to quickly deliver images from events, so having one is an important capability for the A9 to compete in this environment.
Like earlier Alpha mirrorless bodies the A9 is equipped with Wifi and NFC, but now complements them with a low-power Bluetooth option (first seen in the A6500) which can be used to seamlessly tag location details from your phone as you shoot – I’ll detail these wireless capabilities later, but should point out neither the Canon EOS 1Dx Mark II nor the Nikon D5 feature built-in Wifi as their construction prevents it from working effectively – so while the build may be tougher, you will need to buy and connect a Wifi accessory for wireless capabilities. The EOS 1Dx II does however feature a built-in GPS receiver, although again the Bluetooth smartphone solution adopted by Sony works very well too.
A quick note on flashes and lighting: the A9 offers both a hotshoe and a PC Sync port for connecting to external lighting, but both were disabled on my test sample when using the electronic shutter. There can certainly be syncing issues with electronic shutters and artificial lighting, so perhaps Sony’s just being cautious. I’ll report back if the A9 ends up being able to sync with the electronic shutter, but in the meantime there’s the traditional mechanical shutter option for use with artificial and flash lighting.
Another important upgrade for the A9 are twin memory card slots, a feature that’s become commonplace in the mid-range category upwards, and one that was sorely absent on the A7 Mark II bodies. Like other cameras with twin card slots, you can configure the camera to seamlessly overflow from one to another when the first card fills, record different formats to separate cards, or simply make a duplicate as you shoot for backup.
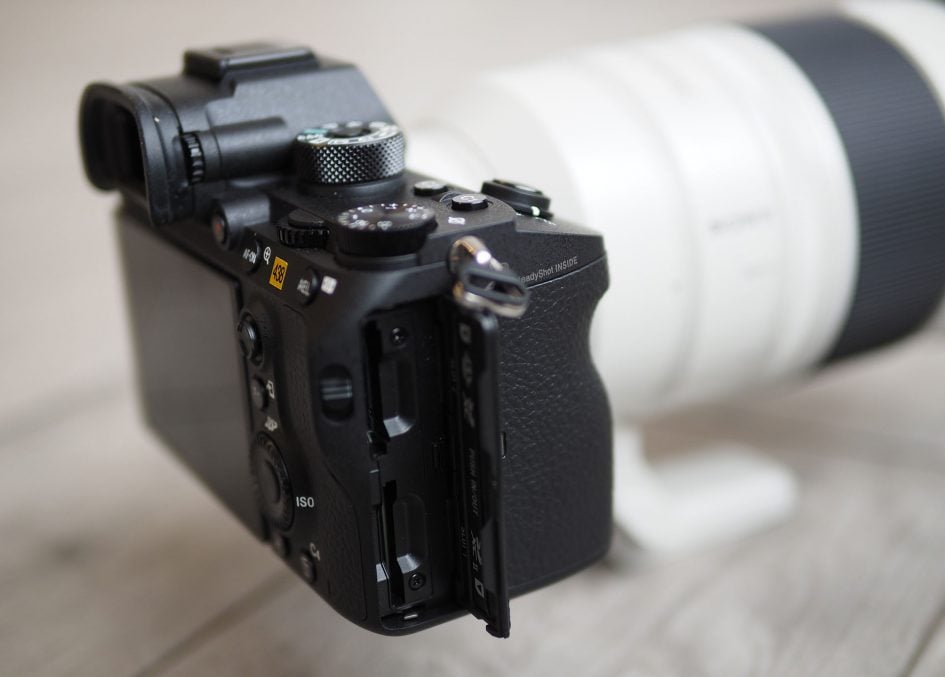
Sony’s opted for twin SD card slots and like Fujifilm’s XT2 and the Olympus OMD EM1 Mark II, only one of them will exploit the extra speed of UHS-II cards. To date, the only camera I’ve tested where both SD slots can exploit UHS-II speeds is the Panasonic Lumix GH5. So for the fastest flushing of the buffer on the A9, get yourself a fast UHS-II card and keep it in the lower slot.
It seems a little mean to only equip one slot of a camera that sells itself on speed with UHS-II bandwidth, but the bigger issue is the A9 sticking with the SD format itself. UHS-II cards can be fast in UHS-II slots, but they’re not as quick as the fastest pro card formats around. For their pro bodies, Canon and Nikon offer various combinations of Compact Flash, C.Fast or XQD card slots, and the latter pair in particular are extremely quick at clearing a buffer. While shooting with the A9, I was impressed by the size of its buffer and never actually bumped-up against it in real-world situations, but I was aware of the camera writing data to the card. While the camera was emptying its buffer, I could continue to fire smaller bursts and view the most recently-written images, but some menus and functions are inaccessible during the process which can prove frustrating. In contrast, if you shoot with an EOS 1Dx Mark II with C.Fast or a Nikon D5 with XQD, you’ll be clearing even full buffers in a second or two.
For professional shooters who need a camera that remains fully responsive and accessible at all times, even after shooting a hundred RAW images in a burst, this could be a deal-breaker. The A9 can certainly shoot quickly, autofocus quickly and capture huge bursts, but if you fill its buffer, you could be waiting a while for it to completely clear. I realize the A9’s body size rules out the larger formats but XQD cards aren’t huge and I’m sure pro sports shooters would have accepted a slightly larger grip to accommodate a faster format. But on the positive side, at least a Sony mirrorless camera now has twin card slots – that’s still progress.
Another criticism of mirrorless cameras is relatively poor battery life compared to shooting with the optical viewfinder on a DSLR. This is because 100% electronic composition with a screen / EVF and sensor always on during composition can’t help but consume more power. This has been exasperated by the use of small batteries on some bodies – especially Sony ones – to maintain a compact body size. The result has been most mirrorless shooters carrying multiple batteries.
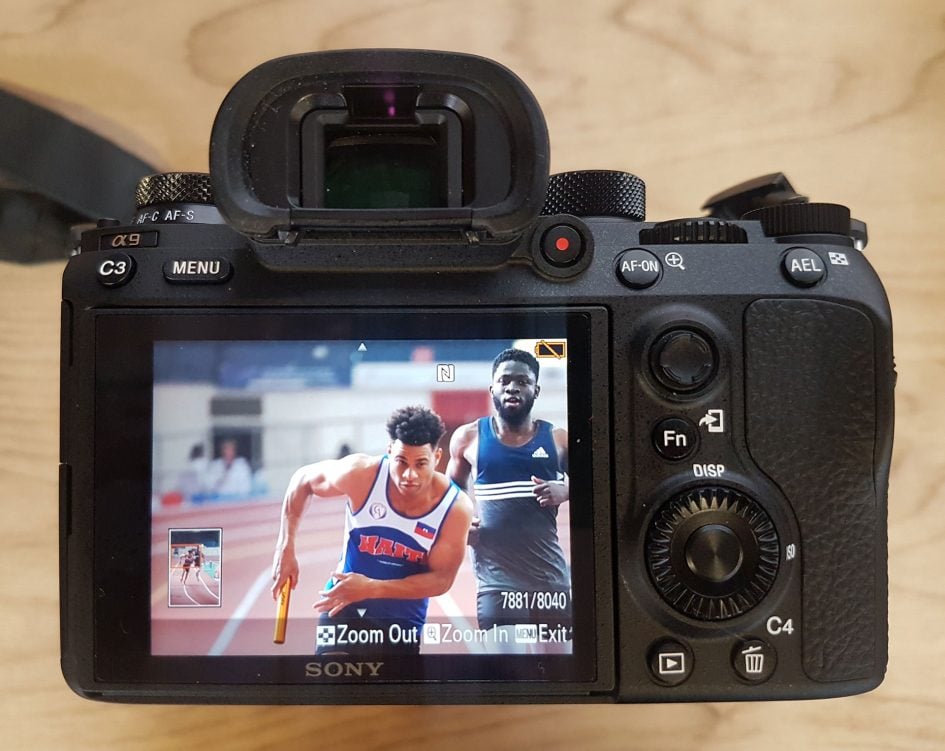
The tide is changing though with both Olympus and Panasonic developing larger capacity batteries for their flagship bodies and now at last Sony has done the same for the A9. So it’s out with the old NP-FW50 which powered so many older Sony bodies, and in with the new NP-FZ100 which sports over double the charge. Sony quotes approximately 480 shots with the viewfinder or 650 with the screen under CIPA conditions, which is a big improvement over the NP-FW50 in the A7r Mark II which only offered 290 shots with the viewfinder or 340 shots with the screen. It’s also worth noting in some conditions you’ll achieve more or less shots. During a solid day’s shooting with the A9, I fired-off a large number of 20fps bursts with the electronic shutter, along with several minutes of 4k video, some Wifi and Bluetooth connectivity, a handful of mechanical shutter images and a great deal of chimping in playback. One battery ended up lasting me the entire day with the final shutter count reading just over 8000 images – see photo below. Not bad for a camera that composes electronically.
Sony provides the A9 with an external AC charger (taking about 1.5hrs to fully charge) but it can also still charge the battery internally over USB if preferred (taking 2.5 hours for a full charge). Like other recent Sony cameras, the A9 can additionally exploit USB as a power source when shooting, whereas all others limit it to charging only. Unsurprisingly, Canon and Nikon DSLRs do not support USB charging.
While the A9’s expanded battery is impressive for a mirrorless camera, its figures of course pale to the numbers you can achieve with a pro DSLR using its optical viewfinder – especially when you consider the hefty batteries accommodated by the built-in portrait grips of the EOS 1Dx Mark II and D5. That said, if we’re counting the shots with a portrait grip, it’d be fairer to include the VG-C3EM grip accessory for the A9 which allows it to use two batteries, doubling the total life to around 1000 shots which actually begins to approach the 1210 quoted by Canon for the EOS 1Dx Mark II.
Offering even more power is the new NPA-MQZ1K Multi Battery Adapter kit which can accommodate up to four NP-FZ100 packs, while transferring power to the camera via either a stalk that fits into the A9’s battery compartment, or via USB to any device. The adapter also features tripod threads, allowing it to be mounted on a video cage, making it a handy accessory for owners of the A9, not to mention other bodies.
So while there’s a few physical disappointments such as no support for anything faster than UHS-II or USB-2, Sony has made a significant number of improvements to the A9 over the A7 Mark II series: you’re getting a much bigger battery, twin card slots, a more detailed viewfinder, touchscreen, AF joystick, AF-ON button, drive and AF mode dials, LAN and PC Sync ports, and Bluetooth, along with greater customization opportunities. They add up to a hugely improved camera over its predecessors, but again most of the improvements were necessary to bring it in-line with rivals.
Sony Alpha A9 focus and continuous shooting
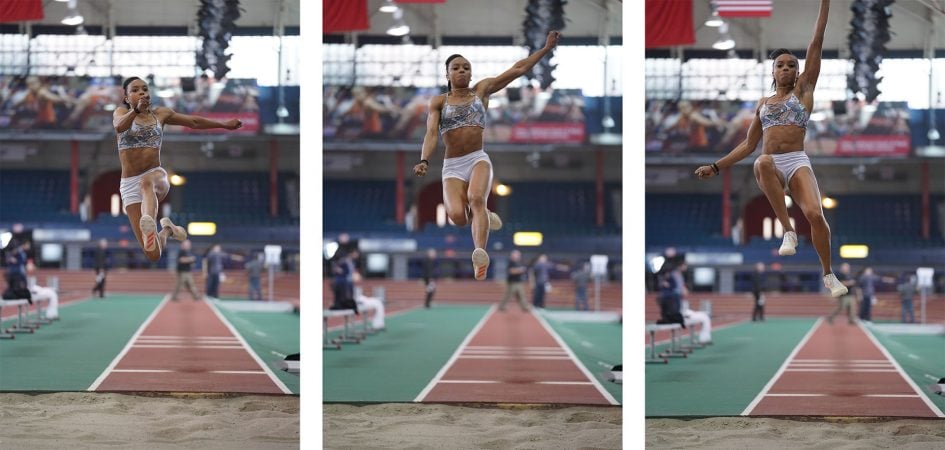
Sony’s Alpha A9 features one of the most modern and sophisticated approaches to continuous autofocus and burst shooting around, exploiting the benefits of an electronic shutter system more than any other company to date. Deploying the electronic shutter allows the A9 to shoot long bursts of 24 Megapixel images at up to 20fps in complete silence, without any vibrations, at shutter speeds up to 1/32000, and with no viewfinder blackout either. A handful of other recent cameras have also exploited electronic shutters for fast burst shooting, most notably the Olympus OMD EM1 Mark II, but the Alpha A9 is the first full-framer to really get behind it for action photography – and I’m delighted to report it works extremely well, more of which in a moment.

Above: Sony A9 with FE 70-200mm f2.8 GM at 200mm. Expand Flexible Spot AF. 20fps. 1/2000, f2.8, 4000 ISO
Electronic shutters have always been able to shoot in silence at high shutter speeds and without vibration, but what makes the implementation of the A9 unique is the sheer speed at which its stacked CMOS sensor can retrieve data. This is what allows it to minimize the traditional risks of skewing from a rolling-shutter while also delivering a live image while shooting with no blackout or lag between frames. Sony also reckons its banished previous limitations on dynamic range when shooting electronically, although I should note it does limit the maximum sensitivity to 25600 ISO. The speed of the sensor coupled with the front-side LSI also allows Sony to claim impressive buffer depths of 241 RAW files or 362 JPEG images when using UHS-II cards.
Sony A9 shooting remotely at 20fps with FE 16-35mm

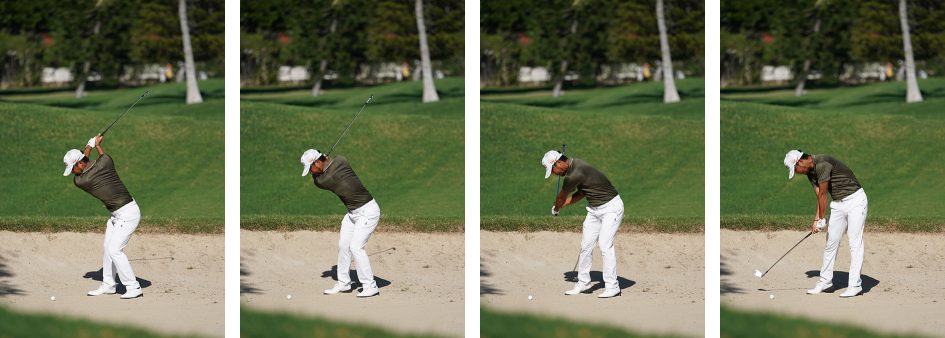
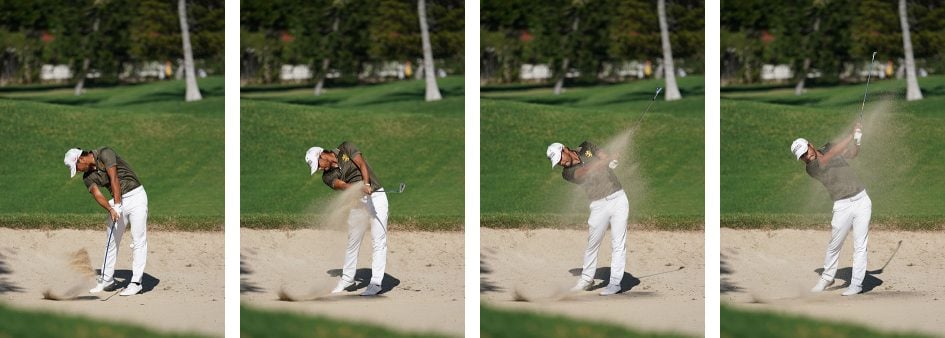
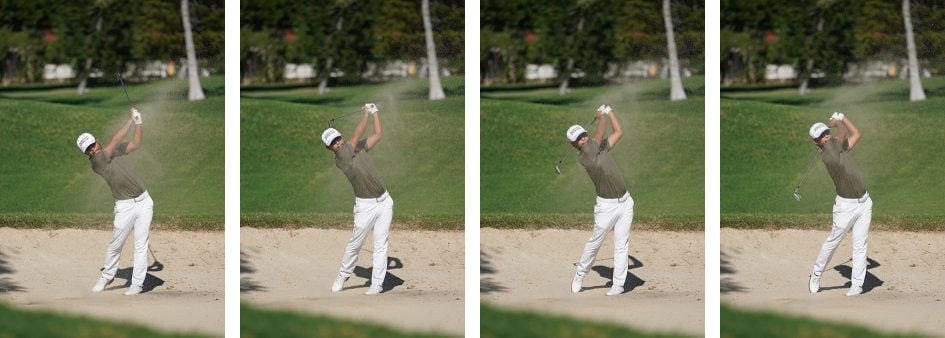
The ability to shoot silently at fast speeds with effective continuous autofocus allows you to capture shots at times that were literally out-of-bounds for traditional mechanical shuttered cameras. For example at some sporting events, it’s strictly forbidden to make any camera sound prior to contact with the ball, such as a golfer teeing-off. Traditionally, a photographer would have to wait for contact with the ball before they could start shooting, but now with the A9’s silent electronic shutter they can start shooting at the top of the back-swing. I put it to the test at the Sony Open Tournament in Hawaii for this sequence below. Of course many mirrorless cameras have offered silent electronic shutters before, but the difference here is the additional benefit of fast bursts, effective continuous autofocus and minimal skewing.
Sony A9 and FE 100-400mm. Silent shooting at 20fps.
While the A9 offers a mechanical shutter option (sensibly deployed with an electronic first-curtain only by the way), it’s mainly reserved for compatibility with flash and other artificial lights, or to access the camera’s maximum sensitivity of 204800 ISO. If you choose to shoot continuously with the shutter manually set to mechanical, you’re looking at the A7r Mark II’s fairly leisurely rate of 5fps with the usual viewfinder blackout and lag between frames. Set the shutter type to Auto and the A9 will select mechanical for single drive, but electronic for all the continuous burst modes, whether high, medium or low – and again all of these are delivered with no lag or blackout in the viewfinder. It’s clear Sony is sufficiently confident about the performance of the electronic shutter on the A9 that it’s effectively the default for burst shooting unless you go out of your way to circumvent it.
Above: Sony A9 with FE 70-200mm f2.8 GM at 200mm. Zone with Face Detection AF. 20fps. 1/2000, f2.8, 1600 ISO
Whichever shutter you select on the A9, you’ll be using it with Sony’s best autofocus system to date, embedding a whopping 693 phase-detect AF points across 93% of the full sensor area. Compare that to the previous A7r Mark II which embedded 399 phase-detect AF points across 45% of its sensor area and it’s clear how far Sony’s progressed. Now the A9 can deploy the confidence and speed of phase-detect autofocus across almost the entire sensor, giving it the kind of frame coverage enjoyed by the A6300 and A6500, but with a much larger full-frame sensor area and the added benefits of zero blackout and 20fps bursts.
The A9’s vast array of AF points sounds overwhelming compared to the competition with Nikon’s D5 employing 153 AF points and Canon’s EOS 1Dx Mark II offering a relatively modest 61. But as always it’s important to understand not all AF points are created equal: a large number of the AF points on the Canon and Nikon are cross-type or even dual cross-type sensors which are sensitive to patterns in multiple orientations. In comparison, Sony has once again stuck with the simplest type of AF point, sensitive to a single axis only; interestingly Olympus is the only current mirrorless manufacturer to deploy cross-type sensors on an embedded array.
There’s no winner in this particular regard as there’s pros and cons to both approaches, but an advantage definitely enjoyed by the A9 is autofocus coverage. When shooting through their optical viewfinders, DSLRs employ separate phase-detect AF modules which concentrate their AF points into lozenge or diamond shapes, which on pro bodies occupy a roughly APSC area of the frame, leaving a thick border around it where the camera won’t autofocus. In contrast, the A9’s phase-detect coverage occupies 93% of the frame, allowing it to autofocus quickly and confidently track subjects even as they approach the extreme edges or corners of the frame; there’s no need to AF lock and recompose as you would with a DSLR. And while Canon’s Dual Pixel CMOS AF allows the 1Dx Mark II to autofocus in Live View across a similar area of the frame to the A9, it doesn’t do so as quickly, nor does it support the fastest burst speeds either.
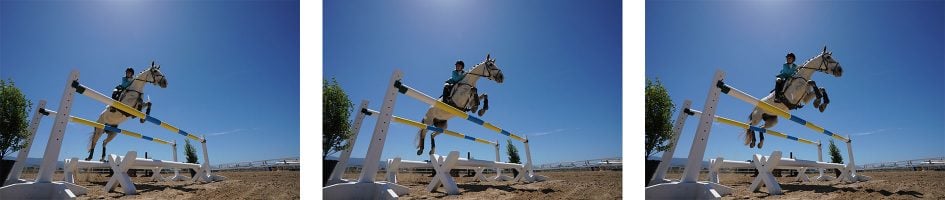
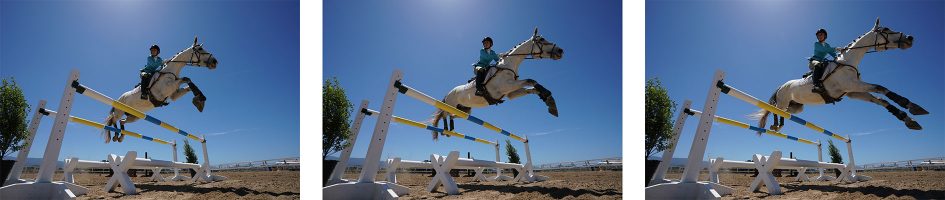
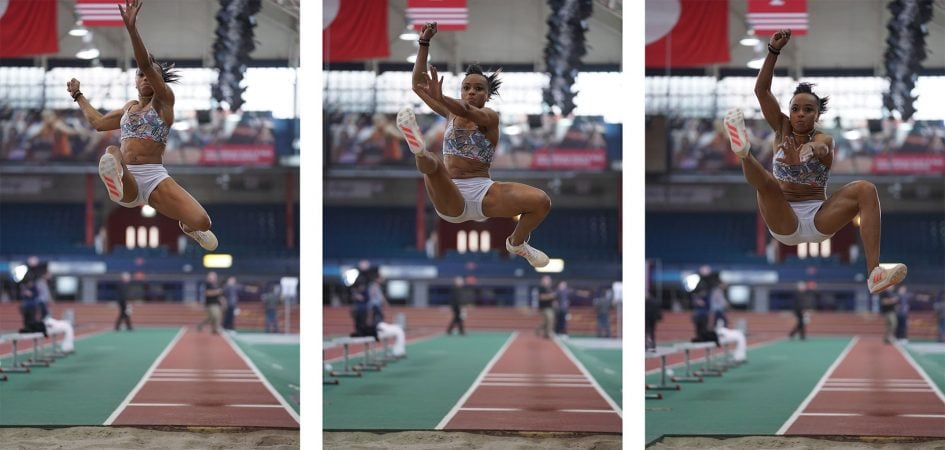
Sony A9 at 20fps with FE 70-200mm f2.8 GM at 200mm f2.8. Face Detection AF, Above: full images, below: 100% crops.

Sony A9 at 20fps with FE 70-200mm f2.8 GM at 200mm f2.8. Face Detection AF, Above: full images, below: 100% crops.

Sony A9 at 20fps with FE 70-200mm f2.8 GM at 200mm f2.8. Face Detection AF, Above: full images, below: 100% crops.

Sony A9 at 20fps with FE 70-200mm f2.8 GM at 200mm f2.8. Face Detection AF, Above: full images, below: 100% crops.

Sony A9 at 20fps with FE 70-200mm f2.8 GM at 200mm f2.8. Face Detection AF, Above: full images, below: 100% crops.

Sony also quotes the new AF system as working at light levels down to -3EV with an f2 lens, beating the -2EV of the A7r Mark II and the -1EV of the A6500. This also compares favourably with the competition with Canon’s EOS 1Dx Mark II also working down to -3EV, leaving Nikon’s D5 to take the lead in the pro bodies at -4EV, although I should add Panasonic’s Lumix mirrorless cameras also work down to -4EV. Either way, it’s great to see Sony lower the light levels under which the A9 will continue to autofocus as this was previously an area where it trailed behind the competition.

Above: Sony A9 with FE 70-200mm f2.8 GM at 200mm. Lock-On Expand Flexible Spot AF. 20fps. 1/2000, f2.8, 6400 ISO
The A9’s phase-detect system is complemented by Sony’s usual 25 contrast-detect AF areas for alternative confirmation or backup. Like most recent Alpha bodies, the A9 employs phase-detect AF to get close in Single AF modes before zeroing-in with a contrast-based wobble, while in Continuous AF it relies completely on the phase-detect AF system.
In terms of AF areas, the A9 gives you the choice of Wide (which chooses for you across the entire array), Zone (which allows you to concentrate the AF on one of nine smaller areas), Center, Flexible Spot (which lets you manually position a single AF point of three sizes), and Expand Flexible Spot (which works like Flexible Spot set to the Small size, but also considers a small area around it).
If AF-C is enabled, you can also choose Lock-on AF which tracks a subject based on its shape and colour, surrounding it with an elastic frame that changes shape and size depending on where it is in relation to the camera. Lock-on AF is available with Wide, Zone, Center, Flexible Spot (small, medium or large), or Expand Flexible Spot. To kick-off you position the active AF area over the subject (or in the case of Wide and Zone, hope that it’s automatically identified), then simply keep the shutter half-pressed for the camera to subsequently track it.
If Face Detection is enabled, it over-rides any of the AF area modes and focuses on the nearest human face instead, wherever it is on the frame, and in AF-C mode it’ll do a good job at tracking people across the frame.

Above: Sony A9 with FE 70-200mm f2.8 GM at 200mm. Face Detection AF. 20fps. 1/2000, f2.8, 5000 ISO
Like other recent Sony bodies, there’s also Eye Detection which can be deployed with a separate button press once face detection has already framed a face. It works well with continuous autofocus, although I still hate having to hold a button down to enable it; surely it’s better to go with a system like Olympus where you can pre-configure face detection to use eye detection automatically if desired (and detected), then just leave the technology to work its magic if the conditions allow.
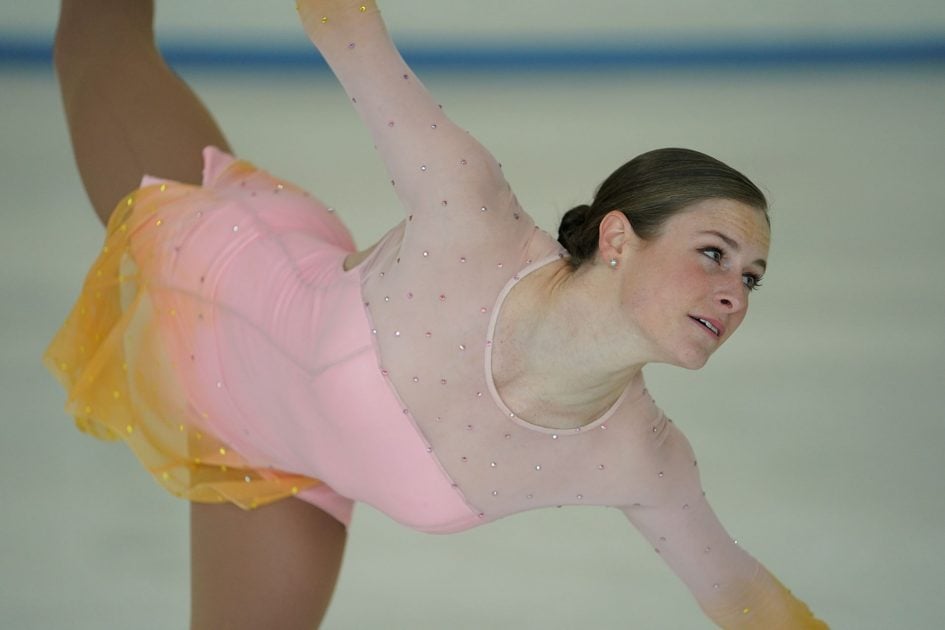
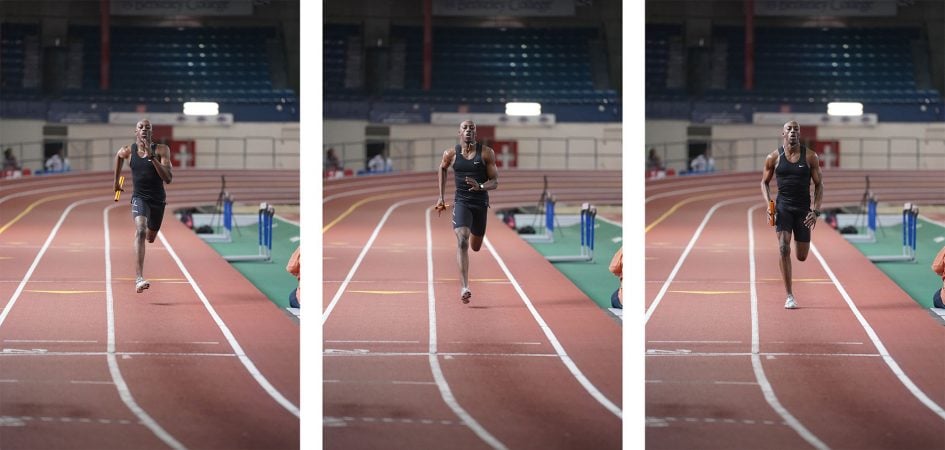
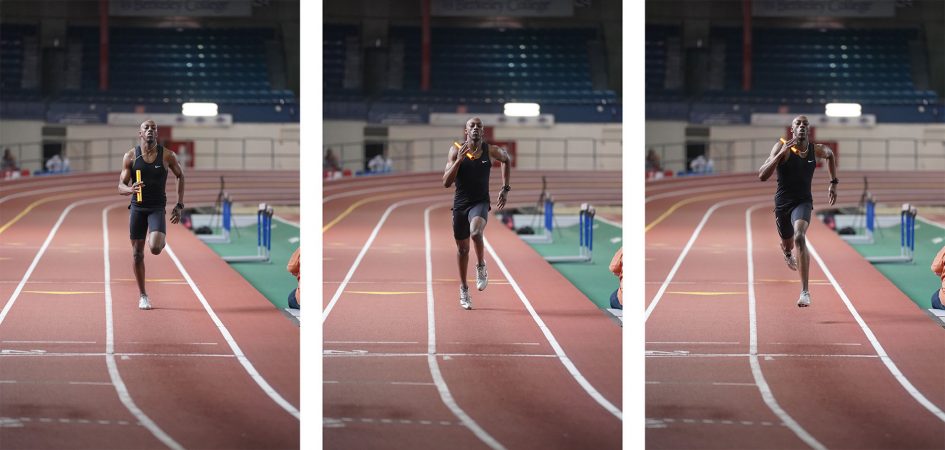
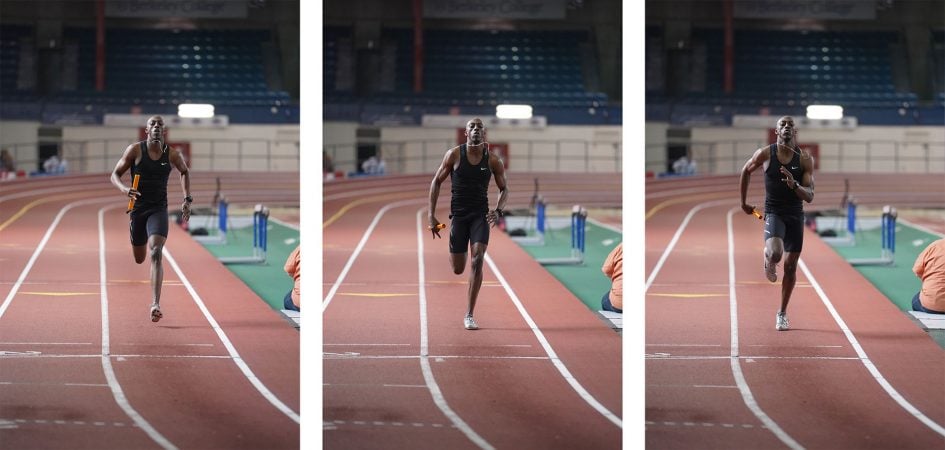
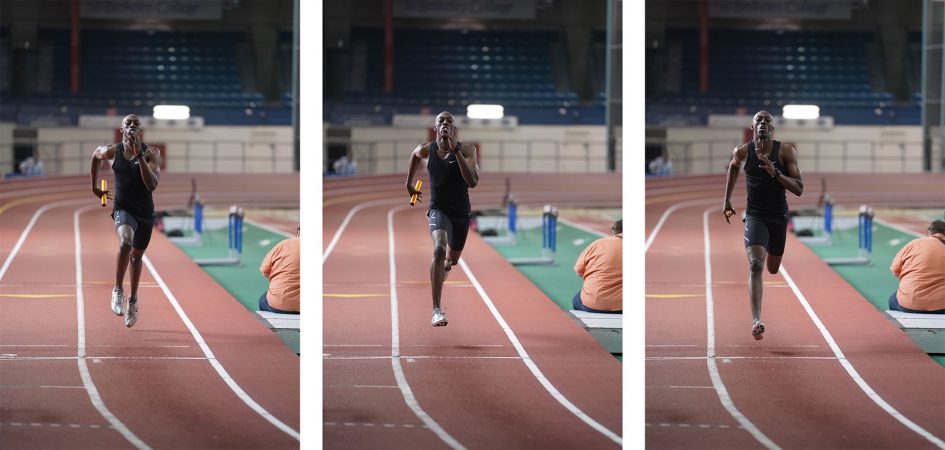
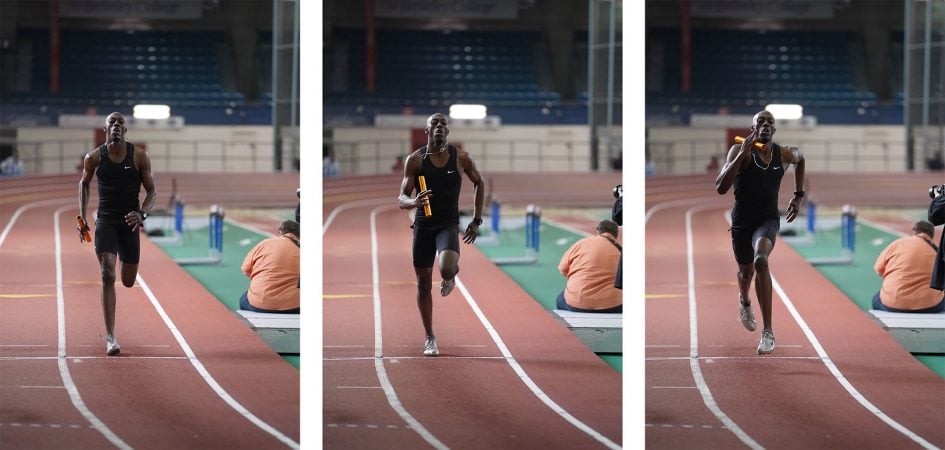
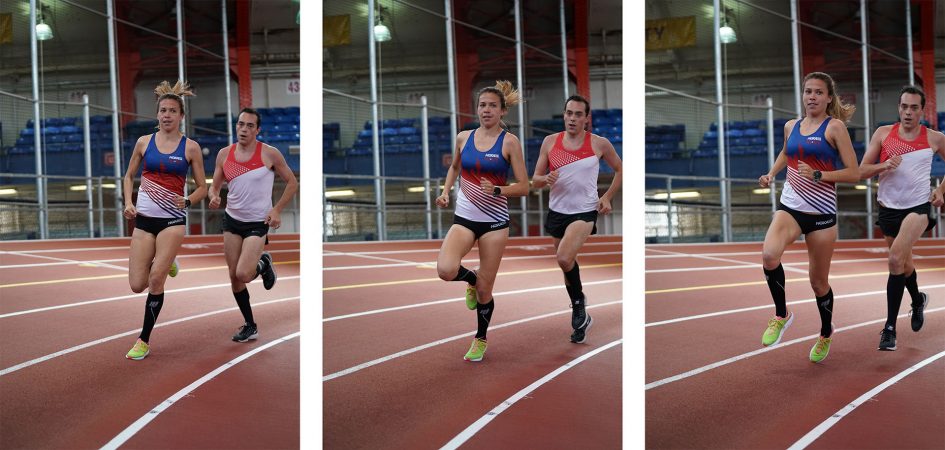
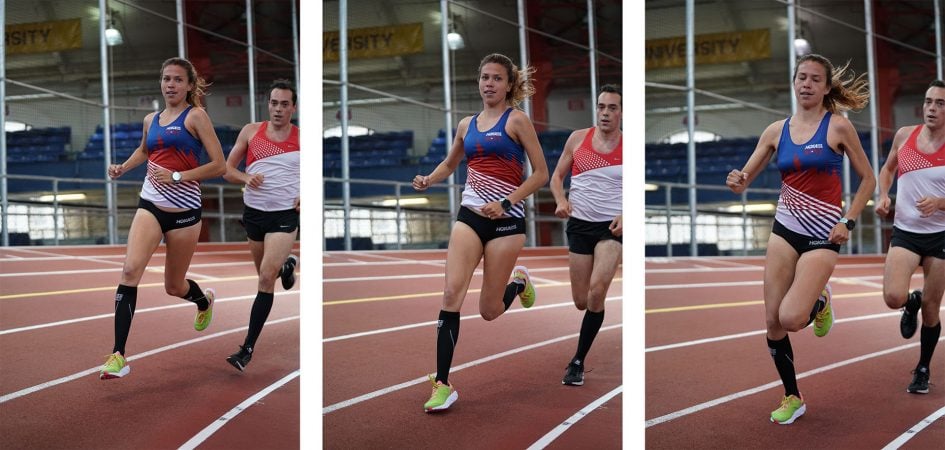
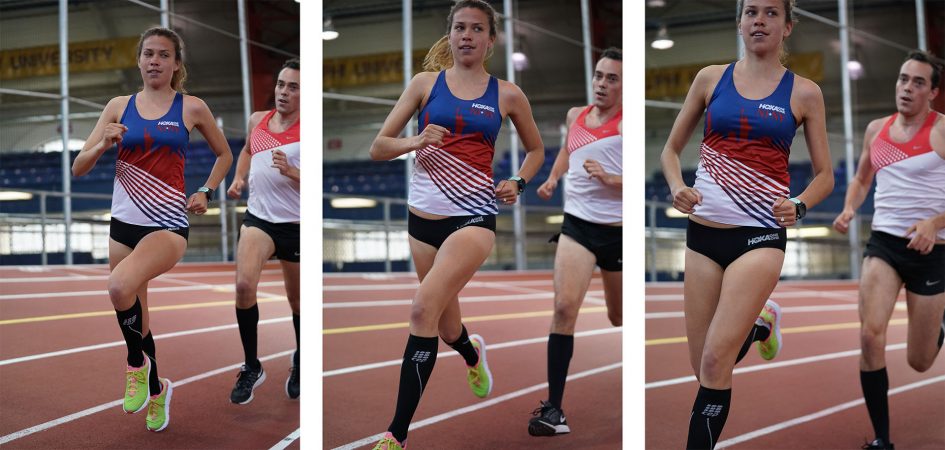
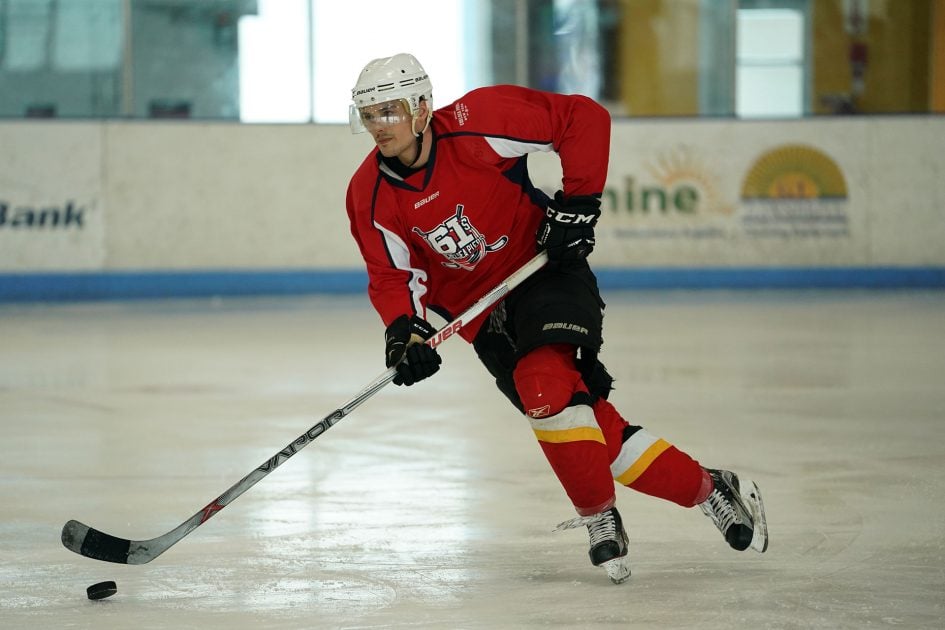
So specifications out the way, how does the autofocus and burst shooting come together on the A9 in practice? To find out I attended a Sony event where I got the chance to shoot figure skaters and ice hockey on a rink, along with covering an entire athletics track meet. I also took the opportunity to perform further tests with cyclists. The bottom line? The AF performance was tremendous, the burst speed impressive and the blackout-free viewfinder while slightly odd at first, quickly proved addictive. Here’s are my experiences.
Sony A9 at 20fps with FE 70-200mm f2.8 GM at 70mm f2.8. Face Detection AF. Above: full images, below: 100% crops.

Sony A9 at 20fps with FE 70-200mm f2.8 GM at 70mm f2.8. Face Detection AF. Above: full images, below: 100% crops.

Sony A9 at 20fps with FE 70-200mm f2.8 GM at 70mm f2.8. Face Detection AF. Above: full images, below: 100% crops.

I almost exclusively shot with the electronic shutter and the Continuous High burst speed of 20fps, using a Sony G UHS-II 128GB card rated at 300MB/s read and 299MB/s write, and inserted into the slot which supports the speed of UHS-II. In terms of lenses I mostly shot with the Sony FE 70-200mmm f2.8 GM, but also tried the new 100-400mm GM as well as the older 24-70mm f2.8 GM for closer action. But before even getting to the performance of the camera’s electronics, it’s the physical changes Sony’s made which you’ll notice first.
On previous Sony mirrorless bodies, you were forced to enter menus to adjust the drive mode, AF mode and AF area; repositioning an AF area was also frequently convoluted. We all complained and finally Sony listened: the A9’s new dedicated drive and AF mode dials make selecting the desired settings as straightforward as they should be, while the addition of an AF joystick and touchscreen mean you can reposition a single AF area or zone with ease. If you prefer to activate the AF with a back button, there’s the long-overdue addition of an AF-ON button. Even better, it’s now possible to configure function buttons to quickly deploy up to four banks of custom settings that can include AF mode, AF area and drive mode. Push and hold a custom button and you could immediately switch from, say, wide area with fast burst speed and continuous AF to a centre point with single AF and single drive. These controls and customisation literally transform the user experience over older Sony bodies that may have sported leading technology but frequently proved frustrating in use. It’s a necessary step too for the A9 to be taken seriously as a pro workhorse and a viable alternative to Canon and Nikon.

Above: Sony A9 with FE 70-200mm f2.8 GM at 200mm. Expand Flexible Spot AF. 20fps. 1/2000, f2.8, 5000 ISO
In terms of AF areas, I generally found myself sticking with Expand Flexible Spot or Zone for approaching subjects like cyclists or runners, but found Wide could be very effective for close-range action. Meanwhile Lock-on AF worked well with the single area modes, allowing you to positively identify the desired subject before then letting the camera track it from that point onwards. As always – and in particular with Sony cameras – the trick is to experiment with all the settings to find combinations that work for your style of shooting with specific subjects.
I was also very impressed with face detection which successfully identified and tracked human subjects even when they were tiny on the frame, and often when the subjects were wearing helmets. There’s a sense of relief when you see the square frame surround a subject as you know it’s pretty much now going to be tracked with a high degree of success while it remains in the frame.
Above: Sony A9 with FE 70-200mm f2.8 GM at 200mm. Zone AF. 20fps. 1/2000, f2.8, 2500 ISO
Whatever AF area I used, I was struck by the expanded coverage of the system. Unless you’ve used cameras like the A6500, there’s an inevitable tendency to try and keep the subject near the centre of the frame where you know it will fall within the best-performing section of the AF system. With the A6500 though – and now the A9 – you can relax and let the subject approach the edges or corners of the frame, confident the camera will continue to track it effectively. This in turn opens up greater compositional flexibility, again with the reassurance you’re not shooting with the AF locked or blind.
Sony A9 at 20fps with FE 70-200mm f2.8 GM at 125mm f2.8. Expand Flexible Spot AF. Above: full images, below: 100% crops.

Sony A9 at 20fps with FE 70-200mm f2.8 GM at 125mm f2.8. Expand Flexible Spot AF. Above: full images, below: 100% crops.

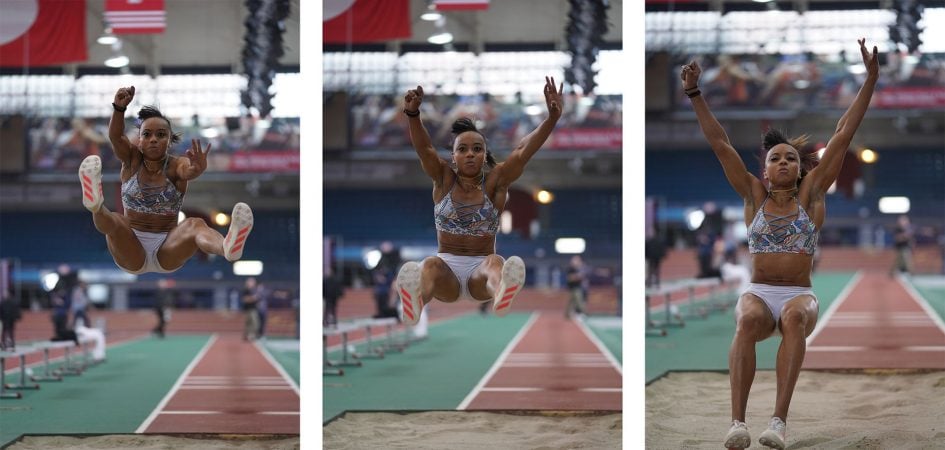
Sony A9 at 20fps with FE 70-200mm f2.8 GM at 125mm f2.8. Expand Flexible Spot AF. Above: full images, below: 100% crops.

I was also impressed by the speed at which the A9 locked-onto a subject and stuck with it. I shot over 8000 frames with the camera (on a single battery charge too, see photo below) and barely noticed it struggling at any point. But again this is the level of performance the camera needs if it’s going to compete with pro Canon and Nikon bodies.
Above: the final frame count after a day’s shooting on a single battery charge: over 8000 photos.
Having seen how far Sony’s come with autofocus over recent generations, I wasn’t entirely surprised to find the A9 performing as well as it did in my initial tests, but I was more sceptical over the electronic shutter experience. It certainly takes some getting used to with an absence of vibration, sound or viewfinder blackout; indeed if you don’t have any of the shooting aids enabled, you can find yourself accidentally shooting a bunch of frames without even realising it.
So the first thing you’ll probably want to do is enable one of the Shoot Timing Display options which superimpose visual aids to indicate when you’re actually taking photos. I found the default thin grey frame worked well, flickering away to indicate the system working – you can see it in action in my video in a moment. I also found the Shoot Timing Display option useful, which indicated the buffer remaining with a decreasing vertical bar on the left side of the image. Then if the venue and situation isn’t too quiet, you could also enable an electronic shutter sound, although of course if you’re at a discreet event like a wedding or presentation, it’s really nice to shoot silently. Anyone shooting video alongside you will be your new best friend.
But even with visual and audible feedback, it’s still quite eerie to shoot with a viewfinder that shows a constant live image without any blackout or lag. It’s something you get used to quickly though, and it’s so refreshing to be able to follow a subject without the view ever disappearing. I filmed the following burst though the A9’s viewfinder to indicate what the absence of blackout – and the flickering grey frame – look like when shooting at 20fps.
Above: In this video I held my phone to the viewfinder of the A9 to show you what it looks like when you’re shooting RAW files with continuous AF and the electronic shutter at 20fps. Notice the absence of viewfinder blackout.
If you’re familiar with electronic shutters you’ll already know about the silence, lack of vibration and super-fast shutter speeds (up to 1/32000 on the A9), but you’ll also know about their limitations so far. Most systems to date operated with a reduced dynamic range, some restrictions involving artificial lighting and worst of all, the risk of rolling shutter skewing artefacts. How well the A9 handles these will make or break the whole concept of shooting electronically. First things first: when set to the electronic shutter the A9 will limit the maximum sensitivity to 25600 ISO (versus 204800 ISO on the mechanical shutter) and also appears to disable any kind of flash sync whether via the hotshoe or sync port. In terms of my initial tests, I didn’t personally notice any compromise in dynamic range or noise compared to the mechanical shutter, but it’s something I’ll keep an eye on during future tests.
As far as the rolling shutter is concerned, I tried making some very fast pans with the A9 at a variety of shutter speeds from 1/2000 up to 1/32000 and found evidence of skewing on vertical lines, like fencing and signage. It’s definitely there if you look for it, but to be fair it’s much better-controlled than any camera I’ve tested to date thanks to the faster readout of the sensor and it’s also important to add I never noticed it in any of my actual real sports shots, including those where I panned to follow the subject. If you’re shooting an aeroplane zooming past at an airshow or a racing car at a motorsports event, you may notice some skewing at the point of maximum panning speed, but for most situations – certainly those involving subjects approaching or receding – it will probably remain invisible.

Above: examples of rolling shutter when panning very quickly
To test the A9’s continuous shooting in a more formal environment, I timed a number of bursts using different settings. In each case I used a shutter speed of 1/500, a sensitivity of 400 ISO and recorded onto a fast Sony UHS-II card fitted in the slot which exploits the full speed.
Note the A9 offers three drive speeds with autofocus for each of the two shutter types: 20, 10 and 5fps with the electronic shutter or 5, 5 and 2.5fps with the mechanical shutter. Note if you’re using adapted A-mount lenses with the LA-EA3 adapter, the fastest burst speed with autofocus on the electronic shutter falls to 10fps, and when using adapted lenses you also lose Eye AF and Lock-on AF options. Also note the fastest speed of 20fps is not available when shooting uncompressed RAW files, at which point the camera falls to 12fps. Oh, and to support the 60fps AF calculations, you’ll also need to be shooting at a shutter speed of 1/125 or faster.
Starting with the electronic shutter with the quality set to JPEG Fine and the drive set to High, I fired-off 363 frames in 18.19 seconds for a speed of 19.95fps. Set to uncompressed RAW, I managed 122 frames in 10.2 seconds for a speed of 12fps. Switching to compressed RAW (which should support the full 20fps speed), I fired-off 220 RAW frames in 11.03 seconds for a rate of 19.95fps, again confirming the A9’s top-speed as quoted.
In terms of buffer flush times, I timed the A9 taking 68 seconds to finish writing 225 compressed RAW images when the card was in Slot-1, compared to 103 seconds to finish writing 214 images when the card was in Slot-2. Clearly Slot-1’s ability to exploit the extra speed of UHS-II cards is greatly beneficial when it comes to clearing the buffer of large bursts. To be fair, it’ll take over ten seconds to fill the A9’S buffer with compressed RAW images at the top speed of 20fps, so it’s unlikely you’ll find yourself doing this often, but equally the write times are considerably longer than a Canon EOS 1Dx Mark II or Nikon D5 when they’re fitted with their respective fastest card technologies. I feel there’s an opportunity here for Sony to develop an accessory for the A9 which features a faster storage solution.
I’ll also add that when switching to the mechanical shutter, the A9’s buffer clears in real-time for JPEG or RAW, effectively allowing you to shoot for as long as you like – albeit at the much slower speed of 5fps.
Sony Alpha A9 shooting modes
Sony’s Alpha A9 may look a lot like the earlier A7r Mark II, but a number of subtle design and control updates make it quite a more serious camera in practice. The target audience is also reflected in the main shooting mode dial which lacks the frivolities of the Panorama and Scene preset modes of the A7r II. Rather, on the A9’s mode dial you have the traditional PASM options, Movie, S&Q, full Auto and three custom positions. Personally speaking I don’t miss the Scene presets, especially as they can be deployed in full Auto, but I wouldn’t have minded the chance to record panoramas even if accessed from a menu.
As with earlier models you can start recording movies in any mode by pressing the red record button, but if you first turn the mode dial to Movie you’ll preview the capture area and access the movie exposure menu. Meanwhile the S&Q mode lets you set a video capture frame rate and an output frame rate for playback, allowing the A9 to interpret footage in-camera – for example, capturing 1080p at the highest 120fps, but interpreting it for playback at 24fps for a 5x slowdown. I have more details on this in the movie mode section.
The Alpha A9 offers the choice of two shutter types: a traditional mechanical shutter (with an electronic first-curtain) or a fully electronic shutter. As noted earlier, you can either manually select the desired shutter type, or let the camera work it out in Auto mode; if the shutter type is set to Auto, the A9 will select the mechanical shutter for single drive and the electronic shutter for all continuous drive modes.
The electronic shutter is required if you want to shoot in silence, without vibration and enjoy both the top shooting speed of 20fps without the viewfinder blackout. It’s available with shutter speeds between 30 seconds and 1/32000 and at sensitivities up to 25600 ISO. The mechanical shutter is available for greater compatibility with flashes and artificial lighting, but reduces the burst speed to 5fps with viewfinder blackout and lag between frames. It’s available at shutter speeds between 30 seconds and 1/8000, but also supports Bulb exposures and a flash sync speed of 1/250, along with an extended sensitivity range up to 204800 ISO.
The absence of downloadable apps on the A9 means it misses out on the touchless shutter capability of earlier models which let you use the viewfinder sensor as a hands-free Bulb trigger. With no evidence of Bulb timers in the menus as far as I could see, there’s sadly no way to program or easily deploy exposures longer than 30 seconds on the A9. I also couldn’t find any timelapse or interval timer facilities in there, again features which were previously deployed by downloadable apps. I feel the lack of built-in interval and Bulb timers are a weakness on a camera of its class and that Sony should find a way to provide them as a firmware update. Or perhaps they simply weren’t yet present in my early test sample.
Exposure bracketing is available in three, five or a generous nine frames. If you’re shooting in three or five frames, you can choose 0.3 to 3EV increments, and when shooting nine frames, you can choose from 0.3 to 1EV increments.
Metering can be set between Multi, Center, Spot (with Standard and Large options), and inherited in part from the A6500, Entire Screen Average and Highlight. Highlight detects the brightest areas and prioritises the metering for them, ignoring potentially darker areas around them – great for compositions against dark backgrounds. Meanwhile Entire Screen Average considers the entire image but better takes the needs of tracking into account.
I mostly used the Multi option and found it did a fair job at evaluating the scene, but typically required greater intervention with exposure compensation than most ‘evaluative’ systems. As always it’s a case of learning how a camera reads a scene and how you should adjust to get the desired result.
Like the A6500, spot-metering can also now be linked to the active AF area if desired. This is a feature highly valued by wildlife photographers, particularly birders, who frequently use spot-metering to expose for a potentially small and dark subject against an overcast sky or dim background. On the majority of cameras, spot metering may provide the exposure birders desire, but it’s generally locked to the center of the frame, which may rarely match the subject’s actual position especially when it’s in motion. What you really want is the spot metering to follow the active AF area as it tracks a subject moving around the frame, but previously this was a feature limited to the most expensive pro DSLRs from Canon and Nikon. Olympus was the first mirrorless company I’ve come across to include spot metering linked to the AF point on the PEN F and OMD EM1 Mark II, and now the Alpha A9 joins them and the A6500 in this fairly exclusive club. This option, coupled with the effective continuous autofocus and fast burst shooting, will make the A9 very attractive to bird photographers.
Auto ISO is also quite sophisticated on the A9. Not only can you set a minimum and maximum sensitivity for Auto ISO to choose from (the latter up to 204800 ISO if it’s using the mechanical shutter), it’s also focal-length aware, so as you mount – or zoom to – longer focal lengths, the minimum shutter speed is automatically raised. For example, I fitted the FE 24-70mm f2.8 zoom and with the standard Auto ISO setting found it selecting a minimum shutter of 1/30 at the 24mm end and 1/80 for the 70mm end, which roughly corresponds to accepted wisdom for minimum hand-holdable shutters when the focal length is taken into account. It would be even cleverer still if it were aware of stabilisation, whether in the lens or body, but I haven’t seen that deployed on any system yet.
You can also set the minimum shutter speed the system’s allowed to use from 1/16000 down to 30 seconds, or use an automatic selection. Like the A6500, the latter can also be adjusted from Standard to Slow, Slower, Fast or Faster, to encourage it to reduce or bump-up the minimum shutter speeds. For example when shooting static scenes with stabilized lenses (or with the body-based stabilisation), I often set the Auto ISO to Slow or Slower, allowing it to deploy slower shutters in order to enjoy lower ISOs and better quality. In contrast, when wanting to freeze action, I’d select Auto ISO with Fast or Faster to encourage quicker shutter speeds than are necessary to just eliminate camera-shake.
Like all Sony cameras, the A9’s Picture Effects are greyed-out if you’re shooting RAW or RAW+JPEG, which is daft as it’d be nice to only have the effect applied to a JPEG and keep a RAW as backup. Set the A9 to JPEG only though and you can apply Toy Camera, Pop Colour, Posterisation Colour, Retro Photo, Soft High-Key, Partial Colour (with a choice of red, green, blue or yellow), High Contrast Mono, or Rich Tone Mono.
Above: Sony A9 monochrome effects.
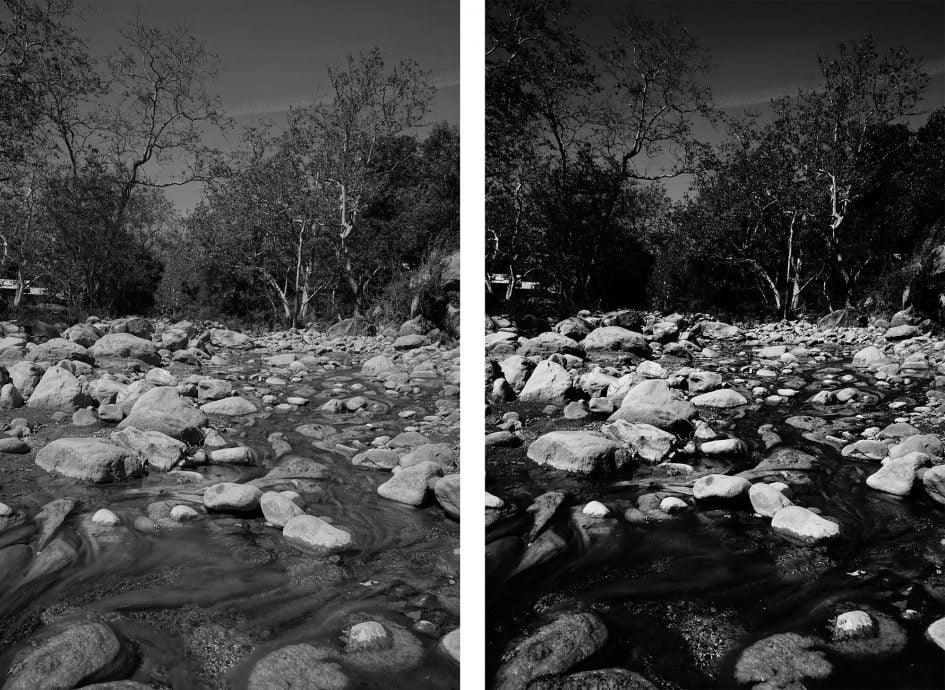
The D-R menu is where you’ll find the Dynamic Range Optimiser (DRO) and in-camera HDR options, the former available in Auto or set Levels of one to five, and the latter available as Auto or in increments of one to six EV. The HDR mode takes three images at the desired interval and combines them in-camera into a single JPEG file, and you can trigger it with a single shutter press or a self-timer. If you have RAW or RAW+JPEG selected, the HDR options are greyed-out. Here’s a comparison between a single frame below left and a maximum six EV HDR version below right. The maximum effect isn’t for me, but the milder versions can be quite effective.
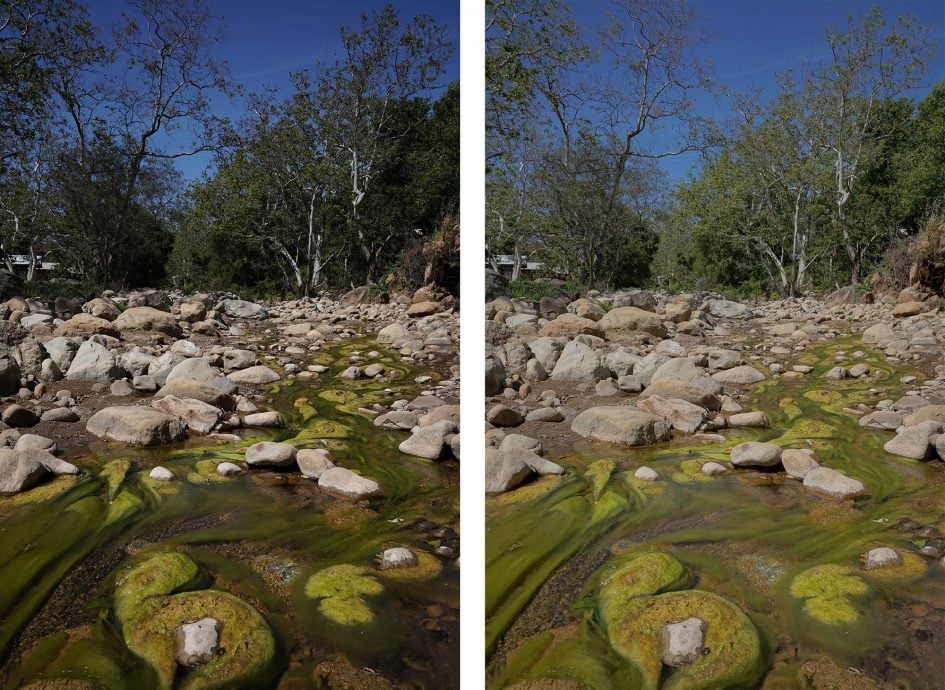
Above left: Standard frame. Above right: HDR mode.
The in-camera Picture Effects, HDR and D-R adjustments are as much as the A9 enters into ‘fun’ territory and misses out on the scene presets and panorama modes of the other models in the range.
The Alpha A9 certainly has a couple of gaps in its feature-set, but Sony’s listening to feedback, especially from its professional users, and already making improvements. In January 2018 it release firmware version 2 in response to feedback from pros, adding the ability to input ITPC data and the camera serial number to images, display the wired LAN MAC address, assign a protect image function to the custom key, and allow protected images to be sent over FTP at once. Version 2 also improves continuous AF tracking on moving subjects and when zooming, and improves the general stability of the camera.
I’d still like to see some kind of solution to make up for the absence of apps, in particular interval and bulb timers, and video shooters will want Picture Profiles to access S-Log, but I am pleased to see Sony addressing some of the needs of its pro sports shooters sooner rather than later and look forward to future firmware updates.
Sony Alpha A9 movie mode
The Alpha A9’s core-focus may be stills photography, but it’s also a very capable camera for video recording. It’ll shoot 4k UHD with full-frame or Super-35 coverage at 24, 25 or 30p (and in either 60 or 100Mbit/s), 1080p at up to 120fps for slow motion, it sports headphone and microphone jacks, has twin card slots for security, outputs clean 8-bit video over HDMI, has a larger battery than before, and now allows you to pull-focus with the new touch-screen. There’s full manual control over exposure and the usual wealth of shooting aids including zebras and peaking, not to mention built-in stabilisation that works with any lens and a higher resolution viewfinder that makes it easier to manually focus without magnification. It’s all good news, although in a strange and frustrating omission, an absence of Picture Profile menus means no S-Log and therefore limited opportunity to capture flat footage for subsequent matching and grading.
It would be easy to look at the specs and assume the A9’s movie quality is essentially the same as the A7r II but with the addition of a touch screen and the removal of Picture Profiles. But while both cameras offer the option to film 4k in full-frame or cropped Super-35 formats, the A9 does the former in a superior way. Previously the A7r II performed some basic line-skipping to turn its huge 42 Megapixel frames into 4k resolution when filming with the full-frame, with the result that footage looked nowhere near as good as the cropped Super-35 mode; so on the A7r II, you’d shoot 4k in the crop mode where possible for the best quality.
Now on the Alpha A9, Sony more carefully oversamples the data, starting with around 2.4 times more information than required for 4k, before condensing it to the UHD format. Note this is only the case when filming in 24p or 25p, as 30p starts with a slightly cropped frame with 1.6x the data. But the bottom line is full-frame footage captured with the A9 looks essentially as good as cropped footage filmed in Super-35 mode, making it much more practical to switch between formats and maintain similar quality. The chance to capture 4k in a crop format is also a benefit the A9 and A7r II enjoy over the A7s II which can only film 4k in the full-frame format.
As noted earlier, another benefit the A9 has over all full-frame Alpha mirrorless cameras to date is a touch-screen. The capabilities are essentially the same as the cropped-frame A6500 which means you can tap to pull-focus, although like that model, Sony doesn’t go as far as to let you tap through menus to offer silent adjustments while filming like Panasonic does. Here’s an example I filmed to demonstrate touch focus-pulling using the G Master 24-70mm f2.8 at 70mm f2.8. I should also mention that the Sunny Weather option (which brightens the screen) is now available when filming in 4k or high frame rate 1080p, making the A9 much more usable than earlier Alpha mirrorless bodies which disabled it, making it hard to the view outdoors.
Above: Download the original file (Registered members of Vimeo only). Sample movie filmed with a Sony Alpha A9 in 4k full-frame in 30p at 800 ISO using the Sony FE GM 24-70mm f2.8 zoom lens at 70mm f2.8.
If you’re into slow motion video, you’ll need to switch the A9 to 1080 / Full HD, to access frame rates up to 120p (or 100p for PAL regions). You can select 120p directly from the movie quality menus or deploy it via the S&Q mode on the dial which allows you to set the capture and desired output frame rates for footage that’s interpreted in-camera (albeit without sound recorded). Here’s a clip filmed in 120p and slowed to 24p in-camera using S&Q. I have another a little lower down the page.
Above: Download the original file (Registered members of Vimeo only). Sample movie filmed with a Sony Alpha A9 in the 1080p slow motion, using S&Q mode to capture footage at 120fps and interpret it to 24fps in-camera; there’s no audio here.
I was a little sad to find the A9 lacking the HFR modes of the RX models which also feature stacked sensors. So there’s no frame rates higher than 120p here, even if you accept a lower resolution. I was also interested to find the A9 lacked 4k above 30p considering its fast sensor. It’s worth remembering its pro rival, the Canon EOS 1Dx Mark II as well as the Lumix GH5 at less than half the price both offer 4k at 60p and in the wider Cinema 4k formats too if desired. Strangely Sony continues to not offer Cinema 4k on its ‘consumer’ cameras, perhaps a limitation of the XAVCS codec or a feature differentiation with the broadcast line.
Arguably the biggest disappointment though is the absence of Picture Profiles, as in every other respect, the A9 is a very capable movie camera – in particular the flexibility of having the choice of 4k in cropped or full-frame formats with no compromise in quality, the security of twin card slots, the bigger battery, support for the maximum screen brightness when filming 4k, and the convenience of focus-pulling by touch. While graders can’t select familiar S-Log profiles though, they can at least deploy Creative Styles to reduce the contrast, saturation and sharpening to a minimum. It’s still a compromise though and Id early hope Sony resolves it with a firmware update soon.
Now for a variety of sample movies.
Above: Download the original file (Registered members of Vimeo only). Sample movie filmed with a Sony Alpha A9 in 4k full-frame in 24p at 800 ISO using the Sony FE GM 24-70mm f2.8 zoom lens.
Above: Download the original file (Registered members of Vimeo only). Sample movie filmed with a Sony Alpha A9 in 4k full-frame in 24p at 200 ISO using the Sony FE GM 24-70mm f2.8 zoom lens.
Above: Download the original file (Registered members of Vimeo only). Sample movie filmed with a Sony Alpha A9 in the 1080p slow motion, using S&Q mode to capture footage at 120fps and interpret it to 24fps in-camera; there’s no audio here.
Above: Download the original file (Registered members of Vimeo only). Sample movie filmed with a Sony Alpha A9 in 4k full-frame in 24p at 1600 ISO using the Sony FE GM 24-70mm f2.8 zoom lens. I also have this available in higher sensitivities: Sony A9 4k 3200 ISO, Sony A9 4k 6400 ISO, Sony A9 4k 12800 ISO.
Sony Alpha A9 Wifi, NFC and Bluetooth
The Sony Alpha A9 has built-in Wifi with NFC to aid negotiation with compatible devices, and in a feature first seen on the A6500, now also includes Bluetooth to maintain a lower power connection with a smartphone to acquire and embed location data.
Wifi on the A9 allows you to wirelessly browse and transfer JPEG images onto an iOS or Android smartphone using a free app, and also remote control the camera with your phone or tablet.
Interestingly though, Sony’s abandoned downloadable apps on the A9 with positive and negative consequences. On the upside it means there’s mercifully no longer any need to sign-up for a PlayMemories account, connect the camera itself to the internet and update its internal apps just to access the full remote control facilities. Instead I’m delighted to report that remote control just works out of the box. But on the downside, Sony previously relied on downloadable apps to expand the functionality of its bodies and equip them with some features that came as standard on other bodies – things like timelapses, interval recording and bulb timers. Sadly it appears these haven’t been included in the standard A9 software – at least on the body I tested – so with no opportunity to download apps, we’ll just have to hope Sony addresses the lack of certain features with a firmware update.
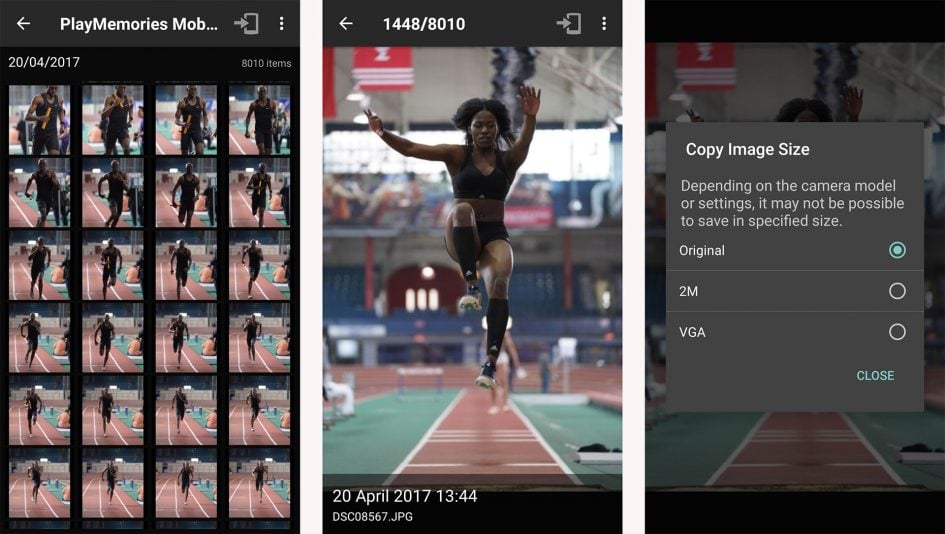
I’ll start with transferring images from the A9 to a smartphone and for my tests I used my Samsung Galaxy S7, onto which I’d previously installed Sony’s free PlayMemories app. If you have an NFC-equipped device, such as my GS7, the entire process is incredibly simple: just choose the image you want to send in playback on the camera, then hold it against your phone. The NFC then instructs the camera and phone to connect (automatically taking care of network names and passwords), before then transferring the image and finally disconnecting. It all happens without a single button press and remains the best implementation I’ve seen for copying images from camera to phone.
If you don’t have NFC, or for some reason it doesn’t work, you’ll need to connect to the A9’s Wifi network manually. First go to the Wireless section and choose the option to Send to Smartphone. This then gives you the choice of either selecting the desired image on the camera, or browsing the camera’s memory using your handset. Selecting either configures the A9 as a Wifi access point which your phone needs to connect to. Next you’ll need to fire-up the PlayMemories app on your phone and connect to the camera.
If you opt to select the image on the camera, it’ll then be sent straight to the phone. If you select the option to choose with your smartphone, you’ll see the camera’s memory presented in a thumbnail view – just select the desired image and again it’ll be copied over. A menu in the PlayMemories app lets you choose whether the image is sent in its original 24 Megapixel format or resized down to VGA or 2 Megapixels. Full sized 24 Megapixel JPEGs take a few seconds to copy over; like most Wifi camera apps, you can’t transfer RAW files.
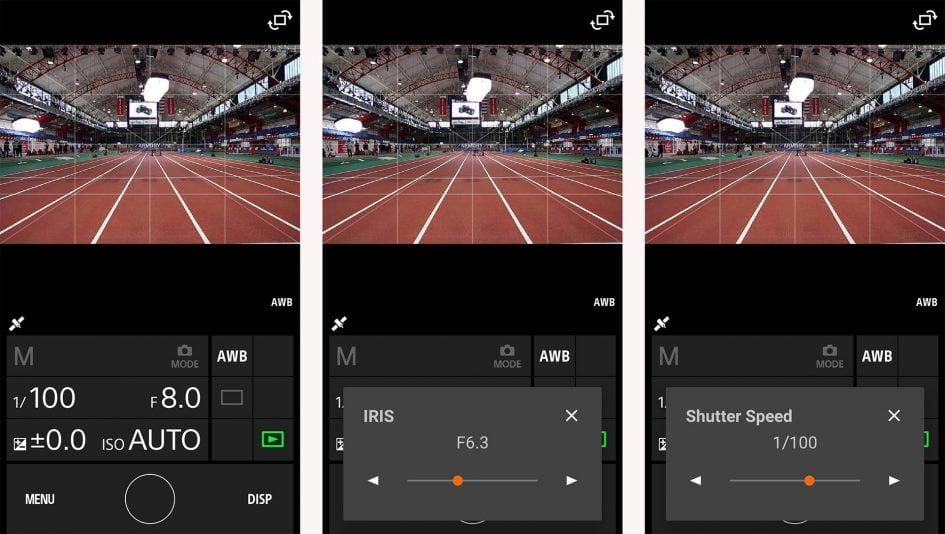
Next I’ll cover remote control which again is really simple for owners of phones with NFC. With the camera powered-up and ready to shoot, simply hold your phone against the NFC logo on the side of the body and the A9 will automatically fire-up the Smart Remote app, connect itself to your phone (again taking care of Wifi network names and passwords), then start the PlayMemories app. So without a single button press, you’ll find your self ready to remote-control the camera with your phone. Brilliant! If you don’t have a phone with NFC, you’ll need to first select the smartphone connection from the network menu on the A9. This sets the camera up as an access point for the PlayMemories app on your phone to connect to.
Once you’re remote-controlling your camera, you’ll be able to see what it sees, adjust the shutter speed and aperture (depending on which exposure mode the camera’s in), tweak the exposure compensation, the sensitivity, white balance and drive mode. In this respect it’s the same as most of the competition, but in a critical upgrade over earlier Sony bodies, you no longer need to sign into PlayMemories and update the remote control app within the camera itself to unlock all of the manual control. It’s finally all available out-of-the-box as standard. By abandoning downloadable apps altogether on the A9, Sony has also neatly resolved issues with duplicate or confusing menus, although it doesn’t appear to have compensated for the lack of certain features the apps brought to earlier bodies – like Timelapses or Bulb timers. It remains to be seen what Sony does to address this.
In happier news though, the A9 becomes Sony’s first mirrorless full-framer to gain Bluetooth connectivity, inheriting the seamless location-embedding capabilities first-seen on the A6500. You simply pair the camera and phone like any other Bluetooth accessories, after which they maintain a low-power link, requesting and embedding GPS co-ordinates as you shoot.
In practice it’s almost that simple, but requires an additional step to get started. First you’ll need to pair the camera and phone, by enabling Bluetooth on the former and searching for it on the latter. Once both are paired, all you need to do is fire-up the PlayMemories app on your phone. Under the Location Information Linkage option you’ll need to set the camera that will receive the GPS data and there on the list you should see the A9 which you previously paired. Once selected, you should see the World / map icon on the A9 screen change to indicate it’s connected and receiving location information, after which you should be good to go. Anything you shoot from this moment onwards will be tagged by the position provided by your phone without further interaction, and the camera will automatically re-establish the link when powered off and on again. Similarly your phone will automatically reconnect when it’s been powered off and on again.
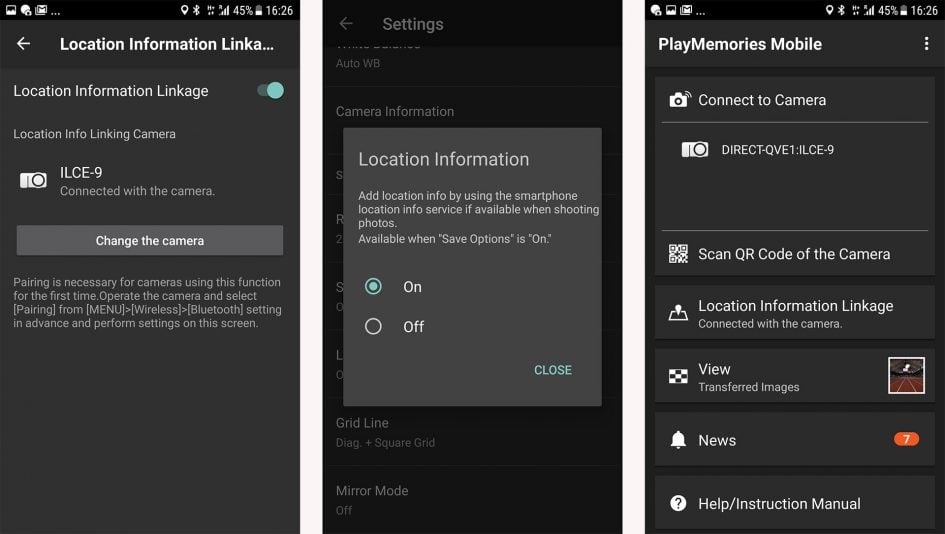
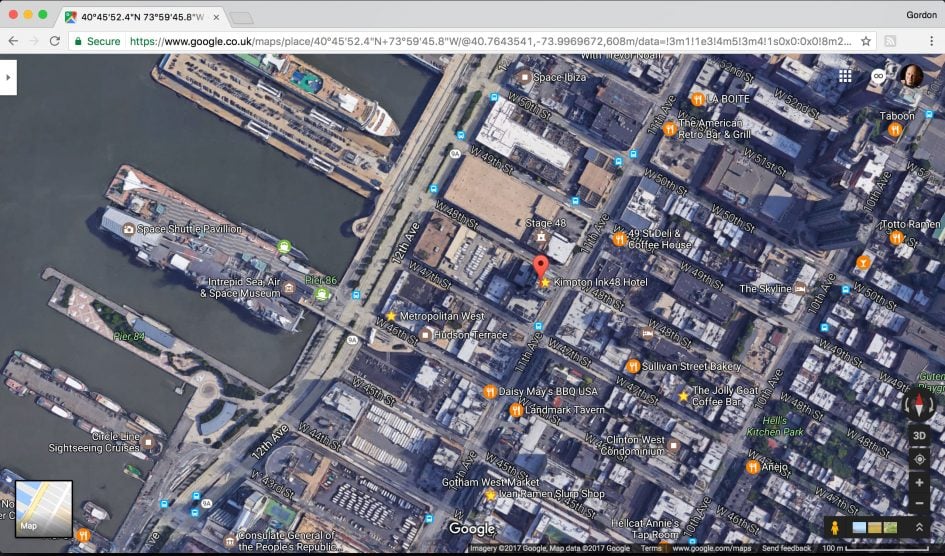
In practice it works seamlessly and I didn’t notice a significant impact on battery life while it was running. I used it for most of my outdoor shooting with the A9 and it worked a treat, successfully embedding co-ordinates as I shot and never requiring further interaction. The only issue, as with all smartphone solutions, is the accuracy being limited to the actual phone. I found my GS7 can often be a few meters out when kept in my pocket, so if I’m after the most accurate co-ordinates during a session, I try to keep my phone in the top of my backpack. But it worked fine for the A9 images I tagged, and here’s one as an example from atop a hotel in New York.
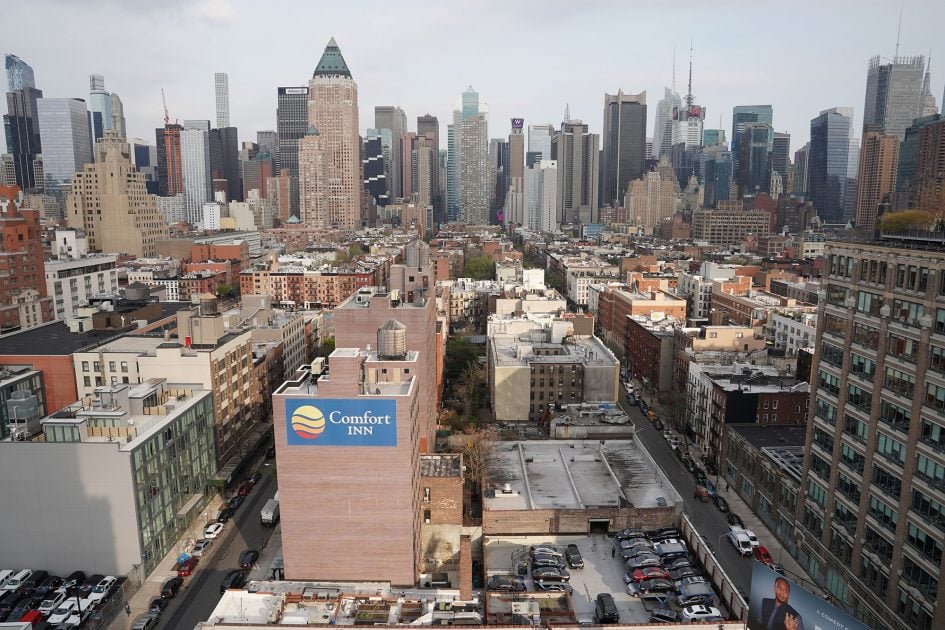
Above: A9 photo taken with location information. Below: location entered into Google maps.
On the whole, the wireless capabilities of the A9 are very good. I may be concerned over how Sony will deploy features which were previously granted by downloadable apps, but I’m much happier you no longer need to jump through hoops just to get the remote control working. It just works out of the box and I continue to love Sony’s approach where NFC phones automatically fire-up remote control or image transfer depending on whether the camera’s in record or playback when touched against the handset. The icing on the cake is Bluetooth which – once running – delivers a seamless approach to location-tagging. No logs, no interaction, no fuss.
Next check out my results, sample images and final verdict!
Check prices on the Sony Alpha a9 at Amazon, B&H, Adorama, or Wex. Alternatively get yourself a copy of my In Camera book or treat me to a coffee! Thanks!