 Sony's Alpha A7r Mark III is a highly capable camera that's equally at home shooting high resolution stills as it is handling fast action or filming quality video. The 42 Megapixel full-frame sensor may be inherited from the Mark II but Sony's improved the processing to deliver superb quality. The ability to shoot at 10fps with confident autofocus makes the A7r Mark III surprisingly good at sports, and great for events or wildlife shooting too with its silent shutter. Movie shooters will enjoy good quality 4k along with 1080 / 120p for slow motion. Earlier concerns over battery life have been banished, and the camera sports improved controls, a more detailed viewfinder, twin card slots and even a touchscreen. The Wifi control also works well, complemented by Bluetooth for seamless location tagging. The removal of downloadable apps means Sony needs to find a way to implement interval and bulb timers, the touchscreen is underused, it would have been nice to have 4k at 60p, and only one of the SD slots will exploit the speed of UHS-II cards. But on the whole, shooting with the A7r Mark III is an overwhelmingly positive and impressive experience that will satisfy a broad array of photographers.
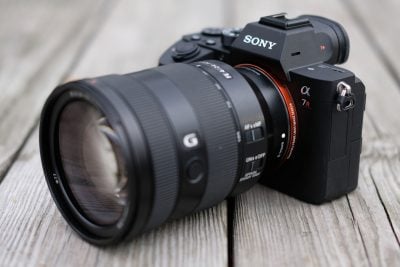
Sony A7r III review
-
-
Written by Gordon Laing
In depth
Sony’s Alpha A7r Mark III is a full-frame mirrorless camera with 42.4 Megapixels, 4k HDR video and 10fps continuous shooting with autofocus. Announced in October 2017, it’s the successor to the A7r Mark II launched just over two years earlier. The new Mark III shares the same 42.4 Megapixel Back-Illuminated CMOS sensor as its predecessor as well as the same body shape, but inside there’s a number of important differences, not to mention a few on the outside too.
Starting with image quality, the A7r III may share the same sensor as the Mark II, but couples it with improved circuit design and image processing to deliver a higher dynamic range: Sony claims 15 stops to the 14 on the A7r II, and 14-bit RAW is now available in both the mechanical and electronic shutter modes, including bursts of uncompressed RAWs. The built-in stabilisation has also improved to offer 5.5 stops of compensation and support a new Pixel Shift Multi Shooting mode which captures four frames (shifted up, down, left and right by one pixel each) that can be later composited in software to eliminate de-mosaic / false colour artefacts.
The sensor offers the same 399-point embedded phase-detect AF system, but complements it with a new 425 area contrast-based system (up from 25 on the A7r II), with Sony claiming AF speed, subject tracking and eye AF all operating twice as fast as before, and at light levels down to -3EV. The Mark III can also shoot bursts at up to 10fps (or 8fps with live feedback) using the mechanical or silent electronic shutter, both with full AF and AE. 4k recording is still available in full-frame or Super-35 modes (the latter still delivering better quality thanks to its oversampling of 5k data), but there’s now the option of S-Log 3 and Hybrid Log Gamma HDR, as well as 1080 at 120p. And while the body shape is unchanged from the Mark II, Sony has impressively managed to squeeze-in the dual SD slots (one exploiting UHS-II), AF joystick, AF-ON button, PC Sync port, Quad VGA OLED viewfinder, and the NP-FZ100 battery pack (2.2 times the capacity of the old battery) from the Alpha A9. The screen is also now touch-sensitive and there’s both USB-2 and USB-C / 3 ports, allowing you to power the camera with one and tether with the other if desired. In my in-depth review, I’ll examine the new features and performance for both high resolution static compositions and fast action, but I’ll start with my video reviews, first my overview, followed by my three-part in-depth report; if you prefer, there’s an audio version you might want to listen to while thumbing through the main review below.
Sony A7r Mark III video reviews and podcast
Check prices at Amazon, B&H, Adorama, or Wex. Alternatively get yourself a copy of my In Camera book or treat me to a coffee! Thanks!
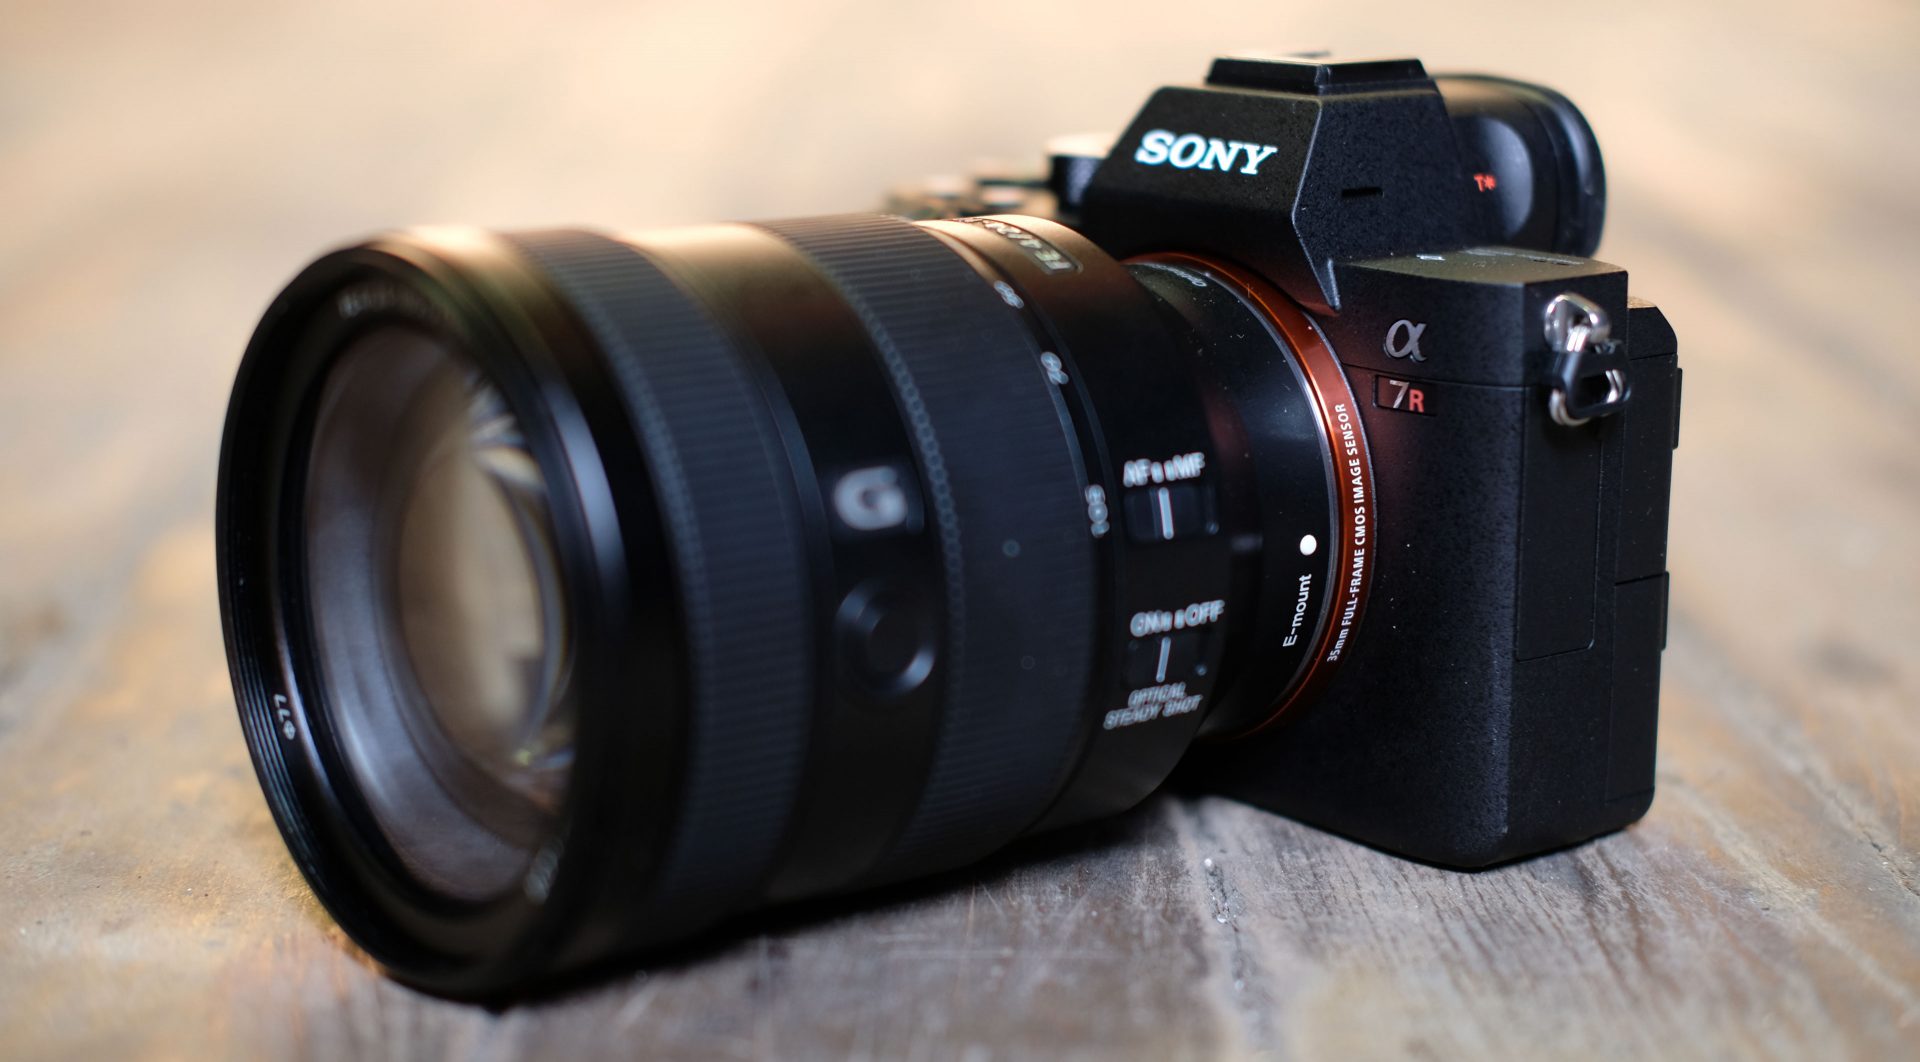
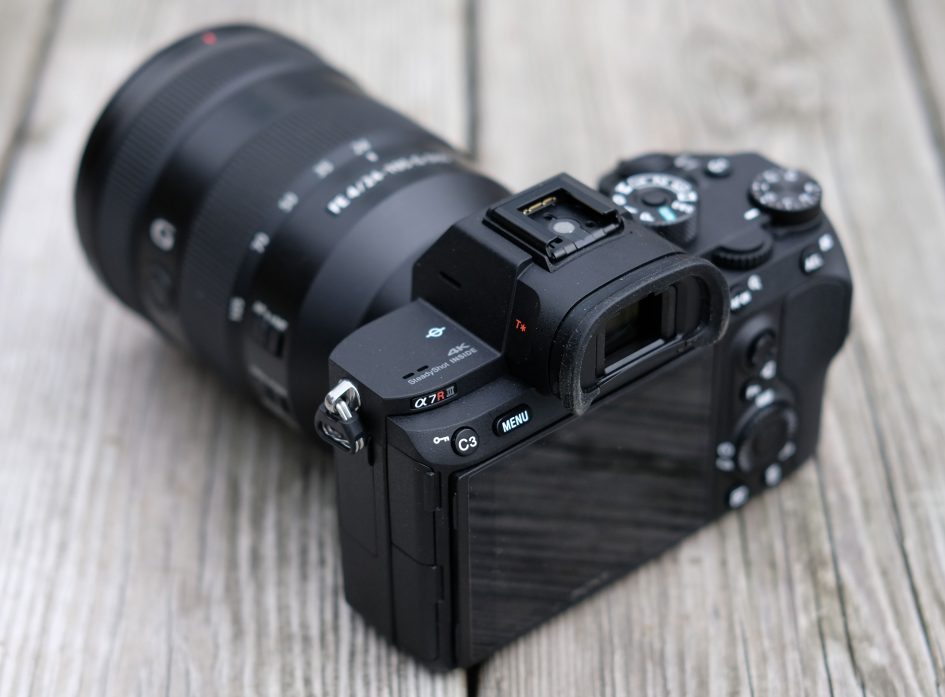
Sony A7r Mark III design and controls
The Alpha A7r Mark III may share the body shape of its predecessor, but inherits a number of controls and other physical enhancements introduced on the A9. I really hoped they’d make an appearance here, but assumed it would involve adopting the A9 body. As it stands, Sony’s decided to squeeze them into the Mark II body shape but claims the weather sealing is now a little better than the A7r II.
So while the A7r Mark III misses out on the A9’s dedicated drive and focus dials and hard-wired ethernet port, it does gain the AF joystick and AF-On buttons, the larger and more tactile rear wheel, the more sensibly-located movie record button, the beautifully-detailed Quad VGA (1280×960 pixel / 3686k dot) viewfinder, dual card slots, PC Sync port, and best of all, the larger capacity Z battery with over twice the life of the earlier battery pack. Sony quotes 650 shots with LCD or 530 with viewfinder – although as I discovered with the A9, you can expect much more in practice when shooting bursts.
The Z series battery transformed the A9 and does the same for the A7r Mark III, banishing the annoyingly short life of its predecessor. Previously on the A7r Mark II, I rarely managed more than 100 photos with a few short clips of video and Wifi image transfers before the battery icon began to flash, meaning I always had to carry several spares. In my tests with the A7r Mark III so far, I typically achieved over 500 shots per charge, again with a few video clips, a handful Wifi image transfers, and with Bluetooth also enabled for geo-tagging. If you’re shooting bursts you can expect even more: on one day I managed 727 shots, around 100 of which were in bursts, along with a couple of minutes of 4k footage, and a handful of 30 second long exposures. On another day I squeezed-out over 1300 shots when roughly half were in bursts, and around half of those were using the electronic shutter.
In terms of video alone, I managed to shoot five half-hour clips of 4k video on a single charge (at 24p in full-frame mode with IS enabled) – a total of 152 minutes, or just over two and a half hours. In stark contrast to the A7r II, where battery life was always at the back of your mind, I found I could forget about the charge remaining when shooting with the Mark III. I never once burned through an entire battery in one day, even when shooting intensively. Overheating wasn’t an issue in my tests either: in a room with an ambient temperature of 22c, the hottest part of the body only reached 33c, and that was even with the screen folded in to the body.
Want even more power? The A7r Mark III is also compatible with the optional VG-C3EM grip for the A9 that accommodates two Z packs to double the life again. Or in a feature introduced in the A7r Mark II, you can alternatively power the camera over USB – not just charge it, but actually operate it under USB power like you can with your phone.
The new controls also transform the day-to-day handling of the camera. I still find the main finger and thumb dials a bit too small and sticky, but the addition of an AF joystick, AF-On button, touchscreen, relocated and enlarged movie record button, and the more tactile rear wheel make the Mark III much quicker, easier and more enjoyable to operate. Quick annoyance though: when moving the AF area with the touchscreen, the target frame is brightly coloured and easy to see, whereas it’s dark grey and hard to see when using the joystick – please fix this Sony!
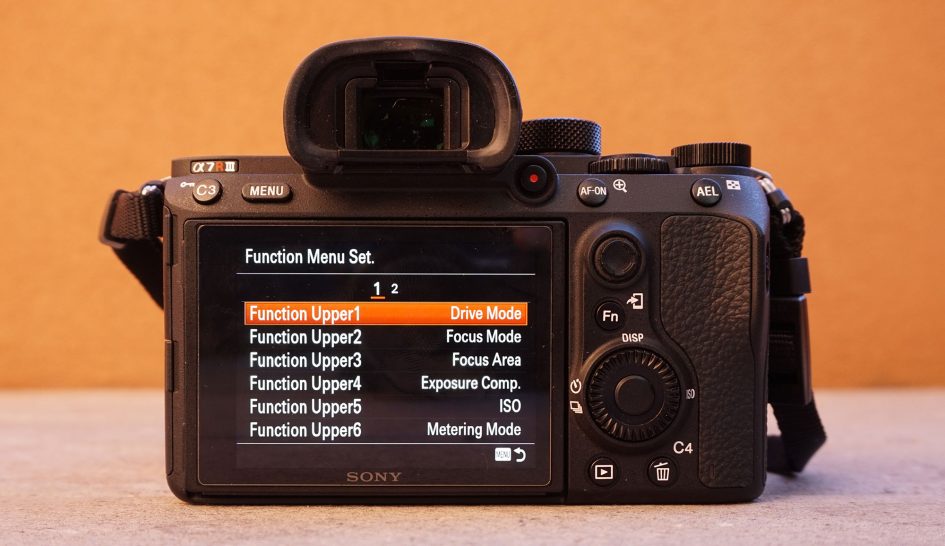
The control improvements go beyond the physical wheels and buttons too. There’s a broad degree of customization available, allowing you to change the function not just of the four labeled Custom buttons, but also that of an additional eight buttons and the control wheel. You can even change their function depending on whether you’re in photo, video or playback modes.

The quick Function menu which presents 12 icons in two rows at the bottom of the screen, can also be completely customized to access the functions you want access, albeit showing the same options whether you’re recording stills or movies. There’s also three custom modes on the mode dial and a customizable My Menu page to quickly access the settings you want.
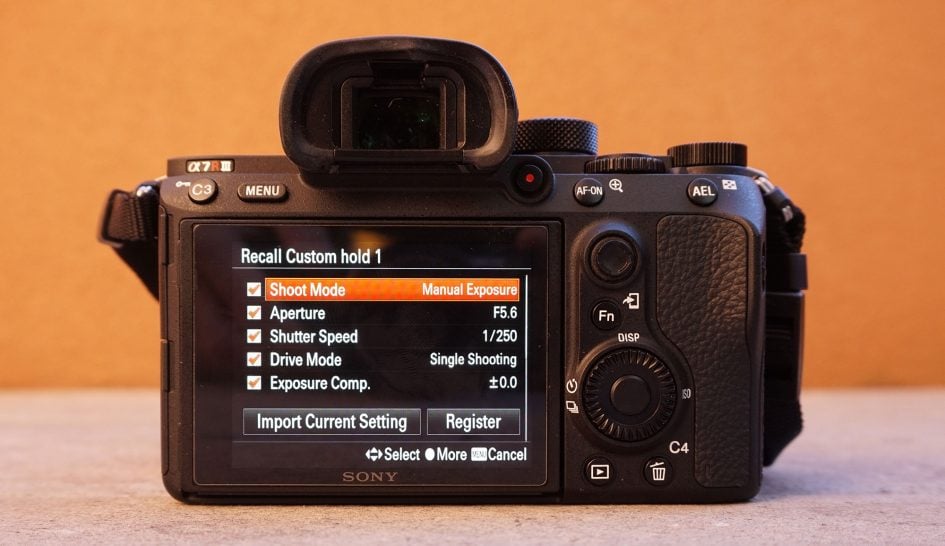
I’m also pleased to find the ‘Recall Custom Setting during Hold’ feature of the A9 is available here. This allows you to assign a number of settings to a custom button that are deployed as you hold it like a shift key, but these can include the exposure, AF and drive mode, even the specific shutter, aperture or AF area settings. I find this invaluable as I frequently find myself switching between groups of settings – for example going from Wide Area AF with Continuous AF to Flexible Spot with Single AF, or for having a backup set when another isn’t working as hoped in a particular situation. Now I can assign up to three groups of settings and deploy them immediately by simply holding-down a custom button.
So while the A7r Mark III suffers from an almost overwhelming number of menu pages and options, you can wisely invest a little time to customize it exactly to your needs and use shortcuts from then on. Sony’s really taken time to think about this aspect of the camera and it really shows. Oh just one quick aside: one of the custom options lets you change the direction of the aperture and shutter dials, but the A7r III now labels them as Av and Tv. Now who else uses that naming convention?

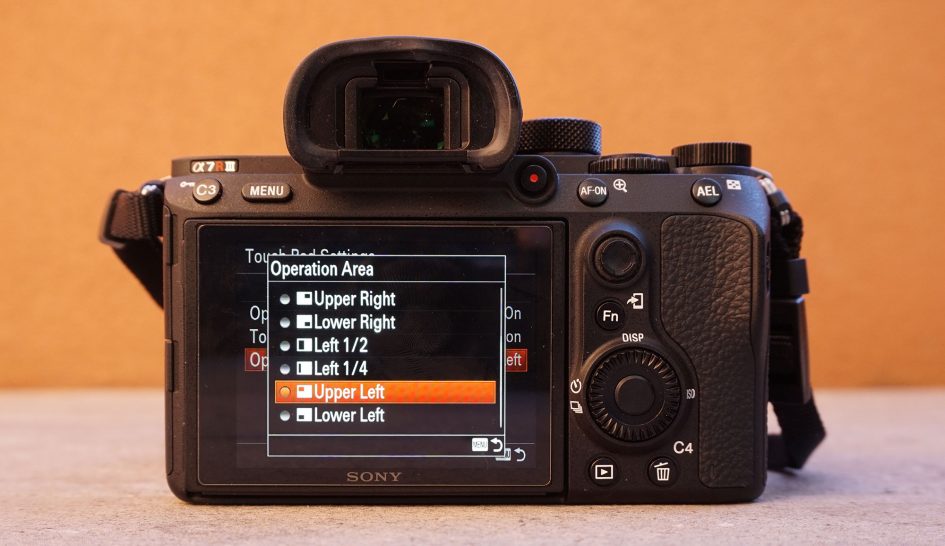
I’m also delighted to find the touchscreen on the A7r Mark III and while, like the A9 and A6500, it’s still underused, you can at least now tap to reposition the AF area or pull-focus during videos. You can also use the screen as a touchpad AF and if desired, configure it to only respond to a specific half or quarter section of the screen, thereby minimizing the chance of a nose operating it by mistake.
In a continued missed opportunity though, the touchscreen still can’t be used to navigate the menus, tap out text strings like the copyright, or even tap the large touch-friendly icons in the on-screen Fn menu. Even Fujifilm has finally touch-enabled its Q Menu on the XE3 and it’s so much better for it. And while you can enable a double-tap to enlarge an image on the A7r III in playback and push to scroll around for a closer look, you can’t actually swipe through images. I think Sony really needs to look at the competition and add much more touch functionality.
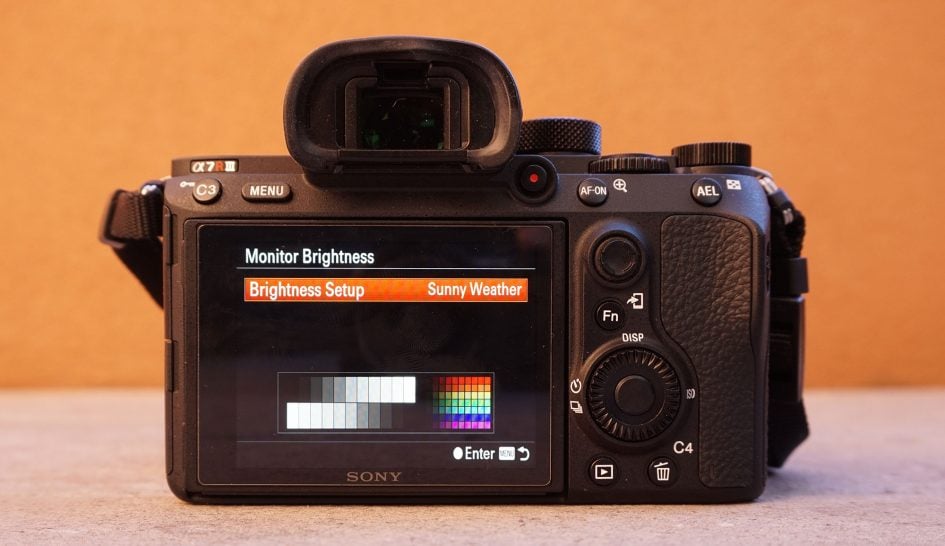
I should also add the screen brightness, like most Sony cameras, is a little dim by default and greatly benefits from enabling the Sunny Weather option in bright conditions. Previously on the Mark II there was also a gotcha where the Sunny Weather option became greyed-out when shooting 4k or high frame rate video, but I was relieved to find it available on the Mark III in all modes, just like the A9.
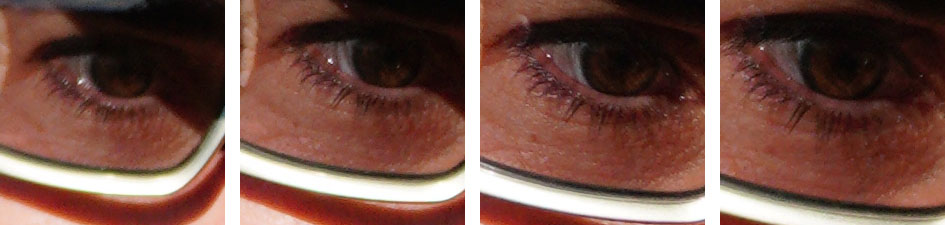
The A7r Mark III also inherits the superb viewfinder of the A9. This delivers the same 100% coverage with a large 0.78x magnification as the A7r Mark II, but the OLED panel now features ‘Quad VGA’ resolution, boosting the detail from 1024×768 to 1280×960 pixels. The difference can be subtle, but look closely at the finest details, especially on text or distant grill patterns, and you’ll notice the A7r III’s viewfinder is crisper and better avoids any kind of moire, fuzziness or other electronic artefacts. The end result is an image that looks more real, while still enjoying the large immersive nature of its predecessors. You also get the wealth of shooting aids including a dual-axis leveling gauge, live histogram, alignment grids, magnification, zebra patterns and focus peaking.
The refresh is fast and smooth too: 60fps as standard, boostable to 120fps in a menu if desired. When shooting continuously, the viewfinder refresh falls back to 60fps, but the detail remains high. Panasonic may have since taken the crown on EVF magnification with the Lumix G9 (albeit with the same resolution panel), but I’m still very satisfied with the A7r III viewfinder experience, and if you’re coming from a DSLR you’ll find the viewfinder image delivered by any of the top-end mirrorless cameras huge.
Dual card slots have also made the A7r Mark III much more useful than its predecessor, allowing you to make backups as you go along, or automatically switch to a second card once the first one fills. I should add that while dual card slots made their Sony mirrorless debut on the A9, Sony neglected to support relay-recording at launch, forcing you to manually select cards for recording. Now the A7r Mark III thankfully supports relay-recording, although I should note you still need to tell it which slot to access in playback even when one of the slots is empty.
Like the A9 before it, the A7r Mark III’s two SD slots run at different speeds: only Slot-1 will exploit the additional speed of UHS-II cards, while Slot-2 relatively limps along at UHS-I speeds regardless of what you insert; I have some examples later in the review where the time taken to flush the buffer is much longer when using Slot-2. Having dual card slots is an important upgrade over the Mark II models, but it’s an area where Sony still falls behind. Several rivals exploit UHS-II speeds on both SD slots, or eschew SD altogether for faster card formats. I realise there’s not exactly room for C.Fast or XQD cards in the A7 series, but I don’t think it’s unreasonable to request both SD slots are UHS-II speed. Still, having two slots remains better than the one on the Mark II and I’m pleased to find them implemented here.
In terms of connectivity, the addition of a USB C port running at USB 3 speed while retaining the older USB-2 port is a great idea. It allows you to tether the camera with one port while powering it with the other. And while the A7r III lacks the hard-wired Ethernet port of the A9, it still allows the same FTP functions, just over Wifi.
The A7r III also shares the same wireless capabilities as the A9 with Wifi complemented by NFC and Bluetooth for easier connectivity. Like the A9 and other Sony cameras with Bluetooth, you can also maintain a low-power link with your phone for seamless GPS tagging as you shoot – see my wireless section later for an in-depth report.
Like the A9 and RX10 Mark IV, there’s no longer any downloadable apps on the A7r Mark II, and like those models I’m not sorry to see them go as the registration and access could provide infuriatingly convoluted at times. But unfortunately like those models, Sony has neglected to integrate any of the app’s functionality into the user interface. So sadly the A7r III, like the A9 and RX10 IV, misses out on having an interval timer or any Bulb timers built-in – a shame for a camera of its class and something the company really needs to address.
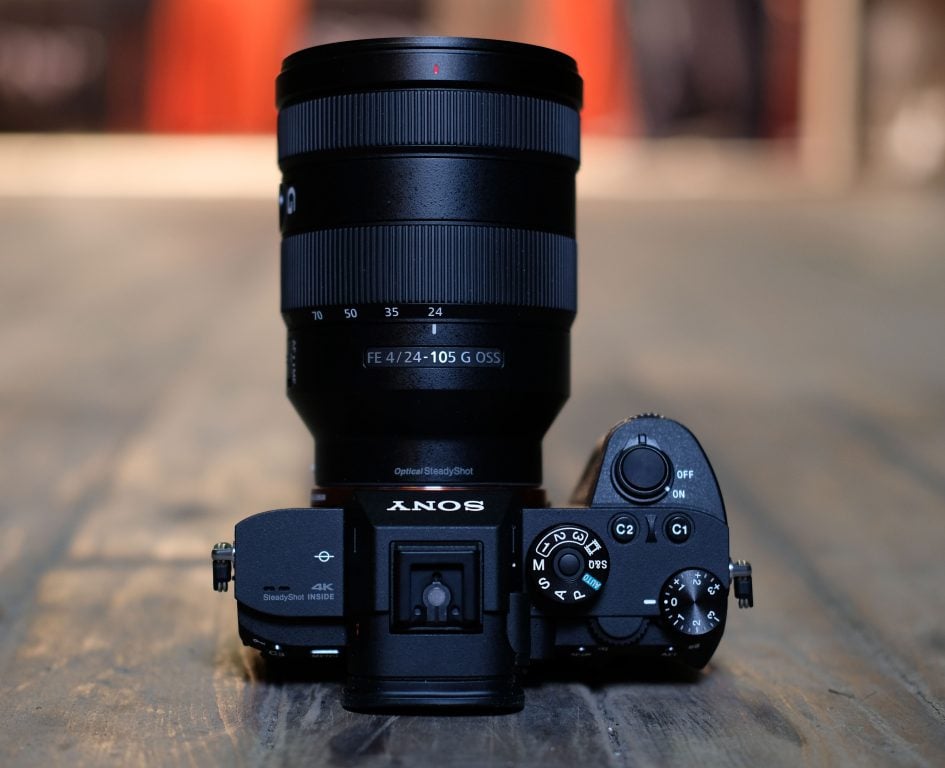
Sony Alpha A7r Mark III lenses and stabilisation
The Alpha A7r Mark III is equipped with an E-mount that’s compatible with both full-frame FE-mount and cropped-frame E-mount lenses. At the time of writing towards the end of 2017, Sony offered no fewer than 24 lenses in the native full-frame FE mount covering focal lengths from 12 to 400mm, along with two additional FE tele-converters; that’s more than double the number of FE lenses available when the A7r II was launched. Check out my Sony lens guide for the models I have tested and can recommend.
You can use any of these, along with a selection of native options from Zeiss, without field-reduction thanks to the full-frame sensor. Alternatively you can directly mount any of the 16 additional e-mount lenses designed for cropped-frame Sony mirrorless cameras and, to avoid vignetting, switch the camera to its APSC mode to capture 18 Megapixel images with a 1.5x field-reduction.
Like its recent predecessors, the A7r Mark III also works very well with certain adapted lenses, especially Sony’s own A-mount or Canon EF mount lenses; if using the latter, I’d recommend the Metabones adapter. The ability to autofocus effectively with a wide variety of third party lenses while also exploiting the camera’s built-in stabilisation, makes the Sony A7r Mark III a highly flexible body and one that eases a transition from other systems. That said, as Sony’s own collection of native FE lenses has steadily grown, I’ve come to really appreciate their optical quality and focusing speed; what started as a small system has now become a very respectable one covering most bases.
Sony launched the A7r Mark III alongside a general-purpose zoom, the FE 24-105mm f4G OSS which I used for most of my tests. It’s a great general-purpose option that’s light, focuses smoothly and quickly, and delivers decent optical quality throughout the range. It might lack the ultimate bite of the best G Master options, but I’d be very happy using it as my walk-around lens on the Mark III, or indeed any Sony full-frame body. Here’s an example of the coverage in practice.

Above: Sony FE 24-105mm f4G OSS coverage on full-frame body
The A7r Mark III features built-in five-axis sensor-shift stabilisation, that now claims to be a stop better than its Mark II predecessors. Like all sensor-shift systems, the major benefit is being able to stabilise any lens you attach, be it a modern native lens, or an older adapted manual focus one. If the lens is native – or passes specification data – then the camera can find out the focal length and configure the appropriate compensation. If the lens is not native, or can’t pass focal length information, then you can enter it manually.
To put the built-in stabilisation to the test I shot two examples, first with an unstabilised lens (where the camera would deploy sensor-shift stabilisation only) and second with a lens featuring optical stabilisation (where the camera and lens work together). I started my sequence at a shutter speed of 1/250 and slowed it by one stop at a time until reaching 1/8. A starting point of 1/250 may seem high for the focal length in question, but with extremely high resolution sensors, the old one-over-focal-length guideline to avoid shake for handheld shots has become out-dated.
First-up the unstabilised lens, a Sony FE 85mm G Master telephoto which, on the conditions of the day, required a shutter speed of 1/250 for consistently shake-free results with the sensor-shift stabilisation switched off (although in my tests I did manage to handhold a fairly good one at 1/60). With the body’s sensor-shift stabilisation enabled, I enjoyed perfectly sharp, shake-free results at 1/250 to 1/60 and pretty good ones at 1/30 and 1/15. I’ve pictured the whole image below, followed by 100% crops of the same region at 1/15 on the left without stabilisation and on the right with stabilisation enabled. The difference is clear and I’d say in my tests the A7r III’s built-in stabilisation allowed me to handhold the 85mm three to five stops slower than without stabilisation.
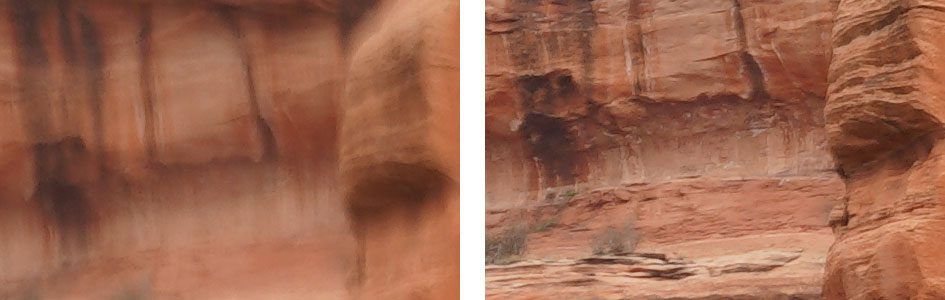
Above: FE 85mm f1.4 GM without stabilisation (left) and with stabilisation (right). 1/15, 100% crops.
Switching to a test with an optically-stabilised lens, I fitted the FE 24-105mm f4G OSS and shot another sequence from 1/250 at progressively slower speeds, one stop apart, although this time at the longer focal length of 105mm. As before you can either enable or disable SteadyShot Stabilisation, there’s no way to selectively choose which technology is active when using lenses with OSS.
So with both sensor-shift and optical stabilisation disabled, I only achieved a sharp image at the fastest shutter of 1/250; any slower and shake ruined the image. With stabilisation enabled, I achieved perfect results at 1/250 and 1/125, and very good ones at 1/60 to 1/15, while shake only really spoilt the image from 1/8 downwards. I’d say this gave the combination of optical and sensor stabilisation a four-stop advantage over my non-stabilised results (at least when using the FE 24-105mm), and to illustrate it I’ve pictured the results again take at 1/15. Remember these are not as sharp as the ones at 1/60 or faster, but again they’re a World-apart from the unstabilised results.
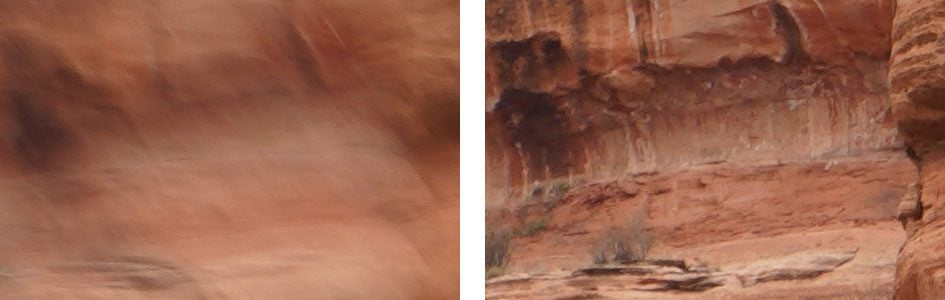
Above: FE 24-105mm f4G OSS at 105mm without stabilisation (left) and with stabilisation (right). 1/15, 100% crops.
The built-in stabilisation doesn’t only benefit stills photography – it’s an important feature for video too. So to see how well the A7r Mark III stabilizes video I filmed two clips with the same two lenses as before, but in different ways. First up, the FE 85mm G Master, fitted to the A7r Mark III filming 4k in APSC / Super-35 cropped mode; the effective focal length was then 128mm and in the video below you can see how smooth the footage is when panning around a scene handheld with sensor-shift stabilisation alone. There’s a few wobbles, but on the whole it’s very impressive considering the long effective focal length.
Above: Download the original file (Registered members of Vimeo only). Testing the sensor-shift stabilisation with the FE 85mm GM lens using the APSC crop. This lens has no optical stabilisation.
Next, here’s a clip I filmed from a hot air balloon using the FE 24-105mm f4G OSS at 24mm in full-frame 4k mode. Here the video exploits both the sensor-shift and the lens’s optical stabilisation to provide a smooth experience.
Above: Download the original file (Registered members of Vimeo only). Testing optical and sensor-shift stabilisation from a hot air balloon in APSC mode using the FE 24-105mm OSS at 24mm.
Sony Alpha A7r Mark III autofocus and burst shooting
By sharing the same sensor as its predecessor, the A7r Mark III also inherits the 399 embedded phase-detect autofocus points spread over 45% of the image area. These work alongside a greatly improved contrast-based autofocus system with 425 areas compared to the basic 25 areas of its predecessor. The main focusing modes and options remain roughly the same as before, but the A7r Mark III gains the superior focusing algorithms of the A9 along with greatly-improved eye-detection. The low light performance is also improved, operating down to -3EV with an f2 lens compared to -2EV of its predecessor.
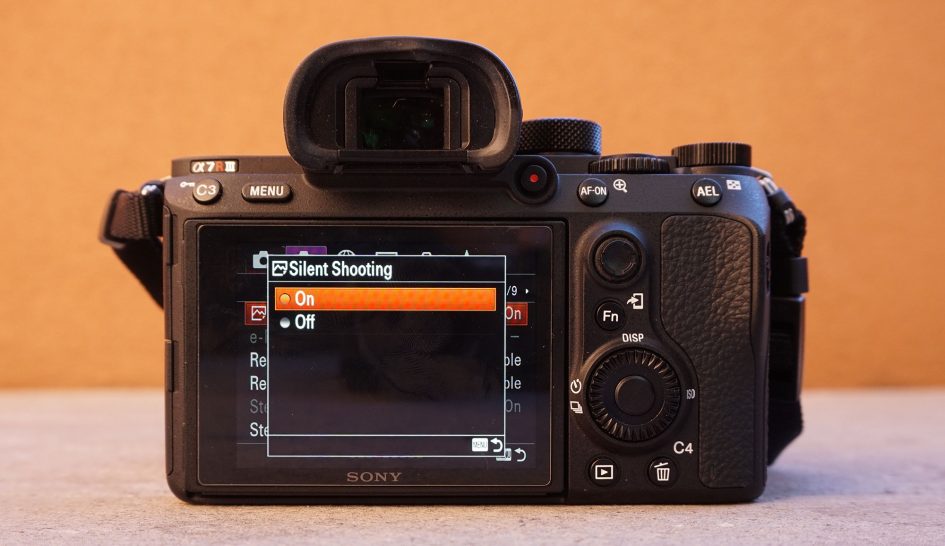
These are coupled with significantly faster burst shooting with a top shooting speed of 10fps, double that of its predecessor and unlike that model available for both the mechanical and the electronic shutter, not to mention with full autofocus and auto-exposure. The ability to shoot in silence with the electronic shutter with confident continuous autofocus at the full 10fps speed, in full resolution and in 14 bit RAW (so long as you’re in uncompressed mode) are a real benefit of the A7r Mark III and allow you to shoot discreetly without compromise – great for wildlife or ceremony photographers.
When shooting at 10fps / H+ mode, with the mechanical or electronic shutter, there’s no blackout, but you are looking at the last picture taken so there’s very minor lag. Reduce the speed to 8fps / H mode though and you can enjoy live feedback with minor blackout introduced to indicate the camera’s firing bursts.
Sony quotes a buffer of 76 frames whether shooting JPEG Standard, JPEG Fine, JPEG Extra Fine or Compressed RAW, falling to 28 images if shooting uncompressed RAW. If shooting uncompressed RAW you’ll also enjoy 14-bits with either the mechanical or electronic shutter, although if you select compressed RAW, the bit depth reduces to 12 bits for RAW. Like other electronic shutters, the lack of vibration and potential for silent operation means it can sometimes be hard to know you’re actually shooting; the A7r Mark III may lack the optional flashing rectangle cues of the A9, but does at least offer a vertical bar on the left side that depletes during a burst (with either shutter), before warning of slowdown when the buffer fills. Oh and I should add that after shooting a burst, the Mark III now allows you to enter the menus, although some options will still be greyed-out while the buffer clears.
The bottom line is a camera that’s much better geared-up for identifying and tracking people, along with more confidently handling action and sports photography than its predecessor. To put it to the test I shot with the Mark III in a variety of situations from portraits to sports, trying out all the focusing and burst modes.
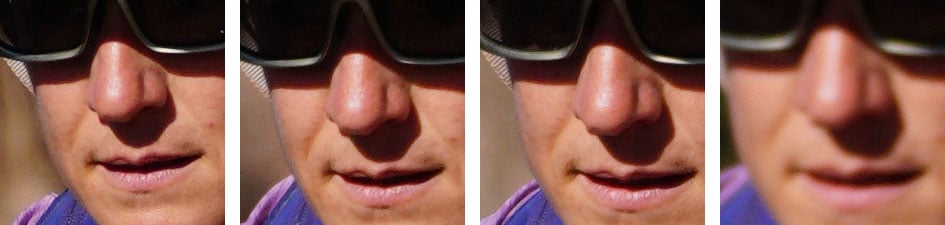
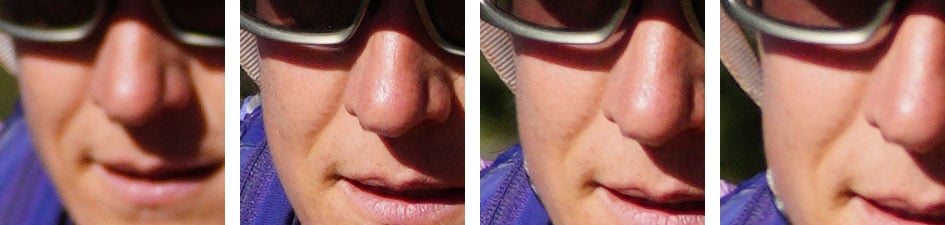
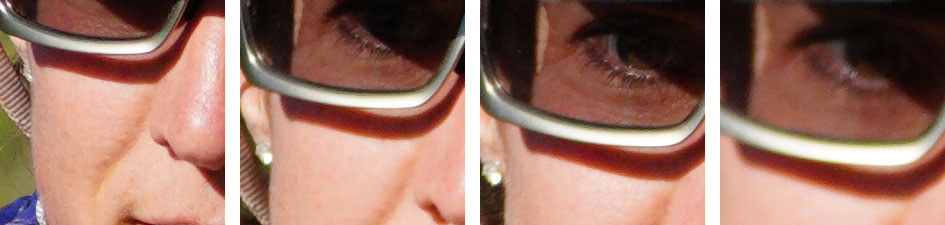
I’ll start with portrait shooting as Sony has always had one of the most impressive eye-detection systems around, and on the A7r Mark III, it’s got even better. It manages to find the closest eye of a subject with remarkable ease, even from a surprising distance, placing a small box over it and following it around the frame wherever your subject goes – I’ll show you a demo of it in just a moment.
The tenacity of the system is certainly improved, but for me the most frustrating aspect of using eye detection on a Sony camera has only been half-fixed. On previous models you’d need to press and hold a button like a shift key to engage eye detection, even when face detection was set to automatic. Surely there can’t be a scenario where you’d want face detection, but not with eye detection too? But as it stood, you’d need to remember to engage eye detection with a button-hold – at least you could configure it onto a custom button. Now on the A7r Mark III, eye detection is engaged automatically with face detection for Single AF modes, but you still need to push and hold a button to engage it for Continuous AF modes.
I find this frustrating, but perhaps it’s because basic face detection is more confident at tracking a subject when the action speeds-up. In the following video clip that I filmed through the A7r Mark III viewfinder, you can see a portrait shoot with a model who I asked to turn and move from side-to-side. I was shooting with the A7r Mark III set to 8fps with the mechanical shutter and live feedback, and with the focus set to continuous. For the first burst I had the button held for eye detection, then for the second burst I left it with plain face detection. Note the minor blackout between frames in the 8fps mode.
Above: Sony Alpha A7r Mark III demonstration of continuous shooting filmed through the viewfinder at 8fps (mechanical shutter) with live feedback, using AF-C, first with eye detection, then with face detection alone, then with eye detection again
When the camera’s not shooting, it’s clear how effectively it can track the subject’s eye even when the subject turns away and back again, but as soon as the shutter starts firing and the subject moves between frames, the system finds it harder to re-engage and keep up; still impressive but not perfect. Meanwhile in the burst taken with face detection alone, the camera more effectively tracks the subject between frames, maximizing your chance of a focused face. Maybe this is why you’re still forced to consciously choose whether to deploy eye detection for Continuous AF, as it works better in some situations than others.
To be fair though, I am being very picky here. The eye detection works remarkably well for the vast majority of portrait subjects who tend not to move quickly across the frame, and it’s a lot better than rival systems. I found it fine for fidgeting kids or subjects who rock or sway, and if you find the eye box frame getting left behind, just let go of the button and let normal face detection take over. Put it this way, when shooting people with the A7r Mark III, the vast majority were in sharp focus even with very shallow depth of field lenses, and it’s a joy to hit the focus check and see a pin sharp eye in glorious 42 Megapixel resolution.
While shooting with the A7r Mark III, I was also struck by how much snappier it felt than its predecessor. The focusing on the Mark III feels faster and more confident in every scenario I tested it in from portraits to landscapes, broad daylight to dusky darkness. But the biggest transformation is how it handles sports and action with a shutter that fires at up to 10fps (whether shooting with the mechanical or electronic shutter) coupled with some of the A9’s tracking algorithms.
I first tested the shutter with some fairly static action that didn’t pose any challenge to the autofocus system. I photographed dancers and gymnastics performing spins and somersaults and what was immediately apparent is how much more useful shooting at 10fps is for capturing the decisive moment than the 5fps of the Mark II. At this top speed, there might not be live feedback, but if the subjects not moving significantly from side to side, it’s easy to keep them in-frame.
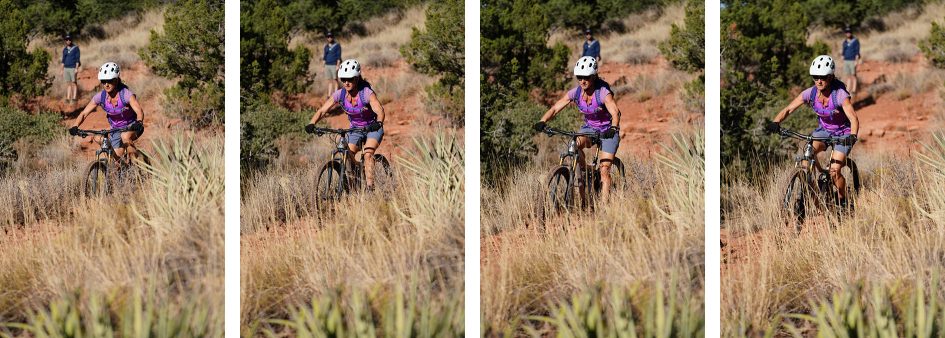
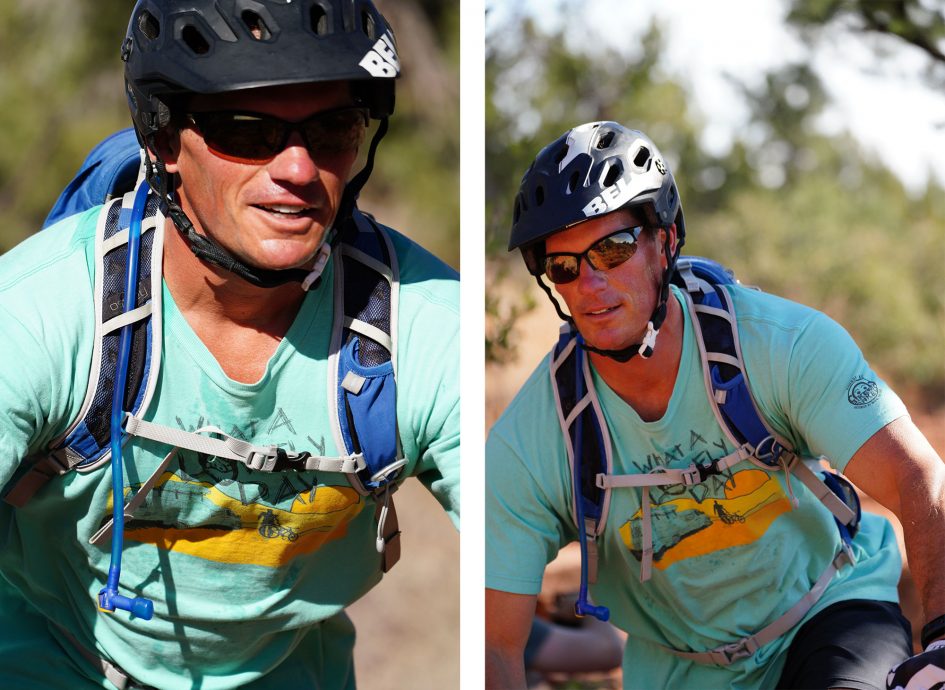
To add motion into the mix, I then tried shooting mountain biking with the Mark III. Here the movement wasn’t hugely fast, but with skids and slides, it could prove unpredictable and as the subject began to fill more of the frame, something that could prove challenging to follow with some electronic composition systems. I tried shooting at 10fps without feedback and 8fps with feedback, and with both the mechanical and electronic shutters for comparison.
First things first: when the side-to-side motion is predictable, you can confidently deploy the top rate of 10fps, but with the mountain bikes I found the lack of live feedback at this speed proved hard to compensate for fast changes. I also found the electronic shutter, while fine for approaching subjects, showed its weakness for skewing as I panned quickly to follow subjects racing past at close range. Switching to the mechanical shutter though eliminated any visual artefacts, and reducing the speed to 8fps provided sufficient feedback for me to better keep the subject in the frame. Here’s a typical sequence of 16 frames, shot at 8fps with the mechanical shutter using the A7r Mark III and FE 100-400mm at around 200mm with the largest aperture value available. Of the 16 frames shown here (the full image followed by 100% crops) I’d say only three are slightly off.
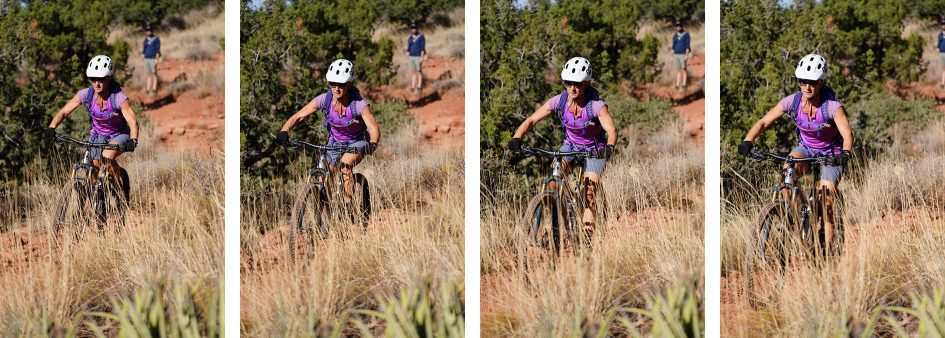
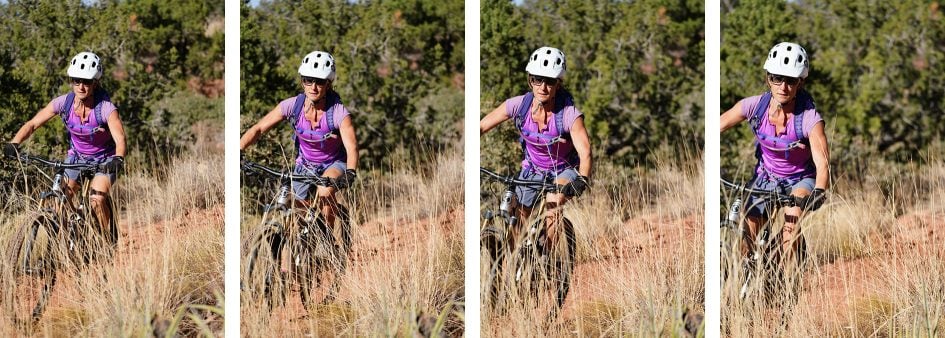
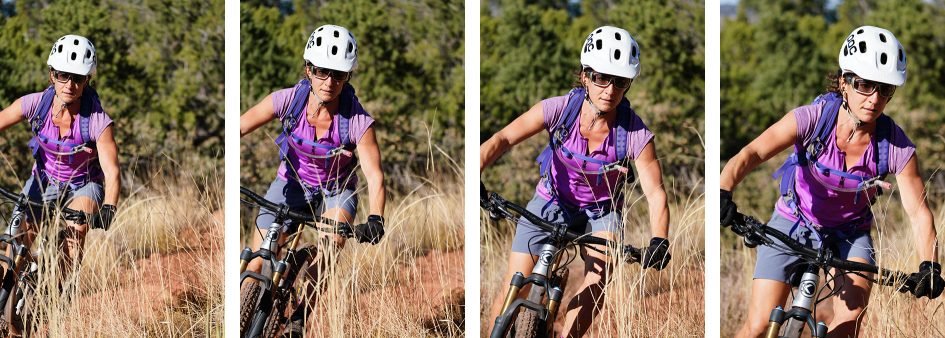
That you can now use the A7r III for shooting respectable action at the full 42 Megapixels makes it a much more flexible camera than its predecessor. Shooting at 10fps is a World apart from the 5fps of the Mark II, and even slowing it to 8fps for the benefit of live feedback captures many more frames before. The ability to shoot silently using the electronic shutter at 10fps with continuous autofocus will also be valued by anyone who prefers not make an audible racket, particularly wildlife or event photographers.
As always for the best results, it’s important to understand the various options and which will work for your particular subject and shooting conditions. For most of my unpredictable sports subjects, I’ll be sticking with the mechanical shutter (to avoid skewing) at 8fps (for live feedback and easier tracking). I’ll be adding more examples here when I try out the A7r III in different scenarios, particularly for very fast moving action and wildlife.
Before moving on, I wanted to briefly mention some formal timings on the burst performance. As always I used a freshly formatted UHS-II card with the shutter set to 1/500 and the sensitivity to 400 ISO before timing various combinations of image quality, shutter type, drive speed and SD card slot.
Starting with Large Fine JPEGs in the top H+ burst speed with the mechanical shutter and with the card in (UHS-II exploitable) Slot 1, I fired-off 82 images in 8.44 seconds for a rate of 9.72fps. Sticking with the burst mode and shutter type, I switched to RAW compressed, firing-off 79 frames in 7.97 seconds for a rate of 9.9fps. Switching to RAW uncompressed, I fired-off 19 frames in 2.03 seconds for a rate of 9.36fps. Sony quotes a buffer of 76 frames whether shooting JPEG Standard, JPEG Fine, JPEG Extra Fine or Compressed RAW, falling to 28 images if shooting uncompressed RAW, so I managed to slightly exceed the buffer size for JPEG Fine and compressed RAW, but fell behind on uncompressed RAW. In all cases though, I essentially achieved the 10fps quoted speed for H+ mode.
Next I tested the silent electronic shutter, again at the top H+ speed. Starting with Large Fine JPEG, I managed to fire-off 79 frames in 7.91 seconds for a rate of 9.98fps. Switching to uncompressed RAW allowed me to capture 34 frames in 5.68 seconds for a rate of 6.16fps, strangely slower than the quoted 10fps speed for H+, albeit for a greater number of frames.
I then tried the H burst mode for live feedback and selected the mechanical shutter for what I believe will be the most common configuration for most sports. With the quality set to Large Fine JPEG, I fired off 92 frames in 11.5 seconds for a rate of exactly 8fps as quoted.
Next I wanted to test the speed of each SD card slot, so I timed how long it took to flush a filled buffer of uncompressed RAW files. I used the same 64GB Lexar UHS-II 200x card in both slots, but only Slot-1 can exploit the full speed. When using Slot-1, the camera took 17.67 seconds to fully write a burst that totaled 30 uncompressed RAW frames (although obviously some would have started being written during the burst capture). Switching the card to the slower Slot-2 saw the camera taking 39.48 seconds to fully flush a buffer that had captured the same number of uncompressed RAW frames. So using the fast card in the faster slot didn’t allow me to shoot more frames compared to the slower slot, but it did flush the buffer more than twice as quickly – a significant time-saving when you want to start shooting large bursts again or to access the full menu system.
As I noted in the design section, I feel a camera shooting such big files so quickly would really benefit from having two slots that can both exploit UHS-II speeds at the least, or better still, support for even faster card formats. I appreciate the latter is tricky in a small body, but surely twin UHS-II cards isn’t too much to ask for. Either way, if you shooting action with the A7r Mark III, make sure you use a UHS-II card and put it in Slot-1 for the best performance.
Sony Alpha A7r Mark III shooting modes
Sony’s Alpha A7r III may look a lot like its predecessor, but a number of subtle design and control updates make it a more serious camera in practice. The target audience is also reflected in the main shooting mode dial that lacks the frivolities of the Panorama and Scene preset modes of the A7r II. Rather, like the A9, you now have the traditional PASM options, Movie, S&Q, full Auto and three custom positions. Personally speaking I don’t miss the Scene presets, especially as they can be deployed in full Auto, but I wouldn’t have minded the chance to record panoramas even if accessed from a menu.
As with earlier models you can start recording movies in any mode by pressing the new chunky red record button, but if you first turn the mode dial to Movie you’ll preview the capture area and access the movie exposure menu. Meanwhile the S&Q mode lets you set a video capture frame rate and an output frame rate for playback, allowing the A7r III to interpret footage in-camera – for example, capturing 1080p at the highest 120fps, but interpreting it for playback at 24fps for a 5x slowdown or at 1fps for playback at 60fps for a 60x speedup. I have more details on this in the movie mode section.
The Alpha A7r III offers the choice of two shutter types: a traditional mechanical shutter (with an electronic first-curtain enabled by default but which can be disabled if preferred) or a fully electronic shutter (chosen in the Silent Shutter mode).
The A7r Mark III lacks the anti-distortion high speed sensors of the A9 or latest RX models, so the shutter range is the same with both shutter types: 1/8000 to 30 seconds. A bulb option is available for longer exposures and the fastest flash sync speed is 1/250, although the camera only enables syncing when using the mechanical shutter. As noted in the previous section, the top shooting speed of 10fps is also available with both shutter types and there’s no penalty on bit depth when shooting uncompressed RAWs (although compressed RAWs are captured in bursts at 12 bits using the electronic shutter).
So the only real benefits of using the electronic shutter are the ability to shoot in complete silence and without vibration – ideal for discreet situations like events or wildlife photography. Since the A7r III lacks an anti-distortion high-speed sensor though, its electronic shutter is more susceptible to rolling shutter / skewing artefacts than the A9 and latest RX models. If your subject is slow or static, you shouldn’t need to worry about skewing, but if it’s moving quickly from side to side or you’re panning to follow, you’ll be better off with the mechanical shutter.
Above: rolling shutter skewing when panning quickly with the electronic shutter.
Sticking with shutter speeds, I’m disappointed Sony hasn’t catered for long exposure photographers by making it easy to program-in periods longer than 30 seconds. Most cameras now offer Bulb timers or in the case of Fujifilm’s latest models, simply let you keep turning the dial to select shutter speeds as long as 15 minutes. To be fair, Sony did offer a neat touchless shutter mode on previous models like the Mark II which could start and stop a Bulb exposure with a wave at the eye sensor, but it was deployed as a downloadable app – and now the A7r III has abandoned downloadable apps, there’s no way to install it. I really feel the A7r III lacks easy ways to deploy long exposures without accessories and Sony should address it with a firmware update – and while it’s at it, also include an interval timer, another casualty of abandoning their downloadable app system.
Here’s a 20 second exposure taken with the A7r III at 12800 ISO. Long exposure noise reduction was disabled, although as I understand it, some NR is still applied on exposures longer than four seconds that could result in some stars still being ‘eaten’, albeit to a lesser extent than its predecessor. Is it a problem for you? Only you can decide.

Above: 20 seconds at 12800 ISO. Levels adjustment in Photoshop.
And here’s a ten second daytime exposure using a variable neutral density filter.
Above: ten seconds with ND filter.
Exposure bracketing is available in three, five or a generous nine frames. If you’re shooting in three or five frames, you can choose 0.3 to 3EV increments, and when shooting nine frames, you can choose from 0.3 to 1EV increments.
Metering can be set between Multi-segment (1200 zone), Center-weighted, Spot (with Standard and Large options), and inherited in part from the A6500, Entire Screen Average and Highlight. Highlight detects the brightest areas and prioritises the metering for them, ignoring potentially darker areas around them – great for compositions against dark backgrounds. Meanwhile Entire Screen Average considers the entire image but better takes the needs of tracking into account.
I mostly used the Multi-segment option and found it did a fair job at evaluating the scene, but like earlier Sony cameras, I felt it required greater intervention with exposure compensation than most ‘evaluative’ systems. As always it’s a case of learning how a camera reads a scene and how you should adjust to get the desired result.
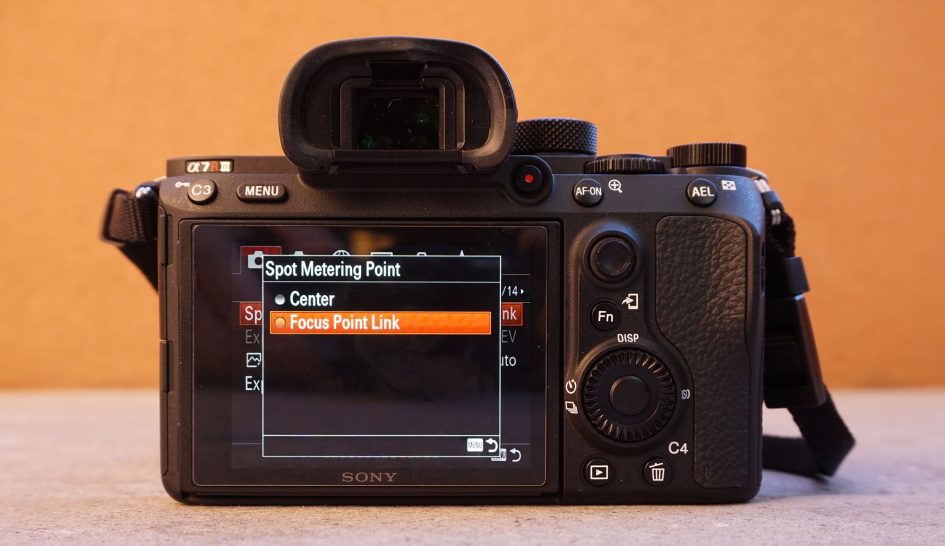
Like the A6500 and A9, spot-metering can also now be linked to the active AF area if desired. This is a feature highly valued by wildlife photographers, particularly birders, who frequently use spot-metering to expose for a potentially small and dark subject against an overcast sky or dim background. On the majority of cameras, spot metering may provide the exposure birders desire, but it’s generally locked to the center of the frame, which may rarely match the subject’s actual position especially when it’s in motion. What you really want is the spot metering to follow the active AF area as it tracks a subject moving around the frame, but previously this was a feature limited to the most expensive pro DSLRs from Canon and Nikon. Olympus was the first mirrorless company I’ve come across to include spot metering linked to the AF point on the PEN F and OMD EM1 Mark II, and now the Alpha A7r III joins them and the A9 / A6500 in this fairly exclusive club.
Auto ISO is also quite sophisticated on the A7r III. Not only can you set a minimum and maximum sensitivity for Auto ISO to choose from (the latter up to 102400 ISO), it’s also focal-length aware, so as you mount – or zoom to – longer focal lengths, the minimum shutter speed is automatically raised.
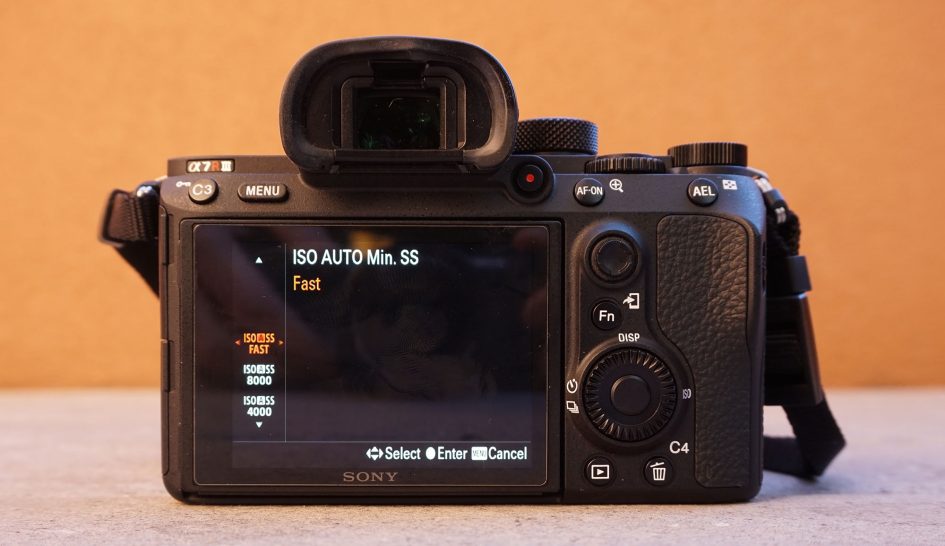
You can also set the minimum shutter speed the system’s allowed to use from 1/8000 down to 30 seconds, or use an automatic selection. Like the A6500 and A9, the latter can also be adjusted from Standard to Slow, Slower, Fast or Faster, to encourage it to reduce or bump-up the minimum shutter speeds. For example when shooting static scenes with stabilized lenses (or with the body-based stabilisation), I often set the Auto ISO to Slow or Slower, allowing it to deploy slower shutters in order to enjoy lower ISOs and better quality. In contrast, when shooting people who might move a little, I’d select Auto ISO with Fast or Faster to encourage quicker shutter speeds than are necessary to eliminate possible motion blur.
Like all Sony cameras, the A7r III’s Picture Effects are greyed-out if you’re shooting RAW or RAW+JPEG, which is daft as it’d be nice to only have the effect applied to a JPEG and keep a RAW as backup. Set the A7r III to JPEG only though and you can apply Toy Camera, Pop Colour, Posterisation Colour, Retro Photo, Soft High-Key, Partial Colour (with a choice of red, green, blue or yellow), High Contrast Mono, or Rich Tone Mono. Here’s how a selection look.

Above left: Pop Colour effect. Above right: Posterisation effect.
Above left: Retro effect. Above right: Soft High Key effect.
Above left: High Contrast Mono effect. Above right: Smooth Tone Mono effect.
The D-R menu is where you’ll find the Dynamic Range Optimiser (DRO) and in-camera HDR options, the former available in Auto or set Levels of one to five, and the latter available as Auto or in increments of one to six EV. The HDR mode takes three images at the desired interval and combines them in-camera into a single JPEG file, and you can trigger it with a single shutter press or a self-timer. If you have RAW or RAW+JPEG selected, the HDR options are greyed-out.
The in-camera Picture Effects, HDR and D-R adjustments are as much as the A7r III enters into ‘fun’ territory and misses out on the scene presets and panorama modes of earlier models in the range.
I’ll also end this section by once again stating the A7r III does not have a built-in interval timer or any bulb timers, and while you can deploy the S&Q mode to film an accelerated movie in 1080p, it falls short of full timelapse options on other cameras. Much of this reduced capability is due to Sony abandoning downloadable apps on its latest bodies – something I’m perfectly happy about, so long as the capability is built-into the camera’s main menu system. I really hope this is addressed in a firmware update, but as it stands, timelapse and long exposure fans will need to buy and carry around intervalometer and cable release accessories.
I should also mention there’s no RAW processing in playback, a feature that’s found on most cameras these days and that allows you to generate new JPEGs in-camera with adjustments in things like the white balance.
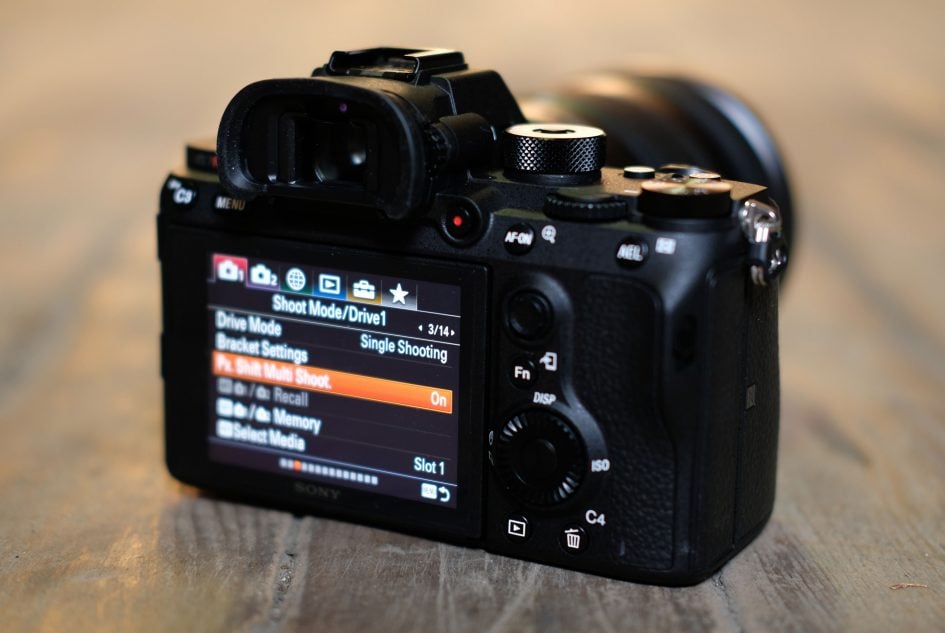
Sony Alpha A7r Mark III Pixel Shift Multi Shooting
The Alpha A7r Mark III may sport the same 42.4 Megapixel sensor as its predecessor, but Sony has added a new Pixel Shift Multi Shooting mode. This captures four frames, shifting the sensor up, down, left or right by one pixel per frame. This saves four RAW files that can then be imported into supplied software to generate a single image where the effect of the Bayer mosaic pattern has been eliminated. The resolution of the final image remains 42.4 Megapixels, but the effect of the Bayer mosaic is eliminated, thereby delivering much higher colour resolution with no false colour moire artefacts.
The four frames are captured using an electronic shutter at intervals of 1, 2, 3, 4, 5, 10, 15, or 30 seconds, so the fastest possible capture period would be four seconds. With the prolonged capture period, the Pixel Shift mode is really aimed at studio / archival / product photography, or architecture so long as there’s nothing moving in the frame. Sony expects it to be used in a tethered environment, so doesn’t see an issue with the actual composite taking place externally in software. I would still have preferred an in-camera assembly option like Olympus and Panasonic, even if it takes some time to process, but it’s still a mode with great potential for those who’s subjects can exploit it.
The capture process is straightforward enough: you enable Pixel Shift Multi Shooting in the menus, adjust the period between frames, then fire the shutter, after which the camera automatically takes the four images. Like other composite modes, careful technique is critical here: use a tripod, trigger the shutter remotely or with a self-timer, fit your best lens, focus perfectly, and while Sony doesn’t appear to impose restrictions on ISO and aperture, you should be using the base sensitivity and a diffraction-friendly aperture for the sharpest results.
The camera records four RAW files, numbered as normal with nothing to identify them as anything special on your card; as such they can be easy to lose mixed in with a load of other images, but when browsing with Sony’s Viewer application on your computer afterwards, you’ll see them indicated as parts 1, 2, 3 and 4 of four. All you need to do then is highlight the four images in the group and choose to Create and Adjust Pixel Shift image from the Edit menu; this opens the view seen below.
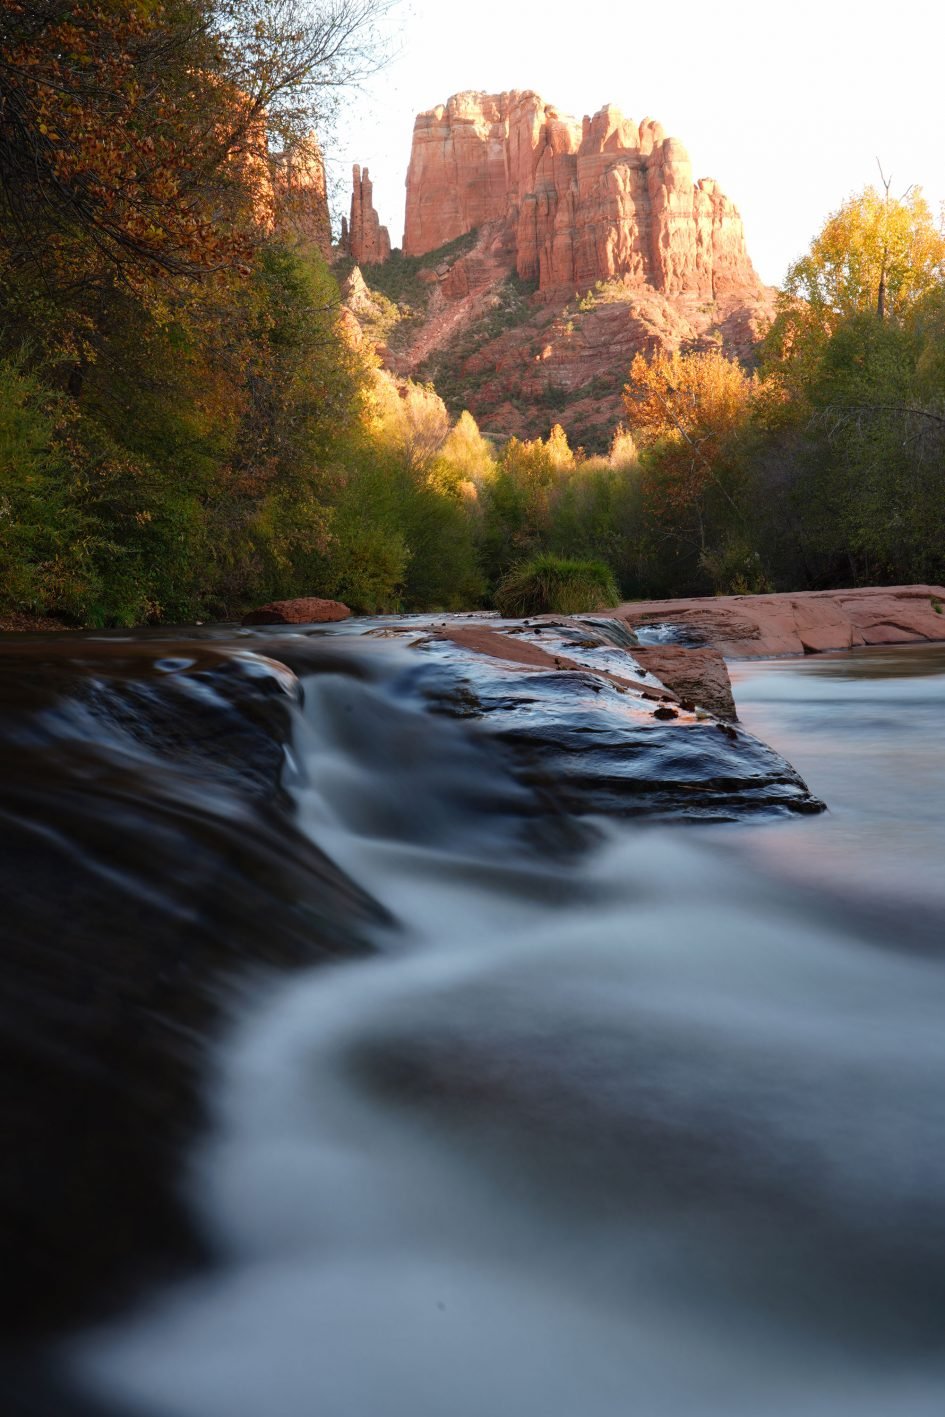
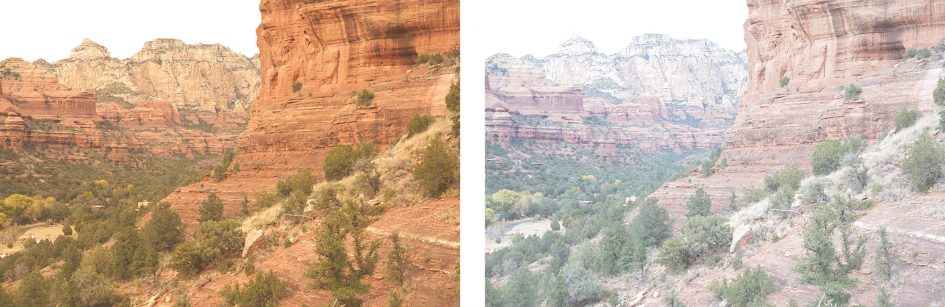
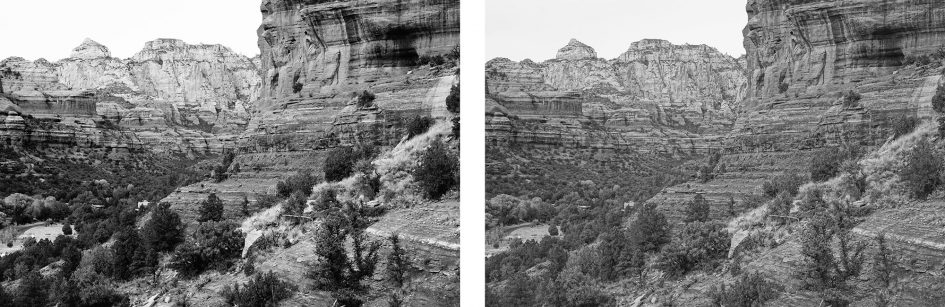
With the four images combined in the software you can apply a variety of adjustments, including a sharpening section dedicated to Pixel Shift images; I found they could handle quite a lot of additional sharpening with few ill effects. You can then export the image as a JPEG or TIFF, the latter in 8 or 16 bits. Here’s a Pixel Shift image I took with the A7r Mark III in Sedona, Arizona using the FE 24-105mm f4G OSS lens, and with an additional unsharp mask in software later.
I’ve taken 100% crops from the ridge area for comparison below: the out-of-camera JPEG crop is on the left and the Pixel Shift version on the right. At first the difference looks subtle, but look more closely and you’ll notice the colours, sharpening and contrast looks a lot more natural on the Pixel Shift version, and there appears to greater resolved detail too. Look at the sky and you’ll notice the Pixel Shift version is completely smooth compared to the fine noise texture on the JPEG, the latter perhaps caused by the bayer process. With a clear blue sky and static rock for a subject, I thought I’d not have to worry about any areas in motion, but a tiny cloud did move in the sky during the Pixel Shift capture and you can see it rendered as a strange cross-hatched patch in the sky below. At this scale it’s something that’s easily cloned-out in post, although it does illustrate how careful you need to be with your subject matter. Studio and true still life work is ideal.
Above: 100% crops from OOC JPEG (left) and Pixel Shift composite (right)
Ultimately Pixel Shift can deliver superior results than a single frame, but like all composite modes, the effects can be subtle, you need to shoot very carefully, and there could still be undesirable artefacts to deal with. I’m pleased to find it here, but use with care. Check back soon for some more examples using Pixel Shift in different scenarios.
Sony Alpha A7r Mark III movie mode
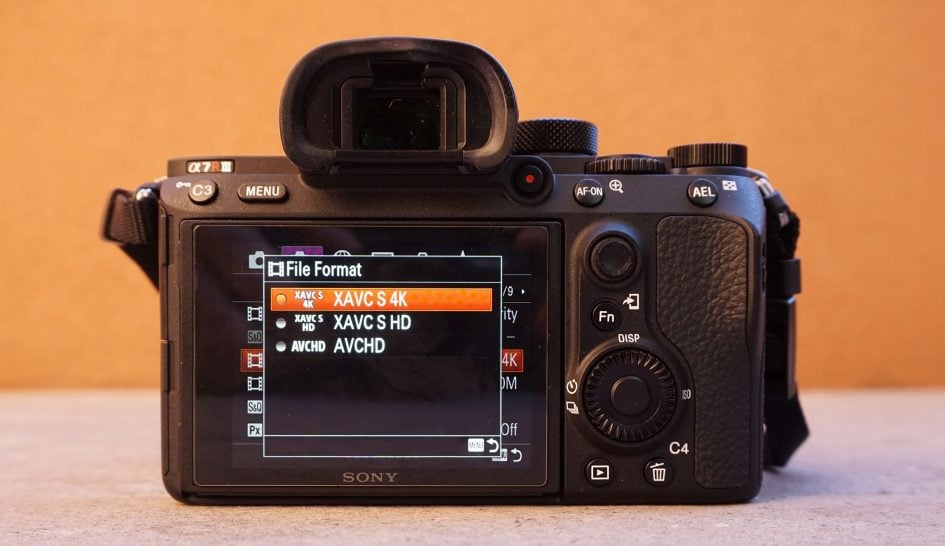
The Alpha A7r Mark III’s core-focus may be high resolution stills photography, but it’s also a very capable camera for video recording. It’ll shoot 4k UHD with full-frame or Super-35 / APSC coverage at 24, 25 or 30p (and in either 60 or 100Mbit/s), 1080p at up to 120fps for slow motion, it sports headphone and microphone jacks, has twin card slots for security, outputs clean 4:2:2 / 8-bit video over HDMI, has a larger battery than before, and now allows you to pull-focus with the new touch-screen.
There’s full manual control over exposure and the usual wealth of shooting aids including exposure zebras and focus peaking, not to mention the improved built-in stabilisation that works with any lens and the higher resolution viewfinder that makes it easier to manually focus without magnification. After skipping Picture Profiles on the A9, I’m also pleased to report they’re present on the A7r Mark III, allowing you to film flat footage for later grading, although in an upgrade over the A7r Mark II you now also have S-Log3 and, in a first for the series, Hybrid Log Gamma profiles for use on compatible HDR displays.
It’s disappointing not to have 4k in 10 bit or at 50p or 60p, but Sony has at least improved the quality of the 4k full-frame coverage, narrowing the gap between it and the Super-35 / APSC cropped 4k mode. To compare the resolving power of 4k in full-frame versus cropped APSC modes, I filmed the following landscape scene with the FE 24-105mm f4G OSS, adjusting the focal length to match the coverage in both modes. In this example, the cropped APSC mode still looks slightly crisper, but there’s much less between them now, making full-frame 4k filming much more usable.

Above: 100% crops from movie screengrabs, full-frame (left), APSC (right)
The touchscreen is a useful upgrade, allowing you to tap to pull-focus while filming – and as before you can adjust the speed and responsiveness of the continuous autofocus. Here’s an example of touchscreen focus-pulling using the FE 24-105mm.
Above: Download the original file (Registered members of Vimeo only).
If you keep the subject within the phase-detect AF region, you’ll enjoy confident continuous autofocusing as well as the chance to deploy face or object tracking. Here’s a video I filmed, again with the FE 24-105mm at 105mm f4, of me walking purposefully towards the camera over a reasonable distance.
Above: Download the original file (Registered members of Vimeo only). Using face detection to track me approaching with the FE 24-105mm lens at 105mm f4.
With the quality set to 1080, you can select frame rates up to 120fps which are captured with audio and played back at normal speed. If you choose the S&Q mode though you can instruct the camera to capture at one frame rate and interpret it to playback automatically in another to speed it up or slow it down; you may lose the chance to record audio with it, but you will have a file that’s ready to use straightaway. Here’s two examples showing the two extremes available. First-up a video captured at 120fps (the fastest rate) and output at 24fps for a slow-down of five times.
Above: Download the original file (Registered members of Vimeo only). Using the S&Q mode to capture at 120fps and conform to 24fps for a five-times slowdown.
Next, here’s a video captured at 1fps (the slowest rate) and output at 60p for a 60-times speedup. This example is as close as you’ll get to an in-camera timelapse video, but the quality is restricted to 1080p and unlike a proper interval timer, you won’t be able to capture separate high resolution frames or enjoy full control over the exposure. Sony really needs to equip the A7r III with a proper Interval Timer and more sophisticated timelapse movie options, but in the meantime, you can still have some fun in-camera with the S&Q mode.
Above: Download the original file (Registered members of Vimeo only). Using the S&Q mode to film at 1fps and conform at 60fps for a 60x speedup.
Two of the best movie upgrades of the Mark III over its predecessor concern battery life and heat control. On the earlier A7r Mark II I managed to film a single 24 minute video clip in 4k before the camera shut itself down with an over heating warning. It cooled down fairly quickly and turning it back on again revealed 40% of the battery had been consumed by the 24 minute clip, implying I’d be able to record about an hour’s worth of footage per charge. In stark contrast, the A7r Mark III in my tests managed to film just over five half hour 4k clips without overheating for a total of 152 minutes, or two and a half hours per charge. Indeed in a room with an ambient temperature of 22c, the hottest part of the body only reached 33c, and that was even with the screen folded in to the body.
I should also mention that the Sunny Weather option (which brightens the screen) is now available when filming in 4k or high frame rate 1080p. This was previously disabled on the Mark II when filming 4k or 120p, making it hard to view the screen in bright conditions and forcing you to compose with the viewfinder outdoors. Now you can film with the screen in 4k and 120p even in bright sunny conditions. Oh and considerately, the remaining memory switches to time rather than images when in the movie mode. Now for some more example clips.
Above: Download the original file (Registered members of Vimeo only). Also see my Sony A7r III full-frame 4k sample and Sony A7r III Super-35 S-Log 3 sample
Above: Download the original file (Registered members of Vimeo only).
Above: Download the original file (Registered members of Vimeo only). A 4k / APSC sample for comparison with a 4k / full-frame version where the lens was adjusted to deliver the same field-of-view.
Sony Alpha A7r Mark III Wifi, NFC and Bluetooth
The Sony Alpha A7r Mark III has built-in Wifi with NFC to aid negotiation with compatible devices, and in a feature first seen on the A6500, now also includes Bluetooth. Wifi on the A7r Mark III allows you to wirelessly transfer JPEG images to an iOS or Android device using a free app, and also remote control the camera with your device. Bluetooth and NFC make the initial connection a breeze, while Bluetooth can additionally retrieve location information from your phone and embed it automatically in your images.
Unlike its predecessor though, the A7r Mark III misses out on downloadable apps to expand the camera’s functionality. The A9 and RX10 Mark IV are the same in this regard, so it’s looking like a strategy going forward from Sony with pros and cons as a result. On the upside, I won’t miss having to register with PlayMemories, login using the camera and update core apps before even getting started. Now the full remote control functionality is ready to go out of the box, and there’s also no confusing duplicate menus to tend with. But unfortunately Sony also used the apps to deploy timelapse, interval and bulb timer functionality, none of which have been integrated into the A7r III’s menus yet. This means the A7r Mark III, along with the A9 and RX10 IV before it, miss out on some useful features found on most rivals, most notably Interval and Bulb timers. I really hope Sony can equip them with these features with a firmware update soon. I won’t dwell on it though as the rest of the wireless experience is so good.
I’ll start with transferring images from the A7r III to a smartphone and for my tests I used my Samsung Galaxy S7, onto which I’d previously installed Sony’s free PlayMemories app. If you have an NFC-equipped device, such as my GS7, the entire process is incredibly simple: just choose the image you want to send in playback on the camera, then hold your phone against the side of the camera for a few seconds. The NFC then instructs the camera and phone to connect (automatically taking care of network names and passwords), before then transferring the image and finally disconnecting. It all happens without a single button press and remains the best implementation I’ve seen for copying images from camera to phone.
Alternatively if you’ve paired the camera and phone over Bluetooth, you can simply tap Connect to Camera from the app, or fire-up a QR code for your phone to scan. If none of this works or you prefer a more manual approach, you can choose Send to Smartphone from the camera’s menus. This then gives you the choice of either selecting the desired image on the camera, or browsing the camera’s memory using your handset. Selecting either configures the A7r III as a Wifi access point which your phone needs to connect to. Next you’ll need to fire-up the PlayMemories app on your phone and connect to the camera.
Whichever approach you take, you can choose to copy images in their original 42 Megapixel size, or a down-scaled 2 megapixel or VGA version. Full sized 42 Megapixel JPEGs only take a few seconds to copy over, and like most Wifi camera apps, you can’t transfer RAW files.
Next I’ll cover remote control which again is really simple for owners of phones with NFC. With the camera powered-up and ready to shoot, simply hold your phone against the NFC logo on the side of the body and the A7r III will automatically fire-up the Smart Remote app, connect itself to your phone (again taking care of Wifi network names and passwords), then start the PlayMemories app. So without a single button press, you’ll find your self ready to remote-control the camera with your phone. Brilliant! If you don’t have a phone with NFC, you can again connect via Bluetooth, a QR code, or by manually connecting your phone to its access point.
Once you’re remote-controlling your camera, you’ll be able to see what it sees, adjust the shutter speed and aperture (depending on which exposure mode the camera’s in), tweak the exposure compensation, the sensitivity, white balance and drive mode. In this respect it’s the same as most of the competition, but in a critical upgrade over earlier Sony bodies including the A7r Mark II, you no longer need to sign into PlayMemories and update the remote control app within the camera itself to unlock all of the manual control.
The A7r Mark III also gains Bluetooth over its predecessor, allowing it to inherit the seamless location-embedding capabilities first-seen on the A6500 and later deployed on the A9. You simply pair the camera and phone like any other Bluetooth accessories, after which they maintain a low-power link, requesting and embedding GPS co-ordinates as you shoot.
In practice it’s almost that simple, but requires an additional step to get started. First you’ll need to pair the camera and phone, by enabling Bluetooth on the former and searching for it on the latter. Once both are paired, all you need to do is fire-up the PlayMemories app on your phone. Under the Location Information Linkage option you’ll need to set the camera that will receive the GPS data and there on the list you should see the A7r III which you previously paired. Once selected, you should see the World / map icon on the A7r III’s screen change to indicate it’s connected and receiving location information, after which you should be good to go. Anything you shoot from this moment onwards will be tagged by the position provided by your phone without further interaction, and the camera will automatically re-establish the link when powered off and on again. Similarly your phone will automatically reconnect when it’s been powered off and on again.
In practice it worked seamlessly for me and I didn’t notice a significant impact on battery life while it was running. I used it for all of my outdoor shooting with the A7r III and it worked a treat, successfully embedding co-ordinates as I shot and never requiring further interaction. The only issue, as with all smartphone solutions, is the accuracy being limited to the actual phone. I found my GS7 can often be a few meters out when kept in my pocket, so if I’m after the most accurate co-ordinates during a session, I try to keep my phone in the top of my backpack. But it worked fine for the A7r III images I tagged, and here’s one as an example from a helicopter shoot in Arizona.


On the whole, the wireless capabilities of the A7r III are very good. I remain concerned how Sony will deploy features (like an interval timer) which were previously provided by downloadable apps, but I’m relieved you no longer need to jump through hoops just to get the remote control working. It simply works out of the box as it should and I continue to love Sony’s approach where NFC phones automatically fire-up remote control or image transfer depending on whether the camera’s in record or playback when touched against the handset. The icing on the cake is Bluetooth which – once running – delivers a seamless approach to location-tagging. No logs, no interaction, no fuss.
Sony Alpha A7r Mark III sensor
As you know, the A7r Mark III inherits the same 42 Megapixel back-illuminated CMOS full-frame sensor of its predecessor and delivers the same maximum image size of 42 Megapixels. But that’s not to say the image quality is the same. Sony has coupled it with a newer image processor and front-side LSI to deliver what it claims are superior dynamic range, better colour reproduction (especially on skin tones), lower noise, and higher overall detail. Certainly from my tests so far, the colour reproduction is better than before, matching the enhancements introduced on the Alpha A9. Check out my sample images page for a wide variety of JPEGs out-of-camera or head over to my verdict using the tabs at the top of the page.
Check prices at Amazon, B&H, Adorama, or Wex. Alternatively get yourself a copy of my In Camera book or treat me to a coffee! Thanks!