 Sony's fifth full-frame mirrorless camera is its most impressive to date, an unashamedly high-end model aimed directly at buyers of Nikon's D810 and Canon's EOS 5DS(r). It features a 42 Megapixel back-illuminated full-frame sensor, 4k video, built-in stabilisation, an electronic viewfinder with a huge image, tilting screen, Wifi with NFC and a powerful embedded phase-detect AF system with 399 AF points. The real-life resolution and noise essentially match the EOS 5DS(r), the 4k video, especially in the cropped Super-35 mode, looks great, and the new AF system with its broad and dense array is fast, works well in low light and can confidently track moving subjects. Meanwhile the combination of built-in IS, an improved grip, electronic first-curtain shutter and improved damping means the A7r II gives you a much better chance of enjoying its high resolution than typical DSLRs. The buttons and dials may be a little small, the IS compensation modest and it could have been even better with a touchscreen, but ultimately the A7r II is one of the most impressive digital cameras to date. PS - if movies are your absolute priority, the A7s Mark II has the edge for video and extreme low light performance, and if you're into shooting pro sports, go for the A9. Also look out for discounts on the A7r Mark II now the A7r Mark III has been released; once my A7r III tests are completed, it's likely to be included in this guide.
Sony Alpha A7r II review
-
-
Written by Gordon Laing
In depth
Sony’s Alpha A7r Mark II is the successor to the original A7r and becomes the fifth full-frame mirrorless camera in the series. Announced in June 2015 it becomes Sony’s highest resolution camera to date boasting 42 Megapixels to its predecessor’s 36.
The A7r Mark II’s sensor is about more than just higher resolution though. It’s the first Back Illuminated full-frame CMOS, allowing it to perform better in low light and support extended sensitivities up to 102400 ISO. It also supports 4K video and unlike the A7s, it’ll record it internally too. The sensor’s additionally packed with 399 embedded phase-detect AF points (vs 117 on the A7 II) with the broadest coverage of any full-frame sensor, and they can also be exploited by A-mount lenses via a simple adapter. So no need to use the previous, more complex SLT-style adapter for continuous AF with A-mount lenses. The icing on the cake is built-in 5-axis sensor-shift stabilisation, inherited from the A7 II, making the A7r II the first camera to offer a body-based full-frame sensor with 4K video and internal recording.
The 4K video is available in two formats with full-frame coverage or cropped Super 35, both encoded at 100Mbit/s and the latter claiming to reduce moire. There’s also 1080p at up to 60p or 720p available at 120fps. Composition is with a tilting 3in screen or an XGA OLED finder with a massive 0.78x magnification, making it the World’s largest EVF. There’s also Wifi with NFC, a locking mode dial, 5fps continuous shooting, a newly designed shutter with an electronic first-curtain which reduces vibrations, and the option of a 100% electronic shutter for silent and vibration-free operation. There’s no touch-screen, but Sony’s really thrown everything else into the A7r Mark II. It’s also unashamedly the highest-end mirrorless camera from a mainstream manufacturer to date. It’s one of the most exciting digital cameras to date, so I’ve prepared a longer than normal review for it with over a month of testing and comparisons with rival cameras. Read-on to discover the future of high-end digital photography!

Sony Alpha A7r Mark II shooting experience
The A7r Mark II may look similar to its predecessor, but the two cameras are a World apart in handling. The bigger grip and repositioned shutter help you hold the body more comfortably, the viewfinder provides a much larger image to pore over, the stabilisation keeps the subject fairly still while framing, the AF system has improved enormously, and once you push down on the shutter release, you’ll feel and hear the shutter is quieter and considerably more damped.
While the 36 Megapixel images of the A7r were not to be sniffed at under best-case scenarios, the combination of improved ergonomics, built-in IS, electronic first curtain shutter and better damping on the A7r Mark II means the difference in recorded detail in general-use is likely to be more than the extra six Megapixels on the sensor. In other words, the A7r Mark II not only gives you a higher resolution sensor than its predecessor, but crucially works much harder to ensure you’ll exploit it under more circumstances.
Throw in 4k video, slow motion 720p and the ability to shoot while powering the camera with an external USB source and you’ve got a camera that delivers a significantly better shooting experience than the original A7r.
While the viewfinder, AF and image quality on the A7r II were all of a high standard, there were a few things which annoyed me about the camera in general use. First, as mentioned in the main review below, I found many of the controls unnecessarily small, and hard to operate when gloved. The finger and thumb dials in particular were too small and didn’t provide positive feedback for me when turning. I feel this is something Canon, Nikon and Olympus have nailed, so I hope Sony’s design team can turn to them for some ergonomic inspiration – certainly cameras like the OMD EM1 and EM5 II prove you can deploy larger, chunky buttons and dials on a small body. Sony has to remember a camera is more about usability in your hands than style in the product shots.
While the viewfinder is outstanding, I would have preferred the screen to be fully-articulated and touch-sensitive. If the screen were side-hinged, you’d be able to shoot at high or low angles in the portrait orientation, and flip it back to face the subject for selfies or filming pieces to camera. I also feel the positioning of single AF areas could have been so much easier with a touch-screen. Lots of photographers claim they don’t like the idea of touch-screens, but most of those I know who’ve tried them would find it hard to go back to a camera without.
Sony’s menus could also do with some work. Items aren’t always grouped consistently and depending on some settings or modes, others can be mysteriously greyed-out. For example if you have RAW or RAW+JPEG selected, you may wonder why the HDR or Picture Effects are unavailable, and you’re not in the panorama mode, you can’t change the panorama settings even if you wanted to in advance. Things get even more confusing if you’re using the downloadable apps, as most employ their own menus, including things like image quality settings. So you may think you’ve already set the image quality, but if you enter an app, you’ll need to do it again. In the heat of the moment it’s easy to forget and think you’re recording RAW, but then discover the app menu was set to JPEG only.
Of course it may all make complete sense to you as much of this boils down to personal preference, but for me I feel the A7r Mark II’s user interface isn’t as intuitive or structured as it could be, and that overall usability could be significantly improved with more tactile buttons and dials. Sort this out – and fit a fully-articulated touch-screen – and there’s really very little to complain about.
Now read-on for my in-depth review, or if you’re ready for some results, check out my Sony A7r II quality and Sony A7r II sample images pages, or skip back to my verdict!
Sony Alpha A7r Mark II design and controls
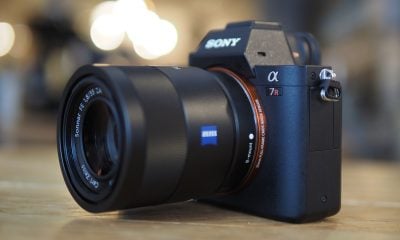
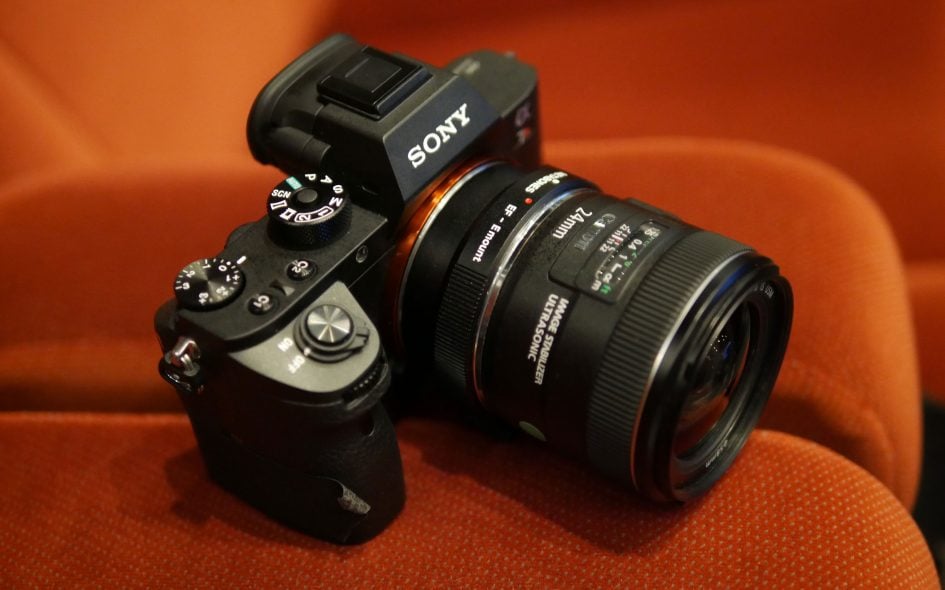
After deploying essentially the same body and design for the first three Alpha A7 models, Sony made some important changes for the A7 Mark II. The new A7r Mark II inherits this latest design and externally is virtually identical to the A7 Mark II. Most obviously the A7r Mark II is now thicker than the original models to accommodate the built-in stabilisation and now features a much more substantial grip.
At 127x96x60mm, the A7r Mark II is the same width as the A7r, but 2mm taller and over 10mm thicker. To be fair much of that thickness measurement is down to the new chunkier grip, but the main body itself is also thicker than before. The specifications also have the Mark II weighing 625g with battery, compared to 474g for the A7r. That’s a difference you’ll notice when you have them side by side, but it’s still way less than lugging around a DSLR like the Canon EOS 5DS(r) which measures 152x116x76mm and weighs 925g with battery.
While testing the Alpha A7r Mark II I spent some time with the EOS 5DSr, shooting with both side-by-side. When switching between them I became quickly aware of the size and weight differences, especially when it came to squeezing them back into my bag. Some people, especially those with larger hands, may prefer the heft of a traditional DSLR, but the more I shoot with mirrorless bodies, the harder I find it to go back. I’ve pictured the A7r Mark II and EOS 5DSr below for comparison.

In terms of build quality, the A7r Mark II is a step-up from the original A7r thanks to greater use of magnesium alloy in the shell and a more robust lens mount. Sony describes it as being their toughest Alpha yet and claims some dust and moisture sealing, but avoids using any statements concerning serious weather-proofing – certainly the various doors around the body lack the rubber seals typically found on DSLRs of this class.
In the mirrorless world, Olympus makes the most noise about dust, splash and freeze resistance on the OMD EM1 and EM5 II, while Panasonic’s GH4 is also environmentally-sealed. Technically I’d rate them higher than the A7r II for weather-proofing, but none match the sheer toughness of a pro-grade DSLR. That said, the A7r II goes up against models like the EOS 5DS(r) more than the 1Dx, so its build is not too far off. Ultimately though when it comes to weather-sealing, anecdotal evidence can be most useful. I shot with the A7r II in steady drizzle outdoors and during an indoor shoot with lots of splashing, and suffered no ill effects. My friends and Sony Artisans Brian Matiash and Colby Brown have also shot with them in challenging conditions in Norway and Iceland, so it’s worth giving them a follow socially to see how they’ve got on.
The A7r II is ultimately a small camera and as such lacks the heftier shell of larger models. This can’t help but impact the overall robustness, not to mention its ability to dissipate heat. I shot with the A7r II in Central Europe over Summer where temperatures rose to 35 to 40 degrees Celsius (95-104 F) and found the body getting very warm to the touch. To be fair, it never over-heated when shooting stills in these conditions and I didn’t find increased noise levels on my images, but again you may need to adjust your physical expectations if switching from a high-end DSLR.
Moving onto design, the A7r Mark II is fairly compact, but larger than its predecessor. While I love miniaturisation, I admit to finding the original A7r body design lacking in the comfort department. The A7r Mark II’s deeper grip greatly improves the handling over its predecessors, in the same way the OMD EM1 did over the EM5 – and while it obviously makes the camera a little larger, it’ll still occupy much the same space in your bag. I also shot with the A7r Mark II alongside other mirrorless cameras including the Olympus OMD EM1 and Fujifilm XT1 and actually found the Sony grip the most comfortable of all, although the Olympus was a close second. So a triumph on the grip, although the downside is the A7r Mark II is no longer compatible with the older battery grip accessory. If it’s any consolation though, it can use the same grip as the A7 Mark II.

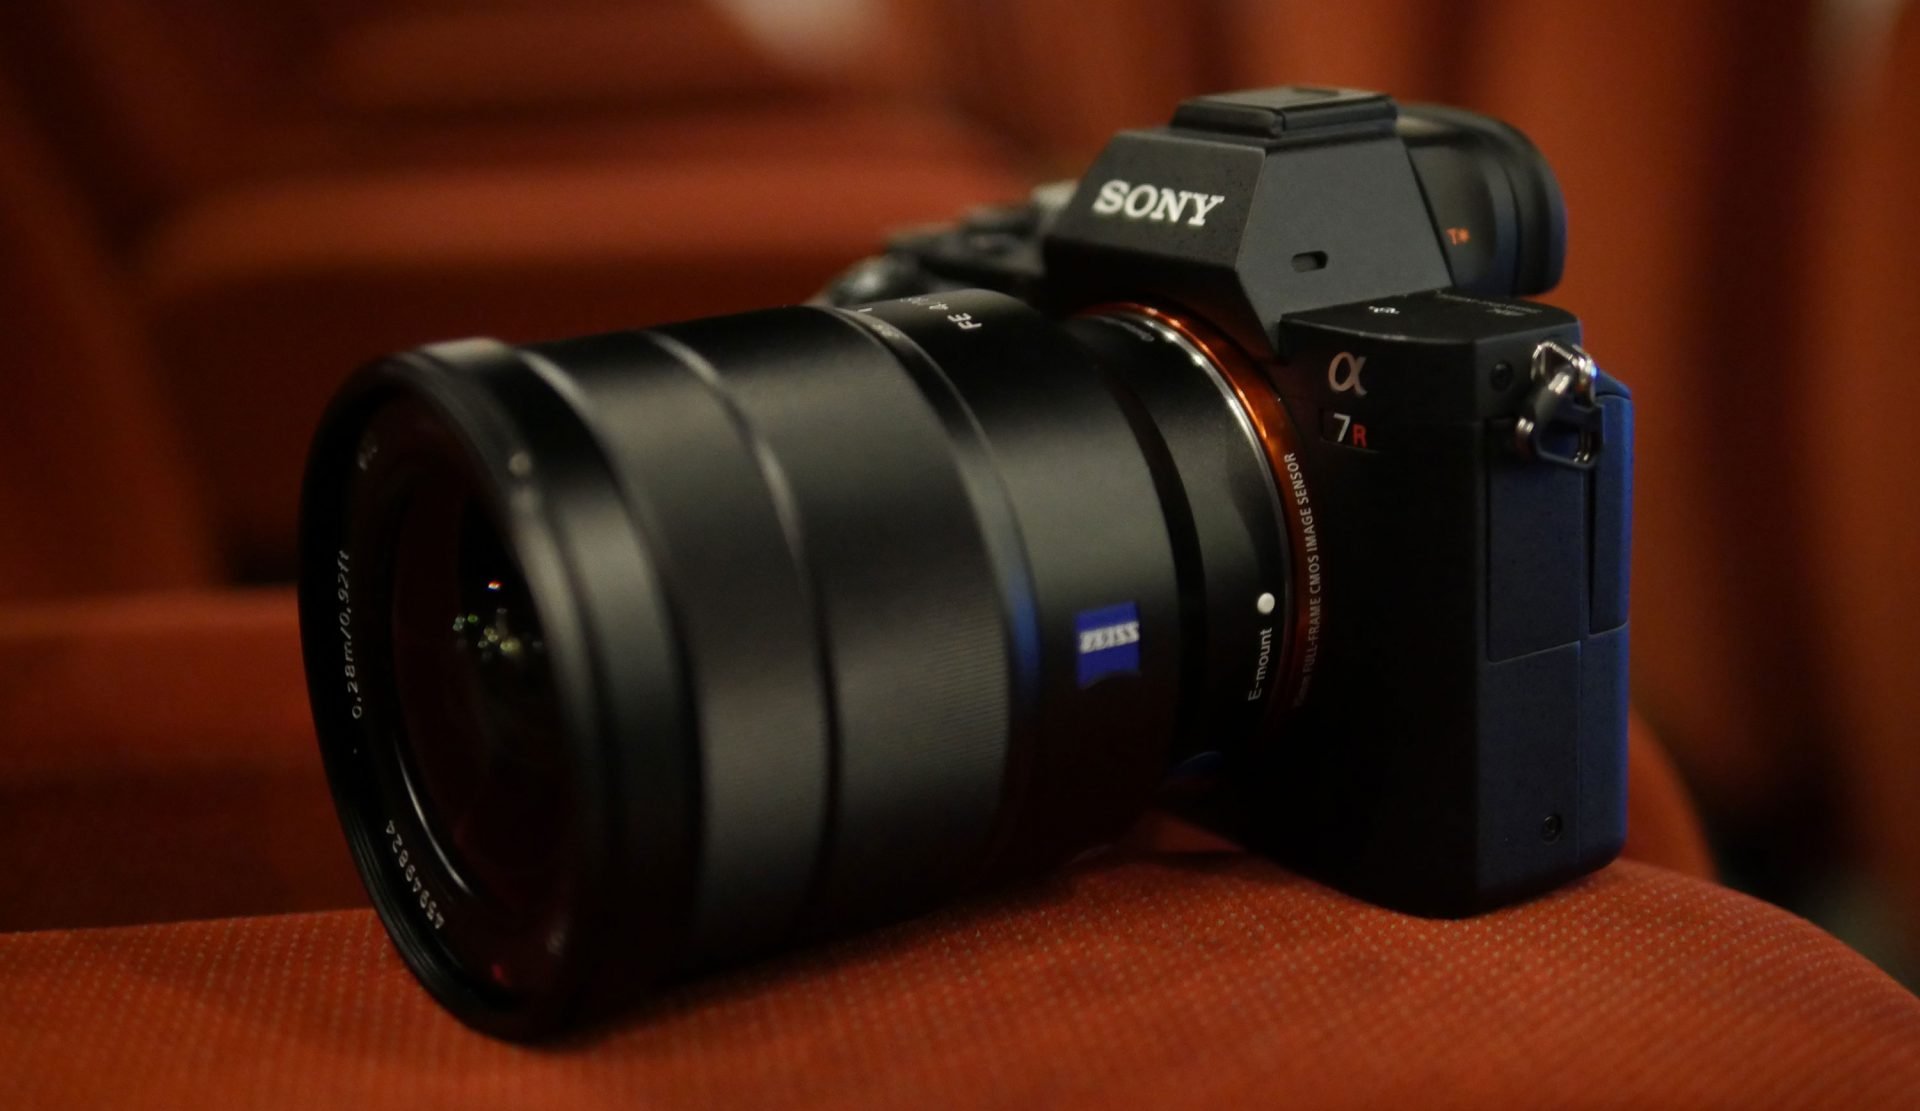
I also like the repositioned shutter release out on the grip, rather than perched atop the main body, again something Olympus owners enjoyed when switching from the EM5 to the EM1. Shifting the shutter release has now freed-up room for a fourth custom function button (all of which offer a wide range of custom functions to choose from) which makes up for some of the control shortcomings of its predecessors – now it’s easy to have instant access to your most used settings and menus.
Less successful though are the new finger and thumb dials. The unusual tall wheels of the earlier Alphas are gone and in their place are more conventional thin dials with more pronounced indentations. Trouble is, the dials are too small, too flush with the body and the friction all wrong for me. I found it too easy to accidentally turn the dials by two notches or more when I only intended one. This became frustrating as I was always very aware of the process and felt I was fighting against the system rather than it working transparently with me.
While it’s nice to still have a dedicated exposure compensation dial, I also found it sometimes turned when being removed from a tight bag, so again it was something I had to learn to be aware of. Interestingly, while sharing most of the A7 Mark II’s body, the mode dial on the A7r Mark II now features a locking button which must be pressed down to turn it. Ergonomically it’s not as pleasant as the ballpoint pen click locks of some rivals, but at least there’s no chance of the mode changing without your knowledge.
But the bottom line is the controls on the A7r Mark II (and the A7 Mark II before it) just didn’t gel for me. The finger and thumb dials didn’t provide the feedback I wanted and the rear buttons were unnecessarily small which not only gave them little travel but also made them hard to operate when gloved. It doesn’t have to be this way on a small body: Olympus proved on the OMD EM1 that you can fit large chunky dials and buttons on a compact mirrorless body, and given a larger body, Canon and Nikon are also masters in control ergonomics.
To be fair, Sony’s not the worst offender. For all its attractive retro style, I find the thumb and finger dials on Fujifilm’s XT1 even worse. Now of course this sort of thing is very personal and you may love the control ergonomics of the Alphas, but for me they simply didn’t work as well as they could have. Sony’s Alpha design team are definitely making steady improvements, thinking more like a camera company rather than a consumer electronics one, but it still needs to study the competition more. This also extends into some of the menus and ways to deploy the AF system, which I’ll describe in more detail later.
Moving onto composition, the A7r Mark II may on the surface appear to share similar options to its predecessor (vertically-tilting screen and EVF with XGA resolution), but there’s been some important upgrades.
Starting with the viewfinder, the 4:3 shaped / XGA (1024×768 pixel) / OLED panel remains the same as before, but the magnification is much larger. All previous A7 models, including the recent A7 Mark II, offer a viewfinder magnification of 0.71x which delivers a pretty large image, but one that’s beaten on size by some rivals, most notably Fujifilm’s XT1 with 0.77x.
With the A7r Mark II, Sony’s increased the viewfinder magnification to 0.78x, and while there’s no perceptible difference in size to the XT1 in practice, the fact remains the image presented to your eye with either model is huge. The image is noticeably bigger than the earlier A7 models not to mention typical full-frame DSLRs.
Since the 4:3 panel is taller than the native 3:2 aspect ratio of images, Sony exploits the unused space above and below the image for shooting information. Even with this ‘wasted’ space though, the active image is impressively as tall as the Olympus OMD EM1 viewfinder image (where the 4:3 panel matches the 4:3 native sensor shape), but wider.
Pressing the DISP button while composing through the viewfinder allows you to super-impose a live histogram or a dual-axis levelling gauge. The shooting information remains present above and below in all viewing modes, as do any alignment grids you’ve chosen to enable.
Throw in focus peaking and magnified assistance for manual focusing, and it all adds up to one of the best viewfinder experiences around, although I should note Fujifilm still has one trick up its sleeve which no-one’s copied yet: the shooting information rotates in the XT1 viewfinder to remain upright when shooting in the tall / portrait orientation.
It’s also worth a brief discussion on optical versus electronic viewfinders for those used to shooting with DSLRs. Optical viewfinders remain superior when panning to follow action, especially if you’re shooting bursts. In comparison electronic viewfinders currently lag a little, although with practice you can anticipate and compensate. Optical viewfinders avoid noise or refresh slowdowns in vey low light and also consume much less power, extending the battery life. But in their favour, electronic viewfinders deliver much larger images which can also be used for filming video and playing back images, they instantly preview any exposure or processing settings, and they allow a wealth of rich overlays and guides including focus peaking and magnified assistance for manual focusing.
Indeed after shooting mirrorless for several years now, I now prefer electronic viewfinder to optical ones. I equally appreciate it’s a personal preference, but it’s important to know there’s pros and cons to both technologies and when you’re shooting at such high resolutions, any focusing aids are very useful. Certainly if you envision yourself focusing a high resolution DSLR on a tripod using Live View on its screen, you should think about whether a native mirrorless system would be better for you.
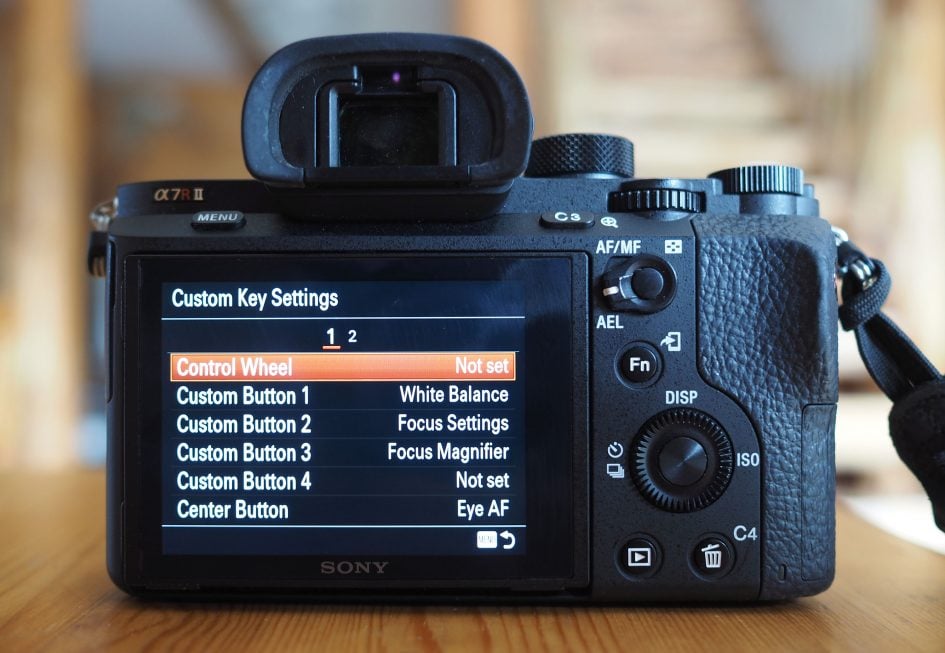
In terms of the screen, Sony has stuck with a 3in panel, although there’s now an extra white dot for each pixel, allowing a more vibrant image. As before it can vertically tilt to face directly upwards, or down at an angle making overhead or waist-height shooting more convenient. Like the viewfinder you can overlay a live histogram, dual axis levelling gauge and a selection of alignment grids. Annoyingly though portrait images don’t turn to fill the screen in playback when the camera is on its side.
Like many Sony screens in my experience, the brightness level is set low by default to save power. It’s fine for use indoors, but outside in brighter conditions it becomes very hard to see. Of course you could switch to composing with the viewfinder in such conditions but if, like me, you like to exploit the tilting screen for unusual angles, you’ll almost certainly have to boost the brightness from the menus and suffer from reduced battery life as a result.
I’m also frustrated that Sony continues to avoid fully-articulated screens and touch-panels on their A7 series. A screen that tilts vertically may offer compositional freedom when shooting in the landscape / horizontal orientation, but is of little to no use when shooting in the portrait / vertical orientation. In contrast, a side-hinged screen opens up complete flexibility, including facing forward for selfies or filming pieces to camera. Meanwhile I’ll continue to beat the drum for touchscreens if only for easier repositioning of AF areas.
Sony believes touchscreens are not appropriate in a high-end camera, especially in the Japanese market, but I disagree. I think they make life much easier, again especially for selecting AF areas. Some consolation however can be had with the Smart Remote app which lets you remote control the camera with a smartphone and, if updated internally to the latest version, supports touch AF on the phone’s screen.
The A7r Mark II still does not have a built-in flash or a PC Sync port either (making it less desirable to beginners or lighting experts respectively), but it does have a standard hotshoe including Sony’s Multi Interface Shoe contacts to support the company’s range of optional accessories. The A7r Mark II is also equipped with standard USB and Micro HDMI ports (the latter supplying a clean (4:2:2 / 8 bit) feed to external monitors or recorders compared to 4:2:0 for internal recording), along with 3.5mm microphone input and headphone jacks. The Mark II also sports built-in Wifi with NFC, which allows wireless transfer of images and supports the company’s selection of optional apps to expand its capabilities, more of which later.
There’s an optional RMT-DSLR2 remote control which is also compatible with a variety of other Sony models, although you can also remote trigger the camera over Wifi using a smartphone since the Smart Remote app is permanently embedded in the camera; there’s also a downloadable app which lets you trigger the shutter by waving your hand at the viewfinder eye sensor, including the handy ability to start a Bulb exposure with a wave and end it with another.
There’s a single memory card slot in the right grip side, that’s compatible with SD cards and Sony’s Memory Stick Duo; you’ll need an SDXC card if you want to encode video in the XAVCS format, which is the only format available for 4k. There’s still no mirrorless camera with dual memory card slots, so if that’s important to you, you’ll need to consider a DSLR like the Canon EOS 5DS(r) or Nikon D810.
The A7r Mark II is powered by the same compact NP-FW50 Lithium Ion pack as all Alpha mirrorless cameras to date, and Sony reckons it’s good for up to 340 shots with the screen or 290 with the viewfinder. The quoted battery life is short, but your experience may be even shorter, especially if you’re exploiting the stabilisation, shooting movies or using Wifi. For example, I regularly drained the camera after shooting around 100 photos and a few minutes of video with the built-in stabilisation. Over several weeks of testing, this proved to be the typical lifespan for my use.
The 100% electronic composition of mirrorless cameras always eats through batteries quickly, but the A7r Mark II was hungrier in use than any other model I’ve tested, matched only in greediness by its sibling the A7 Mark II. It’s a shame too as their larger grips could have potentially accommodated a larger battery. Sony is fully aware of this though and in a generous move, supplies the A7r Mark II with two NP-FW50 battery packs. This in turn extends the total life to a much more respectable amount and should get you through many more situations.
Sony also supplies the A7r II with an AC battery charger, but like earlier Alpha mirrorless cameras, you can alternatively recharge the battery in-camera over USB, allowing you to top-up between shoots. I found myself regularly exploiting this ability, whether connecting the A7r II to my laptop in a cafe, a portable USB battery pack in my bag or to a USB port in my car between locations; typically I’d only need about 90 minutes of charging over USB to go from zero to 100%. This for me is so much more convenient than having to carry a dedicated charging unit and find an AC outlet to plug it into, although again if you prefer that route, Sony supplies an AC charger, and if desired, third parties offer models which can charge two packs at once.
In a particularly welcome upgrade, the A7r Mark II also becomes the first Alpha that lets you shoot while connected to an external USB power source. Previously when you connected USB power, the cameras would switch themselves off and into charging mode. You can still do this by switching the camera off if desired, but if you switch it on, you’ll notice the battery icon changes to indicate an external power source. If you connect a large USB battery, you can then greatly extend the shooting time which is invaluable for time-lapse photography, or even filming long video clips. You could also use an AC-USB adapter to indefinitely power the camera if preferred.
This capability will almost certainly be overlooked in many reviews, but for me is a key upgrade. I exploited the external power option when shooting a sunset timelapse from Mount Hood using the optional Timelapse app. I carelessly forgot to check the charge of my battery when starting the sequence and noticed a few minutes later that it was precariously low. But by carefully connecting an Anker USB battery between frames, my sequence could continue for much longer. Here’s the subsequent video.
Above: Download the original file (Registered members of Vimeo only). Sample movie filmed with the Sony Alpha A7r Mark II using its timelapse app. I programmed it to shoot 720 images at 5 second intervals for a period of one hour, resulting in a 24p clip (encoded in-camera) that lasts 30 seconds. I used the FE 70-200mm f4G OSS at 70mm for this clip.
Sony Alpha A7r Mark II lenses
The Alpha A7r Mark II is equipped with an E-mount that’s compatible with existing E-mount lenses for Sony’s APSC mirrorless cameras along with newer FE lenses that are designed for full-frame use.
After an initial slow start, Sony now offers 11 full-frame compatible FE-mount lenses, consisting of six zooms and five primes. There’s ultra-wide, general-purpose and telephoto zooms, three bright primes, a macro option, a zoom designed for video use and a highly compact walk-around lens that allows the camera to rival smaller mirrorless rivals.
Sony’s promising seven more FE lenses by early 2016, but already there’s a number of native third-party options available. Zeiss in particular has thrown its weight behind Sony’s system with its manual focus Loxia and autofocus Batis lenses. The Loxia 35mm f2 and 50mm f2 deliver a fantastic manual focus experience that can trigger a magnified view of the selected AF area (if desired) as you turn the manual focusing ring – brilliant if the AF system has detected a face or eye, allowing you to instantly check the focus on them. Meanwhile the Batis 25mm f2 and 85mm f1.8 bring AF to wide angle and portrait telephoto lengths, the latter in particular being very welcome in the absence of a classic portrait lens from Sony in the native FE mount, something I expect to change very soon.
Sony also claims all of its native FE lenses deliver sufficient resolution for the 42 Megapixel sensor. While some models are definitely sharper than others, it’s a reassuring statement, especially compared to Canon where only the latest lenses can keep up with the 50 Megapixel 5DS(r). It’s an important point as the perceived advantage of the EF system is native access to the huge lens catalogue, but the fact is many are ageing designs which won’t make the most of the latest bodies. Indeed if you want to pair a 5DS(r) with the optimal lenses, the selection reduces significantly.
If you’re happy to shoot with an APSC crop on the A7r II and capture around 19 Megapixels, there’s also 15 existing E-mount lenses from Sony, not to mention others from third parties such as the pair of Zeiss Touits. None of these involve using adapters.
Perhaps the A7r II’s trump card though is just how well it can work with adapted lenses thanks to its new embedded phase-detect AF system and (possibly) its faster sensor readout. With the simple LA-EA3 adapter, you can now enjoy pretty swift and continuous autofocusing with any of the over 20 full-frame A-mount lenses, including the 85mm f1.4 ZA, 70-200mm f2.8G SSM and 500mm f4G SSM, three exotic lenses not currently in the native line-up. I couldn’t find out from Sony as to why the embedded phase-detect AF wasn’t available when adapting A-mount lenses to the earlier A7 Mark II – it may be the speed of the sensor readout, but either way it’s a key benefit of the new model.
Impressively you can also adapt most Canon EF lenses and, depending on the age of the lens and the capability of the adapter, still exploit the embedded phase-detect AF system. This lets you enjoy an AF experience that in some instances feels like shooting natively on a Canon EOS body, except with a broader array of AF coverage and no front or back focusing calibration issues to worry about; I found the Metabones Smart Adapter IV, updated to the latest firmware, proved most effective, but I know some other photographers favour the Fotodiox adapter. If you don’t mind manual focus, there’s also a wealth of other third party lenses which can be adapted and thanks to the new sensor design, with less peripheral colour issues. Finger’s crossed the rumours of an adapter which allows Nikon lenses to be mounted with autofocus becomes a reality.
I’ll discuss AF with a variety of lenses later in my review, but what I wanted to get across right now is the enormous variety of lenses that’ll work well with the A7r II, and the increasing number of very high quality native options. Sony’s own FE line-up has already matured to a point where it’ll satisfy most photographers. The new FE 35mm f1.4 and FE 90mm f2.8 Macro are both outstanding, I remain very fond of the original FE 55mm f1.8 and FE 70-200mm f4G OSS, and have now found an additional travelling companion in the form of the surprisingly small, light and bright FE 28mm f2.
While there are gaps in Sony’s existing FE-lineup, I expect them to get plugged soon and in the meantime there’s the superb Batis and Loxias from Zeiss, along with Sony’s existing A-mount options. The bottom line is what started as a system with few native options and a variable experience with adapted lenses has now become a system with a wealth of excellent native lenses and a surprisingly good adapted experience.
Oh, and lest we forget, anything you mount on the A7r Mark II becomes stabilised, which brings me neatly to:
Sony A7r Mark II stabilisation
The A7r Mark II inherits the built-in IS of the A7 Mark II which shifts the sensor in order to stabilise any non-stabilised lenses you attach. I say non-stabilised lenses as those with Sony’s optical stabilisation over-ride the built-in system, which gives a clue regarding what to expect in practice. In short, like the A7 Mark II before it, there’s definitely a benefit to the built-in IS, but don’t expect miracles.
Sony describes the stabilisation in the A7r Mark II as operating in five axes: X, Y, Yaw, Pitch and Roll, all achieved by mounting the sensor on a floating platform. The company reckons the system provides up to 4.5 stops of compensation by CIPA standards which ranks it similarly in ambition and approach to the system employed by Olympus in its OMD and PEN cameras. If the lens is native – or passes specification data – then the camera can find out the focal length and configure the appropriate compensation. If the lens is not native, or can’t pass focal length information, then you can enter it manually.
When testing the earlier A7 Mark II, I found the stabilisation worked better with native lenses than adapted ones, so once again I decided to try both approaches, starting with the native FE 55mm f1.8 then switching to a Sigma ART 50mm f1.4, mounted via a Metabones Smart Adapter IV.
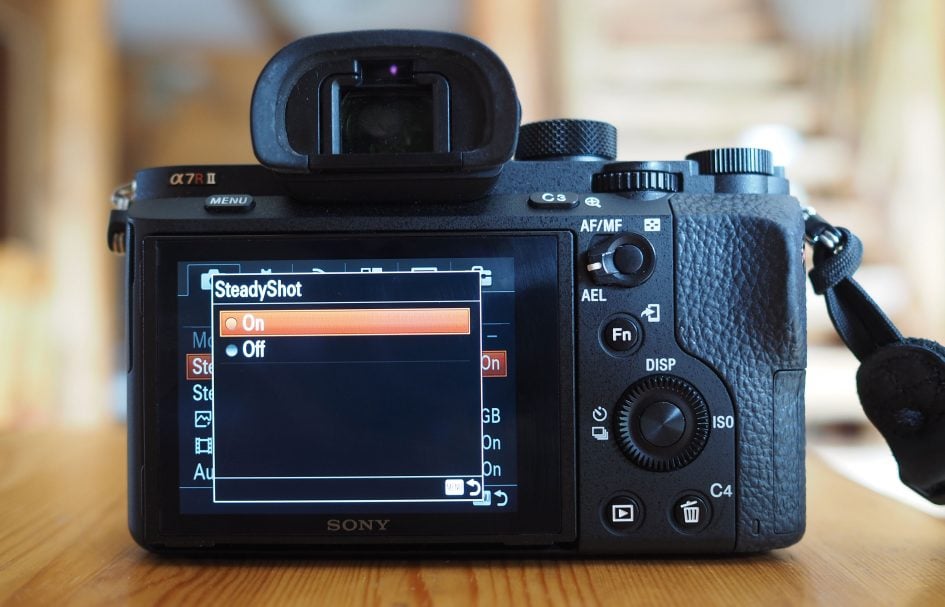
With stabilisation disabled, I found I needed a shutter speed (on the day) of at least 1/50 to consistently handhold the FE 55mm without camera-shake. With stabilisation enabled, I could achieve a perfect result at shutter speeds down to 1/25 or a little slower, corresponding to between one and two stops of compensation. At slower shutter speeds, the results with IS enabled may not have been perfectly sharp when viewed at 100%, but were still good down to 1/6. Certainly much better than the unstabilised versions which below 1/25 were very shaky indeed.
Below are 100% crops from the 1/6 exposures when unstabilised (below left) and stabilised (below right).

Above: Sony Alpha A7r II SteadyShot Stabilisation with FE 55mm Off / On at 1/6
Moving onto the Sigma ART 50mm lens mounted via a Metabones adapter, I again found I needed a shutter speed of at least 1/50 (on the day) to reliably handhold without camera-shake when stabilisation was disabled; the result deteriorated quickly at slower shutter speeds.
With stabilisation enabled, I achieved a perfectly sharp result at 1/25 and good ones at 1/13 and 1/6. So once again compensation of one or two stops in this particular test. I’ve pictured the 100% crops from the 1/6 exposures below, with the unstabilised version on the left and the stabilised version on the right.

Above: Sony Alpha A7r II SteadyShot Stabilisation with Sigma ART 50mm Off / On at 1/6
These results are unsurprisingly similar to those I measured for the A7 Mark II, and at first come across as a little disappointing, especially compared to the Olympus built-in IS which I found can deliver four or even five stops on its latest incarnations. But it’s important to remember the sensor in the Olympus body has one quarter the surface area and also a considerably lower resolution – in short, it’s easier to move around and the lower resolution is more forgiving. It’s also important to remember with a larger sensor area, the A7r II can shoot at high ISOs with lower noise levels, so it’s easier to deploy faster shutter speeds to counteract camera-shake without compromising quality.
But there’s no denying both cameras are very different to shoot with in terms of exposures. With the Olympus system I find I can casually handhold at very slow shutter speeds, even at a second or slower with wide lenses, and still enjoy a perfectly sharp result; indeed it’s really changed the way I approach shooting interiors and blue hour images.
In contrast with the Sony A7r Mark II you need to shoot much more carefully. Like the Olympus, the built-in IS may nicely stabilise the view when composing, but you need to be much more aware of the shutter speed. Even with IS enabled, I found I was safest sticking to the one-over-focal-length rule, or at a push only one stop slower. If I wanted to handhold at even slower speeds, I had to be very aware of my technique (elbows down, breathing out while pressing the shutter) and look out for additional bracing, such as leaning against trees or walls.
Below is one of the longest exposures I made semi-handheld: one quarter of a second at 28mm, corresponding to almost three stops below the old one-over rule, although to achieve a sharp result I had to press the camera against a tree trunk as I took the photo, and I also had to take several before I captured one that was completely sharp.
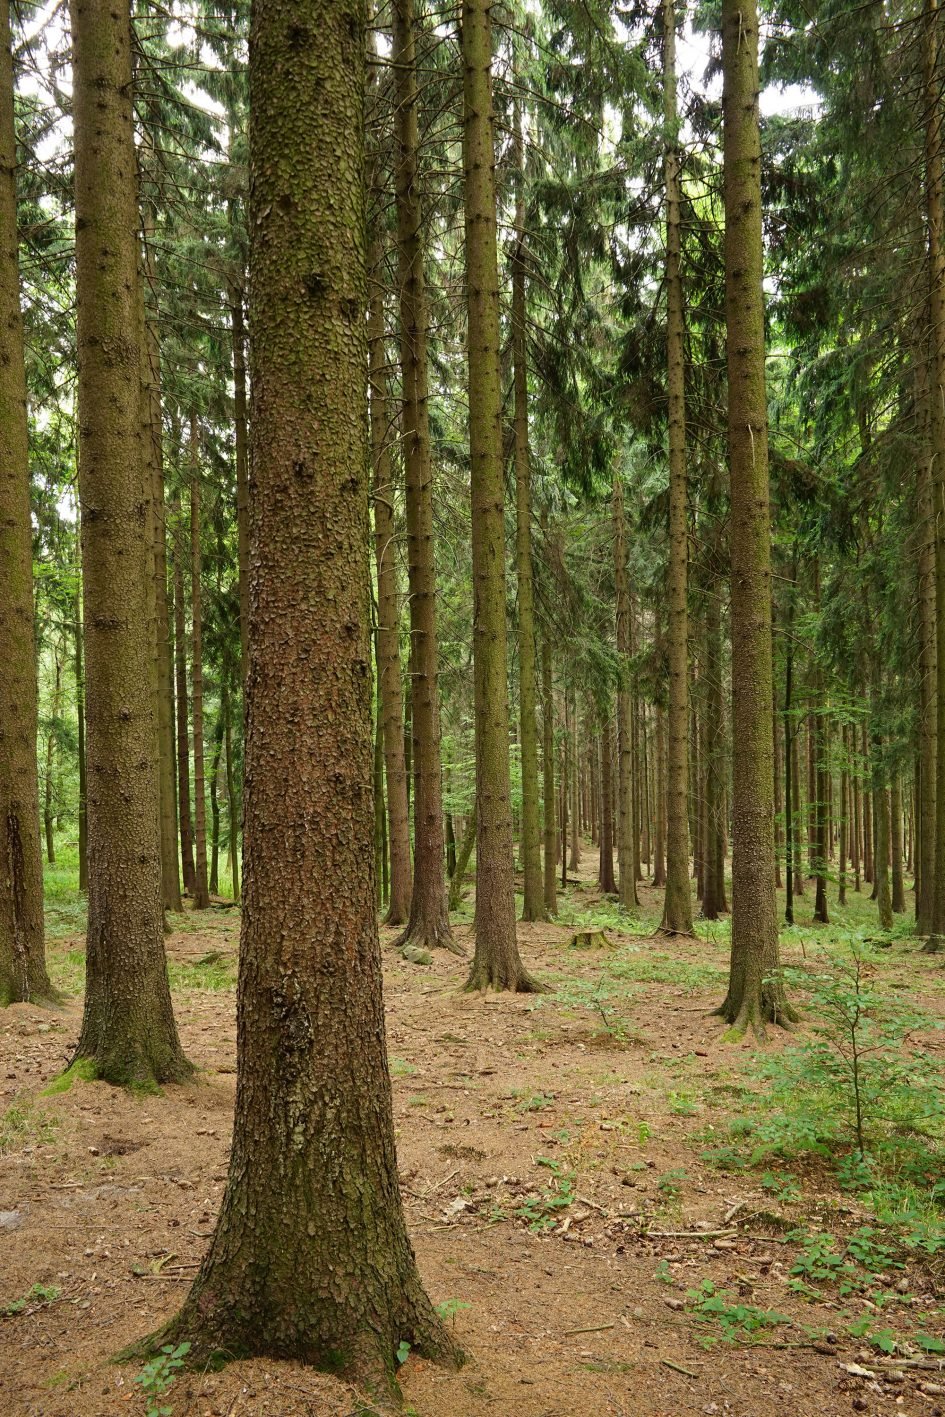
Above: 1/4, f8, 800 ISO, FE 28mm f2
As resolutions steadily increase, I think the old one-over-focal-length shutter guideline is becoming out-dated. If you want to capture images of 40 Megapixels or higher, and pixel-peep them for sharpness at 100%, you will need to revise your safe shutter speeds even with stabilisation.
But while there’s little chance of handholding the A7r II for one second exposures, the built-in IS remains a valuable facility. As I noted in my earlier A7 Mark II review, it steadies the image during composition which makes precision framing much easier and more enjoyable too. And while I personally rarely achieved more than two stops of compensation in practice, it still allows you to more successfully handhold in dimmer light or at small f-numbers without increasing the sensitivity too much. It also gives you that extra safety net when shooting close to your safe shutter limit.
Put it this way, when handholding an unstabilised 50mm prime lens, I had to typically aim for shutters of 1/80 when using the Canon EOS 5DS(r), but I stood a good chance of achieving an equally sharp result with the A7r II at 1/25. Ultimately I really hope Sony can improve the effectiveness of its built-in IS in the future, but right now it’s still a very useful tool and one that’s not available on its DSLR rivals. Plus of course you can always fit a lens with optical stabilisation if you require greater compensation.
Sony A7r Mark II autofocus
The Alpha A7r Mark II is equipped with a new AF system which embeds 399 phase-detect AF points across 45% of the sensor area. These are complemented by Sony’s usual 25 contrast-detect AF areas over a broader region for further confirmation or backup. Compare that to the A7 Mark I and II which embedded 117 phase-detect AF points on their main imaging sensors, or the original A7r which had none at all and relied on contrast-based AF only.
Indeed, the A7r Mark II sports more phase-detect AF points than any other camera I can think of, and spreads them over a broader area too. Compare that to even a high-end DSLR AF system, such as that in Canon’s EOS 5DS(r) which offers 61 AF points in a smaller diamond area, and even then only when composing through the viewfinder. This means the A7r II can track over a wider area with a higher density of AF points, and offers the same AF performance whether you’re framing with the viewfinder or the articulated screen.
In terms of managing all of its AF points, the A7r Mark II gives you the choice of Wide (which chooses for you across the entire array), Zone (which allows you to concentrate the AF on one of nine smaller areas), Center, Flexible Spot (which lets you manually position a single AF point of three sizes), and Expand Flexible Spot (which works like Flexible Spot set to the Small size, but also considers a small area around it).
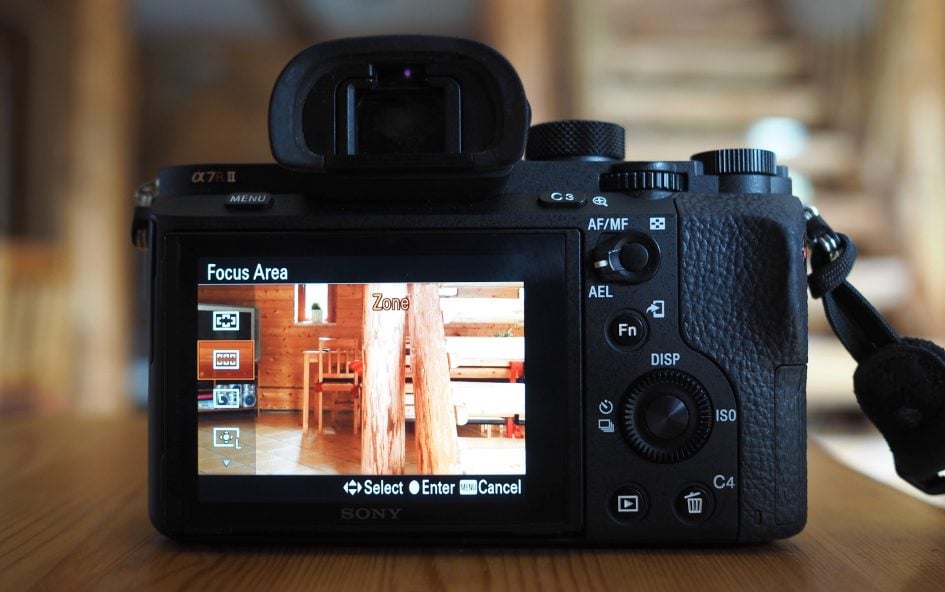
All of these modes work in AF-S or AF-C, although in AF-S the active area is normally indicated from a relatively coarse five-by-five array, whereas in AF-C you often see a selection of the individual 399 AF points swarm around the subject like bees, so long as it falls within the phase-detect area of coverage that is. Speaking of which, you can enable a guide to indicate the phase-detect coverage if desired, which can be handy for knowing where the camera will be most comfortable performing continuous autofocus.
If AF-C is enabled, you can also choose Lock-on AF which tracks a subject based on its shape and colour, surrounding it with an elastic frame that changes shape and size depending on where it is in relation to the camera. Lock-on AF is available with Wide, Zone, Center, Flexible Spot (small, medium or large), or Expand Flexible Spot. To kick-off you position the active AF area over the subject (or in the case of Wide and Zone, hope that it’s automatically identified), then simply keep the shutter half-pressed for the camera to subsequently track it. I found it works best with subjects moving at a modest speed; if you’re tracking fast subjects, the Zone or single AF areas worked best for me.
If Face Detection is enabled, it over-rides any of the AF area modes and focuses on the nearest human face instead, wherever it is on the frame, and in AF-C mode it’ll do a good job at tracking kids running around. If you’ve registered faces with the camera, it’ll also give them priority over others – handy at an event like a wedding where you can prioritise the Bride and Groom in a group shot.
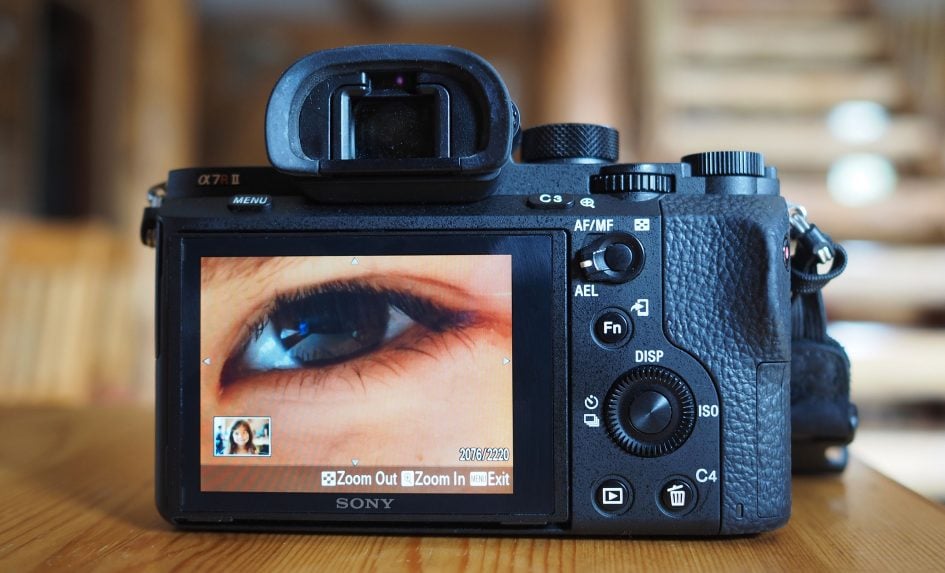
Taking portraiture further, the A7r Mark II also features Eye Detection which is now available with continuous AF for the first time on an A7 model. Unlike Olympus, where eye detection optionally enhances the existing face detection, Sony requires you to assign the feature to a button and to hold it to trigger the process – think of it as an AF-ON button that only looks for the closest eye in the frame. If you have AF-C enabled, you’ll also have to hold the assigned button down to keep it in focus, while pressing the shutter release to actually take the shot. It’s a little convoluted, but the results can be very effective. I found it great for shooting shallow depth-of-field portraits of my kids, and loved the AF-C support to cope with mild swaying back and forth by myself or the subject. Note AF-C with eye detect is designed for minor movements and not for people moving at speed.
Another interesting aspect regards the light levels: Sony quotes the A7r II as being able to focus down to -2EV with an f2 lens. That’s not as dim as the -3EV or -4EV quoted by Panasonic for its latest mirrorless cameras, but the key here is the brightness of the lens, as an embedded AF system should in theory be able to exploit the extra light-gathering power of brighter lenses (small f-numbers). I don’t know what focal ratio Panasonic requires to achieve -4EV, but I do know the AF modules in most DSLRs can’t exploit the light-gathering power of lenses brighter than f2.8 for focusing. So in theory if you give the A7r Mark II a really bright lens, it should be able to AF in lower light than even a high-end DSLR.
So far the A7r Mark II’s AF system sounds more sophisticated than a decent DSLR, but there’s other aspects to consider. For instance the AF points on many DSLR AF modules are not all created equal. Some are described as cross-type, some even dual cross-type, giving them varying sensitivity to different patterns. So far I’ve not been able to ascertain exactly what kind of AF points are employed in embedded systems like the A7r Mark II, but I’m guessing they have to be the simpler ones as you literally have to ‘spend’ precious imaging pixels on them (apart from Canon’s Dual Pixel CMOS AF); Sony’s engineers consistently resisted my journalist-Jedi mind tricks to probe further. So the question then is whether having loads of simple AF points beats a fewer number of more capable ones? We can speculate all day, or simply just try shooting different subjects under different conditions to find out.
So theories and specifications out the way, how does the AF on the A7r Mark II perform in practice? The short answer is very well, indeed surprisingly well considering how frustrating it was on the original A7r.
Starting with Single AF, I found the A7r Mark II focused surprisingly swiftly and confidently. The performance is understandably best when the subject is within the phase-detect area, although in AF-S mode, the A7r II still employs a little contrast-based loopback check at the end just to make sure. In good light you’re looking at most native lenses locking-on in less than half a second, and in low light I found it was still finding the target in less than a second. In Single AF speed the A7r II can be beaten by the fastest cameras out there, but it remains very swift and a World apart from its predecessor. Note Sony says you need to have the aperture set to f9 or larger (smaller f-number) to use the phase-detect system. Apertures smaller than f9 will employ contrast-based AF only, but even then in my tests at f11 and f16, I found the A7r II still felt snappy.
The theory behind exploiting bright lenses in low light also held true in practice. With sub-f2 lenses fitted, the A7r Mark II could focus in light levels as low as Panasonic’s latest Lumix models.
In terms of Continuous AF, I wondered if the A7r Mark II could take-on the excellent tracking performance of the A6000 which I’ve now used successfully at two Tour de France races.
I tested it under a variety of conditions. Fitted with the FE 70-200mm f4G OSS wide-open at f4, I photographed amateur (but still fit and fast) cyclists approaching at speed and found it could successfully keep them in sharp focus across around four out of every five frames when shooting at the camera’s top speed of 5fps; note it’s also possible to separately configure AF-S and AF-C for release, focus or balanced, so depending on whether you want to maintain speed or sacrifice it for better accuracy, you may enjoy better results.
Like the A6000, the A7r II is keen to focus on the closest subject in the frame and can sometimes get confused by the ground before the desired subject becomes sufficiently dominant. As such I found the Zone mode was more effective than Wide area, or better still, a single AF area if you could position it accurately enough.
Another alternative worth trying is the cropped / APS-C mode which matches the field-of-view of the A6000 and allows the A7r II’s phase-detect array to cover almost the entire frame rather than ‘just’ 45% of it. Configured like this, I found the Wide area mode particularly exciting, although again Zoning gives you more control over where the camera should focus.
According to Sony engineers, the A6000 may still enjoy an edge in AF tracking performance, at least when shooting at its top speed of 11fps, as there’s simply less subject movement between frames than when shooting at the A7r II’s top speed of 5fps. But in my tests with non-pro cyclists I thought they performed similarly.
I’m planning on shooting more demanding action with longer and brighter lenses, and will update this review with further results, but right now I’m very happy with the continuous AF performance of the A7r Mark II. Put it this way, in terms of coverage, density, speed, low light capability and tracking, it’s as good or better than most cameras I’ve tested.
I feel high-end DSLRs still enjoy an edge when it comes to selecting smaller Zoneable areas and the chance to configure the tracking response, and these may sway pro sports photographers to stick with their traditional bodies. But it’s stunning how far the A7r Mark II has come since the original A7 and A7r less than two years ago. It’s gone from lacklustre AF to a system that rivals or beats almost anything around.
The A7r Mark II also has a trump card up its sleeve in the ability to deploy its embedded AF system with many adapted lenses, most notably Sony’s own A-mount series and Canon’s EF models. In general, most A-mount lenses I tried via the simple LA-EA3 adapter focused a little slower than native FE-mount lenses, but some, including the large 500mm f4, felt very snappy indeed.
I also tried the A-mount lenses with the more expensive LA-EA4 adapter which employs Sony’s SLT semi-transparent mirror system. This time the AF felt a little faster than with the LA-EA3, but the number of AF points reduced to 15 and their coverage was smaller too. In contrast, using the A7r Mark II’s embedded AF system with the LA-EA3, allows A-mount lenses to exploit all 399 AF points spread across a broader area, roughly 45% of the frame. The embedded AF approach also avoids front and rear calibration issues, although the A7r II does have AF micro-adjustment options if you decide to go down this route and need to fine-tune.
I also tried a selection of Canon EF lenses via a Metabones Smart Adapter IV with varying results. Some focused slowly, older ones not at all, but some worked brilliantly, focusing as fast as they would on an actual EOS body. Perhaps unsurprisingly, I enjoyed the most success with lenses launched in the last few years, including the Canon EF 24mm f2.8 USM and EF 11-24mm f4L USM, both of which felt very responsive on the A7r II.
Put it this way, all of the lenses which could autofocus did so sufficiently quickly for very usable handheld operation which is a World apart from the infuriatingly slow experience on the A7r that saw most adapted lenses being used on tripods only.
The A7r Mark II now represents a serious upgrade for owners of A-mount lenses and provides a much smoother transition for owners of Canon EF lenses looking to switch systems. Ironically in some cases it actually delivers a better AF experience with certain EF lenses than a native Canon body – remember the embedded AF system is immune to front or rear focusing errors, the AF coverage is broader, and the absence of a mirror coupled with the electronic first-curtain shutter and built-in IS makes it easier to minimise vibrations and maximise resolution, especially when shooting handheld.
Ultimately, like any camera, the A7r II is designed to work best with lenses native to the system and thankfully there are now a decent number to choose from. The ability to adapt lenses from third parties is something that’s possible with third party adapters which are nothing to do with Sony – as such the capability should be considered a bonus, especially since it works so well. If there are specific third party lenses you’re interested in using, I’d strongly recommending searching the web for user reports, as from my experience so far, it’ll be very much on a case-by-case basis. As I try more adapted lenses on the A7r II, I’ll update my review.
Before concluding this section, I’d like to talk about manual focus assistance as it’s one of the highlights of the camera. The beauty of full-frame mirrorless is being able to adapt a wealth of third party lenses without any field reduction, and with the A7r II you’ll enjoy some degree of stabilisation with them too. But if you can’t focus them easily, the capability to adapt becomes a lot less compelling.
Luckily Sony has this side of things covered with an optional magnified view and focus peaking – both at the same time if you like. If you’re using an adapted lens, you’ll probably need to assign the magnified focus assist option to one of the custom buttons, after which you can fire it up as required, but if you’re using a native (F)E lens the focus assist can start automatically as soon as you turn the manual focusing ring. Once you’re in the magnified view you can easily scroll around using the controls, but if you have face detection enabled, the camera automatically starts with a magnified view of the person’s face regardless of their position on the frame.
This works brilliantly in practice and is one of the first cases I cite to those who insist optical composition is superior in every way. With the A7r Mark II I can fit any lens and nail the focus with the combination of magnification and peaking, whether framing with the screen or electronic viewfinder. If it’s a native lens, the focus assist kicks-in as soon as I turn the manual focusing ring, and again if face detection is enabled, I’m shown the person’s face straightaway. In contrast try manually focusing with the optical viewfinder and clear screen of a traditional DSLR, especially if you’re working at 50 Megapixels. It’s much harder.
Of course all of this focusing assistance was possible with the original A7r, but what makes it better now is the view becomes stabilised on the Mark II even with unstabilised prime lenses. Previously I found the magnified view wobbled too much with unstabilised lenses, but now it’s nice and steady, allowing me to quickly nail the focus. Indeed the combination of all these technologies made the Zeiss Loxia 2/50 one of my favourite lens to use on the A7r Mark II and A7 Mark II. It’s a manual focus lens, but as it’s native to the system, the focusing ring can fire-up the focus assistance as you start turning it. With face detection presenting the face, focus assist magnifying it, peaking highlighting the area in focus and stabilisation keeping it all steady, manual focusing with the A7r Mark II is an absolute dream.
Sony A7r Mark II shooting modes
In terms of actual shooting modes, the A7r Mark II offers much the same as previous models, except that the mode dial now has a locking button that must be depressed in order to turn it. So along with the usual PASM options, you get Full Auto, SCN (allowing you to manually select from nine presets), Panorama, Movie and two Custom positions which retrieve pre-registered settings. Note you can start recording movies in any mode by pressing the red record button, but by first turning the mode dial to Movie you’ll preview the capture area and access the movie exposure menu.
Some may wonder why a $3000 camera would even have Auto, Scene presets or Panorama modes. But you know what? I’m totally at peace with Sony’s decision to include them here. Just because someone buys a top-end camera doesn’t mean they always want to shoot in Manual or semi-auto modes. Full Auto lets the camera deploy all the technology, metering and recognition at its disposal to capture a decent image with ease – brilliant if you spot a sudden opportunity, hand the camera to someone to take a photo of you, or simply want an easy life while still enjoying top image quality. Why wouldn’t you want it? And if you really don’t, then just ignore the other modes, or use a Sharpie to colour their icons in.
Before you write-off the fun modes though, you may want to check out the Panorama mode as it does a surprisingly good job of stitching-together a burst of images captured while turning the camera in an arc. Like other Sony cameras, you can set the panorama size to be Standard or Wide, and the direction of capture to be up, down, left or right. Just remember to turn to the Panorama mode first though or the options will be greyed-out.
Here’s a panorama I shot with the A7r Mark II set to Wide and Up, capturing with the camera held in the portrait orientation. It’s the view from a castle in Slovakia taken with the FE 28mm lens, and the original measures 5536×2160 pixels. Sure that’s actually smaller than a single frame at the top resolution, but the point of the Panorama mode is to capture a much wider (or taller) field of view, in this case over 180 degrees.
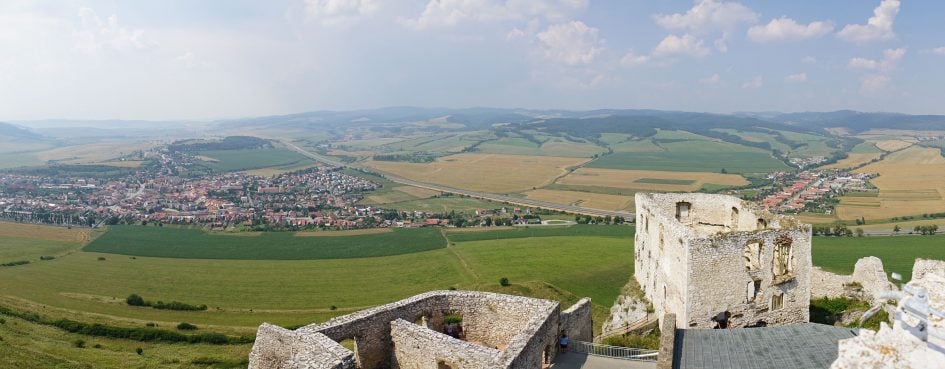
Above: Sony A7r II panorama
In terms of shutter speeds, the A7r Mark II offers a range of 1/8000 to 30 seconds with Bulb and a flash sync speed of 1/250. If you’ve installed the Touchless Shutter app, you can trigger an exposure with a wave of your hand in front of the viewfinder sensor; you can also do this to start and stop a long Bulb exposure without touching the camera or buying an accessory. This is a very neat feature, although it could be even better if Sony displayed an on-screen stopwatch to help time your Bulb exposure as Olympus now does.
By default the A7r Mark II uses an electronic first curtain to start the exposure and a mechanical shutter to end it. This significantly reduces vibrations compared to its predecessor, not to mention the sound of the shutter itself. If you prefer you can disable the electronic first curtain just to remind yourself what it used to sound like, before swiftly enabling it again. Sony also quotes a shutter life of 500,000 actuations, an impressive figure that’s way beyond most rivals.
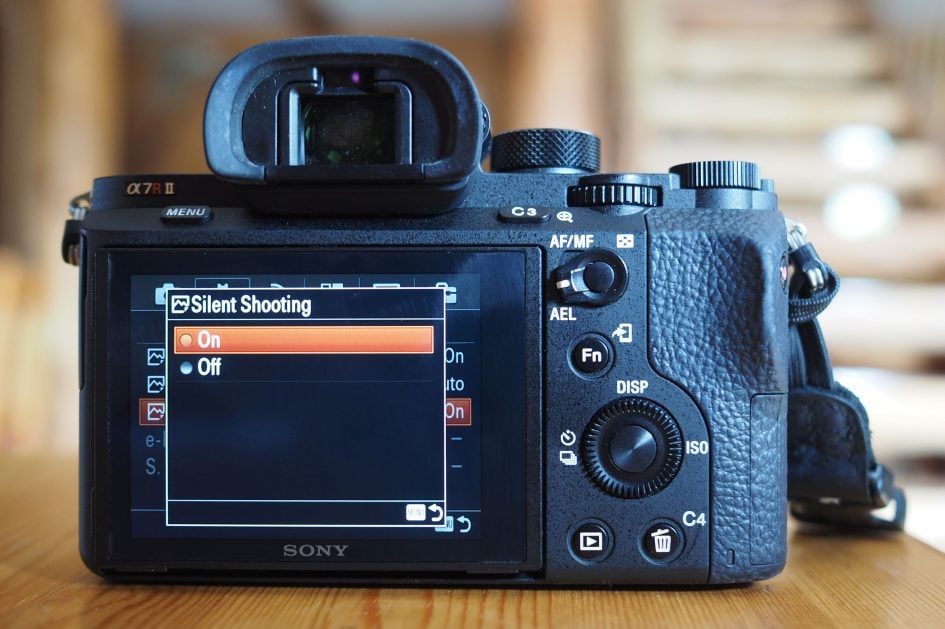
If you prefer to shoot more quietly, there’s a completely silent mode which employs an electronic shutter to start and end the exposure; in this case the only sound is that of the aperture and focus mechanism within the lens, making it to all intents and purposes silent. While increasingly common on mirrorless cameras, fully silent operation still eludes DSLRs.
Full electronic shutters are great when shooting in quiet environments, such as wedding ceremonies, or for being extra discreet during street photography (although don’t be uncool about it!). But they do have their downsides: most, including the A7r II, suffer from rolling shutter artefacts which can cause the subject or image to skew if it or the camera are in motion. Sony is actually working hard to alleviate the problem with its latest anti-distortion technology in the RX10 II and RX100 IV, but it’s a tougher nut to crack on a full-frame sensor.
Most 100% electronic shutter modes also come at the cost of reduced dynamic range in RAW files and while Sony wouldn’t confirm, I believe the A7r Mark II records 12 rather than 14 bits when the Silent Shutter is enabled. I actually put this to the test and shot a scene with subtle tones using the RAW modes with and without the silent shutter and couldn’t see any difference even with hefty Levels adjustments, but others have seen the impact, so be warned if you intend to retrieve highlight or shadow details. Note there’s no loss of dynamic range when using the default electronic first curtain shutter though; it’s only an issue if you go for the Silent Shutter mode which uses an electronic shutter at both ends of the exposure.
Despite their current issues, I believe fully electronic shutters are the future for very high resolution cameras as they eliminate moving parts within the body, and thereby any unwanted vibrations. If they can switch on and off sufficiently quickly they can also offer very fast shutters and high burst speeds. Right now though, the A7r Mark II’s Silent shutter mode won’t go any faster than 1/8000 and it is susceptible to rolling shutter artefacts and possibly reduced RAW dynamic range too, so use it with care.
Exposure bracketing is available in three, five or a generous nine frames. If you’re shooting in three or five frames, you can choose 0.3 to 3EV increments, and when shooting nine frames, you can choose from 0.3 to 1EV increments. You can also set the drive to Continuous and trigger the entire multi-frame burst with a self-timer if desired. This is also possible when triggering the shutter using the viewfinder sensor app or the smartphone remote control.
If you prefer a more automatic approach to HDR, the A7r Mark II offers Auto HDR options in the DRO / Auto HDR menu; note that you’ll need to be shooting JPEG only to unlock the HDR options though, so if you’re shooting RAW, they’ll be greyed-out. Once enabled, the camera will capture and combine three frames into one, and subsequently store one image file with a broader dynamic range; you can either let the camera decide on the exposure gap, or set it between 1 and 6EV in 1EV increments. There’s no control over tone-mapping, so you just have to let the camera do its work and see if you like the result. I found the 4EV gap was as far as I liked to go without entering too far into fantasy-land. Here’s a shot without HDR on the left and with Auto HDR and 4EV on the right; both are out-of-camera JPEGs.


Above: Sony A7r Mark II HDR mode (disabled, left / 4EV mode, right)
For more conventional tonal enhancement, Sony offers its Dynamic Range Optimser, or DRO for short. It’s enabled by default and does a good job at making your images look punchier, but I found it can also counteract any significant application of exposure compensation. So if you’re trying to make your image deliberately dark or bright and it’s just not having the desired effect, you should disable DRO.
If you prefer to apply effects to your image as you capture them, then head to the Picture Effect menu on page 6 of the Shooting options, but be sure to set your quality to JPEG-only first or it’ll be greyed-out again. If you are shooting JPEGs though, you can choose from Toy Camera, Pop Colour, Posterisation, Retro, Soft High-Key, Partial Colour, High Contrast Mono, Soft Focus, HDR Painting, Rich Tone Mono, Miniature, Watercolour or Illustration; in many cases, there are additional options available for each, for example adjusting the intensity for the HDR Painting and Watercolour effects.
In practice some of the less extreme effects can look good, although I don’t see why I have to miss out on a RAW file if I change my mind and desire a more normal process instead. I feel Olympus has got this right with its ART filters which apply the effect to the JPEG, but also let you record a RAW which can reverse the effect (or indeed apply a different one). I also noticed when having to switch to JPEG-only when shooting the effects or HDR modes, I often forget to switch back to my preferred RAW+JPEG quality afterwards and ended up capturing quite a few subsequent images only as JPEGs. Anyway, warning over, here’s how a bunch of the effects look when applied to Budapest’s Parliament building.

Above left: Toy Camera effect, above right: Retro effect

Above left: High Contrast Mono effect, above right: HDR Painting effect

Above left: Miniature effect, above right: Illustration effect
Moving onto Continuous shooting, the A7r Mark II is quoted at delivering a rate of 5fps for up to 30 Fine JPEGs or 23 RAW files. To put it to the test I fitted it with a fast and freshly formatted SD card, set the shutter to 1/500, the sensitivity to 400 ISO and fired-off a number of bursts.
With the camera set to Large Fine JPEG, I captured 38 shots in 7.2 seconds before the camera slowed-down. This works out at an initial speed of 5.28fps, before slowing to around 2.5fps. Switching to RAW allowed me to capture the quoted 23 files in 4.46 seconds for a rate of 5.16fps, after which the speed fell considerably to around 1fps.
So the A7r II performed as quoted, and at the same speed as the Canon EOS 5DS(r) in my tests too. Interestingly the Canon could keep shooting JPEGs at this speed for longer, but it captured slightly fewer RAW files, 15 in total before slowing down. This would seem contradictory until you realise Sony compresses its RAW files so they typically measure 43MB compared to the 75MB size of typical 5DS(r) RAW files. This could be why the A7r II can record more RAW files in a burst than the 5DS(R) but fewer JPEGs. Either way, both cameras shoot at the same speed and being able to capture seven seconds worth of JPEGs on the A7r II without slowing down should satisfy most owners. I should also add that cameras could maintain their 5fps shooting speed when continuously autofocusing on a moving subject.
Sony A7r Mark II movies
The Sony A7r Mark II can record 4k UHD at up to 30p, 1080p at up to 60p and 720p at up to 120p. It gives you full manual control over exposure, supports continuous AF with the embedded AF system, and if desired, the built-in stabilisation can be active to reduce the effect of wobbles. Like the A7 Mark II before it, there’s also S Log (offering a flatter picture profile for subsequent grading, but still anonymously hidden as picture profile 7). The A7r II uses a 4:2:0 space when recording internally, but the clean HDMI output can deliver 4:2:2 to an external recorder if desired, albeit still at 8-bit.
Audio is recorded using the built-in stereo microphones, or with optional mics connected to the 3.5mm jack; there’s also a headphone jack for monitoring. As before there’s a movie position on the dial (useful for previewing the frame and changing the exposure mode), but you can start recording in any mode by pressing the dedicated record button on the grip; the indentation and positioning of the button means you’ll never press it by accident, indeed it’s quite tough to even press it on purpose.
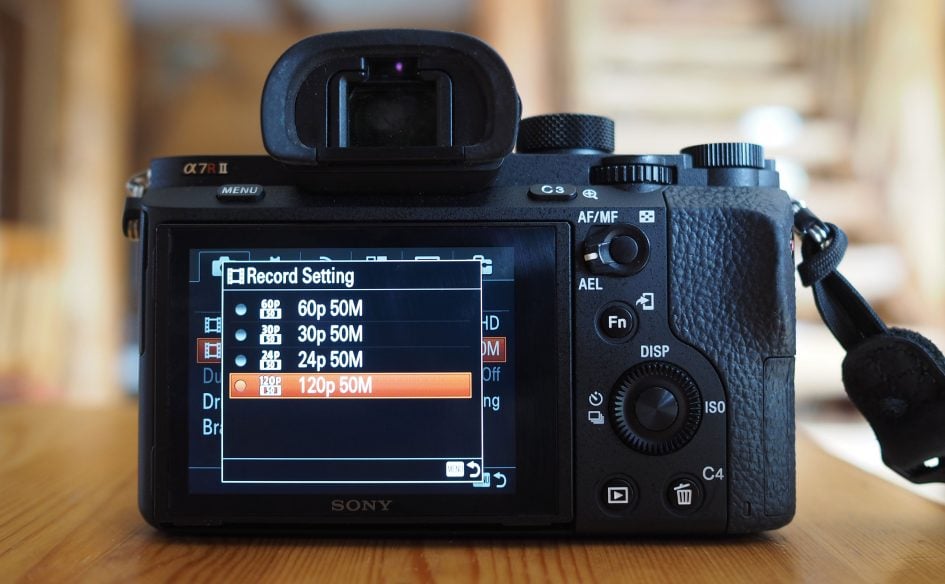
If you’re shooting 4k UHD video, you have the choice of XAVC S encoding at 60 or 100Mbit/s, and at frame rates of 24 / 30p for NTSC or 25p for PAL. If you choose the XAVC S HD option, you can film 1080p at 24, 30 or 60p for NTSC or 50 or 25p for PAL, all at 50Mbit/s. An additional 720p option is also offered at 120p for NTSC or 100p for PAL (both at 50Mbit/s), allowing you to slow the footage down by five or four times on 24p or 25p timelines respectively. Note to support any of the XAVC S modes, you’ll need an SDXC memory card. Here’s a compilation of clips I filmed at 720 / 120p, interpreted to 24fps on an Adobe Premiere Timeline.
Above: Download the original file (Registered members of Vimeo only). Compilation of clips filmed with the Sony Alpha A7r Mark II in its 720 / 120p mode, then interpreted to 24fps in Adobe Premiere CS6 for a 5x slowdown. All clips were filmed with the FE 55mm f1.8 lens.
Set the camera to AVCHD and you can film 1080 in 24p (at 17 or 24Mbit/s), in 60i (at 17 or 24Mbit/s), or 60p (at 28Mbit/s). That’s with the camera set to NTSC. In PAL mode it’ll use the same bit rates but for 25p, 50i and 50p. Finally the MP4 mode offers 1080 at 30p (16Mbit/s), 60p (28Mbit/s) or 720 at 30p (6Mbit/s) all for NTSC and again 25p and 50p for PAL.
It’s possible to switch the camera between NTSC and PAL modes, opening up all frame rate options (at least on my US-based sample), but doing so involves a reboot and a possible reformatting of the card – I believe to conform with AVCHD standards.
The maximum recording time on modern cameras is frequently limited by memory, battery or heating issues, so rather than quote what Sony claims, I’ll tell you what I achieved with a full battery: just under 24 minutes of 4k UHD at 400 ISO and with both IS and CAF enabled, using the FE 55mm lens. As the file reached this size, there was an audible warning and the camera switched itself off, presumably due to over-heating. The body was warm, but happy to be turned back on again, although I’d leave it to cool down for a few minutes if you wanted another long clip. Meanwhile the 24 minute clip itself measured 16.8GB and consumed around 40% of my battery with the indicator reporting 60% remaining. I performed this test in the UK where the ambient temperature was around 20 degrees Celsius. In hotter climates I’ve found the camera can become very warm in use and this will almost certainly reduce your longest recording times.
Turn the A7r II to its dedicated movie mode and you can set the exposure mode to Program, Aperture or Shutter Priority or full Manual. You can also set the sensitivity between 100 and 25600 ISO, or use Auto ISO, the latter also available in Manual mode if you wish to fix the aperture and shutter and have the camera adjust the sensitivity for varying lighting conditions.
Like earlier Sony cameras, you have the choice of Continuous AF or Manual focus only. Sadly there’s no Single AF option, which means if you do want autofocus while filming, there’s no way to tell the camera when to focus. In a feature originally offered on the A6000 though, you can change the AF Drive Speed and AF Tracking Sensitivity for movie autofocus. So you can at least slow down the response to focus readjustments along with the speed of racking. It’s great to have this control, although again I’d ultimately like to tell the camera when to focus too with an AF-S option.
On some earlier Sony cameras there was also no way to tell the camera where to focus while filming – it was wide area or nothing. Now I’m pleased to report the A7r II lets you select any of the AF area modes for movie AF, allowing you to choose from Wide, Zone, Center, Flexible Spot and Expand Flexible Spot. The latter pair let you fix the position of a single AF area to ensure the camera refocuses where you want it. It’s also possible to enter the focus menu while filming to move the position of the AF area if desired, but this involves a lot of button presses which will be audible and probably shake the camera too. Once again this is a process which would have been so much better with a touch-screen. On Panasonic, Canon and Olympus cameras which support the feature, you just tap to reposition the AF area while filming and watch the camera pull-focus. Sadly you can’t pull-focus for movies while remote-controlling the camera with your phone either.
On the upside though, the A7r II’s embedded phase-detect AF system means the focusing during movies is smooth and confident with minimal (or even no) hunting. This makes for great-looking footage and I have two clips to demonstrate, both filmed at close-range using the FE 90mm Macro lens wide-open at f2.8.
Above: Download the original file (Registered members of Vimeo only). The embedded phase-detect AF system also supports confident refocusing while filming, as demonstrated in this and the next clip. Sample movie filmed with the Sony Alpha A7r Mark II in its 4k UHD / 30p mode with the Super-35mm OFF, Standard Style and 100 Mbit compression. The camera was set to 400 ISO, and the lens was the FE 90mm f2.8 in Manual Movie mode at f2.8 and 1/50.
Above: Download the original file (Registered members of Vimeo only). Sample movie filmed with the Sony Alpha A7r Mark II in its 4k UHD / 30p mode with the Super-35mm OFF, Standard Style and 100 Mbit compression. The camera was set to 200 ISO, and the lens was the FE 90mm f2.8 in Manual Movie mode at f2.8.
One of the more interesting options offered by the A7r Mark II is the APS-C / Super-35 mode, hidden away (in typical Sony menu style) on the sixth settings page. When enabled, this tells the camera to take an APS-C crop from the middle of the frame, reducing the field of view (or effectively increasing the focal length) by 1.5 times. When shooting still photos, this reduces the resolution to around 19 Megapixels, but for movies there’s still sufficient resolution to maintain 1080p or 4k.
The interesting part though is how the A7r II scales the image when filming video. With Super-35 mode disabled, the camera captures the full frame width and simply scales it down to 3840×2160 for 4k or 1920×1080 for Full HD. With Super-35 enabled, it starts with a smaller frame, measuring 5168×2912 pixels, before converting that to 4k or 1080 resolutions. In Sony’s briefings, the company repeated how the scaling was superior in the Super-35 mode, even though neither mode employed a nice even integer value.
To put this to the test I filmed three scenes in the full-frame and Super-35 modes, in both 4k UHD and 1080p, using a zoom lens to match the field of view and compensate for the crop. This allows us to directly compare the resolved detail and style of the image. Here I’ve made 100% crops from screengrabs to compare detail, but I’d also encourage you to download the original clips and play them back on 4k displays to check for moire and other motion artefacts.
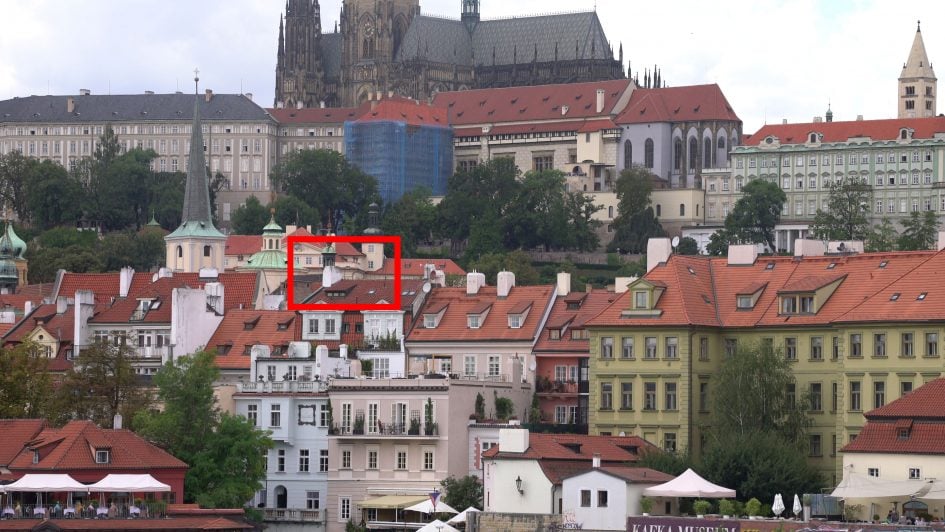
I’d like to start with the first composition of Prague’s Astronomical Clock, filmed from fairly close range with the FE 70-200mm f4G OSS at f8 and the sensitivity set to 100 ISO. You can download the original videos at the following links: Sony A7r II 4k UHD movie full-frame, Sony A7r II 4k UHD movie Super-35, Sony A7r II 1080p movie full-frame, Sony A7r II 1080p movie Super-35. First-off let’s compare the 1080p quality for full-frame versus the Super-35 crop. You can see the full composition below, with the red rectangle indicating the area I’ve cropped for analysis.

Below you can see the cropped area from the full-frame version, below left, and the Super-35 version, below right. The first thing to note is the lighting unfortunately changed a little as I switched from full-frame to Super-35, so the latter on the right is a little brighter. But even taking that into account, I’d say the full-frame version actually looks a fraction crisper to me.

Above left: Sony A7r Mark II 1080 / 60p / 100% crop with FE 70-200mm f4G OSS. Super-35 mode DISABLED. Above right: Sony A7r Mark II 1080 / 60p / 100% crop. with FE 70-200mm f4G OSS. Super-35 mode ENABLED
Now for the 4k versions, and again here’s the full composition with the cropped area again marked in red. This time the cropped area is smaller though since the resolution is higher.

Below you can see the cropped area from the full-frame version, below left, and the Super-35 version, below right, and as before, the Super-35 version looks a little brighter due to the lighting changing a tad as I switched formats – sorry, the perils of real-world subjects! The next thing to mention though is the obvious increase in detail over the 1080p version above: 4k really is recording noticeably finer detail, indeed enough to generate a fairly decent-looking 8 Megapixel still photo with every frame. In terms of comparing full-frame against Super-35, I’d say the latter has the edge in 4k, delivering visibly crisper details even once you take the lighting difference into consideration.

Above left: Sony A7r Mark II 4k UHD / 30p / 100% crop with FE 70-200mm f4G OSS. Super-35 mode DISABLED. Above right: Sony A7r Mark II 4k UHD / 30p / 100% crop with FE 70-200mm f4G OSS. Super-35 mode ENABLED
Here’s another example, this time viewing Prague across the water alongside the Charles Bridge. Once again the complete composition is shown below, this time from the 4k footage, and again the red rectangle represents the cropped area. I’m only going to analyse the 4k footage here, but I’ve provided links to all four versions including 1080p: Sony A7r II 4k UHD movie full-frame, Sony A7r II 4k UHD movie Super-35, Sony A7r II 1080p movie full-frame, Sony A7r II 1080p movie Super-35.
Okay, now to the crops, and as before the crop from the full-frame 4k footage is below left and the crop from the Super-35 4k footage is below right. I think here the difference is more obvious than the first example: there’s an overall softness to the full-frame version compared to the Super-35 crop, and the latter has much better-resolved details especially in the tiles.

Above left: Sony A7r Mark II 4k UHD / 30p / 100% crop with FE 70-200mm f4G OSS. Super-35 mode DISABLED. Above right: Sony A7r Mark II 4k UHD / 30p / 100% crop with FE 70-200mm f4G OSS. Super-35 mode ENABLED
So I’d agree with Sony’s claim that filming in Super-35 mode delivers crisper results than full-frame, at least for 4k UHD, but obviously you’re working with a crop which means your lenses are effectively working at 1.5 times their focal length, which in turn makes wide-angle shots harder. If Super-35 works for your composition with your lenses, then go for it, but don’t feel bad about filming in full-frame mode to achieve the coverage if you need it – as I illustrated above, it’s still recording way more detail than 1080p. I should also add my third comparison (not pictured here) involved a more distant landscape scene where much of the differences in quality between full-frame and Super-35 mode were absorbed by atmospheric disturbance.
Now let’s check out some more clips filmed with the A7r Mark II.
Above: Download the original file (Registered members of Vimeo only). Sample movie filmed with the Sony Alpha A7r Mark II in its 4k UHD / 30p mode with the Super-35 crop disabled, the Standard Style and 100 Mbit compression. The camera was set to 100 ISO, and the lens was the FE 35mm f1.4 in Manual Movie mode at f9 and 1/30.
Above: Download the original file (Registered members of Vimeo only). Sample movie filmed with the Sony Alpha A7r Mark II in its 4k UHD / 30p mode with the Super-35 crop enabled, the Standard Style and 100 Mbit compression. The camera was set to 100 ISO, and the lens was the FE 35mm f1.4 in Manual Movie mode at f9 and 1/30.
Above: Download the original file (Registered members of Vimeo only). Here’s another example of the detail possible when filming in 4k using the Super-35 crop mode. Sample movie filmed with the Sony Alpha A7r Mark II in its 4k UHD / 30p mode with the Super 35 APS-C crop, Standard Style and 100 Mbit compression. The camera was set to 400 ISO, and the lens was the FE 35mm f1.4 in Manual Movie mode at f4 and 1/30. Here’s a version I filmed in 1080p in the full-frame mode: 1080p full-frame.
Above: Download the original file (Registered members of Vimeo only). Here’s a handheld clip filmed in 4k using the FE 35mm f1.4 and with audio recorded by the built-in microphone. Sample movie filmed with the Sony Alpha A7r Mark II in its 4k UHD / 30p mode with the Standard Style and 100 Mbit compression. The camera was set to 800 ISO, and the lens was the FE 35mm f1.4.
Above: Download the original file (Registered members of Vimeo only). Sample movie filmed with the Sony Alpha A7r Mark II in its 4k UHD / 30p mode with Super 35mm / APS-C crop disabled, the Standard Style and 100 Mbit compression. The camera was set to 1600 ISO, and the lens was a Sony FE 70-200mm f4G OSS.
Sony Alpha A7r Mark II Wifi and NFC
The Sony Alpha A7r Mark II has built-in Wifi with NFC to aid negotiation with compatible devices. Wifi on the A7r Mark II allows you to wirelessly browse and transfer JPEG images onto an iOS or Android smartphone using a free app, and also remote control the camera with your phone or tablet. The A7r Mark II can additionally download apps directly to extend its capabilities, a feature first introduced on the NEX-6, and a capability that remains unique to Sony (if we’re not counting Android-powered cameras from the likes of Samsung or Panasonic).
I’ll start with transferring images from the A7r Mark II to a smartphone and for my tests I used my Samsung Galaxy S6, onto which I’d previously installed Sony’s free PlayMemories app. If you have an NFC-equipped device, such as my GS6, the entire process is incredibly simple: just choose the image you want to send in playback on the camera, then hold it against your phone. The NFC then instructs the camera and phone to connect (automatically taking care of network names and passwords), before then transferring the image and finally disconnecting. It all happens without a single button press and is the best implementation I’ve seen for copying images from camera to phone.
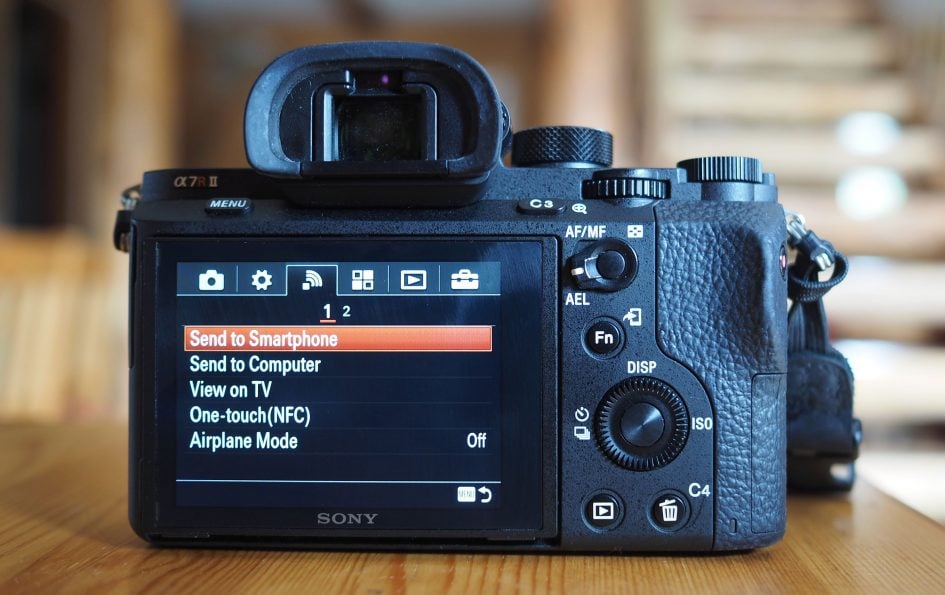
If you don’t have NFC, or for some reason it doesn’t work, you’ll need to connect to the A7r Mark II’s Wifi network manually. First go to the Wireless section and choose the option to Send to Smartphone. This then gives you the choice of either selecting the desired image on the camera, or browsing the camera’s memory using your handset. Selecting either configures the A7r Mark II as a Wifi access point which your phone needs to connect to. Next you’ll need to fire-up the PlayMemories app on your phone and connect to the camera.
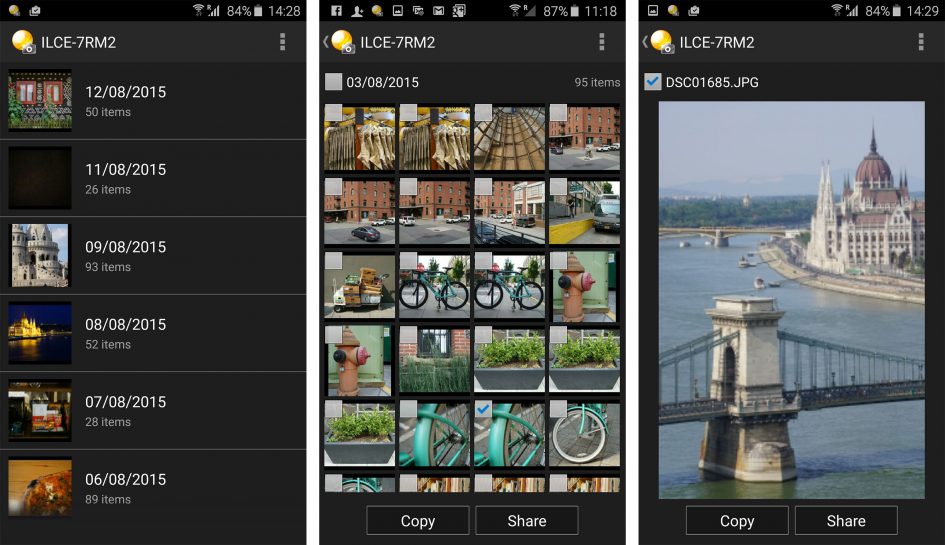
If you opt to select the image on the camera, it’ll then be sent straight to the phone. If you select the option to choose with your smartphone, you’ll see the camera’s memory presented in a thumbnail view – just select the desired image and again it’ll be copied over. A menu in the PlayMemories app lets you choose whether the image is sent in its original 42 Megapixel format or resized down to VGA or 2 Megapixels. Full sized 42 Megapixel JPEGs take about ten seconds to copy over; like most Wifi camera apps, you can’t transfer RAW files.
Next I’ll cover remote control which requires the Smart Remote app to be installed on the camera – as luck would have it, Sony embeds this into the A7r Mark II to get you started in the World of apps, no doubt in an attempt to get you comfortable with the idea and possibly purchase some more in the future – although there is a catch I’ll mention in a moment.
Once again, Sony makes things really easy for owners of NFC phones. With the camera powered-up and ready to shoot, simply hold your phone against the NFC logo on the side of the body and the A7r Mark II will automatically fire-up the Smart Remote app, connect itself to your phone (again taking care of Wifi network names and passwords), then start the PlayMemories app. So without a single button press, you’ll find your self ready to remote-control the camera with your phone. Brilliant! If you don’t have a phone with NFC, you’ll need to first select the Smart Remote from the App menu on the A7r Mark II. This sets the camera up as an access point for the PlayMemories app on your phone to connect to.
Once you’re remote-controlling your camera, you’ll be able to see what it sees, adjust the exposure compensation and take a photo when desired. But out-of-the-box you won’t be able to change the aperture, shutter speed or ISO, nor reposition the AF area. There is however a solution: an update to the in-camera Smart Remote app unlocks full exposure control along with the chance to tap anywhere on your phone’s screen to move the AF area.
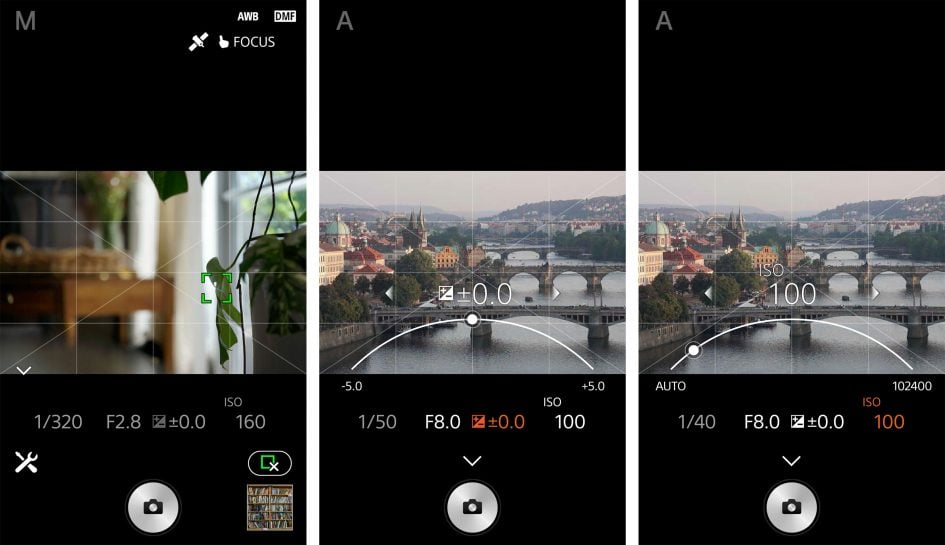
To update the app, you’ll need to connect your camera to the internet, log into the PlayMemories service (using an account you’ve previously set up on a computer), and choose Smart Remote in the camera’s Application menu, then select the update option. Alternatively you can download an app via a browser on a laptop or desktop, then connect the camera to transfer it.
A few seconds later you’ll have the latest version of Smart Remote sporting a wealth of manual control. It’s great the camera offers this, but a shame you need to go looking for it, as I’m sure many owners won’t jump through the required hoops. Sony really ought to ship its cameras with a more up-to-date version of Smart Remote. It’s also a shame that while you can trigger a movie using Smart Remote, you can’t use the screen on your phone to reposition the AF area by touch, as you can when shooting stills.
While updating the Smart Remote, you’ll notice a selection of other apps you can download to extend the capabilities of the camera, some free, some costing up to $9.99. Arguably the most powerful app is Timelapse which has gradually become more sophisticated over several updates. It now works alongside a new Angle Shift Add-On ($4.99) that lets you perform pans, tilts and zooms within a timelapse video, all generated in-camera.
A Beta section in the download section also lets you access apps under development. I tried the Touchless Shutter app (currently free in beta) which cleverly exploits the viewfinder eye sensor to trigger the shutter – simply wave your hand close to the viewfinder and the camera takes the shot. Better still, it also works in Bulb mode with a wave to start an exposure and another wave to end it.

There’s also apps to simulate the effect of long exposures by combining multiple frames and ones designed to better capture light or star trails. It’s all good fun, but the question is whether most or even all of these should just be part of the standard camera operating system. After all most rivals offer built-in timelapse facilities, and Olympus continues to raise the bar for cunning long exposure options.
I also find Sony’s apps aren’t always accessed or adjusted in an intuitive manner. Rather than integrating new functions into the existing menus, they’re all kept in a dedicated Apps section. I’m sorta okay with that, but once you fire-up an App, you’ll find it has its own multi-page menu system, including options to set the image quality. Yep, a separate image quality menu just for that app that works independently of the main image quality menu for the camera. So you may have the main menu set to, say, RAW+JPEG, then enter an App assuming it’ll inherit that setting, only to discover later that you’ll need to set it separately. This caught me out a few times when using, say, the Touchless Shutter app. I assumed it would be capturing images using my main quality settings, but was in fact using a default setting of JPEG only. Why would I want to have different quality settings just because I’m using an App? Sony really needs to think more carefully about how the Apps integrate with the camera.
As you browse the Apps and experiment with Smart Remote, you’ll also notice a lack of GPS logging options. Most mirrorless camera apps now offer an option to record a GPS log that’s then synced with your photos after a day’s shooting. To me that makes the most sense, but Sony has instead gone for an approach which only offers to embed a position when you take a photo using the Smart Remote. But wait, the location isn’t embedded in the file recorded by the camera. Instead it’s only embedded in the image copied onto your phone, which may not be at the full resolution. So unless you’ve ticked ‘Original’ as the quality setting in the Smartphone app, you could find yourself with a high-res image in the camera without a location and the same shot on your phone with the location, but at a lower resolution. Configure all the options carefully and your phone can store an original resolution file with the location embedded, which you could then copy back to a computer but it’s overly complicated. Sony, please just offer a GPS logging option in the Smart Remote app that syncs the location on a bunch of images in the camera.

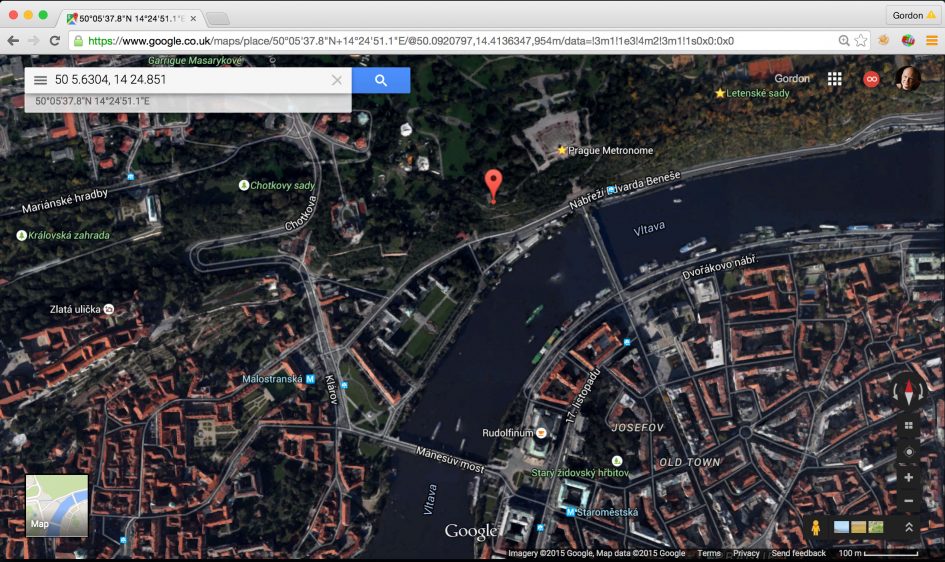
In order to capture the image above in the full resolution image with the location embedded, I first configured the Play Memories app on my phone to transfer Original files and then ticked Location logging. I then set the camera to shoot, held my phone against it to trigger the Smart Remote control, checked that the satellite icon was visible in the corner of the phone’s screen, then took the photo. I then copied the image into Dropbox to sync it with my computer. Phew. I then entered the GPS co-ordinates into Google maps for the map view.
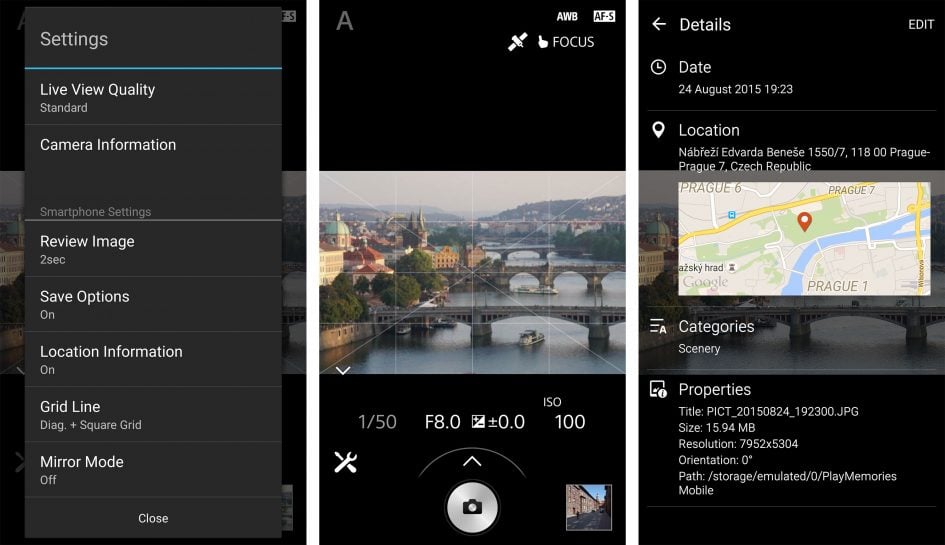
But it seems slightly churlish to complain when the most common processes of wireless image transfer and remote control continue to work so well here. Sony’s really nailed the process across its entire range of Wifi-equipped cameras, especially if you own a handset with NFC.
Sony A7r Mark II sensor
The Alpha A7r Mark II is equipped with a brand new full-frame sensor, sporting 42.4 Megapixels and a 3:2 aspect ratio. It’s Sony’s first back-illuminated full-frame sensor, coming six years after the company first deployed back-illumination on the tiny 10 Megapixel sensor of the Cyber-shot WX1. To maximise the detail there’s no optical low pass filter, and as you know from the autofocus section, the sensor also features a new embedded phase-detect AF system with 399 points. The data read-out allows continuous shooting at 5fps and supports 4k video at up to 30p. Meanwhile, a gapless structure helps reduce corner colour shading on legacy lenses.
Set to the highest resolution with full-frame coverage, Fine JPEG files typically measure between 6 and 16MB each, while compressed RAW files weigh-in at around 43MB each. Thanks to the October 2015 firmware update, the A7r II can now also record uncompressed RAW files if desired.
The A7r Mark II allows you to shoot in the native 3:2 shape, or a wider 16:9 aspect ratio, although strangely there’s no other shapes available out-of-the-box; a shame since I think a 1:1 option would be useful when framing for square output. There’s also the chance to choose three lower resolutions for JPEGs, along with the choice of three JPEG compression levels, but RAWs remain fixed at full-size with no smaller options (unless shooting in APS-C mode and suffering the crop). While it is now possible to embed copyright and author information on files, I think there’s an opportunity – necessity even – for Sony to add more image quality options to bring it in-line with rivals in the price bracket. Let’s have additional aspect ratios and lower resolution RAW options please.
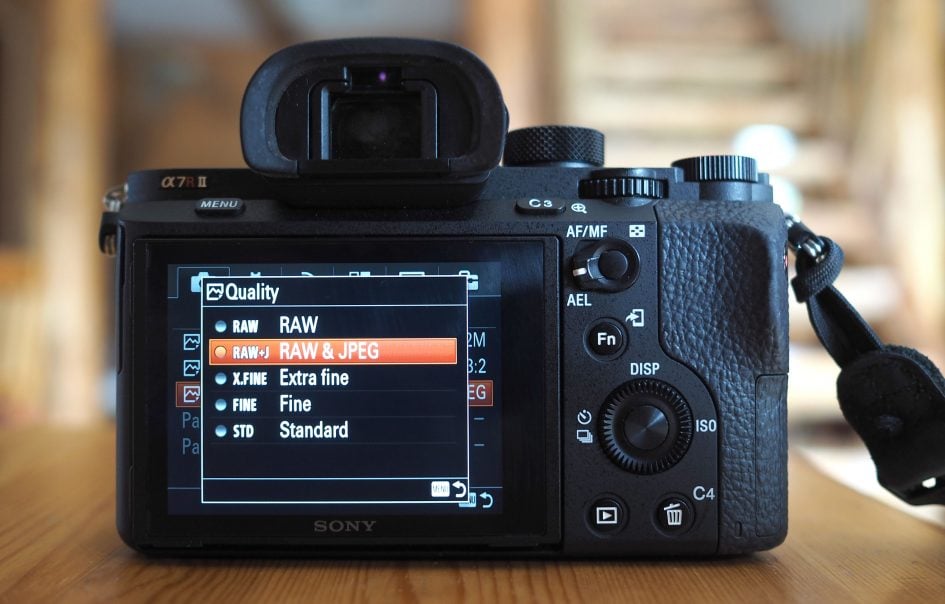
There’s also the opportunity to switch to an APS-C / Super-35 mode which crops the sensor and the field of view by 1.5 times. You can use this to avoid optical issues outside the APS-C area when shooting with lenses designed for APS-C bodies, or simply to extend the reach of your full-frame lenses, albeit with a loss of resolution from 42 to around 19 Megapixels.
The smaller frame and file size could in theory increase burst speeds or buffer depth, but the A7r II’s continuous speed is limited to 5fps by the physical shutter and sadly there’s no option for the fully electronic shutter mode to go any faster either. You may then wonder why you’d shoot in the APS-C mode if you have a full-frame lens, as you could of course simply crop later on. The answer is the phase-detect AF coverage area goes from 45% of the frame to almost all of it, which can be great for unpredictable action, and as noted in the movie section, the scaling-down to 4k is performed with crisper results. I should also add that shooting in the APS-C mode is the only way to record a smaller RAW file.

Set to 3:2, the maximum full-frame resolution is 7952×5304 pixels, allowing you to output in 300dpi at 26.5×17.7in. Compare that to the 7360×4912 pixel resolution of 36 Megapixel cameras like the Nikon D810 or Sony’s original A7r which can be output at 24.5×16.4in – so a couple of inches wider, or greater latitude for cropping. Today without going to medium format, the A7r Mark II is only beaten in resolution by the Canon EOS 5DS(r) with its 50 Megapixels delivering 8688×5792 pixels that can be output in 300dpi at 29x19in.
The numerical resolution difference between the 36 Megapixel A7r and 42 Megapixel A7r Mark II may not be significant, but as described earlier, Sony’s made a lot of improvements to the Mark II to give you the best shot at enjoying the full quality. Aspects like the improved grip, built-in IS, electronic first-curtain and more effective damping mean the quality gap between the Mark II and original version is likely to be much more than the six Megapixel difference in numbers implies. Sony’s also made many improvements in handling, composition, AF and movies, so the new model represents a big upgrade in every respect.
I could quote and discuss more specifications, but it’s far more useful to actually see the quality in practice under real-life conditions. So over the following pages you’ll find numerous comparisons on noise and resolution, along with a wide selection of sample images captured with a variety of lenses. So without further ado, check out my Sony A7r II quality, Sony A7r II sample images pages, or skip back to my verdict!