Solar Eclipse Photography
-
-
Written by Gordon Laing
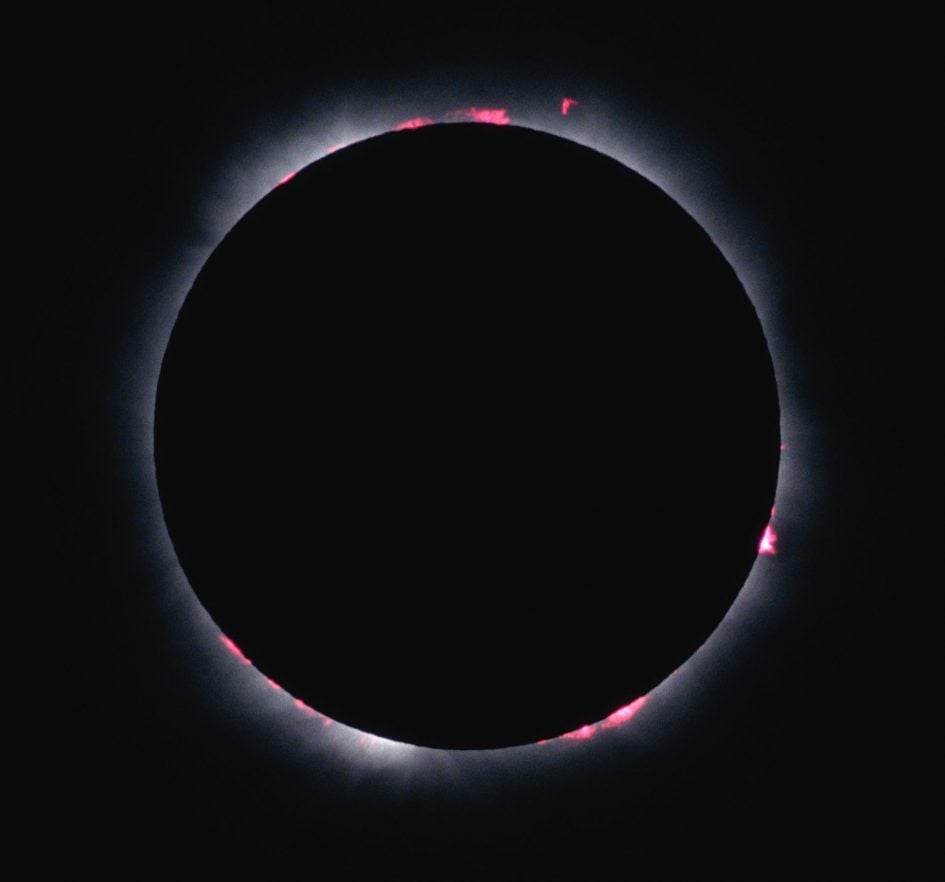
A Total Solar Eclipse is one of nature’s most spectacular sights: as the Moon passes between the Earth and Sun, it gradually obscures the disc into an ever-decreasing crescent. Then for a brief period of totality, it covers the Sun entirely, blocking the bright disc sufficiently to temporarily darken the sky and reveal the wispy Coronal atmosphere to the naked eye. If this weren’t enough, sometimes a tiny sliver or the Sun’s bright disc can peek through the Moon’s uneven surface just before or after totality to momentarily produce a ‘diamond ring’ effect, where you’ll see the outer atmosphere as a circle punctured by an intensely bright portion like a precious jewel.
Above: 2017 Eclipse: Canon EOS 80D and EF 400mm f5.6 (640mm equivalent). Uncropped image, f8, 1/50, 800 ISO
I’ve viewed and photographed three Total Solar Eclipses and on this page I’ll explain everything I’ve learned about the process. But before going any further, there’s two important points to make: first, always use a certified solar filter to view or photograph the partial phases of a Solar Eclipse, and second, if anything goes wrong with your camera gear, don’t waste precious time trying to fix it. Depending on the Eclipse and your location, Totality may last less than a few minutes, and believe me that time is better spent enjoying the spectacle with your eyes rather than diagnosing and resolving a camera problem.
Solar eclipses typically occur two to four times a year, but not all are Total. Some are Partial, where the Moon only obscures a portion of the disc before moving away again. Others are Annular where the Moon may pass completely in front of the Sun, but due to a mis-match of distances leaves a bright ring visible, preventing the faint Corona from revealing itself. Both are lovely to see but don’t come anywhere near the wonder of a true Total Solar Eclipse. Believe me, if you’ve previously only seen a Partial eclipse, you’ve missed out on the grand finale. If you get a chance to view a Total Solar Eclipse, I’d go for it without hesitation.
Viewing a Total Solar Eclipse should be simple: just ensure you’re within the narrow path of totality directly behind the shadow of the Moon. NASA kindly produces detailed maps of exactly where and when you need to be, so there’s no excuse not to be in the right place at the right time, right? Except when the path is in a different country that’s difficult to get to, or perhaps over a war zone, or maybe crosses a mountain range or over the North or South pole. Or how about the path isn’t over land at all and can only be seen from the Ocean? Then there’s the timing. An eclipse could take place when the Sun is very low in the sky, making it harder to view, or perhaps during a season when cloud or rain is likely to obscure it. So when an eclipse comes along that’s in a fairly easy to access location, positioned high in a (hopefully) cloudless Summer sky, you doubly go for it.
I’ve been lucky enough to view and photograph three total solar eclipses, my first in Europe in 1999, my second in Zambia in 2001, and my third in the USA in 2017. NASA’s eclipse pages have all the location and timing details you need, so I’m going to concentrate on imaging here.
If the gear goes pear-shaped, forget the pictures!
Depending on your location and the eclipse in question, you may only have a couple of minutes of Totality, or even less. This time is extremely precious, so while I’m not going to flatly recommend you just look at it with your eyes, I will say that if anything does goes wrong with your gear, just forget about the photos and enjoy the event in person. If for some reason you lose the Sun from your frame or it goes horribly out of focus, you may not have time to resolve it.
Photographing a Total Solar Eclipse
There are two main parts of a Total Solar Eclipse: the Partial Eclipse before and after Totality, and the brief period of Totality itself. Each has completely different requirements for both photography and viewing. The first and most important point to make is it remains dangerous to look directly at the Sun during the partial phases, including seconds before and after Totality. Even in the final moments before Totality or those following, the Sun is bright enough to permanently damage your eyesight, and equipment.
If you want to view the partial phases of a Solar Eclipse or photograph them, you’ll need appropriate filtration. By that I mean proper Solar filters with official safety certification, not just any old stacked neutral density filters or a welding hood. Note you will not need a filter or glasses to view the brief period of totality though. If it is a true Total Solar Eclipse and you are on the path, you can view Totality directly and shoot it safely without any filters. But immediately before and after you’ll need to use filters to protect your eyes and camera gear.
Filters for the partial phases
Solar glasses and filters in a variety of sizes for camera lenses, binoculars or telescopes are available from most astronomy shops. I’ve successfully used pre-assembled and home-made filters with Baader Astro Solar film for all three of my solar eclipses, and I can also recommend products by astronomy giant Celestron. Just remember demand will be high approaching an eclipse, so don’t leave it to the last minute to get what you need.
Buy Celestron Solar Eclipse glasses at Amazon.com
Buy Baader Astro Solar film for DIY filters from Amazon.co.uk
Buy Baader Astro Solar film for DIY filters from Amazon.de

Above: 1999 Eclipse, partial phases using Televue Genesis and Canon EOS 5: 1080mm equivalent. Note the colour cast from the solar filter, and also the Sun spots on the disc.
Many filters will change the colour of the Sun’s surface, typically to a blueish / silver tint so if you’d like to present your partial phases with a more attractive yellow colour, you’ll need to do it in post. The partial phases are essentially monochrome anyway, so I normally turn the image to greyscale in post before adding a duotone with the desired tint.
Best lens for Solar Eclipse Photography
The Sun’s brightness gives the impression of an object that’s bigger in the sky than it really is, but the reality is the Sun – and Moon – are both relatively small subjects, so if you want them to be large in your picture, you’ll need a lens with a correspondingly long focal length. How long? Well if you want either to completely fill the frame with the Sun or Moon, you’ll need to shoot at an equivalent focal length of over 2000mm.
Luckily some of the best Solar Eclipse shots are taken at much shorter focal lengths. Depending on your exposure, the faint wispy Coronal atmosphere can extend to over twice the diameter of the Sun’s disc and you won’t want to crop it with the edges of your frame. Coronal shots also look great with a decent amount of dark sky framing them, so an ideal focal range is between 500 and 800mm. If you factor-in the field-reduction of a cropped-frame camera with an APS-C or Micro Four Thirds sensor, you begin to approach fairly accessible telephoto lenses, like a 100-400 zoom. Even a 70-300mm on a cropped body will produce a fair result.

Above: 2001 Eclipse shot with Canon EOS 5, EF 400mm f5.6L and 2x converter. Here uncropped at 800mm equivalent.
For me, affordability and portability are two very important factors, and the longest lenses which won’t break the bank or my back are around 400mm in focal length. Back in 2001 I used a Canon EF 400mm f5.6L USM telephoto lens with a 2x teleconverter on a ‘full-frame’ EOS-5 35mm film camera loaded with Fuji Provia 100 ISO film, and was very satisfied with the results. Indeed for my longer exposures of the Corona during Totality, the 800mm equivalent focal length was actually a tad long and cropped some of the wispy shapes. So for the greatest flexibility, I’d aim for something closer to 600mm equivalent.
Fast-forward a couple of decades to the 2017 Eclipse and I actually stuck with the EF 400mm f5.6L USM, but that time mounted on a Canon cropped DSLR for an effective focal length of 640mm. This is the perfect coverage for both prominences and wide Corona shots, but sadly this lens has been discontinued, but you may find a used bargain at MPB.
Today I’d use a more modern 100-400 zoom (or thereabouts) on an APSC / cropped-frame mirrorless camera, such as the Canon RF 100-400mm, Canon RF 100-500mm, Sony FE 200-600mm or Sigma 100-400mm, although if you’re using a zoom, do be aware of possible creep where the barrel may retract under its own weight when pointed directly upwards. I’d recommend doing some tests before hand to see if this is going to be an issue.
If you’re shooting full-frame, you’ll ideally need something longer, such as a zoom that extends to 600mm (like the Sony FE 200-600mm or Sigma 150-600mm), or maybe even a 600 or 800mm prime (for example the Canon RF 600 or RF 800mm), or indeed a small telescope. If you don’t own one or can’t afford their high price tags, consider renting a lens for the job. Beware big lenses can find themselves booked-out approaching big events, so you may need to order early to secure one. Try BorrowLenses in the US or Hireacamera in the UK.
An interesting alternative is using a super-zoom bridge camera which could provide 600mm equivalent coverage or even more. The model with the best balance between reach and sensor quality is the Sony RX10 IV.
A full view of the Corona may be a classic eclipse shot, but there are other compositions you could go for. If you have access to a very long focal length, how about taking shorter exposures around the edge of the Sun during Totality in an attempt to capture prominences?
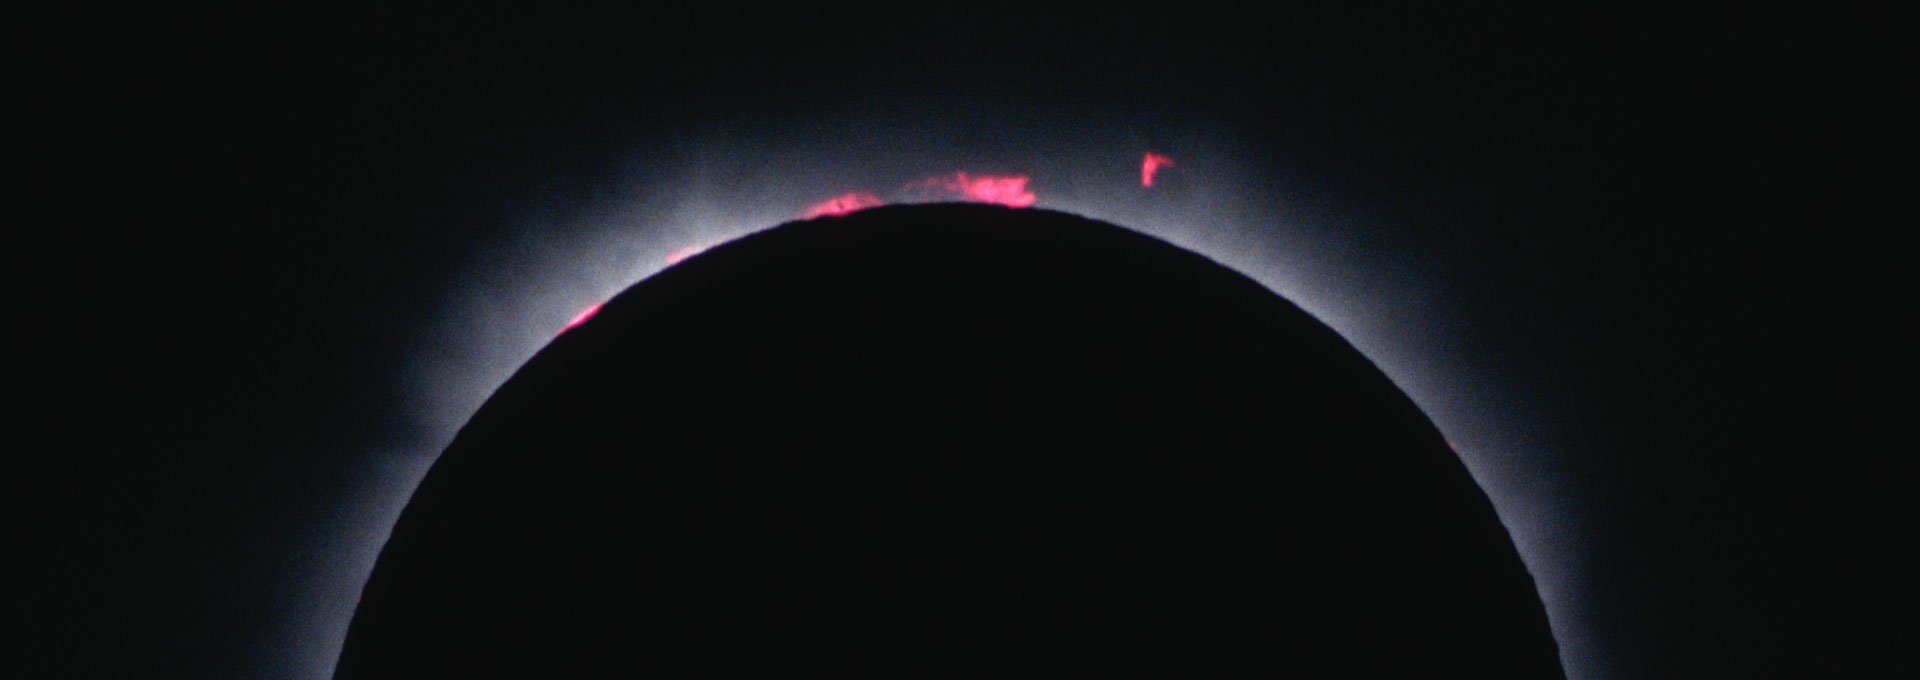
Above: Prominences captured during Totality of 2017 Eclipse. Canon EOS 80D and EF 400mm f5.6 at f8, 1/500, 100 ISO. Image cropped here.
Above: Prominences captured during Totality of 1999 Eclipse. Canon EOS 5 and Televue Genesis with 2x converter (1080mm equivalent). Image cropped here.
Alternatively, why not go wide and attempt to include some scenery in your shot? Ultra-wide or even fisheye eclipse shots can look great, showing the entire sky with beautiful gradations around the tiny Solar disc.
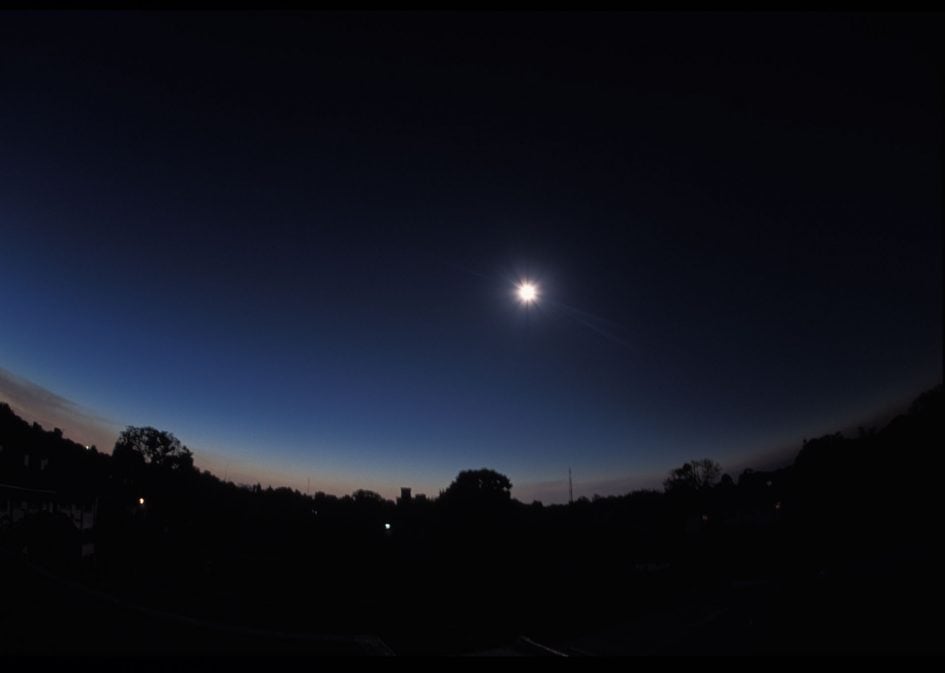
Above: 2001 Eclipse with Canon EOS 5 and 15mm Fisheye lens.
Even if your goal is a Totality shot, it’s fun to shoot the partial phases at regular intervals on either side in order to generate a composite image. Again these can work well whether shooting wide or long focal lengths; indeed you could devote one camera to automatically capture interval shots with a wide lens while you concentrate on shooting long shots on another by hand.
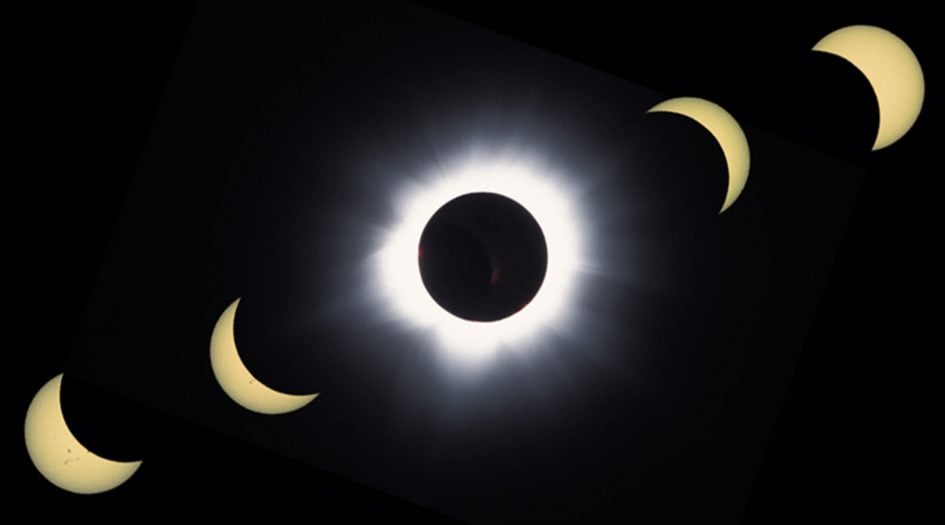
Above: Composite shot from 2001 Eclipse, including filtered and coloured partial phases and unfiltered totality in the middle. Canon EOS 5 and EF 400mm f5.6 with 2x converter.
Best camera for Solar Eclipse Photography
You can photograph a Solar Eclipse with just about any camera, but for the greatest flexibility, I’d recommend a DSLR or mirrorless model with interchangeable lenses and full control over focus and exposure. Challenges you’ll come up against include focusing on a subject that can be extremely bright and or dark, readjusting focus if necessary when removing or replacing a filter, and easily changing exposures during the event. If you intend to shoot both the Partial phases and Totality, you will be making significant exposure adjustments, so you’ll want a model that makes it quick and easy.
It’s important to practice before the event with your filter so you can get used to the focusing and ideal exposures. Also try different focusing techniques as some may work better than others – don’t assume autofocus will work, especially during Totality. It’s also worth experimenting with focusing on stars at night to get an idea of how to focus on very faint subjects successfully. I can’t stress how important it is to become absolutely familiar with every aspect of your camera that you’ll need on the day – you’ll need to instinctively know where the right menus, buttons and dials are, and also how to operate it in both bright and dark conditions.
If you intend to shoot a sequence for a composite, or capture a detailed view at a long focal length, you’ll also need a tripod. Don’t forget the rotation of the Earth will mean the Sun will gradually move across the frame too, and if you’re shooting with a telephoto lens, you’ll need to adjust it every few seconds to keep it centred. If you’re shooting at very long telephoto lengths, you’ll also need to be very careful with your adjustments as the smallest nudge could see the Sun career-off the frame, wasting precious seconds of Totality – you don’t want to be wasting your time recomposing and possibly refocusing during this time.
Typical ball heads and basic three-way heads are the worst in this regard and I’d stay clear of them for long telephoto work. Video heads with fluid adjustments allow smoother movements, but again an accidental knock can still scupper the mission. Personally speaking I think the best options are geared tripod heads which can be precisely adjusted by twisting knobs. Check out my Manfrotto XPRO Geared head review – that’s what I use.
A more advanced option is to use a driven equatorial mount which will counteract the rotation of the Earth and keep a celestial subject still in the frame, freeing you from constant readjustments. These are however specialist pieces of equipment that can be hard to setup in daylight, so unless you’re an experienced astro-photographer, I’d recommend a tripod with a geared head.
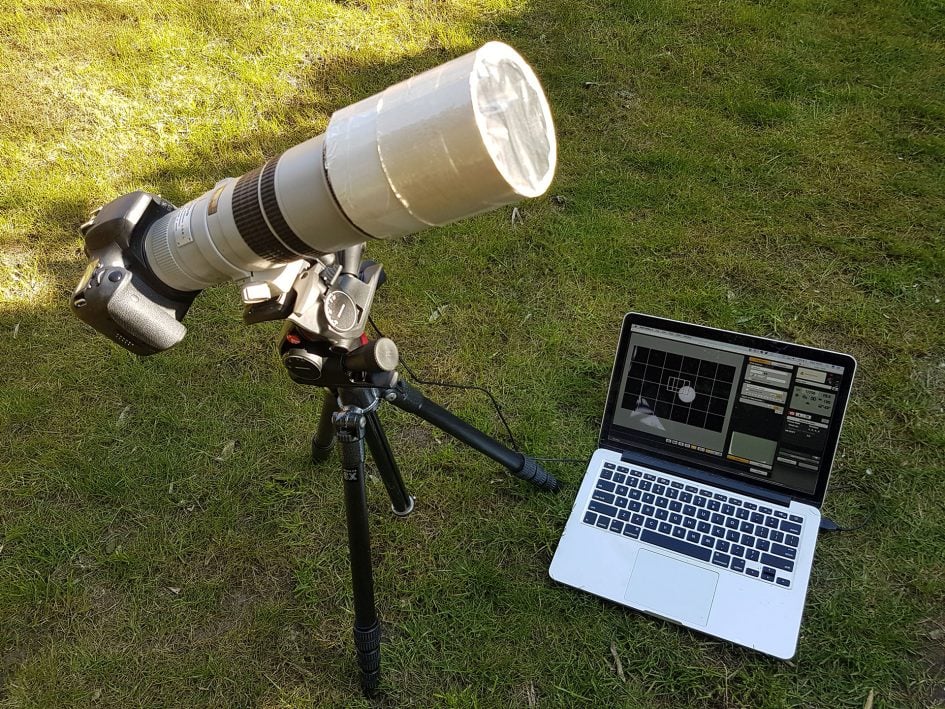
Above: my 2017 eclipse setup, with a cropped / APSC Canon DSLR, 400mm prime lens, home-made solar filter, tripod with geared head and laptop for remote control.
In terms of triggering the shutter without camera shake, I often use the self-timer for landscape photography, but with an Eclipse lasting only a couple of minutes or even just seconds, you don’t want to waste any of that time. A cable release is ideal for triggering the shutter, but you may also want to consider a more sophisticated remote control with some exposure control, as during totality you’ll probably be ramping through a series of different shutter speeds and or ISO sensitivities. If you can make these adjustments without touching the camera, you’ll minimize the risk of wobbling it.
While I love new technology, I don’t currently feel Wifi or Bluetooth remote controls are sufficiently reliable for this kind of event, but directly-connected USB solutions might be. Canon owners might want to experiment with the excellent EOS Remote utility running on a laptop over a USB connection as it will allow you to focus, adjust the exposure and trigger the shutter all by remote control, see photo above. Do beware though that the more devices you rely on, the greater the chance of failure through connectivity, battery or plain old software crashes. Again if anything goes wrong, you’re unlikely to be able to fix it during Totality.
How to photograph a Solar Eclipse
You’ve got your location and your gear and you’re now ready to shoot! Due to the high dynamic range and rarity of the subject I’d always recommend shooting an eclipse in RAW – this is not the time for compression to scupper your potential for success. As always though I’d also record JPEGs for quick and easy sharing after the event.
In terms of exposure, you will be dealing with a huge range of brightnesses during Totality and on either side of it, but in my experience, the correct exposure can be entirely handled by adjusting the shutter speed with a fixed aperture and ISO for the partial phases and prominences, before then leaving the shutter fixed and adjusting the ISO for the wispy Corona.
First, set your camera’s exposure mode to Manual. In terms of sensitivity, you should start with the camera’s base value, typically 100 or 200 ISO. In terms of the lens aperture, you should be able to shoot at (or near to) the maximum value (smallest f-number), since the subject should be near the centre of the frame where the optics perform best, and an eclipse isn’t hugely detailed either. I typically go for f8.
This leaves adjusting the shutter speed to deliver the ideal exposure for your initial shots. The correct shutter speed for the Partial phases really depends on your filter, but luckily you’ll have plenty of time to make adjustments during the event – not to mention practicing on the full Sun before the event. Once you’ve found a shutter speed that works, you should be able to use it for all your partial phases. Easy.
Totality is harder as there’s a whole range of brightnesses you’ll want to capture from intense prominences to the dim Coronal atmosphere. You’ll also have to remember to remove your solar filter as the last diamond ring burst disappears and Totality starts properly. Depending on your filter, you may need to make a minor adjustment to focus too.
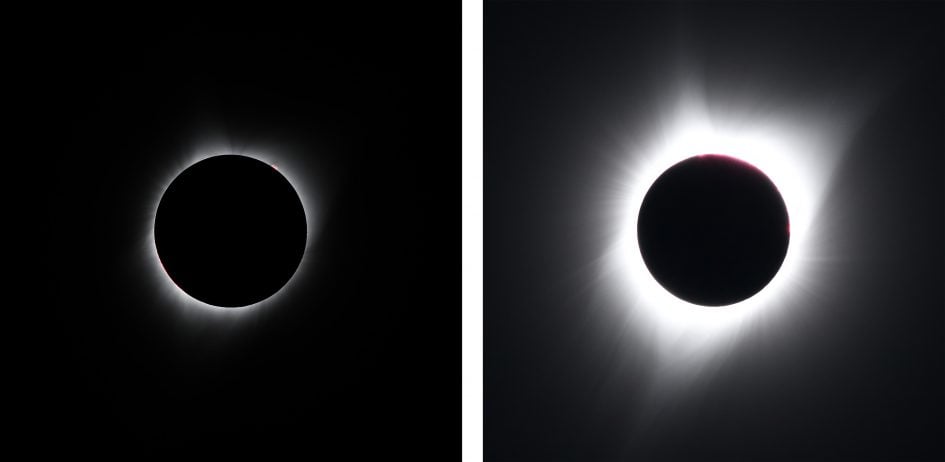
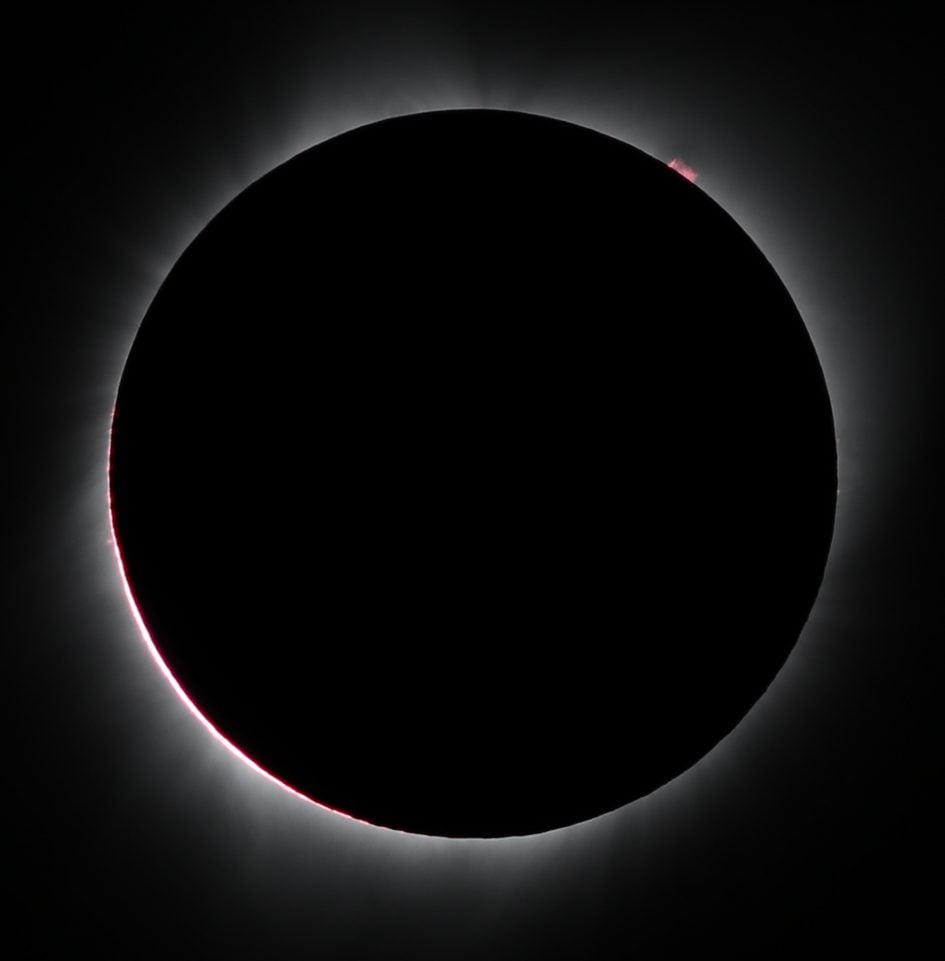
Above: 2017 Eclipse with Canon EOS 80D and EF 400mm f5.6 (640mm equivalent, but cropped here). This is the same composition during Totality, just with different exposures: f8, 1/500, 100 ISO (left) and f8, 1/50, 800 ISO (right).
Wide bracketing is the order of the day during Totality and the easiest way to handle it is to simply start with a fast shutter speed, then gradually reduce it for multiple shots. At 100 ISO and f8, I’ve found a range of between 1/500 and one second will give you a great range of images to work with. If you’re shooting one-stop apart, you’re looking at 10 images in a sequence from 1/500 to one second, which should be possible during Totality, hopefully leaving you some time to view it in person with your eyes.
But beware of slow shutter speeds when using long focal lengths and a fixed tripod. Due to the rotation of the Earth, the Sun will appear to move slowly across the frame, and at certain shutter speeds the image will actually suffer from motion blur. At an equivalent focal length of around 600mm, I found the slowest shutter speed I could confidently use for a sharp image was around 1/60. If you’re using longer focal lengths, you’ll need an even faster speed.
Unfortunately these shutter speeds will be too short to capture much of the Corona shape at f8 and 100 ISO, so the solution is to stop adjusting the shutter when you reach the slowest reliable value (for me that’s around 1/60 at 600mm), and from that point, increase the ISO one stop at a time instead. You can see an example of this above where I used 1/500 at 100 ISO for the prominences, and 1/50 at 800 ISO for the Corona. As for the aperture, I decided to shoot the EF 400mm f5.6 closed one stop to f8 to improve the quality and be a little more forgiving on focusing.
So an example set of exposures during Totality for a 600mm (or thereabouts) lens would be as follows. First set the aperture to f8 in Manual mode and leave it fixed for the duration of the event. Next, set the sensitivity to 100 ISO. Then shoot exposures at 1/1000, 1/500, 1/250, 1/125 and 1/60, before then leaving the shutter fixed at 1/60 and doubling the sensitivity going forward, first at 200 ISO, then 400 ISO, then 800 ISO, then 1600 ISO, and finally 3200 ISO. This ten shot sequence should capture everything from bright prominences to the wispiest Coronal clouds, and gives you the opportunity to combine several into an HDR image if desired. Plus you should be able to capture the sequence and still hopefully have time left to view it in person.
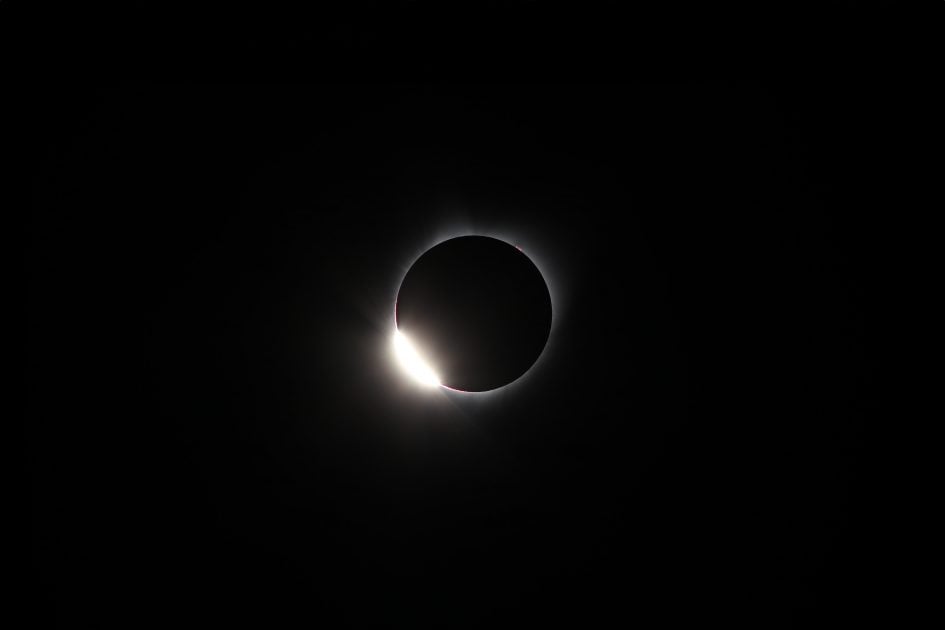
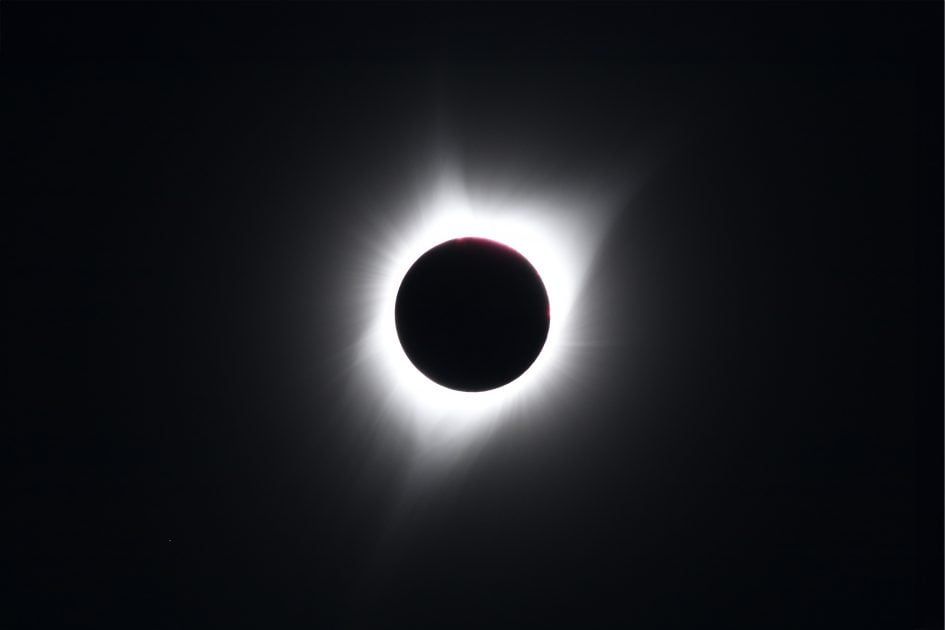
Above: Diamond Ring effect. 2017 Eclipse, Canon EOS 80D and EF 400mm f5.6 (640mm equivalent, uncropped image) at f8, 1/500, 100 ISO.
Which brings me full-circle back to my advice that if in doubt, or should anything go awry, I’d strongly advise just forgetting your photos and enjoying it with your eyes instead. During Totality, it will become dark and hard to correct any problems you might be having, so don’t waste what precious time you have! Good luck and enjoy these wonderful events!
Check prices at Amazon, B&H, Adorama, eBay or Wex. Alternatively get yourself a copy of my In Camera book, an official Cameralabs T-shirt or mug, or treat me to a coffee! Thanks!