 The Sigma 24-70 2.8 DG DN II is impressive for the money, becoming one of the best general-purpose event lenses at this price-point. Compared to its predecessor, it’s sharper across the frame and throughout the range, enjoys faster focusing, and features more controls including a de-clickable aperture ring, all packed into a weather-sealed barrel that’s 10% lighter than before. Indeed it comes close to Sony’s own 24-70 G Master II which is the best 24-70 2.8 I’ve tested to date. The Sony still enjoys a mild edge in sharpness, particularly at 70mm f2.8, but I was struck how close they were overall. As a third-party lens, remember the Sigma won’t support the fastest burst speeds with AFC on the top Sony bodies, and won’t support focus breathing correction either, but is well-behaved in that regard. I also find Sony’s Active Stabilisation for video works best with their own lenses, but few will be handheld vlogging at 24mm. So while the Sony 24-70 GM II remains the best overall 24-70 I’ve tested, I’d say Sigma’s DG DN II is easily good enough for most of us, especially those using the more affordable bodies. And the best part is it costs just over half of the Sony lens, making it a relative bargain. So if you’re looking for the classic 24-70 range with an f2.8 aperture, the Sigma DG DN II becomes the best option under 1500.
Sigma 24-70mm f2.8 DG DN II Art review
-
-
Written by Gordon Laing
Intro
The Sigma 24-70mm f2.8 DG DN II Art delivers a classic general-purpose range on full-frame cameras with a bright aperture. Announced in May 2024, this new Mark II version arrives four and a half years after the original model, and costs around $1200 or pounds.
At the time I made this review, it was only available in Sony-e and Leica L-mounts, but we can keep our fingers crossed for other versions in the future. My full review is in the video below, but if you prefer to read the written highlights, keep scrolling!
There’s no shortage of similar-spec lenses. If you own a Sony body, their most recent FE 24-70mm f2.8 GM II from 2022 is one of the best I’ve tested, albeit at a correspondingly high price of $2300 or about £2000, making it almost double the price of the new Sigma.
Meanwhile L-mount owners have Panasonic’s Lumix S Pro version for around $1700 or pounds, or the Leica Vario Elmarit SL for just under three grand.
For those on a tighter budget, the Mark I versions of both Sigma and Sony’s 24-70 2.8 lenses are still available, as are a variety of alternative ranges, such as Sigma’s 28-70 2.8 and Tamron’s 28-75 2.8 for less than a grand.
But in terms of new 24-70 2.8 zooms, the latest Sigma becomes one of the most affordable, while including a number of improvements over its predecessor. So let’s see what it can do!
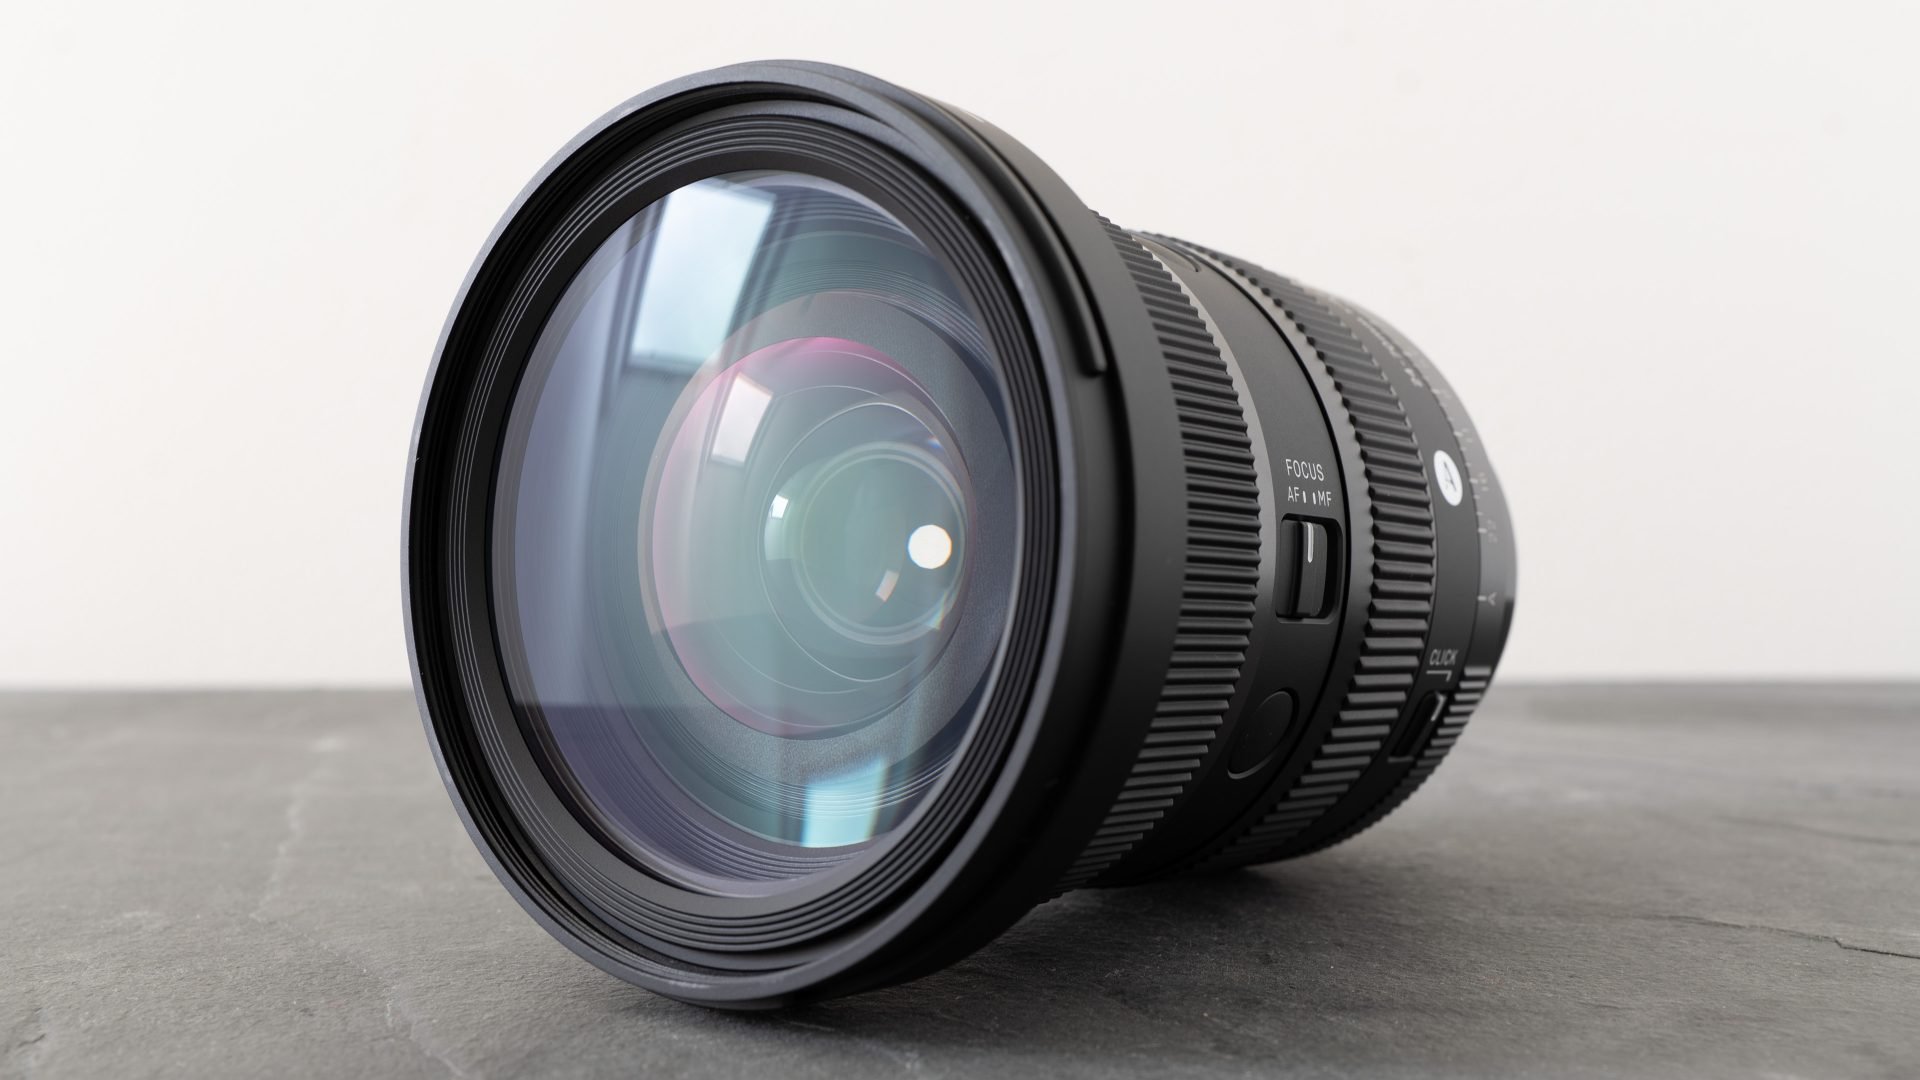
Designed, manufactured and assembled at Sigma’s sole factory in Japan, the build quality is excellent. Like their other lenses, it’s made from what Sigma describes as a Thermally Stable Composite material, and as an Art lens it’s sealed against dust and moisture including a rubber grommet at the mount.
Sigma 24-70 f2.8 DG DN II Art: 88x122mm, 735g // Sony 24-70 f2.8 GM II: 88x120mm, 695g
Measuring 88mm in diameter and 122mm long, it’s essentially the same size as Sony’s GM II version, with both being a few mm shorter than the original Mark I Sigma. Weighing 735g, Sigma’s managed to make a decent reduction over the 827g of its predecessor, and while Sony’s GM II beats them both at an impressive 695g, it’s not a huge difference once in your hands. That said, both Sony and Sigma are now showing-up Nikon and Canon on weight, with their mirrorless 24-70 2.8s weighing-in at a relatively hefty 805 and 900g respectively.
Starting at the mount-end of the new Sigma, you’ll find an aperture ring running between f2.8 and f22 in third stop increments. It’s interesting to recall the original Sigma and Sony versions didn’t have aperture rings, but now both companies have added them to their Mark II versions, proving demand for this control. Like Sony, the ring is de-clickable for smoother and quieter adjustments, while a lockable A position allows body-based operation if preferred.
Next comes the zoom ring which turns smoothly and extends the barrel by around 35mm at the longest focal length. This is lockable at the 24mm focal length to avoid unwanted extensions, although the barrel and control weren’t loose when new. Note a firm twist of the zoom will deactivate the lock.
This portion of the lens between the zoom and focusing rings is also where you’ll find an AF / MF switch and a pair of programmable focus-hold buttons.
Finally at the end of the barrel is a free-spinning manual focusing ring which feels lighter than the zoom ring, and allows very precise adjustments.
Like most 24-70 2.8 zooms, there’s an 82mm filter thread, and Sigma supplies a petal lens hood which twists-onto the end of the barrel, and while it lacks the window on the Sony hood to operate rotating filters, it does include a lock button to release it. Sigma also supplies a padded bag for transportation, albeit not when mounted to a body.
And speaking of bodies I tested the e-mount version of the lens on a Sony A7 IV. Like most modern mirrorless lenses, it’s designed to be used with a profile to correct distortion, so this was set to Auto in the Sony Lens Correction menus for all my tests.
This corrects a little barrel distortion at the wide-end with a tiny reduction in the field of view, while at the long-end it corrects a little pincushion, but this time with no change to the field of view. In general use it’s applied automatically to JPEGs and available in updated RAW converters.
Ok, so let’s start with focus and you’re looking at the Sigma 24-70 at 24 2.8, positioned pretty close to the bottle and set to single AF-S mode, where the focusing is pretty quick, with no visible hunting.
Change the focus mode to continuous AFC mode though, and the Sony switches to phase-detect AF only, with essentially instant results between the bottle and the background.
Next for the lens at 70mm f2.8, again starting in single AFS mode where there’s a tiny wobble before the lens and camera refocus on the subject. Switch the camera to continuous AFC mode though, and again the speed is increased to become essentially instant. Sigma says they’re using a redesigned High-response Linear Actuator for focusing, and it’s certainly performing well here.
And for those who are interested in video, here’s a 4k clip filmed at 24mm f2.8, showing smooth and confident focus pulls between the bottle and wall. And now at 70mm f2.8, again smoothly refocusing without any wobbles or other issues.
Next for focus breathing, starting at 24mm and manually focusing from infinity to the closest distance of 17cm and back again. As I focus closer, you’lls ee the field of view widen a little, but across typical focus-pulls, I’d say it’ll be barely visible.
And now at 70mm, again focusing from infinity to the closest distance, this time of 34cm, and back again, where I’d say the impact of breathing is even lower. I’d say it’s not going to be an issue in general use, which is good news since the breathing compensation of recent Sony bodies only works with Sony’s own lenses.
Next for stabilisation, and while the lens doesn’t have optical compensation of its own, it can still be useful to see how well it works with body-based IBIS systems.
So first here’s a view through the camera during composition, initially with SteadyShot IBIS disabled where the view can get wobbly at 70mm, before enabling SteadyShot in the menus and returning to a view that is much more stable, making it much easier to frame accurately. Like most stabilisation, it’s worth waiting a moment for the full effect.
Here’s a shot I took at 70mm and a shutter speed of 1/10 using IBIS on the A7 IV. This was the slowest I could handhold with IBIS and enjoy a perfectly sharp result, although my test at one-fifth was very close.
I’ll put this on the left and the same exposure without IBIS on the right to show the difference. I actually needed a shutter of 1/160 to match my result on the left without IBIS, thereby representing around four to four and a half stops of compensation.
Just briefly here’s a video clip filmed with the lens at 70mm but without IBIS, where you can see how shaky it looks.
Next here it is with IBIS alone on the A7 IV where you can see the footage has become much steadier.
And finally with IBIS and Active SteadyShot which applies extra digital compensation in return for a crop. I find Active SteadyShot works better with Sony’s own lenses, especially when vlogging or moving the camera, but it’s certainly usable here.
Now for my image quality tests, starting with my distant landscape view of Brighton Pier, angled as always so that details run right into the corners. This image was taken at 24mm f2.8, so let’s zoom in for a closer look.
Here you can see nice, sharp details in the middle of the frame where the camera was focused, with nothing to complain about. Stopping the lens down to f4 or f5.6 has minimal impact on the image, proving it’s great in the middle out of the gate.
Let’s return to the f2.8 image before heading into the far corner, where you’ll notice some darkening due to vignetting. That said, the details are still looking pretty crisp, and as I gradually close the aperture, the biggest gain is to reducing that vignette. So a solid start for the lens at its widest focal length.
Next here’s the lens zoomed to the 35mm focal length, so let’s take a closer look at the middle, again where the camera was focused. Here you can see the details are still nice and crisp, as it was at 24mm, and if I close down the aperture, there’s little if anything to be gained in the middle of the frame.
So it’s back to the f2.8 version before heading into the far corner once more. Here, along with the expected darkening due to vignetting, I’d say the details have become a little softer, but it’s not bad by any means, and as I close the aperture to f4, then 5.6 and to f8, you’ll see that corner sharpness improve.
Next here’s the lens at the 50mm focal length, so let’s take a closer look in the middle. And like the previous focal lengths, it’s looking nice and sharp out of the gate at f2.8. And as I close the aperture, there’s little to be gained in the middle of the frame.
So it’s back to the f2.8 version before heading into the far corners once more. Here you’ll again notice some darkening as well as a little softening of the finest details. Closing the aperture gradually improves this with the sharpness peaking in the corner here at f8.
And finally to the longest-end of the range at 70mm f2.8, before taking a closer look in the middle of the frame. Here there’s plenty of detail, albeit lacking the ultimate crispness I recorded at the shorter focal lengths.
Viewed in isolation, I’d say it’s fine, but closing the aperture one stop to f4 brings a visible boost in sharpness and contrast, with mild further improvements at f5.6 and f8.
Returning to the f2.8 image and heading into the corners shows a similar degree of detail to the centre at this aperture, and a mild degree of darkening due to vignetting.
Close the aperture to f4 and you’ll enjoy a boost in sharpness and reduced vignetting, with further, albeit milder improvements at f5.6 and f8.
All of the images I’ve presented here were taken with the lens focused in the middle of the frame, but I repeated them all with the lens focused in the corner and found similar results, proving it enjoys a flat-field.
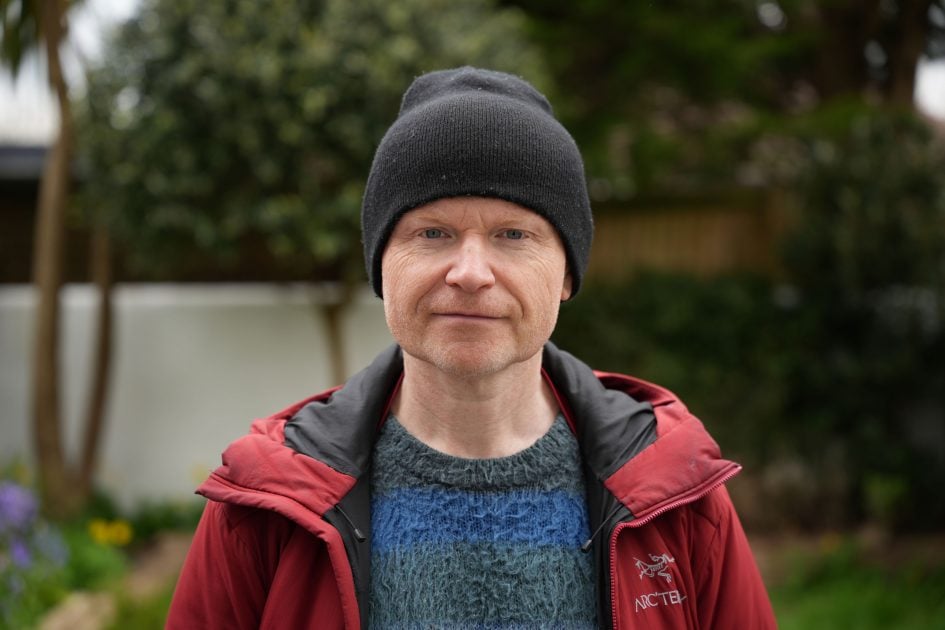
Portraits are the bread and butter of 24-70 zooms, so here I am at 70mm f2.8 from a typical distance where you can get an idea of the background blur and rendering style.
Looking closely it may lack the bite of the sharpest lenses I’ve tested, but that’s not necessarily a bad thing for portraits. There’s certainly plenty of detail around my eyes and stubble, with smooth rendering behind me.
Let’s pop the Sigma on the left and the Sony GM II on the right for a quick comparison. I used different bodies here and obviously the posing and framing is a bit different, not to mention having two years between them, but you can still get an idea of their respective styles.
The Sony lens is crisper on the details, partly thanks to the Alpha 1 body used for my tests of it, but from this distance I’d say they’re actually looking quite similar in rendering style.
The lens is also ideal for presenting pieces to camera, and here’s how it looks at 70mm f2.8 where you’ll enjoy some decent separation from the background.
Or how about at 24mm f2.8 if you’d like to capture more of the environment around you. This works fine from a tripod where you can stand a little further back, but as you can see from this clip filmed handheld at arm’s length with IBIS alone, the 24 focal length isn’t quite wide-enough for vlogging, especially if you’d like to apply additional digital compensation.

To better evaluate the background rendering, here’s the Sigma at 70mm f2.8 and focused as close as it can at this focal length from 34cm. The bokeh blobs at f2.8 from this distance are large and well-behaved, with minimal evidence of outlining or onion-ring textures.
Closing the aperture one stop at a time shows the blobs becoming more uniformly round, with the 11-bladed diaphragm system mostly keeping out of the way and avoiding obvious geometric shapes.
As a quick comparison, here’s the Sigma on the left and the Sony GM II on the right, both at 70mm f2.8 and from their closest focusing distances. The Sony can focus a little closer from 30cm at this focal length, in-turn delivering slightly larger blobs, and you’ll also notice its rendering style has crisper edges. There’s no right way here, just different approaches, so you have a preference?
And before moving-on, here’s both lenses at 24mm f2.8, again from their closest focusing distances, but this time it’s the Sigma on the left that can focus closer to an impressive 17cm compared to 21cm on the Sony.

At the other end of the aperture range, here’s a shot with the Sigma at 24mm f22, to show its potential for sunstars. The spikes are nicer and crisp, although notice the faint circular flare when I’m pointed directly at the Sun.
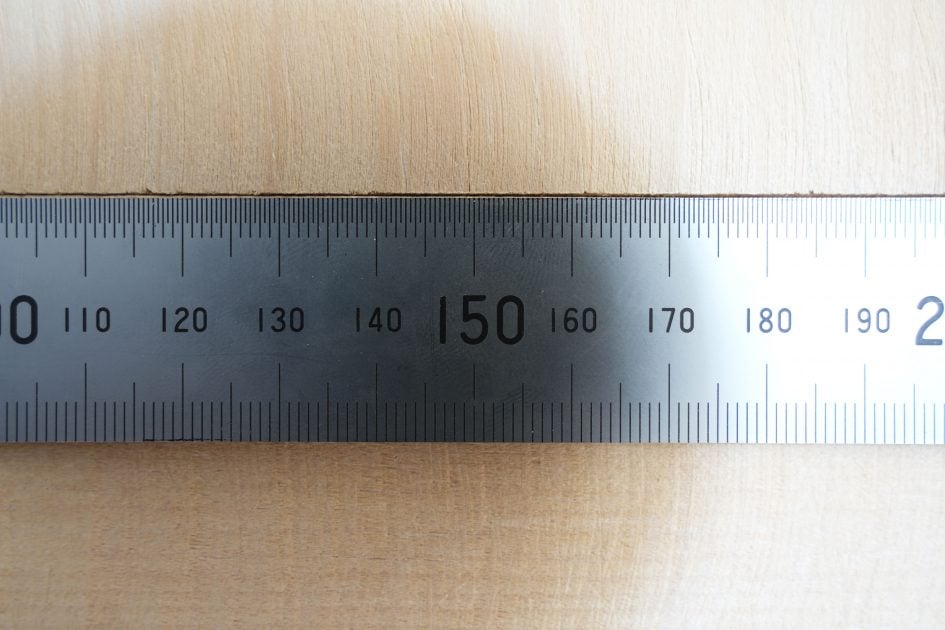
My final test is for macro capabilities, focusing as close to a ruler as the lens would allow, first at 24mm where the 17cm minimum distance means your subject will be around 2cm from the very front of the lens. Inevitably it’s cast shadows here, but the result at f8 is impressive, delivering 97mm across the frame.
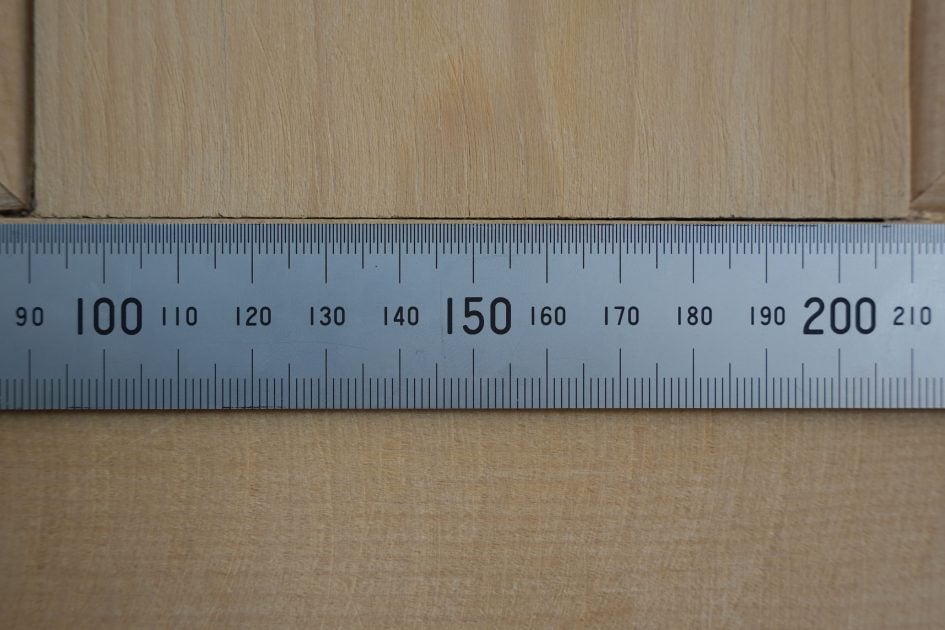
And now for the lens at 70mm, from the minimum distance of 34cm where it’s delivering slightly reduced magnification with 128mm across the frame. Note from these closest distances the details become soft at the edges at larger apertures, so you’ll want to close-down for the best results. Both my ruler images were taken at f8, but if your subject keeps away from the edges you could get away with larger apertures.
Check prices on the Sigma 24-70mm f2.8 DG DN II Art at B&H, Adorama, WEX UK or Calumet.de. Alternatively get yourself a copy of my In Camera book, an official Cameralabs T-shirt or mug, or treat me to a coffee! Thanks!


