 The Lumix GF7 is Panasonic's latest entry-level mirrorless camera, and like other Lumix G models, employs the established Micro Four Thirds standard and a 16 Megapixel sensor. Like its predecessor, the highlight is a tilting screen which can fold back to face the subject for selfies. Panasonic's had fun thinking of new ways to enhance the selfie experience with a selection of filters, a buddy mode that recognizes when two faces are close, and Jump Snap which cleverly exploits the accelerometer in your smartphone to trigger the shutter as you leap into the air.
Panasonic Lumix GF7 review
-
-
Written by Ken McMahon
Intro
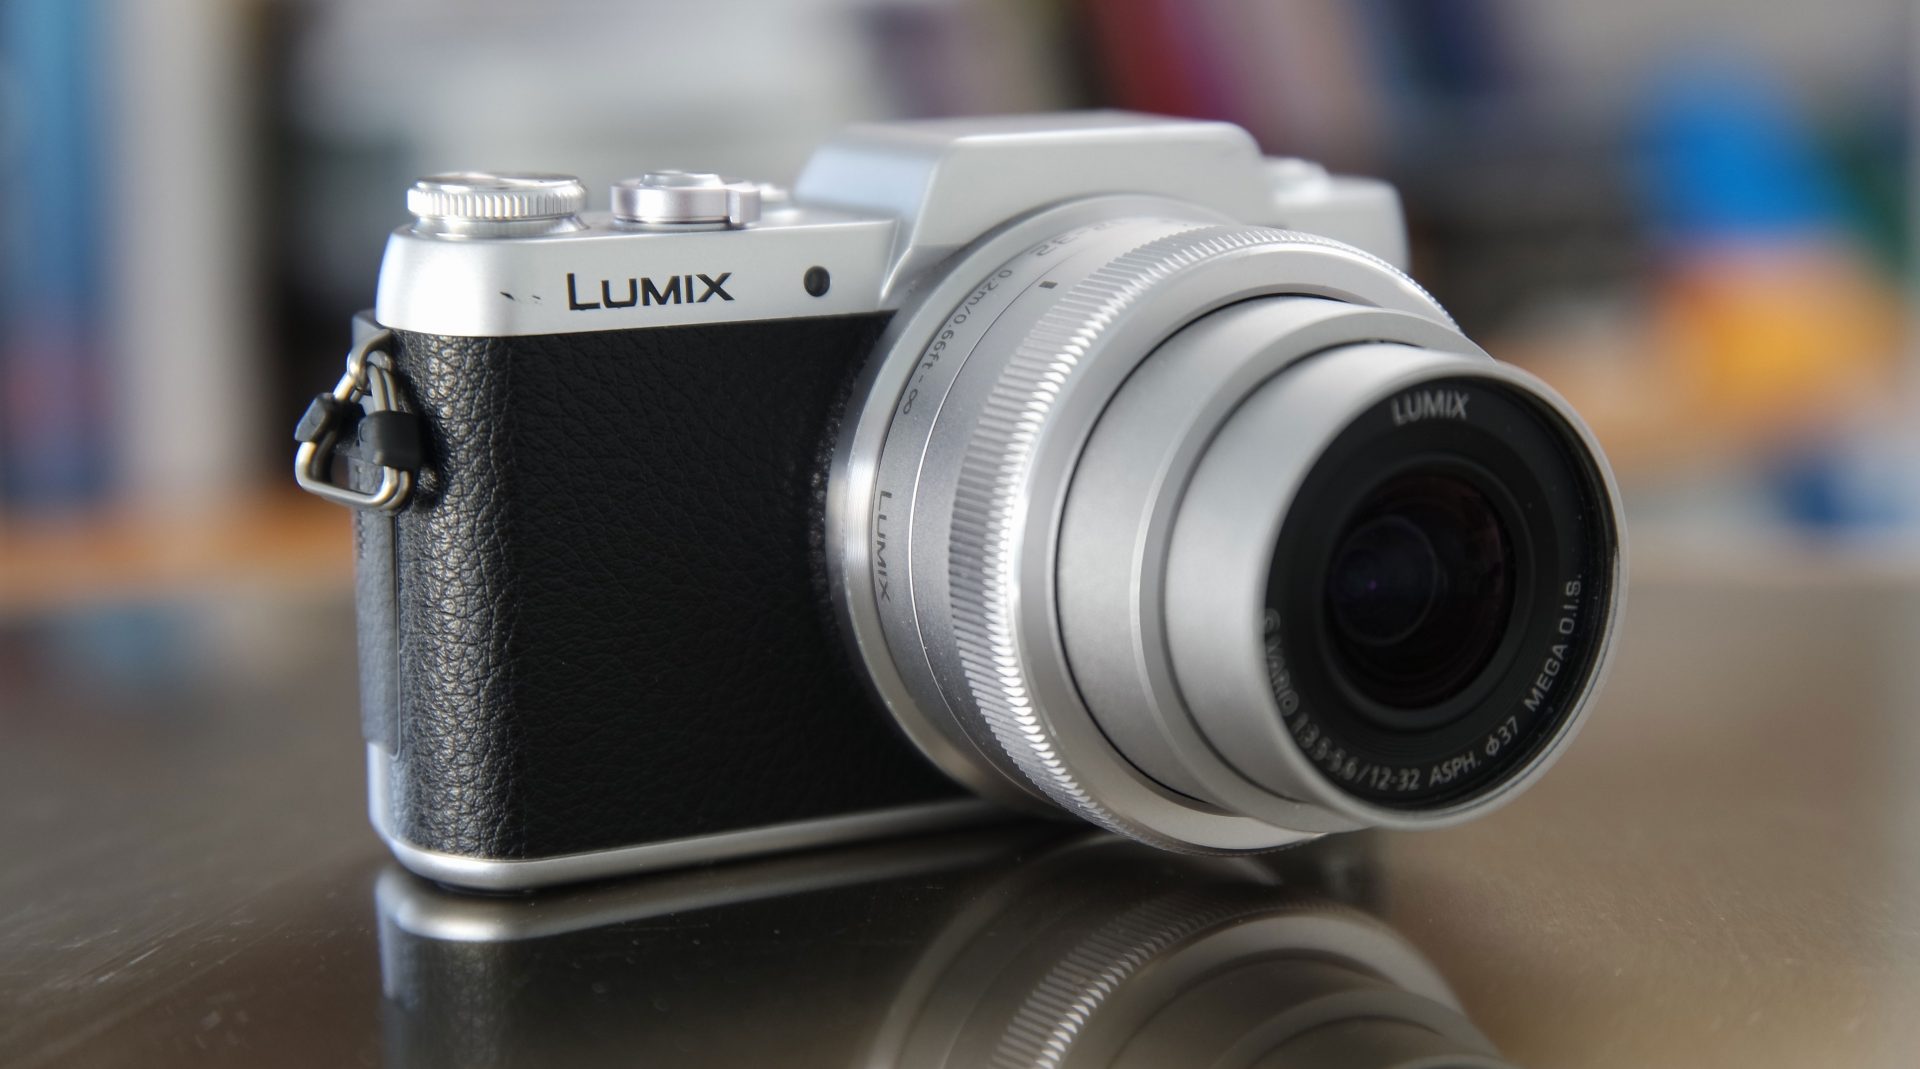
The Lumix GF7 is Panasonic’s latest entry-level mirrorless camera, and like other Lumix G models, employs the established Micro Four Thirds standard and a 16 Megapixel sensor. Announced in January 2015, it comes almost two years after its predecessor, the Lumix GF6, although the older model will remain on sale while stocks last.
Like its predecessor, the major feature of the GF7 is its tilting screen which can fold forwards to face the subject for selfies. Once folded out, the GF7 switches into Self Shot mode, making it easy to grab photos of yourself, with new optional slimming, defocusing and smooth skin filters. Panasonic’s also had fun thinking of ways to enhance the selfie experience. A new Buddy mode recognizes when two faces are close to each other, and the fun Jump Snap mode cleverly exploits the accelerometer in your smartphone to trigger the shutter as you leap into the air. As before, the hinge for the screen is at the top, that and the built-in flash is what the bulge on top of the body accommodates – sadly it’s not an EVF. If you want an EVF in a small Lumix G camera, you should go for the GM5.
Movies have been upgraded to support 1080 / 50p / 60p, the autofocus which previously worked down to -3EV now works under even darker conditions at an industry-leading -4EV, and continuous shooting has been boosted a little to 5.8fps, or 5fps with AF tracking. There’s also focus peaking, built-in Wifi (but no NFC), and a casual snapshot movie mode which shoots and assembles very short clips. The GF7 is available in silver or brown and in my review I’ll help you decide what’ll be the best entry-level mirrorless camera for you! Thanks to Eve Franklin, the anonymous Truro couple and Ben Talbot-Imber for the selfie shots.

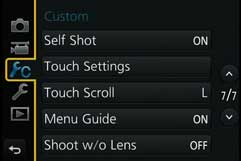
Lumix GF7 design and controls
The Lumix GF7 has undergone a complete makeover and in terms of external styling has very little in common with its predecessor. The one thing they do share is the flip up forward-facing screen introduced on the Lumix GF6, but even that’s changed, as we’ll see in a moment. The new model is substantially smaller and lighter and has lost the curves of its predecessor. The hump that houses the flash (and provides a pivot point for the screen) gives it the appearance of a mini-SLR. It’s undeniably cute and a little bit retro, but it doesn’t reference the golden days of analogue rangefinder models the way the Olympus PEN E-PL7 does.
 |
Measuring 107x 65×33.3mm and with the body weighing 266 grams with battery, the Lumix GF7 will fit comfortably in a bag or coat pocket. It’s significantly smaller and lighter than both the PEN E-PL7 and the Samsung NX3000; the latter not only having a bigger body, but larger lenses demanded by its APS-C sensor. The PEN E-PL7 on the other hand is the heaviest of the three at 357g, it too will fit in a coat pocket, but it feels a little like you’re carring a small brick around.
A smaller body makes the GF7 more portable, but it’s not as comfortable and doesn’t feel as secure in your hands as the PEN E-PL7 or the Samsung NX3000. It feels more like a generously proportioned compact than an interchangeable lens system camera and the flat front surface, while textured, isn’t particularly easy to hold on to, lacking the moulded grip provided on the other models.
The smallish mode dial is positioned on the right corner and needs both your thumb and index finger to change position, though on the plus side it’s not going to happen by accident. The on/off switch is a two-position collar around the shutter release – an arrangement I quickly grew to like – and there’s one other button on the top right to switch into intelligent Auto mode. On the other side of the hump there’s a programmable function button that by default turns on the Wifi (or fires the shutter in self shot mode). The dedicated movie record button is handily positioned for your right thumb and to the right of it, just above the screen is a small sliding switch to pop-up the flash.
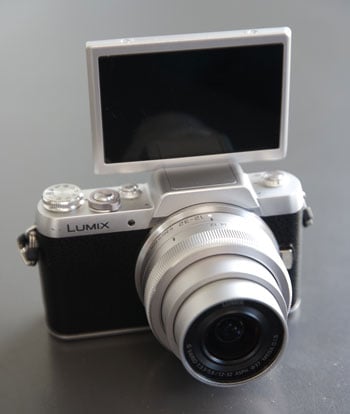 |
The GF7’s screen is hinged at the top which means it can fold up and over into a forward-facing position for selfies. The GF7 is first and foremost a selfie camera, so if selfies aren’t your thing much of what it has to offer might be wasted. Panasonic introduced selfie shooting features for the forward-facing screen on the GF6 and has expanded and improved them on the GF7, I’ll explain how they work in more detail in the Shooting Experience section below.
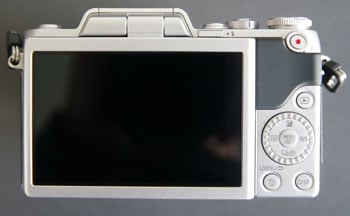
As before the screen measures 3 inches diagonally, has a 1040k dot resolution and is touch-sensitive. It displays a bright punchy image that’s viewable even at quite wide angles horizontally and vertically. It’s 3:2 proportioned which means full resolution stills, which are 4:3, are displayed with narrow black bands down either side and when you shoot movies there are black bands top and bottom. The PEN E-PL7’s active screen area is the same size and proportions and the same goes for the Samsung NX300 except that its APC-C sensor produces 3:2 proportioned images which fill the entire area of the screen.
Finally, I ought to point out that in one respect the Lumix GF7’s screen is a step backwards from the GF6 in that it can only fold up, not down. That means that, unlike the double-hinged PEN E-PL7 you can’t fold the screen down for overhead shots, for example when in a concert crowd. This isn’t as much of a drawback as you might imagine though, as you can always achieve the same effect by turning the camera upside down and using your thumb to press the shutter release.
The Lumix GF7 has a built in flash that pops-up and forward when you slide a small mechanical switch on the rear panel. As it’s forward of the screen hinge you can use the flash even when the screen is in the forward-facing position, though it does obscure the lower section. The flash has a Guide Number of 5.6 at 200 ISO, giving it a maximum range of 1.6 Metres; easily powerful enough for selfies at arms length and for other reasonably close subjects.
The flash can be forced on or off, or fired automatically when the conditions require it and has slow sync and red-eye reduction modes. The PEN E-PL7 is supplied with an accessory flash that fits into the camera’s hot shoe. It might be a little less convenient, but it’s more powerful with a guide number of 10 at 200 ISO. The E-PL7 also has the advantage of being able to accommodate even more powerful flash units as well as other accessories, such as a choice of electronic viefinders, an external mic and macro lighting in its AP2 accessory port. Like the E-PL7, the The Samsung NX300 has a hotshoe and comes with an accessory flash in the box. So while it has a built-in flash the lack of a hot shoe puts the Lumix GF7 at a disadvantage compared with the PEN E-PL7 and the Samsung NX3000.
The Lumix GF7’s battery last for 230 shots (with the H-FS12032 kit lens), which is on the low side compared with the PEN E-PL7 (350 shots) and the Samsung NX3000 (370 shots). To be fair, both of those models have bigger heavier batteries, so the GF7’s poor battery life is the price you pay for portability. That said, for anything other than casual shooting you might want to think about carrying a spare. The battery is charged outside the camera using the AC mains charger provided.
A combined USB / A/V out port and an HDMI port are situated behind a door on the right side of the Lumix GF7 providing a couple of ways to connect the camera to a TV. Apart from a USB data cable, there’s no cable included in the box, but then there probably aren’t that many people that will want to connect the GF7 to a TV given the other options available for transferring photos.
Lumix GF7 lens and stabilisation
The Lumix GF7 is available as a kit with Panasonic’s compact 12-32mm f3.5-5.6 zoom lens. This provides an equivalent field of view to a 24-64mm zoom on a full-frame 35mm camera – just multiply by two for the equivalent coverage. That’s a wider angle than you get with the Olympus kit zoom which starts at 28mm (equivalent) but has a slightly longer 84mm (equivalent) telephoto. The 1.6x field reduction on the NX3000 gives it’s kit lens a 35mm equivalent range of 25-75mm.
Lumix GF7 with 12-32mm wide | Lumix GF7 with 12-32mm tele |
 |  |
| 12-32mm at 12mm (24mm equiv) | 12-32mm at 32mm (64mm equiv) |
Above you can see the coverage of the 12-32mm lens which provides great wide angle coverage that will allow you to fit more in than the Olympus 14-42mm. The payback for that is that the maximum telephoto focal length is significantly shorter – in 35mm terms only 64mm compared with 84mm on the Olympus lens. There are two consequences there, the obvious one is that you can’t get quite so close to the action when zooming in. The shorter focal length also makes it more difficult to produce blurred backgrounds for portraits. All three of these lenses have a maximum aperture of f3.5 closing to f5.6 at the maximum telephoto range.
The Lumix kit lens is incredibly light and measures a mere 24mm in length with a diameter of 55.5mm, making it slightly narrower than the GF7’s mount. It has a collapsing design that must be extended for use. There’s no lock, you simply give the zoom ring, which is located at the front, a firm twist and an inner barrel pops out, roughly by the same amount again; the zoom ring then starts at 12mm and rotates round to 32mm.
You can twist the zoom ring on the Lumix 12-32mm kit lens very quickly and arrive at the longest focal length (or any other) in under a second. The 14-42mm f3.5-5.6 EZ pancake lens supplied with the PEN E-PL7 is also very short at 24mm and unlike the Lumix 12-32mm, but its electronically coupled zoom takes a little longer to zoom the full extent and grab a shot.
Optical physics demands that cameras with APS-C sensors need bigger lenses than models equipped with the smaller Micro Four Thirds sensor. But Samsung has managed to keep its 16-50mm incredibly compact at 30mm long x 65mm in diameter. Like the Olympus kit lens its zoom is electronically actuated so takes a little longer than the physically coupled zoom of the Lumix.
The Micro Four Thirds mount gives the Lumix GF7 access to the broadest native lens catalogue of any mirrorless system – and of course multiple third party lenses via adapters; that’s also true of the Olympus PEN E-PL7. That said, the 12-32mm is such a good match for the GF7 that it’s fair to believe many owners will rarely if ever remove it.
The Lumix 12-32mm f3.5-5.6 features Panasonic’s Mega O.I.S images stabilisation. To put it to the test I zoomed it into its longest focal length and took a series of photos with and without stabilisation enabled at progressively slower shutter speeds.
Panasonic Lumix GF7 Mega O.I.S: Off / Normal | ||||
 |  | |||
100% crop , 12-32mm at 32mm, 200 ISO, 1/8, O.I.S off. | 100% crop , 12-32mm at 32mm, 200 ISO, 1/8, O.I.S Normal. | |||
As you can see from the 100 percent crops above, enabling stabilisation allowed me to handhold a sharp result at 1/8, which means the system was delivering three stops of compensation. This isn’t as great as some of the systems I’ve tested, but a factor in successful handholding is without a doubt how easily you can hold the camera body steady to start with – and in this respect the GF7’s small dimensions and light weight don’t do it any favours. That said, the 12-32mm was good for three stops of compensation in my tests which is still very useful to have.
Lumix GF7 movie modes
Set the Lumix GF7 to AVCHD encoding and you can choose from 1080 at 60p, 60i, or 30p for NTSC regions, or 50p, 50i, or 25p for PAL regions. The interlaced modes are encoded at 17Mbit/s with the 60p / 50p and 30p / 25p modes encoded at 28Mbit/s and 24Mbit/s respectively. Regardless of region you can alternatively choose a 1080 / 24p option at 24Mbit/s.
Alternatively the Lumix GF7 can encode videos in the MP4 format for easier editing, with the choice of 1080 / 60p / 50p at 28Mbit/s, 1080 / 30p / 25p at 20Mbit/s, 720 / 30p / 25p at 10Mbit/s, or VGA 30p / 25p at 4Mbit/s. Again those frame rates are region dependent. Audio is recorded using built-in stereo microphones on the upper surface and it’s possible to set the recording levels manually if desired, and if you like, also display mini peak level meters in the corner of the screen.
Like earlier models, the Lumix GF7 offers the choice of single or continuous AF modes, along with the option to pull-focus by simply tapping the subject on the touch-screen. New to the GF7 is focus peaking, which surrounds subjects that are in focus with a coloured fringe. This makes it much easier to manually focus as you’ll know exactly when to stop adjusting the focus as third subject becomes highlighted. Though the kit lens lacks a focus ring, manual focussing using screen crontrols in combination with the peaking feature proved suprisingly effective.
Not unexpectedly, the Lumix GF7 doesn’t provide manual control over exposure for movies. Regardless of the mode dial position movies are recorded with the exposure and sensitivity set automatically. Panasonic has instead opted for a user-friendly snap movie feature which records a short clip of between two and eight seconds in length. With snap movies you can set up a focus pull in advance tapping the screen to define the start and end focus positions, which is pretty neat. You can also add a monochrome to colour fade in our out effect, which is nice, but a simple exposure fade might have been more useful.
Snap movie isn’t as consumer friendly as the Hybrid Auto mode on Canon compacts which takes a short clip prior to each still shot and assembles them all into one movie, but it’s a step in the right direction and a good fit on a camera aimed a selfie shooters.
| |
|---|---|
| |
|
| |
|---|---|
| |
|
| |
|---|---|
| |
|
| |
|---|---|
| |
|
| |
|---|---|
| |
|
| |
|---|---|
| |
|
Lumix GF7 shooting Experience
The Lumix GF7 is a quick starter, with the kit lens already exended you can fire off a shot in well under a second after turning it on. Despite its selfie shooter characterization, it offers the same sophisticated AF features as the more ‘serious’ models in the Lumix G line-up.
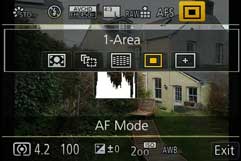
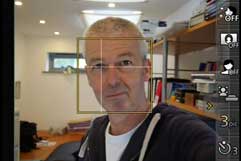
The GF7’s low light performance is exceptionally good on paper, functioning in lighting situations down to -4EV (compared with -3 on the GF6) and in practice it lives up to that promise, quickly and seemingly effortlessly locking onto subjects indoors in low light as well as at night. It has five AF-Area modes including 23 Area, a single area mode that’s adjustable, pinpoint, subject tracking and Face / Eye detection. Face / Eye detection is automatically enabled when you flip the screen forward to enable self shot mode and defaults to the 23 area mode if there are no faces in the frame.
There’s also manual focus aided by focus peaking, a feature that Panasonic has rolled out on all of its recent Lumix G models including the GX7, G6, GH4, GM1 and GM5. Focus peaking works for movie as well as stills shooting and takes the guesswork out of manual focussing, particularly in low light. The only downside of manually focussing with the GF6 is the 12-32mm kit lens lacks a focus ring. Though manual focussing using the touch-screen slider is easier than you might think, you can’t beat a physical lens focus ring. Of course if you like to focus manually, there’s nothing to stop you fitting a different lens.
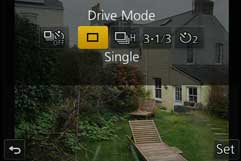
The Lumix GF7 offers fairly respectable, by compact system camera standards, full resolution continuous shooting modes with a top speed of 5.8 frames per second with the focus fixed on the first frame. If you want continuous autofocus that figure drops slightly to 5fps. Both of those modes operate using the GF7’s mechanical shutter, but there’s a 40fps option using the electronic shutter. The downside of that is, depending on your subject you might experience rolling shutter distortion of moving subjects plus you can’t see what you’re shooting as the screen goes blank.
The mechanical shutter modes are limited to a 7-frame burst for RAW images, but Panasonic claims that for JPEGs the only limit is the capacity of your memory card. I managed a burst of 40 Fine JPEGs at a speed of 5.6fps before the GF7 slowed slightly and became a little erratic. In RAW mode The GF7 fired an 8 frame burst at exactly 5fps before slowing to around two frames per second.
As you’d expect, the Lumix GF7 mode dial offers PASM shooting in addition to a range of feature modes. There are dedicated positions on the mode dial for portraits, kids, and scenery, followed by a SCN button for choosing from a wider range of scene modes. Filters and effects, which I’ll talk more about a little later, are available in Creative Control mode and finally there’s Panorama shot mode.
The GF7 also has an intelligent Auto mode, which uses scene detection to set the optimal exposure, but rather than include it on the mode dial it can be activated regardless of the current shooting mode by pressing a button on the top panel behind the shutter release.
 |  |  |
 |  |  |
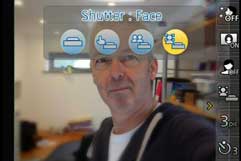
But what sets the Lumix GF7 apart from most other compact system cameras is its Self shot mode; designed to make selfie shooting that much simpler, Self shot mode is initiated when you flip the screen up into the forward-facing position. In addition to flipping the preview so you get a right-way up mirror image of yourself, face detect AF mode is activated and a column of touch icons is displayed on the right side of the screen providing selfie features like skin softening, background defocus and slimming mode. Tap one and some more buttons appear on screen so you can set the level. For example you can set the slimming mode to off, opt for moderate slimming, or really suck it in with the slimming mode set to high.
|

It’s not just about changing your appearance, the Lumix GF7 offers some novel ways to release the shutter in addition to the traditional methods of pressing the shutter release or tapping the screen. Buddy mode automatically takes a shot when there are two faces close together in the frame and in Face mode you can release the shutter by passing your hand across your face to hide it momentarily, then removing it.
| |||
| In practice, both Face and Buddy mode work pretty well, though they’re not infallible and on rare occasions you can find yourself waving frantically in front of your face, or knocking heads togeher to no avail. Most of the time though it works first time and it’s surprising how much easier it is to hold the camera and frame a shot without having to worry about pressing the shutter release. There’s one final selfie mode that takes a shot without you even having to think about it. Jump snap uses the accelerometer in your phone to fire the shutter when you’re at the peak of a jump. To use it you need to link your phone to camera via wifi and run the Panasonic imaging app, there’s more about how that works in the next section. Jump snap actually works, as you can see in the example below. It’s great fun and a really clever and imaginative way of combining phone and camera technology to produce superb results. |

 |  |  |
 |  |  |
The self shot features work independently of the shooting mode, so if you want to shoot selfies in Manual mode, or with filters that’s fine. You can’t set self timer or continuous shooting mode, but self shot has its own programmable delay timer and you can also choose the number of shots to take, up to a maximum of four.
The Lumix GF7 isn’t the only compact system camera with a forward facing screen and features aimed at selfie shooters, but from my experience with it I’d say it not only offers more than the PEN E-PL7 and Samsung NX300, but makes the whole process simpler and a lot more fun.
Panasonic quickly built a reputation for reliable and versatile wifi features in its earlier models and with the GF7 it takes remote control and image sharing to new levels. The Lumix GF7 has built-in Wifi, but unusually for a Panasonic model, no NFC chip, so you can’t connect to an NFC equipped smartphone by tapping the two devices together. That said making a connection isn’t all that difficult without it. Having pressed the Fn1 button (which is also labelled Wifi) you can simply connect to the GF7’s SSID in the usual way from your phone settings or you can do it by scanning a QR code displayed on the camera’s screen using the Pansonic Image App. Once connected, you’re given the option of remote operation or image transfer.
You have as much control over the GF7 using your smartphone as you are ever likely to want. About the only thing you can’t do is change the shooting mode as it’s hard wired on the Mode dial. You can shoot remotely in pretty much any mode, the only exception being Panoramas. The remote app also doesn’t function when the screen is flipped forward and the camera is in self shot mode. That’s a bit of problem as, though you get a preview on your phone screen, you’re likely to want to be looking at the camera if you’re self-shooting. There’s an easy way round that problem though and that’s simply to turn off self shot from the menu, then when you flip the screen forward it still flips the image but the self shot features and icons aren’t activated and you can control the camera remotely.
 | 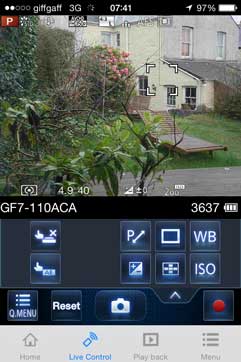 |  |
The app Q.menu lets you set most of the same functions you can on the camera including the focus and metering modes; you can also apply filters even when the mode dial isn’t in the Creative control position. There’s full exposure control, depending on the mode, as well as white balance, ISO sensitivity and exposure compensation. You can select the AF area mode and of course position it by tapping the preview and you can also tap to set the exposure independently of the focus area.
Though you can’t use the self shot features from your phone, you can of course simply use the app as a remote trigger, but Panasonic has introduced something new, designed to help you excel at one of the most popular selfie sub-genres – the jump shot. Jump snap, as it’s called, uses the accelerometer in your smartphone to fire the shutter just when you reach the peak of your jump.
There are six sensitivity settings from Off to 5 (high) with best results being achieved in the middle of the range. I tested it with the phone in my hand as well as in my pocket and I must admit I was surprised at just how often the GF7 managed to catch me at the peak of my jump. It’s a great feature and gives the GF7 a real edge over other selfie-styled system cameras.
|

You can also use a connected phone or tablet to quickly browse the images in your camera on their bigger screens without having to copy them over first. To maintain a responsive experience which feels like the images are stored locally on your phone or tablet, the camera sends a lower resolution version. So you can pinch to zoom-in a little, but not as much as if you were viewing the original. But when you see an image you like, just press and hold it on-screen for a second and the Lumix Image app will let you save the original to your device or start uploading it to one of the social, sharing or storage services installed on your device.
You can configure the app to provide shortcuts to two or three of your most used services which could include Dropbox and Instagram in addition to the more usual suspects. Or of course once the image is copied into your device, you could just exit the Panasonic app and handle it direct from whichever sharing or storage app you like via your phone’s gallery.
You can also choose whether to copy images in their original resolution, or in one of two smaller versions. It typically took about eight seconds to copy an original JPEG from the camera to my iPhone 4s from a distance of about 1m; it’s not possible to copy RAW files though.
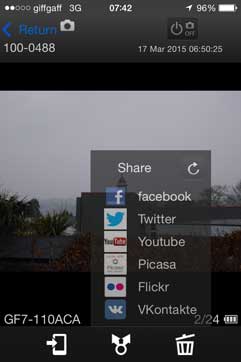
The Lumix GF7 can also upload images directly to the internet by itself via a suitable Wifi connection. You can upload directly to Facebook, Twitter, Picasa, Youtube, Flickr, but there’s two gotchas. The first is the camera doesn’t have any kind of built-in browser to accept the terms and conditions of public hotspots, so you’ll mostly be using home or office-based Wifi. To be fair though, the only cameras I can think of which do have a browser to accept terms and conditions are Sony’s Wifi-equipped models. The second problem is before letting you upload anything directly from the camera you’ll first need to register for Panasonic’s free Lumix Club.
To be fair, the approach is not dissimilar to the way most other manufacturers implement direct uploads, but this side of sharing images is just so much easier and flexible using a smartphone or tablet. For me it makes more sense to just use Wifi to copy the image from the camera to a more capable device and upload from there instead.
There’s no GPS built-into the Lumix GF7, but the Lumix Image app can be set up to record a GPS log with your phone that can later be synced with the camera. The camera and phone don’t need to be in Wifi contact while you’re taking photos, only during the initial time sync and final data transfer. The only thing you need to remember is to take the phone with you and try to ensure it has a relatively clear view of the sky for successful GPS acquisition.
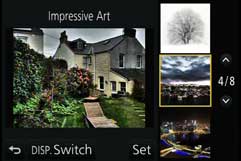
Switch the GF7’s mode dial to the Creative control position and you can choose from one of the 22 effects filters that are now standard on most Lumix Compacts. No fewer than four of the filters are monochrome variations – Monochrome, Rough Monochrome, Silky monochrome and Dynamic monochrome give you the choice of four ways to produce in-camera black and white effects. Other options include Old days, Toy pop, Bleach bypass, Fantasy and sunshine. Below you can see the Sepia, Silky monochrome, Impressive art, Cross process, Toy pop, and One point colour.
 |  |  |
 |  |  |
Most of the effects can be adjusted in some way, usually by means of a slider to adjust colour, or in the case of the black and white filters, tonal reproduction, contrast or graininess. Plus you can use most of the Creative effects filters with video, the only ones not available are Rough monochrome, Silky monochrome, Soft focus, Star filter and Sunshine.
All in all, the Lumix GF7 provides a very well balanced mix of ease of use and selfie features, while managing to maintain the sophistication that progressing photographers will be looking for. Aside from the poor battery life, there are a couple of omissions that will doubtless come as a disappointment to some. The lack of a viewfinder of any kind, or the means to attach one will rule it out if you prefer to compose with a viewfinder rather than a screen. That said, more and more people are coming to compact system cameras who have only ever known phone photography previously, so maybe that’s not so much of an issue.
The Lumix GF7 also lacks a hot shoe, so you can’t plug in an external flash or other accessories. Again, in the market this model is aimed at that’s unlikely to be a deal-breaker and the upside is a very compact, lightweight and pocketable form factor.


