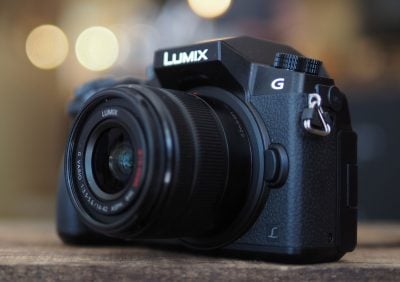
 The Lumix G7 is a very capable mid-range camera that should be considered by anyone wanting a step-up from budget models, whether DSLR or mirrorless. It has well thought-out controls, a large and detailed electronic viewfinder and the flexibility of a fully-articulated touch-screen. It's responsive, focusing quickly even in low light and firing-off bursts up to 8fps at the full resolution. It's feature-packed with built-in Wifi, timelapse, silent shooting up to 1/16000, and up to seven-frame bracketing. It's innovative with 4k video allowing you to capture movies with four times the detail of 1080p, and the chance to grab 8 Megapixel photos from footage at 30fps. Plus as a Micro Four Thirds camera, it enjoys access to the broadest range of native mirrorless lenses. In all these respects it takes the baton of the earlier G6 and runs with it, making it one of the best mid-range cameras around, and one which even treads on the toes of higher-end models. Indeed for many, the video capabilities approach that of the flagship GH4, making it an ideal budget option for film-makers or a backup body for B-roll. It's a lot of camera for the money.
Panasonic Lumix G7 review
In depth
Panasonic’s Lumix G7 is a mid-range mirrorless system camera that’s based on the Micro Four Thirds standard. Announced in May 2015 it replaces the two year old Lumix G6, slotting between the existing GF7 and GH4. This also places it roughly in-line with the GX7, although in a different form-factor designed for those who prefer the traditional DSLR-styled shape, and also with a number of key upgrades over that model.
Like all recent Lumix G cameras, the G7 employs a 16 Megapixel sensor (the same sensor as GX7, GM5 and GF7) and contrast-based AF system, enhanced by Panasonic’s DFD (depth-by-defocus) technology which aids continuous AF by profiling the out-of-focus characteristics of Panasonic lenses. Burst shooting has accelerated to 8fps or 6fps with continuous AF, versus 7 or 5fps on the earlier G6. The new electronic shutter option also allows the camera to shoot in silence at shutter speeds up to 1/16000, beyond the 1/4000 fastest mechanical shutter – this is great for shooting at large apertures in bright conditions.
Movies are always important to Panasonic, so it’s no surprise to learn the G7 becomes the company’s latest camera to support 4k video (UHD at 24, 25 or 30p) in addition to 1080p at up to 60p. As with earlier 4k Lumix cameras, the G7 makes it easy to grab 8 Megapixel still photos from video, effectively giving you 30fps burst shooting. It all adds up to one of the best-featured mid-range cameras around, but does it make it one of the best in practice? Find out in my in-depth review where I’ve compared its quality and handling against rival mirrorless and DSLR cameras, paying particular attention to differences with the flagship Lumix GH4!
Panasonic Lumix G7 video overview
Panasonic Lumix G7 design and controls
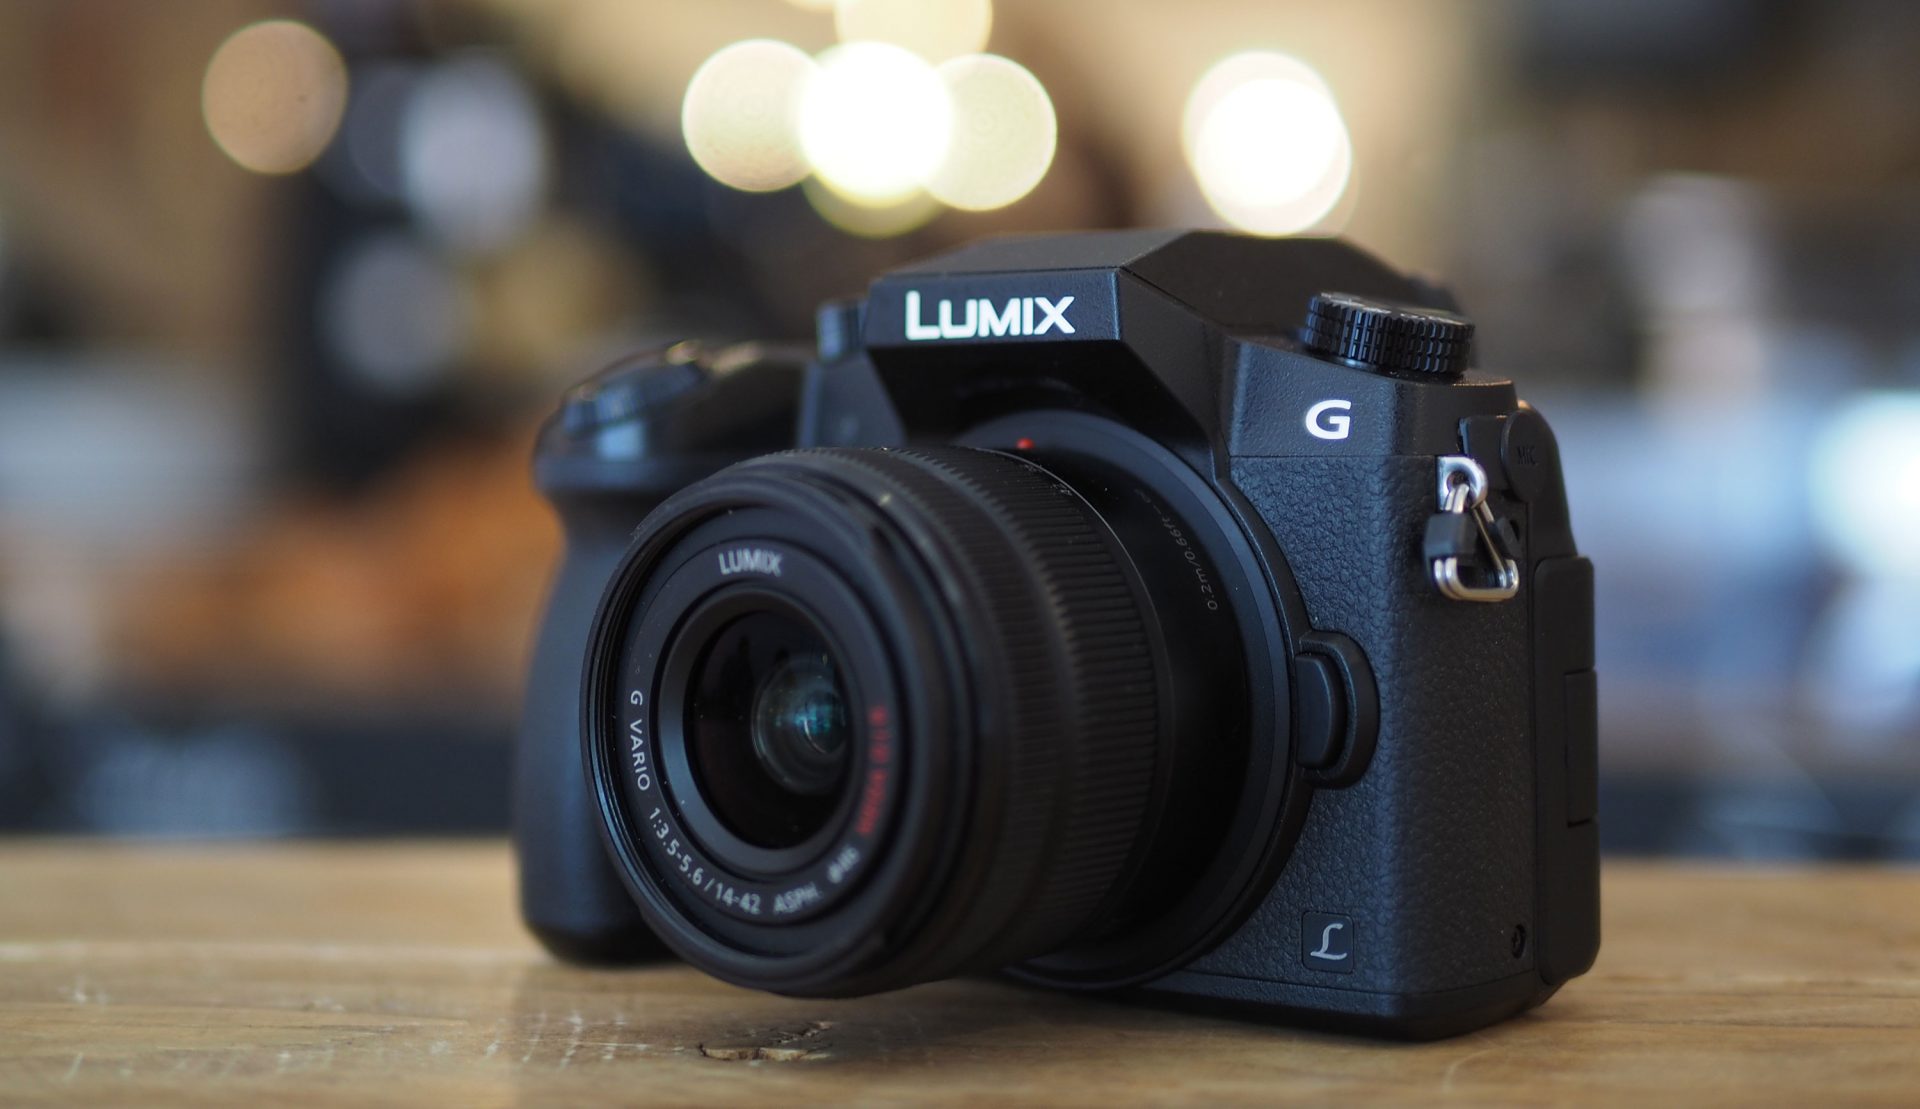
The Lumix G7 is a mid-sized mirrorless camera with a viewfinder hump above the lens mount. Like earlier single-digit G-series models, it’s styled like a mini DSLR, although the organic curves of the previous G6 have been switched for a more angular appearance and there’s changes to the controls I’ll cover in a moment.
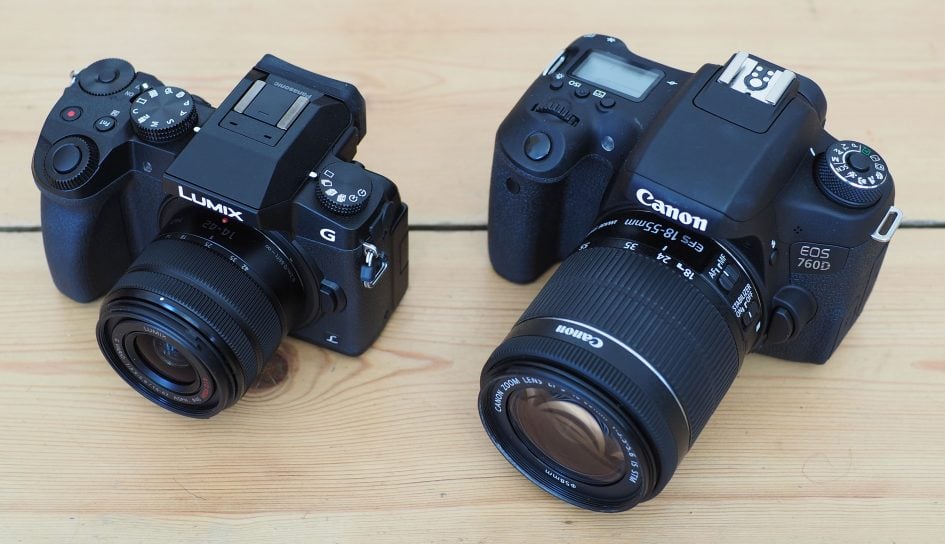
Measuring 125x86x77mm and weighing 410g with battery, it’s roughly the same width and height as the Olympus OMD EM5 II, although a little lighter and thicker thanks to a chunkier grip. In mirrorless terms, the flat-topped Sony A6000 is more compact at 120x67x45mm and lighter too at 344g with battery, although the G7 is still comfortably smaller and lighter than most DSLRs.
In terms of specification and price it goes up against models like Nikon’s D5500 (124x97x70mm / 470g) and Canon’s EOS 750D / T6i (132x101x78mm / 555g). Add their respective kit zooms and the differences become even greater, especially for Canon who’s EF-S 18-55mm STM doesn’t collapse to save space. I’ve pictured the Lumix G7 alongside the EOS 760D / T6s below and the difference in height and depth (with lenses) is quite dramatic. Note the smallest of the bunch remains the Sony with its particularly compact kit zoom, although in my tests I’ve found the Sony kit zoom to be the worst performer of its rivals, becoming quite soft in the corners. I’m pleased however to report the Lumix 14-42mm kit zoom, pictured on the G7 below, performs very well for its size.
Like its predecessor the G7 offers a generous grip with plenty to wrap your fingers around – indeed much more than most mirrorless cameras of its class. Like the G6 before it, the light but mid-sized body gives the G7 a less dense feeling in your hands compared to models from Sony and especially Olympus, but it’s still a solid and well-built camera. There’s no battery grip option, and at this price-point neither the G7 nor any comparably priced rivals can claim weather-sealing either – for example, the Olympus OMD EM5 II costs over 50% more than the G7.
In terms of controls, Panasonic has made quite a few changes on the Lumix G7 compared to the G6. For starters, there’s a new dedicated drive mode dial on the top panel, to the left of the viewfinder hump; this lets you easily switch between single, continuous, 4K Photo, bracketing, self timer or timelapse drive modes. The camera’s more customisable too with 11 custom function buttons (six physical and five soft versus five and two on the G6), and each of the G7’s function buttons can be configured from no less than 14 pages of options.
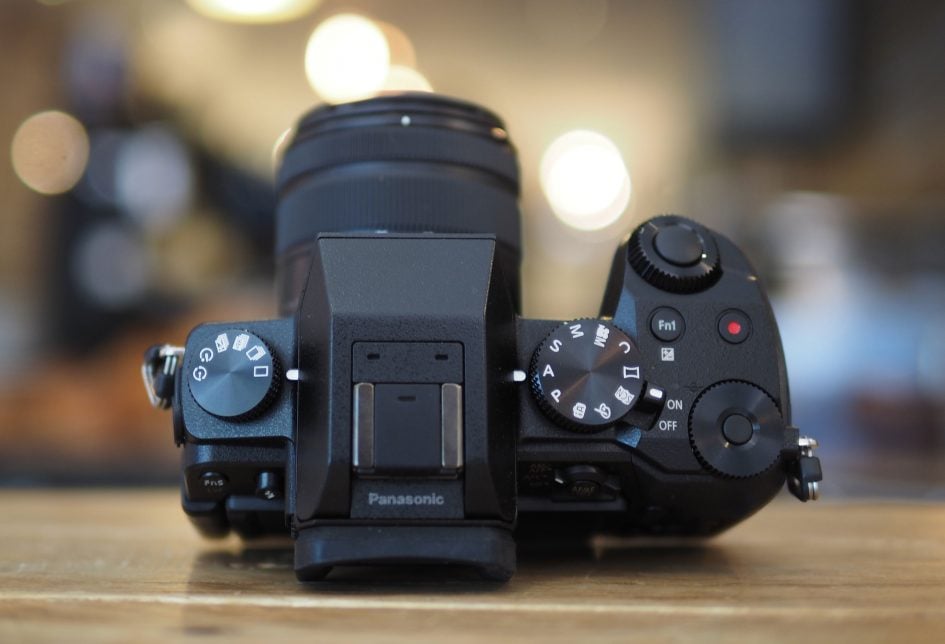
Arguably the biggest change from a usage point-of-view though are the control wheels. The earlier G6 had a thumb dial which could be clicked-in to change its function, along with a rocker control under your index finger which could also operate power zooms. Now the G7 has become more traditional with two control dials, one around the shutter release at the front for your index finger and one at the rear for your thumb (with one of the custom function buttons in the middle). Like the Olympus OMD EM5 II, the twin dials have been carefully positioned to allow easy adjustment of either even when holding the camera with one hand. For me this isn’t possible with either the Canon EOS 750D / T6i or Nikon D5500, and is tricky with the Sony A6000. Ultimately I feel the OMD EM5 II’s chunkier dials are more tactile, but it’s a higher-end camera; for its price point, the G7’s dials work very well. Do I miss the G6’s rocker control? Not really as I rarely used any of the Power Zoom lenses and they don’t seem to be promoted in many bundles anymore.
I do however feel Panasonic could have made its various buttons larger or travel further. As it stands, they’re all quite small and give minimal feedback when pushed. The body is certainly large enough to accommodate larger buttons. It is of course personal but I don’t see why so many cameras employ tiny buttons when there’s room for larger ones that are easier and more comfortable to operate.
Like other single-digit G models, the G7 is equipped with an electronic viewfinder and a fully-articulated touchscreen for composition. Like the G6 before it, I’m pleased to report the G7 has stuck with an OLED panel, although while the magnification remains 0.7x, the resolution has been upgraded from 1440k dot (800×600) to 2360k dot (1024×768). This means the G7 shares the same panel technology and resolution as the flagship GH4; indeed Panasonic told me the G7 viewfinder was the same as the GH4, although the official specs quote the GH4 magnification as fractionally lower. The 2360k dot resolution is also a key benefit the G7 has over the Sony A6000 which, as an older mid-range model, employs a 1440k dot panel.
Either way the G7 viewfinder is one of the highlights of the camera. It’s large, bright, detailed and can display a wealth of information and shooting aids including effect previews, a live histogram, magnified assistance, leveling gauge, focus peaking, zebra patterns and a variety of alignment guides; as an electronic viewfinder, you can also use it for shooting movies or playing-back files.
While roughly comparable in size and detail to other new mirrorless cameras of its class, the G7’s viewfinder delivers a considerably larger view than rival DSLRs. The optical viewfinders of Canon’s EOS 750D / T6i and Nikon’s D5500 are roughly three quarters of the size, won’t show the full coverage of the frame and miss out on the variety of shooting aids. Of course the flipside is that optical viewfinders don’t consume as much battery power, don’t lag in very low light and also provide instant feedback when shooting and panning, but for general-use I much prefer the experience of a good electronic viewfinder, and the G7’s is certainly one of the better ones.
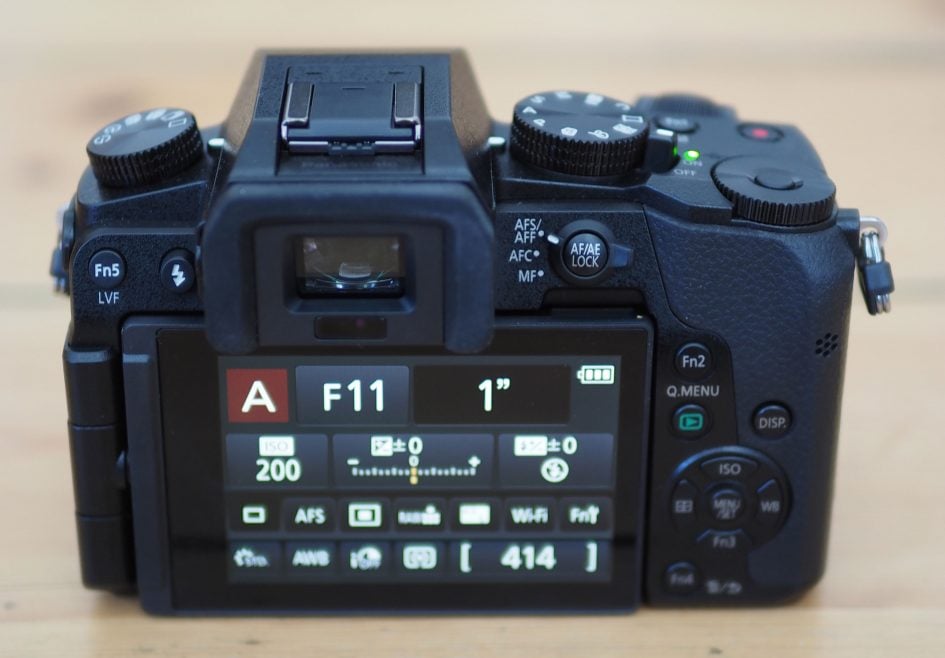
One of the other highlights of shooting with a single-digit G-series camera is the fully-articulated touch-screen that can flip and twist to any angle. I prefer fully-articulated screens to ones that only tilt vertically as I can angle them for high and low compositions when shooting in the vertical / portrait shape rather than just the horizontal / landscape shape; they also let you flip the screen back on itself for protection if the conditions become precarious.
The screen panel itself is the same 3in size and 3:2 shape as the G6 and shares essentially the same resolution of 1040k dots. The 3:2 shape is a common choice for Micro Four Thirds screens, although if you’re shooting in the native 4:3 aspect ratio of the sensor, you won’t be filling the screen width-ways; instead images are displayed with thin black bars running vertically down either side. But 3:2 is a good compromise for the screen as it means the wider shape of 16:9 movies aren’t displayed too small, and of course you can always shoot photos in the 3:2 shape if you’re willing to accept a minor crop and loss of resolution. I should also mention you can not only adjust the brightness of the G7’s screen, but also the contrast, saturation, red tint or blue tint, all in fine increments. I found the default mid-brightness level was mostly fine for shooting outdoors, although benefitted from a boost in very bright conditions.
Like earlier models, Panasonic makes good use of the touch-sensitive capabilities of the screen. You can tap your way through all the menus, drag alignment guides and the live histogram around, swipe through images and pinch-to-zoom in playback, and of course tap to reposition the AF area. Being able to quickly reposition the AF area by simply tapping is a boon and something I really miss on cameras without touch-screens. The touch-screen also unlocks five soft-function keys which popout from a tray on the right, and in the Movie mode an additional set of on-screen buttons provide silent control over the exposure; Panasonic also lets you tap to pull-focus while filming video. In short there’s little you can’t do with the touch-screen, although the wealth of physical controls provide a more traditional alternative if you prefer.
Interestingly while most DSLRs can come across as old fashioned in many respects compared to modern mirrorless cameras, the Lumix G7’s mirrored rivals are actually well-represented on the screen front. Both Canon’s EOS 750D / T6i and Nikon’s D5500 feature fully-articulated touchscreens, and the latter boasts the biggest panel of the bunch at 3.2in. But both these DSLRs miss out on assistance like focus peaking, zebra patterns, and of course the larger view afforded by the viewfinders of rival mirrorless cameras. So while I commend Canon and Nikon for equipping these DSLRs with fully-articulated touch-screens, I feel the G7 delivers a preferable compositional experience overall.
A button to the left of the viewfinder releases the popup flash which offers a Guide Number of 6.6 at 100 ISO, less powerful than the GN 12 at 100 ISO of the Canon EOS 750D / T6i. There’s a hotshoe for external flashguns.
In terms of ports, the Lumix G7 is equipped with a 3.5mm microphone input on the left and, behind a flap on the right, a combined USB / AV output, a Type-D Micro HDMI port and a 2.5mm socket for the optional DMW-RSL1 wired remote control. The HDMI output can deliver a clean feed (up to 4k) to external monitors and recorders, although it lacks the 10-bit option of the flagship GH4, instead operating at a more traditional 8-bit. There’s also built-in Wifi for wireless communications which I’ll discuss later in the review.
The DMW-BLC12E Lithium Ion battery pack is recharged externally in a supplied AC unit and Panasonic quotes around 360 shots per charge under CIPA conditions. This is roughly the same as Sony quotes for the A6000 but falls short of the 440 or 820 shots per charge that Canon and Nikon quote for their EOS 750D / T6i and D5500 respectively, although remember that’s when using their optical viewfinders; switch them into Live View and their batteries are depleted much faster. That said, I actually managed comfortably more than 360 shots from the G7: on one charge I shot 345 images with the mechanical shutter, along with a further 1800 using the electronic shutter across two Timelapse sequences, not to mention several minutes worth of 4k and 1080p video.
I do however wish Panasonic would offer USB charging in-camera for its mirrorless cameras. I like the opportunity to top-up a depleting battery while I’m out and about without having to remember to bring the charger and find an AC outlet. For me Sony leads the pack in this respect, offering in-camera USB charging across its range, even for full-frame mirrorless.
Panasonic Lumix G7 lenses
The Lumix G7 is equipped with a lens mount that’s compatible with the Micro Four Thirds standard. This gives it access to the broadest and most established catalogue of native mirrorless lenses, including many great quality options from Panasonic and Olympus. While many mirrorless formats are lacking a complete range of lens options, Micro Four Thirds generally offer two or three alternatives at each common focal length – a key advantage over rival systems.
The Micro Four Thirds standard employs a field-reduction factor of two times, so lenses like the standard 14-42mm or 14-140mm kit zooms deliver coverage equivalent to 28-84mm or 28-280mm respectively. The latest Lumix G 14-42mm f3.5-5.6 kit zoom (H-FS1442AE) may not be a collapsing design, but is very compact none-the-less, measuring 49mm in length, 56mm in diameter and weighing 110g. Even the 14-140mm zoom is compact at 75mm long, 65mm in diameter and 265g in weight, making it roughly similar in size and weight to Canon’s EF-S 18-55mm STM kit zoom, but with a 10x range rather than 3x. Here’s the coverage you can expect rom the 14-42mm kit zoom, and like other Panasonic zooms, it’s optically stabilized.
Above: Lumix G7 14-42mm kit zoom coverage at 14mm (left) and 42mm (right)
Many kit zooms represent an entry-point to a system – something to get you started before you upgrade to a more capable lens. I’ve found this particularly with many collapsing kit zooms which often trade image quality for size. Panasonic’s Lumix G 14-42mm however is an exception: a lens which may not collapse, but is very compact none-the-less and which importantly delivers much better quality than you’d think for the money, including surprisingly sharp corners. It is in short the best quality small, budget kit zoom I’ve used.
Like other kit zooms, the f3.5-5.6 focal ratio means you won’t be achieving very shallow depth-of-field effects, a fact accentuated by the smaller Micro Four Thirds format. If you desire a nice portrait lens, I can highly recommend Panasonic’s Lumix G 42.5mm f1.7 or the Olympus 45mm f1.8. Check out these and my other recommendations in my Micro Four Thirds lens guide.
Panasonic Lumix G7 shooting experience
The Lumix G7 is a good, solid mid-range camera that feels responsive and confident in your hands. As noted earlier, it’s light but well-built and the repositioned control dials fall comfortably under your thumb and index finger, allowing you to operate the camera without taking your eyes from the view.
The viewfinder and screen deliver bright, large and detailed images with a wealth of optional shooting information and guides; it’s great have focus peaking and zebra patterns in addition to the usual leveling gauge, alignment grid and histogram.
You can control pretty much any aspect of the camera with the touch-screen and Q.Menu interface, although to adjust either the exposure, drive or focusing modes, you’ll need to turn their dedicated respective dials. I’ll cover each in turn.
The Lumix G7’s main exposure dial offers the usual PASM modes, along with Creative Movie mode (unlocking all the video options), Panorama, Custom, Creative (with the choice of 22 effects), Scene (with 24 presets including Cute Desert and Appetising Food in addition to the usual suspects), and the foolproof Intelligent Auto.
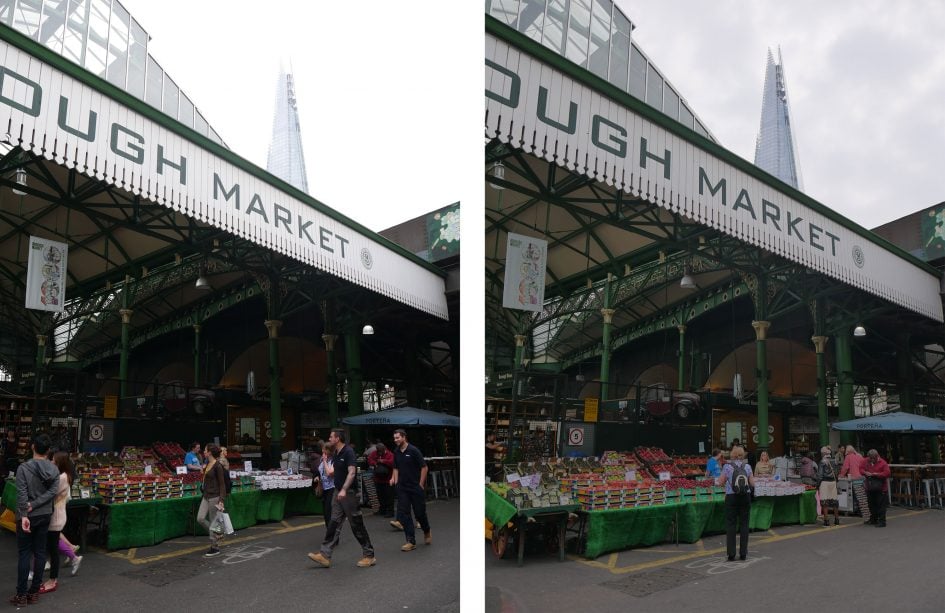
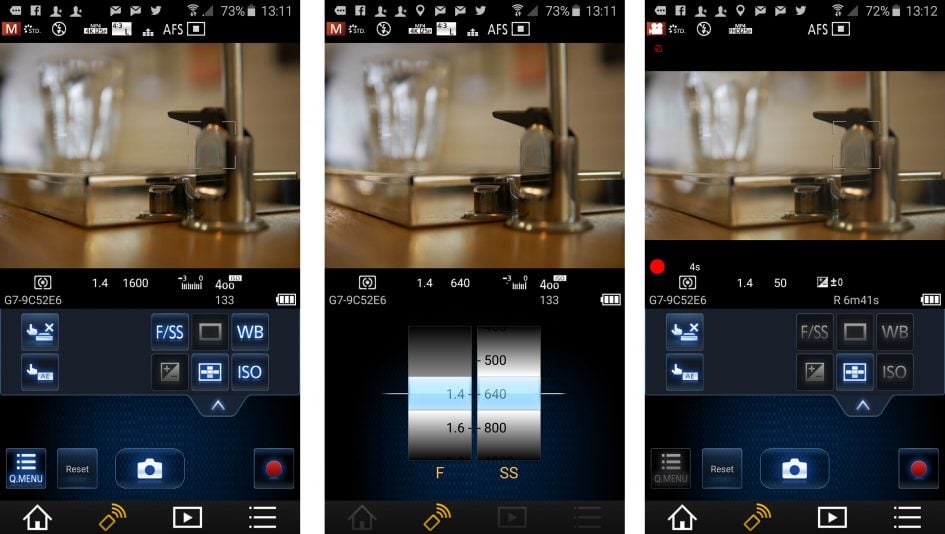
The Lumix G7’s mechanical shutter offers speeds between 1/4000 and 60 seconds, or a maximum Bulb length of two minutes; long exposure photographers may find the latter limiting. Switch the G7 to its electronic shutter option and the fastest shutter speed shortens to 1/16000, giving you an extra two stops over the top mechanical shutter with the added benefit of operating in complete silence. In the photo below it allowed me to shoot at f1.4 in very bright sunlight, without having to deploy neutral density filters. Note the slowest shutter speed with the electronic shutter is 1/8, and the sensitivity range is the same 100-25600 ISO as shooting with the mechanical shutter.

Above: 1/10000, f1.7, 200 ISO, 42.5mm (85mm equiv)

Above: 1/16000, f1.4, 200 ISO, 25mm (50mm equiv)
Electronic shutters aren’t however perfect. If you’re shooting RAW on the G7 with the electronic shutter, the dynamic range is reduced from 12 to 10 bits. Electronic shutters can also suffer from rolling artefacts which can skew the image if the subject or camera are in fast motion, but if you understand their limitations they can be very useful, not just for being discreet in quiet environments, but also for shooting with large aperture lenses in bright conditions. I also like to use them during timelapse sequences to avoid the constant sound of the mechanical shutter clicking, and I have an example of this later in this section. It’s a key benefit over most DSLRs which currently don’t offer truly silent shooting options.
With the mode dial set to Creative you can choose from 22 effects on-screen with a preview of how they’ll look applied to the live image. Here’s a selection.
Above: Lumix G7 Expressive effect (left) and Retro effect (right)
Above: Lumix G7 Dynamic Mono effect (left) and Silky Mono effect (right)
Above: Lumix G7 Cross Process effect (left) and Toy Pop effect (right)
It’s also possible to apply some of the effects to movies which are then encoded at the selected video size up to 1080 / 50p / 60p. Here’s an example of the Miniature Tilt / Shift effect applied to a 1080 / 50p movie.
Above: Download the original file (Registered members of Vimeo only).
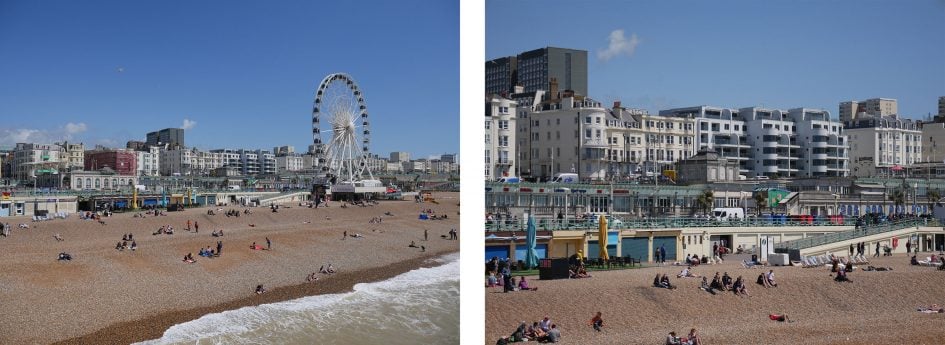
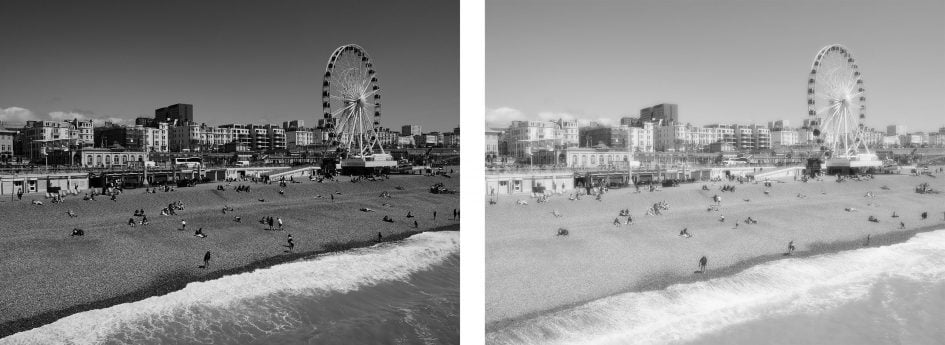
The Panorama option on the mode dial gives you the choice of Standard or Wide image sizes and the chance to pan the camera up, down, left or right. The camera keeps shooting to generate a 360 degree panorama, which can require some practice to keep turning, but you can of course crop the image to the desired coverage. In general the G7 did a fair job at blending the exposures, although sometimes there was a visible change in brightness when the sky became bright as seen below in an example I shot from Brighton Pier; look closely and you’ll also see multiple instances of subjects in motion, whether birds in flight or tourists walking along.

Above: Lumix G7 panorama
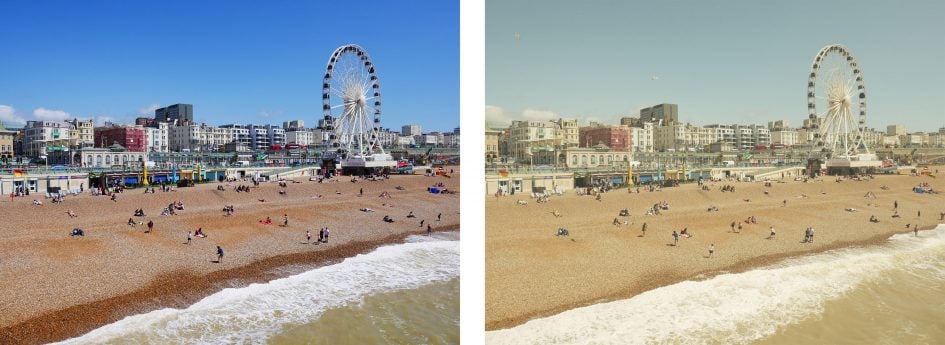
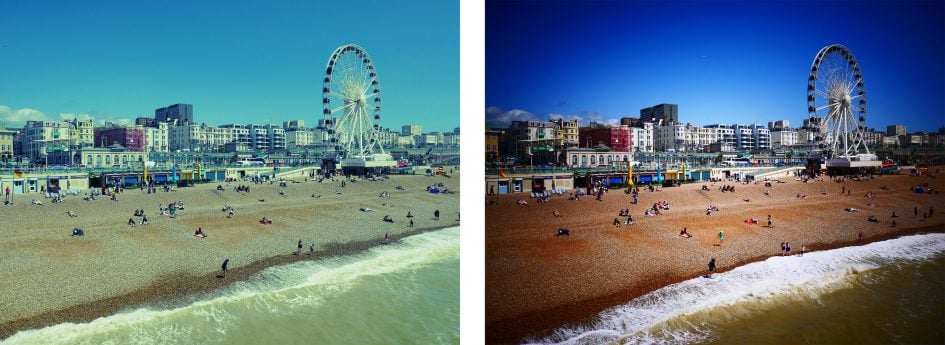
If you’re recording in JPEG only, the G7 unlocks its in-camera HDR option which captures three frames at 1, 2 or 3EV intervals before compositing them into a single file. Here’s an example that illustrates how the HDR mode can be used to lift detail in shadows and retrieve it in highlights. Note the minor crop incurred when the camera assembles the images itself.
Above: Lumix G7 HDR disabled (left), enabled with 3EV range (right)

Above: Lumix G7 Histogram with HDR disabled (left), enabled with 3EV range (right)
If you prefer to generate HDR manually, or simply want to cover yourself, the G7 is very well-equipped for exposure bracketing with three, five or seven frame options at up to 1EV apart; these can be triggered singly or in a burst, although not in conjunction with a self-timer. Compare this to the paltry three-frame bracketing of most DSLRs at this price point.
There’s also plenty of control over the way the camera processes images, including the chance to adjust tone curves, again taking it beyond most rivals at this price-point.
Like its predecessor, the Lumix G7 offers in-camera Timelapse capabilities with the opportunity to encode the frames into a movie afterwards, in 4K resolution if desired. You can adjust the shooting interval between one second and a second shy of 100 minutes, and for between one and 9999 frames; you can also delay the start to a set time up to 24 hours in advance. Alternatively you can choose the Stop Motion option which relies on you pressing the shutter for each frame when you’re ready – great for making films with toys.
Once you’ve captured the desired number of frames, the camera offers to encode them into a movie; if preferred you can trigger this process during playback later. The video resolutions include VGA, 720p, 1080p (at up to 50p / 60p) and even 4k (at 24 or 25 or 30p depending on region). You can also choose a lower frame rate to stretch your movie length and choose whether to run through the sequence forwards or backwards. You’re welcome to re-run this process as often as you like to create multiple versions.
When capturing the frames, be careful to choose a photo aspect ratio that matches the shape of the desired video, which in most cases will be 16:9, otherwise you may end up with 4:3 shaped video letter-boxed in a 16:9 frame. I’d also recommend reducing the image quality to ensure you don’t run out of space. The 8 Megapixel resolution is sufficient to generate 4k video and unless you intend to manipulate the frames later, you probably don’t need to record RAW either.
Here’s one I filmed of a tasty Thali lunch at Brighton’s Chilli Pickle restaurant, composed of 1200 frames at one second intervals and encoded at 25fps – so a 20 minute period compressed into 48 seconds. I set the camera to shoot 8 Megapixel JPEGs in the 16:9 shape, and also set the focus to manual to avoid hunting during the sequence.
Above: Download the original file (Registered members of Vimeo only).
To trigger a Timelapse you’ll need to turn the dedicated Drive mode dial to the final option. Between this and the Single shooting modes, you’ll find options for Continuous shooting, 4K Photo, Bracketing and the Self Timer.
Set to Continuous, the G7 will shoot at 8fps in Single AF or 6fps with Continuous AF and Live View, both up by one frame per second over its predecessor. Panasonic quotes over 100 images when set to JPEG, or 13 when a RAW file is also being recorded.
Fitted with a UHS-1 card and with the camera set to capture Fine JPEGs only with AFS, I fired-off 87 frames in 9.81 seconds for a rate of 8.9fps, after which the camera slowed its speed. Set to AFC and with the camera in motion, I shot 69 frames in 17.06 seconds for a rate of 4fps; only a handful of shots were out of focus and the camera seemed happy to keep shooting. Meanwhile in RAW and AFS, I fired-off 15 frames in 1.96 seconds for a rate of 7.7fps, after which the rate slowed to around 2.5fps.
So in single AF with JPEGs, the G7’s burst shooting slightly exceeded the specifications and in continuous AF it was slightly slower. Sony’s A6000 remains top-dog in this price bracket for continuous shooting, especially since it can rattle-off 11fps with continuous AF, but it’s revealing to note the DSLRs from Canon and Nikon at this price point both shoot at a relatively modest 5fps regardless of AF mode. Since the G7 actually manages to roughly match this for continuous AF and exceed it for single AF, I’d say that’s a good result for the camera as continuous AF in burst shooting was traditionally an aspect where DSLRs lead. I’ll discuss the AF performance more in a moment.
The drive mode dial is also where you’ll find a dedicated option for 4K Photo. This exploits the fact that 4K video actually contains 8 Megapixels worth of information on every frame, so why not use it for capturing stills at high frame rates? Panasonic’s taken this idea and run with it, making the initial capture and subsequent photo extraction process as simple as possible. There’s three options: Burst (which records video while the shutter button is pressed), Burst S / S (which starts recording with one press and stops with another), and 4K Pre-burst (which keeps a rolling buffer to avoid unwieldy clips to store and go through). I ended up using the Burst mode more often than not.
When you play the capture back, you’re shown a still photo rather than a video clip, with the option to cycle through the frames quickly by oppressing the left or right arrow keys. This makes it very easy to jog back and forth before selecting the perfect moment, after which a press of the Menu / Set button saves the frame as a new JPEG with 8 Megapixel resolution. You can’t save RAW files in the 4K Photo mode, but you can choose the aspect ratio prior to capture along with having full control over the focus, exposure mode, aperture, shutter and ISO.
The 4K Photo mode is perfect for capturing the perfect moment when faced with fast action, and indeed I used it below for the photo of a jetski jumping or models throwing coloured chalk in the air. But it’s also surprisingly useful for portraits, especially of kids, where an expression can change between frames.

Above: 4k Photo Grab, 1/16000, f1.7, 400 ISO, 42.5mm (85mm equiv)

Above: 4k Photo Grab, 1/4000, f6.3, 800 ISO, 14-42mm at 42mm (84mm equiv)
Moving onto focusing, the G7’s dedicated switch to the right of the viewfinder sets the camera to AF-S (Single), AF-C (Continuous) or MF (Manual Focus). Like previous Lumix G bodies, the G7 employs a 100% contrast-based AF system with Panasonic once again resisting embedded phase-detect points on the sensor; in this respect Micro Four Thirds bodies, with the exception of the OMD EM1, differ from the vast majority of new mirrorless cameras which employ hybrid AF systems.
The G7 lets you choose from six AF area modes: pinpoint, single, Custom Multi (which lets you configure your own zones), 49-Area, Tracking or Face Detection. In each case you can use the touch-screen to reposition AF areas or select subjects, a feature that I really miss on cameras which neglect to offer touch-screens. Panasonic even lets you tap the screen to configure the AF area when you’re composing through the viewfinder, a job that’s easiest to do with the screen flipped-out to the side. That said, I ended up repositioning the AF area unintentionally with my nose when the screen wasn’t flipped-out or reversed, so I disabled the feature.
As always, the Single AF modes are the highlight of the Lumix G focusing experience. The camera focuses quickly and confidently even if the AF area is dialed-down to its smallest size, and impressively in very low light too. The G7’s AF system works down to -4EV which means it can simply keep focusing in very dim conditions when other cameras become sluggish or give up. It’s an important capability that makes the G7 very usable across a wide range of lighting conditions. Whether you’re shooting cityscapes at night or exploiting the excellent face and eye detection to capture events, the G7’s AF system feels very confident.
As a 100% contrast-based system, the Lumix G7 is never going to perform as well as hybrid systems when it comes to continuous AF. Panasonic’s engineers have worked hard to profile the out-of-focus characteristics of Lumix lenses to better guess where to focus and when to stop, but while this ‘Depth by Defocus’ process is indeed faster than older Lumix G bodies, there’s still visible hunting. This in turn can’t help but reduce the success rate when shooting in Continuous AF, especially as the subject moves more quickly.
That said, I enjoyed fair success using both Panasonic and Olympus lenses for people walking or jogging towards me, but as the speed increased, such as people running quickly or cycling towards me, the G7 returned a lower success rate. In my tests it was generally fine for kids or pets playing around, but not up to sports played at a high level. Of the competition, the best mirrorless cameras I’ve tested for effective continuous AF at high burst speeds are Sony’s A6000 and A5100, but it’s important to mention neither of them offer Single AF that’s as quick or that works in as low light as the G7. So you have to decide how you’re mostly going to use a camera. Personally speaking I prefer having the quick Single AF and low light performance.
Set the G7’s focus dial to MF and you can manually focus the lens with a wealth of visual assistance. You can choose to magnify a portion of the image by up to six times and either display it full-screen or in a window, allowing you to keep an eye on the entire composition too; this window can also be dragged around by touch if desired. If focus peaking is enabled, the edges of objects are highlighted when they’re in focus, which offers additional confirmation; this works particularly well in conjunction with the magnified view. Peaking is also available for movies, but once you start filming the magnified option becomes unavailable, so you’ll be relying on peaking alone with a full view of the composition; still, it’s better than just judging it visually on the image alone.
Moving on, the G7 is equipped with Wifi for wireless image transfer and remote control with Andoid and iOS smartphones. Sadly the NFC capabilities of the earlier G6 have been removed, no doubt as a cost-saving exercise – a shame since I enjoy the geeky aspect of initiating a smartphone connection with a tap, but it has to be said scanning a QR code isn’t actually any harder or slower.
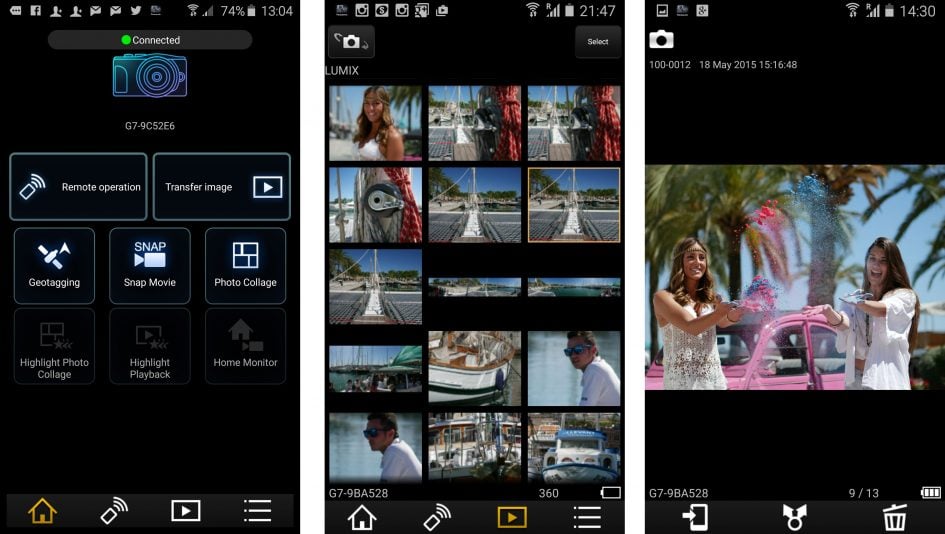
I tried the Lumix Image App on my Samsung Galaxy S6. Like previous versions, this gives you full manual control over the camera with the chance to adjust pretty much anything that’s not set by a physical dial. So while the exposure mode, drive mode and AF mode still have to be adjusted on-camera, the app lets you set the photo and video quality, aperture, shutter, ISO, white balance, exposure compensation and AF area. You can tap to reposition the AF area too, with or without triggering the shutter. You can start and stop video recordings of any quality via the app, and also tap the phone screen to pull-focus while filming.
During playback you can view thumbnails of stills and videos. JPEGs can be copied onto the phone over Wifi, but not RAW files. Videos can be streamed from the camera and played on the phone’s screen, including those recorded up to 4K resolution. You can also use the app to copy videos to your phone, although only up to 1080p quality.
The app also lets you record a GPS log for later syncing with images in the camera, a process that involves wirelessly copying a log to the camera, before using the camera’s playback menus to apply it to relevant images in that timeframe. Here’s an example I tagged of Brighton’s Royal Pavilion, using a GPS log made in my Galaxy S6.


It’s also possible to send image direct from the camera to a variety of social services, including Facebook, twitter, Youtube, Picasa and Flickr. To do so you’ll first need to sign-up for Panasonic’s Lumix Club and grant it permission to post on your behalf – so when sharing to, say, Twitter, the camera sends the image via the Lumix Club. It’s not as neat as Sony’s solution which appears to post direct from the camera, but it’s fairly standard for most Wifi-equipped cameras.
Finally, the Lumix Image app allows the G7 to inherit the fun Jump Snap feature introduced with the GF7. This uses the accelerometer in your phone to trigger the shutter remotely as you jump in the air. It works surprisingly well too. Using the app you can remotely view the composition and refocus the camera if necessary, before then setting the sensitivity of the jump detection. After a little fine-tuning of the sensitivity you’ll be able to capture the perfect moment when you’re at the top of your leap. It’s a really fun way to exploit the technology in your pocket.
Panasonic Lumix G7 movie mode
The Lumix G7 is a very capable camera for video, offering 4K capture, full control over exposure, silent screen-based adjustments, flat profiles, focus peaking and zebra patterns. 4K UHD video is available at 24p and either 25p or 30p depending on region, all at 100Mbit/s. Alternatively you can capture 1080 at 50p / 60p at 28Mbit/s, or at 25p / 30p at 20Mbit/s. 720p and VGA options are also available. The maximum recording time on all models, whether in Europe or not is 29:59.
You can start recording in any exposure mode by simply pressing the red record button, but for the most control and options you should turn the mode dial to Creative Video which lets you film in PASM modes with full control over exposure. The sensitivity for movies is selectable between 200 and 6400 ISO, and there’s an Auto ISO option too, although sadly not when shooting in full Manual mode.
The touchscreen is well-used for movies: it’s possible to tap to pull-focus between subjects when filming, either automatically if Continuous AF is enabled, or as soon as you half-press the shutter release if it’s disabled. Tapping the screen also pops-out a tray of controls, allowing you to silently adjust the aperture, shutter speed, ISO, exposure compensation or microphone level all while filming, depending on the mode.
A variety of processing parameters can be adjusted within the Photo Styles, including sharpness, contrast, saturation and noise reduction. There’s also the Cinelike V and Cinelike D profiles inherited from the GH4, the latter offering fairly flat output for grading later (plus you can dial-it down even further if desired). You can also choose between 0-255 and 16-255 for the Luminance Level.
Audio is recorded using either the built-in stereo mics, or an external microphone connected to the 3.5mm jack. Stereo level meters can be displayed and the level adjusted in fine increments, but there’s no headphone jack.
The Extra Teleconverter option works in all but the 4K modes, taking a 1:1 crop from the middle of the frame at the selected video resolution and therefore providing a tighter view without degradation in quality; neatly the 1:1 crop also better avoids moire effects. When filming in 1080p, the Extra Teleconverter effectively applies a 2.39x field reduction. Here’s screengrabs from footage filmed in 1080p with the Leica Lumix 25mm f1.4, with the teleconverter disabled below left and enabled below right. Below these are 100% crops from the area in the middle of the frame where it’s clear the Extra Teleconverter option is delivering genuinely greater detail rather than just cropping and enlarging.

Above: Lumix G7 1080p coverage with 25mm (left) and with EX Tele enabled (right)
Above: Lumix G7 1080p 100% crops with 25mm (left) and with EX Tele enabled (right)
At this point many of you may be wondering how the G7 compares to the flagship GH4 for video. I’ve detailed the feature differences in the verdict at the end of the review, but for now wanted to compare the quality of their output as they take different approaches to capturing and rendering.
When filming 1080, the G7 takes the full usable sensor width of 4592 pixels and scales it down to 1920 pixels. So the horizontal field of view when filming in 1080 is identical to shooting stills, but of course the uneven scaling factor means there’s also artefacts to deal with.
So far so similar to the GH4, but the G7 handles 4k differently. On the GH4, the 4k modes simply took 3840×2160 or 4096×2160 crops (for UHD or Cinema 4k respectively) direct from the middle of the sensor and recorded them without scaling. Since they were crops, there was a reduction in the field of view, but since there was also no scaling, there was minimal moire to worry about.
The G7 however takes the different approach implemented on the FZ1000 and LX100: the camera takes a milder crop of the sensor than the GH4 before then scaling it down to a 3840×2160 UHD 4k frame. I filmed some comparisons and measured the original crop for 4k on the G7 as around 4120×2318 pixels. This is then scaled-down to 3840×2160 and encoded as 4k UHD video.
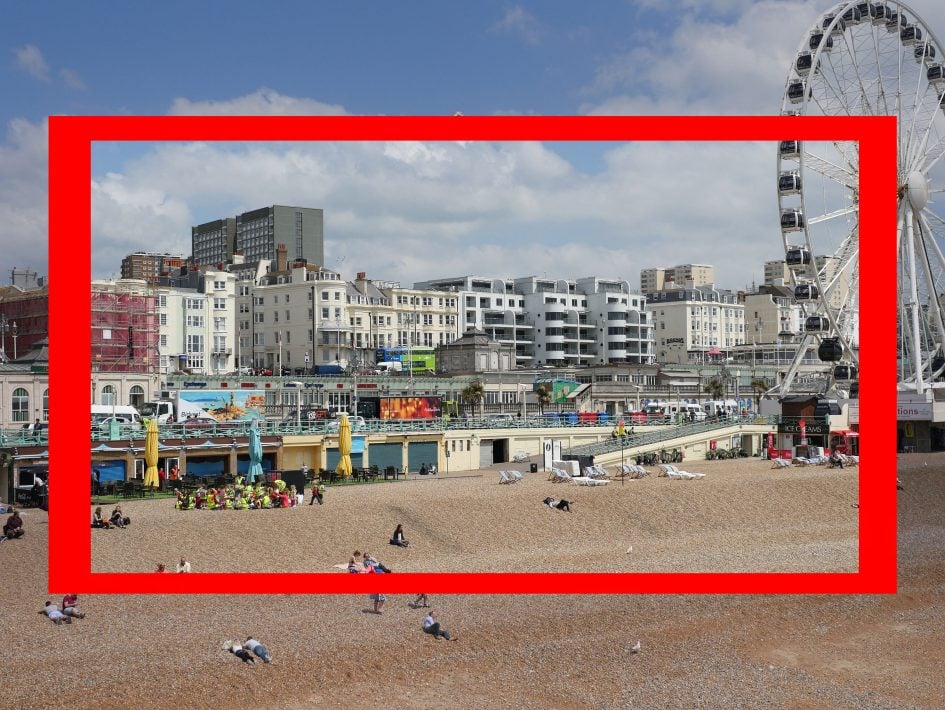
Above: Panasonic Lumix G7 coverage for 4k video. G7 4k UHD crop indicated by outer edge of red frame. GH4 4k UHD crop indicated by inner edge
I’ve made a composite above (using actual footage I filmed) of a still photo, overlayed by the G7’s 4k video crop, indicated by the outside edge of the red frame. Meanwhile an exact 3840×2160 crop (as recorded by the GH4) is indicated by the inside edge of the red frame, and as you can see while the 1:1 crop definitely loses more coverage, it’s not much to pay for a potential reduction in artefacts. Remember, the 1080p coverage from both cameras is the full width of the image above without cropping.
To further illustrate the differences in coverage for video, here’s two screengrabs from the G7 fitted with the 25mm f1.4 lens for 4k UHD on the left and 1080p on the right; it’s clear how filming in 1080p captures broader coverage.

Above: Lumix G7 video coverage with 25mm lens, 4K UHD (left) and 1080p (right)
Now let’s see how the G7’s coverage for 4k compares to the GH4, again when both are fitted with the same 25mm f1.4 lens. Below left is the G7 and below right is the GH4, both filming in 4k UHD.

Above: 4K UHD video coverage with 25mm lens, Lumix G7 (left) and Lumix GH4 (right)
In theory the GH4’s 1:1 crop for 4k should allow it to better avoid moire and scaling artefacts, while only suffering from slightly less coverage than the G7 with the same lens. But the important thing is to see how the footage compares in practice. I also wanted to see how much more detail was possible with 4k compared to 1080p, but to put them on a level playing field I also needed them to start off capturing exactly the same field of view. A prime lens was out of the question for this comparison due to the different crops taken by each camera, so I switched to the Olympus 7-14mm f2.8, set to f4 for the best quality and adjusted between 12 and 14mm to deliver the same field of view for each mode and each camera. Here’s what the coverage looked like for each mode.
Above: Download the original file (Registered members of Vimeo only). Sample movie filmed with the Panasonic Lumix GH4 in its 4k UHD / 25p mode. The camera was set to 200 ISO, the Standard Photo profile (0, 0, 0, 0) and the Luminance Level of 16-255. The lens was the Olympus 7-14mm f2.8, set to f4 in the Manual Movie mode and adjusted to deliver the same field of view as the other 7-14mm clips in this sequence, allowing us to compare the effective resolution of each camera and filming mode. Also see my Lumix G7 4k UHD CineLike D sample movie. I also filmed this scene moments later with the Lumix GH4 and the same lens adjusted to deliver the same coverage as the 4k mode on the G7. See my Lumix GH4 4k UHD sample movie and Lumix GH4 4k UHD Cinelike D sample movie. I strongly encourage you to download the G7 and GH4 versions of this clip via Vimeo and evaluate them on a native 4k display.
Okay, now for the crops, taken from roughly the centre of the frame and representing a 100% view. I’ll start with the G7 in 4k UHD below left and in 1080p below right, and it’s pretty clear how recording in 4k is resolving considerably greater detail. The 4k footage also responds well to down-sampling to 1080p, and I’d recommend trying it out.

Above: Lumix G7 video quality with 7-14mm lens, 100% crops from 4K UHD (left) and 1080p (right)
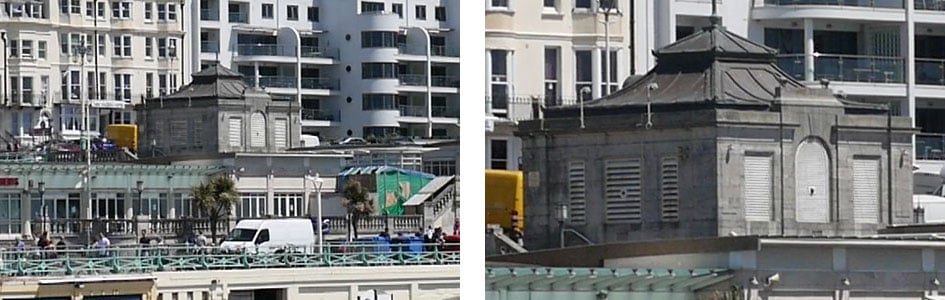
My next comparison is between the G7, below left, and the GH4, below right, both filming in 4k UHD, with the zoom adjusted fractionally to deliver the same coverage. Again the crops are from the middle of the frame and shown here at 100%.

Above: 4K video quality with 7-14mm lens, 100% crops from Lumix G7 (left) and Lumix GH4 (right)
Looking at the screengrabs, there’s little if anything to choose between the two bodies. Both deliver essentially the same degree of detail and also seem to avoid moire in most areas. This would seem like a fantastic result for the G7, but it’s important to also compare the actual moving footage on a native 4k display. I used a large Panasonic 4k TV and played the respective clips via a laptop connected over HDMI.
The composition includes many areas of fine horizontal lines, particularly on the various doors and shutters by the beach. As these approach the resolving power of a camera, there’s inevitably issues with moire, and indeed when I played the footage back on the 4k TV, I noticed tell-tale shimmering in some of these areas. Interestingly the GH4 wasn’t immune to this effect, and while it suffered a little less than the G7, it really was only by a small amount in this particular composition. I’d expected to recommend the GH4 in this situation, but was surprised to find them very close in quality. Of course this is just one example and in others greater differences may emerge. Equally there’ll be other situations when the difference will reduce or even disappear. I think the bottom line is while the GH4 should still enjoy the edge in 4k quality, the G7 comes very close, and in some situations the footage will be almost indistinguishable. Of course the GH4 has many other advantages over the G7, but for video quality the new body is punching above its weight.
Now here’s a selection of other clips to demonstrate the G7’s video performance in various conditions.
Above: Download the original file (Registered members of Vimeo only). Sample movie filmed with the Panasonic Lumix G7 in its 4k UHD / 25p mode. The camera was set to 200 ISO, the Standard Photo profile (0, 0, 0, 0) and the Luminance Level of 16-255. The lens was the Lumix 14-42mm kit zoom in Manual Movie mode. I also have a version filmed in 1080 / 50p – see my Lumix G7 handheld 1080p movie.
Above: Download the original file (Registered members of Vimeo only). Sample movie filmed with the Panasonic Lumix G7 in its 4k UHD / 25p mode. The camera was set to 1600 ISO, the Standard Photo profile (0, 0, 0, 0) and the Luminance Level of 16-255. The lens was the Lumix 14-42mm kit zoom in Manual Movie mode. I also have a version filmed in 1080 / 25p – see my Lumix G7 low light 1080p movie.
Above: Download the original file (Registered members of Vimeo only). In this clip I tested the continuous AF capabilities of the camera by pointing it between near and far subjects. Sample movie filmed with the Panasonic Lumix G7 in its 4k UHD / 25p mode. The camera was set to 400 ISO, the Standard Photo profile (0, 0, 0, 0) and the Luminance Level of 16-255. The lens was the Lumix Leica 25mm f1.4, set to f1.4 in Manual Movie mode. I also have a version filmed with the 14-42mm kit zoom at 42mm f5.6. See my Lumix G7 CAF 14-42mm movie.
Above: Download the original file (Registered members of Vimeo only). In this clip I tested the focus-pulling by touch, using the screen. Sample movie filmed with the Panasonic Lumix G7 in its 4k UHD / 25p mode. The camera was set to 400 ISO, the Standard Photo profile (0, 0, 0, 0) and the Luminance Level of 16-255. The lens was the Lumix Leica 25mm f1.4, set to f1.4 in Manual Movie mode. I also have a version filmed with the 14-42mm kit zoom at 42mm f5.6. See my Lumix G7 touch-focus 14-42mm movie.
Above: Download the original file (Registered members of Vimeo only). In this clip I tested the continuous AF by moving steadily towards, then away from the subject in a ‘dolly’ motion. Filmed in the 4k UHD / 25p mode. The camera was set to 400 ISO, the Standard Photo profile (0, 0, 0, 0) and the Luminance Level of 16-255. The lens was the Lumix Leica 25mm f1.4, set to f1.4 in Manual Movie mode. I also have a version filmed with the 14-42mm kit zoom at 42mm f5.6. See my Lumix G7 dolly CAF 14-42mm movie.
Above: Download the original file (Registered members of Vimeo only). And finally a clip filmed at the G7’s maximum movie sensitivity of 6400 ISO. I also have one filmed in 1080 / 25p, see my Lumix G7 1080p 6400 ISO sample movie.
Panasonic Lumix G7 results
Okay, now the main part of the review is over it’s time to look at the image quality with my Lumix G7 quality results, Lumix G7 sample images. Alternatively if you’ve already seen enough, skip back to my verdict!