 The Olympus OMD EM1 Mark II takes the popular weatherproof Mark I, deepens the grip, adds twin memory card slots and employs the most generous battery of any mirrorless camera. It improves the already amazing stabilisation, adds a minor boost in resolution and offers a cunning composite mode which under the right conditions can increase the resolving power up to 50 Megapixels. The major upgrades though concern video and autofocus. The EM1 Mark II shots great quality 4k and Cinema4k video which work a treat with the stabilisation, while a new embedded AF system can genuinely track moving action at up to 18fps; switch to Single AF and it'll even shoot up to 48 RAWs at 60fps. It all adds up to a supremely confident and capable camera that can capture images where others can't, but you'll really have to need the 4k and or burst capabilities to justify the professional price tag. There's a lot of very compelling rivals for the same or less money. But if you'll exploit the feature-set, the EM1 Mark II becomes one of the most powerful and desirable cameras in its class and justifies its asking price regardless of format.
Olympus OMD EM1 Mark II review
-
-
Written by Gordon Laing
In depth
The OMD EM1 Mark II is the new flagship body from Olympus. Announced in September 2016, it comes three years after the original OMD EM1 and like all OMD and PEN bodies, is based on the Micro four Thirds mirrorless standard.
The OMD EM1 Mark II is equipped with a new 20 Megapixel Live MOS sensor that’s stabilized within the body. Olympus claims 5.5 stops of compensation for the body alone, or more for lenses with optical stabilisation that support Sync IS. This excludes Panasonic OIS lenses, and at the time of writing included just two from Olympus: the 300mm telephoto and the new 12-100mm f4 IS PRO, delivering 6 and 6.5 stops of compensation respectively. A new 121-point embedded phase-detect AF system covers a larger area of the frame than before and all are cross-type sensors that work alongside a contrast-based system for both Single and Continuous AF and for Micro and older Four Thirds lenses; Panasonic lenses are supported. Impressively the EM1 Mark II will shoot at its full resolution (including RAW) up to 18fps with continuous AF or 60fps with single AF, and a quad-core processor is dedicated to AF duties.
The viewfinder still uses an LCD with the same size and resolution as the EM1, but now features a faster 120fps refresh and 6ms response, while the touch-screen is now side-hinged and fully-articulated. Joining 1080 video are 4k UHD and Cinema4k recording at 102 and 237Mbps respectively. There’s dual SD memory card slots, a higher capacity battery with quicker charging, and the body remains dust, splash and freeze-proof. I’ve spent over a month testing the EM1 Mark II and comparing it against its predecessor and key rivals, so read on to find out which high-end camera is best for you!
Olympus OMD EM1 Mark II video review / podcast
In the video below, Doug Kaye and I discuss everything you need to know about the Olympus OMD EM1 Mark II! I also have an audio podcast of this discussion at Olympus OMD EM1 Mark II podcast, or you can subscribe to the Cameralabs Podcast at iTunes.
Olympus OMD EM1 Mark II design and controls
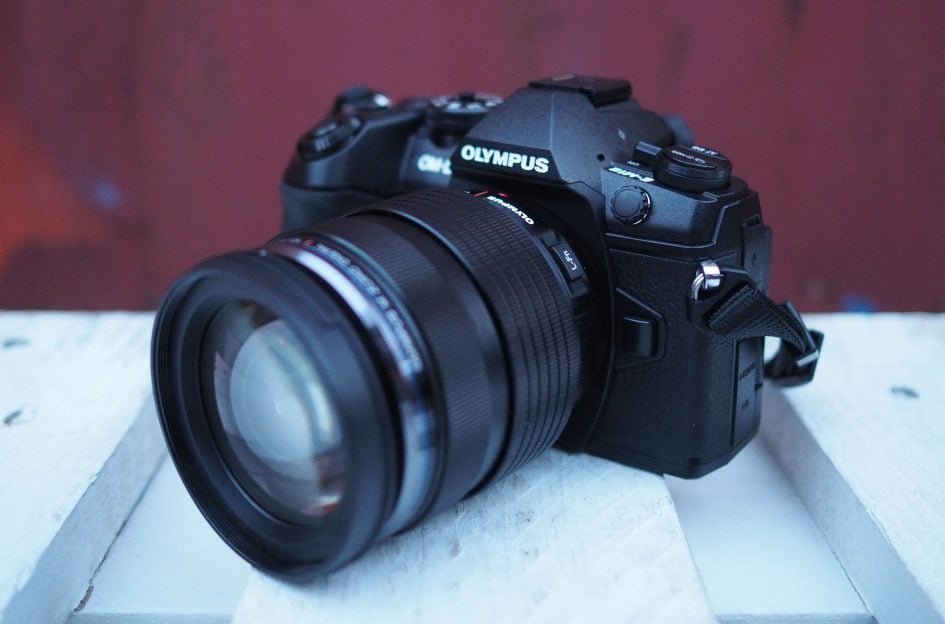
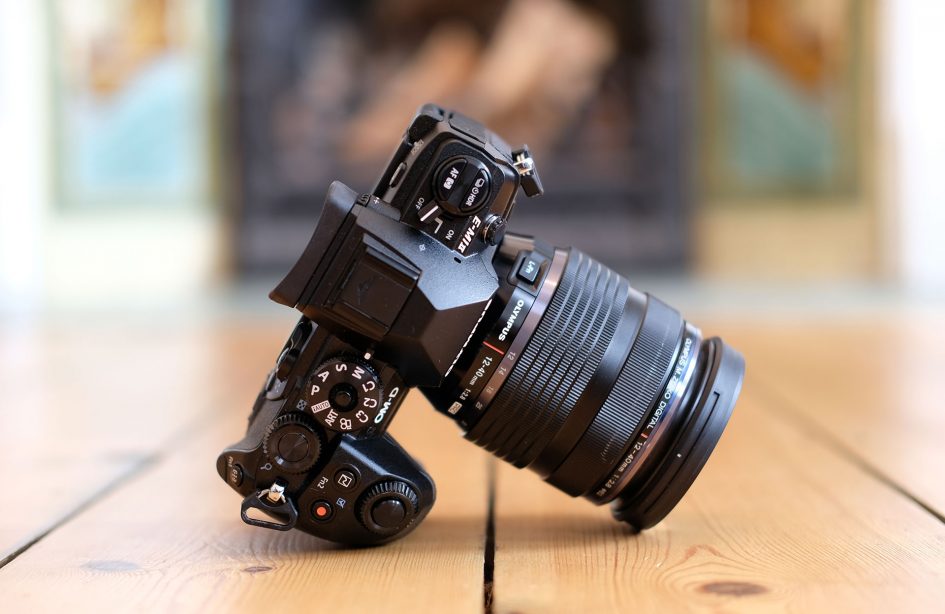
The Olympus OMD EM1 Mark II is a chunky mirrorless camera with some of the best controls and ergonomics of any camera in any class. It’s fairly large compared to most mirrorless cameras, but remains smaller and lighter than most comparably-performing DSLRs, while crucially not compromising on comfort and handling. I say it every time I review an Olympus OMD camera, but I really feel the company has nailed this sort of thing and should act as inspiration for many other manufacturers in this regard.
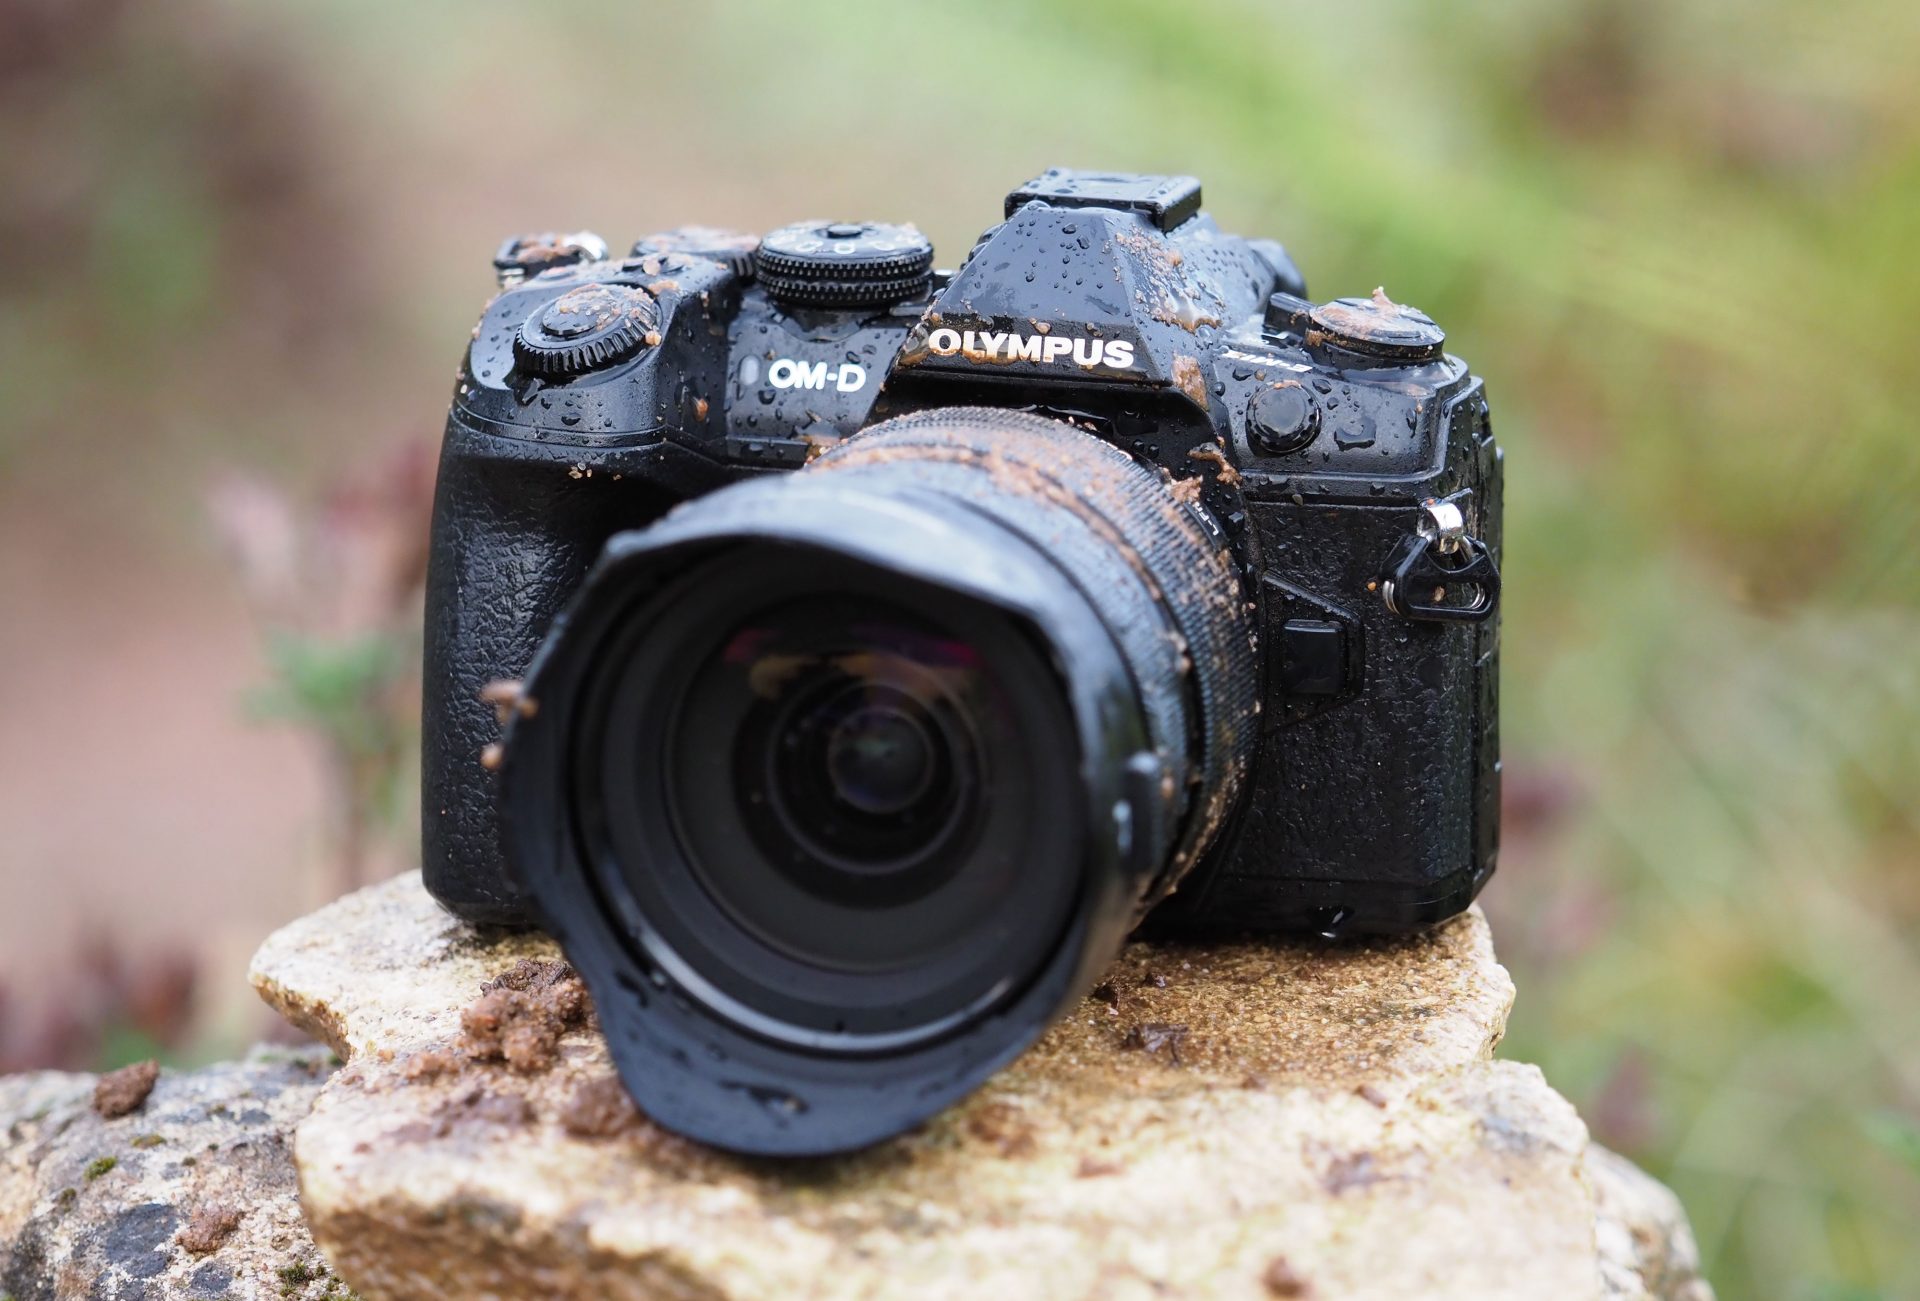
Like its predecessors the EM1 Mark II is also well-equipped at dealing with the elements. Olympus describes it as being dust and spashproof, not to mention freezeproof down to -10 degrees Celsius. Olympus isn’t shy about demonstrating this either and I’ve seen the EM1 Mark II splashed with water, mud and snow and even run under a tap with no ill effect. I’ve also shot extensively with it in steady drizzle without issue. You will of course need an equally-sealed lens, but there’s plenty of those in the Micro Four Thirds catalogue from both Olympus and Panasonic.

If, like me, you’re an existing OMD owner, you’ll feel immediately at home with the Mark II – particularly if you’re coming from the original OMD EM1 Mark I as the design and control layout is almost identical.
EM1 Mark I owners will however notice a number of small but important design tweaks. Most obviously the main body is now slightly taller and the main grip and rear thumb rests are chunkier than before, boosting comfort and security, especially for those with bigger hands. Where previously your little finger could partly dangle from the bottom of the EM1 Mark I grip, it’s now fully engaged on the Mark II. These improvements make it much easier to handhold the larger lenses in the catalogue which are arguably going to be fitted more often thanks to the superior AF and burst capabilities. While I’m very fond of the ergonomics of Fujifilm’s XT2, I’d rank the EM1 Mark II as the best of the mirrorless bodies in comfort and controls, and again it’s arguably the toughest too. It’s certainly very easy to hold the camera steadily.
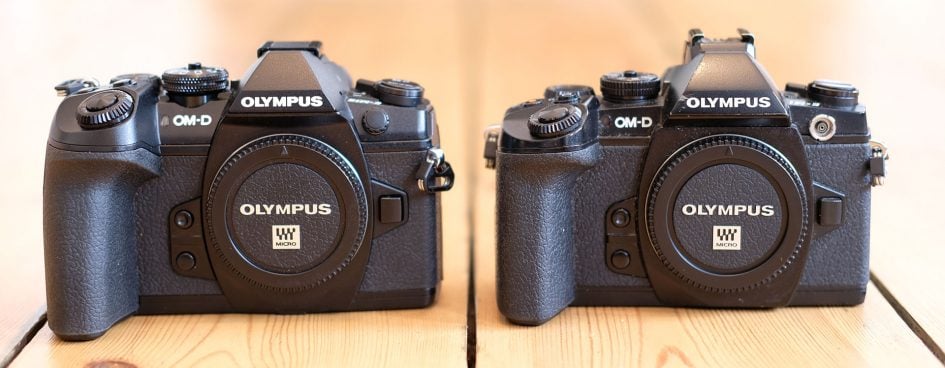
This boost in height and grip thickness gives the impression of a comfortably larger body than the EM1 Mark I, but they’re actually very close. I described the upper panel as being higher than the Mark I but the total height of the body is actually a tad shorter, due to a lower viewfinder head which dispenses with the increasingly redundant accessory port sandwiched between the previous eyecup and hotshoe on the Mark I. So the Mark II, at 134x91x69mm is only a couple of mm wider and thicker than before and actually a fraction shorter – as such you’re unlikely to notice any difference in overall size. It’s certainly heavier at 574g vs 496g including their respective batteries, but again remains much lighter than a comparable DSLR. Nikon’s D500 body for instance measures 147x115x81mm and weighs 860g with battery. If you want to bulk-out the EM1 Mark II further though, you can always fit the optional HLD-9 battery grip which adds portrait controls and support for a second battery complementing (albeit also blocking) the one that remains inside the camera body.
Another interesting physical difference between the EM1 Mark II and its predecessor is the position of the right strap lug. Rather than hanging off the side of the body on the Mark I, the right lug on the Mark II is now positioned on the far right of the upper panel. This means the right lug and anything attached to it no longer press uncomfortably into the palm of your right hand – and while it’s something you do get used to on cameras with lugs on the sides, it’s refreshing when this is resolved. Thanks Olympus.
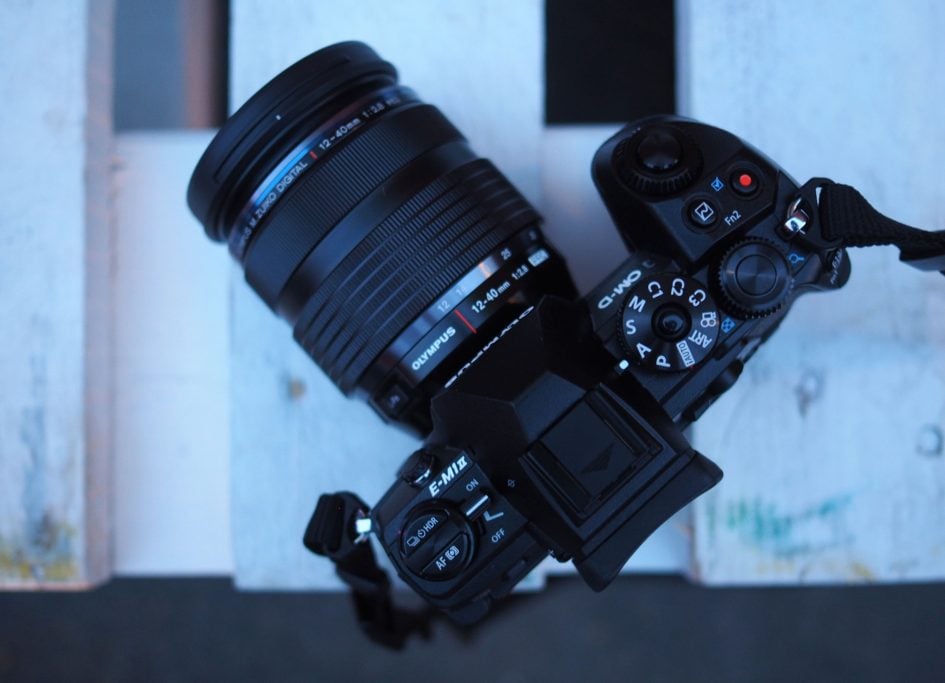
As mentioned above, the controls on the EM1 Mark II are virtually identical to the Mark I. As such there’s a mode dial with a ballpoint-pen style push-button lock to prevent it from accidentally turning. This works alongside chunky finger and thumb wheels which, as before, fall perfectly under your digits, allowing you to make easy adjustments to both even when holding the body with one hand. Both dials also provide very positive clicky feedback and remain some of my favourites on any camera body.
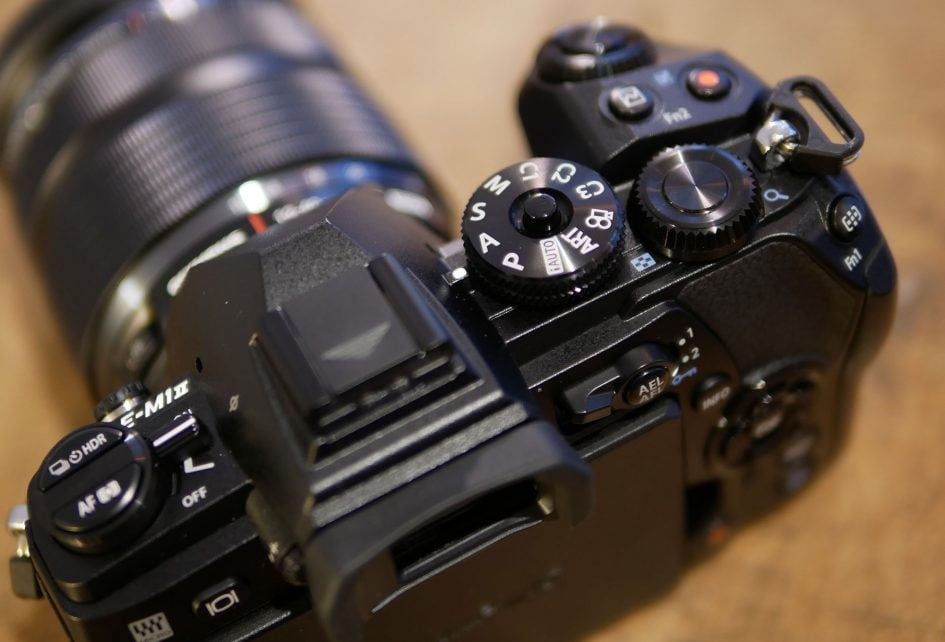
The Mark II also inherits the 2×2 lever of its predecessor and other recent models which switches the function of the two control dials. By default, the two dials control exposure, but with a flick of the lever they offer White Balance and ISO adjustment. The lever cleverly doubles the functions of the dials and works really well in practice. The only difference with the Mark I is that the switch side of the lever is now on the left rather than the right side; I prefer this as I ended up pushing it less by accident and wondering why the dials had suddenly changed function.
Meanwhile the numerous buttons spread around the body remain chunky and easy to press even when wearing thin gloves. Again I’ve noted it before, but Olympus perfectly understands that a compact camera doesn’t necessarily need to have compact controls. There’s plenty of room for chunky dials and nice fat buttons. My only recommendation for improvement for a camera in this price bracket would be backlit buttons. To be fair Nikon’s D500 is one of the few in this class which offers them, but they transform the ease with which you can shoot in low light; it’s also worth remembering Olympus is no stranger to backlit buttons, deploying them on the E-620 DSLR back in 2009.
There’s also plenty of customization if you’re so inclined. 11 buttons, including the two labeled Fn1 and Fn2, can be customized, and if the rear cross-keys aren’t set to adjust the AF area position, you can reconfigure two of them as well. In instances where a function requires a button to be pushed and held, you can even adjust the period – and for each button separately.
You can additionally configure the function – and direction – of the two control dials, and the function of the 2×2 lever. Fit a lens with an L-Fn button or the optional grip, and even more customization options are unlocked. There’s little you can’t adjust on the EM1 Mark II, although I found the default Olympus implementation worked fine for my personal needs. I particularly liked the configuration of the lever between exposure and WB / ISO and (in the absence of a joystick) having the four cross-keys devoted to repositioning the AF area.
Like the EM1 Mark I before it, the Mark II provides dedicated controls for the drive / HDR mode and AF / metering mode on the upper left side, with a chunky power switch around them; their design remains reminiscent of a classic film rewind lever on a 35mm SLR. Each button presents two sets of options on-screen, one along the top controlled by the finger dial and one along the bottom controlled by the thumb dial. Like the 2×2 lever, it’s easy to access and adjust two sets of controls.
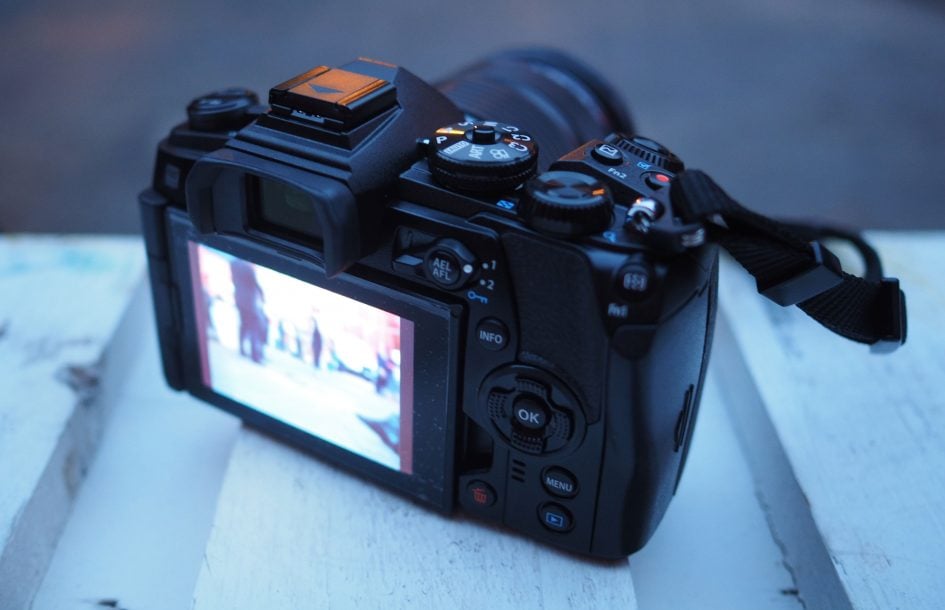
In terms of composition you have the choice between a large and detailed electronic viewfinder or a fully-articulated touchscreen. The major difference between the Mark II and the Mark I is that the screen is now side-hinged, allowing it to flip and twist to any position as oppose to the previous screen which could only tilt vertically. I personally prefer a fully-articulated screen as it allows you to shoot comfortably at high or low angles regardless of whether you’re framing in the horizontal / landscape or tall / portrait orientation, and I also appreciate being able to flip the screen forward to face the subject not just for selfies but filming pieces to camera, and there’s the added bonus of flipping the screen back on itself for protection.
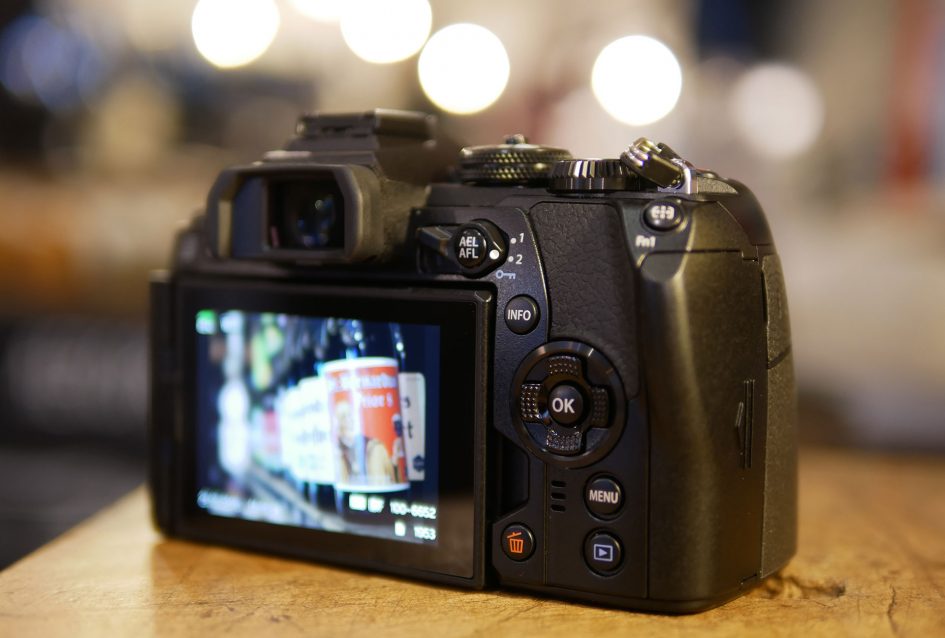
So in these respects, the EM1 Mark II’s screen greatly enhances my own use over its predecessor, but it’s important to note it’s not an entirely positive upgrade. First is when the screen is opened out to the side and rotated to face upwards or downwards, it’ll bump against anything you have connected to the ports on the left side; this will annoy film makers who may have external microphones, headphones or monitors / recorders connected. Additionally in order to angle the screen up or down, you’ll first need to open it out to the side in what becomes a two-step process. Compare this to a vertically-tilting screen which can angle up or down in one step, making it quicker and more convenient, not to mention more discreet in a street environment. That said, as someone who shoots a lot in the portrait orientation and films pieces to camera, the fully-articulated screen on the Mark II is a big upgrade over the Mark I for me; but equally it’s a feature that’s also available on the cheaper EM5 Mark II and a number of Panasonic Lumix bodies.
The screen itself employs a 3in / 1040k dot / 3:2 shaped touch-sensitive panel; in these respects I believe the specification is unchanged from the Mark I, but I’ve no complaints. There’s no room for a larger panel and the resolution is sufficient for the 3in size. As before, the touch-interface lets you simply tap to reposition the AF area (and optionally trigger the shutter if desired), or swipe through images and drag magnification sliders in playback. There’s more limited touch control in terms of menus: the Super Control menu, accessed by pressing OK, lets you tap to choose a function to adjust, but then forces you to use physical buttons or dials to change the value. The main menu system isn’t touch-sensitive at all, and that sadly includes entering copyright and author details. Now to be fair there’s so many options in the menus that the text is pretty small, but Canon’s proven you can successfully navigate your way through an entire menu system by touch, so it is possible. At least the most important ability to reposition the AF area by touch is present and correct, whether composing on-screen or through the viewfinder.
Moving onto the electronic viewfinder, the EM1 Mark II inherits a great deal from the original EM1. It shares the same panel resolution, shape, technology and magnification: a 2.36 Million dot, 4:3 shaped LCD, with 0.74x magnification. As I understand it, the only major difference is the response and refresh rate which at 120fps is now faster on the EM1 Mark II for smoother updating, but even when panning with both cameras or composing in very low light side-by-side I didn’t notice a huge amount of difference between them.
What is worth mentioning though is Olympus’s decision to employ an LCD panel rather than the OLED technology favoured by almost every other body right now. In my experience, OLED panels deliver a higher contrast image that looks more vibrant and makes the LCD viewfinder in the EM1 Mark I and II look a little flat and muted in comparison. Of course this is just a playback technology and doesn’t impact on the actual image you’re recording, but compare an OLED viewfinder directly against an LCD and they do look quite different. Olympus says they chose LCD over OLED because they believe it delivers more accurate colour and tones and I’m inclined to agree. LCDs certainly look better for portrait and skin tones use in my view, but I still personally prefer the punchier view of an OLED when shooting landscape and architecture. It is of course entirely personal though, and both technologies can be used successfully with any subject matter.
More interesting though is the shape of the viewfinder panel: the vast majority used in electronic viewfinders are 4:3 in shape which matches the native shape of the Micro Four Thirds sensors used by Olympus and Panasonic. In contrast, virtually every other camera captures images in a slightly wider 3:2 native shape which means during composition and playback, their images are letterboxed above and below with thin black bars. You need to bear this in mind when comparing relative viewfinder magnifications: yes the viewfinder magnification on the Fujifilm XT2 and Sony A7r Mark II is slightly larger, which means the images appear bigger width-ways, but by using the full vertical height of its panel, the EM1 Mark II’s viewfinder image is slightly taller. The bottom line though is all deliver a great-looking image during composition and playback, and as electronic viewfinders can also be used for playback or when filming video.
Another benefit of electronic viewfinders is the wealth of overlays and shooting aids that can be displayed. The EM1 Mark II, like its predecessor, offers a variety of alignment grids (now with slightly thicker lines making them more visible), a dual-axis leveling gauge, live histogram with customisable shadow and highlight markers (although still using surprisingly chunky graphics) and a magnified view for a closer look. Usefully when manually focusing with native lenses you can set the camera to automatically magnify the portion under the AF area and or display focus peaking which highlights areas of high contrast that are in sharp focus, then when you stop focusing, the full and or clean view returns.
When composing through the viewfinder, you can still use the touchscreen to reposition the AF area if desired. If, like me, you’re a left-eye composer though, you should be careful with your nose and the screen; it won’t inadvertently move the AF area by itself, but it can make the system unresponsive to your finger or thumb movements. Moving the camera away a fraction resolves the issue though, and if you don’t like the feature you can always turn it off.
Atop the viewfinder head you’ll find a hotshoe for use with flashguns or for mounting accessories like microphones or external HDMI monitors. There’s wireless flash control with four channels that’s compatible with the FL-36R, FL-50R, FL-300R, FL-600R, FL-900R and STF-8. There’s no built-in flash, but Olympus supplies the EM1 Mark II with a surprisingly respectable mini flash unit with a Guide Number of 12.9 at 200 ISO and which will suffice for close-range work, along with triggering wireless setups. It usefully also tilts and rotates. If you’re into studio lighting, you’ll be pleased to find a PC-Sync port on the front of the body.
On the left side of the body you’ll find three rubber flaps covering, from top to bottom, a 3.5mm microphone jack, a 3.5mm headphone jack and a Type-D HDMI with a Type-C USB 3 port. The presence of external microphone and headphone connectivity as standard shows Olympus taking the video market seriously and I welcome their presence. Although as noted earlier, actually connecting anything to any of them will prevent the screen from angling up or down; you will be able to flip it out, just not rotate it for easier viewing at high or low angles, without first disconnecting then reconnecting any cables.
It’s also forward-thinking to find a USB-C port on the camera, and Olympus thoughtfully supplies a USB-C to Type-A cable so you can connect it to older systems not yet equipped with USB-C. Unlike Sony and the Fujifilm XT2, there’s still no USB charging of the battery in-camera, but you can use the cable for copying images as well as tethered shooting with the supplied Olympus Capture software for PCs and Macs.
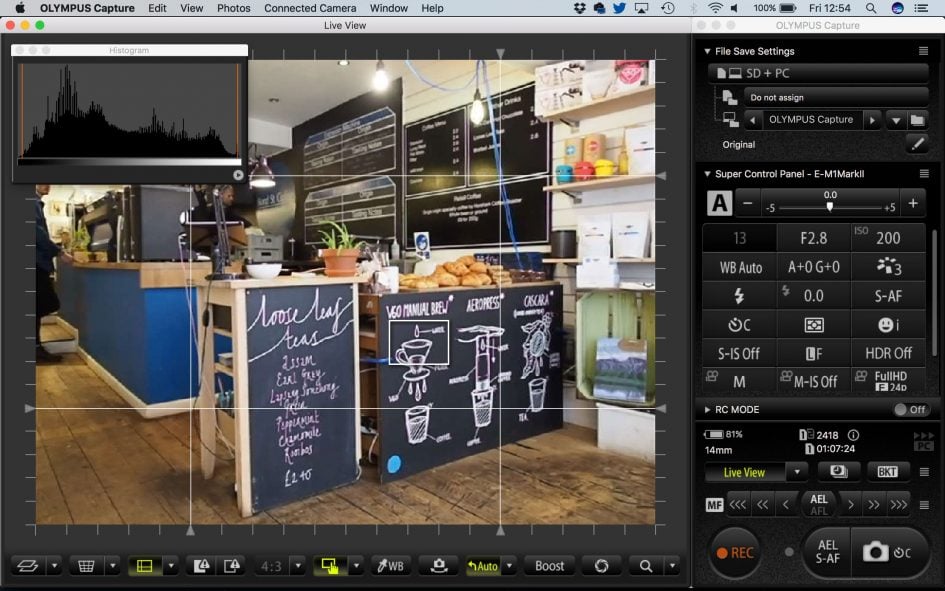
Olympus Capture offers a wealth of features and control, letting you see a large live image on your PC or Mac, along with adjusting almost every setting or manually focusing all by remote control. Just about the only thing you can’t adjust is the exposure mode that’s locked to the setting on the physical mode dial – and interesting limitation given the smartphone app can change the exposure mode remotely. The Capture program is also for wired-use only – there’s sadly no Wifi remote control with your computer, but on the plus-side the response is nice and fast over USB and if you do want Wifi control, there’s always the smartphone app which I’ll cover in detail later in the review. Note when remote-recording video using either Capture on a computer or OI Share on a smartphone, you’re limited to 1080p – there’s no remote triggering of 4k video, even if you’re asking the camera to only record it internally.
Behind a tall door on the grip side you’ll find not one but two SD memory card slots, a first for an Olympus OMD body and a very welcome upgrade over its predecessor. Dual slots are now becoming standard features on high-end cameras and you’ll find them on the Fujifilm XT2 and Panasonic GH5, not to mention Canon and Nikon’s top bodies; this leaves Sony as the only major player to still only offer a single slot on even its top bodies. Like other cameras with twin slots, you can configure the EM1 Mark II to overflow when one card’s full, duplicate content across both for backup or record one type of content to one and another to the second for easier management.
Both slots will work with UHS-II cards, but only Slot-1 at the top will exploit their extra speed. So if you only have one UHS-II card, make sure it’s in Slot-1 for the best performance. Olympus recommends using UHS-II or UHS-1 U3 cards for recording 4k video, and while Slot-1 is faster, I’ve successfully recorded the highest bit-rate Cinema4k to UHS-II or UHS-1 U3 cards in either slot. But when it comes to shooting bursts, using a UHS-II card in Slot-1 will increase the number of shots you can take before filling the buffer, and accelerate the time taken to empty it afterwards – see my AF and continuous shooting section later for more details.
Under the body you’ll find a large hatch to accommodate the Mark II’s brand new, chunkier battery pack. Since mirrorless cameras first arrived with their 100% electronic composition, there’s been valid criticisms over reduced battery life compared to DSLRs with their low-power optical viewfinders. Olympus has attempted to address this here by developing a larger battery pack, the BLH-1 Lithium Ion, rated at 1720mAh and quoted as being good for 440 shots with IS enabled under CIPA conditions. Compare this to the earlier BLN-1 with its 1220mAh capacity which powered multiple models and which, on the original EM1 Mark I, was quoted as offering 330 shots per charge.
While it’s slightly annoying not to be able to reuse any spare batteries from previous systems, I think Olympus has made the right decision here, and while the EM1 Mark II’s shot capacity still falls short of what you could expect from a comparable DSLR shooting with its optical viewfinder only, it’s still a step forward. When shooting sustained bursts one day, I managed around 1000 shots on the EM1 Mark II before the battery indicator started to flash.
In terms of video, I managed to film five consecutive 29 minute clips of 4k UHD video with stabilisation enabled (but in a static position) on a single charge – that’s a fraction under two and a half hours, which is very impressive for a single battery, and better still the camera body felt barely warm at the end (albeit when tested in a cool room). In my tests with the Fujifilm XT2, I also managed two and a half hours of 4k, but only when using the grip and deploying three batteries in total. Most single batteries provide 45 to 90 minutes of 4k, so squeezing 150 minutes from one is great news for the EM1 Mark II.
When filming video, the EM1 Mark II’s battery indicator usefully switches from percentage remaining to an approximate number of recording minutes left. Starting at 100%, one 29 minute 4k UHD clip saw the battery reduce to 91%, the second to 73%, the third to 53%, the fourth to 32% and finally the fifth virtually consumed what was remaining, leaving just enough for a minute or so on a sixth clip.
If you want more power, you can fit the optional HLD-9 battery grip which adds portrait controls and support for a second battery complementing (albeit also blocking access to) the one that remains inside the camera body. Two batteries may not match the cunning triplet the Fujifilm XT2 accommodates with its optional grip, but with higher capacity packs to start with, the end result on both cameras is roughly similar in total shots.
Olympus OMD EM1 Mark II lenses and stabilisation
The Olympus OMD EM1 Mark II employs a Micro Four Thirds sensor and lens mount which, like all OMD and PEN models before it (along with all Panasonic Lumix G cameras), results in a field reduction of two times relative to full-frame systems. So a 25mm lens delivers an equivalent field of view to 50mm on full-frame, and the effective depth of field compared to full-frame is also reduced by two times, so f1.4 will deliver a depth of field equivalent to f2.8 on full-frame.
The Micro Four Thirds mount gives the OMD EM1 Mark II access to the broadest and most established native lens catalogue of all the mirrorless camera systems, with multiple options available at every focal length. At the time of writing, Micro Four Thirds had over 75 lenses available from Panasonic and Olympus along with third parties including Sigma, Tamron, Samyang, Voigtlander and others. So while many rival mirror-less formats are only now beginning to cover most bases with a single lens, Micro Four Thirds typically has two or more options available. Whether it’s Fisheye, ultra wide, fast aperture, macro, super-zoom or good old general-purpose, the Micro Four Thirds catalogue has it covered, and many of them are great quality too – find out more in my Micro Four Thirds lens guide.
As a high-end camera, the OMD EM1 Mark II is typically sold body-alone although depending on region, there may be a selection of kits available. The M.Zuiko Digital 12-40mm f2.8, launched with the original EM1, remains a popular general-purpose choice, although if you can live with a variable aperture, you may prefer the newer M.Zuiko Digital 12-100mm zoom which not only offers a much longer range, but becomes the second Olympus lens to feature Sync-IS, where optical stabilisation in the lens works with sensor-stabilisation in the body to deliver even greater compensation. Note the 12-100mm may not yet work with the in-camera focus-stacking feature though; confirm if this is important to you.
Which brings me to the built-in stabilisation, which remains a highlight of the Olympus system. Olympus has long championed built-in sensor-shift stabilisation which has the benefit of working with any lens you attach, new or old, native or adapted. While Panasonic and Sony now also steadily improving built-in stabilisation, Olympus remains at least one step ahead and the EM1 Mark II is no different.
Previously the original EM1 offered four stops of compensation which the EM5 Mark II boosted to five. Now the EM1 Mark II improves on both of them with 5.5 stops of body-based compensation, but you can extend it further still by exploiting the optical stabilisation of compatible lenses simultaneously. Olympus calls this Sync-IS and right now it only works with two lenses: the Olympus 300mm telephoto and the new 12-100mm zoom mentioned a moment ago, which claim a total of 6 and 6.5 stops respectively. Panasonic offers something similar with its Dual-IS system, but sadly the EM1 Mark II can’t exploit the optical stabilisation on the Lumix lenses as Sync-IS can’t synchronise with them. So right now if you want the ultimate stabilisation on the EM1 Mark II, you’ll need the 12-100mm zoom and or 300mm prime.
I had the chance to film 4k video with both of the Sync IS compatible lenses and have included clips with these – not to mention other lenses – in the following compilation. Every single clip was handheld and remember some were at 600mm equivalent using the 300mm f4 lens. I have more examples in my movie mode section.
As the compilation above demonstrates, the EM1 Mark II delivers eerily good stabilisation for video, whichever lens you mount. Sure the two Sync-IS lenses are steadiest of all, but I have no complaints with the other lenses I tried. This is one of the big selling-points of the EM1 Mark II – the ability to enjoy steady footage in 4k and Cinema 4k when handheld, even in rough conditions. I’ve walked and even run with the EM1 Mark II and enjoyed decent results, all without the bulk, cost and inconvenience of a separate rig.
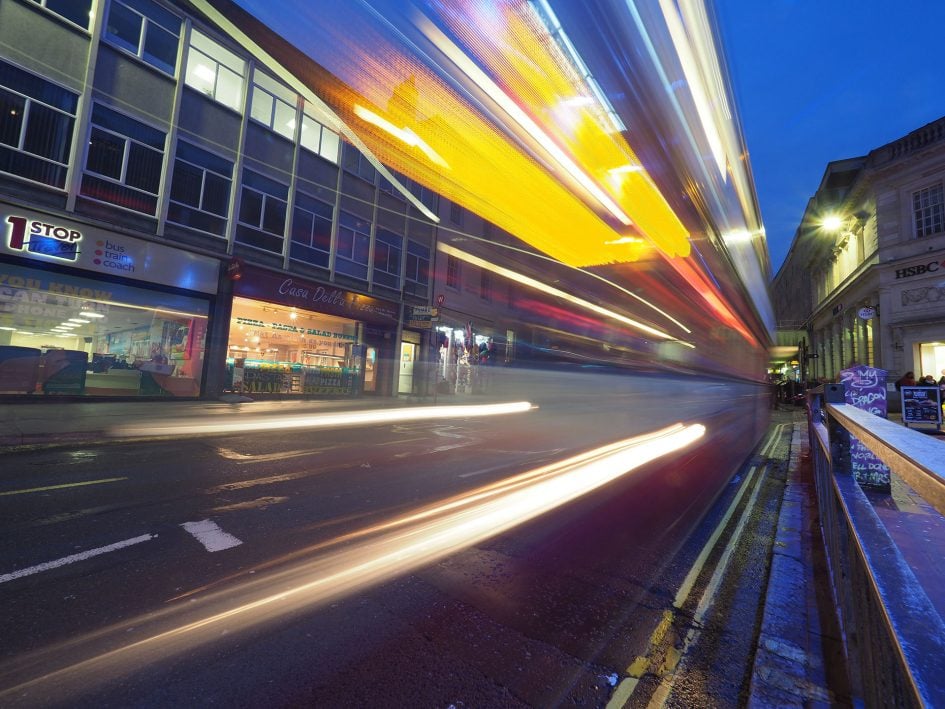
Of course the stabilisation also works a treat for stills, and allows you to easily handhold very slow shutter speeds, in turn allowing you to deploy low sensitivities under most conditions and achieve deliberate motion blurring effects all without a tripod. I love using it to shoot in the Blue Hour without a tripod, and it means I can typically capture several compositions in this limited timeframe as there’s no setting-up time. It’s also fun to challenge the expectations of other photographers who invariably shoot on tripods under the same conditions. Here’s a couple of shots I took handheld with fairly long exposures.
Above: Olympus OMD EM1 Mark II and 7-14mm at 7mm. 2 seconds handheld with IS

Above: Olympus OMD EM1 Mark II and 7-14mm at 12mm. 4 seconds handheld with IS
Previously on the EM1 Mark I, I could typically handhold a 24mm equivalent focal length at one second. The improved stabilisation of the EM5 Mark II meant I could handhold 24mm equivalent at around two seconds. Now on the EM1 Mark II I can handhold the same focal length at two to four seconds, depending on my stance. Fit the 12-100mm and lean against a wall and you can usually handhold even longer exposures. Four seconds was about my limit at 24mm equivalent, but I know of others who’ve managed even longer.
Olympus OMD EM1 Mark II and 75mm at 0.4 secs. IS off (left), IS on (right)

Above are 100% crops from frames taken with the Olympus 75mm lens mounted on the EM1 Mark II at a shutter speed of just 0.4 seconds. With a 150mm equivalent focal length, conventional wisdom – and indeed the conditions of the day – required a shutter speed of 1/160 to handhold a sharp result without stabilisation. With stabilisation enabled though, I achieved a similar result at 0.4 secs, corresponding to around six stops of compensation – and this without a Sync IS lens.
Olympus OMD EM1 Mark II autofocus and burst shooting
Olympus has completely revamped the autofocus, burst shooting and processing capabilities on the EM1 Mark II, addressing earlier criticisms of the system’s inability to confidently track and focus on fast action. There’s a ton of information to follow below, but the bottom line is the EM1 Mark II becomes not just the best Micro Four Thirds camera for action shooting, but in some conditions manages to match or exceed many rivals, whether mirrorless or DSLR. Whether it’s sports, wildlife, or simply an active family, the EM1 Mark II makes it easy to capture dynamic, focused images.
The EM1 Mark II’s new 20 Megapixel sensor features an embedded array of 121 phase-detect AF points, arranged in an 11×11 rectangular pattern that covers 80% of the frame width and 75% of its height; in practice this provides coverage across almost the entire frame with only a thin border around it. While some embedded AF systems beat it on total coverage and density – most notably those on the Sony A6300 and A6500 – the EM1 Mark II fights back with every AF point being cross-type, making them sensitive to both horizontal and vertical patterns. In contrast, the vast majority of embedded phase-detect AF systems employ more basic points that are sensitive to either horizontal or vertical patterns, but not both. There’s pros and cons to each approach, density versus sophistication, and I’ll discuss their relative performance in a moment.
In terms of sensitivity, Olympus quotes the AF system as operating at light levels down to -2EV. That’s roughly in the middle of the pack, better than some, but not as good as others. Sony quotes a fairly modest -1EV for the A6300 / A6500, but Fujifilm quotes -3EV for the XT2, while Panasonic quotes -4EV for most of its recent mirrorless cameras. That said I used the EM1 Mark II in some pretty dim conditions, setting up long exposures as dusk turned to night, and I rarely experienced any mis-focusing.
In terms of choosing an AF area on the EM1 Mark II, you can go for single area, five area (arranged as a cross pattern), or nine area (arranged as a 3×3 zone). In each instance you can reposition the point or points by touch or using the four cross-keys on the rear. Alternatively you can enable the entire 121 area array and let the camera work out the subject.
Face and eye detection are adjusted on a separate menu with options to prioritise the left, right or closest eye if preferred. If any of the face detection options are enabled and the camera spots what it thinks is a human face, it’ll ignore the previously set AF area and focus on the face instead; in an ideal World this would be the preferred approach, but like all face detect systems the EM1 Mark II can occasionally mistake non-human subjects for faces and annoyingly focus on them instead. By default though, the AF area and face detect options are adjusted by the push of a button before turning the finger and thumb wheels, so it’s easy to toggle them quickly on and off as required – at least you don’t need to delve into the menus to adjust the face and eye detection settings.
Driving the AF system are Single AF or Continuous AF options, the latter available with optional tracking if desired. If the tracking option is enabled, the EM1 Mark II lets you specify your target with a half-press, after which the camera will attempt to follow it around the frame, refocusing as required.
Working alongside the autofocus system are a wealth of burst drive modes which are impressive but at first – and even second – glance can be more than a little bewildering. The specs proudly state the EM1 Mark II can shoot full resolution RAW files at 60fps in Single AF or 18 fps in Continuous AF, but both require the use of an electronic shutter with its related pros and cons. Mechanical shutter options are available with the speeds falling to a still impressive 15fps for Single AF or 10fps for Continuous AF, so you need to understand the various drive options to choose the most appropriate mode.
Under the drive menu you’ll find Single, Sequential Low and Sequential High options, each available in two or three versions depending on the type of shutter used. The different shutter options are labeled with icons you’ll need to learn: a plain square means a fully mechanical shutter, a square with a tiny heart refers to silent shooting with a fully electronic shutter, while a square with a tiny diamond refers to an anti-shock mode which employs an electronic first-curtain shutter to minimize the risk of shutter shock – although to be fair I never experienced shutter shock using the fully mechanical shutter of the EM1 Mark II.
The Single and Sequential Low modes are available in all three shutter flavours, while Sequential High misses out on the anti-shock option. That still totals eight options in the drive menu, and that’s before you add in the two Pro Capture options, the High Res mode and the various self-timers. It can be terribly confusing for even experienced Olympus owners, and potentially muddying it further is the ability to customize the actual fps speeds of the various Sequential Low and High modes. I think it would have been better to employ the approach of Panasonic and Sony which basically offer single, low and high speed options in the drive menus, and leave the choice of shutter type to the main menus.
Another factor to consider is the combination of speed and focusing mode. Single AF is available in any of the drive modes, but if you want Continuous AF, you’ll need to select the Sequential Low modes, at least when using the options pre-configured by default. As such, I found it easiest to choose my drive mode based on whether I needed Continuous AF or not first, followed by the desired frame rate. If I wanted Continuous AF, I’d go for one of the Sequential Low modes, choosing the plain square if I wanted the 10fps mechanical shutter, or the square with the heart if I wanted the maximum 18fps electronic shutter. If I wanted faster frame rates, I’d accept the loss of Continuous AF and select one of the Sequential High modes, either the plain square for up to 15fps with the mechanical shutter or with the heart icon for up to 60fps with the electronic shutter. Phew!
Ok that’s a lot of numbers and theory, but how well does it come together in practice? First up, Single AF, which was never an issue on earlier Micro four Thirds bodies, and continues to be a delight here. Like the OMDs before it, the EM1 Mark II focuses quickly and confidently in Single AF modes, snapping into focus with the minimum of fuss and delay. There’s also minimal hunting and sometimes none at all, implying the phase-detect AF system is employed, perhaps with an additional contrast based confirmation only when required.
But what you really want to know is whether all the work that’s gone into the Continuous AF finally lays earlier demons to rest: can the EM1 Mark II keep focused on fast moving subjects? I’m delighted to say the answer is a resounding yes, with a high degree of success even when shooting at the top burst speeds.
I tried out the EM1 Mark II’s Continuous AF in a variety of conditions with a number of lenses the performance was a World apart from its predecessor. Where the original EM1 struggled to continuously autofocus with any degree of confidence in my tests, the Mark II consistently felt quicker and much more confident.
I’ll start with some tests I did at an Olympus event under dull conditions. My first Continuous AF test was shooting a small herd of bulls charging towards me, peering from behind the safety of a gate. I shot with the Olympus 40-150mm f2.8 lens at 150mm f2.8 and with the AF system configured to a nine-area zone, and I used the 10fps mechanical shutter. The camera easily snapped onto the closest subject within the nine-area zone and stuck with it as it approached at fair speed. Here’s an example from a burst, cropped a little vertically, but showing the full horizontal width.
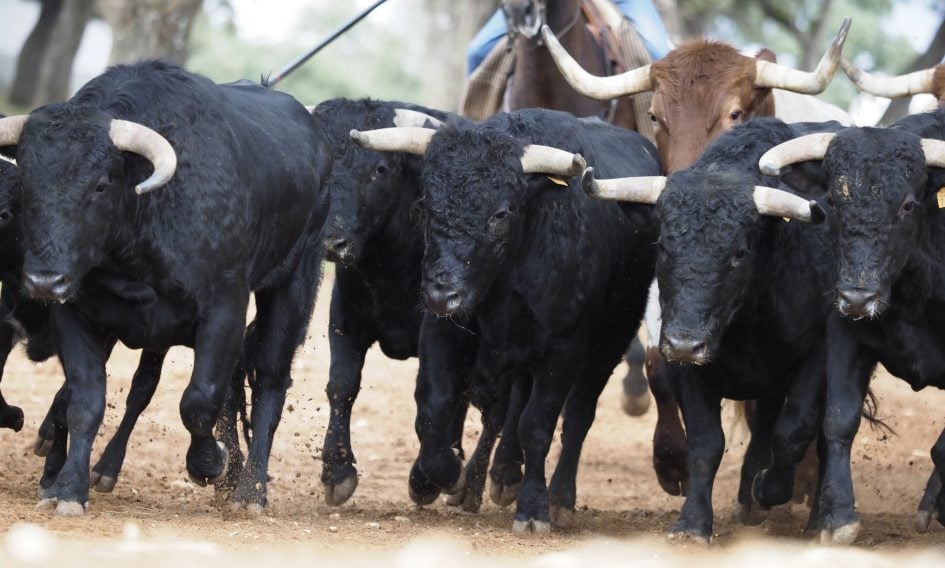
Above: Olympus OMD EM1 Mark II and 40-150mm at 150mm f2.8
During each run of the bulls, the owner’s dog, Kiwi, would run alongside, so I turned the camera onto him and again it snapped-on quickly and confidently. Here’s an uncropped frame.
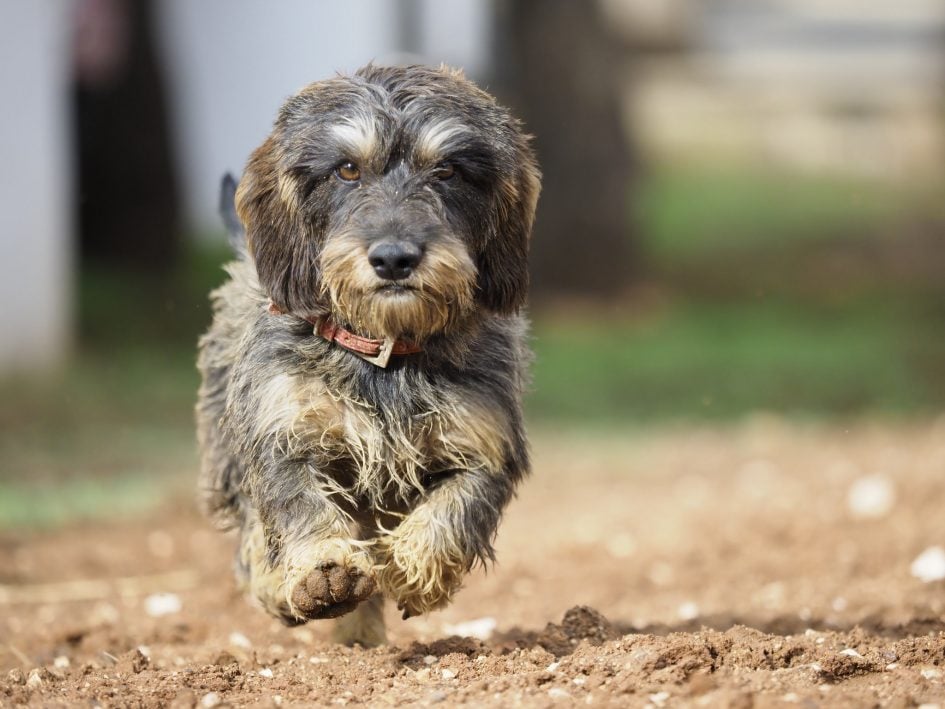
Above: Olympus OMD EM1 Mark II and 40-150mm at 150mm f2.8
I was also impressed with the single AF speed which while hardly slow on earlier models, now felt even faster. But for me the most exciting aspect was seeing a new lease of life for the 40-150mm as a premium lens that now becomes quite usable for shooting fast action.
I was curious to push this even further, so when I moved onto photographing birds of prey, both stationary and in flight, I opted for the Olympus 300mm f4. For starters here’s a portrait of a Russian Eagle Owl from fairly close range and even though the light was low and the weather beginning to drizzle, the EM1 Mark II continued to focus quickly and confidently. I was also delighted by the Sync IS stabilisation as the image floated eerily in the viewfinder – the stability felt like I was shooting at an equivalent of about 200mm, but it was in fact equivalent to 600mm.

Above: Olympus OMD EM1 Mark II and 300mm f4
To find out if this lens could be used to track action on the Mark II, I tried shooting falcons flying directly towards me. To minimize mis-focusing on the busy forest background I used the five-area cross-shaped AF pattern and again shot at 10fps with the mechanical shutter. My own inexperience at shooting birds in flight meant I found it fairly hard to keep the AF pattern over the target but as soon as I did, it snapped into focus and stayed there for several frames – and again the conditions were worsening for light and rain. Here’s an example again cropped vertically but showing the full horizontal width.
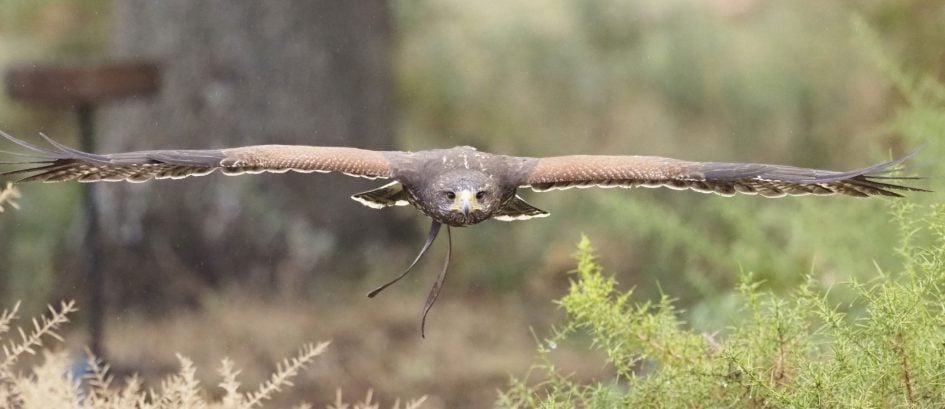
Above: Olympus OMD EM1 Mark II and 300mm f4
When I returned to Brighton to continue my in-depth tests, I tried the EM1 Mark II with approaching cyclists and more birds in flight. This time I shot mostly with the Olympus 40-150mm f2.8 and the Leica 100-400mm, the latter being a very popular choice for birders.
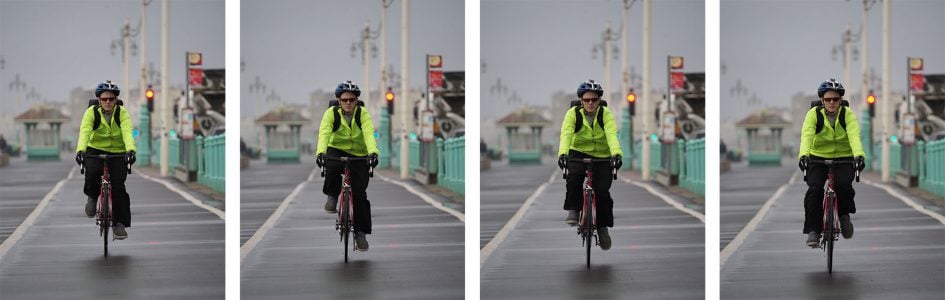
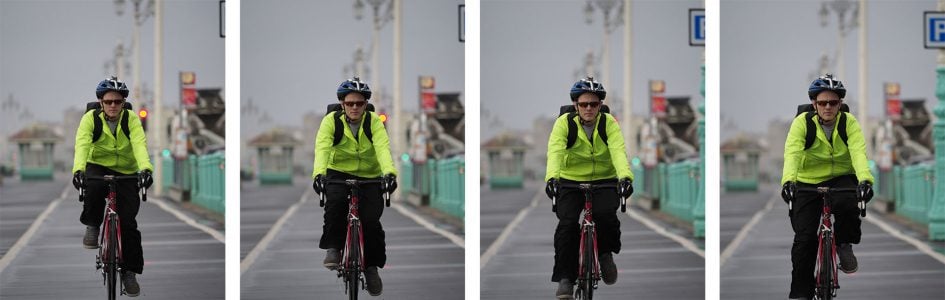
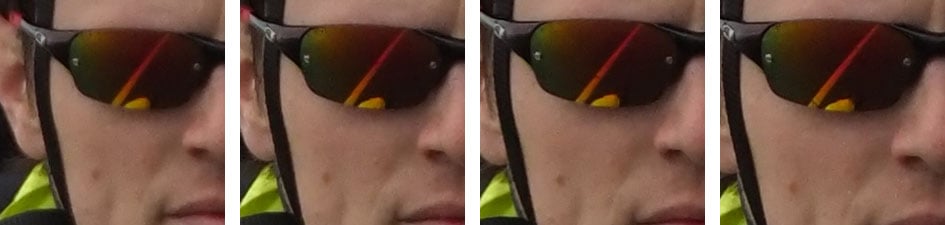
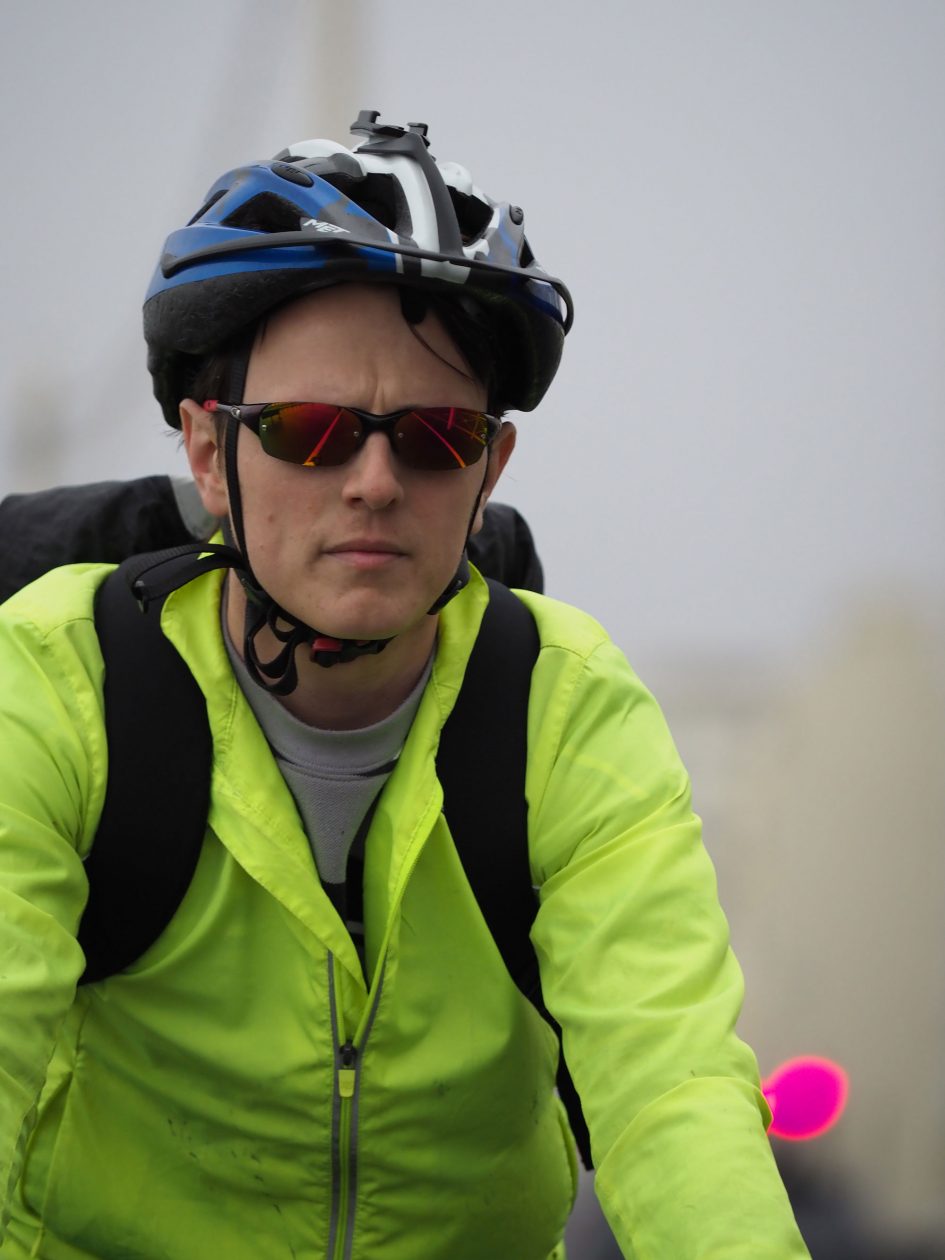
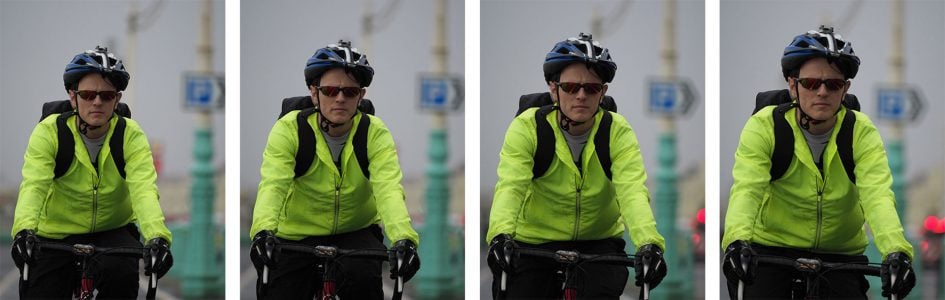
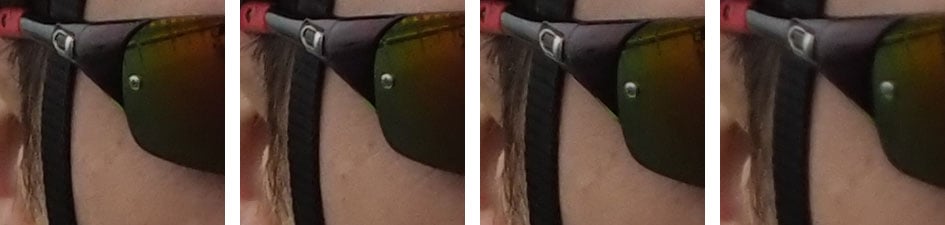
Here’s a sequence of my friend Ben, cycling towards me in dim daylight conditions with the EM1 Mark II fitted with the 40-150mm at 150mm f2.8 and set to Sequential High using the mechanical shutter at 10fps and the five-area cross pattern manually positioned at face-height. As you can see in the 100% crops taken from each frame, the EM1 Mark II returned a high hit rate.
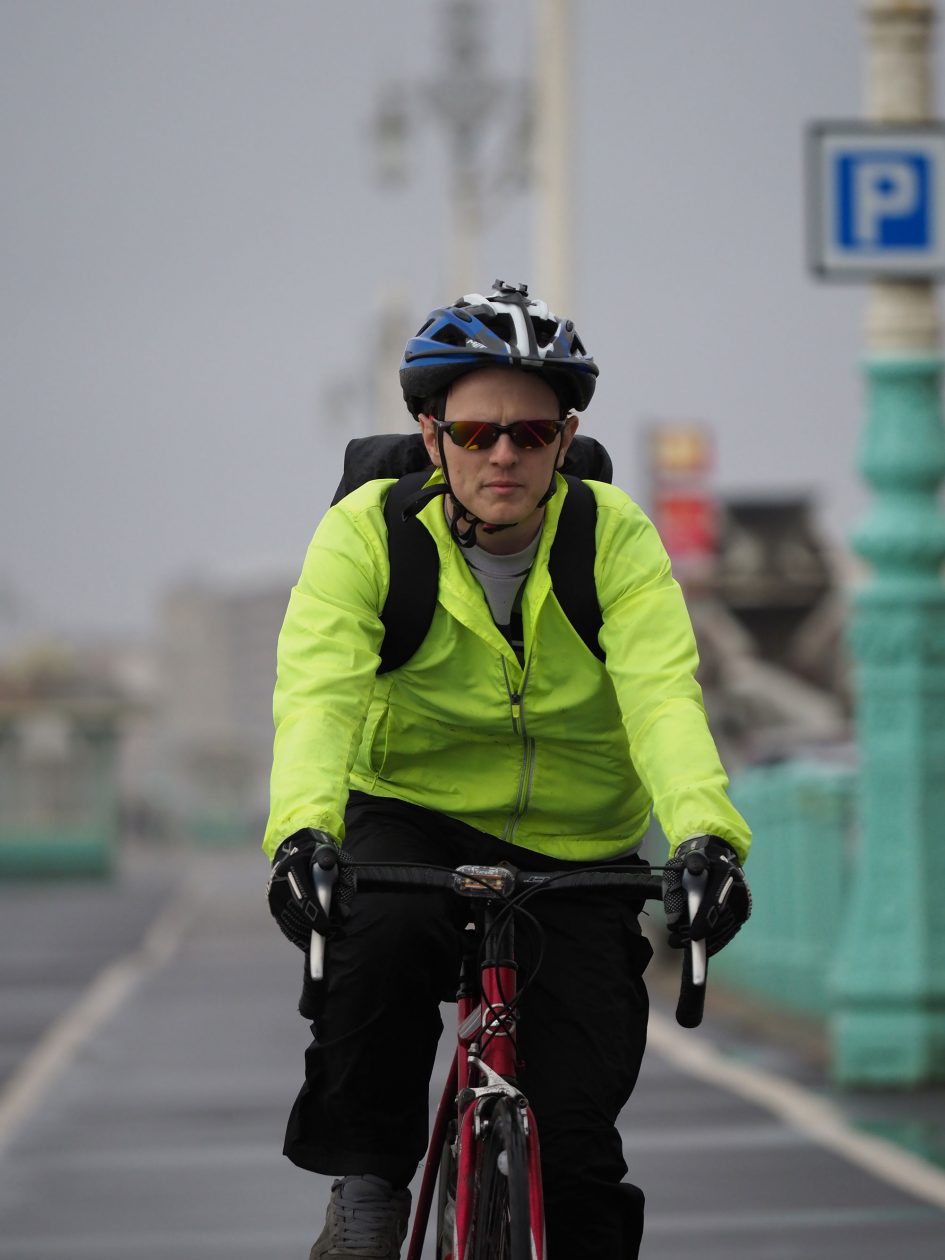
Above: Olympus OMD EM1 Mark II and 40-150mm f2.8 at 150mm f2.8. Sequential High at 10fps

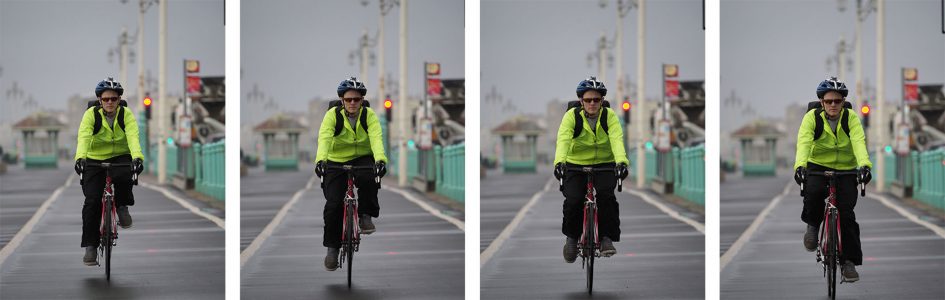

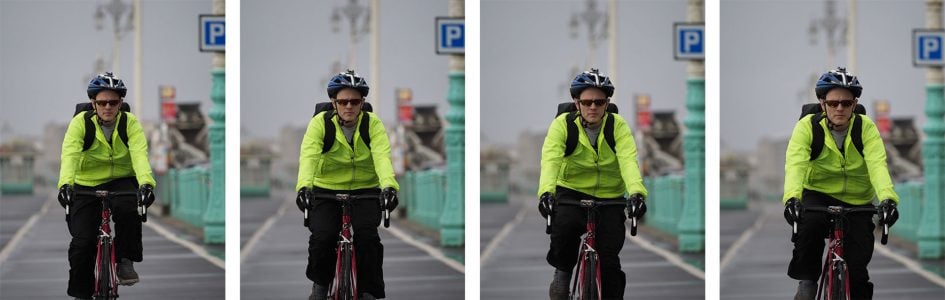
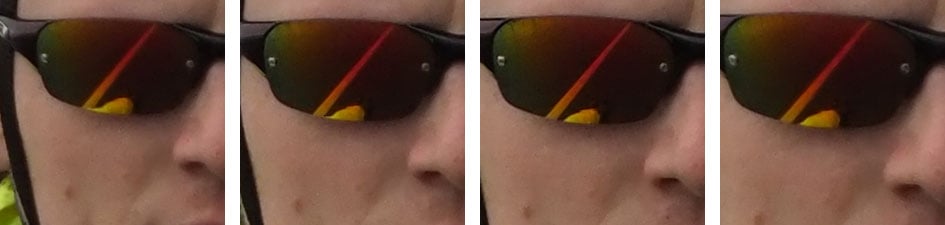
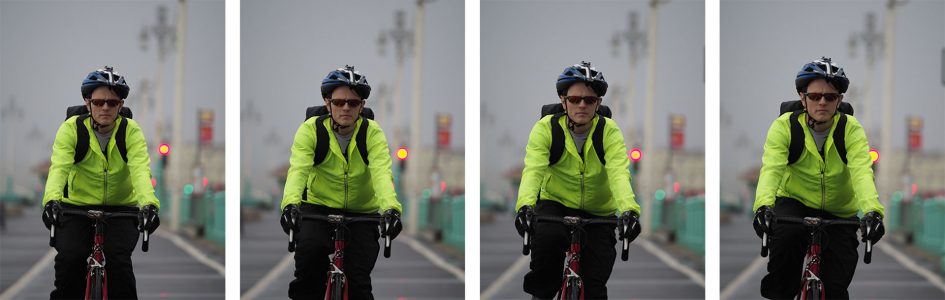
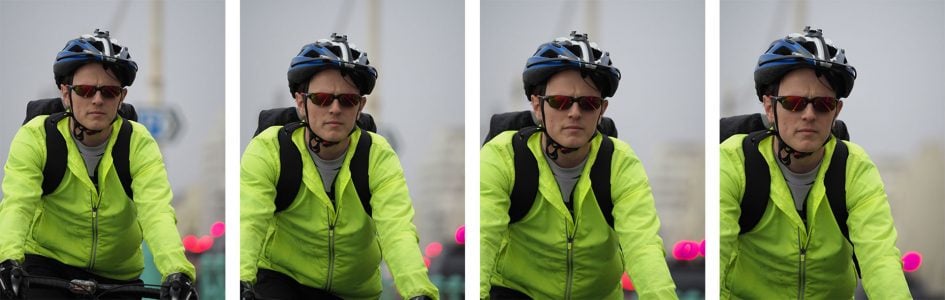
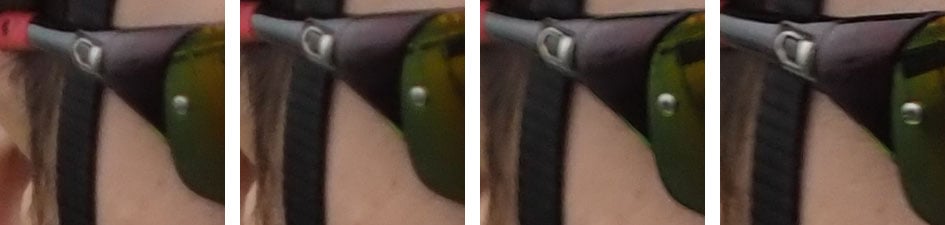
In the next sequence I switched to the Sequential High mode with the electronic shutter, capturing at up to 18fps (albeit closer to 16fps in practice); as before I used the 40-150mm at 150mm f2.8 and with the five-area cross AF patter which I found most affective for this kind of mostly predictable target. As before the EM1 Mark II returned a respectably high hit-rate, although at the point Ben cycled past and I panned to follow, there was some skewing from the electronic shutter. Bear this in mind depending on your subject and technique – if your subject crosses the frame quickly or you’re panning to follow them, you may experience some skewing when shooting with the electronic shutter; in these scenarios, it’s best to switch to the mechanical shutter instead.
Above: Olympus OMD EM1 Mark II and 40-150mm f2.8 at 150mm f2.8. Sequential High at 18fps

One of the most satisfying things about the new AF system was how well it worked with every lens I tried, including some old favourites I’d previously ruled-out for action shots due to disappointing body AF. The M.Zuiko Digital 75mm f1.8 for instance worked a treat with active kids and pets on the EM1 Mark II, with its comfortable reach and nice shallow depth-of-field. The afore-mentioned Leica 100-400mm also proved a great partner with the EM1 Mark II for photographing distant subjects like birds. Once again it’s wonderful to see all these lenses enjoying a new lease of life in an action environment.
While the EM1 Mark II’s AF system was great at refocusing on subjects approaching or receding fairly predictably, I found it felt less confident tracking subjects moving across the frame. Don’t get me wrong, the tracking can be effective in some situations, but it’s not yet at the level Nikon enjoys with the D500 – and I mention this as the price of both bodies is roughly the same. As always there’s pros and cons with all cameras and while the D500 and EM1 Mark II share the same top mechanical shutter speed, the Olympus features a potentially quicker electronic shutter option, much faster shooting in Single AF, plus built-in IS much more besides. There’s lots to weigh-up.
Before concluding this section, I wanted to perform some formal timing tests on the burst modes to measure what’s possible and also the impact of using the different card slots. All the burst timings below were performed with the EM1 Mark II set to a shutter speed of 1/500 and a sensitivity of 400 ISO; I used a 16GB UHS-II SD card and reformatted it before each burst.
With the card inserted in Slot-1, the image quality set to Large Fine JPEG, the AF to Single, and the drive set to Sequential High with the mechanical shutter (quoted at 15fps), I fired-off 117 frames in 7.72 seconds for a rate of 15.2fps, before the camera slowed to around 8fps and kept shooting while memory remained. When reshooting the initial burst of 117 frames at the top speed, the camera took about five seconds to flush the buffer to the UHS-II card in Slot-1. With the same card in Slot-2, I managed 74 frames in 4.83 seconds, before the camera slowed down. The speed during the initial burst was still a tad over 15fps, but the slower card slot meant the buffer filled more quickly – and it took longer to empty too, taking ten seconds to write the 74 images, versus five seconds to write 117 images in Slot-1.
Switching to RAW in Sequential High with Single AF, and with the card in Slot-1, I managed 95 frames in 6.14 seconds for a rate of 15.5fps; this burst took six seconds to write to the card after I stopped shooting. With the card switched to Slot-2, I managed 56 frames in 3.59 seconds for a rate of 15.6fps, but this time the burst took 20 seconds to write.
These first tests prove that the EM1 Mark II can maintain 15fps with its mechanical shutter for decent bursts in RAW or JPEG, but that there’s a measurable benefit to using a UHS-II card in Slot-1. Doing so will extend the total burst depth at the top speed as well as clearing the buffer afterwards – and the latter is important as the EM1 Mark II frustratingly won’t let you play any images from the burst until it’s finished writing all of them to the card (although you can fire-off more during this time if desired).
Sticking with Single AF and card Slot-1, I then switched to Sequential High in Silent drive mode to access the top shooting speed of 60fps with the electronic shutter. With the quality set to Large Fine JPEG, I fired-off 48 frames in 0.92 seconds for a rate of 52fps before the rate slowed to 8 to 10fps. In RAW, the camera again fired-off 48 frames in 0.85 seconds for a rate of 56fps, and again you’re looking at about six seconds to clear the buffer with a UHS-II card in Slot-1. While my measured shooting rate fell a tad below the quoted 60fps, it’s certainly very close and the depth of 48 images means you’re capturing almost a second’s worth of action.
Switching to Continuous AF with the Sequential Low modes, I first tried the mechanical shutter rated at 10fps. With the quality set to Large Fine JPEG and the UHS-II card in Slot-1, the EM1 Mark II seemed happy to keep shooting while memory remained. I shot for over a minute before getting bored, capturing 549 frames in 63.93 seconds for a rate of 8.59fps. With the same card in Slot-2, the buffer filled a little after 15 seconds, but that’s still around 100 shots.
With the camera set to Sequential Low with the silent drive mode, I could access the electronic shutter rated at 18fps with continuous AF. This time I managed a rate of around 12fps for around 20 seconds before the camera slowed. While both burst modes with Continuous AF delivered slower rates than quoted in my tests, they were slowing a tad to maintain focus on the subject. The priority between speed and focus can be customized if you prefer one over the other, but the bottom line is it’s easy to approach the quoted top speeds with continuous AF and enjoy them for sustained bursts.
My only complaint is there’s no indication how many frames are left in the buffer while shooting, which is useful not only to monitor how many shots you have left, but also the current speed of the camera as this can vary when the buffer fills – significantly so when starting off at the top speeds.
New to the OMD EM1 Mark II is the Pro Capture mode which I’ll describe in detail in the next section, but just briefly I wanted to mention some findings: most notably when shooting at the top speed of 60fps, the maximum number of frames that could be captured before the camera slowed was 48 frames. This tallies with my tests in the Sequential High / Single AF modes earlier and indicates the extent of the EM1 Mark II’s buffer – essentially 48 frames, JPEG or RAW, when shooting at 60fps. If you slow the camera down though, you’ll enjoy long bursts, especially if using a UHS-II card in Slot-1, and if you go for 10fps to enjoy continuous AF, you should be able to keep shooting while memory remains.
The bottom line is the EM1 Mark II can shoot sustained bursts with continuous AF up to 18fps with the electronic shutter, or unlimited at 10fps with the mechanical shutter. Sacrifice continuous AF for single AF and you can accelerate to 60fps with the electronic shutter or 15fps with the mechanical shutter, and it’s only when shooting at 60fps that you’ll become aware of the Mark II’s buffer, with a maximum of 48 images at this fastest speed. It all adds up to very impressive performance even compared to sports-oriented DSLRs at the same price point. Olympus has really delivered the goods here and banished former demons.
Olympus OMD EM1 Mark II Pro Capture
New to the EM1 Mark II is the Pro Capture mode which uses the electronic shutter to shoot full resolution 20 Megapixel images, even in the RAW format, at up to 60fps; it’ll maintain this speed for up to 48 frames, before continuing at a lower speed. Note, Pro Capture only works with Olympus lenses.
Of course shooting 48 frames at 60fps with an electronic shutter is already possible in the Sequential High mode with the heart icon, but what makes Pro Capture different is the camera can maintain a rolling buffer of up to 14 frames which begins when you half-press the shutter. As soon as you fully depress the shutter, the most recent 14 frames are committed to your card and the camera keeps shooting as you keep the button pressed. Capturing a selection of images before and after the full-press should increase your chances of recording the decisive moment – but with the buffer effectively only saving a quarter to one second’s worth of images prior to the full-press (depending on the frame speed), you still need to be careful with your timing.
The EM1 Mark II offers a variety of Pro Capture modes, again all employing an electronic shutter: Pro Capture H can shoot at 60, 30, 20 or 15fps in Single Autofocus, while Pro Capture L can shoot at 18, 15 or 10fps with Single or Continuous AF. In any mode you can set the number of pre-shutter frames from 0 to 14, and if desired set a total frame limit up to 99 frames or unlimited.
It makes sense to set a limit too as even though the rate slows down after 48 frames when shooting at the top 60fps, you’ll still burn through your memory – especially if you’re recording in RAW. The silence and lack of vibration when using the electronic shutter also makes it easy to shoot for longer than you really need to. I casually shot a few seconds of Pro Capture H at 60fps in RAW and quickly ended up with about 1.5GB of data. Like the other Sequential modes, you’ll also ideally want to use a UHS-II card in Slot-1 in order to clear the buffer in reasonable time.
As noted earlier, it’s important to calculate how long the pre-shutter buffer will last depending on your chosen fps. If you’ve gone for the maximum 14 frame buffer, it’ll only represent around one second at the slowest Pro Capture speeds, and as little as a quarter second at the fastest. So while the buffer is constantly being refreshed with the most recent 14 frames as you keep the shutter half-pressed, you should still be careful with your timing. Typically you’d half-press the shutter as the moment of action approached, then fully depress it the instant the key moment happens. That way you’ll have a small burst before the full-press plus a selection afterwards.
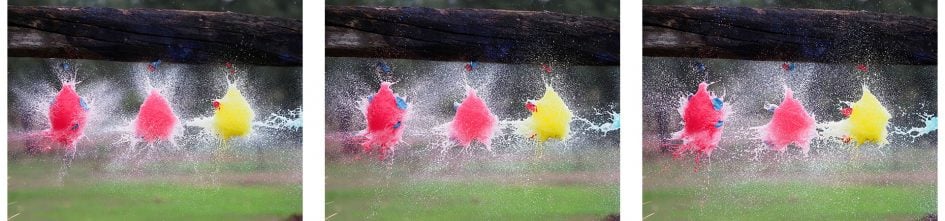
To demonstrate Pro Capture in action, Olympus set up rows of balloons filled with water at a European event and had an archer fire an arrow through them. I set the EM1 Mark II to the fastest Pro Capture H mode, shooting at 60fps with a 48 shot / 0.8 second limit (to avoid filling the card with unnecessary frames), half-pressing the shutter as I waited for the archer to get ready, then fully-pressing once he let go. Even with only 0.8 seconds of action captured, it was possible to capture the arrow in flight as it passed through the balloons. Here’s a frame taken from a burst, cropped vertically but showing the full width.
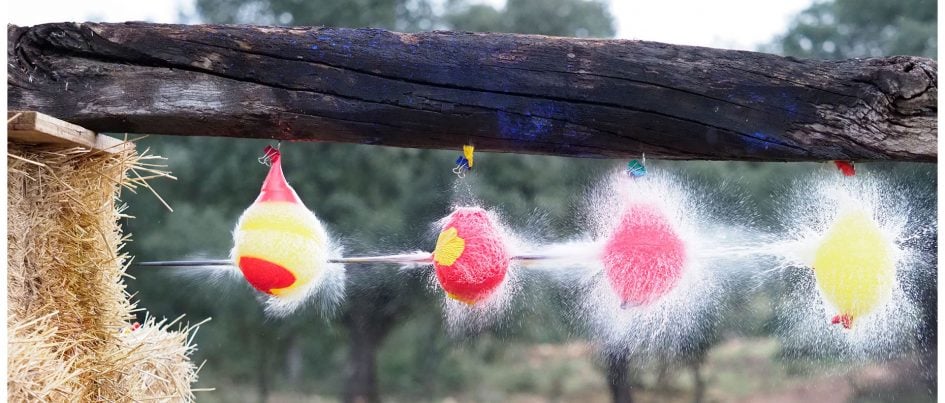
Above: Olympus OMD EM1 Mark II and 40-150mm: Pro Capture H mode
In many ways the buffering process felt like shooting with the rolling buffer of Panasonic’s 4k Photo or the pre-capture option on Sony’s HFR video modes, but the difference was the EM1 Mark II was capturing full resolution 20 Megapixel images (in RAW too if desired), albeit only for short bursts. Here’s a typical selection I shot with the Olympus 40-150mm f2.8 lens.


Olympus OMD EM1 Mark II High Res mode
The EM1 Mark II inherits the High Res mode of the EM5 Mark II which exploits the built-in image stabilization to shift the sensor’s position eight times by a tiny amount, before combining them all into a single, higher resolution image all in-camera – for JPEG images on the EM1 Mark II it’ll boost the recorded resolution from 20 to 50 Megapixels. This time the TruePic VIII processor claims to do a better job at recognizing elements that may have moved during the process, but it still demands very careful technique for the best results – I’m talking not just about choosing subjects that remain static during the capture process, but also shooting with your sharpest lens at its optimal aperture, and from a tripod with a delay.
The High Res Shot mode is tagged on the end of the (already packed) Drive options, although also has a dedicated mention in the second Camera menu page with additional options. These include a chance to delay the shot which is critical if you want to avoid wobble; you can’t deploy the normal self-timer as it’s a separate option on the Drive menu. There’s the chance to record the final image as a single JPEG or a JPEG with a RAW file accompanied by a mysterious ORI file; the latter is actually the first frame in the sequence saved as a RAW file, so even if the composite result doesn’t look great, you still have a single frame as backup, so long as you’ve selected the RAW option. Note the file options for the Super High Res mode are independent of the quality set for single frame images, so just because you have RAW set for one doesn’t mean you’ll necessarily have RAW set for the other – an annoying situation.
During the capture process, the sensor is repositioned eight times around a square pattern. It takes the first shot, shifts right by half a pixel, takes the second, then right again by half a pixel for the third. Then up half a pixel for the fourth, up another half for the fifth, then left by half a pixel for the sixth, left half again for the seventh, then finally down by half a pixel for the eight and final shot. Another way of picturing it is the camera captures a photo at each corner of a square and an additional four in the middle of each side.
The theory is the four images in single pixel increments allow the camera to effectively capture red, green and blue for every pixel, greatly boosting colour resolution (and reducing colour moire), while the four half-pixel increments effectively quadruple the spatial detail.
With a native resolution of 20 Megapixels on the sensor, the High Res mode effectively generates a new RAW file with four times the total pixels: 80 Megapixels in all. But as before, Olympus is realistic when it comes to the actual useful detail recorded and if you opt for an in-camera JPEG, it offers 50 or 25 Megapixel options. Since the earlier EM5 Mark II started with 16 Megapixels, its High Res mode generated 64 Megapixels of RAW data, but saved them as 40 Megapixel JPEGs.
Normal 20 Megapixel JPEGs from the EM1 Mark II measure 5184×3888 pixels, while 50M JPEGs generated in-camera by the High Res mode measure 8160×6120 pixels. Compare this to the 4608×3456 pixel native images from the EM5 Mark II and its 40M JPEG versions at 7296×5472 pixels. In terms of file size, the High Res mode is pretty hungry, with 50M JPEGs from the EM1 Mark II typically measuring around 20MB each, compared to around 8MB for a single frame JPEG using Fine compression. If you’re saving the High Res images in the RAW format, you’re looking at 60MB for the RAW file itself, plus another 20MB or so for the accompanying ORI file (which again is simply the first frame in the sequence saved as backup in case the composite doesn’t work out). While the size of the High Res RAW files appears to have shrunk from those on the EM5 Mark II (which typically measured 100MB each), you’re still looking at 60MB plus another 20MB for the ORI file, and another 20MB or so if you’ve gone for an accompanying JPEG, making roughly 100MB per image.
Again like the EM5 Mark II before it, the High Res mode on the EM1 Mark II switches the camera to an electronic shutter (for speed and stability) and fires its eight shots in about a second. It then takes about five or six seconds longer to generate the final composite file – interestingly more than twice as long as the EM5 Mark II which implies more work behind the scenes beyond just the impact of slightly higher image resolution.
While Olympus has expressed a long-term desire to make this a faster and hand-holdable process, the High Res mode on the EM1 Mark II still requires the camera and subject to be kept as still as possible during the capture process. While it is possible to handhold the EM1 Mark II for one second exposures during normal use, its stabilization is disabled during the High Res mode in order to shift the sensor – so hand-holding it is still out of the question. Indeed the camera indicates if the camera isn’t sufficiently steady by blinking its High Res mode icon at you, and it’ll even warn you as you push the shutter release – which is why you should either deploy a delay from the menu or use remote control.
As for the subject, any motion during the roughly one second capture process can generate ghostly stitching errors. Cars, people or birds can appear as multiple faint shapes next to each other, although to be fair the latest Olympus processing has improved in this regard. The surface of rivers and the Sea look slightly blurred, and although while the effect isn’t as smooth as a traditional single long exposure, I personally felt moving seascapes looked better in the EM1 Mark II’s High Res mode than in the EM5 Mark II. That said portraits in the High Res remain virtually impossible. As such the High Res mode is best-suited for compositions that remain static during the one second capture period: think studio work, still life, product photography, buildings, interiors, and of course image reproduction.
There are other caveats too: like the EM5 Mark II, the highest sensitivity is 1600 ISO and the minimum aperture is f8, to avoid noise or diffraction. The maximum exposure (per frame) has however been extended from eight seconds to 60 seconds, which is better news for long exposure photographers, although the process still needs to capture eight of them. Most important of all though are the optics. In order to resolve 50 Megapixel’s worth of detail from a relatively small area, you’ll need to use the best lenses as basic kit zooms are unlikely to deliver sufficient resolution.
With all that said, here are a selection of images I took with the normal 20 Megapixel mode and with the 50M High Res mode for comparison.

Above: Olympus OMD EM1 Mark II: normal vs High Res mode. Full image below
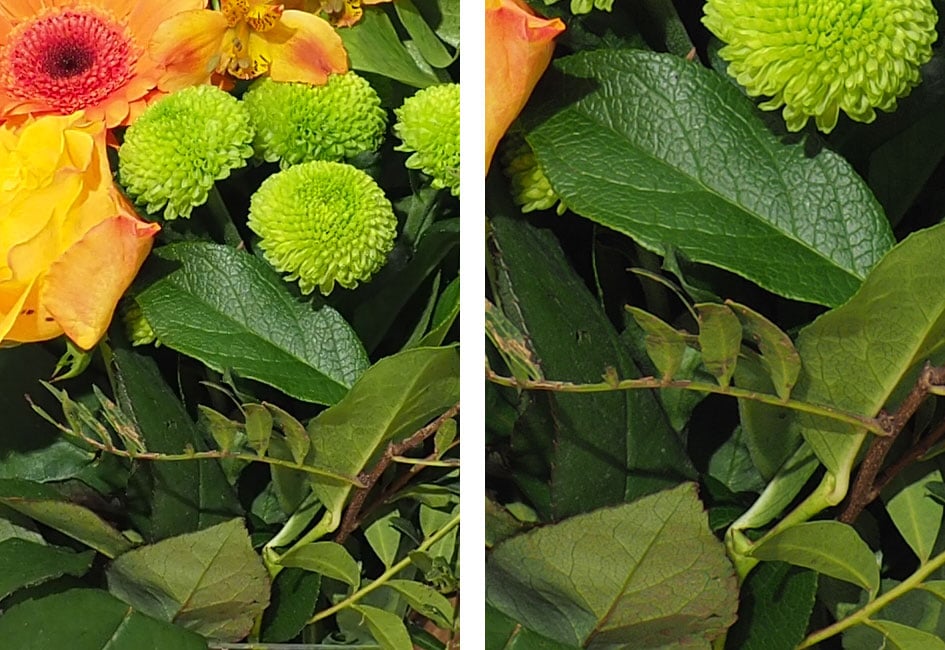
Above left: 100% crop from 20 Megapixel image, above right: 100% crop from 50 Megapixel High Res mode

Above: Olympus OMD EM1 Mark II: normal vs High Res mode. Full image below
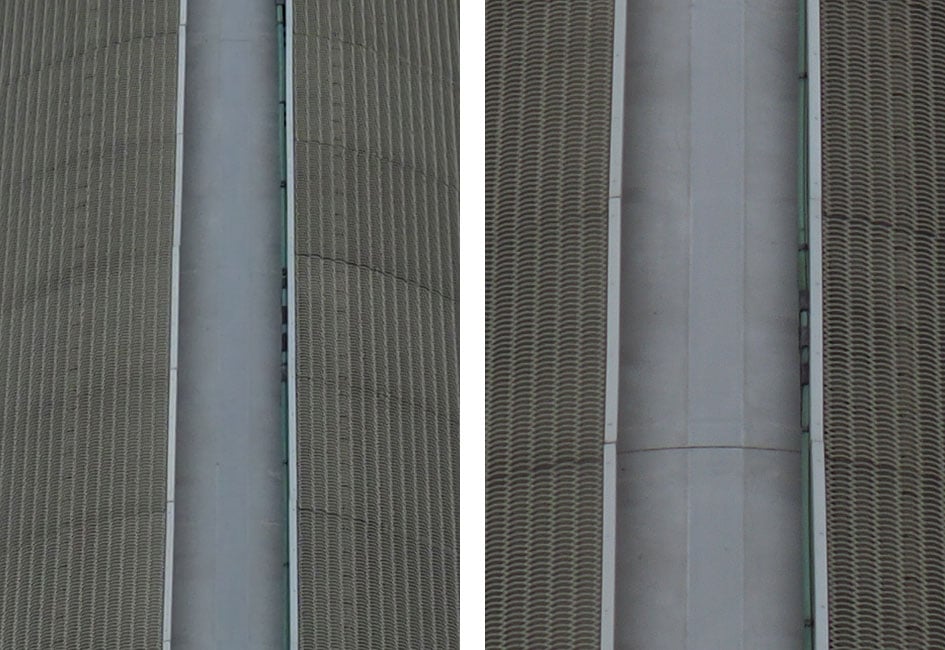
Above left: 100% crop from 20 Megapixel image, above right: 100% crop from 50 Megapixel High Res mode

Above: Olympus OMD EM1 Mark II: normal vs High Res mode. Full image below
Above left: 100% crop from 20 Megapixel image, above right: 100% crop from 50 Megapixel High Res mode

Above: Olympus OMD EM1 Mark II: normal vs High Res mode. Full image below
Above left: 100% crop from 20 Megapixel image, above right: 100% crop from 50 Megapixel High Res mode

Above: Olympus OMD EM1 Mark II: normal vs High Res mode. Full image below
Above left: 100% crop from 20 Megapixel image, above right: 100% crop from 50 Megapixel High Res mode
Olympus OMD EM1 Mark II Shooting modes
The Olympus OMD EM1 Mark II’s mode dial features ten positions, one more than its predecessor, with a little juggling of options. There’s the traditional PASM modes, along with iAUTO, ART (to access an expanded selection of effects), Movie, and now three Custom banks. The Mark II misses out on the SCN and Photo Story modes of its predecessor, although I don’t think the target audience will miss them. The addition of three directly-accessible Custom banks is far more useful at this end of the market.
As before though the shutter range remains the same: 1/8000 to 60 seconds are manually selectable, and Bulb exposures as long as 30 minutes are possible. Again there’s the choice of three shutter types: fully mechanical (indicated by a plain square in the drive menu), Anti-Shock (which employs an electronic first curtain to minimize the risk of shutter shock at speeds up to 1/320) and Silent (which employs a fully electronic shutter to operate in silence and access the fastest burst shooting rates). If you’re new to Olympus, it can be a little confusing working out the different shutter icons: tiny diamond means Anti-Shock, tiny heart means Silent / fully electronic, and plain squares mean fully mechanical shutter. Oh and if you want a delay with the Anti Shock, you can’t use the normal self-timer as it’s on the same drive menu – instead you’ll need to set any delay in a separate menu.
Olympus rates the shutter for 200,000 actuations and I generally used the fully mechanical option for my day-to-day photography. I shot at a wide variety of shutter speeds and didn’t notice any evidence of shutter-shock, although again the first-curtain option’s there if you want it. In terms of shutter sound, I’d say the EM1 Mark II’s shutter sounds slightly higher-pitched and a little quieter than its predecessor – it’s a satisfying click.
Sensitivity runs between 200 and 25600 ISO with a Low option operating at an equivalent of around 64 ISO – lower than the 100 ISO or previous models. You can set the sensitivity manually in one third or single EV increments, or let the camera work it out itself using Auto ISO.
Auto ISO can be configured with lower and upper sensitivities from a range of 200 to 6400 ISO, the latter disappointingly two stops slower than the maximum available sensitivity of 25600 ISO. You can also set the slowest shutter speed at which the ISO should be bumped-up to an Automatic value or between 1/8000 and 30 seconds. The Auto slowest shutter option seems to be focal length-aware, sensibly selecting a minimum shutter of 1/160 when I fitted my 75mm (150mm equivalent) lens. But fitting the Leica 100-400mm proved less decisive. Auto selected a minimum shutter of 1/200 at 100mm (200mm equivalent) as you’d hope, but zooming the lens to longer focal lengths didn’t see the shutter rise beyond 1/250 even before the upper ISO limit was reached. This could be problematic at 400mm (800mm equivalent), where you’d really want a shutter of 1/800 to avoid shake without stabilisation. Like most Auto ISO systems, the EM1 Mark II’s is also unaware of stabilisation being enabled or not, which is a shame as obviously it’s possible to use much slower shutters with lower corresponding ISOs when stabilisation is active. I should also note Auto ISO is not available when filming movies in fully Manual exposure – a sad omission.
Moving on, Auto Exposure Bracketing is available on the EM1 Mark II at two, three or five frames at 0.3, 0.7 or 1EV apart, or for seven frames at either 0.3 or 0.7EV apart. Matching the EM1, this is a nice broad and deep range for HDR enthusiasts, although unfortunately you still can’t trigger an entire multi-frame burst with a single press of the shutter release or self-timer. Instead you need to fire each exposure separately, or use one of the Sequential modes to fire them as a burst while your finger is holding the shutter release down. On the upside the built-in Wifi means you can at least trigger each frame remotely using your smartphone rather than having to buy a cable release accessory.
Alternatively you could use the in-camera HDR mode. This offers seven different options, starting with two presets which capture four frames and assemble them in-camera with mild or strong contrast effects; these two modes record a single composite image, but they can include a RAW in addition to a JPEG if desired. The remaining five modes capture multiple frames, but require you to assemble them yourself later. You can choose three or five frames at 2EV or 3EV increments, or seven frames at 2EV only, and again you can record JPEG, RAW or both for each frame.
Regardless which of the seven options you choose though, the drive mode is fixed to Continuous High, forcing the camera to fire-them off in a quick burst. This is fine, but annoyingly it prevents you from implementing the self-timer to avoid camera shake, and it’ll ignore any Anti Shock delays too. Again though you can trigger the burst remotely using your smartphone, and in practice this can work well.
I should also add the EM1 Mark II offers ISO, White Balance, Flash Level and ART effect bracketing; the latter is a fun way to quickly try out all (or a selected bunch) of the ART filters if you can’t decide which you prefer – you can find out more about the ART filters later.
There’s also Focus Bracketing on the EM1 Mark II with up to 99 shots and a differential of one to ten, for use with optional focus stacking software like Helicon. Alternatively you can perform basic focus-stacking in-camera on the Mark II, although it’s limited to just eight frames which may not be sufficient to cover the desired distance even with the maximum differential. I should also add that focus-stacking is currently only supported by a handful of Olympus lenses: right now, the 7-14 PRO, 12-40 PRO, 40-150 PRO, 8mm fisheye PRO, 30mm Macro, 60 mm Macro and 300mm PRO. You’ll note the two latest lenses, the 12-100mm PRO and 50mm PRO are not included on the list and mounting them will see focus-stacking greyed-out. I’m hoping this may be resolved with a firmware update in the future, but for now be warned. Of course you’ll still be able to focus-bracket with these lenses and stack in software later, just not stack them in-camera.
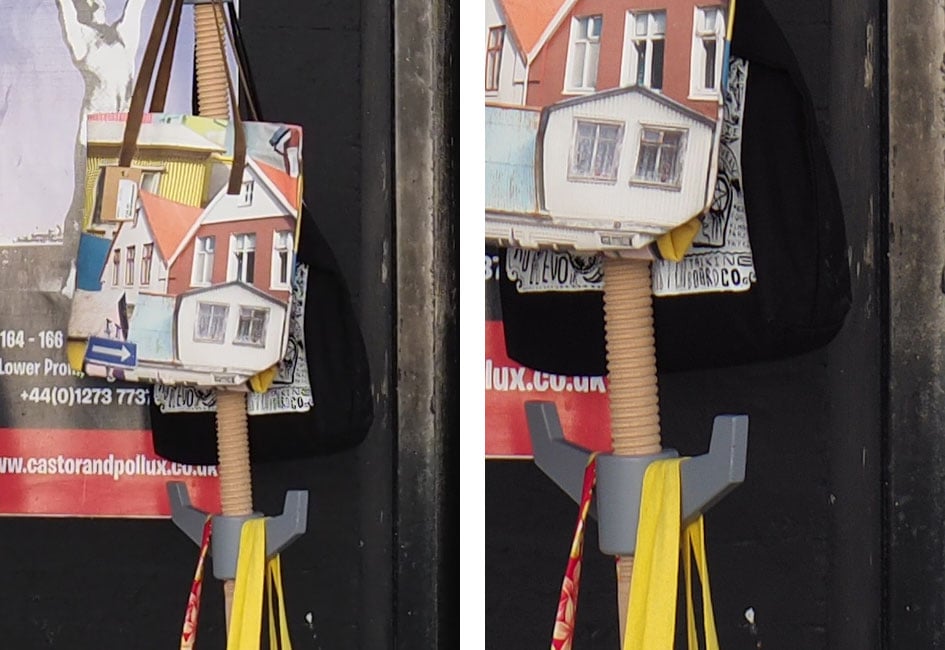
To illustrate focus-stacking in practice, here’s a single frame I took of a menu with the 12-40mm at 40mm f2.8 focused on the closest part of the text on the left, while on the right is an in-camera focus-stacked version which automatically racked the focus across the eight frames and combined them into one composite with a larger depth-of-field. As you can see, the in-camera focus-stacking incurs a crop and in this case wasn’t sufficient to over the full distance, at least at f2.8, but the potential is clear. I do however feel Panasonic has overtaken Olympus here by exploiting 4k photo to focus-stack after the event with the user interface simply letting you specify the nearest and farthest areas with the touch-screen – sure the end result may only be 8 Megapixels, but you almost always get the range you want and first time too.
Above: Olympus OMD EM1 Mark II single frame (left), in-camera focus-stack (right)
Sticking with the subject of multiple exposures, the EM1 Mark II also lets you combine two images on a single frame. You can also have the camera adjust the gain and show the first as a ghostly overlay as you line up the second. One file is recorded after the second exposure.
Moving on, the EM1 Mark II inherits the interval timer of the EM1, offering up to 999 frames at intervals from one second to a second shy of 25 (yes, 25) hours, and with an initial delay again up to a second short of 25 hours. You can choose whether to record just the images, or have the camera additionally create a movie from them. Like the more recent bodies you can choose to encode the timelapse movie in 720p HD, 1080p Full HD or 4k, but unfortunately the frame rates become lower at the higher resolutions. 720p HD is available up to 30fps for smooth playback, but increase the resolution to 1080p and the maximum frame rate falls to 15fps, while at 4k it becomes essentially unusable at a maximum of 5fps.
TIMELAPSE MOVIE
Of course there’s nothing stopping you from assembling the still images yourself in software later to generate a movie with whatever quality and frame rate you desire, but the EM1 II does fall behind the in-camera timelapse movie options of rivals. In particular, Panasonic’s Lumix G cameras offer a variety of frame rates and resolutions, even allowing 4k at smooth rates. Olympus really needs to update this part of its operating system rather than just inheriting the limited functionality of earlier models.
In terms of inheriting older features though, I have no complaints regarding long exposure control on the EM1 Mark II. Sure the options and settings are mostly taken from earlier models, but they did it so well, I’m delighted to find them here again. As before, the longest manually selectable shutter is 60 seconds, itself allowing you to achieve much nicer long exposure effects than the usual 30 second limit of most rivals. If you want longer though, the Bulb and Time modes allow up to 30 minutes.
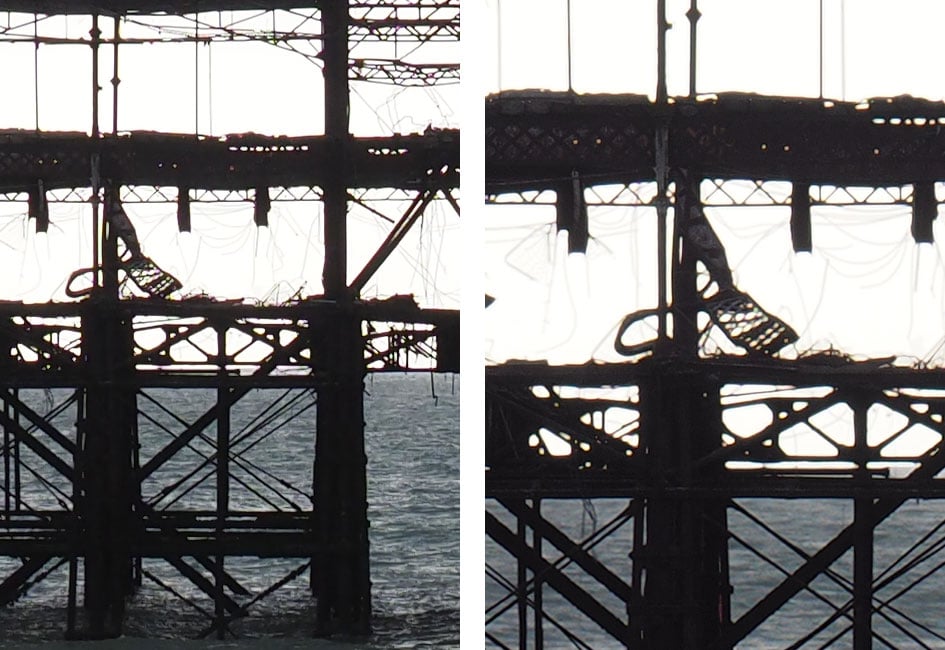
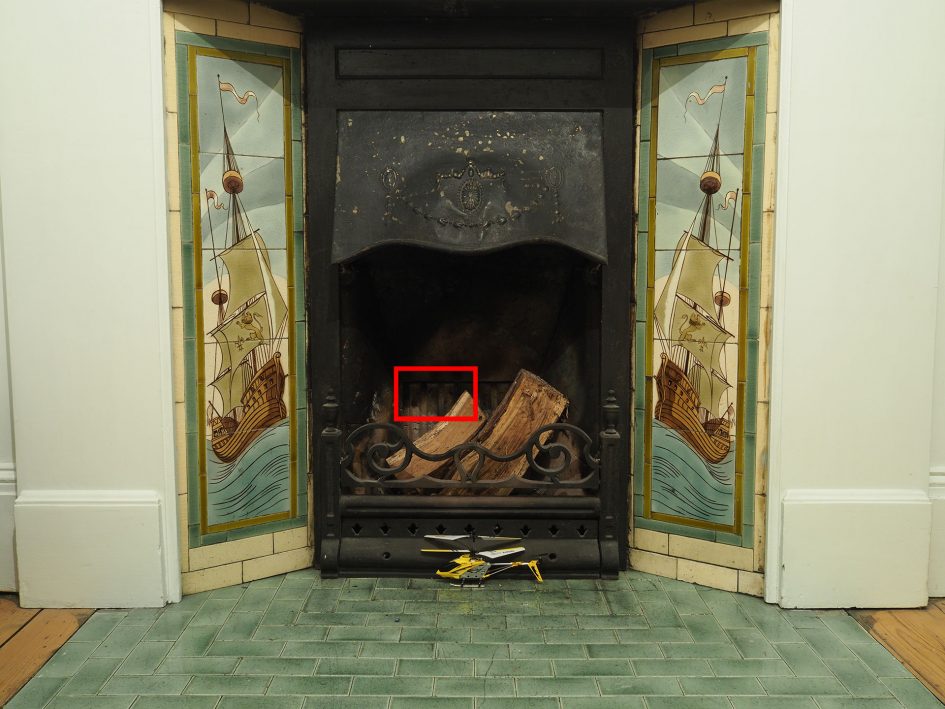
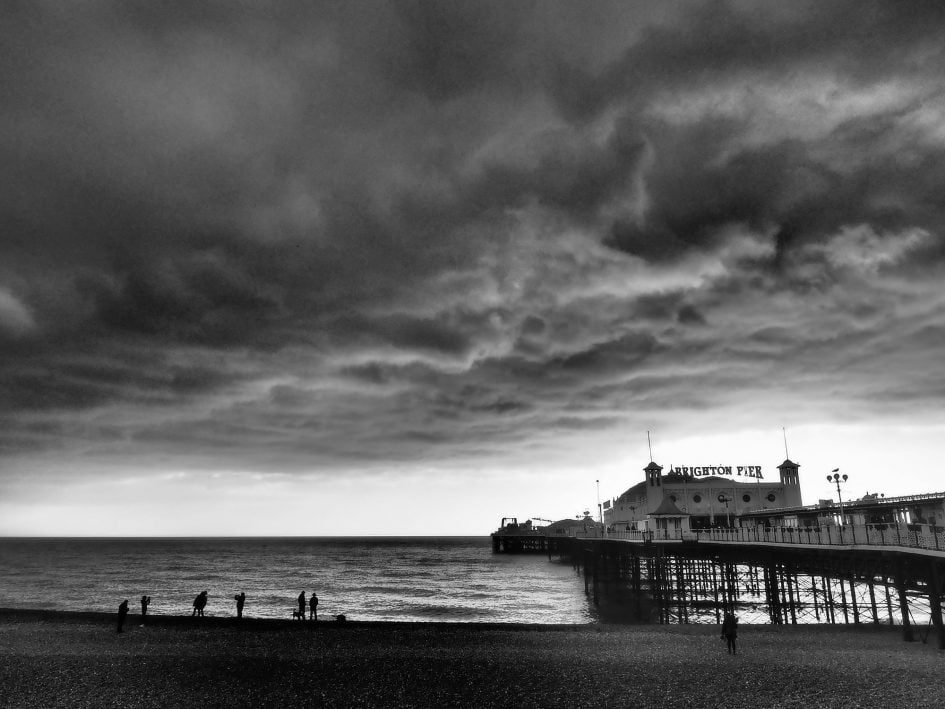
Bulb requires you to press and hold the shutter release, either on the camera or remotely, while Time opens the shutter with one press and closes it with another. Usefully both Bulb and Time can be set to automatically end after a preset period of between one and 30 minutes, so you can effectively perform a hands-free long exposure by triggering Time with the self-timer, before letting it end the exposure itself after a preset period. It works a treat and means you don’t need to invest in any accessories or muck about connecting the camera and phone over Wifi. Here’s an image I took of Brighton’s old West Pier in Time mode, lasting two minutes.

Above: Olympus OMD EM1 Mark II long exposure: 120 seconds without NR
The EM1 Mark II lets you set different limits to Bulb and Time and you can also now separately configure the screen / EVF brightness when shooting in Bulb or Time modes – a considerate step to protect night vision as well as allowing you to better-judge exposure on-screen.
I’m pleased to say many cameras now offer Bulb timers, but what continues to make the Olympus bodies special are the optional Live modes for Bulb and Time. These let you take a peek at a long exposure before it’s finished to monitor how it’s getting on. This provides a useful indication on whether the final exposure is going to be under or over-exposed, allowing you to abort a potentially lengthy process, make and adjustment and start again. Making it even easier now to judge the exposure so far is a histogram display – an upgrade over the EM1 Mark I, inherited from the EM5 Mark II.
As before you can take multiple peeks during an exposure at preset intervals. You can set the intervals between half a second and 60 seconds apart, and the total number of ‘peeks’ is again based on sensitivity: in Low, 400, 800 or 1600 ISO, the maximum number of ‘peeks’ allowed during an exposure are 24, 19, 14 or nine times respectively.
While it’s fun to enable the maximum number of peeks and watch an almost animated version of the image gradually appear before your eyes – reminiscent of developing a print in an old darkroom – each peek will negatively impact on noise levels. The impact in my tests isn’t huge, but it is measurable, so if you’re after the cleanest results, you should avoid the Live options, or at least go for a minimum of peeking.
As a long exposure enthusiast, I’m always interested to see how clean a camera is, especially with long exposure noise reduction disabled. For the uninitiated, long exposure noise reduction takes a second exposure after the main one lasting exactly the same time, but without recording any real-life data. Therefore any marks on the second ‘dark’ frame are noise artefacts that can subsequently be digitally subtracted from the first. It’s clever and it works, but doubles your recording time. That may not be terribly inconvenient for 30 second exposures, but if you’re shooting for, say, four minutes, it can be excruciating to wait another four minutes just for the additional noise reduction frame. Remember conditions can change quickly during the dusk and dawn period beloved by long exposure photographers, so you don’t want to waste unnecessary time; equally if you’re shooting a firework display, you don’t want to miss out on the grand finale just because your camera was tied-up with noise reduction.
Interestingly in my earlier tests, I found the original EM1 Mark I suffered from significantly more noise artefacts like hot pixels than the EM5 Mark II or EM10 Mark II when all were set to record without noise reduction; indeed the EM1 Mark I really needed NR enabled for long exposures. I guessed this could be due to it using a different type of sensor, so now that the EM1 Mark II also has a brand new sensor, I was curious to see how it stacked-up. To test it, I made a number of long exposures under controlled lighting with the EM1 Mark I and Mark II at 200 ISO.
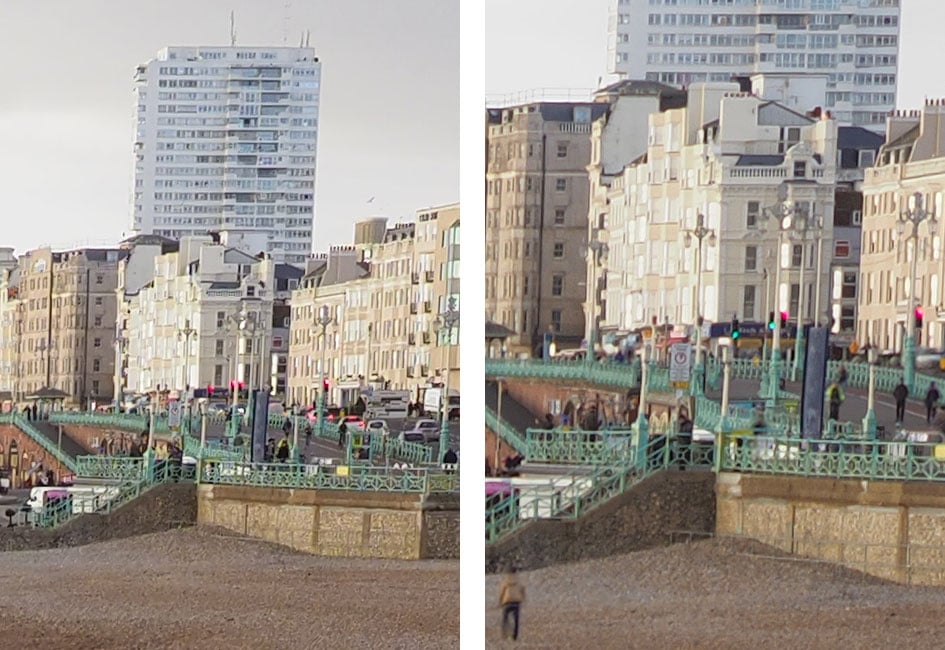
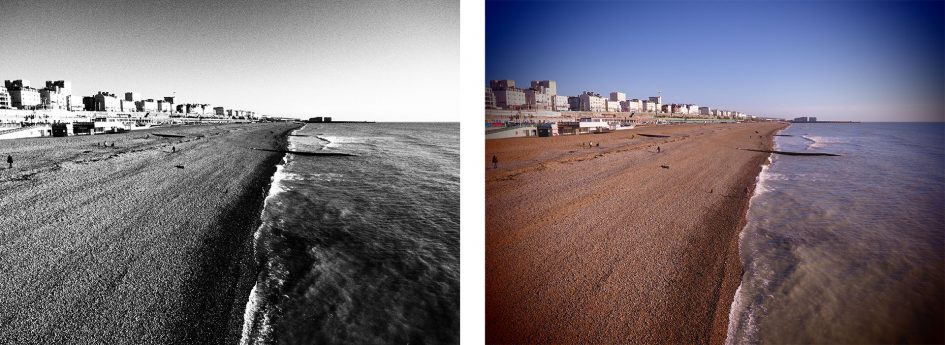
Above is the complete image photographed in my tests with each camera and below are 100% crops from versions using different exposure lengths and settings. All are using the same fixed White Balance and the same 200 ISO sensitivity, so any drift in colour is due to the exposure. In each case I also used the same lens, the Olympus 17mm f1.8 at f8.

Above left: EM1 Mark I: 30 secs, no NR. 100% crop, above right: EM1 Mark II: 30 secs, no NR. 100% crop. In this first comparison you’re looking at 100% crops made from 30 second exposures without noise reduction. Interestingly the EM1 Mark II on the right looks much cleaner, as if NR has been applied, but this was not the case. So a win here in cleanliness from the Mark II. Things start to get interesting though below.

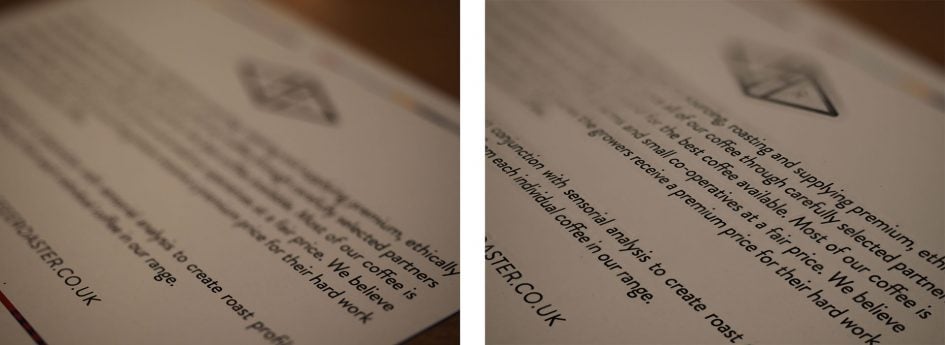
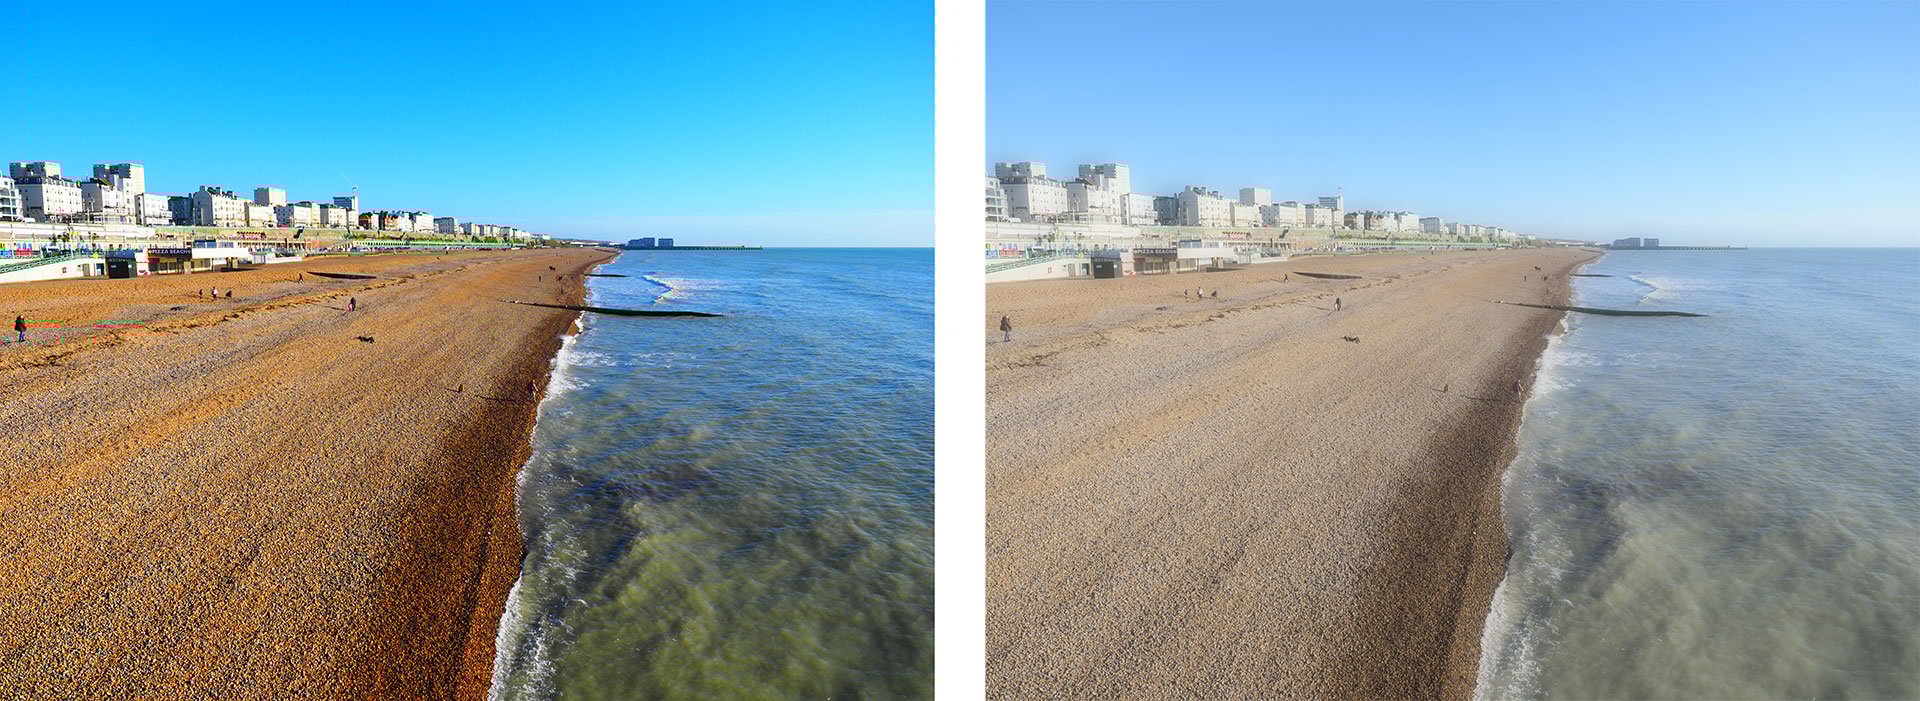
Above left: EM1 Mark I: 240 secs, no NR. 100% crop, above right: EM1 Mark II: 240 secs, no NR. 100% crop. To achieve a longer exposure under the same lighting and with the same aperture, I fitted a 3 Stop Neutral Density filter, extending the earlier 30 seconds to 240 seconds, or four minutes. Again this was taken without long exposure noise reduction. Here you’re looking at 100% crops, and the impact of a long exposure without NR is visibly apparent. Both cameras are exhibiting coloured speckles which are hard to eliminate using NR software afterwards, but it’s clear the older EM1 Mark I is suffering much more in this regard compared to the new model.

Above left: EM1 I: 240 secs, no NR, 6 Live Time peeks, 100% crop, above right: EM1 II: 240 secs, no NR, 6 Live Time peeks, 100% crop. Here’s another comparison at 240 seconds using a 3-stop ND filter, but this time with the LIVE feature enabled. I set it to peek at the exposure at 30 second intervals, so six peeks were made during this four minute exposure period. If you pixel-peep the images above you’ll see the noise levels are slightly worse than the example before, proving the LIVE feature may be a fun way of monitoring long exposure as they build, but at the cost of slightly increased noise. Once again though, the new EM1 Mark II looks far superior to its predecessor, albeit again far from clean.

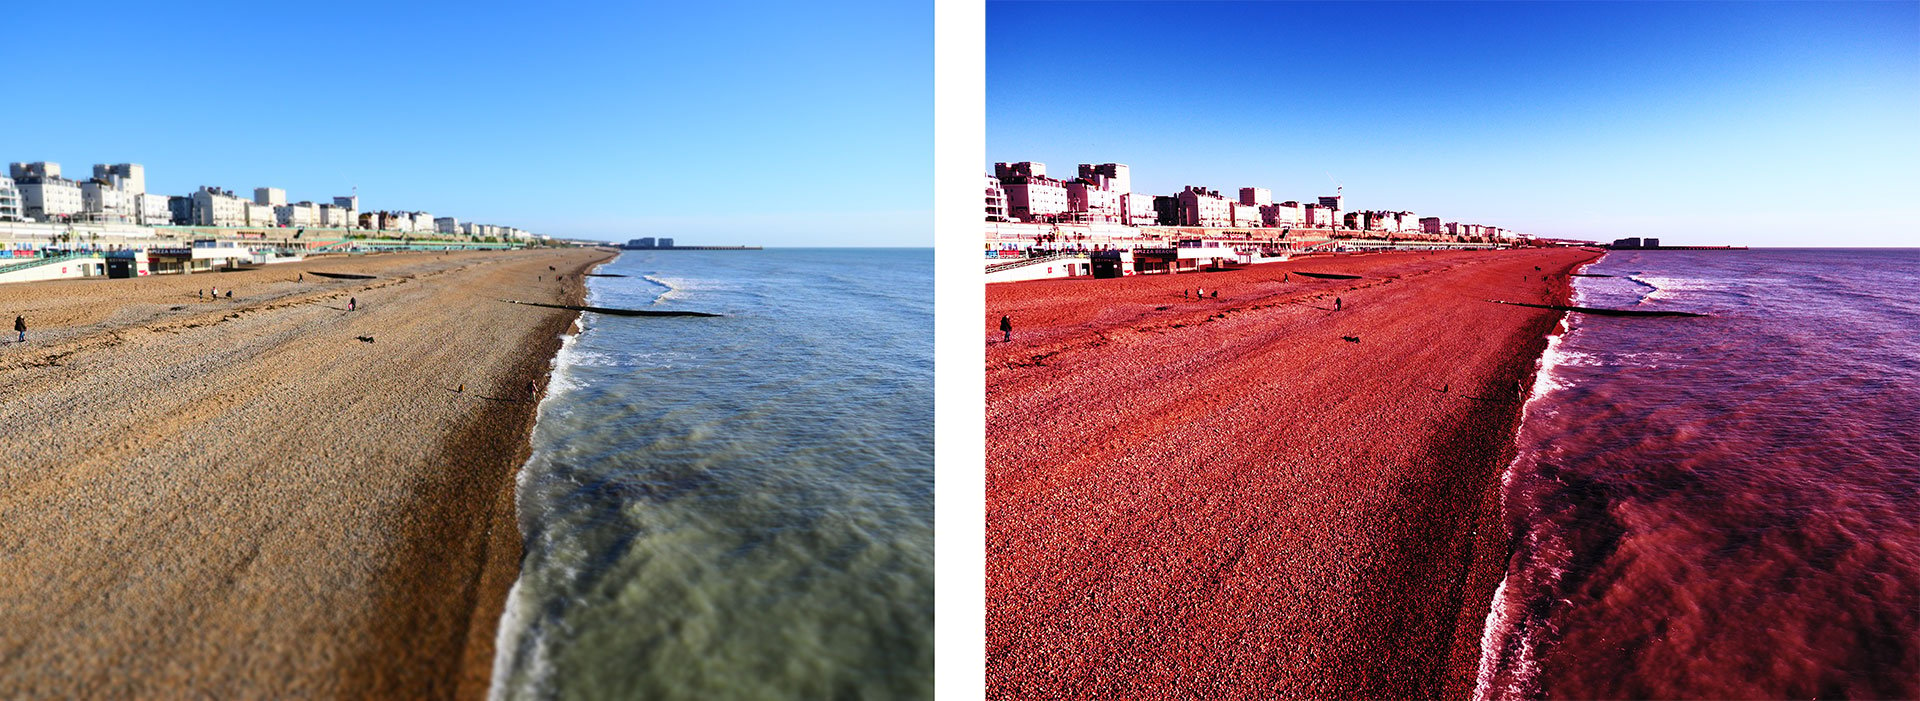
Above left: EM1 I: 240 secs, NR enabled, 100% crop, above right: EM1 II: 240 secs, NR enabled, 100% crop. My final comparison is another 240 second exposure with a 3-stop ND filter, but this time without the LIVE peeks and more importantly with long exposure noise reduction applied. As explained earlier, long exposure NR takes a second exposure of the same length, so another four minutes here. The result is visibly much cleaner on both cameras, effectively eliminating the off-putting noise artefacts, but again with the inconvenience of the extended recording period.
Judging from the crops above, the EM1 Mark II delivers significantly cleaner long exposures than its predecessor when noise reduction is disabled, but there’s still a lot more present than I’d be happy under close examination. Certainly, cameras like the Fujifilm XT2 remain cleaner with NR disabled for these kind of exposure lengths. If you’re happy with two minutes, or better still, one minute exposures, the EM1 Mark II can deliver good-looking results without NR, but go much beyond two minutes and you’ll really want to be applying NR if you want to avoid the noise artefacts pictured above.
Finally, while the EM1 Mark II may lack the Photo Story and SCN modes of its predecessor on the Mode dial, it still offers the Olympus ART filters which go beyond plain old sepia or monochrome to include much more dramatic or considered effects. There’s 14 main ART filters, a number of which offer two or even three variations. This makes 28 in all, and you can either select them manually, or go for ART Bracketing which does them all – or a pre-selected customizable subset. Here’s how a few of them look.
Above left: Art Filter: Grainy Black and White, above right: Art Filter: Pinhole III
Above left: Art Filter: PopArt I, above right: Art Filter: Soft Focus
Above left: Art Filter: Diorama, above right: Art Filter: Cross Process II
It’s also possible to combine effects, for example in the image below I liked the impact of the Dramatic Tone ART filter on the scene, but preferred a fully black and white approach, so applied a monochrome filter in playback. In-camera RAW processing is also available, letting you try out different settings on the same image after the event, but sadly / strangely ART effects are not on this particular menu. So if you fancy an ART effect, you’ll need to take it at the point of capture and if you’re undecided on which looks best, deploy the ART bracketing option.
Above: Olympus OMD EM1 Mark II: Dramatic Tone ART filter with Monochrome Picture Mode

Above left: Art Filter: Dramatic Tone, above right: Art Filter: Dramatic Tone with Monochrome
PS – The EM1 Mark II also inherits the keystone compensation of its predecessor, allowing you to digitally straighten-up converging lines – great when pointing the camera up at buildings from below, or even looking down from a window. But as before it is a digital process that wrangles pixels. I for one would love to see an optical tilt-shift lens in the Micro Four Thirds catalogue, or indeed for any mirrorless system – right now, it’s the one type of lens strangely absent from all mirrorless catalogues. Perhaps there’s a flange to sensor distance issue.
Olympus OMD EM1 Mark II movie mode
The Olympus OMD EM1 Mark II is equipped with greatly enhanced movie capabilities over its predecessor – most notably, the ability to film 4k video in both UHD or Cinema 4k formats, complemented by mic and headphone jacks, on-sensor phase-detect autofocus, and improved stabilisation which eliminates the need for a rig in many situations.
You can film in 4k UHD at 24, 25 or 30p at a bit rate up to 102Mbit/s or the wider Cinema 4k format in 24p up to 237Mbit/s. 1080p is available at 24, 25 or 30p in IPB (up to 30 or 52Mbit/s) or All-I (up to 202Mbit/s), or at the higher frame rates of 50p or 60p in IPB only. Sadly there’s no faster 1080p rates for significant slow motion, but the camera can conform footage to playback at lower frame rates than the capture rate for modest slowdowns – for example capturing at 60p, but playing back two and half times slower at 24p.
There’s the choice of two stabilisation modes: MIS-1 uses both sensor-shift and additional electronic stabilisation with a mild crop as a result, while MIS-2 uses sensor-shift only with no reduction in the field-of-view. So when shooting movies in MIS-2 (or no stabilisation) in any quality, you’ll enjoy the full horizontal coverage of your lenses, albeit with a vertical crop for the 16:9 shape. Note the movie stabilisation options are set separately to the still photo stabilisation options.
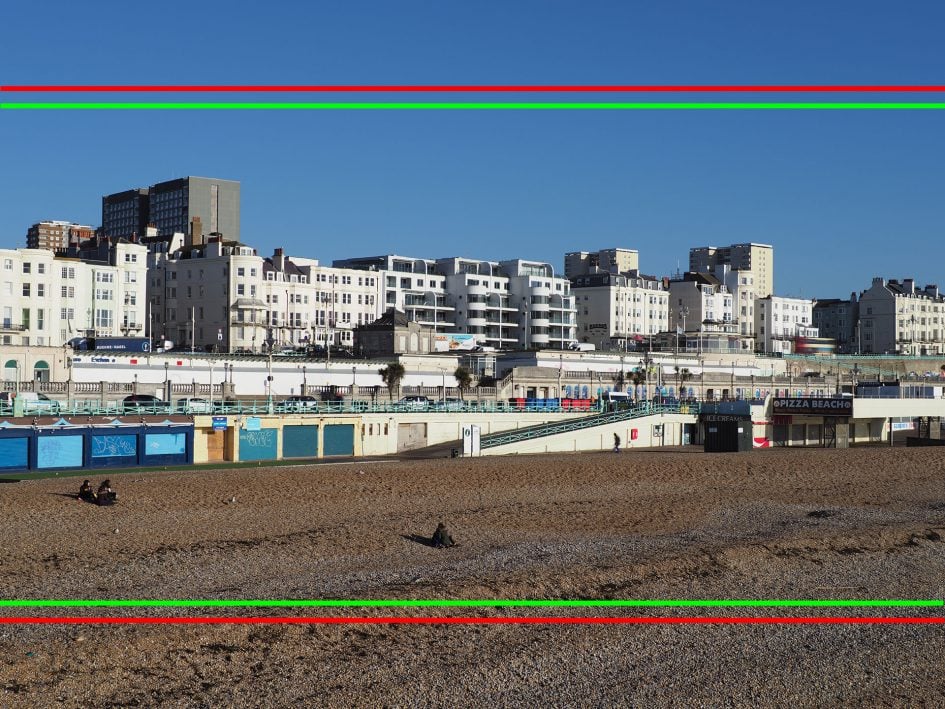
Above: Olympus OMD EM1 Mark II movie crops with MIS2 mode: red frame represents 1080p and 4k, green is C4k
To illustrate the difference in real-life resolution between 1080p, 4k UHD and Cinema 4k, I filmed the same scene with all three, using the same settings. I then took framegrabs from each movie clip and have published 100% crops below. Note the Cinema 4k version shows a slightly smaller area than the 4k UHD one as it deploys more pixels within the same frame width.
Olympus OMD EM1 Mark II movie quality. 100% crops from 1080p (left), 4k (middle), C4k (right)

Above: Olympus OMD EM1 Mark II movie quality in 1080p (left), 4k UHD (middle) and Cinema 4k (right). 100% crops from movie frame grabs clearly show the resolving power difference. Note how fine details in the Cinema 4k crop are slightly better resolved than the 4k version; this is a combination of having slightly more pixels horizontally, a higher bit-rate and possibly more favourable scaling. The bottom line is 4k UHD is resolving a lot more than 1080p, while Cinema 4k resolves a little more still.
The maximum clip length is a second shy of half an hour, although in my tests I was limited to a minute less at 28:59. Olympus recommends using UHS-II cards in Slot-1 when filming 4k, but I managed it with UHS-I U3 cards in either slot. In terms of battery life, I managed to film five consecutive 29 minute clips of 4k UHD video with stabilisation enabled (but in a static position) on a single charge – that’s a fraction under two and a half hours, which is very impressive for a single battery, and better still the camera body felt barely warm at the end (albeit when tested in a cool room). In my tests with the Fujifilm XT2, I also managed two and a half hours of 4k, but only when using the grip and deploying three batteries in total. Most single batteries provide 45 to 90 minutes of 4k, so squeezing 150 minutes from one is great news for the EM1 Mark II.
When filming video, the EM1 Mark II’s battery indicator usefully switches from percentage remaining to an approximate number of recording minutes left. Starting at 100%, one 29 minute 4k UHD clip saw the battery reduce to 91%, the second to 73%, the third to 53%, the fourth to 32% and finally the fifth virtually consumed what was remaining, leaving just enough for a minute or so on a sixth clip.
You can film in Program, Aperture Priority, Shutter Priority or full Manual exposure modes. Auto ISO is available in the first three, but sadly not in full Manual. You can adjust the exposure while filming, but there’s no way of doing it silently from the camera itself – there’ll always be the sound of button or dial clicks.
In terms of focusing you can choose Single, Continuous or Manual options, although the latter sadly doesn’t seem to support peaking even if it’s enabled for still photos. With the focus set to Continuous you can use the screen to tap to pull-focus, although in my tests (below), the results varied in confidence and consistency.
Unlike an increasing number of cameras, there’s no opportunity to take still photos while filming video, nor grab frames during playback; that said, there’s nothing stopping you from filming, say, in 4k then grabbing stills frames from it on your computer later.
If you want to grade your footage later, Olympus offers a flatter profile from the movie menus known as Picture Mode. If Picture Mode is disabled, as it is by default, then the footage is already processed and ready to use. If you switch Picture Mode on in the movie menu, the footage becomes more muted, ready for grading. The ability to film with a flatter profile is appreciated, but I personally think Olympus’s labeling is a little confusing. Picture Mode is also an option for stills photography, where you use it to apply various styles. So I’d assume disabling Picture Mode for movies would select the flat output, but it’s in fact the other way around. So if you want flat output for later grading, you need to turn Picture Mode On in the movie menus.
Now here’s a selection of clips to demonstrate the EM1 Mark II’s movie quality and features in practice!
Download the original file (Registered members of Vimeo only)
I filmed the clip of a Russian Owl above handheld with the Olympus 300mm f4 prime lens which delivers a 600mm equivalent field of view. Yes, handheld at 600mm, and while there’s inevitably some movement, you can’t help but be impressed by the sheer steadiness and usability of the footage. For many people, this is all they’ll need to see. The ability to capture good-looking footage with minimal or no support at all is a boon to anyone travelling light.
Download the original file (Registered members of Vimeo only)
In the video above I tested the stabilisation while moving. I fitted the unstabilised Olympus 17mm f1.8 lens, set to f2.8 and with a shutter speed of 1/25, then walked back and forth and up and down stairs. I was using Movie IS mode 2 in this clip which employs sensor-shift stabilisation alone for uncropped coverage; I have a version with Movie IS Mode 1 below. I had continuous AF enabled here so the camera would refocus from near to distant subjects; as you’ll see it does this successfully if a little hesitantly.
Download the original file (Registered members of Vimeo only)
Above is the same walk through the Brighton Museum, but with Movie IS Mode 1. This employs electronic stabilisation in addition to sensor-shift stabilisation for even fewer visible wobbles, albeit with some reduction in the field of view. I started and ended in the same positions as the first video above, so you can directly compare the field-of-view.
Download the original file (Registered members of Vimeo only)
To test the continuous autofocus capabilities while filming, I first performed a simple focus-pulling test from a nearby to distant subject and back again in a café, using the touch-screen. I first tried this with the Leica 25mm f1.4, but found the combination was both hesitant and lacked confidence, with the camera frequently settling without focusing on anything. Thinking it might be a restriction with this older lens (that’s also a non-Olympus model), I switched to the Olympus 17mm f1.8 which claims movie and stills focusing capabilities. You’re looking at that second combination in the video above which may be better than my first test, but remains less confident than I’d like it to be. It can be hard to specify exactly what you’d like to focus on and even when you’re tapping it, the camera doesn’t always respond the way you’d want it to; and once it does settle, there’s a little focus breathing back and forth. To be fair sometimes the EM1 Mark II pulls-focus confidently and smoothly from one subject to another, stopping dead as desired, but it’s not consistent and many times it hesitated or hunted more like a contrast-based system.
Download the original file (Registered members of Vimeo only)
Pulling-focus between static subjects is one thing, but refocusing on a subject in motion is another. To test the EM1 Mark II in this environment, I walked towards it until my face filled the frame before ducking to the side, then back again. I used CAF with face detection enabled. I tried it first here with the Leica 25mm f1.4 at f1.4 and as with my focus-pulling tests earlier, found it could be hesitant and lacked confidence; it’s certainly not tracking me throughout the clip, nor is it locking-on quickly even when I’m stationary. But again this could be a lens limitation, so I repeated it below with the Olympus PRO 12-40mm f2.8 lens.
Download the original file (Registered members of Vimeo only)
Here’s a second clip of me walking towards the camera, but this time with the Olympus 12-40mm f2.8 at 40mm f2.8. This time the EM1 II seems happier and does a better job at refocusing on me as I move towards the camera and in and out of frame. But again it remains fairly hesitant and lacks the ultimate confidence of models like Sony’s A6300 / A6500 and the Canon bodies with Dual Pixel CMOS AF.
Download the original file (Registered members of Vimeo only)
Here’s a clip filmed in low light levels at 400 ISO with the Olympus 17mm f1.8 lens at f2.2. You’re looking at the ‘Murmuration’ of birds around Brighton’s old West Pier.
Download the original file (Registered members of Vimeo only)
The OMD EM1 Mark II offers timelapse capabilities which can assemble photos into a movie afterwards, but they seem unchanged from the EM5 Mark II. As such you’ll only enjoy smooth frame rates if you encode your movie at 720p. If you want 1080p, the maximum frame rate falls to 15fps (as demonstrated above) and if you want a 4k timelapse, it falls further to a paltry 5fps. This is poor show compared to much cheaper Panasonic Lumix bodies which have offered smooth 4k timelapses for ages. Olympus needs to update this part of its software to be more in-line with the camera’s other video capabilities. In the meantime for the clip above I captured 500 frames at three second intervals in Aperture Priority and again chose the 1080 / 15fps option as a balance between smoothness and resolution.
Download the original file (Registered members of Vimeo only)
Sample movie filmed with an Olympus OMD EM1 Mark II in 4k / 24p with Movie IS Mode 2 and Picture Mode Off; I filmed in manual exposure mode with the Olympus 12-40mm f2.8 at f2.8, 1/48 and 400 ISO.
Download the original file (Registered members of Vimeo only)
Sample movie filmed with an Olympus OMD EM1 Mark II in 4k / 24p with Picture Mode Off; I filmed in Aperture Priority with the Leica 25mm f1.4 at f4 and 200 ISO.
Download the original file (Registered members of Vimeo only)
Sample movie filmed with an Olympus OMD EM1 Mark II in Cinema 4k / 24p with Picture Mode Off; I filmed in Aperture Priority with the Leica 25mm f1.4 at f4 and 200 ISO.
Download the original file (Registered members of Vimeo only)
Sample movie filmed with an Olympus OMD EM1 Mark II in Cinema 1080 / 24p with Picture Mode Off; I filmed in Aperture Priority with the Leica 25mm f1.4 at f4 and 200 ISO. I also have a version in 1080 / 60p.
Download the original file (Registered members of Vimeo only)
Sample movie filmed with an Olympus OMD EM1 Mark II in 4k / 24p with Picture Mode ON; I filmed in Aperture Priority with the Leica 25mm f1.4 at f4 and 200 ISO.
Overall, despite a few oddities and a couple of limitations, I was very impressed with the movie capabilities of the EM1 Mark II. The quality is significantly better than earlier models, especially in 4k and particularly in Cinema 4k. The real joy is shooting in these modes with the amazing built-in stabilisation, allowing you to truly run-and-gun with a very portable setup.
Olympus OMD EM1 Mark II Wifi
The OMD EM1 Mark II has built-in Wifi for remote control, image transfer and geo-tagging via an iOS or Android smartphone, and the implementation is essentially the same as the original EM1 Mark I. I tested it with my Samsung Galaxy S7 running the latest version of the Olympus OI Share app.
There’s still no NFC, nor any Bluetooth, but getting connected remains pretty straightforward. Choosing ‘Connect to Smartphone’ from the menus or a customized button sets the EM1 Mark II up as a Wifi access point to which your phone needs to connect. The camera displays a QR code on-screen which the OI Share app can read to quickly configure the network and password, but once you’ve connected the camera to your phone once, it normally finds it subsequently as soon as you fire-up the app.
Once connected the app offers four main options: Remote Control, Import Photos, Edit Photo and Add Geotag. I’ll cover each in turn. Tapping Remote Control lets you see a live image from the camera and refocus it by tapping on your phone or tablet’s screen. Impressively you can remotely change the exposure mode between Program, Aperture Priority, Shutter Priority, Manual, iAUTO, ART and movie without touching the camera’s mode dial – something that’s not possible when using Olympus Capture on a PC or Mac over a USB cable.
Depending on the selected mode, you can then tap to adjust the shutter speed, aperture, exposure compensation, ISO and white balance, along with changing the drive mode, and of course triggering the exposure. It’s also possible to tap to reposition the AF area.
If desired you can also dial the shutter speed in Manual all the way to Live Time and if previews are enabled on the camera you can view the peeking during the exposure along with the updated histogram on your handset’s screen. There’s also a wealth of drive mode options, allowing you to configure an advanced self-timer that’ll capture a pre-set number of images or short video clips.
You can also remotely trigger a movie recording, although only at a maximum quality of 1080p, even though the file is being recorded internally to the camera’s own SD card; annoyingly the ability to tap to refocus is still unavailable when remotely triggering a movie, ruling out the chance of remote focus-pulling.
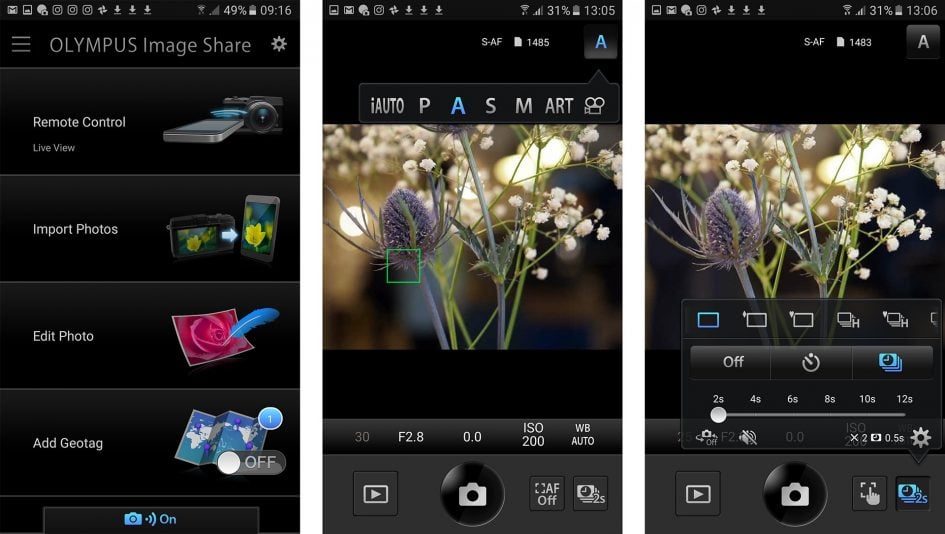
It’s also possible to switch to a Remote Shutter option which dispenses with the live image and exposure controls to simply present a large shutter release control, complete with a locking slider. Great for use as a wireless release and Bulb control, although as noted earlier, you can preset the length of Bulb exposures to end them automatically if preferred. In my tests with the Wifi Remote Shutter it felt fairly responsive, although its latest rivals which exploit Bluetooth are better still.
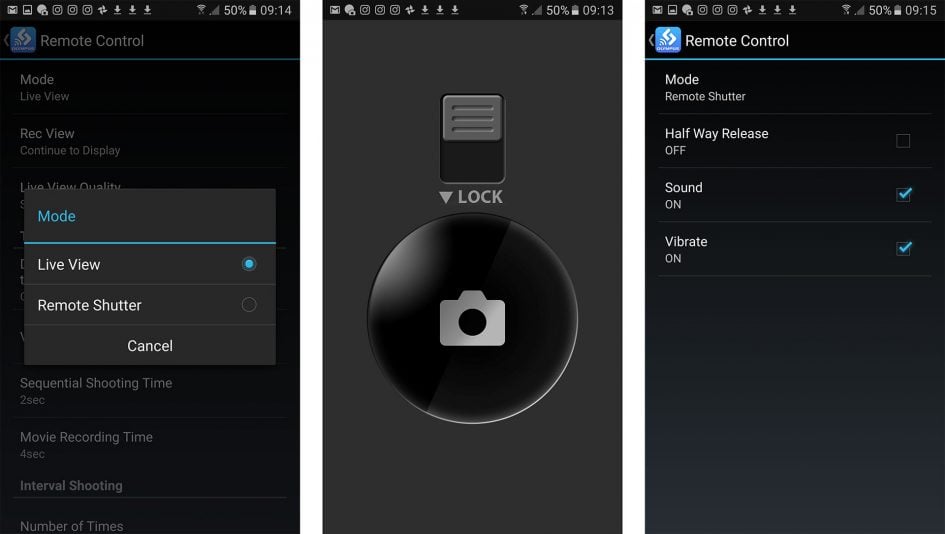
The second option on the app is to Import Photos and pressing it displays a thumbnail view of the card’s contents which you can scroll through. Tapping a photo displays it full-screen, after which you can pinch to zoom-in for a closer look, albeit not at the maximum resolution. If you like what you see you can save the image to your handset by tapping the floppy disk icon, or share it using the sharing icon alongside – of course once it’s saved onto your handset you can also share it later. In the separate settings page you can choose to import images for saving or sharing at 1024×768, 1600×1200, 1920×1440, 2048×1536 or their original resolution, including 50M High Res images – JPEGs only though, not RAW files.
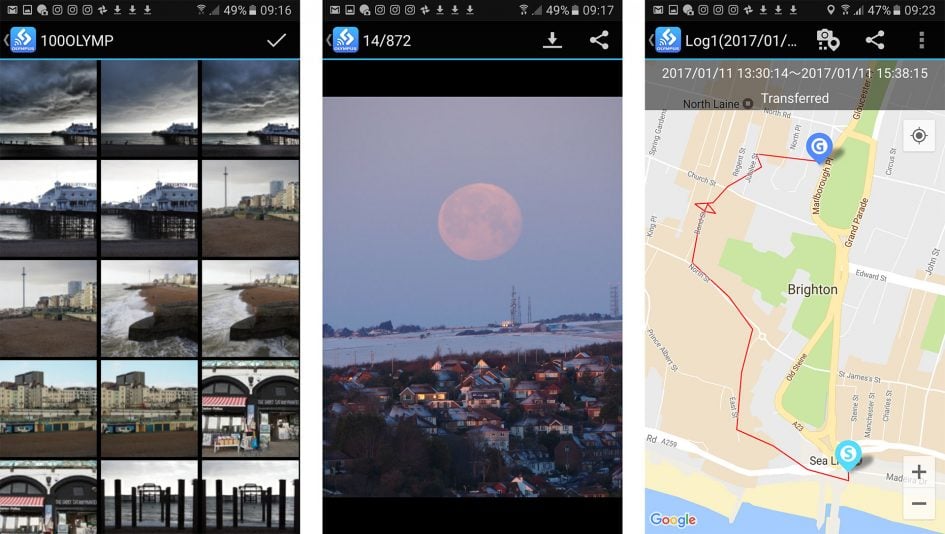
Choosing Edit Photo lets you perform a number of adjustments on images that have already been copied onto your handset. You can apply Art Filters, superimpose text, logos, even signatures written on your phone’s touchscreen, and play around with composite Photo Story arrangements.
Finally the Add Geotag option does what it says on the tin by tagging photos with positional information recorded by your phone. For this to work, you first need to switch on the Geotag feature from the app, and if desired, change the logging frequency from the default 60 seconds. After that the app will dutifully record your position at the preset intervals until you’re ready to sync them with the images on the camera.
The actual tagging is a very easy process: if it’s enabled the app will actually offer to tag your photos as soon as the phone and camera are next connected over Wifi. The process is fairly quick too, and the app can additionally plot a log on a Google map, although you may need to disconnect from the camera to load the map details from the internet. Here’s an image I tagged using the app with the GPS position entered into Google Maps.

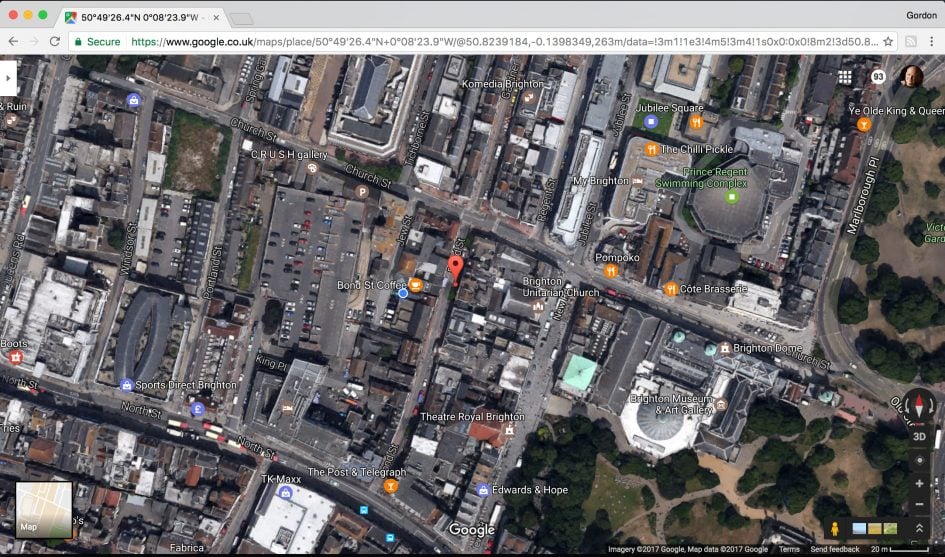
While the Wifi capabilities are essentially unchanged from the EM1 Mark I, they still offer a good overall feature-set. The only things that are missing are the ability to touch-focus-pull while remotely triggering movies and the presence of Bluetooth to ease connectivity, offer a more responsive remote shutter and maintain a low-power link for unattended geo-tagging. I’d also like to be able to use Olympus Capture on my Mac or PC over Wifi even though it would understandably reduce in performance.
Olympus OMD EM1 Mark II sensor
The OMD EM1 Mark II is equipped with a new 20 Megapixel Live MOS sensor. This may share the same resolution as the PEN F sensor, but is a new component with embedded phase-detect AF points and faster data readout to support the 60fps shooting modes and 4k video; Olympus also claims there’s improved dynamic range in highlights.
I’ve performed a number of tests to evaluate its quality in terms of resolution and noise against its predecessor, the EM1 Mark I, and what’s arguably its biggest rival, the Fujifilm XT2. Check out my results in the quality section, or skip to my sample images or verdict pages.
Check prices at Amazon, B&H, Adorama, eBay or Wex. Alternatively get yourself a copy of my In Camera book, an official Cameralabs T-shirt or mug, or treat me to a coffee! Thanks!


