Pentax K20D
-
-
Written by Gordon Laing
Pentax K20D design and controls
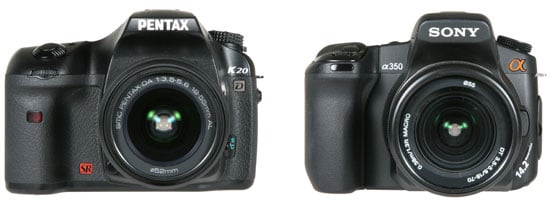
Externally the Pentax K20D could easily be mistaken for its predecessor, the K10D. The rear screen on the new model may be slightly larger, but otherwise both models share virtually the same body shape and control layout. We’ve pictured the K20D below alongside the Sony Alpha DSLR-A350, which may be a cheaper model, but with both cameras sporting 14 Megapixel sensors they’ll certainly be compared against each other.
 |
Owners of the K10D will notice a handful of subtle differences on the new K20D: the shutter release is now coloured black, the SR logo silver on red, the textured grip for your thumb stops above the memory card door switch, the buttons to the left of the screen have a slightly different contour to their side, and the shake reduction switch has been rotated 45 degrees counter-clockwise.
But screen size and minor design tweaks aside, the K20D looks and feels essentially the same as its predecessor. This is of course no bad thing as in terms of build quality and ergonomics, the K10D was a step-ahead of most rivals at the price. As such the K20D inherits tough construction and weatherproofing with no fewer than 72 seals against humidity, dust and sand. It may not feature the magnesium alloy shell of semi-pro models, but it certainly feels very solid and confident in your hands.
At 715g excluding battery, the K20D is just a few grams heavier than its predecessor, and close to the 740g of Canon’s EOS 40D. This makes it noticeably heavier than popular mid-range budget DSLRs like Canon’s EOS 450D / XSi or Sony’s A350, but again lends it an air of physical confidence. And it should be noted the K20D, like the EOS 40D, but unlike the cheaper models, sports a heavier but brighter penta-prism viewfinder.
 |
The K20D feels very comfortable in your hands, inheriting an excellent grip from the K10D. Along with a tactile finish, there’s a bigger than average ridge for your thumb to press against on the back, allowing you to hold the camera very securely.
Unusually the opposite side of the body also features an outwardly curving surface that’s bereft of controls and provides a small grip for your left finger-tips. While you’d normally use your left hand to support and adjust most lenses, Pentax offers several super-slim pancake models which are more easily used with your left hand gripping the side of the K20D body; for more details, check out our full reviews of the Pentax Limited Edition DA 40mm and DA 70mm lenses.
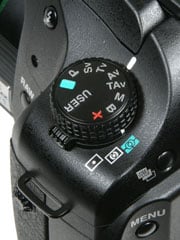 |
In terms of controls, the K20D is virtually unchanged from its predecessor. Like most mid-range and semi-pro DSLRs, the K20D’s main command dial is located on the upper left side, and features the usual Auto ‘Green’, Program, Manual, Aperture and Shutter Priority modes, along with separate Bulb, flash-sync (locked at 1/180) and User positions; as a more ‘serious’ DSLR, there’s no scene presets. Around the base of the dial is a rotary switch to select the metering mode, more details on the Features page.
The K20D’s Program mode is slightly unusual though. Most DSLRs allow you to shift, say, the aperture while in Program mode, but like its predecessor, the K20D has what Pentax calls a ‘Hyper Program’ mode. Turn the finger dial and you’ll instantly be able to adjust the shutter speed as if you were in shutter priority mode. Likewise for the aperture with the thumb dial. This allows you to quickly and easily make adjustments to either the shutter or aperture, without leaving Program – and if you want to return to the default exposure setting, just press the green button to the left of the shutter release to reset it. You can also configure both dials to adjust different settings in any mode.
 |
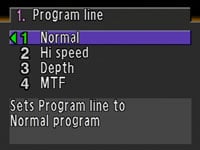 |
You can also choose from one of four Program lines: Normal, Hi-Speed, Depth and MTF. Hi-Speed places greater priority on faster shutter speeds, while Depth prioritises a larger depth of field. MTF prioritises the apertures which deliver the best quality of the lens attached, although you’ll need a DA, D FA, FA or FA J type lens. The choice of different Program lines, along with the Hyper Program mode show how Pentax is continuing to innovate in commonly-used areas which other manufacturers haven’t enhanced for years.
Like its predecessor, the K20D’s command dial also features two modes you won’t find on rival models: Sensitivity and combined Shutter and Aperture priority modes. The Sensitivity Priority (Sv) mode allows you to dial-in a preferred ISO setting, leaving the camera to automatically select an aperture and shutter to match – think of it like Program mode with easily adjustable sensitivity. The Shutter / Aperture Priority (TAv) mode works in reverse by allowing you to set the desired shutter speed and aperture, leaving the K20D to find an ISO sensitivity to match. You could argue they’re novelties, but it’s nice to see a company embracing the unique capabilities of a DSLR and offer new shooting modes which wouldn’t be possible on a film model.
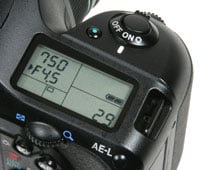 |
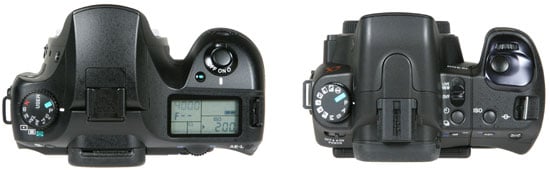
Further reinforcing its semi-pro aspirations, the K20D’s upper right surface is dominated by an LCD status screen with a bright green backlight. This again is identical to the K10Ds, employing larger, chunkier fonts than, say, the Nikon D80’s screen, but still managing to convey most of the basics, including an exposure compensation scale, but sadly not ISO at all times – you can choose between displaying ISO or the number of shots remaining from the custom menu, but not both simultaneously.
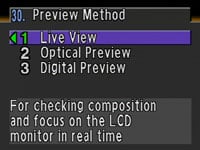
Positioned to the front of the screen is the shutter release button, surrounded by a rotary on / off switch. Twisting the switch clockwise from the ON position activates one of three previews depending on a custom setting. You can choose from a traditional optical depth of field preview through the viewfinder, a digital preview, which essentially takes a photo and displays it without saving (unless you want to keep it), or new to the K20D, Live View which we’ll describe in detail later on this page. As mentioned earlier, the K20D sports both finger and thumb dials for adjusting settings, while the green button next to the shutter release resets the exposure settings.
 |
 |
 |
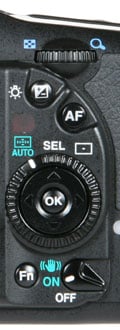 |
The rear surface houses most of the K20D’s buttons, including a traditional four-way rocker for navigating menus and scrolling around images in playback. This is surrounded by a rotary switch to select the three focus area modes – see next page.
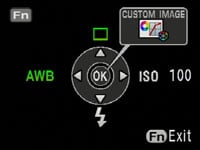
Unusually for a camera of its class though, there’s no buttons dedicated to ISO or White Balance modes. To access these you’ll need to press the Fn button and press the four-way rocker left for white balance, right for ISO, up for drive mode and down for flash settings.
While it’s possible to adjust the ISO directly in the K20D’s Sensitivity priority mode or by pressing OK and turning the front dial, the lack of dedicated buttons to access it and other common settings is a serious omission inherited from the K10D. Pushing the Fn button does however reveal the K20D’s new custom image options, more of which on the Features page.
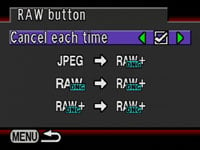
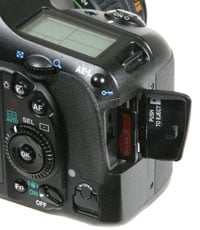
You won’t find a dedicated button to adjust the K20D’s resolution or JPEG compression either, although they are at least the first two options presented when you enter the main menu; see our Features section. On the upside, Pentax has dedicated a button to the left of the lens mount to RAW mode, and pressing it allows you switch between recording a normal JPEG, or a RAW file plus a JPEG.
You can additionally configure this button to alternatively switch between RAW and RAW plus JPEG if desired, and also decide whether the settings stick or reset afterwards. It’s a nice feature to have, but perhaps a press and hold option could have fired-up quick access to other quality settings. We’ll detail the quality and RAW options on the Features page.
Pentax K20D flash
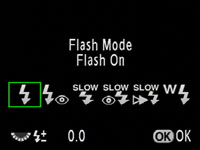
The Pentax K20D is equipped with both a popup flash and a hotshoe for external flashguns. Flash compensation from -2 to +1 EV in half or one-third steps is available, and you can also choose from red-eye, slow-sync, rear-curtain and wireless options. The built-in flash must be manually popped-up and the fastest flash sync speed is 1/180. As mentioned earlier, the K20D’s command dial features an X mode which locks the shutter to 1/180 for syncing with external flash guns which can’t automatically change the shutter speed.
To support the wireless flash capabilities you’ll need to use with K20D with either the AF360FGZ or AF540FGZ flash guns which offer 100 ISO guide numbers of 36 and 54 respectively. Pentax offers a number of accessories including the optional CL-10 which can be used to clamp flashguns in place during wireless operation.
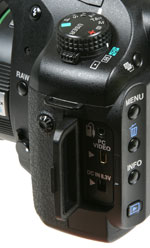
A welcome upgrade over the K10D is the presence of an X-Sync port on the left side of the body, just to the side of the door which hides the other ports. This is protected by a small screw-in cover.
Pentax K20D viewfinder
The Pentax K20D employs the same penta-prism viewfinder as its predecessor, with 95% coverage and 0.95x magnification (using a 50mm f1.4 lens). In use, it’s large, bright and roughly similar to the Nikon D80’s excellent viewfinder – as such it’s also a step-up from models like Sony’s A300 and A350 which suffer from a smaller viewfinder due to their Live View implementation.
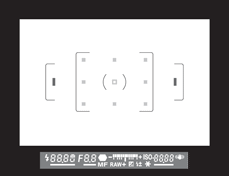 |
Running along the bottom of the K10D’s viewfinder are the usual exposure details including an exposure compensation scale. Like most DSLRs, the ISO setting isn’t shown in the viewfinder as standard, although switch the K10D to Sensitivity Priority Sv mode and the current ISO takes the place of the shots-remaining counter. Since Sv mode essentially works like Program except with easier access to the ISO, you may prefer to use it in preference to P.
An icon of a small hand also appears in the bottom right corner of the viewfinder when the K20D’s Shake Reduction feature is enabled. Unlike the Sony Alpha A100 though, it doesn’t give any impression of how hard the system is working, or if you’re approaching or even exceeding its compensating capabilities; more on Shake Reduction on our Features page.
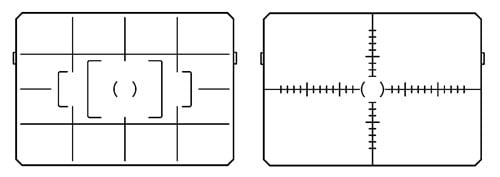 |
The K20D also supports interchangeable focusing screens from a choice of three: the supplied LF-80 provides a clean view pictured above, while the LL-80 screen adds a four by four grid for alignment and the LI-80 delivers a horizontal and vertical scale.
Pentax K20D Screen and Live View
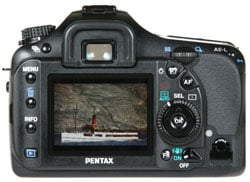
The Pentax K20D is equipped with a 2.7in screen featuring 230k pixels – this is the biggest external change between it and the earlier K10D which employed a 2.5in 210k monitor. The extra 0.2in is welcome, but it’s nothing particularly exciting when comparable or cheaper models from Canon and Sony are employing bigger and brighter 3in screens or tiltable 2.7in screens respectively. Indeed for roughly the same money, Sony’s Alpha A700 sports nothing less than a 3in screen with VGA resolution.
In fact the K20D’s fixed 2.7in 230k screen is the same type you’d find on the considerable cheaper Sony Alpha A200. Of course there’s a wealth of features in the favour of the K20D, but it’s disappointing Pentax has equipped it with a relatively unremarkable display which is neither as large, detailed nor flexible as its current DSLR rivals.
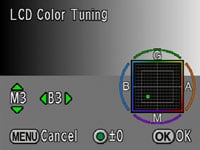 |
On the upside though, Pentax does allow you to fine tune the colour balance of the LCD which is a fairly unique option in its class.
A major new feature of the K20D over its predecessor is Live View, although like Canon’s DSLRs, there’s no obvious control for activating it – indeed existing K10D owners will notice there’s exactly the same controls as their DSLR, so clearly one of them will be doubling-up for Live View. On the K20D, that’s the preview control which is activated by twisting the power dial clockwise from the ON position. On the K10D, this control offered either an optical depth of field or a digital preview, and now on the K20D, a custom option allows you to alternatively configure it to activate Live View instead.
|
|
The K20D uses its main sensor for delivering Live View, an approach which as we’ve seen on other models has its pros and cons. On the downside, there’s a delay and the sound of the mirror flipping as Live View commences, and in order to autofocus, the mirror will need to temporarily drop, causing additional delay and further noise. On the upside, using the main sensor should allow the K20D’s Live View to show exactly what you’re going to capture, although the implementation here is more basic than most rival models.
So with Live View enabled in the custom menus, simply twist the power dial clockwise and you’ll hear the mirror flip, the shutter open, and about one second later see the image appear on the screen. To autofocus you’ll need to press the AF button on the back of the K20D; this drops the mirror, blanks the screen, focuses the lens, then flips the mirror back up again to continue the live video feed. The time taken to perform this obviously depends on the speed of the lens, but with the Pentax DA 18-250mm, you were looking at about two seconds. There’s no contrast-based AF option.
 |
 |
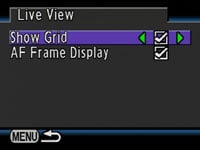 |
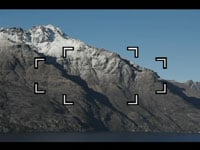
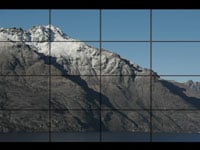
In terms of superimposed graphics, you can choose to overlay an alignment grid and or focus point markings, but sadly there’s no live histogram – the closest you’ll get is the optional histogram after taking a shot in the digital preview mode. Perhaps a greater surprise though is the absence of any exposure or shooting information while in Live View. Unlike any other Live View implementation we can think of, the K20D doesn’t show any information during Live View, and unhelpfully the exposure details also disappear from the upper screen. And for anyone thinking of flying blind, you can’t change any exposure settings during Live View either.
 |
 |
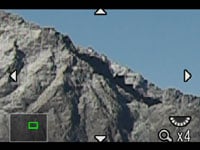
Two major benefits of using the main sensor for Live View are also moot here. There is a manual focus assist mode which uses the rear dial to enlarge the view by four or eight times, but rather than reveal what’s happening at a finer pixel level, the K20D just appears to be enlarging a lower resolution signal. As such the result looks coarse and can’t be used for precision focusing. The K20D’s Live View should also show 100% coverage, but when photographing our test charts, we noticed while the full width of the image was indeed shown, a tiny amount from the top and bottom appeared to be missing; this was however captured in the recorded image. This isn’t too big an issue in practice, especially outside the studio, but is worth mentioning.
One upside though is being able to preview the built-in stabilisation by simply flicking the Shake Reduction switch on the back of the camera, although again if you use the magnified option, you’ll be looking at a coarse image.
So without a live histogram, a usable magnified mode nor the ability to change or even see exposure information, the K20D’s Live View implementation is of limited use compared to other models. It’s neither as quick or flexible as the Sony A300 / A350 or as technically accurate as the Canon 450D / XSi or EOS 40D. It’s a feature which appears to have been bolted onto the K20D without much thought to practical operation.
Pentax K20D menus
Upon first powering-up, the K20D, like its predecessor, briefly displays the shooting mode along with handy guidance on what the main controls will do – for example indicating the finger and thumb dials will adjust the shutter speed and aperture in Program mode.
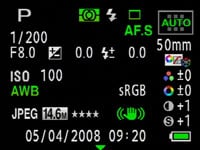
| Pressing the INFO button also still briefly presents a summary of all the current settings on the main colour monitor; this includes the metered aperture and shutter speed at the moment you pressed the button, although it’s a snapshot and not updated in real-time. Instead Pentax is sticking with tradition and you’ll be using the upper LCD screen or the optical viewfinder for real-time exposure information and adjustments. |
 |
 |
 |
 |
 |
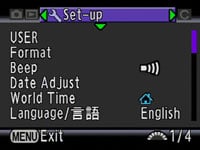
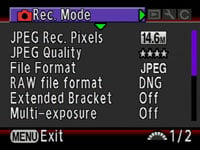
Pressing the MENU button takes you straight to the K20D’s Recording Mode options which include adjustments to the resolution, compression and image parameters, details of which are on the next page. Pushing the right arrow button toggles between the K20D’s other three menu tabs, covering Playback, Setup and Custom Settings.
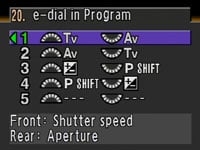
If you’re into tweaking, you’ll love the K20D as it offers no fewer than 36 custom settings, including adjusting the size of exposure and sensitivity steps, activating the neat one-push bracketing feature (more on next page), adjusting noise reduction, and configuring the finger and thumb dials in any mode.
 |
 |
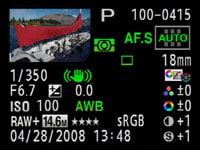 |
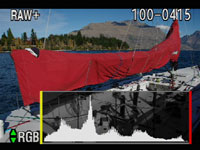
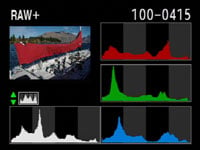
Pressing the INFO button in Playback mode cycles between a clean view of the image, one with basic shooting info, another with either RGB or brightness histograms, and finally one showing a thumbnail of the image accompanied by a broad array of shooting details. You can also zoom-into images by up to 32 times, although the result will look a little fuzzy.
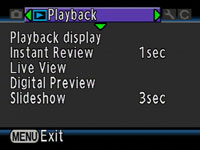
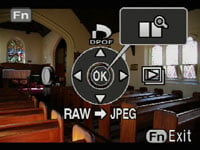
Pushing the FN button during playback presents four options selected using the four-way rocker control on the back of the camera. Pushing up presents the DPOF printing options, pushing right starts a slideshow, pushing down performs an internal RAW to JPEG conversion, while pushing left applies a choice of filters. New to the K20D is the ability to compare two images side by side by pressing the OK button.
 |
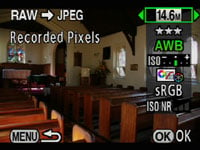 |
Like the K10D, you can perform a number of adjustments when processing RAW files into JPEGs using the camera – you can adjust settings including the White Balance, Sharpness, Contrast and Saturation.
The Digital filters can be applied to any image and include Black and White, Sepia, six different coloured tints, softness, an illustration edge effect type filter, a digital HDR simulation, and, ahem, a slimming filter which stretches the horizontal or vertical axes. The latter is a bit of fun, but unlikely to be used a great deal on a camera of this class. And if you’re an HDR photographer, forget the simulation and be sure to check out the K20D’s excellent bracketing options on the next page.
Pentax K20D battery and connectivity
 |
 |
The Pentax K20D employs the same rechargeable D-LI50 Lithium Ion battery pack as its predecessor, which is rated at 1620mAh; this is accessed by another latch-operated door with environmental sealing. Pentax claims this is good for approximately 530 shots under CIPA conditions, although these don’t include the effect of Live View or built-in stabilisation systems, both of which will drain the battery much quicker.
By sharing the same body as its predecessor, the K20D also shares its optional D-BG2 battery grip which can take a pair of D-LI50 packs. Battery life is indicated by a three segment graphic on the K20D’s upper LCD status screen, or on the main monitor when the INFO button is pressed.
 |
In terms of connectivity, a door on the left side of the body houses ports for the cable release, USB / composite TV output and a DC power input; while this door can be pushed open without a latch, it still features environmental sealing. To the upper left of this door is the K20D’s new X-Sync socket for connecting to external lighting – a welcome upgrade from its predecessor.
Pentax has no reason to switch memory formats, so behind a latch-operated door on the right side you’ll still find an SD card slot; like the other doors on the K20D, this also features rubber sealings for dust and moisture resistance.


