Panasonic Lumix DMC-TZ3
-
-
Written by Gordon Laing
Panasonic Lumix TZ3 design and build quality
Like its predecessor, the Lumix TZ3 is a fairly plain-looking compact which gives few clues to the powerful 10x optical zoom lens housed within. Again like the earlier TZ1, the new TZ3 is available in black, silver or blue, although all three variations may not be sold in every region.
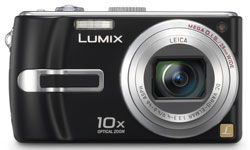 |
At first glance the Lumix TZ3 appears pretty similar to the TZ1, but place them side by side and you’ll notice the new model is slightly smaller. Most notably the relatively large grip of the TZ1 has slimmed down on the TZ3, with the benefit of the camera being more pocketable, albeit not something you’d slip into a shirt pocket. A slim horizontal strip on the front of the TZ3 along with a thumb rest on the rear allow you to grip it reasonably steady, although at longer focal lengths you should certainly use both hands – even with the TZ3’s stabilisation.
 |
 |
Following earlier Panasonic compacts there’s absolutely no complaints with the TZ3’s build quality. It feels very sturdy in your hands with smooth joins and absolutely no creaks, while the stainless steel exterior lends an air of confidence.
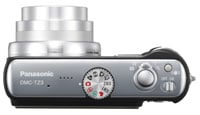
Like the TZ1, the upper surface houses the main controls. The mode dial now features three additional options, although there’s still no manual mode nor any way to select specific apertures or shutter speeds. The TZ3, like its predecessor, is pretty much automatic only, although careful use of exposure compensation and scene presets allow a reasonable degree of creativity.
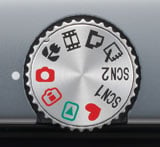 |
The TZ3’s mode dial switches between Auto, Macro, Movie, Print, Clipboard, two programmable Scene selections (from a choice of 21 presets), Simple Mode, Playback and Intelligent ISO mode. The Print, Clipboard and Intelligent ISO setting are new to the TZ3 and we’ll describe these and the full exposure details in our Features pages.
The shutter release button is housed within a circular zoom rocker and alongside are a button to adjust the Optical Image Stabilisation mode and an on / off switch.
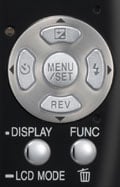 |
The rest of the controls are concentrated in the lower right corner on the rear of the camera. Four buttons arranged like a joypad are used to navigate menu options, scroll across images during magnified playback, or select various options during shooting. A button in the middle of these four brings up the main menu system or confirms settings.
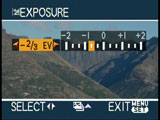
Pressing the top of the four buttons while shooting presents the exposure compensation settings, offering the traditional +/-2EV range for darkening or brightening exposures. Pressing the bottom button shows the last image taken (or viewed during playback), and like playback mode, you can magnify using the zoom lever.
 | |
Pressing the left button lets you choose between a 10 or two second self-timer, while pressing the right button cycles through the five options for the built-in flash: Auto, Auto with red-eye reduction, Forced on (with optional red-eye reduction if you’re using the Party or Candle Light scene presets), Slow sync with red-eye reduction and Forced off.
 |
Below the main group are two further buttons: one dedicated to display options and the other used to delete images or fire-up the TZ3’s quick access menu, a great feature inherited from Panasonic’s higher-end LX and FZ range. We’ll describe all of these in the Features pages.
Connectivity and battery
A single small door on the right side of the body opens to reveal DC-in and a combined USB / video out port. A larger door under the grip side of the body houses the battery and memory card.
The Lumix TZ3 is powered by a CGA-S007E 1000mAh Lithium Ion battery pack and the camera is supplied with a mains recharger. Panasonic claims each charge is good for 260 shots under CIPA conditions. This seems slightly optimistic though as during our test periods we generally managed to fire off closer to 100 shots with stabilisation before the battery needed recharging. Investing in a spare would be advisable.


