Panasonic Lumix DMC-L1
-
-
Written by Gordon Laing
Panasonic DMC-L1 design and controls
The L1 may offer shutter speeds between 1/4000 and 60 seconds, but rather than pack them all onto the limited real-estate of the dial, the extreme positions are instead labelled 1000-4000 and 2-60s. Once you’ve turned the dial to either, you’ll need to use the electronic dial on the back to select faster or longer exposures. Interestingly the shutter dial is also locked once turned clockwise to the A position. This means there’s no way to jump straight from the longest to the quickest exposures without turning the dial all the way around. The position of the shutter release button, parallel to the upper surface in the middle of the shutter dial, may also seem a little un-ergonomic compared to the angled forward location on modern DSLRs, but before long feels completely natural. Continuing the analogue control theme are two levers around the shutter dial and a third on the rear surface, used to select metering, drive and focusing modes respectively. The L1 offers spot, center-weighted and multi-pattern metering, single, burst, auto-bracket and self-timer drive modes, and the choice of single AF, continuous AF or manual focus options.
Again each lever offers quick and easy adjustment of these settings without delving into menus, although they could be stiffer in operation. There were many occasions when one or more of these switches were knocked to a different position when pulling the L1 out of a bag, and while you’d know pretty quickly if the focus had inadvertently been set to manual or the drive to self-timer, an accidental switch to spot metering could easily go unnoticed with annoying consequences. Two programmable Function buttons alongside the shutter dial offer adjustment of the quality and exposure compensation settings by default, while four further buttons on the rear provide direct access to the White Balance, ISO, Flash mode and even Flash Compensation. Since the L1 is not equipped with a secondary status screen though, you’ll need to make most of these adjustments using the main colour monitor – more of which later. While it’s still good to have direct access to these settings, we found it a little annoying only being able to adjust them using the dial on the back. We’d have preferred the option to alternatively use the four directional menu buttons. The L1’s equipped with a popup flash with two positions: press the Flash Open button once and it flips upwards at an angle into a bounce position; press it a second time and the head’s flipped out to point forwards. In this second position the flash head looks quite high, but it’s actually roughly the same distance from the lens axis as a DSLR with a traditional head on top of the body. That said, the two positions are handy, especially having the flexibility of a bounce without having to invest in an external flashgun. Should you want more power though, a hotshoe above the optical viewfinder offers TTL control over Panasonic’s optional DMW-FL500 or FL360 flash guns, but there’s no PC Sync port.
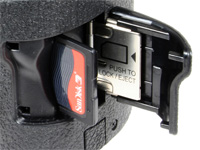
Connectivity and battery
The L1 has two ports hidden behind a flap on the left hand side, one for USB and the other a combined remote control / video output. The SD memory slot is located behind a door on the right hand side and the L1 supports SDHC for capacities above 2GB. The L1’s powered by a DMW-BL14 Lithium Ion rechargeable battery pack, rated at 1400mAh which Panasonic claims is good for up to 450 images with viewfinder composition or up to 300 images with Live View composition, both under CIPA standards. During our tests we found it typically lasted for around 200 shots, including a mix of viewfinder and Live View compositions. |
 |


| Support this site by shopping via these links |
The Panasonic Lumix DMC-L1 is certainly no traditional-looking digital SLR. Clearly inspired by Leica’s classic M-Series rangefinders, the L1 stands out from the crowd and will greatly appeal to enthusiasts who look back fondly on analogue designs. The L1’s not just about nostalgia though, as its analogue control system provides genuine benefits we’ll discuss later.
The Lumix L1’s pictured above and below with its ‘kit’ Leica 14-50mm lens, alongside the Nikon D80 and Nikkor DX 18-70mm. Measuring 146x87x80mm and weighing just over a kilogram with the lens, the L1’s shorter, but wider and heavier than most DSLR kits. The most obvious difference when viewed from the front is the absence of the traditional penta-prism / penta-mirror head – indeed it looks like it’s been sliced clean off to give a completely flat upper surface.
This approach follows the earlier Olympus E-330 and indeed the L1 shares the same sensor, shutter and mirror assembly – so like the E-330, the L1 flips its mirror sideways rather than upwards. This results in the L1’s viewfinder being located to the left side of the lens axis, as seen in the view below. It also allows the L1 to feature a flat upper surface which lends it an appearance closer to a rangefinder than a DSLR. Panasonic’s also fitted the AF-assist lamp in the top right corner where a rangefinder viewfinder window would normally be found.
The view above also clearly reveals the L1’s grip as considerably smaller than a modern DLSR. This again follows the rangefinder inspiration, and while there’s obviously less to wrap your fingers around, you can still hold the L1 both comfortably and securely. The L1’s rubber coated magnesium alloy body also feels very solid and built to a high standard, roughly equivalent to higher-end DSLRs like the Canon EOS 30D. The L1’s design will undoubtedly polarise opinions and you’ll either love or hate it. Either way, there’s no denying it’s an original concept, and personally speaking we reckon it’s a classy-looking camera, and much more appealing than the Olympus E-330.
 | |
The Lumix L1’s exterior design is about more than just rangefinder styling though: it shuns many modern electronic controls in favour of older analogue alternatives. There may be a dial on the upper right surface, but instead of selecting an exposure mode, it’s dedicated to adjusting the shutter speed. And close to the body around the lens barrel is a mechanical aperture ring – the mere mention of which will be enough to get many enthusiasts going.
And for good reason too: aperture rings and shutter dials offer quick and easy ways to set the exposure and f-number without reading manuals, pressing buttons or peering at a screen. Panasonic’s also used them to implement a neat way of switching between exposure modes. Both the shutter dial and aperture ring feature A settings, and if both are set to these positions, the L1 operates in Program mode.
If you turn either the Aperture ring or Shutter dial though, the L1 switches into Aperture or Shutter Priority respectively (both adjustable in one third EV increments). Turn both away from their A settings and you’re in full Manual. After using the L1 for a short while, you wonder whether the almost universal switch to electronic control of shutter and aperture was such a good idea after all.