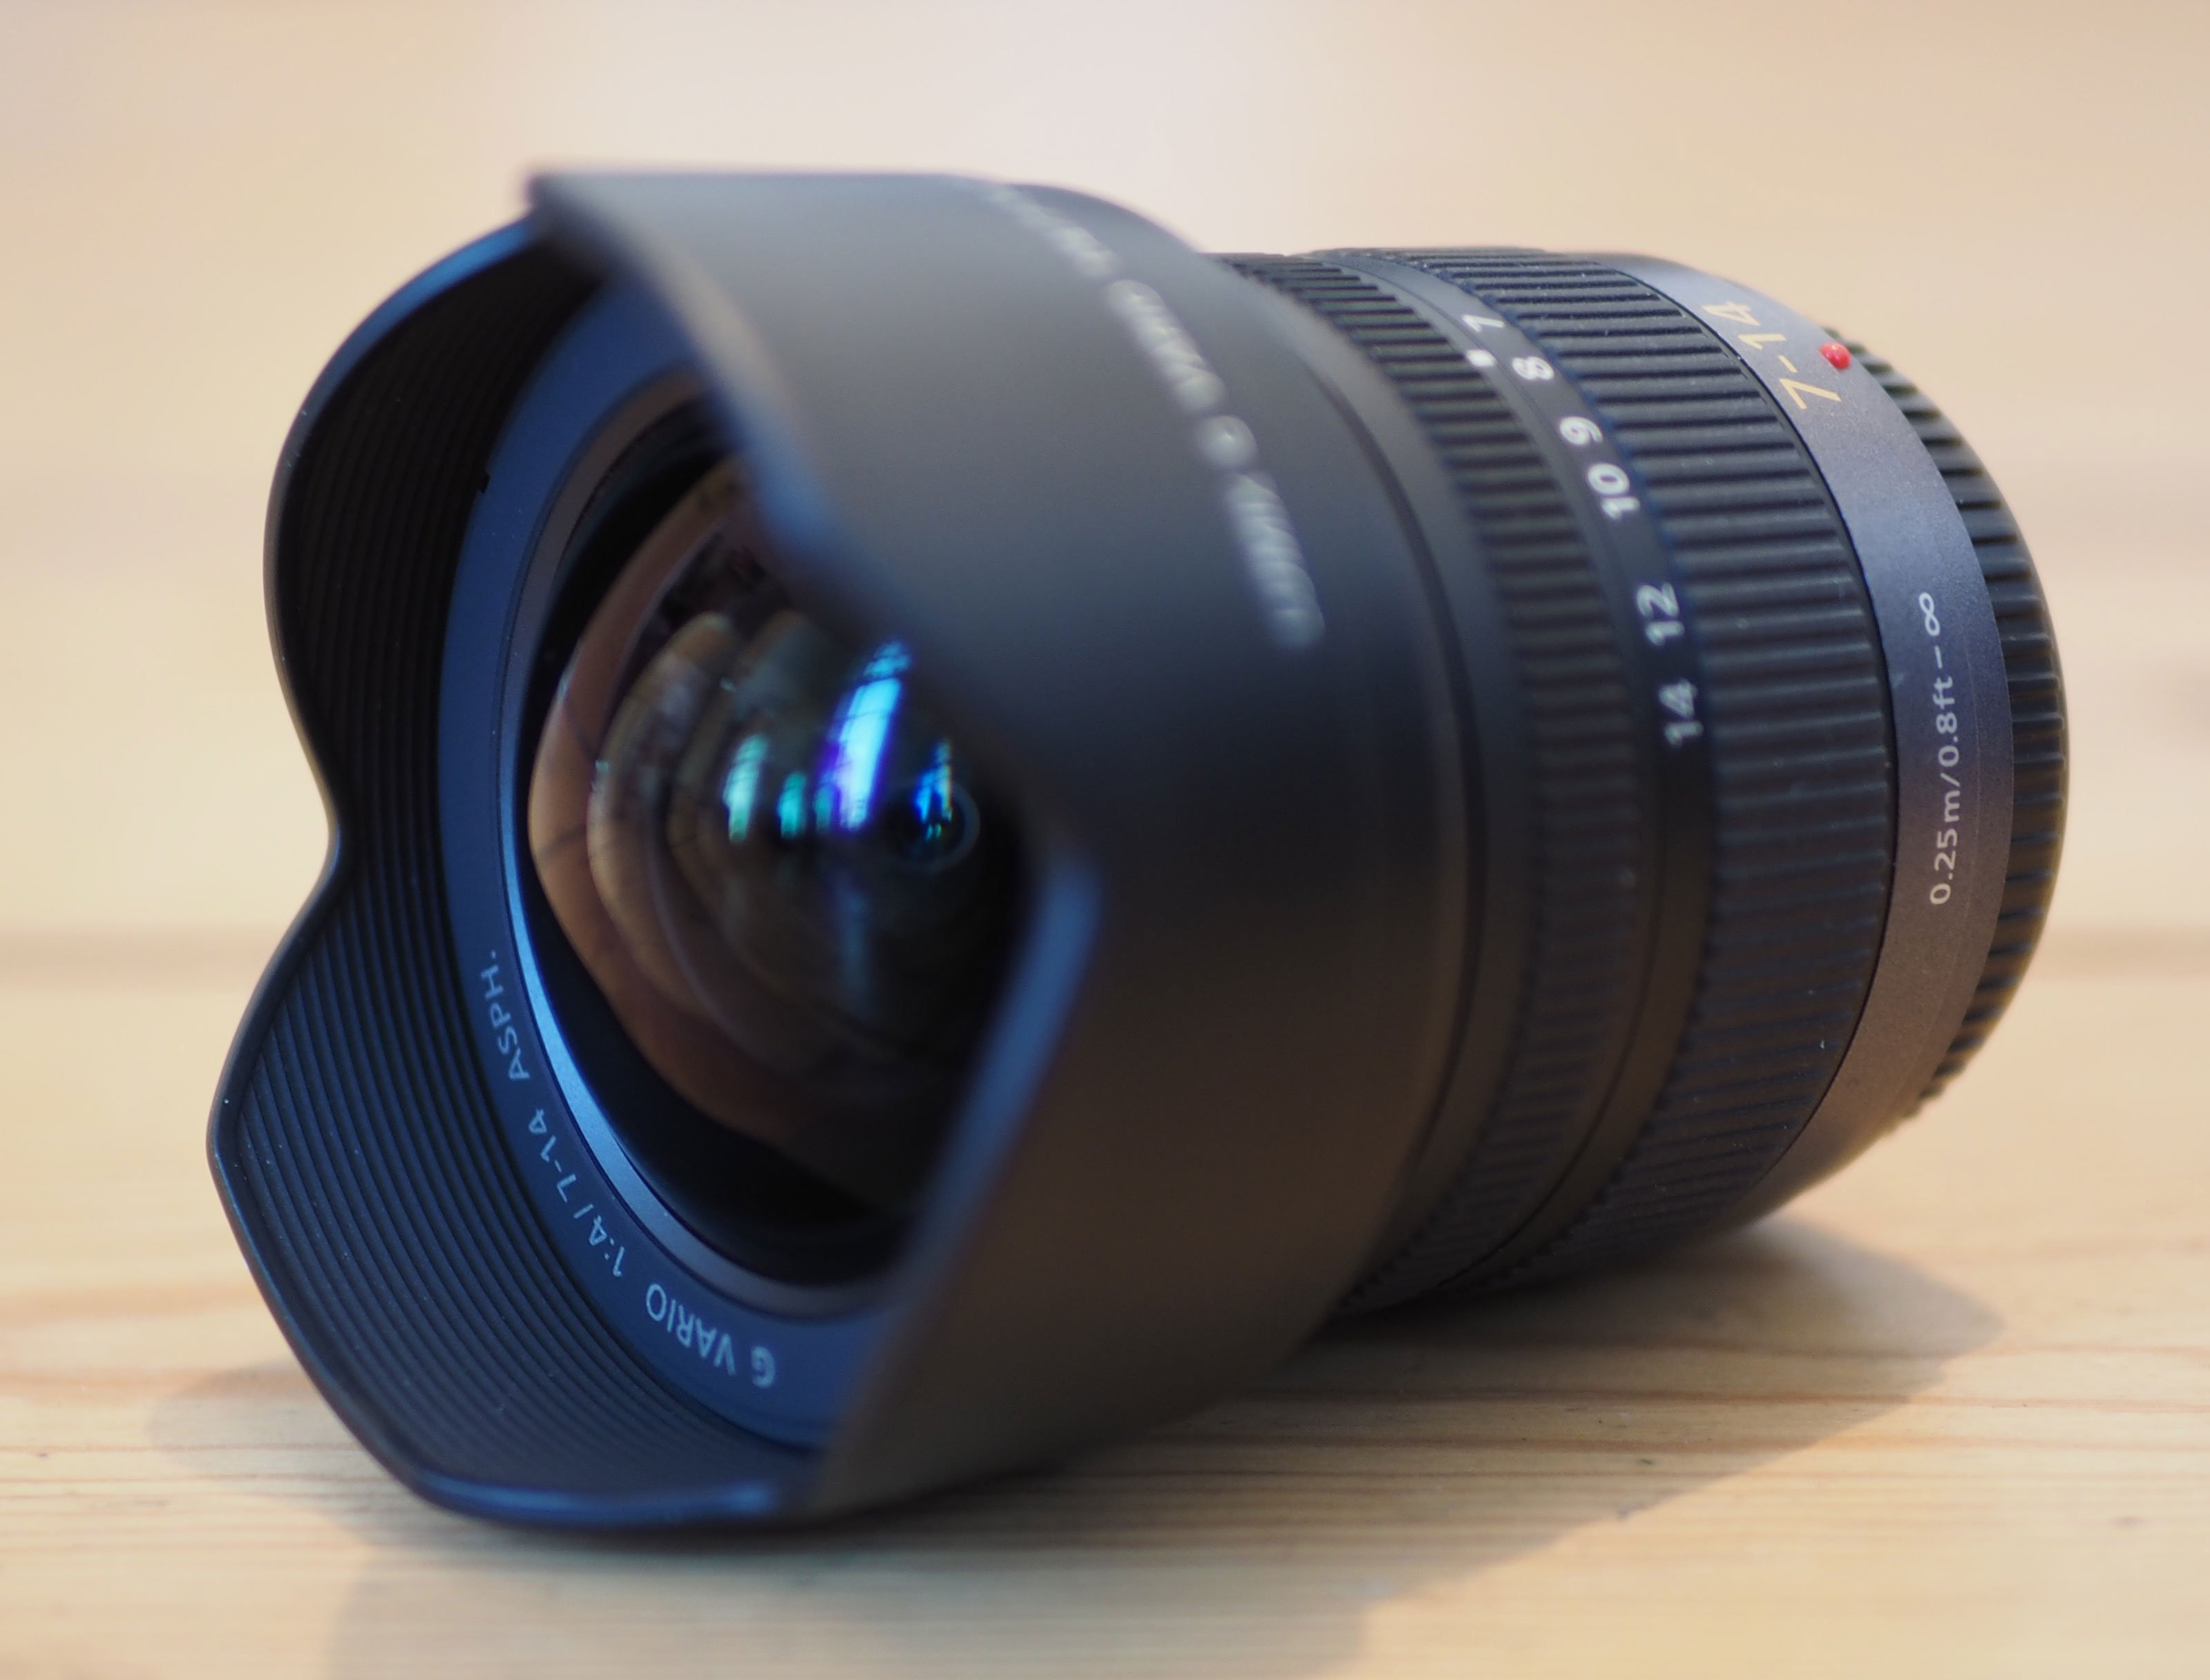
Panasonic Lumix 7-14mm f4 review
-
-
Written by Gordon Laing
Quality
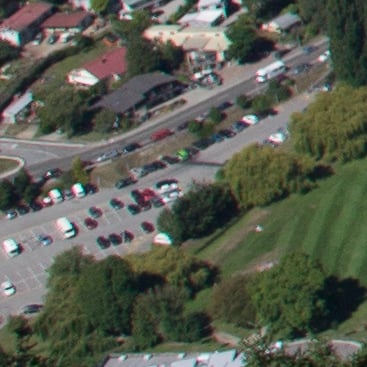
Panasonic Lumix 7-14mm f4 quality at 7mm
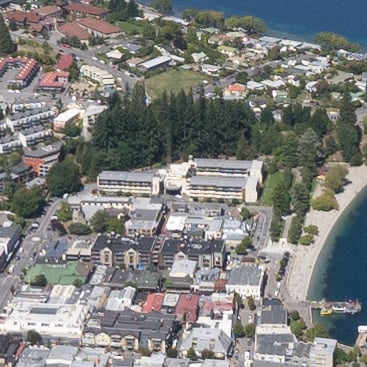
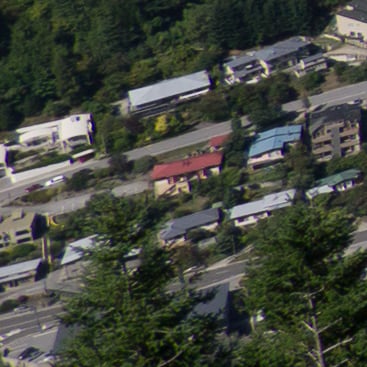
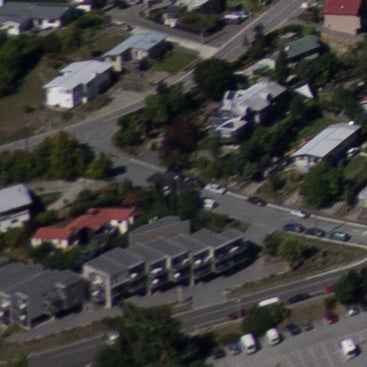
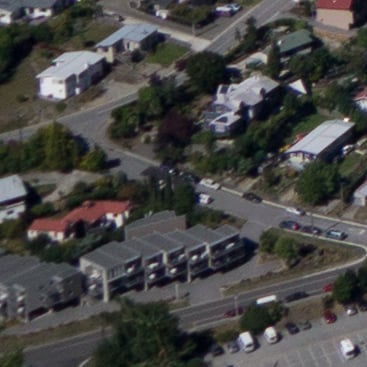
To evaluate the real-life performance of the Panasonic Lumix 7-14mm f4 lens at its widest focal length, I shot this landscape scene at 7mm with every aperture setting using a Panasonic Lumix GX1 mounted on a tripod. The GX1 was set to its base sensitivity of 160 ISO and the lens focused on the center of the composition using magnified Live View assistance.
I also shot this scene moments later using the Olympus 12mm f2 and the Panasonic Lumix 14-42mm Power Zoom for direct comparisons, with the 7-14mm set to 12mm and 14mm respectively. You can find the results in the contents, above right. I hope to add further comparisons with the Olympus 9-18mm when I get a chance to test it.
I shot the scene using the GX1’s RAW mode and processed the files in Adobe Camera RAW (ACR) via Photoshop using the following settings: Sharpening at 70 / 0.5 / 36 / 10, Luminance and Colour Noise Reduction both set to zero, and the Process to 2012 with the Adobe Standard profile. The high degree of sharpening with a small radius enhances the finest details without causing undesirable artefacts.
All lens corrections were disabled, so there’s no additional software compensation for vignetting, geometric distortion or chromatic aberrations. Normally this would allow us to evaluate the uncorrected optical performance of the lens alone, but with Micro Four Thirds lenses there are additional corrections stored as profiles within the firmware; these are automatically applied to JPEGs in-camera, and also by most RAW converters including ACR when opening the RAW file. You can’t turn them off.
As such it’s often hard to see exactly what’s going on behind the scenes of Micro Four Thirds lenses without using an obscure RAW converter which ignores the profiles, so instead of trying to chase the pure optical performance of the lens for the sake of it, I thought it would be much more useful to simply show how it will perform in normal use. That said, as a Panasonic lens on a Panasonic body, I believe both the geometric distortion and chromatic aberrations are being automatically corrected by the RAW processor here, with only vignetting being left untouched.
Which now lets me tell the simple story of the performance you can see in the crops below. With the lens operating at its minimum focal length of 7mm, there’s some inevitable stretching of the subject in the extreme corners, but the actual degree of recorded detail is very respectable with only a little softening. There’s noticeable darkening in the corners due to vignetting with the aperture wide open, but this is easily corrected in RAW converters (or automatically on JPEGs in-camera). If you close the aperture one stop to f5.6 though, most of the vignetting disappears, although the detail doesn’t noticeably improve.
In the center you’ll enjoy very sharp results even with the lens wide open, which continues at f5.6. There’s nothing to complain about here, although at f8 diffraction has begun to soften the image, a process which becomes noticeably worse at f11. As such I’d recommend shooting with the lens at f4-f5.6 for the sharpest results. Since these have an effective full-frame depth of field of f8-f11, you’ll also have no worries over getting everything in focus from near to far. I’d avoid using anything smaller than f8 at 7mm due to the impact of diffraction unless you’re chasing a starburst effect on lights or the Sun, or simply have too much light even at your maximum shutter speed and minimum ISO.
So a great start for the Lumix 7-14mm at its widest focal length. Next up see how the lens performs mid-way through the range in my Panasonic 7-14mm quality at 10mm results. Alternatively if you’ve seen enough you may wish to check out my Panasonic 7-14mm sample images or skip straight to my verdict.
Panasonic Lumix 7-14mm f4 corner sharpness at 7mm | Panasonic Lumix 7-14mm f4 center sharpness at 7mm | |
 |  | |
Panasonic Lumix 7-14mm f4 corner crop at 7mm f4 | Panasonic Lumix 7-14mm f4 center crop at 7mm f4 | |
 |  | |
Panasonic Lumix 7-14mm f4 corner crop at 7mm f5.6 | Panasonic Lumix 7-14mm f4 center crop at 7mm f5.6 | |
 |  | |
Panasonic Lumix 7-14mm f4 corner crop at 7mm f8 | Panasonic Lumix 7-14mm f4 center crop at 7mm f8 | |
 |  | |
Panasonic Lumix 7-14mm f4 corner crop at 7mm f11 | Panasonic Lumix 7-14mm f4 center crop at 7mm f11 |
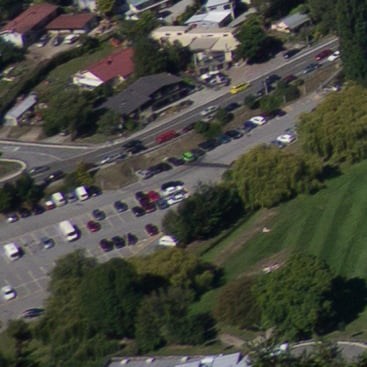
Panasonic Lumix 7-14mm f4 quality at 10mm
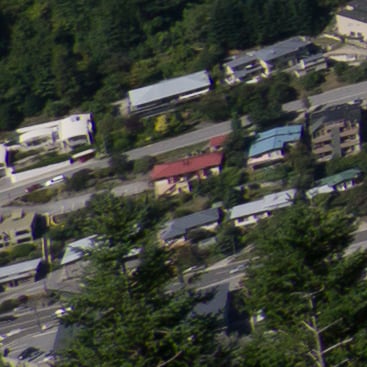
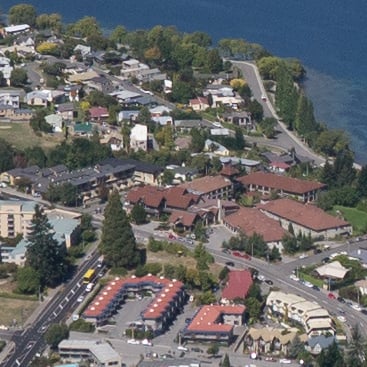
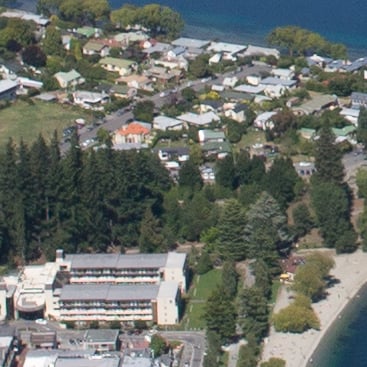
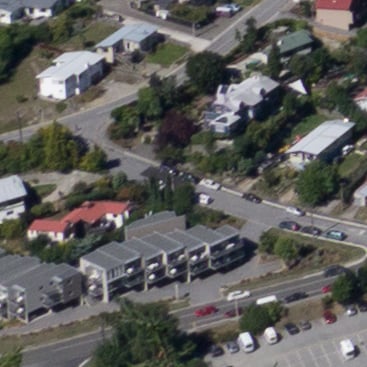
To evaluate the real-life performance of the Panasonic Lumix 7-14mm f4 lens midway through its focal range, I shot this landscape scene at 10mm using every aperture setting using a Panasonic Lumix GX1 mounted on a tripod. The GX1 was set to its base sensitivity of 160 ISO and the lens focused on the center of the composition using magnified Live View assistance.
I also shot this scene moments later using the Olympus 12mm f2 and the Panasonic Lumix 14-42mm Power Zoom for direct comparisons, with the 7-14mm set to 12mm and 14mm respectively. You can find the result on another page here.
Once again I shot the scene using the GX1’s RAW mode and processed the files in Adobe Camera RAW (ACR) via Photoshop using the following settings: Sharpening at 70 / 0.5 / 36 / 10, Luminance and Colour Noise Reduction both set to zero, and the Process to 2012 with the Adobe Standard profile. The high degree of sharpening with a small radius enhances the finest details without causing undesirable artefacts.
All lens corrections were disabled, so there’s no additional software compensation for vignetting, geometric distortion or chromatic aberrations. Normally this would allow us to evaluate the uncorrected optical performance of the lens alone, but with Micro Four Thirds lenses there are additional corrections stored as profiles within the firmware; these are automatically applied to JPEGs in-camera, and also by most RAW converters including ACR when opening the RAW file. You can’t turn them off.
As such it’s often hard to see exactly what’s going on behind the scenes of Micro Four Thirds lenses without using an obscure RAW converter which ignores the profiles, so instead of trying to chase the pure optical performance of the lens for the sake of it, I thought it would be much more useful to simply show how it will perform in normal use. That said, as a Panasonic lens on a Panasonic body, I believe both the geometric distortion and chromatic aberrations are being automatically corrected by the RAW processor here, with only vignetting being left untouched.
Moving onto the crops below, I’d say the performance has actually improved a little in the corners compared to the 7mm focal length. There’s still some stretching due to geometric distortion and subsequent correction, but the actual recorded detail is sharper with very little to complain about. Once again the most noticeable artefact in the corners is vignetting at f4, which again mostly disappears at f5.6, or is easily corrected in RAW converters.
In the center of the image, the recorded detail is again exemplary – it’s very sharp and there’s so much to pore over. As before though, this tack-sharp detail begins to soften at f8 and becomes noticeably impacted by diffraction at f11, so choose your aperture carefully to maximize the quality from this lens. I’d again recommend shooting between f4 and f5.6 and avoid using anything smaller unless you’re chasing a starburst effect on lights or the Sun, or simply have too much light even at your maximum shutter speed and minimum ISO.
So a great result at 7mm has become even stronger mid-way through the range at 10mm, which only leaves the performance at the longest focal length – see my Panasonic 7-14mm quality at 14mm results. Alternatively if you’ve seen enough you may wish to check out my Panasonic 7-14mm sample images or skip straight to my verdict.
Panasonic Lumix 7-14mm f4 corner sharpness at 10mm | Panasonic Lumix 7-14mm f4 center sharpness at 10mm | |
 |  | |
Panasonic Lumix 7-14mm f4 corner crop at 10mm f4 | Panasonic Lumix 7-14mm f4 center crop at 10mm f4 | |
 |  | |
Panasonic Lumix 7-14mm f4 corner crop at 10mm f5.6 | Panasonic Lumix 7-14mm f4 center crop at 10mm f5.6 | |
 |  | |
Panasonic Lumix 7-14mm f4 corner crop at 10mm f8 | Panasonic Lumix 7-14mm f4 center crop at 10mm f8 | |
 |  | |
Panasonic Lumix 7-14mm f4 corner crop at 10mm f11 | Panasonic Lumix 7-14mm f4 center crop at 10mm f11 |
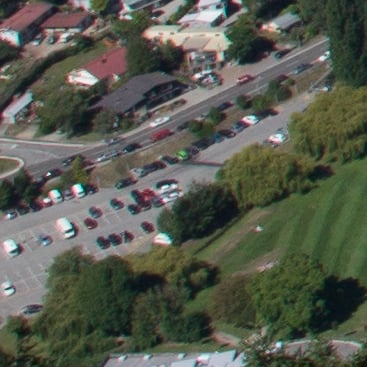
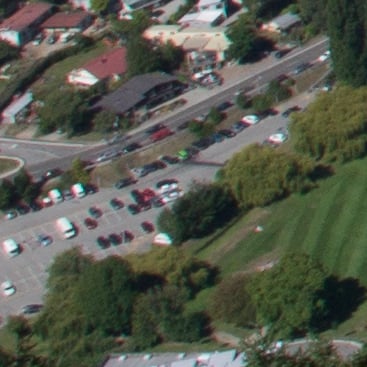
Panasonic Lumix 7-14mm f4 quality at 14mm
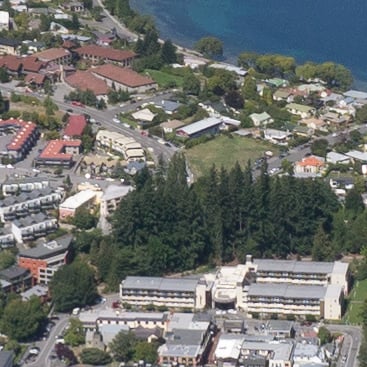
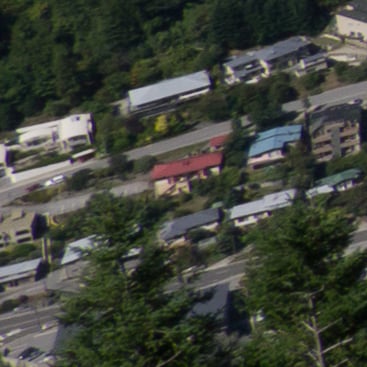
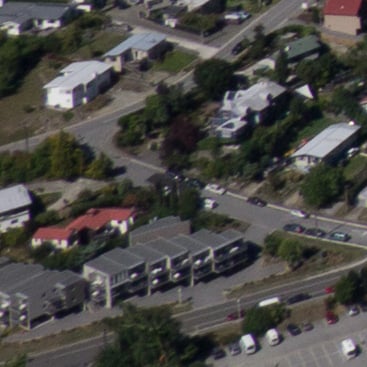
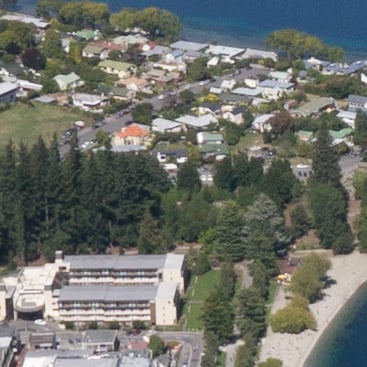
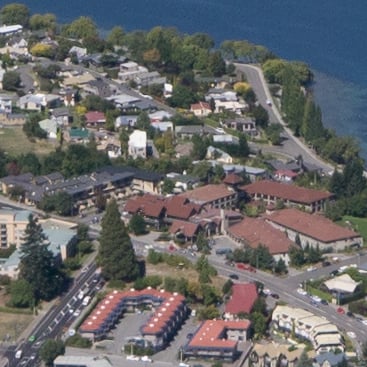
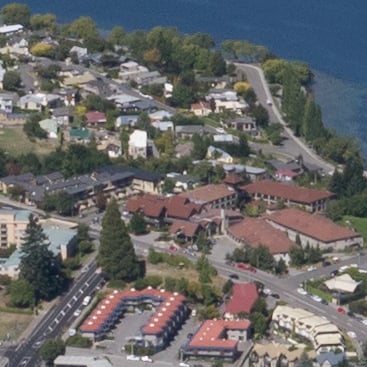
To evaluate the real-life performance of the Panasonic Lumix 7-14mm f4 lens at its longest focal length, I shot this landscape scene at 14mm with every aperture setting using a Panasonic Lumix GX1 mounted on a tripod. The GX1 was set to its base sensitivity of 160 ISO and the lens focused on the center of the composition using magnified Live View assistance. I also shot this scene moments later using the Olympus 12mm f2 and the Panasonic Lumix 14-42mm Power Zoom for direct comparisons, with the 7-14mm set to 12mm and 14mm respectively.
Once again I shot the scene using the GX1’s RAW mode and processed the files in Adobe Camera RAW (ACR) via Photoshop using the following settings: Sharpening at 70 / 0.5 / 36 / 10, Luminance and Colour Noise Reduction both set to zero, and the Process to 2012 with the Adobe Standard profile. The high degree of sharpening with a small radius enhances the finest details without causing undesirable artefacts.
All lens corrections were disabled, so there’s no additional software compensation for vignetting, geometric distortion or chromatic aberrations. Normally this would allow us to evaluate the uncorrected optical performance of the lens alone, but with Micro Four Thirds lenses there are additional corrections stored as profiles within the firmware; these are automatically applied to JPEGs in-camera, and also by most RAW converters including ACR when opening the RAW file. You can’t turn them off.
As such it’s often hard to see exactly what’s going on behind the scenes of Micro Four Thirds lenses without using an obscure RAW converter which ignores the profiles, so instead of trying to chase the pure optical performance of the lens for the sake of it, I thought it would be much more useful to simply show how it will perform in normal use. That said, as a Panasonic lens on a Panasonic body, I believe both the geometric distortion and chromatic aberrations are being automatically corrected by the RAW processor here, with only vignetting being left untouched.
Moving onto the crops below, much of the stretching in the corners due to distortion and subsequent correction has disappeared at the milder focal length of 14mm, although I’d say while the degree of detail is still very good, it’s not quite as crisp as my 10mm and 7mm results. One thing remains constant though and that’s the vignetting which darkens the corners at f4, but is greatly reduced by closing the aperture to f5.6, or simply applying correction either automatically for in-camera JPEGs or using your RAW converter.
No complaints as you move towards the center though where the degree of detail remains very sharp and well-defined at f4 and f5.6. As with the other focal lengths though, beware of shooting at smaller apertures as a veil of softness due to diffraction begins to descend at f8 and becomes quite noticeable by f11.
So I’d again recommend shooting between f4 and f5.6 and avoid using anything smaller unless you’re chasing a starburst effect on lights or the Sun, or simply have too much light even at your maximum shutter speed and minimum ISO.
So while the corner performance peaked mid-way through the focal range, the 7-14mm still delivers great quality across the frame at 14mm, and as you move into the center of the image, the quality remains superb.
But how does this compare to other lenses? Find out in my Panasonic 7-14mm vs Olympus 12mm or Panasonic 7-14mm vs 14-42mm pages. Alternatively if you’ve seen enough you may wish to check out my Panasonic 7-14mm sample images or skip straight to my verdict.
Panasonic Lumix 7-14mm f4 corner sharpness at 14mm | Panasonic Lumix 7-14mm f4 center sharpness at 14mm | |
 |  | |
Panasonic Lumix 7-14mm f4 corner crop at 14mm f4 | Panasonic Lumix 7-14mm f4 center crop at 14mm f4 | |
 |  | |
Panasonic Lumix 7-14mm f4 corner crop at 14mm f5.6 | Panasonic Lumix 7-14mm f4 center crop at 14mm f5.6 | |
 |  | |
Panasonic Lumix 7-14mm f4 corner crop at 14mm f8 | Panasonic Lumix 7-14mm f4 center crop at 14mm f8 | |
 |  | |
Panasonic Lumix 7-14mm f4 corner crop at 14mm f11 | Panasonic Lumix 7-14mm f4 center crop at 14mm f11 |
Panasonic Lumix 7-14mm f4 vs Olympus M Zuiko Digital 12mm f2
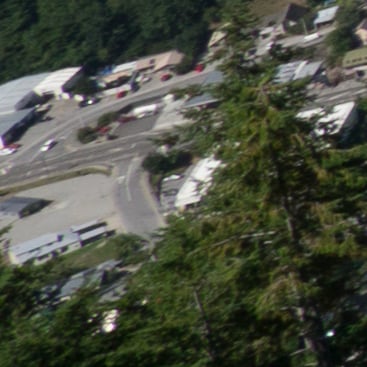
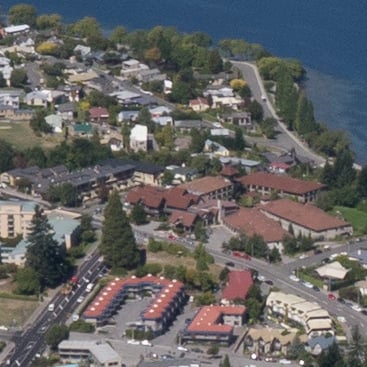
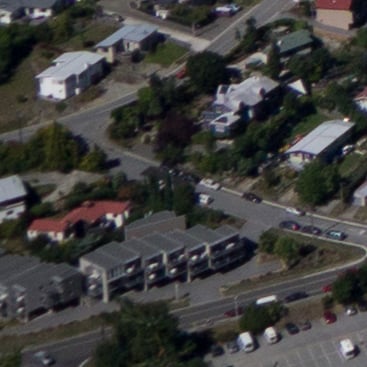
To compare the real-life performance between the Olympus M Zuiko Digital 12mm f2 and Panasonic Lumix 7-14mm f4 lenses, I shot this landscape scene with both at every aperture setting using a Panasonic Lumix GX1 mounted on a tripod. The Lumix 7-14mm was adjusted to deliver the same 12mm focal length. The GX1 was set to its base sensitivity of 160 ISO and the lenses were focused on the center of the composition using magnified Live View assistance. Most of the scene is effectively at infinity so even at f2 the depth of field covers the range of distances from top to bottom.
Once again I shot the scene with both lenses using the GX1’s RAW mode and processed the files in Adobe Camera RAW (ACR) via Photoshop using the following settings: Sharpening at 70 / 0.5 / 36 / 10, Luminance and Colour Noise Reduction both set to zero, and the Process to 2012 with the Adobe Standard profile. The high degree of sharpening with a small radius enhances the finest details without causing undesirable artefacts.
All lens corrections were disabled, so there’s no additional software compensation for vignetting, geometric distortion or chromatic aberrations. Normally this would allow us to evaluate the uncorrected optical performance of the lenses alone, but with Micro Four Thirds lenses there are additional corrections stored as profiles within the firmware; these are automatically applied to JPEGs in-camera, and also by most RAW converters including ACR when opening the RAW file. You can’t turn them off.
As such it’s often hard to see exactly what’s going on behind the scenes of Micro Four Thirds lenses without using an obscure RAW converter which ignores the profiles, so instead of trying to chase the pure optical performance of the lenses for the sake of it, I thought it would be much more useful to simply show how they will perform in normal use, at least on a Panasonic body anyway.
Both lenses have their geometric distortions automatically corrected in my results below, but as I understand it, only the combination of Panasonic lenses on Panasonic cameras will additionally apply chromatic aberration corrections automatically. As such, the 7-14mm results below are bereft of fringing as they were taken with a Panasonic body and processed by RAW software that understands the corrections. In contrast the Olympus 12mm exhibits fringing because it’s not corrected automatically – it’s something you’d need to do at the RAW conversion stage, and as explained above I had all the manual lens corrections turned off in ACR. This is clearly a tricky situation when it comes to comparing Panasonic and Olympus lenses on a Panasonic body as only the fringing on Panasonic’s own lenses will be corrected, but that’s what I had available at the time of testing, so that’s what I’m presenting below.
With all that said we can start looking at the results which are of course kicked-off by the Olympus 12mm with its brighter aperture. The crop from the corner at f2 isn’t bad, with plenty of detail recorded, although there’s a slight softness to the image, some darkening due to vignetting, and minor fringing on areas of high contrast – although the latter is actually respectably low since it’s not being corrected by the body or RAW processor. Apply CA corrections and it cleans up nicely on RAW files, but obviously it’ll remain on uncorrected JPEGs.
The f2.8 corner sample looks much brighter due to a reduction in vignetting, but this stop-down hasn’t made much difference to the overall sharpness or fringing which remain similar to the f2 sample. Likewise at f4 which is where the Panasonic 7-14mm joins-in the comparison. The 7-14mm crop at f4 appears much darker, again due to vignetting at the maximum lens aperture, but while there’s no fringing visible (due to the auto-corrections), the overall sharpness and recorded detail is higher than the Olympus at the same aperture.
With both lenses at f5.6, vignetting is banished on the 7-14mm and you can really begin to compare sharpness. Again the Olympus 12mm isn’t bad in this department, and arguably delivers its best result so far, but the Lumix 7-14mm is simply better with crisper details. As the aperture is closed further, the Panasonic maintains a lead in overall crispness that has nothing to do with auto corrections.
Scroll down to see how the lenses compare in the middle of the frame, or if you’ve seen enough you may wish to check out my Panasonic 7-14mm sample images or skip straight to my verdict.
Olympus M Zuiko Digital 12mm f2 corner sharpness | Panasonic Lumix 7-14mm f4 corner sharpness at 12mm | |
 | ||
Olympus M Zuiko Digital 12mm f2 corner crop at f2 | Panasonic Lumix 7-14mm f4 – f2 not available | |
 | ||
Olympus M Zuiko Digital 12mm f2 corner crop at f2.8 | Panasonic Lumix 7-14mm f4 – f2.8 not available | |
 |  | |
Olympus M Zuiko Digital 12mm f2 corner crop at f4 | Panasonic Lumix 7-14mm f4 corner crop at 12mm f4 | |
 |  | |
Olympus M Zuiko Digital 12mm f2 corner crop at f5.6 | Panasonic Lumix 7-14mm f4 corner crop at 12mm f5.6 | |
 |  | |
Olympus M Zuiko Digital 12mm f2 corner crop at f8 | Panasonic Lumix 7-14mm f4 corner crop at 12mm f8 | |
 |  | |
Olympus M Zuiko Digital 12mm f2 corner crop at f11 | Panasonic Lumix 7-14mm f4 corner crop at 12mm f11 |
Panasonic Lumix 7-14mm vs Olympus 12mm at 12mm in the middleMoving onto the center of the image the Olympus delivers a great-looking result even with the aperture wide open at f2. Likewise between f2.8 and f5.6 where the lens arguably performs at its best. Viewed in isolation you’d be very happy with these results, but put them alongside the Lumix 7-14mm and you may change your mind. The Panasonic lens joins-in the comparison at f4 where it delivers a result that’s simply crisper and higher contrast, with the very finest of details being better resolved. This continues throughout their aperture range, although by f8 and f11, diffraction is kicking-in and softening the images making them appear closer in overall detail. This is a very interesting result as many would assume the fixed focal length of the Olympus 12mm would allow it to out-resolve the Lumix 7-14mm, at least when stopped-down a notch or two. But while the Olympus 12mm does deliver very respectable performance, it’s simply out-resolved by the Lumix 7-14mm even when the latter is wide-open at f4. The fact is while the Olympus 12mm is clearly very good, the Lumix 7-14mm is even better when it comes to resolving fine details and delivering them with high contrast. Where the 12mm scores is of course having two stops greater light gathering power, not to mention a smaller and lighter body that can take filters and is also a bit cheaper. But if you’re into big landscape or architecture shots that are packed with detail and don’t need a filter, the Lumix 7-14mm clearly delivers the goods. I have one more test for you comparing the 7-14mm against a kit lens at 14mm – you can find this in my Panasonic 7-14mm vs 14-42mm comparison. Alternatively if you’ve seen enough you may wish to check out my Panasonic 7-14mm sample images or skip straight to my verdict. 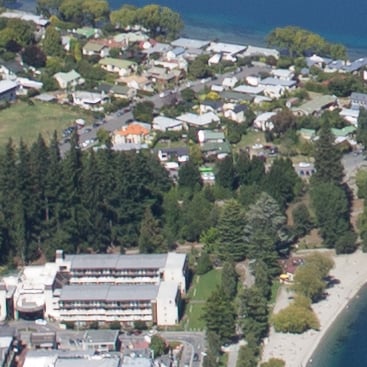
|
Olympus M Zuiko Digital 12mm f2 center sharpness | Panasonic Lumix 7-14mm f4 center sharpness at 12mm | |
Olympus M Zuiko Digital 12mm f2 center crop at f2 | Panasonic Lumix 7-14mm f4 – f2 not available | |
 | ||
Olympus M Zuiko Digital 12mm f2 center crop at f2.8 | Panasonic Lumix 7-14mm f4 – f2.8 not available | |
 |  | |
Olympus M Zuiko Digital 12mm f2 center crop at f4 | Panasonic Lumix 7-14mm f4 center crop at 12mm f4 | |
 |  | |
Olympus M Zuiko Digital 12mm f2 center crop at f5.6 | Panasonic Lumix 7-14mm f4 center crop at 12mm f5.6 | |
 |  | |
Olympus M Zuiko Digital 12mm f2 center crop at f8 | Panasonic Lumix 7-14mm f4 center crop at 12mm f8 | |
 |  | |
Olympus M Zuiko Digital 12mm f2 center crop at f11 | Panasonic Lumix 7-14mm f4 center crop at 12mm f11 |
| I have one more test for you comparing the 7-14mm against a kit lens at 14mm – you can find this in my Panasonic 7-14mm vs 14-42mm comparison. Alternatively if you’ve seen enough you may wish to check out my Panasonic 7-14mm sample images or skip straight to my verdict. |
Panasonic Lumix 7-14mm f4 vs Lumix 14-42mm f3.5-5.6 PZ
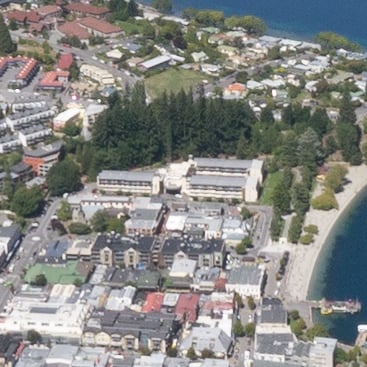
To compare the real-life performance between the Panasonic Lumix 7-14mm f4 and Lumix 14-42mm PZ lenses, I shot this landscape scene with both at every aperture setting using a Panasonic Lumix GX1 mounted on a tripod. Both lenses were tested here at 14mm, representing the long-end of the 7-14mm and the wide-end of the 14-42mm. The GX1 was set to its base sensitivity of 160 ISO and the lenses were focused on the center of the composition using magnified Live View assistance.
Once again I shot the scene with both lenses using the GX1’s RAW mode and processed the files in Adobe Camera RAW (ACR) via Photoshop using the following settings: Sharpening at 70 / 0.5 / 36 / 10, Luminance and Colour Noise Reduction both set to zero, and the Process to 2012 with the Adobe Standard profile. The high degree of sharpening with a small radius enhances the finest details without causing undesirable artefacts.
All lens corrections were disabled, so there’s no additional software compensation for vignetting, geometric distortion or chromatic aberrations. Normally this would allow us to evaluate the uncorrected optical performance of the lenses alone, but with Micro Four Thirds lenses there are additional corrections stored as profiles within the firmware; these are automatically applied to JPEGs in-camera, and also by most RAW converters including ACR when opening the RAW file. You can’t turn them off.
As such it’s often hard to see exactly what’s going on behind the scenes of Micro Four Thirds lenses without using an obscure RAW converter which ignores the profiles, so instead of trying to chase the pure optical performance of the lenses for the sake of it, I thought it would be much more useful to simply show how they will perform in normal use, at least on a Panasonic body anyway. In this instance the body and RAW processor are correcting the geometric distortions and chromatic aberrations automatically, but any vignetting will remain.
The motorized pancake zoom kick’s off the comparison at 14mm f3.5 with a result that suffers from noticeable vignetting, but sports surprisingly respectable sharpness and detail for such a small lens. Closed a fraction to f4, some of the vignetting is reduced and we can compare it to the 7-14mm wide-open. The premium 7-14mm is also exhibiting some vignetting here but as we’ve seen on my earlier results, it doesn’t perform at its best in the corners at 14mm. So we have the interesting and slightly surprising result that the 14-42mm Power Zoom is actually delivering slightly better quality in the corners when both are set to 14mm. At f5.6 with most of the vignetting eliminated from both lenses, the difference in detail becomes more apparent. It’s subtle, but the 14-42mm is a tad crisper in the corners up to f5.6. By f8 though the results are essentially neck in neck and by f11 diffraction is blurring any differences.
Scroll down to the second table to see how the lenses compare in the middle, or skip straight to my Panasonic 7-14mm sample images or verdict.
Panasonic Lumix 7-14mm f4 corner sharpness at 12mm | Panasonic Lumix 14-42mm f3.5-5.6 PZ corner sharpness at 14mm | |
 | ||
Panasonic Lumix 7-14mm f4 – f3.5 not available | Panasonic Lumix 14-42mm f3.5-5.6 corner crop at 14mm f3.5 | |
|  | |
Panasonic Lumix 7-14mm f4 corner crop at 14mm f4 | Panasonic Lumix 14-42mm f3.5-5.6 corner crop at 14mm f4 | |
|  | |
Panasonic Lumix 7-14mm f4 corner crop at 14mm f5.6 | Panasonic Lumix 14-42mm f3.5-5.6 corner crop at 14mm f5.6 | |
|  | |
Panasonic Lumix 7-14mm f4 corner crop at 14mm f8 | Panasonic Lumix 14-42mm f3.5-5.6 corner crop at 14mm f8 | |
|  | |
Panasonic Lumix 7-14mm f4 corner crop at 12mm f11 | Panasonic Lumix 14-42mm f3.5-5.6 corner crop at 14mm f11 |
Panasonic Lumix 7-14mm vs 14-42mm Power Zoom at 14mmMoving onto the crops taken from the center of the images, the power zoom again kick’s off the sequence at f3.5 with a respectable result that’s full of detail. Closing the aperture to f4 slightly improves the look of the 14-42mm at 14mm, but at this point the 7-14mm joins in with a noticeably crisper result that contains finer details and higher contrast. This continues at f5.6 where the superiority of the 7-14mm is clear over the kit zoom. If you’ve ever doubted the impact of diffraction in practice though, just look at the f8 and especially the f11 samples where any benefit of the 7-14mm is lost. This proves if you want to make the most of the potential sharpness of a higher-end lens, you’ll need to shoot at apertures which avoid diffraction, which for the 7-14mm means ideally between f4 and f5.6. As for the 14-42mm Power Zoom, it delivers better performance than you might have expected for a kit lens, at least at 14mm anyway. Admittedly this is the weakest focal length for the 7-14mm in my tests, but the results from the kit lens remain respectable. Right, that’s the end of my optical results, so it’s now time to either check out my Panasonic 7-14mm sample images or head straight to my verdict. 
|
Panasonic Lumix 7-14mm f4 center sharpness at 14mm | Panasonic Lumix 14-42mm f3.5-5.6 PZ center sharpness at 14mm | |
Panasonic Lumix 7-14mm f4 – f3.5 not available | Panasonic Lumix 14-42mm f3.5-5.6 center crop at 14mm f3.5 | |
|  | |
Panasonic Lumix 7-14mm f4 center crop at 14mm f4 | Panasonic Lumix 14-42mm f3.5-5.6 center crop at 14mm f4 | |
|  | |
Panasonic Lumix 7-14mm f4 center crop at 14mm f5.6 | Panasonic Lumix 14-42mm f3.5-5.6 center crop at 14mm f5.6 | |
|  | |
Panasonic Lumix 7-14mm f4 center crop at 14mm f8 | Panasonic Lumix 14-42mm f3.5-5.6 center crop at 14mm f8 | |
|  | |
Panasonic Lumix 7-14mm f4 center crop at 14mm f11 | Panasonic Lumix 14-42mm f3.5-5.6 center crop at 14mm f11 |
| Right, that’s the end of my optical results, so it’s now time to either check out my Panasonic 7-14mm sample images or head straight to my verdict. |


