Panasonic Lumix DMC-TZ5
-
-
Written by Gordon Laing
Panasonic Lumix DMC-TZ5 design and controls
At first glance, the Panasonic Lumix DMC-TZ5 greatly resembles its predecessor. By modern standards, it’s a fairly chunky compact, measuring 103x59x37mm and weighing 214g without its battery. There’s certainly slimmer and lighter models on the market, including the company’s own Lumix FX35, which we’ve pictured alongside below. But of course few if any compacts can boast the same impressive 10x optical zoom range which take you from decent wide angle to respectable telephoto coverage. And while the TZ5 may bulge slightly from shirt pockets, it’ll still easily slip into coats or bags.
Like its predecessor, the new TZ5 is available in black, silver or blue, although all three variations may not be sold in every region. And by sharing what’s essentially the same shell, the new TZ5 also inherits excellent build quality. The camera feels very solid and confident in your hands.
 |
Place the new TZ5 next to its predecessor though and you’ll notice Panasonic has made a number of external alternations. Most obviously on the front, the grip has changed from a horizontal bar to a more traditional thicker vertical design with a textured finish. On the rear, the ridge running down the right side of the screen and the bulge to the top right corner with dots in-between remain as the thumb rest and the combination allows you to comfortably hold the camera single-handedly – although at longer focal lengths you should certainly use both hands, even with the TZ5’s stabilisation.
The bulge on the upper right corner of the rear surface is now home to a new switch which sets the TZ5 between recording and playback. This has allowed the main mode dial on the top of the camera to be simplified, and indeed Panasonic has also been able to dispense with a few modes.
So the TZ3’s ten mode dial options have become just six on the new TZ5. Play, Print, Macro, and the often confusing heart and intelligent ISO modes have now gone and in their place are a single Intelligent Auto mode, along with the earlier Normal mode (auto with some manual options), two Scene positions, movie mode and the clipboard option. This simplification is a sensible and effective update.
 |
Staying on the top surface, the shutter release and zoom rocker remain as they were, but the power switch now sits between it and the mode dial, with a new ‘E.Zoom’ button in its place. Pressing this zooms the lens directly to its maximum focal length, and pressing it again engages the ‘EZ Zoom’ digital extension (at lower resolutions). Finally, the shaky-hand button for adjusting the image stabilisation mode has been removed, with it now controlled through the super-imposed menu system or the main menu pages instead.
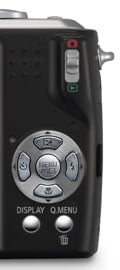
Round the back, the four-way controls with a Menu / Set button in the middle remain. During record mode, pushing up adjusts the exposure compensation or activates the backlight boost option, pushing right adjusts the flash, pushing down puts the TZ5 into macro mode, while pushing left sets the self-timer between 10 and two seconds.
Below these are two buttons which again cycle through the display options and fire-up the redesigned on-screen function menu, although the latter is now called Q.Menu. On previous Panasonics, this button doubled-up to adjust the LCD brightness mode, but that option has now sensibly been put onto the dropdown function menu instead – keep reading for full details.
Panasonic Lumix DMC-TZ5 exposures and creative modes
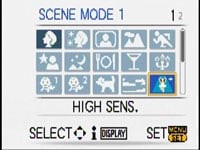
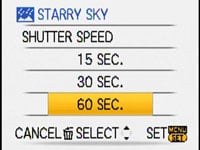
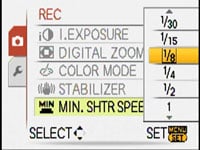
The Panasonic Lumix DMC-TZ5 has shutter speeds from 1/2000 to 8 seconds (up to 60 seconds in its Starry Sky Scene preset) and two aperture settings at its disposal, although there’s little or no means to manually adjust them. By carefully choosing one of the 23 Scene presets and adjusting exposure compensation though you can actually achieve a wide range of creative results. If you’re into taking longer exposures in dim conditions though, be sure to change the minimum shutter speed from the default 1/8 to something slower – the menu allows you to adjust this between 1/200 and one second.
 |
 |
 |
The 23 scene presets include two new options over the TZ3: High Speed Burst (at reduced resolutions) and Multi Aspect which takes three shots at the 4:3, 3:2 and 16:9 aspect ratios – see sensor section on the next page for more details.
It’s possible to use some of these presets to ‘trick’ the TZ5 into using preferred apertures or shutter speeds – for example, Portrait mode will select a small depth of field, while Sports will opt for a fast shutter speed. The Starry sky preset also allows surprisingly long exposures for a compact, offering the choice of 15, 30 or 60 seconds.
 |
Panasonic’s Intelligent Auto mode, first seen on its July 2007 launches, is now featured on the TZ5 with further refinements. As before it employs a number of cunning technologies which attempt to recognise what kind of photo you’re taking.
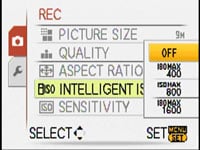
Automatic scene detection analyses the composition and if it recognises key elements it will select either the Portrait, Scenery, Macro, Night Scenery or Night Scenery with Portrait presets. If none fit the bill, the TZ5 selects a general automatic mode. Next up comes Intelligent ISO which automatically detects motion in the frame and increases the sensitivity if necessary to allow a sufficiently quick shutter speed to freeze the action.
New to the TZ5 and Panasonic’s 2008 range is Intelligent Exposure which can actually adjust the ISO over different portions of the frame. This first divides the frame into around 3000 areas, then finds the brightest portion and exposes for it using the lowest sensitivity. Then it increases the gain in the darker portions of the frame to boost detail in shadow areas.
While the idea of having different sensitivities on the same image sounds unusual, it’s not actually that different in practice to other dynamic range optimisation systems which digitally increase the brightness in darker areas. The result is also similar, where shadows are boosted, but at the cost of greater noise or artefacts in those areas.
 |
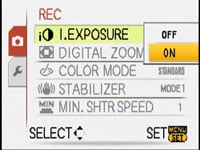 |
Intelligent ISO and Intelligent Exposure can also be selected separately for the Normal shooting mode if desired, but are both active along with Automatic Scene Detection when the camera’s set to its Intelligent Auto mode.
It all sounds ambitious, but proves surprisingly effective in practice. We repeated a test used on previous models and found the TZ5 switched to Landscape mode when pointed at a mountain, adjusted itself to Macro when directed towards a close subject, then fired-up its Portrait preset with Face Detection when turned to people. The Intelligent ISO system also reacted well to subjects in motion. Sadly the latest addition, Intelligent Exposure, failed to make much impact on our test shots, but you may have more mileage. Either way, the addition of Scene and Face Detection to the TZ5 are valuable enhancements.
Indeed, while Intelligent Exposure didn’t impress in our tests, Panasonic’s Intelligent Auto mode overall remains by far the cleverest automatic system we’ve tested to date, exploiting a wide range of technologies, and we’d happily recommend it for day-to-day use and spontaneous shots. Then when you want to be more specific, simply switch to Normal mode or one of the wider choice of scene presets.
Panasonic Lumix DMC-TZ5 Flash
The Panasonic Lumix DMC-TZ5 has a built-in flash with a variety of options cycled-through using right arrow button: Auto, Auto with red-eye reduction, Forced on, Slow sync with red-eye reduction and Forced off. There’s no flash compensation settings.
Panasonic Lumix DMC-TZ5 Screen and menus
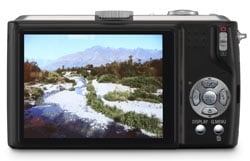 |
Panasonic may have upgraded the screen on the earlier TZ3 to a decent-sized 3in model, but hasn’t rested on its laurels here. The new TZ5 keeps the 3in size, but increases the resolution from 230k to 460k pixels. This corresponds to an increase in resolution from 320×240 to 480×320 pixels.
Interestingly there doesn’t appear to be any noticeable benefit while taking photos or navigating menus – both appear to be scaled up from 230k data and as such look no different from other 230k screens. But the magic starts when you enter playback as the images look much more detailed than on 230k screens. As you’d expect given the actual screen resolution, it’s not as impressive as a jump to those with 920k 640×480 pixel displays, but it’s still a welcome upgrade. It’s just a shame there doesn’t appear to be any benefit during recording or menu navigation.
 |
We did however notice there were occasionally vertical streaks seen on-screen in compositions with very high contrast – for example a window taken from indoors with a very bright outdoor scene. This was perhaps due to the sensor’s live feed and only appeared occassionally during composition. It didn’t affect the recorded image – and may have been a fault on our review sample, but if it might bother you, check before buying.
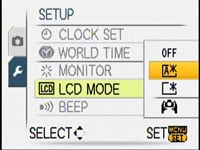
On previous Panasonic compacts, the Display button doubled-up as a means to adjust the screen brightness. This control has now been relocated to the on-screen Q.Menu and main menu system, and offers the same Power (brightening boost) and High Angle options as before, but now also has an automatic mode which can detect ambient light and switch into Power mode. We found this worked very well in our often bright outdoor conditions and would recommend leaving the camera in this mode unless you need to save power.
 |
 |
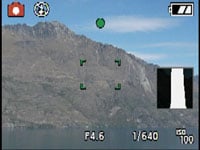 |
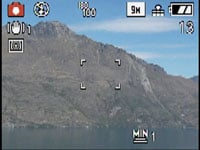
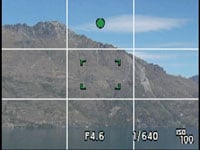
Pressing the Display button cycles between a clear view with no information, one with an alignment grid and one with detailed shooting information – and despite not letting you manually adjust the aperture or shutter, the TZ5 is more than happy to tell you exactly what it’s going to use. A menu option allows you to also show a live histogram over both the recording info and grid screens.
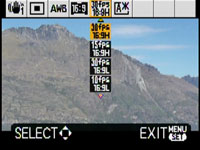 | |
Like previous models, Panasonic splits (and often duplicates) its various settings over an overlaid function menu (now called Q.Menu) and a more conventional paged menu system. After using the same layout and graphics for some time though, Panasonic has opted for a redesign with its 2008 range, but the operation remains the same.
Pressing the Q.Menu button overlays a drop-down styled menu over your live composition and offers context-sensitive options. With the TZ5 set to Normal recording mode, you can adjust the stabilisation mode, continuous shooting, AF area, white balance, sensitivity, Intelligent Exposure, aspect ratio, image resolution and LCD brightness mode. So several options have been relocated from previous buttons and menus, although the compression quality has now been moved to the main menu system.
 |
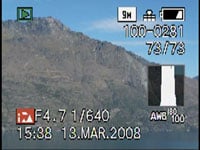 |
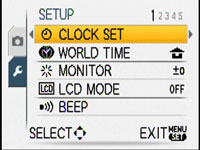
Pressing the Menu button in Normal recording mode offers four pages of recording options and five setup pages; many of the common options are duplicated in the Q.Menu system.
With the TZ5 switched into playback mode, the Display button cycles between a clean image and ones with varying degrees of detail – if you have Histograms enabled in the setup menu, one will appear in the third screen.
 | |
Like its predecessor, the TZ5 can display two images simultaneously during playback for easy comparison. In theory this is really no different from a thumbnail mode which only shows two pictures, but Panasonic cleverly flips them on their side so you use the screen in a portrait orientation to maximise their reproduction.
This ‘Dual Display’ option is quite useful in practice, especially on a detailed 3in screen and you can also choose which two images to show alongside each other – rather than just two consecutive files.
Panasonic Lumix DMC-TZ5 battery and connectivity
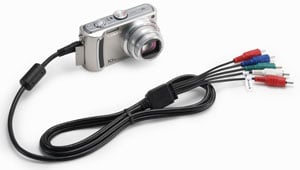 |
A single small door on the right side of the body opens to reveal a DC-input, a combined USB / AV port, and new to the TZ5, a component output for the optional DMW-HDC2 cable. With this cable the TZ5 will output a 1080i signal for HDTVs. A larger door under the grip side of the body houses the battery and SD memory card slot.
The Lumix TZ5 is powered by the same CGA-S007E 1000mAh Lithium Ion battery pack as its predecessor and the camera is supplied with a mains recharger. Panasonic claims each charge is good for 300 shots under CIPA conditions. If you enable stabilisation, continuous AF, the auto LCD brighten option and regularly record movies though, you’ll consume the battery much faster, so investing in a spare would be advisable.
