 I said it before and I'll say it again: the Panasonic Lumix GX7 is a very satisfying and capable system camera that will delight most enthusiasts. It's responsive and packed with features that allow it to perform confidently in a variety of situations, and there's little in terms of specifications that are missing. Wifi, focus peaking, manual movie exposures, tilting screen and viewfinder, adjustable tone curves, built-in IS, 1/8000 shutter, the GX7 has it all. In these respects it's easily one of the best system cameras to date and one I very much enjoyed shooting with.
Panasonic Lumix GX7 review
-
-
Written by Gordon Laing
Intro
The Panasonic Lumix GX7 is a mirrorless camera based on the Micro Four Thirds standard and aimed at enthusiasts. Announced in August 2013, it’s officially the successor to the Lumix GX1, despite there being no GX2 to GX6 between them.
The original GX1 was developed in response to enthusiasts who demanded lots of control and features, but in a smaller form factor. Panasonic’s GF series fitted the bill on size, but subsequent generations lost key features like a hotshoe and optional EVF, which the GX1 brought back. Now the Lumix GX7 takes this concept further by packing a wealth of features into a new body which looks not unlike the much earlier Lumix L1 from 2006, Panasonic’s first DSLR – in modern terms, think Sony’s NEX 6 or NEX 7 and you’ll be close.
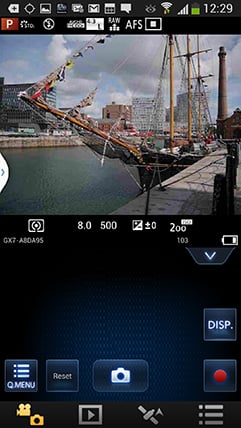
The GX7’s magnesium alloy body is a little wider, taller and thicker than the GX1 with a broader grip, but remains smaller than the DSLR-styled Lumix G6, while managing to squeeze-in an EVF which sports 2.76 million dots and can angle 90 degrees upwards; the 3in touchscreen on the rear also tilts and there’s still room for a hotshoe and popup flash on the top panel. Like most recent Lumix bodies, there’s built-in Wifi with NFC, and like the G6, focus peaking too, but for GPS location data you’ll still need to sync with your phone. Taking a leaf from the Olympus EP5, the GX7 boasts a 1/8000 fastest shutter speed, the quickest of any Lumix body and the joint fastest in the mirrorless world. The AF remains contrast-based, but is faster than the GX1 with a 240fps drive system and the GX7 will also focus in very low light down to -4EV. The image resolution sticks at 16 Megapixels, but Panasonic claims it’s a new sensor with a greater signal to noise ratio than the GX1; it also now supports 1080p video at 24p and 50p / 60p depending on region with full manual control over exposure. In a move that will surprise many, the GX7 also becomes the first Lumix G model to feature built-in sensor-shift stabilisation which works with any lens you attach. It’s not as sophisticated as the 5-axis system from Olympus and not available when shooting video either, but remains an important and very welcome addition to the Lumix family.
Does this add up to the best Micro Four Thirds camera for enthusiasts, or indeed the best mirrorless camera around? Find out in my in-depth review where I’ll be closely comparing it to the Olympus OMD EM5 and EM1, not to mention the Sony NEX 6, Lumix G6 and of course the original Lumix GX1!
 |
Panasonic Lumix GX7 design and controls
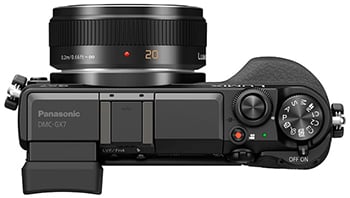
The design of Panasonic’s GX7 may have been inspired by the company’s L1 DSLR from 2006, but to most people the camera it most resembles is Sony’s NEX 6 / 7. With a flat-topped surface sporting from right to left a mode dial, popup flash, hotshoe and viewfinder perched in the corner, it’s impossible not to draw comparisons.
Measuring 123x71x55mm, the GX7 is actually a little larger than the NEX 6 when viewed from the front and noticeably thicker too thanks to a deeper body and a viewfinder housing and grip which protrude further outwards. At 402g including battery, the GX7 is heavier too by 57g, but fit a lens on them both and any differences in their bodies becomes academic. They are very similar looking cameras to hold and carry around.
Anyone trading-up from the original GX1 will find the GX7 a larger camera overall though, a little bigger in all dimensions and not as pocketable, although it remains comfortably shorter and thinner than the DSLR-styled Lumix G6. It is however more interesting to compare the GX7 to the Olympus OMD EM5, which despite employing a DSLR-shape is remarkably similar in size. The EM5 and GX7 are almost exactly the same width, and their main bodies share a similar thickness. While the EM5’s viewfinder head makes it taller overall by almost 2cm, the actual top panel of the Olympus is a little lower than the upper surface of the GX7. Viewed from the top, the viewfinder housing and especially the grip on the GX7 also protrude further, making it thicker overall than the EM5. So while the vital statistics give the impression the EM5 is much larger thanks to its taller height, it’s actually a very similar proposition to squeeze into a bag or carry around with you.
 |
In your hands the Lumix GX7 feels comfortable and confident. The chunky front grip gives you plenty to hold onto – certainly much more than the OMD EM5 in its basic configuration – although there’s not as much on the rear for your thumb to press up against. I should at this point note the OMD EM5 supports an optional two-part battery grip, where the first section beefs-up the front grip and makes it a little taller so your little finger isn’t left dangling so much. The second part then complements this, making it thicker still while accommodating portrait controls and a second battery. There’s no grip option for the GX7, so you have to be satisfied with its ergonomics as it stands.
In terms of build, the Lumix GX7’s magnesium alloy body feels tough and well-constructed, but there’s no indication from Panasonic concerning dust or weather-proofing. Again this is in contrast to the Olympus OMD EM5 and Panasonic’s own GH3 which are dust and splash-proof, although of course you’ll need an equally tough lens too. I realize environmental sealing is something that’s normally reserved for higher-end and larger products, but I think there’s demand for a smaller enthusiast class body that’s confident under tougher conditions. I was disappointed the original GX1 wasn’t weather-proof and continue to be disappointed the GX7 isn’t either. To be fair, I have taken both the GX1 and GX7 out in light showers without problem, but it’s something you’ll need to be more aware of than if you were shooting with the OMD EM5.
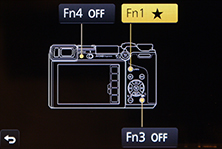
On the upside though, the lack of true weather-sealing has allowed Panasonic to equip the GX7 with nice clicky buttons rather than the squashy ones Olympus needed to use for the EM5. There’s plenty of them on the GX7 too including no fewer than four Function buttons on the rear and a further five soft keys in a pull-out ‘tray’ on the touch-screen. All nine are completely customisable, even down to having different functions for recording and playback.
 |
 |
 |
The GX7 also sports two control dials, one around the shutter release and the other in the upper right rear corner. Again these are completely customisable, even down to the direction they’re turned, so it’s easy to set them up to adjust, say, aperture on one and exposure compensation on the other. The thumb dial also has a push-click action to switch its function if desired like many earlier Lumix cameras. There’s also a nice switch on the rear to choose between Auto and Manual focus rather than selecting it via the menus as you do on the G6 or OMD EM5. Note the EM5 and EM1 also have twin control dials and the latter additionally features a neat 2×2 switch which allows you to instantly switch them from adjusting the exposure to the ISO and white balance instead. But to be fair the EM1 is a higher-end camera, and in its price bracket I feel the GX7 does very well on the control front. It’s definitely a highlight of the camera.
 |
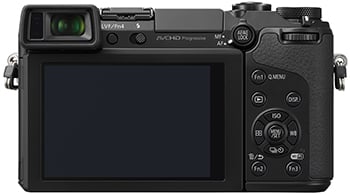 |
Again like many Lumix cameras before it, the GX7 also gives you quick access to the ISO, White Balance, drive modes and AF areas using the cross-keys on the rear, although as I’ll mention later in the review, these are also all accessible via the very capable touch-screen interface. Overall I’d say the GX7 has better controls than the OMD EM5, not just in terms of their feel, but also their number and degree of customization.
As mentioned earlier the GX7 sports a standard hotshoe and a popup flash, the latter rated as GN5 at 100 ISO or GN7 at 200 ISO; this is a tad weaker than the GN6 / 100 ISO popup flash of the NEX 6, although at least both models actually have one built-in as the OMD EM5 is supplied with a clip-on accessory instead. Yes, yes I know popup flashes aren’t that strong or subtle, but I still find them very useful as a fill-in and it’s simply much more convenient to have them built-in. If you do want something more powerful though, the GX7’s hotshoe supports the optional DMW-FL220E, FL360LE or FL500E flashguns.
Behind a plastic panel on the left side are three ports: a combined USB / AV output, a Mini HDMI port and a 2.5mm remote jack for the optional DMW-RSL1E cabled remote, although remember you can alternatively remote control the camera over Wifi with an iOS or Android smartphone (see later in the review). Sadly though, in another missed opportunity, the GX7 does not offer an external microphone input; this is daft considering the G6 has one and both the NEX 6 and OMD EM5 can accommodate external microphone accessories which slot onto their hotshoes. Surely if you’re going to equip a camera with a 16:9 shaped viewfinder that’s optimized for HD video, at least make it the best movie camera you can. It’s not as if Panasonic is protecting the GH3 for video customers either as the G6 sports a 3.5mm microphone jack.
In happier news the Lumix GX7 is equipped with Wifi and NFC, the latter buried into the main grip and allowing wireless negotiation by touch with compatible handsets like the Samsung Galaxy S3 and S4 and Google NEXUS 4, 7 and 10, although sadly still no iPhones to date. The inclusion of Wifi brings it in line with the NEX 6 and ahead of the EM5 which sadly doesn’t have wireless built-in. Note there’s no GPS built-into the GX7, but you can sync with a log made with your smartphone in a (somewhat convoluted) process I’ll explain later.
Underneath the camera, Panasonic continues to house the memory card slot in the battery compartment, but in a very considerate move it’s all now turned by 45 degrees and wedged into the corner where the grip protrudes. This means it will clear most smaller tripod plates, unlike many earlier Lumix cameras where the battery and card are blocked when mounted on a tripod. I’d still prefer the card slot on the side in the grip, like the OMD EM5 and most DSLRs, but this is still progress.
Panasonic quotes 350 images under CIPA conditions, compared to 360 for the NEX 6 or 330 for the OMD EM5. Note Olympus doesn’t use CIPA conditions to quote measure this figure, but in a major advantage over both the GX7 and NEX 6, you can fit an optional grip to accommodate a second battery and effectively double the life.
Panasonic Lumix GX7 lenses and stabilisation
The Lumix GX7, like all Panasonic G-series cameras, is based on the Micro Four Thirds standard, which means it can use any lens designed for this system. The sensor in Micro Four Thirds cameras reduces the field of view by two times, so the 14-42mm kit lens delivers an equivalent range of 28-84mm – you can see the coverage of the 14-42mm HD kit lens below.
Panasonic Lumix GX7 with 14-42mm coverage wide |
Panasonic Lumix GX7 with 14-42mm coverage tele | |
 |  | |
| 14-42mm at 14mm (28mm equivalent) | 14-42mm at 42mm (84mm equivalent) | |
The GX7 becomes the first Panasonic Lumix G body to feature built-in stabilisation which works with any lens you attach. This is a big move for Panasonic as prior to the GX7, if you wanted stabilisation on a Lumix G system, you needed to use lenses with optical stabilisation. In contrast Olympus has always equipped its Micro Four Thirds bodies with built-in sensor-shift stabilisation which works with any lens you attach. This has always been a big differentiator between their cameras, and an important factor to consider if you use a lot of unstabilised lenses, such as any Olympus models or older optics, not to mention a number of Panasonic’s own lenses.
It is however important to note Panasonic’s built-in stabilisation on the GX7 is considerably simpler than that on the latest Olympus bodies. You’re looking at a basic two-axis system compared to a genuine five axis system on the latest OMD and PEN models, and even Panasonic describes it as not being as effective as optical stabilisation. Indeed it’s revealing that Panasonic’s latest 14-42mm HD kit lens, a common bundle with the GX7, still features optical stabilisation.
So how effective is the GX7’s built-in stabilisation, not to mention that of the latest kit lens? I’ll start with the latter. To test the stabilisation of the 14-42mm kit lens, I zoomed it into its maximum focal length of 42mm, delivering an 84mm equivalent field of view. According to conventional wisdom, this would require a shutter speed of at least 1/80 without stabilisation for a sharp result. Coincidentally 1/80 ended up being the slowest shutter speed I could successfully handhold a sharp result without stabilisation on this lens but with optical stabilisation enabled, I could achieve the same result at 1/10 and just about at 1/5. This corresponds to between three and four stops of compensation – a respectable result for an optical system. You can see my exposures at 1/5 below, with optical stabilisation on the right and without on the left.
Panasonic Lumix GX7 with 14-42mm HD Optical Image Stabilisation off / on | ||
 |  | |
100% crop, 14-42mm at 42mm, 1/5, 160 ISO, IS off |
100% crop, 14-42mm at 42mm, 1/5, 160 ISO, IS on | |
At this point I would loved to have entered a menu on the GX7 and switched to body-based stabilisation for a proper side-by-side comparison, but unfortunately the GX7 doesn’t give you the option to choose if optical stabilisation is present in the lens – once again confirming its more basic capabilities. So to measure the effectiveness of the body-based stabilisation I fitted the non-stabilised Olympus 75mm f1.8 lens instead.
When you fit an unstabilised lens to the GX7, the Stabilisation menu changes from lens-based to body-based, but still offers you the choice of dual axis, or vertical only for panning. If the lens has electronic profile information, like the Olympus Micro Four Thirds models, the GX7 should read their focal length and adjust as required, but if you’re using an older or simpler manual lens, you can enter the focal length manually from between 8 and 1000mm.
According to the 1/focal length rule, the 75mm lens should require a shutter speed of at least 1/150 to avoid camera shake without stabilisation. This was born out in practice with me needing to use at least 1/160 without stabilisation to avoid shake.
Enabling the GX7’s body-based stabilisation however delivered some unexpected results. My 1/160 exposure was understandably sharp, but at 1/80 there was blurring in a geometric pattern, shaped like an upside-down letter V. At 1/40 and slower this pattern turned into a shape not unlike a plus symbol. The results were much sharper than the non-stabilised versions at the same shutter speeds, but at 100% there was no denying that the stabilisation was compensating for my shake in a basic and not fully effective manner. You can see the organic curve of natural shake below left at 1/20, and in the middle the result from the GX7 with stabilisation enabled. Yes it’s better than the non-stabilised version, but it doesn’t look particularly natural.
Panasonic Lumix GX7 using Olympus 75mm f1.8 Body stabilisation off |
Panasonic Lumix GX7 using Olympus 75mm f1.8 Body stabilisation on |
Olympus OMD EM5 using Olympus 75mm f1.8 Body stabilisation on | ||
 |  |  | ||
100% crop, 75mm, 1/20, body IS off |
100% crop, 75mm, 1/20, body IS on | 100% crop, 75mm, 1/20, body IS on | ||
Meanwhile above right is the result from the same lens mounted on an Olympus OMD EM5 using the same exposure moments later, and the difference is striking. Revealingly it’s still suffering from a little motion blur, but it’s still a big improvement over the GX7.
I repeated comparisons under different conditions with different subject distances and different lenses too, but the overall result remained very similar: I was typically achieving only a stop or so of compensation from the GX7 compared to at least three from the EM5 under the same conditions. Maybe your mileage will vary, but I’d say judging from my tests in its current generation the GX7’s stabilisation isn’t anything to get too excited about. It may let you handhold at slightly slower shutter speeds, but it’s not yet any substitution for an optically stabilized lens or of course the Olympus system.
I should also add the GX7’s stabilisation is only offered for stills, not video, a decision I’m told is due to operating noise. While the GX7’s stabilisation is certainly audible, it’s not particularly any noisier than the Olympus system (which is available for video) and I think I’d have preferred to make the decision whether it’s spoiling my footage or not.
The bottom line is while I was disappointed by the performance of the GX7’s built-in stabilisation, I also appreciate it’s a first commercial attempt. I really do appreciate Panasonic equipping this body with the capability and dearly hope they continue to develop and refine it. There’s some fantastic unstabilised lenses in the Micro Four Thirds catalogue and I’d love for future Lumix G bodies to stabilize them as well as Olympus bodies can. But right now if you want three or more stops of compensation with an unstabilised Micro Four Thirds lens, you’ll need to buy an Olympus body.
Before moving on, a quick note about the lenses available for the Lumix GX7. The Micro Four Thirds standard, jointly developed by Panasonic and Olympus, is the most established of the mirror-less system camera formats, bringing bodies and native lenses to the market at least one year before its first rival arrived. Being first to market along with having not one but two major manufacturers behind it are two major advantages Micro Four Thirds enjoys over the competition, and it really shows when you compare their respective native lens catalogues. As of 2013, Micro Four Thirds had over 40 lenses available from Panasonic and Olympus along with third parties including Sigma, Tamron, Samyang, Voigtlander and others. So while many rival mirror-less formats are struggling to offer even one lens in every category, Micro Four Thirds typically has two or more options available. Whether it’s Fisheye, ultra wide, fast aperture, macro, super-zoom or good old general-purpose, the Micro Four Thirds catalogue has it covered, and many of them are great quality too – find out more in my Micro Four Thirds lens guide.
Panasonic Lumix GX7 screen and viewfinder
The Panasonic Lumix GX7 is equipped with a touch-screen and an electronic viewfinder for composition, and uniquely both can tilt vertically. The screen can be angled by 90 degrees to face directly upwards for waist-level shooting, or by about 45 degrees down for composing at high angles, while the viewfinder can be angled by up to 90 degrees upwards, again useful if you enjoy composing while looking down, like a medium format camera. The ability for both the screen and the viewfinder to tilt vertically makes the GX7 unique among its rivals, although I should note the screen is not fully-articulated like the Lumix G6, so much of the compositional flexibility is lost if you’re shooting in the portrait aspect ratio.
Like the G6 before it, a sensor to the side of the viewfinder can automatically switch between it and the screen for composition, and this process is fairly swift – unlike some cameras, the switch is quick enough that you never have to wait. It’s certainly much faster than switching a DSLR in and out of Live View. If you prefer though you can turn off the detector and manually switch between them using a button – something I did from time to time when an unusual grip on the camera could see my fingers get in the way of the sensor and switch off the screen.
The GX7’s viewfinder sports 2.7 million dots and 1.39x magnification which edges it into the lead in terms of resolution against its rivals, but it’s equally or even more important to also consider the shape of the panel and the technology behind it. Unlike the Olympus OMDs, the Sony NEX 6 / 7 and Panasonic’s own G6, the GX7’s viewfinder panel is 16:9 in shape. When shooting 16:9 videos or stills, the view is impressively large and both bigger and more detailed than any other EVF I’ve used for 16:9 content, even better than Panasonic’s flagship GH3. Note I believe the GX7’s resolution is actually 1024×768, stretched into a 16:9 shape.
But when shooting stills in the native 4:3 aspect ratio, the active image is sandwiched between thick black bars, reducing the effective size and resolution. The resulting image may still sport 768×768 pixels (stretched into a 4:3 shape), making it roughly as detailed as the 800×600 EVFs on the Lumix G6 and Olympus OMD EM5, but crucially it’s a little smaller.
This is always the compromise when choosing a screen or panel that has to accommodate different shaped content, and a particular issue for Micro Four Thirds as its native 4:3 aspect ratio for stills is much squarer than the 16:9 shape for HD video. If you choose a 16:9 panel, then 4:3 stills will sit in the middle with thick black bars on the left and right sides. If you choose a 4:3 panel, then HD video will be letterboxed between thin bars at the top and bottom.
So if you’re shooting HD video on the GX7 you’ll love the unparalleled size and detail of the EVF, but if you’re shooting stills in the 4:3 shape, you’ll almost certainly prefer the G6 or Olympus OMDs for composition, especially the latest OMD EM1 which sports the biggest 4:3 viewfinder image of them all. So why did Panasonic choose a 16:9 panel for the GX7 as it’s surely more of a stills than a movie camera? I don’t have the answer, but suspect it may have something to do with the wide shape of the viewfinder housing to accommodate the tilting mechanism. If this was indeed the case, I’d personally have preferred a fixed viewfinder with a taller 4:3 shaped panel, like the Lumix G6.
It’s also important to discuss the actual technology behind the viewfinder panels. While the earlier Lumix G6 employed an OLED panel, the GX7 has gone for field-sequential technology instead which is prone to image tearing – where rainbow artefacts can appear when glancing around the image or panning quickly. Now it’s important to stress that some people aren’t sensitive to this effect, but others, including myself very much are. I certainly found glancing around the shooting information on the GX7’s viewfinder could elicit the effect, as could panning. I also felt the viewfinder image was dimmer than models like the OMD EM5 and less natural-looking, but this is a subjective view.
There’s also the positioning of the viewfinder on the body to take into consideration with some people preferring a centrally-mounted viewfinder as oppose to one in the corner – again this is personal though and often boils down to whether you compose with your left or right eyes. Those who compose with their left eyes may find their noses inadvertently operating the touch-screen.
Putting aside the subjective aspects though I still feel the GX7’s panel is the wrong shape and employs the wrong technology for a camera who’s audience are more likely to be stills photographers rather than movie shooters. As someone who extensively shot with the GX1 and missed the presence of a viewfinder, I certainly welcome the inclusion of one here, but ultimately due to some technical decisions it feels like a missed opportunity rather than a key highlight.
Moving onto the screen, the GX7 employs a 3in touch-sensitive panel with a 3:2 shape, like most Lumix G models before it. With 1040k dots, I assume it’s the same or at least a very similar panel to the Lumix G6 and certainly shares its lack of internal air gap, meaning the image is nice and crisp.
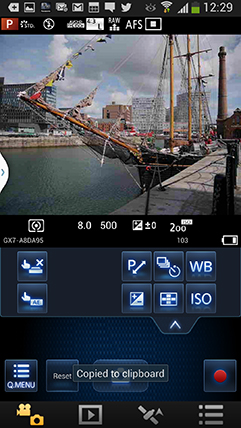
The touch-screen interface remains a joy to use, and as explained earlier, you can adjust almost every setting with it, or if you prefer, ignore it altogether and use the physical buttons, dials and levers instead. Personally speaking I find it hard to shoot without a touch-screen now, almost always tapping on the area I want to focus on. I still enjoy tapping to refocus while filming video, and it’s also useful to drag guides around the screen to aid composition, not to mention swiping between images in playback and pinching to zoom.
Panasonic also lets you touch your way through the chunky menu lists and tap-out text using a mobile-style keypad interface on-screen – something the ZS30 / TZ40 super-zoom doesn’t allow. Suffice it to say you can also swipe between photos in playback, pinch to zoom, or tap an icon for a thumbnail view. In short there’s virtually nothing you can’t adjust on the GX7 using its screen, although again if you prefer you can ignore it altogether and operate the camera using its wealth of physical buttons, dials and levers. As I noted earlier, those who compose using the viewfinder and their left eyes may wish to disable some touch functions as their noses may inadvertently operate the screen.
 |
 |
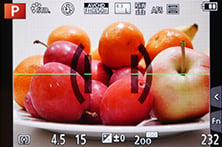 |
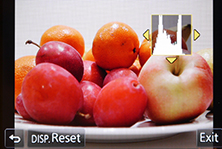
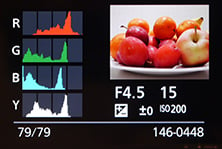
There’s also a broad array of display options when composing on the GX7. You can view a choice of alignment grids or draggable guidelines, a live histogram (also draggable), or a dual-axis leveling gauge. During playback there’s varying levels of exposure detail with each press, culminating in separate RGB and brightness histograms. In a missed opportunity though, Panasonic still resists the chance to auto-rotate images in playback as you turn the camera, so portrait shaped images in playback will never fill the screen.
 |
 |
 |
Finally, a quick mention of the new Clear Retouch option in playback, which offers a clone-like tool to remove unwanted objects from images. In theory all you need to do is trace around the undesired object and the GX7 should remove it, but in my tests I just couldn’t get it to work satisfactorily, and even then the screen was too small and my finger too big to accurately select areas. So while it’s a nice idea in theory, it didn’t work well for me in practice. Others may have more mileage, but I prefer to do this sort of thing using Photoshop afterwards.
Panasonic Lumix GX7 autofocus
The Lumix GX7 has inherited most of the AF modes and capabilities of the G6, which makes it a bigger step-up from the GX1 than appears at first glance. Most importantly, the GX7 now offers 240fps AF drive for quicker response, and usefully it can also autofocus down to -4EV compared to 0EV on the GX1. Like the G6, I confirmed the benefit of lower light AF capabilities by shooting in very dim conditions. At no point in my tests, even under very low light conditions, did the GX7 (or indeed the G6) complain or make an error in focus; so long as it could find even an inkling of light and the subject had some contrast, it’d lock-onto it. Interestingly Panasonic claims the GX7 can AF in dimmer conditions down to -4EV compared to -3EV for the G6, although I couldn’t measure a difference between them in practice; the bottom line is both models were very confident focusers in very low light when many rivals struggled. Their secret? Simply slowing down the AF process in low light, to give the system more of a chance to lock-on rather than blindly searching back and forth.
While it’s hard to quantify this performance, I can absolutely confirm the Lumix GX7 and G6 are two of the best cameras I’ve used when it comes to AF in low light – it’s quite liberating to be able to autofocus in situations where you’d normally expect to manually focus for the best results.
The new 240fps drive means they’re also very quick in better light, especially with lenses which support it like the new 14-140mm super-zoom, although to be fair its predecessors weren’t exactly slouches. Fitted with the new 14-42mm HD kit lens for most of my tests, the Lumix GX7 snapped onto the subject almost the instant I half-pressed the shutter release. Like earlier models, the touch-screen also makes it easy to tap on the subject you’d like to focus on, and I still very much appreciate the chance to adjust the size of the AF area using the finger dial. I love dialing this down to a tiny square and just tapping the closest eye on portrait shots, although for an easier life I do like the automatic eye-selection options of the Olympus models.
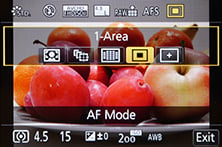 |
 |
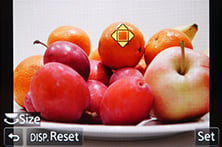 |
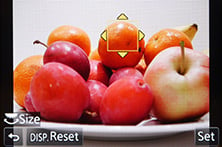
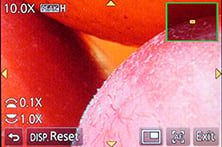
For even more precise focusing on the GX7, go for the pinpoint mode, introduced on the G3; this temporarily magnifies the image by up to six times (with new 0.1 increments if desired) for a really close conformation, while also letting you swipe the enlarged target area around with your finger until you settle on the desired part of the subject.
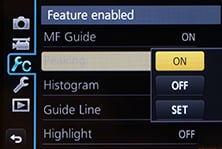
You can also opt for Manual focusing assistance with either a small window in the middle showing an enlarged view at 3x to 6x (again in single or 0.1 step increments), or a full-screen view at 3x to 10x. In a really neat upgrade over its predecessor, not to mention the flagship GH3, the GX7 also offers focus peaking introduced on the G6.
 |
 |
 |
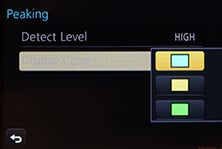
When focus peaking is enabled, the camera will highlight subjects that are in focus with the choice of a blue, yellow or green edge. This sounds a little odd, but becomes an invaluable aid when manual focusing for both stills and video. I used it to confirm the areas in focus during night photography, and also to know exactly when to stop pulling focus for video, and you can see an example of this below. Focus peaking may also be a feature the GX7 and G6 enjoy over the GH3 for some time (or maybe forever) as Panasonic suggested it was more complex than simply requiring a firmware update. Note the Olympus PEN EP5 and OMD EM1 now also offer focus peaking, but only for stills, not movies.
| |
|---|---|
| |
| |
While the single AF performance of the GX7 is impressively quick and accurate in low light, it’s important to note it, like all Micro Four Thirds cameras to date from Panasonic, remains a 100% contrast-based system. Meanwhile Sony, Canon, Nikon, Fuji and even Olympus with its latest OMD EM1 have adopted hybrid AF systems for their latest models which complement contrast-based AF with phase-detect AF points on the sensor. Now in my tests these phase-detect AF points don’t necessarily make these cameras any faster at focusing, but they can make them more confident with less searching or hunting back and forth. This may not be a big issue for single AF acquisition, but can certainly help with continuous AF tracking for both stills and movies.
With its contrast-based AF system, the GX7 can’t help but hunt back and forth a little to confirm focus. Under ideal conditions, a phase detect or even hybrid system has the potential to nail it first time and just stop dead, which delivers a better hit-rate for stills of moving subjects and looks much less distracting for video too. Note I say under ideal conditions though, as plenty of hybrid AF systems I’ve tested do hunt from time to time, but generally speaking they do it less than a 100% contrast based system.
Is the absence of a hybrid AF system a big deal for the GX7? If you regularly use continuous AF for movies, then you may prefer a camera which has it, although I’d recommend you play my clips below as they prove it’s still pretty capable in this respect. As for continuous AF for stills, there’s not so much in it between the mirrorless systems – and again if a high hit-rate is critical to you for serious sports use, then you’ll be much happier with a semi-pro DSLR instead.
But when using Single AF for still photos, the Lumix GX7 performs admirably, nailing the focus very quickly and confidently even in very low light. Everyone has different priorities, but for me, this is where I want a camera to perform best of all and I suspect I’m not alone.
Panasonic Lumix GX7 shooting modes
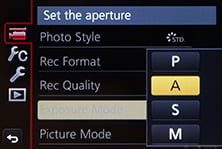
The Panasonic Lumix GX7 offers a broad range of manual and automatic shooting options, although there’s a number of key changes compared to earlier models. First, the Intelligent Auto button of earlier models has gone, and the mode now finds itself on the main mode dial instead. I have mixed feelings about this as while I do know of some people who didn’t understand why turning the mode dial made no difference (without realising they were in Intelligent Auto mode) I did like the way it acted like a ‘Don’t Panic’ button. Well, Intelligent Auto still takes care of everything for you, but now you’ll just need to turn the mode dial to access it.
 |
 |
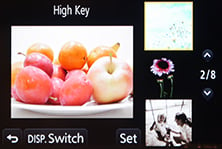 |
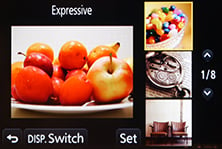
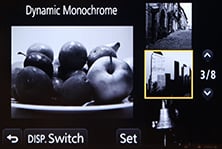
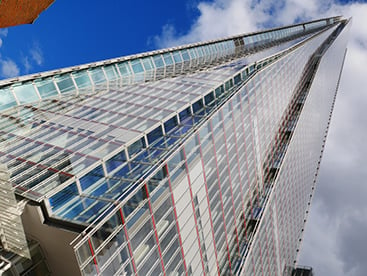
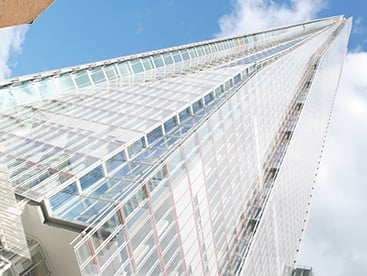
For a little more control, the Lumix GX7 offers a selection of 24 scene presets, chosen from the screen, which cover the usual situations like portrait, sports, landscape and night compositions. Lumix watchers may note it’s one more preset than the G6, thanks to its Panorama mode being relocated from the dial to the scenes. Alternatively how about one of 22 digital filters, including sepia, four monochrome options, high key, low key and the popular miniature mode. Here’s an example of six of them in practice.
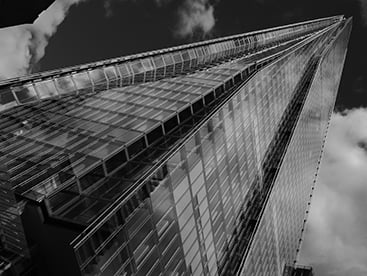
Panasonic Lumix GX7 Dynamic Mono |
Panasonic Lumix GX7 Expressive | |
 |
 | |
Panasonic Lumix GX7 High Key |
Panasonic Lumix GX7 Old style | |
 |  | |
Panasonic Lumix GX7 Impressive Art |
Panasonic Lumix GX7 Sunshine | |
 |  | |
While cycling through these options, the camera previews the effect on a live thumbnail, and most effects can also be applied to movies by simply pressing the red record button. Here’s an example of the miniature mode applied to a movie, which simply inherits your existing quality settings – this makes it easy to record a 1080p miniature movie.
| |
|---|---|
| |
| |
For complete control you can set the mode dial to Program, Aperture / Shutter Priority or Manual, unlocking a range of shutter speeds from 1/8000 to 60 seconds, or a Bulb option up to two minutes. The fastest flash sync speed is 1/320 for the built-in flash and 1/250 for an external flash. A two minute Bulb should cover basic long exposure work, but if you want something longer from Panasonic, you may prefer the GH3 which offers Bulb exposures as long as one hour. I should also note the Olympus OMD cameras offer a Bulb down to half an hour with the unique chance to actually peek at the final result at regular intervals in case you’d prefer to stop or abort the exposure, making them more desirable for very long exposure work.
The maximum shutter and flash sync speeds of the GX7 represent the fastest of any Lumix G camera to date. Until the GX7, all Lumix G models, including the flagship GH3, stopped at a maximum of 1/4000 and typically offered a flash sync speed of 1/160. Indeed a maximum shutter speed of 1/4000 also applies to most mirrorless cameras from rival companies too. Olympus broke the mold first with the EP5 sporting 1/8000, followed by the GX7, and since then also the Olympus OMD EM1. So Micro Four Thirds is leading the market in this respect.
You may well wonder why you’d need a shutter speed of 1/8000 unless you were into freezing very fast action, but remember it also lets in half as much light as 1/4000, which in turn means being able to open up the aperture by a further stop under the same lighting and sensitivity. This makes it easier to use large apertures under bright conditions without having to fit Neutral Density filters.
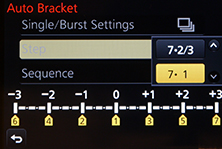
Moving on, like most Lumix G cameras, the GX7 offers very capable auto exposure bracketing with three, five or seven frames up to 1EV apart. Annoyingly like many cameras though there’s no way to trigger a burst of AEB frames using the self-timer – you have to trigger them one frame at a time which of course runs the risk of slightly nudging the camera between frames and causing alignment issues for HDR composites. The solution is to use a remote control, and this is where the camera’s built-in Wifi becomes particularly useful. While you can buy an optional cabled remote control for the GX7, you can alternatively use an iOS or Android device connected via Wifi to wirelessly trigger the shutter using the free Lumix Image app. I tried this and it works a treat.
 |
 |
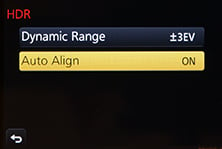 |
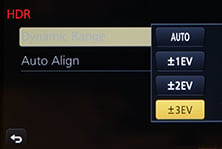
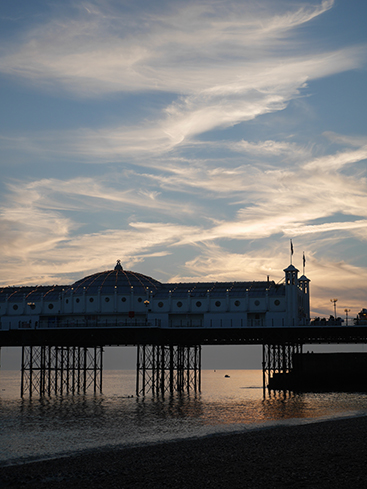
If you prefer a more automatic approach to HDR, you can choose the HDR option from the recording menu, although note it’ll be greyed-out if you’re recording in RAW or RAW+JPEG modes. The HDR mode automatically captures three frames at one, two or three EV apart and assembles them for you, with the auto-alignment cropping the result slightly compared to a single frame. The camera only records one image though, so there’s no chance to access the three separate frames afterwards if preferred, and again no RAW option either. On the upside it will trigger the entire process with a single press of the shutter release, allowing you to capture an HDR using the self-timer. Here’s an example below with a single frame on the left and a composite three frame HDR at 3EV on the right. As you can see, the HDR version has most obviously brightened the mid-tones making the pier buildings more visible, but it’s also reigned-in the highlights and dark shadows. Also notice how the auto alignment has slightly cropped the HDR result compared to the single frame version.
Panasonic Lumix GX7 Single frame |
Panasonic Lumix GX7 HDR mode at 3EV | |
 |  | |
 |  | |
1/500, f5.6, 200 ISO |
1/640, f5.6, 200 ISO | |
The Lumix GX7 is also well-catered when it comes to time lapse sequences with the choice of a traditional interval timer (Time Lapse Shot mode) or one which will automatically assemble a sequence of images into a movie for you at the end (Stop motion mode). I’ve detailed Stop Motion mode in the movie section lower on this page and in use it’s great fun.
 |  |
In the meantime the Time Lapse Shot timer can be set to record up to 9999 frames at intervals from one second to a second shy of 100 minutes, and you can delay the starting time by up to 24 hours. It’s fantastic to have both of these modes at your disposal, and at the time of writing the Lumix GX7 and G6 were the only Lumix G cameras in the range to offer both modes. It’s also worth noting that the Olympus OMD EM5 does not offer any kind of built-in interval timer, and while the feature was introduced on the EP5 and refined on the EM1, it still only offers 99 or 999 exposures respectively. Bottom line, the GX7 is better for in-camera interval shooting.
Moving on, the Lumix GX7 joins the G6 and GF6 in offering an auto panorama feature, although on the GX7 you’ll find it in the Scene preset menu. Like other auto panorama modes, you simply pan the GX7 in an arc while holding the shutter release button down, during which time it furiously clicks away. Once complete, the GX7 automatically assembles them into a wide panorama image. You can choose the JPEG compression and the direction of the pan, including up and down, but otherwise the process is fully automatic. When panning horizontally, the maximum image size is 1920 pixels tall by around 8160 pixels wide.
Like most panorama modes on other cameras, the GX7 is sensitive to the speed of the arc and helps guide you with a thumbnail view – this also indicates how close you are to the end of the capture. Depending on your speed you should capture around 180 degrees. Here’s one I took with the GX7 in daylight with the kit lens zoomed-into 42mm. As always there can be some stitching errors, especially with close subjects, but in general it does a good job and is a welcome addition on the Lumix G series; it’s also another feature the GX7, G6 and GF6 have over the GH3.
| Lumix GX7 panorama using 14-42mm at 42mm |
 |
| Click image to access original at Flickr |
Finally, the Lumix GX7 offers an electronic shutter option which allows the camera to operate in silence. I found this genuinely useful on a number of occasions, whether shooting in quiet locations like churches, or when capturing regular shots for a time-lapse sequence. Indeed you might wonder why you shouldn’t use it all the time, but it’s important to note electronic shutters can often suffer from a rolling / jello effect which can actually skew subjects in motion. This not only makes it innappropriate for most action photography, but can even be an issue with heavy camera shake. So it’s best used with reasonable care, and only when the conditions really need it. But even with the caveats, I’m pleased Panasonic has included it on the GX7 as it’s a rarity on many rivals.
Panasonic Lumix GX7 Wifi and NFC
The Lumix GX7 becomes Panasonic’s latest camera to offer Wifi with Near Field Communications, or NFC for short. It joins the Wifi and NFC equipped TZ40 / ZS30, G6, GF6, LF1 and FT5, proving Panasonic is really committed to these technologies and intends to integrate them into all but its budget-oriented cameras. The presence of Wifi and NFC on the GX7 is a major upgrade over the earlier GX1.
 |
Wifi allows you to wirelessly browse the GX1’s images on the larger and more detailed screen of a smartphone, tablet or laptop, copy them onto these devices, upload them to online storage or social media services (either directly or via a smartphone), or become remote-controlled by a free app for iOS or Android devices. These are flexible and powerful features to have at your disposal, and if your phone or tablet is additionally equipped with NFC you can simply hold it against the GX7 for a second and they’ll sort out the Wifi network selection and password entry for you, making the whole process much quicker and easier.
At the time of writing, only a handful of smartphones and tablets were equipped with NFC, most famously including the Google NEXUS 4, 7 and 10, and Samsung Galaxy S3 and S4, but sadly not yet any iOS devices. As luck would have it, I own a Galaxy S3, S4 and a NEXUS 7 so I can tell you exactly how the NFC experience works in practice. If you don’t have an NFC device yet though, don’t worry. You can achieve the same end result by manually choosing a Wifi network and entering any security by hand, it’s just that NFC will do that part for you with a simple tap or two. I’ll concentrate on the Android app from here on.
Okay so let’s start with establishing a connection between the camera and a smartphone or tablet. NFC or not, the first thing you’ll need to do is install the free Lumix Image app, available for iOS or Android devices. Next you’ll need to enable Wifi on your phone or tablet and if you’re intending to use NFC, you’ll also need to enable this on your phone / tablet.
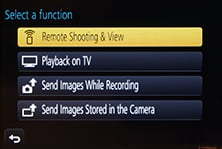
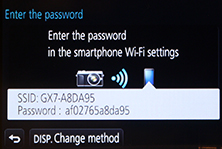
If your phone / tablet doesn’t have NFC you’ll now need to press the Wifi button on the back of the camera and either create a new connection, or load one you’ve previously configured. If you’re creating a new connection you can choose from ‘remote shooting and view’, ‘playback on TV’, ‘send images while recording’ or ‘send images stored in the camera’. For a smartphone / tablet connection, you should choose the first option for remote shooting and view. This then sets up the GX7 as a wireless access point, displaying the SSID name and password. You’ll then need to start the Lumix Image app, select Wifi as your means of connection, select the GX7’s network and enter the password.
If your phone or tablet has NFC you should start the Lumix Image app then briefly hold the two devices next to each other for about one second. For security, NFC has a very short range, so you’ll need to ensure the NFC chips on both devices are literally right next to each other for the initial negotiation. The location of the NFC chip is marked on the main grip of the GX7, but it may not be as obvious on your handset. On the NEXUS 7 it’s actually hidden behind the large NEXUS logo on the back, but on the Galaxy S3 and S4 it’s hidden on the rear to one side, but all you need to do is brush the camera’s NFC sensor over the other device and when it finds it, it’ll let you know. A message will appear on both the camera and phone or tablet asking you to tap again to confirm the connection, and that’s it. I found it worked most times, but at others it required a couple of attempts, or a restart of the Image app.
If the connection was unsuccessful for some reason you’ll hear an error sound from your phone or tablet, but if it works, you’ll hear a triumphant ‘ta-da’ sound instead. When it works you’ll feel like whooping too, at least the first couple of times, but clearly the Lumix engineers feel excited every time as the app plays the confirmation literally at full blast. The problem is some handsets, such as the GS3 and GS4, can be pretty loud at full volume and there doesn’t appear to be any way to change this sound or turn it down. It even plays at full blast when your phone is muted. This caused me some embarrassment on more than a couple of occasions including one time when I performed the process in a library.
The NFC negotiation process takes about 15 to 20 seconds to complete, but the devices only need to be in close contact for the initial handshake which takes less than a second. You may be twiddling your thumbs during the negotiation, but it’s still quicker and much easier than manually searching for and selecting the right Wifi network and entering any security.
Once your phone or tablet becomes connected to the GX7, you can remote control it, browse the images direct from the memory card, copy them onto the handset and if desired send them onto various storage or sharing services. You can also set the app to make a GPS log for subsequent syncing and tagging, which I’ll cover in a separate GPS section below.
 |
 |
 |
The remote control feature is really neat, showing a live image on your phone or tablet’s screen and allowing you to take a photo or start or stop a video. You can tap anywhere on the live image to set the focus to that area or directly take the shot. If the camera’s mode dial is set to Aperture or Shutter Priority, you can remotely adjust the aperture or shutter speed respectively, and in Manual you can change both.
You can also adjust the drive mode, ISO, white balance, exposure compensation or focus area, and there’s also a Q.Menu button which presents a list of additional options you can remotely change including the flash mode, aspect ratio, resolution, compression, metering mode, photo style or movie quality.
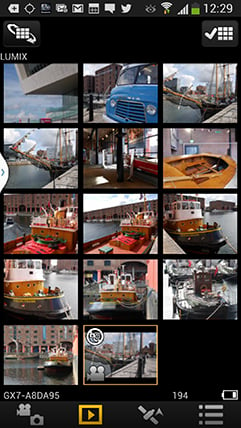
Moving on, you can also use a connected phone or tablet to quickly browse the images in your camera on their bigger screens without having to copy them over first. This is more useful than it sounds. I found myself really enjoying scanning through a day’s shoot on an iPad or NEXUS 7 without having to remove the card, physically connect the camera or copy any unnecessary files.
 |
 |
 |
To maintain a responsive experience which feels like the images are stored locally on your phone or tablet, the camera sends a lower resolution version. So you can pinch to zoom-in a little, but not as much as if you were viewing the original. But when you see an image you like, just press and hold it on-screen for a second and the Lumix Image app will let you save the original to your device or start uploading it to one of the social, sharing or storage services installed on your device. You can configure the app to provide shortcuts to two or three of your most used services which could include Dropbox and Instagram in addition to the more usual suspects. Or of course once the image is copied into your device, you could just exit the Panasonic app and handle it direct from whichever sharing or storage app you like via your phone’s gallery.
You can also choose whether to copy images in their original resolution, or in one of two smaller versions. It typically took about 20 seconds to copy a 5MB original JPEG from the camera to my Galaxy S4 from a distance of about 1m; it’s not possible to copy RAW files though. On some Wifi cameras we’ve noticed the JPEGs sent over Wifi can be modified (typically shrunk) even if ‘original’ is selected, but I checked the JPEG files wirelessly transferred from the GX7 against the genuine originals and they were identical, meaning you really can use the Wifi to make transfers or backups.
Alternatively if you’re browsing your images on the camera and you see one you’d like to share, just tap the camera against your NFC phone or tablet and it will automatically establish a temporary network and copy the original over; the entire process again takes about 20 seconds. This is a brilliant feature and makes it easy to share or store your images.
It’s so much fun interacting with the camera using a smartphone or tablet that it’s easy to forget the Lumix GX7 can also upload images directly to the internet by itself via a suitable Wifi connection. You can upload directly to Facebook, Twitter, Picasa, Youtube, Flickr, but there’s two gotchas. The first is the camera doesn’t have any kind of built-in browser to accept the terms and conditions of many public hotspots, so you’ll mostly be using home or office-based Wifi. To be fair though, the only Wifi-equipped cameras I can think of which do have a browser to accept terms and conditions are Sony’s NEX 5R and NEX 6.
The second problem is before letting you upload anything directly from the camera you’ll first need to register for Panasonic’s free Lumix Club. Again this is an approach shared by most manufacturers, although unlike many, your images aren’t actually sent via this service. So if the images are going direct, why do you need to sign-up to Lumix Club at all? Well on the upside it does offer you some cloud storage, albeit temporary, deleting your images 30 days after uploading them. But on the downside when you’re using Lumix Club to authorize the use of, say, Facebook or Twitter on your camera, it’ll also ask you to let it view your contacts and post on your behalf. You can untick the posting permissions on Facebook, but not for Twitter. Now this may be the perfectly innocent process of an app doing something helpful in the background, or it could be something more advertiser or commercial driven. Either way, when it’s technically possible to upload direct from the camera without any third party apps or services, I’d prefer not to have to sign up for or agree to anything thankyou very much.
Once you do upload any images direct from the camera, they wait in a private Lumixclub album to be shared with a description. Since this requires you to have access to a computer, tablet or phone, it makes more sense to just use NFC / Wifi to copy the image from the camera to that device first and upload from there. The process is faster and avoids having to go accept Lumix Club’s privacy settings.
 |
 |
 |
As mentioned earlier, you can also configure the Lumix GX7 to automatically send images after they’re taken to a smartphone, tablet, or a computer, although as far as I understand it, you can only send images to a computer via a separate access point, such as a home or office network; I certainly couldn’t configure a direct peer-to-peer link between the Lumix GX7 and my MacBook Air, although direct connections are of course possible to smartphones and tablets as discussed earlier. Either way, it’s nice to have images automatically sent to devices which can subsequently upload them to cloud storage and backup if desired. Sure it’s heavy on bandwidth, not to mention battery power, but if neither are significant issues for you, it’s a compelling proposition. Or of course you could simply have a client viewing images on a tablet as you’re taking them, inside or out.
Like the Lumix G6 before it, I was very fond of the Wifi capabilities of the Lumix GX7. I enjoyed browsing through a day’s shoot on the larger screen of a tablet and once connected it was a doddle to select original images to copy over for closer examination or sharing. The remote control facility was also fun and genuinely useful, although the range and response could vary significantly depending on surroundings and interference.
The only thing that could have been better was uploading direct from the camera to online services, but to be honest the more I test connected cameras, the more I think this is a red herring and that the actual getting online part is best left to your phone, tablet or computer. Beyond remote control or backup, the job of a Wifi camera should simply be to get your photos onto the sharing device as quickly and easily as possible, and in that respect the GX7 works very well. Indeed if you have a device with NFC it becomes much easier still and once you’ve used it to establish a connection you’ll never want to search for a Wifi network or enter security passwords ever again. It really gives the GX7 a compelling edge over rivals. When I bought my Galaxy S3 and NEXUS 7 in 2012, NFC was a feature I didn’t give a second thought to, but now it’s become a must-have and I really hope Apple equip its iPhones and iPads sooner rather than later, although it doesn’t seem in any hurry to do so. At least Panasonic, Samsung and now Sony are really driving it forward and we can look forward to many more NFC-equipped devices from them going forward
My only bugbear with the NFC implementation on the Lumix GX7 is that it’s not quite a single step process. In my tests I always needed to launch the Lumix Image app on my phone or tablet before holding it against the camera. If I tapped before launching the app, the phone or tablet would attempt to connect to a Panasonic website instead with information about the app. Maybe I’m being lazy but I’d like the NFC negotiation to automatically launch the required app on my device. I’m sure it’s just an association which needs to be set, and to be fair it may have also been the fault of an early NFC implementation on my test camera or the app software, but it’s just so tantalizingly close to being a single-step operation.
If Panasonic manage to fix this and also let us adjust the alarmingly loud Ta-da! sound, then I’ll be delighted. As it stands though I’m still very happy and as the owner of several NFC-equipped devices it would certainly drive me towards the suitably-equipped Lumix models and away from rivals.
Panasonic Lumix GX7 GPS
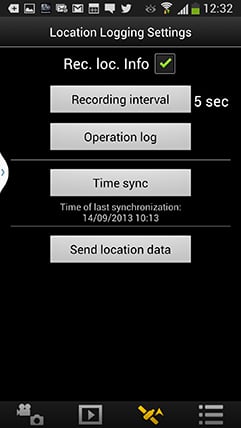 |
There’s sadly no GPS built-into the Lumix GX7, but the Lumix Image app can be set up to record a GPS log with your phone that can later be synced with the camera in the same way as the Lumix G6. There’s several steps to this process. First you’ll need to start the Lumix Image app then connect the camera to your phone using Wifi. Next you should select the satellite icon and then click the button for Time Sync which ensures your camera and phone agree on the current time. The third step is to tick the box labeled ‘Rec Loc Info’, after which the phone will record its current position at pre-determined intervals, the default being every five seconds.
Now you can merrily snap away with the GX7, safe in the knowledge that your phone should be recording your current position in preparation for a synchronization at a later point. The camera and phone don’t need to be in Wifi contact while you’re taking photos, only during the initial time sync and final data transfer. The only thing you need to remember is to take the phone with you and try to ensure it has a relatively clear view of the sky for successful GPS acquisition.
As with my Wifi tests earlier, I used my Samsung Galaxy S4 to try out the GPS syncing process. At first I kept the phone in the top of my backpack to maximize a clear view of the sky, but later became lazier and simply popped it in the pocket of my jeans. At first I was concerned the five second recording interval would hammer my phone’s battery life, but it didn’t seem to have a significant impact. Put it this way I could happily leave the logging running all day while also performing a number of camera, Wifi and internet tasks on a single charge.
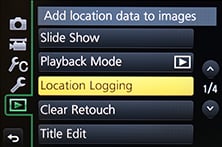
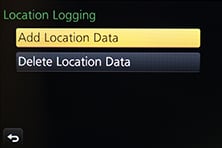
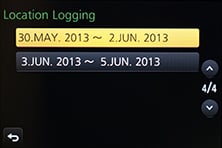
At some point you’ll need to transfer the location data recorded by your phone into the GX7, and this process again starts by connecting the camera to Lumix Image app running on the phone. Then from the satellite section, choose to ‘Send Location Data’, which normally takes a few seconds. This seems satisfyingly quick and simple, but the transfer is only one half of the process. The second is to have the camera actually apply the data to your images. To do this choose Location Logging from the GX7’s Playback menu, then select ‘Add Location Data’. You’ll then be presented with a list of date ranges for the periods where location data is available.
Actually applying this data to images can however be quite time-consuming. It can take a few minutes to append a day’s worth of shots, during which time the camera gives no indication of how far through the process you are; indeed the GX7’s screen powered-off on me a couple of times. But the process always completed successfully and my images were subsequently tagged with location details.
 |
 |
 |
Out of curiousity I entered the co-ordinates of several images into Google maps and was impressed to find some were extremely accurate – indeed one I took was literally bang-on. From the screenshot below right you can see my position marked by the green arrow at one end of the boat you can see pictured on the left. I’d say this was within a couple of meters of my actual shooting position, and reassuringly my phone was in my pocket at the time, although I had remained fairly still for a few minutes prior to the photo.
 |
 | |
However at other times with my phone in my pocket, the accuracy could reduce by at least 20m – sufficiently accurate for an approximate location, but not as precise as it could be.
And this is the big problem when you’re using a separate device to gather the location data. For the best results you have to make sure it’s got a clear view of the sky while you’re taking the photos, and since we’re talking about your phone, it’s more likely to be stuffed into a pocket or a bag. Obviously you also have to make sure you have it with you while you’re shooting. If only there was a device which was always with you and out in the open when you’re taking photos – oh wait-a-minute, there is, it’s called your camera.
Ultimately the process also isn’t that much different to making a log with a standard GPS device and syncing the data with your images once they’re on your computer using tagging software. The only benefits the GX7 has over this traditional process is being able to sync the GPS and camera using Wifi, transfer the data wirelessly and then tag the images within the camera itself, so there’s no computer or additional software involved. While this sounds more convenient, the process remains quite involved and I can’t help but wish Panasonic had simply built a GPS receiver directly into the Lumix GX7 as it had with its Lumix ZS30 / TZ40 super-zoom. It’s so much easier if the camera just handles it all itself and you only have to choose if the GPS is on or off. It would have also made this section of the review simpler: I’d have just written ‘if you enable the GPS option, it’ll record your position on images’. What’s not to like about that?
Panasonic Lumix GX7 movies
The Lumix GX7 inherits much of the recent G6’s movie capabilities, making it a much more powerful camera in this respect than the GX1. The earlier GX1 was limited to 1080i video, so the first big upgrade here is being able to record in 1080p at 50p or 60p depending on region, along with an additional 24p option. The next upgrade is the option to shoot in PASM exposure modes as well as fully automatic, and like the G6 there’s also focus-peaking for manual focus assistance while filming. The GX7 also inherits the G6’s neat Time Lapse movie options, and of course the new 16:9 shaped viewfinder is ideal for framing HD video, although sadly the GX7 misses out on having an external microphone input – a strange differentiator with the G6, which also enjoys the benefit of a fully-articulated screen. But again overall, the GX7’s movie capabilities remain a big step-up over the GX1 in every respect.
 |
 |
 |
 |
 |
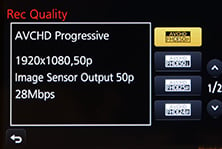
Set the Lumix GX7 to AVCHD encoding and you can choose from 1080 at 60p or 60i for NTSC regions, or 50p or 50i for PAL regions; the progressive options are encoded at 28Mbit/s, while the interlaced ones are at 17Mbit/s. Regardless of region you can alternatively choose a 1080 / 24p option at 24Mbit/s. There’s also a 720 mode at 60p or 50p depending on region and encoded at 17Mbit/s, but the GX7 doesn’t have the G6’s 1080 at 30p or 25p options for AVCHD.
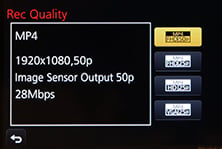
Alternatively the Lumix GX7 can encode videos in the MP4 format for easier editing, with the choice of 1080 / 60p / 50p at 28Mbit/s, 1080 / 30p / 25p at 20Mbit/s, 720 / 30p / 25p at 10Mbit/s, or VGA 30p / 25p at 4Mbit/s. Again those frame rates are region dependent; unlike Canon and Nikon’s DSLRs, you don’t get both 60 and 50 or 30 and 25.
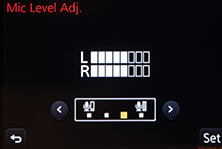
Audio is recorded using built-in stereo microphones in front of the hotshoe, and it’s possible to set the recording levels manually from four levels if desired, and if you like, also display mini peak level meters in the corner of the screen. Sadly there’s no chance to fit an external microphone though, which is a real missed opportunity, especially as the G6 has one.
Like earlier models, the Lumix GX7 offers the choice of single or continuous AF modes, along with the option to pull-focus by simply tapping the subject on the touch-screen. Inherited from the G6 is focus peaking, which surrounds subjects that are in focus with a blue fringe. This makes it much easier to manually focus as you’ll know exactly when to stop adjusting the focus as your subject becomes highlighted. It’s a fantastic feature to have, and only the second Micro Four Thirds camera to offer it for video; annoyingly while the Olympus OMD EM1offers peaking for still photos, it’s not available while filming video. And lest we forget even Panasonic’s flaghsip video-oriented camera, the GH3 doesn’t have peaking at all. You can see examples of the various focusing options in my samples below.
In a welcome, but necessary upgrade over the GX1, the Lumix GX7 gains a Movie Manual option on the mode dial, which lets you film in PASM modes, offering aperture, shutter or complete manual exposure control. You can also adjust the exposure while filming, and to avoid recording the sound of the control dial clicking, you can make the adjustments silently using on-screen sliders if preferred – literally a nice touch.
As before you can start and stop recording by pressing the dedicated red button near the shutter release. You can take photos while filming which share the same aspect ratio as the video, and with the choice of two quality options: if you don’t want the stills to interrupt the video, they can only be saved in a small size, but if you prefer a large version, it’ll temporarily blank the recording.
Also inherited from the G6 is a Stop Motion mode, accessed through the main menus rather than the movie options. This can automatically assemble a movie from a sequence of still photos, either taken automatically by the camera at preset intervals, or manually as and when you’re ready. The auto mode is ideal for making time-lapse films, although the manual option allows you to create your own animated movies using drawings or models for example. Once you’ve finished capturing your photos, the camera can then encode them into an MP4 movie at your desired resolution and frame rate, although note it will inherit the original aspect ratio of the photos and won’t crop 4:3 to 16:9, so if you’re wanting a widescreen movie, don’t forget to set the photo aspect ratio to 16:9 first.
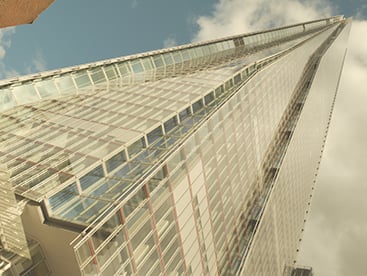
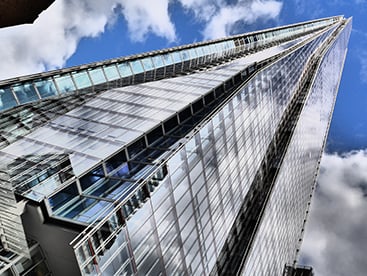
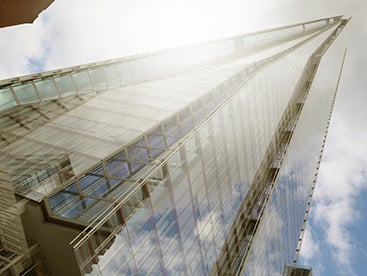
To put it to the test I mounted the camera on a tripod pointing up at The Shard, a tall modern building in London as clouds blew past on a windy day, and set it to record a frame every second; I also shot each still in the Creative Effects mode, applying the Dynamic Monochrome option. My plan was to then encode this into a movie at 25fps, effectively accelerating the process by 25 times. I wanted to be fairly discreet, so switched the GX7’s shutter from mechanical to electronic, allowing it to shoot silently. I also took the opportunity to reduce the image quality from 16 Megapixel RAW+JPEG down to small JPEGs only, as I’d minimize the risk of running out of memory and this image size still has sufficient resolution to generate an HD video. Since the end goal was 16:9 video, I also set the still photo aspect ratio to 16:9, as the in-camera assembly process doesn’t offer a crop from 4:3 photos. When I ran out of memory 357 shots later, the GX7 asked if I wanted to make a movie from the frames, but of course it didn’t have spare memory to actually create it. So I deleted a few old movies and restarted the assembly process from the playback menu instead and a couple of minutes later it was complete.
I really enjoyed having the Stop Motion mode on the GX7 – and the G6 before it – as it saved me from having to manually assemble a bunch of images myself later. Obviously doing it manually will allow you to crop and resize, not to mention supporting higher resolutions and frame rates, and you’re welcome to do this with the images you’ve captured in the Stop Motion sequence instead of – or even as well as – having the camera do it for you. You could alternatively just use the Time Lapse Shot mode for more advanced interval timer options. Anyway, enough talk – let’s check out those clouds!
| |
|---|---|
| |
| |
Just before sharing more movie samples, it’s interesting to compare the GX7’s video capabilities not just to the GX1 and G6, but also to the earlier GH2 as a number of owners may be looking for a cheaper upgrade than the GH3. Both the GH2 and GX7 offer PASM exposure modes, 1080 at 24p / 24Mbit/s, and four adjustable audio levels but there are important differences to weigh up.
The GH2 offers a 2.5mm external microphone input compared to no external input at all on the GX7, and it also boasts adjustable frame rates, not to mention a fully articulated screen.
On the other hand, the GX7’s viewfinder delivers a much larger 16:9 image and offers AVCHD at 50p and 60p encoded at 28Mbit/s, compared to 50i and 60i on the GH2 encoded at 17Mbit/s. The GX7 also boasts focus peaking which is absent on the GH2, not to mention the GH3 – indeed this alone could be a reason to go for the GX7 over the flagship model.
The only remaining question is the cleanliness of the HDMI output to drive external monitors and recorders. I can confirm the GH2’s feed was clean, but with my current test gear while traveling, I can’t confirm if that’s the case for the GX7. But at least the GX7’s bit rates are respectably higher to start with.
So the GX7 offers GH2 owners the benefits of AVCHD at 1080 / 50p / 60p, a larger 16:9 viewfinder image, higher bit rates for video and the joy of focus peaking. But switching from the GH2 to the GX7 would mean losing the microphone input and full screen articulation.
What about the GH3? What can it do that the GX7 cannot for video? Well in addition to a fully articulated screen, it offers much higher encoding bit rates up to 72Mbit/s in an ALL-I format, variable frame rates, optional timecode, plus a microphone input and headphone jack along with the benefit of a weather-sealed body, although crucially it lacks the GX7’s focus peaking and its Stop Motion option, although you can always capture a sequence with the interval timer and assemble them into a movie yourself later. The only thing I can’t confirm right now is whether the GX7 enjoys the clean HDMI output of the GH3 and GH2, but I’ll update this page when I know. Potential upgraders should also consider Panasonic’s Lumix G6 which sports an articulated screen and a 3.5mm microphone input over the GX7, although delivers a smaller 16:9 image in the viewfinder.
With all that said, now it’s time for my Lumix GX7 sample movies.
| |
|---|---|
| |
| |
| |
|---|---|
| |
| |
| |
|---|---|
| |
| |
| |
|---|---|
| |
| |
| |
|---|---|
| |
| |
| |
|---|---|
| |
| |
| |
|---|---|
| |
| |
| |
|---|---|
| |
| |
| |
|---|---|
| |
| |
Panasonic Lumix GX7 continuous shooting
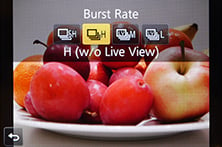
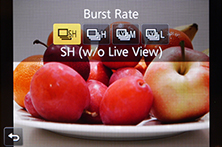
The Panasonic Lumix GX7 offers three continuous shooting modes with its mechanical shutter, quoted at the following speeds: Low at 2fps, Medium at 4fps and High at 5fps, or at 4.3fps with continuous autofocus enabled. Switch the camera to its electronic shutter and the High option accelerates to 10fps. There’s also a Super High option which uses the electronic shutter to deliver 40fps, albeit at a reduced resolution of 4 Megapixels. Remember the caveat about using an electroic shutter for subjects in motion though as they can appear to skew due to the way the sensor reads the data during an exposure.
 |
 |
 |
The GX7’s speeds are essentially the same as the GX1 before it, although the High mode is fractionally quicker on the GX7 at 5fps vs 4.2fps. Note the G6 also shares most of the same speeds, but its High mode squeezes out 7fps from the mechanical shutter, which is more useful for action than the 5fps on the GX7. There are however a number of additional caveats to be aware of though.
One of the problems with fast continuous shooting on mirrorless cameras is their ability – or lack of – to show a live image between frames, allowing you to follow subjects and keep them in the frame. The Lumix GX7 only offers Live View when shooting at the Low and Medium speeds. Set the camera to High and you’ll be looking at the last image captured between frames, which makes it hard to follow fast or unpredictable action as you’re effectively looking at what’s just happened, not what’s happening right now. As for the Super High mode, it blanks the display during the capture, but only for two seconds before the buffer’s filled.
To put the continuous shooting capabilities to the test, I fitted the Lumix GX7 with a freshly formatted SanDisk Extreme 16GB UHS Class 1 SD card, set the shutter speed to 1/500, the sensitivity to 400 ISO and fired-off a selection of bursts with different quality settings. Note for my tests I used the default processing settings.
I started with the Medium setting which offers Live View. I set the quality to Large Fine JPEG and fired-off a burst of 50 frames in 12.25 seconds, corresponding to a speed of 4.08fps, confirming the quoted specification. The GX7 seemed happy to keep shooting at this speed until you run out of memory, and the buffer flushed in a couple of seconds.
I then moved up to the High setting without Live View or continuous AF. With the quality set to Large Fine JPEG, I captured 50 frames in 9.53 seconds, corresponding to a speed of 5.25fps, slightly above the quoted 5fps, and again the camera seemed quite happy to keep shooting at this speed while memory remained. I then set the GX7 to RAW, after which it captured 11 frames in two seconds, corresponding to a speed of 5.5fps, similar to the JPEG rate and again to the quoted specification. As before the buffer flushed in just a couple of seconds.
Finally, I tried the Super High mode. This blanked the screen for two seconds, during which time it captured 80 JPEGs, corresponding to a speed of 40fps, matching the quoted specification. Note the image size in this mode is reduced to Small, which is roughly 4 Megapixels.
So in practice the Lumix GX7 performed roughly as quoted, although this made it a tad slower than the earlier G6 which in my tests managed 6.4fps. That said, using its High speed, the G6 stalled after capturing 28 frames, slowing down significantly, whereas the GX7 kept shooting at its slightly slower rate. It’s down to the situation and photographer to decide if one approach is better than the other. I was also interested to find the GX7’s Super High mode could capture twice as many frames as the G6, firing for two seconds rather than one, making it more forgiving on timing for action sequences. As for the GX1, the GX7 is slightly faster, but by less than 1fps in my tests, so don’t expect a major upgrade in continuous shooting.
It’s interesting to compare these numbers to a DSLR like the Canon EOS SL1 / 100D, which in my tests delivered just over 4fps. This would suggest the Lumix GX7 and G6 are more capable at shooting action, but remember if you want either continuous AF or live view between frames on the Panasonics, they will slow down to roughly the same speed as the Canon, or a tad slower. And even in the modes with Live View, the tracking experience with an electronic viewfinder remains inferior to the instant feedback of an optical viewfinder on a DSLR. Indeed if you regularly shoot action where you need to follow the subject in the viewfinder, I still believe a DSLR is a better bet. But if the action is more predictable, like a stunt which takes place in a fixed spot, or where the subject is approaching or receding (and doesn’t require continuous AF), then the GX7 will have a good stab at capturing it.
Panasonic Lumix GX7 sensor
The Panasonic Lumix GX7 is based on the Micro Four Thirds standard, which means it has an active sensor area of 17.3x13mm, effectively reducing the field of view of all lenses by two times and delivering images with a 4:3 aspect ratio. Panasonic describes it as a new sensor, and certainly unlike the G6 / G5 / GH2, it does not have a slightly higher total resolution that’s cropped to become 16 Megapixels.
But what it does have in common with every single other Micro Four Thirds camera on the market right now is the same 16 Megapixel resolution. With Olympus also deploying 16 Megapixel sensors, even on its latest EM1, it looks like Micro Four Thirds has stalled at this resolution. Sure the latest image processors are gradually refining the output, but we’re not seeing any significant jumps in image quality from the format.
This is a real stumbling block for many potential owners, but it’s important to put it into perspective. I’ve done many comparisons between Micro Four Thirds and the various APS-C formats and found little to no benefit of the latter at all but the highest sensitivities; likewise for tonal dynamic range and highlight retrieval. And while pixel-peepers may get excited by a minor benefit in noise above 6400 ISO on the larger formats, it’s critical to consider the whole picture and the fact the slightly smaller sensor of Micro Four Thirds allows high quality lenses to be more easily designed. Indeed having now shot mostly with Micro Four Thirds for two years, I’ve found the access to a catalogue of excellent lenses has delivered better results overall than having slightly superior noise levels at very high ISOs.
I should however add that while Panasonic does describe the GX7’s sensor as being a new design, it has not taken the opportunity to remove the optical low pass filter nor integrate phase detect AF points, unlike the Olympus OMD EM1 and many rival models.
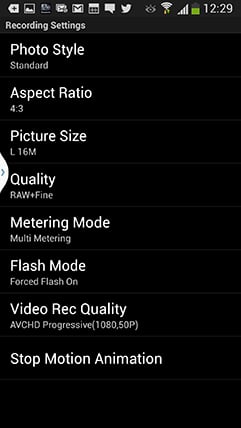
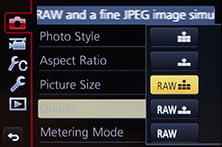
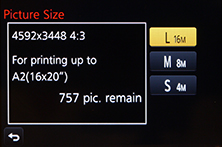
Just briefly mentioning the quality options, the Lumix GX7 lets you record at three different image sizes with the choice of two JPEG compression levels or RAW files recorded with or without a Large Fine JPEG. You can also switch the aspect ratio between 1:1, 4:3, 3:2 and 16:9, although as noted above, all involve cropping the native 4:3 shape with a reduction in resolution and field of view. In my tests, Large Fine JPEGs typically measured around 6-9MB each, while RAW files weighed-in at 19.8MB.
 |
 |
 |
The sensitivity ranges from 125 to 25600 ISO and from the Photo Styles menu you can adjust the noise reduction, along with contrast, sharpness and saturation on a scale of +/-5 steps. Like many previous Lumix G models I’ve found the default style can benefit from a little more sharpening and a little less noise reduction, but you’re welcome to tweak away. Note an Auto ISO option is available, but not in the Manual exposure mode.
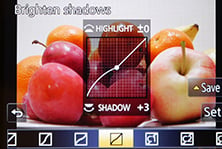
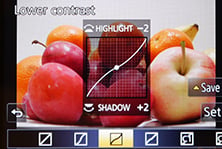
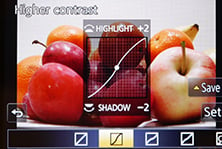
There’s the usual selection of White Balance presets, along with two custom readings and the opportunity to manually enter a colour temperature from 2500 to 10000K. Impressively the GX7 also becomes the first Lumix G camera to actually let you adjust the tonal curves for in-camera JPEGs in the Highlight / Shadow menu. There’s four presets for Standard, Higher Contrast, Lower Contrast and Brighten Shadows, along with three Custom positions where you can adjust Highlights and Shadows in a range of +/-5 steps; you can even drag the curve with your finger on the touchscreen,a lthough you can’t change the anchor points, only the degree of the curve for each half. This is however a real boon to anyone who likes to nail a particular style in-camera for JPEGs rather than going through the processing of RAW files later. Note the Olympus OMD EM5 also lets you adjust tonal curves in-camera, but again it’s great to see Panasonic now including it here.
 |
 |
 |
If you prefer a more automatic approach, the Lumix GX7 offers Panasonic’s iResolution and iDynamic options to enhance images with either additional sharpness or contrast. These can certainly deliver punchier results and are deployed in the Intelligent Auto mode, but I prefer to keep things flatter for possible adjustment later. In PASM modes, both are set to off by default, so that’s what you’ll see in my results and sample images pages.
The only thing which remains now is to present my results pages so you can see how the Lumix GX7 measures-up against the Olympus OMD EM5 and EM1 in practice. So take a look at my Panasonic Lumix GX7 quality and Panasonic Lumix GX7 noise results pages, browse my Panasonic Lumix GX7 sample images, or skip to the chase and head straight for my verdict.


