Panasonic Lumix DMC-GH1
-
-
Written by Gordon Laing
Panasonic Lumix DMC-GH1 design and controls
The Panasonic Lumix DMC-GH1 is physically almost identical to its earlier counterpart, the video-less Lumix G1. Both cameras share the same body and controls, with only stereo microphones and a record button on the GH1 to tell them apart. The microphones are positioned on the popup flash unit, and contribute to the GH1’s extra 6mm height over the G1, but otherwise the dimensions and weight are the same.
Like the G1, the GH1 looks like a traditional DSLR from the outside, with a large grip, defined viewfinder head, and protruding lens barrel, but place it alongside most DSLRs and its size advantage becomes clear. We’ve pictured the Lumix GH1 below in the middle, flanked by the Canon PowerShot SX1 IS super-zoom on the left and the Nikon D90 DSLR on the right.
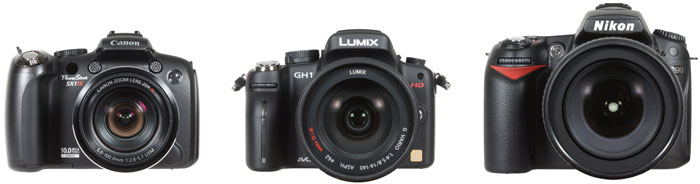 |
Measuring 124x90x45mm for the body alone, the Lumix GH1 is roughly the same size as the body portion of the Canon super-zoom and comfortably smaller than the D90 (along with most other ‘proper’ DSLRs). It’s pretty light too at just 443g for the body with battery, or 903g when also fitted with the G VARIO 14-140mm kit lens. To put that into perspective, the earlier Lumix G1 weighs 635g when fitted with its battery and the shorter G VARIO 14-45mm kit lens. The Canon SX1 IS when fitted with a set of AA batteries weighs 705g, while the Nikon D90 with battery weighs 700g, or 1120g when also fitted with its DX 18-105mm VR kit lens.
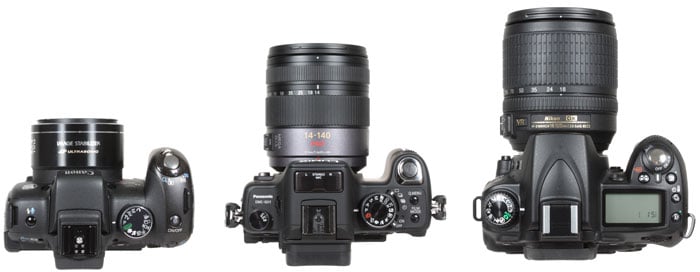 |
When comparing sizes and weight, it’s obviously important to also consider the respective optical zoom ranges at your disposal. The G1 kit has a 3.2x range, the D90 kit has a 5.8x range, the GH1 kit has a 10x range, while the SX1 IS has a built-in 20x range. Super-zoom models like the SX1 IS will always manage to pack an impressive optical range into a relatively small form factor, but it’s revealing to view the GH1 kit alongside comparable DSLRs. It’s dwarfed by the D90 kit whether viewed from the front or above, despite sporting almost double the optical range. Roughly match the range by fitting the D90 with the Nikkor DX 18-200mm VR lens, and the physical difference becomes even greater, with the DSLR combination weighing-in at 1260g.
So the Panasonic GH1 is clearly smaller and lighter than most DSLRs when fitted with a similar optical range. What you can’t tell from the photos though is the weight distribution on the GH1 kit: the G VARIO 14-140mm lens weighs a little more than the GH1’s body plus battery, which makes the combination feel a bit front-heavy. To be fair, this is no different from fitting one of the smaller Canon or Nikon bodies with their respective 18-200mm lenses, but the difference here is the GH1 is currently only sold with its super-zoom lens. We personally felt the GH1 felt better-balanced with a lighter lens, like the original 14-45mm kit lens of the earlier G1. As always, this is a personal view, and you may find the balance of the GH1 kit is fine.
In terms of ergonomics and build quality, the GH1 is identical to the G1 before it. Both bodies may be fairly compact, but feature generous grips and thumb rests, along with rubber coatings, allowing you to hold them comfortably and securely – there’s certainly much more to hold onto than the Olympus E-420 / E-450. The build quality and finish are on par with most budget DSLRs, and like them, there’s no mention of weather-proofing.
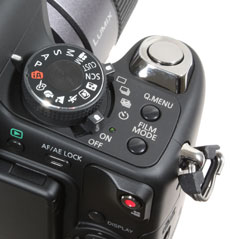 |
The Lumix GH1’s controls are a cross between a traditional DSLR and one of the company’s super-zooms. The main mode dial is on the upper right side with positions for PASM, Intelligent Auto, Custom settings, Colour (offering quick access to hue, brightness and saturation), five dedicated scene positions (each with sub-categories such as Normal, Soft Skin, Outdoor, Indoor and Creative for Portrait), and a SCN position to access five further presets. New to the GH1’s dial is an additional Creative Motion Picture Mode which allows manual control over exposures when filming video. Check out the Features pages for full details on the movie mode, along with exposures and metering for stills photos.
Two rotary switches sit to the right edge of the mode dial: one to power the camera on and off, and the other to select the four drive modes (see next page). It’s nice to find a physical switch for the drive settings when most comparably priced models force you to enter a menu instead. To the right of these are dedicated buttons to switch the GH1’s Film Mode (see next page) or fire-up the on-screen Q.Menu. Following the strategy for physical controls, the GH1’s AF modes are selected using a small dial on the upper left side of the body: there’s positions for Single, Continuous and Manual focus.
Like similarly-priced DSLRs, there’s only one finger dial, located at the front of the grip below the shutter release. Unusually though, this dial also has a push control that’s used in modes like Aperture Priority to switch between adjusting the f-number and exposure compensation, or in Manual to switch between adjusting aperture and shutter speed. In use it’s so quick and intuitive you wonder why more cameras don’t implement it.
Round the back of the GH1 you’ll find the usual four cross-keys with a Menu / Set button in the middle: pushing up sets the ISO, pushing right sets the White Balance, pushing left sets the AF area, while a downward push gets you a programmable Function key. Above this group is a button to switch the Display mode, while below is one for the camera’s Preview mode.
The latter is particularly cunning, offering not just a depth-of-field preview to see the effect of different aperture settings, but an additional shutter-speed option which previews on-screen the effect of a slow or quick exposure. This will actually show a subject in motion as a blur if you have a slow shutter speed selected.
New to the GH1 over its predecessor is a big, red button in the upper right corner of the rear surface. This is used to start and stop recording video, and we have full details on the GH1’s movie mode in the Features section.
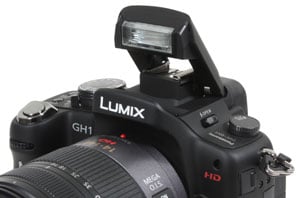 |
The Panasonic Lumix GH1 is equipped with a small popup flash with a Guide number of 11; this is a little less powerful than the more typical Guide number of 13 found on models like Canon’s EOS 450D / XSi. But the GH1 is also fitted with a hotshoe that can use the optional DMW-FL220, DMW-FL360 or DMW-FL500 flashguns if you need greater power and range. Like most cameras at this price-point, there’s no PC Sync port.
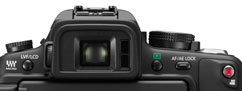
Like the Lumix FZ28, the GH1’s popup flash is manually raised by pushing a lever to the side of the viewfinder head – this means there’s no surprises where the flash pops-up on its own accord. With the flash popped-up you can choose between a variety of red-eye and slow-sync options. The flash output can be varied between +/-2EV and there’s also rear-curtain options. The fastest flash sync speed is 1/160.
The popup flash unit is also where Panasonic’s fitted the stereo microphones for the GH1’s movie mode; these aren’t visible in the photo here, but scroll back up this page and you’ll clearly see them in the top view in front of the hotshoe. The hotshoe also has a dual-purpose on the GH1, as it’s used to alternatively mount the optional DMW-MS1 microphone, again for the movie mode. This external microphone connects to a port on the GH1, rather than communicating through the hotshoe – there’s a photo in the Movie Mode Features page.
Panasonic Lumix DMC-GH1 viewfinder
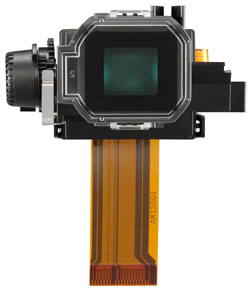
The Micro Four Thirds standard does away with the optical viewfinder of a traditional DSLR, and in its place, the Lumix GH1 is fitted with an electronic viewfinder. This is no normal electronic viewfinder though with a low resolution, heavily pixelated image. The GH1’s electronic viewfinder, known here as a Live View Finder or LVF, inherits technology from Panasonic’s industrial video cameras and is the first time it’s been implemented in a consumer model.
 |
While models like Panasonic’s own Lumix FZ28 employ electronic viewfinders with just over 200,000 pixels, the GH1’s Live View Finder boasts nothing less than 1,440,000 dots. According to Panasonic, this equates to a 480,000 pixel display with an 800×600 resolution and 4:3 aspect ratio which matches the native aspect ratio of the sensor.
In use, the GH1’s Live View Finder is a revelation. It’s a little wider than the view through the Canon EOS 450D / XSi, but much taller thanks to its squarer 4:3 aspect ratio. Nikon’s D90 viewfinder appears a tad wider, but again is dwarfed by the height of that in the GH1. In both cases, the GH1’s view simply looks much larger. This also means the GH1’s view is considerably larger than all the consumer Four Thirds DSLRs such as the E-420 and E-520. As an electronic system, it also delivers 100% coverage.
It’s not just about size though. The GH1’s viewfinder image may coincidentally appear roughly the same size as that in the Canon’s PowerShot SX10 IS, but the difference in quality is like night and day. The EVF in the SX10 IS is heavily pixelated, whereas the GH1’s LVF looks incredibly detailed. You’re never in any doubt you’re looking at an electronic image, but there’s virtually no evidence of individual pixels or jagged edges in the image itself.
The technology behind the LVF is an LCOS panel which employs a Field Sequential technique to display red, green and blue images in quick succession, to deliver what appears as full colour, gapless pixels at every location. A quick glance from one side to the other can see the image tear momentarily with a rainbow effect similar to that seen on DLP projection systems, but this artefact aside, it’s a very successful implementation.
 |
The GH1 of course additionally enjoys the benefits of other electronic viewfinders which replicate the graphics you see on the main screen. On the GH1 these can include a live histogram, alignment grid, dynamically formatted characters depending on the mode and conditions, the depth-of-field and shutter previews, along with magnified manual focus assistance, which with the fine image resolution is very practical in use. The GH1’s LVF is also very bright and like other electronic viewfinders will adjust its gain depending on the conditions – although this will result in visible noise speckles and a reduced frame rate in darker environments.
In terms of operation, there’s a button to the left of the viewfinder which switches between it and the screen, although sensors to the right side will automatically do it for you. In fact such is the quality of the LVF image and ease of switching between it and the screen, you find yourself instinctively raising the camera to your eye during playback for a closer look when bright conditions make the screen harder to view.
So with its superb LVF, Panasonic has not only addressed a major concern over Micro Four Thirds’ lack of optical viewfinder, but actually improved upon what you’ll see when looking through most budget DSLRs – especially those of the Olympus E-4×0 and E-5×0. Traditionalists will be hard to sway, but we urge everyone to try the GH1’s LVF for themselves – ultimately some may still personally prefer an SLR optical viewfinder, but compared to other electronic viewfinders, it’s a triumph.
Panasonic Lumix DMC-GH1 screen and menus
 |
The Panasonic Lumix DMC-GH1 is equipped with a 3in fully-articulated screen which can flip and twist to any angle, including to face the subject or back on itself for protection. Like other fully-articulated screens, this gives the GH1 great compositional flexibility, and after the superlatives used to describe the viewfinder, it’s a relief to find the screen also delivers a great quality image.
The GH1’s screen has 460k dots, which corresponds to a resolution of 480×320 pixels. This delivers a noticeable step-up in detail over the 230k / 320×240 pixel screens of most budget DSLRs, although isn’t as classy at the 920k / 640×480 monitors on higher-end models. The screen looks detailed in both composition and playback with a bright image and smooth refresh. It also has a decent viewing angle, although obviously the ability to flip and twist the panel ensures it can always be viewed square-on.
Panasonic should be commended for the screen on the GH1, as most rival models force you to choose between a smaller flip-out monitor, or one that’s large and detailed but fixed in position; with the GH1 you get both, and of course that wonderful LVF too.
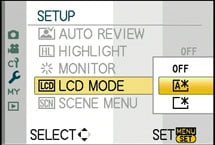 |
Like recent Panasonic cameras, you can choose a Power LCD mode which boosts the brightness of the screen or an Auto Power option which effectively adjusts it depending on surrounding lighting – beware of using the latter if you need to critically evaluate the exposure on-screen though.
Interestingly despite having a 4:3 shaped viewfinder, Panasonic has chosen to fit the GH1 with a slightly wider 3:2 aspect ratio screen. As such when you’re shooting in the 4:3 aspect ratio, there’s thin black bars running vertically down either side of the image, although the shooting information still extends right to the edges. To be fair, the black bars aren’t particularly obtrusive (it’s nowhere near as bad as shooting 4:3 on a 16:9 screen), and had the screen been 4:3 in shape, it couldn’t have physically been any taller. As such, it’s a reasonable compromise, regardless of whether you’re shooting in 4:3, 3:2 or 16:9 aspect ratios.
 | |
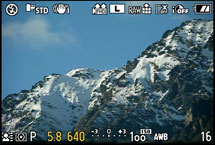
Since there’s no reflex mirror or optical viewfinder in Micro Four Thirds cameras, the GH1 effectively operates in Live View at all times, always showing the composition on-screen or through the electronic viewfinder like a compact camera.
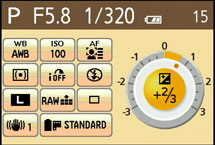
Pressing the Display button cycles between detailed shooting information running along the top and bottom of the image, the exposure basics alone, and a full-screen presentation of various settings alongside a large circle graphically indicating exposure compensation; this latter view (with its choice of three colour schemes) is not available in the viewfinder.
 |
 |
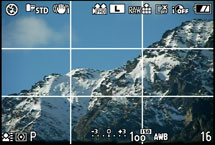 |
Options in the menu additionally allow you to overlay a live histogram (with an adjustable position on-screen) and the choice of three different guide lines: a traditional three-by-three grid, a star pattern, or two lines who’s positions can be adjusted to pinpoint any spot on the frame.
 |  |
With the dial on the upper left side of the body set to Manual focus, the GH1 can display a small frame on-screen which can be moved using the cross-keys and adjusted between two sizes using the finger dial – these represent magnifications of five and ten times respectively, the latter corresponding to a view that’s a little greater than 1:1.
Pressing the Menu / Set button then implements the magnification, which again you can adjust in position and size as desired. With the maximum magnification and fine resolution of the screen or viewfinder, precise manual focusing is quite possible.
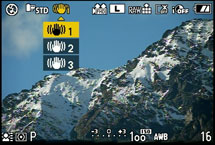 |
Pressing and holding the Q.Menu button on top of the camera allows you to highlight and adjust any of the shooting details running along the top and bottom of the screen. In Program mode, these include the Flash setting, Film and Stabilisation Modes, Movie quality, Resolution and Aspect Ratio, Compression, LCD mode, Intelligent Exposure, AF area, Metering, Exposure Compensation, ISO, White Balance and finally, the choice of showing either remaining shots or remaining time for filming. Like Panasonic’s other cameras, it’s a quick and easy way to access and adjust a wide range of options.
Pushing the Menu button in Program mode presents five pages of recording options, two pages dedicated to the Movie mode, five pages of Custom options, five setup pages, the My menu items and three pages of Playback options; many of the common options like Image Quality and Stabilisation mode are duplicated in the Q.Menu system.
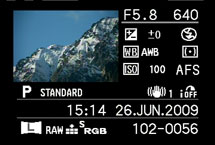
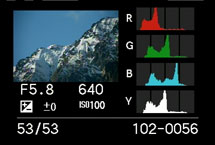
With the GH1 switched into playback mode, the Display button cycles between a clean image, one with basic shooting information, a third with a thumbnail and detailed shooting information, and a fourth which keeps the thumbnail but switches the right hand detail for red, green, blue and brightness histograms. You can use the finger dial to zoom-into 16 times filling the full width of the screen, or zoom-out to display increasing numbers of thumbnails: first 12, then 30, followed by a calendar view.
 |
 |
 |
Unlike models like the Lumix LX3, there’s no Dual Display option to show two thumbnails with the screen turned on its side, nor the fine rotation of its Levelling command, just basic 90 degree flipping, resize and trimming options. Sadly orientation sensors aren’t used to rotate portrait images to fill the screen during playback when the camera’s held on its side either.
Panasonic Lumix DMC-GH1 battery and connectivity
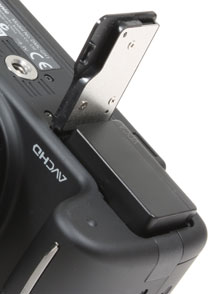 |
The Panasonic Lumix DMC-GH1 is powered by a 1250mAh rechargeable Lithium Ion battery pack, model number DMW-BLB13E. Panasonic quotes 300 or 320 photos under CIPA standards using the screen or viewfinder respectively; interestingly a little down from the G1’s figures. Compare this to the 400 shots Canon quotes for the 1080mAh battery on the 500D / T1i when using its optical viewfinder, although it’s not so bad when you consider the Lumix GH1 is effectively operating in Live View mode all of the time. And if you’re shooting movies, a fully charged battery should be good for two hours of Full HD footage.
Battery life is indicated by a three segment graphic, and it’s a shame give the high-tech nature of the GH1 that Panasonic hasn’t implemented an accurate percentage remaining figure. Unsurprisingly considering small size is a key selling point of the GH1, there’s also no optional battery grip, so with up to 320 shots per charge and no optical viewfinder to fall back on, it’d be sensible to carry a spare.
On the subject of spare batteries, Panasonic warns the GH1 will be unable to use third-party batteries if it’s running the latest 1.1 firmware (released in June 2009). This could be seen as an anti-competitive move, especially as many will update the firmware to enjoy extended movie and continuous shooting capabilities, without thinking about the impact on battery compatibility. On the other hand, Panasonic makes the warning clear on its firmware update page, and claims it is to protect its customers from poorly manufactured third-party batteries which don’t include protection against over-charging, internal heating or short circuits.
As a Panasonic camera, it’s no surprise to find the Lumix GH1 takes SD memory cards. Panasonic quotes compatibility with cards up to 32GB in size, so long as anything 4GB or greater conforms to the SDHC standard.
Behind a small door on the left side you’ll find two ports: a combined USB and TV output alongside a mini Type-C HDMI port. The latter can be used to deliver high definition slideshows to an HDTV (although not a Live View from the camera) and can be configured to output 1080i or 576p / 480p, the latter modes depending on whether it’s set to PAL or NTSC. There’s also a Viera Link option which allows the GH1 to be controlled by compatible Panasonic TVs over an HDMI link.
Behind a smaller door just above these, you’ll find a 2.5mm jack which on the earlier G1 was previously reserved for the optional remote control. Now on the GH1, this doubles-up as an external microphone input for the movie mode. Now let’s take a closer look at the Lumix GH1’s features, including the new video recording capabilities.


