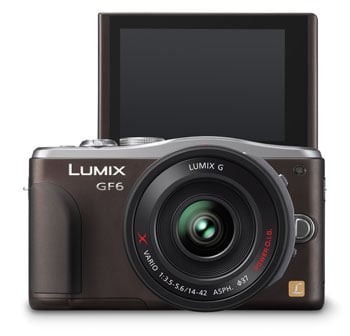
Given the current obsession with retro styling and rangefinder chic, it would be easy to pass over a camera like the Panasonic Lumix GF6 in favour of something superficially more classy. But while it may not look as sexy and desirable as models like the Olympus E-P5 and the Fujifilm X-M1, the Lumix GF6 has a huge amount to offer photographers of every ilk. Yes, it's marketed as a consumer model, but the return of the mode dial along with its other advanced features gives it a much broader appeal than earlier GF models. Only the most demanding enthusiasts, those who like the kind of physical control offered by multiple dials and the option to add a viewfinder, plus features like focus peaking and fast continuous shooting are likely to pass the GF6 over for something more capable, and probably bigger, heavier and more expensive as a result.
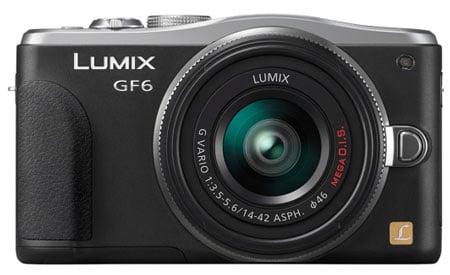
Panasonic Lumix GF6 review
-
-
Written by Ken McMahon
Intro
The Panasonic Lumix GF6 is a compact mirror-less system camera based on the Micro Four Thirds standard. Announced in April 2013, it comes exactly one year after the GF5 and replaces that model. Existing GX1 owners who are finding the newer GX7 is a step too far may also find many of the upgrades tempting. So while the GF6 is not treading on the toes of the GX series, it’s definitely aimed higher than earlier GF models.
Panasonic describes the GF6 as being for people who want to take high quality photos and share them with friends and family. The quality side comes from a 16 Megapixel sensor that I believe is inherited from the GX1, although now coupled with the latest image processor for superior noise reduction. The sharing side comes from built-in Wifi (with NFC to aid configuration on compatible handsets), and the implementation is much the same as the Lumix G6 and GX7, which means you can remote control the camera using iOS and Android devices, along with exploiting their GPS for tagging as well as uploading images direct to various services.
The other major new feature is a tilting screen, hinged at the top allowing it to turn upwards through 180 degrees to face the subject for crafty self-portraits – indeed the camera even knows to switch into Self shot mode when the screen is facing forward. It’s also an electrostatic touch screen like those employed by smartphones, for greater brightness and the resolution bumped-up a little from the GF5 to 1040k dots. The AF is also improved in low light by simply slowing it down, there’s a Sony style panorama feature and a new scene preset: meal recognition. Find out more about the Lumix GF6 in my in-depth review, in which I’ve tested and compared it with the Olympus PEN E-P5 and the Fujifilm X-M1 which both share similar feature-sets.
Lumix GF6 design and controls
The Lumix GF6 has undergone a design revision that irons out the voluptuous curves of its predecessor. The earlier GF5’s rounded hump is remodelled into a gentle slope and the one-piece body moulding now has a distinct division with a sliver top section mounted on a coloured body. Our review model was black, there are other colours available including red, brown, and white, but these vary regionally, so you’ll need to check your local Panasonic website for details.
At 111.2 x 64.8 x 38.4mm the Lumix GF6 is a little larger than its predecessor in every dimension, but we’re talking two or three millimetres, not enough to make a difference that you’d really notice. It is heavier though, at 323g with the battery and a card compared to 267g for the GF5.
The Lumix GF6 body is noticeably smaller than both the Olympus PEN E-P5 and the Fujifilm X-M1, and weighs about the same as the X-M1, both being considerably lighter than the E-P5. But with compact system cameras, the body is only half the story; it’s not much use without a lens attached and, as many will opt for the kit zoom, that’s what I’ll compare them with. The Lumix GF6 ships with Panasonic’s new 14-42mm f3.5-5.6 kit lens which is significantly smaller than the older 14-42 kit lens. With the lens attached the depth of the GF6 becomes 88mm and the weight 433g. The equivalent figures for the PEN E-P5 (with the lens collapsed)and Fujifilm X-M1 are 87mm and 533g and 104mm and 525g respectively.
So with those kit lenses attached the GF6 is comfortably lighter and more compact than both the Olympus E-P5 and the Fujifilm X-M1. Of course, kit lenses aren’t the only option and the Micro Four Thirds models offer numerous pancake prime lenses. There’s also the very compact motorised PZ 14-42mm.
One of the drawbacks of the Lumix GF6’s more compact dimensions is that it’s not such a snug fit in your hand as the PEN E-P5 or the X-M1. But the grip at the front still provides a good purchase for your fingers and, along with the generous thumb pad on the rear, provides a reasonably secure grip, particularly when supporting the lens with your left hand.
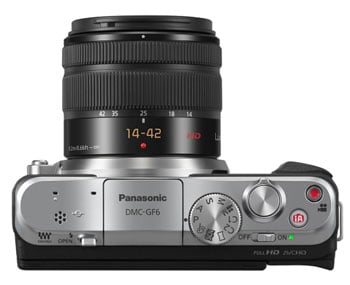
The big change on the top panel is of course the mode dial, not seen on a GF model since the original GF1 and reintroduced in a move that will make many long-time GF users very happy. Indeed, Panasonic says it has brought back the mode dial in response to customer feedback. I’ll talk about shooting modes a little later, for now though I’ll simply say that in addition to the PASM positions, there’s a movie position, two custom positions, panorama shot, scene and effects modes.
To the right of the mode dial is the large flat disc of the shutter release surrounded by a compact-style zoom collar. This works in the usual way when a motorised zoom is attached, otherwise it controls exposure compensation. There are two further small buttons to the right of the shutter release. Near the front corner is the dedicated movie recording button, behind it and slightly to the left the familiar Panasonic button for toggling intelligent Auto mode. There’s a little bit of potential for confusion here, but, aside from position, the fact that the movie button is slightly recessed where the iA button stands proud of the surface helps differentiate them if your eyes are elsewhere.
On the left side of the top panel are grilles for the stereo mics and mono speaker and on the rear bevelled edge a mechanical button that pops up the flash which is centrally mounted right above the lens axis. You’ll note there’s no hotshoe for mounting an external flash or optional viewfinder – both the Olympus EP5 and Fujifilm XM1 have hotshoes for flashes, although only the Olympus alternatively supports an optional viewfinder.
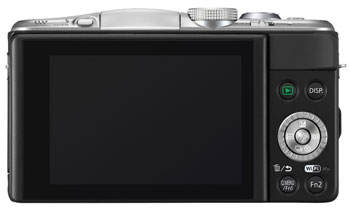
Moving onto the rear panel, the button layout to the right of the screen is very simple, with just four buttons flanking the four-position control wheel, two above and two below. The top two control playback and display overlays, the bottom two are both programmable function buttons with the left one activating the Q Menu and the right Wifi functions.
On the right side of the camera body there’s a mini HDMI and a USB 2 / AV port, covered with a plastic door and underneath a door that opens onto the combined battery and card compartment. The tripod bush is located directly on the lens mount axis, so you can’t access the battery and card compartment when the camera is mounted on a tripod or with a quick release plate attached, something that can be managed on the PEN E-P5.
The Lumix GF6 takes a DMW-BLG10E battery with a power rating of 1025mAh. This is a new battery so you won’t be able to use spares if upgrading from an earlier GF model. It’s charged outside the camera in the supplied charger and on a full charge will deliver 340 shots under CIPA standard conditions. That’s just 10 short of the Fujifilm X-M1 but the PEN E-P5 outlasts it by a fair bit, with 400 shots. None of these models has an optional battery grip though and, particularly if you make more than occasional use of the built-in Wifi that all three provide, you’ll probably want to carry at least one spare for day-long shooting. The remaining battery power is indicated by a three-segment graphic on the top right corner of the screen.
Like its predecessor, and both the Olympus PEN E-P5 and Fujifilm X-M1, the Lumix GF6 is equipped with a built-in flash that’s activated by pressing a small button on the sloping section of the top panel – conveniently positioned for your left thumb. The flash has a Guide Number of 6.3 (in metres) at 160 ISO, the same as the earlier GF5 and roughly equivalent in power to the Fujifilm X-M1.
The Olympus E-P5’s built-in flash packs a little bit more power, but all of these built-in units are really only designed for fill-in and to illuminate reasonably close subjects and small spaces. For more power you’ll need to mount an external unit; no problem for the E-P5 and X-M1, but again the GF6 lacks a hotshoe and so the built-in flash is the only option.
The flash can be set to operate automatically, (but you still have to press the button to pop it up) forced on and has slow sync and red-eye reduction modes, but no 2nd curtain sync option. That means you can’t fire the flash at the end, rather than the beginning of a long exposure, and moving subjects will have trails that extend in front of them rather than behind. That won’t be a concern for too many people, but the lack of a hotshoe does put the GF6 at a disadvantage compared with the E-P5 and X-M1.
Lumix GF6 screen
The lack of a hotshoe also means that the GF6 can’t be fitted with an accessory viewfinder, but in a major upgrade over its predecessor it gets a new 1040k dot LCD screen which is double-hinged allowing it to flip up and down as well as face forwards for self-shooting. As before, the screen is touch-sensitive, but unlike the pressure sensitive screen of the GF5, Panasonic has opted for a capacitive screen similar to those used on smartphones. Olympus uses capacitive screens on the PEN range, they’re more responsive than pressure sensitive screens and you don’t have to push to get a response, the one disadvantage being they can’t be used if you’re wearing gloves.
If you’re used to the pressure-sensitive type of screen on the GF5, you’ll find the GF6’s touch screen a revelation, it just works, you never have to do anything more than once and Panasonic puts it it to much greater use than Olympus on the E-P5. In addition to touch focussing it comes into play a lot more for menu navigation and playback control. Its also a key element of the in-camera retouching features.
Another thing that’s improved over the GF5 is the screen’s visibility. The GF5 screen had an air-filled gap between the screen and the protective front panel and this is absent on the GF6, resulting in fewer internal reflections and generally improved visibility. In use against rivals though, I found little difference between the visibility of the GF6’s screen and the PEN E-P5 and Fujifilm X-M1’s.
Where the GF5’s screen was fixed, the GF6 sports an articulated flip out screen with a double hinge that allows you to angle the screen downwards by around 45 degrees and upwards all the way to a 180 degree forwards-facing position for self-shooting. This goes further than either the PEN E-P5 or the Fujifilm X-M1 which will flip up, but not over.
The GF6 isn’t the only model with a forward-facing screen for self-shooting, but it does have a rather clever trick that I haven’t seen before. When you flip the screen into the vertical forward-facing position, as well as vertically flipping the image so it appears the right way up, the GF6 automatically enters its self-shot mode. This is a self-timer mode that displays three big touch buttons on the right side of the screen. The first allows you to select from between one and four shots, the second controls the application of the Soft Skin smoothing filter and the third toggles touch screen shooting on and off.
This seems like such an obvious thing to do it’s surprising no one’s thought of it before. It’s very handy feature that, while obviously aimed at casual snappers, will be greatly appreciated even by enthusiast photographers. It’s also clearly something Panasonic have thought carefully about, paying attention to the details. It would have been easy just to use the existing self-timer mode, instead there’s a 3 second photo booth-style countdown, perfect for when you’re holding the camera at arms length and leaving no doubt about the precise moment the shutter will fire.
Lumix GF6 lens and stabilisation
The Lumix GF6 is available as a body only, with the new Lumix G Vario 14-42mm F3.5-5.6 II ASPH Mega OIS lens, or as a twin kit which also includes the 45-150mm f4.0-5.6 zoom. The new 14-42mm kit zoom has an equivalent range of 28-84mm, and is considerably smaller than the earlier mark I lens with a length of only 49mm compared with 63.6mm. Indeed it’s the same length as the Olympus PEN E-P5’s 14-42mm kit lens in its collapsed configuration. The new lens has 9 elements, compared to 12 in the earlier one, but has the same 7-blade circular aperture diaphragm with a minimum aperture of f22.
The 14-42mm F3.5-5.6 II is one of the smallest Micro Four thirds 3x kit zooms around, but the GF6 becomes even more compact when fitted with the PZ 14-42mm f3.5-5.6 power zoom, which is a mere 26.8mm long. With the PZ 14-42mm fitted you can also take advantage of the rocker switch surrounding the shutter release to zoom the lens, though there’s also a zoom control on the lens barrel. The Power zoom is around twice the price of the 14-42mm manual zoom, one of the reasons it’s not offered as a kit option on this particular camera.
Lumix GF6 14-42mm f3.5-5.6 coverage wide | Lumix GF6 14-42mm f3.5-5.6 coverage tele | |
|
| |
| 14-42mm at 14mm (28mm equiv) | 14-42mm at 42mm (84mm equiv) |


Before moving on, a quick note about the lenses available for the Lumix GF6 and PEN E-P5, both of which are based on the Micro Four Thirds standard. Jointly developed by Panasonic and Olympus, Micro Four Thirds is the most established of the mirror-less system camera formats, bringing bodies and native lenses to the market at least one year before its first rival arrived. Being first to market along with having not one but two major manufacturers behind it are two major advantages Micro Four Thirds enjoys over the competition, and it really shows when you compare their respective native lens catalogues.
As of mid 2013, Micro Four Thirds had over 40 lenses available from Panasonic and Olympus along with third parties including Sigma, Tamron, Samyang, Voigtlander and others. So while many rival mirror-less formats are struggling to offer even one lens in every category, Micro Four Thirds typically has two or more options available. Whether it’s Fisheye, ultra wide, fast aperture, macro, super-zoom or good old general-purpose, the Micro Four Thirds catalogue has it covered – find out more in my Micro Four Thirds lens guide.
While both Olympus and Panasonic share the same lens mount though, they’ve historically taken different approaches to stabilisation. Until the launch of the Lumix GX7 in August 2013, all Panasonic bodies required lenses with built-in optical stabilisation, while Olympus built stabilisation into the actual camera bodies. The benefit of the Olympus approach is enjoying stabilisation with any lens you attach, whereas on a Panasonic body (pre GX7) you’ll only have stabilisation on lenses which support it. Panasonic does, however, equip most of its zooms with optical stabilisation, including of course the common kit options.
The new 14-42mm F3.5-5.6 II features Mega O.I.S stabilisation. With a stabilised lens fitted the GF6 provides three options, Off, vertical stabilisation only, and 2-axis vertical and horizontal stabilisation. To test it I took a series of shots in Shutter priority mode at progressively slower speeds with the stabilisation turned off and then repeated the process with it turned on.
Panasonic Lumix GF6 with Lumix G Vario 14-42mm f3.5-5.6 stabilisation Off / Continuous | ||||
|
| |||
100% crop, 14-42mm at 42mm 200 ISO 1/10 stabilisation Off. | 100% crop, 14-42mm at 42mm 200 ISO 1/10 stabilisation On. | |||


As you can see from the above crops, you can safely hand-hold the Lumix GF6 at speeds down to 1/10th, around three stops slower than conventional wisdom recommends. With a little practice you might squeeze an extra stop from the GF6, but even my best efforts at 1/5 were all a little soft. I think this is one area where the GF6’s compact size and light weight actually work against it. The chunker PEN E-P5 is easier to hold steady. But it’s unlikely to be just the extra bulk and weight of the PEN E-P5 that results in sharper shots at slower shutter speeds. Like the OM-D E-M5, the E-P5 has 5-axis stabilisation that works to counteract pitch, yaw and roll in addiiton to horizontal and vertical movement of the camera.
I thought it would be interesting to compare the E-P5’s built-in sensor-shift stabilisation with the Mega O.I.S. lens stabilisation on the Panasonic 14-42mm f3.5-5.6 kit lens, so I fitted the Panasonic lens onto the E-P5 and took shots using the body-based stabilisation followed by the lens-based stabilisation. When fitted with a stabilised lens the PEN E-P5 gives you the option to use either the camera’s built-in stabilisation or the lens stabilisation. The crop on the left is with the EP-5’s built in stabilisation and the right crop shows the Panasonic lens stabilisation in action, both at half a second. As you can see, the 5-axis sensor-shift stabilisation built into the PEN E-P5 is more effective than the Mega O.I.S. stabilisation of the Panasonic 14-42mm kit lens.
Olympus PEN E-P5 with Lumix G Vario 14-42mm f3.5-5.6 stabilisation body vs lens | ||||
 |  | |||
100% crop, 14-42mm at 42mm 200 ISO 1/2 Lens priority Off. | 100% crop, 14-42mm at 42mm 200 ISO 1/2 Lens priority On. | |||
It’s not just that the E-P5’s stabilisation works at slower shutter speeds at a given focal length, it’s more intelligent; it can tell when you’re panning the camera and even in which directions and set the appropriate stabilisation mode. With a stabilised lens on the GF6 you can manually set the panning mode, but it only works in one direction, so if you’re panning with the camera in portrait orientation you’re out of luck, the best option in that case is to turn off the stabilisation altogether.
Lumix GF6 shooting modes
With its reinstated mode dial, the Lumix GF6 now has a more direct method of selecting shooting modes than its predecessor, which required navigating a shooting modes menu using the touch screen. But it’s not just the handling that’s changed, Panasonic has equipped the GF6 with several new shooting modes including a new panorama option, interval shooting and several new scene modes and filter effects.
As before there are the traditional PASM exposure modes with a shutter speed range of 1/4000 to 60 seconds. There’s no bulb mode – an unusual omission on a system camera, but then the GX1’s Bulb mode offered only a 120 second maximum. For serious night and astro photography, the PEN E-P5, with a 60 minute timer and bulb limit as well as the innovative Live bulb mode is better equipped.
As on earlier GF series models, there’s a dedicated iA button just behind the shutter release which switches the camera into Intelligent Auto mode regardless of the position of the mode dial and other settings. So if the opportunity for a shot presents itself, but your settings are are out of kilter, there’s no need to miss the shot, just keep calm, press the iA button and carry on. It’s like a ‘Don’t Panic’ button.
Like most ‘smart’ or ‘intelligent’ auto modes these days, the GF6 uses scene detection to evaluate what’s in front of the lens and make better decisions about exposure than simply taking an old-fashioned light measurement. While there’s nothing new in that, it’s intriguing to see that among the eight scene options including the usual suspects like portrait, scenery, baby and sunset, there’s a new food option. So the GF6 can tell if you’re pointing it at your dinner and set the exposure accordingly.
If you want a bit more control but aren’t quite ready for the PASM modes, the GF6 offers 23 scene modes – all of those that were available in the GF5 plus two new ones – Glistening water and Soft image of a flower. Switching the mode dial to the Creative control position puts no fewer than 19 effects filters at your disposal – with the GF5 complement extended to include Old days, Toy pop, Bleach bypass, Fantasy and Sunshine. Below you can see examples of six of them, including all of the new ones.
Panasonic Lumix GF6 Old days | Panasonic Lumix GF6 Toy pop | |
 |  | |
Panasonic Lumix GF6 Bleach bypass | Panasonic Lumix GF6 Fantasy | |
 |  | |
Panasonic Lumix GF6 Sunshine | Panasonic Lumix GF6 Star filter | |
 |  | |
While cycling through these options, the camera previews the effect on a live thumbnail, and most effects can also be applied to movies by simply pressing the red record button. In the movie section below you can see an example of the miniature mode applied to a movie, which simply inherits your existing quality settings – this makes it easy to record a Full HD miniature movie.
Interval timing makes its debut on the GF6 with a new Stop Motion animation feature selected from the Rec menu. As the name suggests, this is pitched more at those who want to create quick stop motion animation sequences than for time lapse photography, but there’s no reason you shouldn’t use it for either. In manual mode you need to press the shutter each time you want to add a frame to the sequence, a ghost image of the previous frame is displayed on the screen to help you arrange your scene and any characters. Select Auto shooting and you can define an interval from one to 60 seconds with a maximum limit of 9999 frames. So for time-lapse you could in theory record an event for nearly a week and the resulting movie, played back at 25fps would be speeded up by a factor of 1,500.
At the other end of the scale, a 1 second interval would allow recording for a little under three hours played back at 25x in a clip lasting just over six and a half minutes. So despite the focus on animation, the GF6 is actually much better equipped for time-lapse movies than the PEN E-P5 with its rather paltry 99-frame limit.
The Lumix GF6 joins the G6 to become the first Lumix G models to offer an auto panorama feature, and to celebrate, it enjoys its own position on the GF6’s main mode dial. Like other auto panorama modes, you simply pan the GF6 in an arc while holding the shutter release button down, during which time it furiously clicks away. Once complete, the GF6 automatically assembles them into a wide panorama image. You can choose the direction of the pan, including up and down, but otherwise the process is fully automatic. When panning horizontally, the image size is 1920 pixels tall by around 8176 pixels wide and vertical panoramas measure 2560 x 8176.
Like most panorama modes on other cameras, the GF6 is sensitive to the speed of the arc and helps guide you with a thumbnail view – this also indicates how close you are to the end of the capture. Depending on your speed you should capture around 180 degrees. Here’s a shot I took with the GF6 in portrait orientation with the kit lens at the 14mm wide angle setting. As always there can be some stitching errors, especially with close subjects, but in general it does a good job and is a welcome addition on the Lumix GF series; it’s also feature the GF6 has over the PEN E-P5 and the Fujifilm X-M1.
| Lumix GF6 Panorama shot: 9.86MB, 1/500, f11 -1EV, 160 ISO, 14mm |
 |
Lumix GF6 movie modes
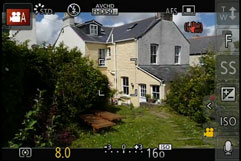
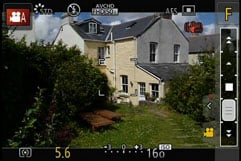
Like all recent Lumix system cameras the Lumix GF6 offers two movie encoding options, AVCHD and MP4. The AVCHD mode can record video in either 1080i or 720p, both at a maximum bit rate of 17Mbit/s (I measured the average bit rate at around 12Mbits/s). 1080 footage is recorded at 50i or 60i depending on region, while 720p footage is recorded at 50p or 60p depending on region. Using the best quality 1080i AVCHD mode, you’re looking at about 120Mbytes per minute of footage.
The MP4 mode can record video in Full HD 1080p, 720p or standard definition VGA, at maximum bit rates of 20, 10 and 4 Mbit/s respectively. All three modes are encoded at 25p or 30p depending on region. Panasonic quotes both the AVCHD and MP4 modes as being restricted to clips with a maximum length of 29 minutes and 59 seconds. It also recommends using an SD card rated at Class 4 or faster for recording movies.
To begin movie recording with automatic exposure control, you simply press the direct recording button on the top left corner. It’s recessed a little, so you need to give it a firm push and while this means accidents are avoided and you never record video unintentionally, it can result it a bit of a wobble at the beginning and end of clips.
Switch the mode dial to the movie position and, in addition to getting a 16:9 view showing the exact framing, you can select any of the PASM exposure modes and set the ISO sensitivity manually. What’s more, you can alter exposure settings during recording using the touch screen. This makes it possible to, for example, throw a background out of focus by progressively widening the aperture during recording. Exposure is controlled by means of on-screen buttons and a slider, so you don’t have to worry about the noise from physical control movements being recorded. You can also shoot video clips using most of the Creative control filters.
You can take photos while filming which share the same aspect ratio as the video, and with the choice of two quality options: if you don’t want the stills to interrupt the video, they can only be saved in a small size (Motion picture priority), but if you prefer a large version, it’ll temporarily blank the recording (still picture priority). There’s also a limit on the number of shots you can take; 30 for Motion picture priority and 4 for Still picture priority.
| |
|---|---|
| |
| |
| |
|---|---|
| |
| |
| |
|---|---|
| |
| |
| |
|---|---|
| |
| |
| |
|---|---|
| |
| |
| |
|---|---|
| |
| |
| |
|---|---|
| |
| |
Lumix GF6 handling
The return of the mode dial makes a big difference to the handling of the GF6 compared with its predecessor. With the touch screen, menu navigation, exposure and other adjustments are quicker and easier than using a four-way controller and Set button, but even so, you can’t beat a physical dial for quickly switching shooting modes with ease.
The mode dial has two custom positions which can be used to recall custom settings, as on most other Lumix models that offer it, the C2 position provides access to not one, but three settings, with the choice of two additional ones selected from the main menu.
In all, there are four programmable function buttons, two of these, fn1 and fn2, are physical, and in the default configuration activate the Q menu and Wifi. Additionally, there are two touch icons, fn3 and fn4, which initially are allocated to displaying depth of field and slow shutter speed preview and activating the live histogram display respectively. All four can be reprogrammed to one of a wide range of functions including Picture size, Quality, Aspect ratio, ISO sensitivity, Focus mode, HDR, and stabilisation.
In practice, few people will want to sacrifice the Q menu button, which provides access to a wealth of useful settings via the touch screen (which can themselves be customised), to an alternative single-function. And while you might temporarily re-assign the Wifi button, it effectively disables the camera’s connectivity. So at best there are 3 programmable buttons, 2 if you want to retain access to Wifi. Even so, that will satisfy most people and you could even regard it as generous given the GF6’s ‘non-enthusiast’ target market. It doesn’t go nearly as far as the customisation options on the Olympus PEN E-P5, but to be fair, few can match the PEN range for its depth of custom options. It’s certainly well ahead of the Fujifilm X-M1.
 |  |  |
 |  |  |
 |  |  |
Lumix GF6 Wifi
Like the Lumix G6 and GX7 launched shortly afterwards, the Lumix GF6 offers built-in Wifi with Near Field Communications, or NFC for short. These join the Wifi / NFC equipped Lumix LF1, Lumix ZS30 / TZ40 and Lumix FT5 models, proving Panasonic is really committed to these technologies and intends to integrate them into all but its budget-oriented cameras. Note the flagship Lumix GH3 was Panasonic’s first mirror-less system camera to sport Wifi, but it preceded their adoption of NFC so you’ll need to select networks and enter passwords manually on that model.
Wifi allows you to wirelessly browse the GF6’s images on the larger and more detailed screen of a smartphone, tablet or laptop, copy them onto these devices, upload them to online storage or social media services (either directly or via a smartphone), or become remote-controlled by a free app for iOS or Android devices. These are flexible and powerful features to have at your disposal, and if your phone or tablet is additionally equipped with NFC you can simply hold it against the GF6 for a second and they’ll sort out the Wifi network selection and password entry for you, making the whole process much quicker and easier.
At the time of writing, only a handful of smartphones and tablets were equipped with NFC, most famously including the Google NEXUS 4, 7 and 10, and Samsung Galaxy S3 and S4, but sadly not yet any iOS devices. As I don’t own any of these devices, I was unable to test NFC on the GF6, but Gordon Laing has tested it, so if you want to know how it works in practice, take a look at his Lumix G6 review.
If you don’t have an NFC device yet though, don’t worry. You can achieve the same end result by manually choosing a Wifi network and entering any security by hand, it’s just that NFC will do that part for you with a simple tap or two. I’ll concentrate on the iOS app from here on.
NFC or not, the first thing you’ll need to do is install the free Lumix Image app, available for iOS or Android devices. Note that this is the same app used to connect and control the G6, but different from the Lumix Link app used for the Lumix GH3. I still had the older Lumix link app installed on my iPhone and was able to connect with the GF6 using it, but control was limited and it lacked most of the features provided by Lumix Image. But with Panasonic producing apps tailored to specific models it’s clearly important that you download and use the right one.
Next you’ll need to enable Wifi on your phone or tablet, press the Wifi button on the back of the camera and either create a new connection, or load one you’ve previously configured. If you’re creating a new connection you can choose from ‘remote shooting and view’, ‘playback on TV’, ‘send images while recording’ or ‘send images stored in the camera’. For a smartphone / tablet connection, you should choose the first option for remote shooting and view. This then sets up the GF6 as a wireless access point, displaying the SSID name and password. You’ll then need to start the Lumix Image app, select Wifi as your means of connection, select the GF6’s network and enter the password.
Once your phone or tablet becomes connected to the GF6, you can remote control it, browse the images direct from the memory card, copy them onto the handset and if desired send them onto various storage or sharing services. You can also set the app to make a GPS log for subsequent syncing and tagging.
The remote control feature is really neat, showing a live image on your phone or tablet’s screen and allowing you to take a photo or start or stop a video. You can even tap anywhere on the live image to set the focus to that area or directly take the shot, as if you were tapping directly on the camera’s own screen. Even better than that, on the iPhone you can pinch to resize the AF area in 1-Area AF mode. If the camera’s mode dial is set to Aperture or Shutter Priority, you can remotely adjust the aperture or shutter speed respectively, and in Manual you can change both.
You can also adjust the drive mode, white balance, ISO sensitivity, exposure compensation or focus area. There’s also a Q.Menu button which presents a list of additional options you can remotely change including the photo style, flash mode, aspect ratio, resolution, compression, focus mode, metering mode, movie quality or starting a stop motion animation sequence.
When previously testing the app with cameras sporting motorized zooms, such as the ZS30 / TZ40, or the GH3 equipped with a Power Zoom, I was also able to adjust the zoom using buttons on the phone, but I didn’t get the chance to confirm if this works on the GF6 as I didn’t have a Power Zoom lens during the test period.
Moving on, you can also use a connected phone or tablet to quickly browse the images in your camera on their bigger screens without having to copy them over first. To maintain a responsive experience which feels like the images are stored locally on your phone or tablet, the camera sends a lower resolution version. So you can pinch to zoom-in a little, but not as much as if you were viewing the original. But when you see an image you like, just press and hold it on-screen for a second and the Lumix Image app will let you save the original to your device or start uploading it to one of the social, sharing or storage services installed on your device. You can configure the app to provide shortcuts to two or three of your most used services which could include Facebook, Flickr, Twitter and Youtube. Or of course once the image is copied into your device, you could just exit the Panasonic app and handle it direct from whichever sharing or storage app you like.
You can also choose whether to copy images in their original resolution, or in one of two smaller versions. It typically took about 6 seconds to copy a 6MB original JPEG from the camera to my iPhone 4S from a distance of about 1m; it’s not possible to copy RAW files though. On some Wifi cameras we’ve noticed the JPEGs sent over Wifi can be modified (typically shrunk) even if ‘original’ is selected, but I checked the JPEG files wirelessly transferred from the GF6 against the genuine originals and they were identical, meaning you really can use the Wifi to make transfers or backups.
It’s so much fun interacting with the camera using a smartphone or tablet that it’s easy to forget the Lumix GF6 can also upload images directly to the internet by itself via a suitable Wifi connection. You can upload directly to Facebook, Twitter, Picasa, Youtube, and Flickr, but there’s two gotchas. The first is the camera doesn’t have any kind of built-in browser to accept the terms and conditions of many public hotspots, so you’ll mostly be using home or office-based Wifi. To be fair though, the only Wifi-equipped cameras I can think of which do have a browser to accept terms and conditions are Sony’s NEX 5R and NEX 6.
The second problem is before letting you upload anything directly from the camera you’ll first need to register for Panasonic’s free Lumix Club. Again this is an approach shared by most manufacturers, although unlike many, your images aren’t actually sent via this service. So if the images are going direct, why do you need to sign-up to Lumix Club at all? Well on the upside it does offer you some cloud storage, albeit temporary, deleting your images 30 days after uploading them. But on the downside when you’re using Lumix Club to authorize the use of, say, Facebook or Twitter on your camera, it’ll also ask you to let it view your contacts and post on your behalf. You can untick the posting permissions on Facebook, but not for Twitter. Now this may be the perfectly innocent process of an app doing something helpful in the background, or it could be something more advertiser or commercial driven. Either way, when it’s technically possible to upload direct from the camera without any third party apps or services, I’d prefer not to have to sign up for or agree to anything thankyou very much.
Once you do upload any images direct from the camera, they wait in a private Lumixclub album to be shared with a description. Since this requires you to have access to a computer, tablet or phone, it makes more sense to just use NFC / Wifi to copy the image from the camera to that device first and upload from there. The process is faster and avoids having to go accept Lumix Club’s privacy settings.
As mentioned earlier, you can also configure the Lumix GF6 to automatically send images after they’re taken to a smartphone, tablet, or a computer, although as far as I understand it, you can only send images to a computer via a separate access point, such as a home or office network. Either way, it’s nice to have images automatically sent to devices which can subsequently upload them to cloud storage and backup if desired. Sure it’s heavy on bandwidth, not to mention battery power, but if neither are significant issues for you, it’s a compelling proposition. Or of course you could simply have a client viewing images on a tablet as you’re taking them, inside or out.
Lumix GF6 Autofocus
Like all Panasonic’s G system cameras, the GF6 uses a contrast detect AF system which has developed a reputation as one of the quickest and most accurate around. Nonetheless the GF6 has a couple of improvements over the GF5 which make a significant difference to its AF performance in low light.
Low Light AF improves the ability of the GF6 to lock onto a subject by slowing the rate at which it samples. The result is that instead of hunting back on fourth, making several unsuccessful attempts before locking on, the GF6 takes the time to get it right first time. In practice, it works, I tested the GF6 indoors and at dusk with low contrast subjects and it consistently and unhesitatingly got it right.
Increased sensitivity means the GF6 can now focus in low light conditions down to -3EV compared to 0EV on the GF5. Although I didn’t test this extensively, I did use the GF6 in very dimly lit interiors and its performance was very impressive, rarely failing to lock onto dimly lit subjects first time. This is essentially the same system used in the G6 which Gordon has thoroughly tested in low light conditions, so for a more extensive review of its perfomance take a look at his Lumix G6 review.
Aside from its low light performance the GF6 provides the kind of almost instantaneous AF performance we’ve come to expect from Lumix G models. Both Panasonic and Olympus have stuck with contrast detect systems, and for single AF acquisition they remain as fast and sure footed as hybrid AF systems including phase-detect AF that have been introduced by competitors like Sony, Canon, Nikon and Fujifilm. In terms of speed, there’s nothing between the Lumix GF6 and PEN E-P5; in good light, both lock onto the subject almost the instant you half-press the shutter release. The Fujifilm X-M1, which also employs a contrast detect AF system, lagged a little behind with a short but perceptible lag between half pressing the shutter and the confirmation beep.
Where the GF6 falls behind its hybrid-equipped rivals though is when it comes to continuous AF tracking. To be fair it’s not bad for movies where a leisurely pace allows it to shift focus from one subject to another fairly successfully, but if you’re tying to shoot action or sports photos where the subject is rapidly changing position, you’ll find the GF6 – and other 100% contrast-based AF cameras – frustrating.
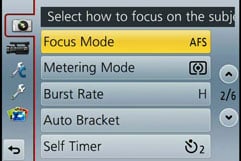
The Lumix GF6 retains the focus modes of its predecessor with single and continuous AF as well as an AFF mode designed for subjects with unpredictable movement like children and pets. As well as 23-area AF – essential on a consumer model – there are the usual AF modes including 1-area, AF tracking, Face detection and pinpoint, which magnifies the screen 5x to allow precise positioning of the AF spot.
Touch focussing cleverly adapts to the currently selected AF mode. So in 23-mode AF if you’re not happy with the automatically selected areas, tapping the screen selects a different group. In 1-area AF, you tap to position the single area anywhere on the screen and then use the control dial to fine tune the position and select one of four AF area sizes.
Overall, focussing on the GF6 is a thoroughly positive and pleasurable experience which, other than for sports photography, rarely disappoints. The one minor let down is that it it doesn’t include the new focus peaking feaure introduced on the G6. In a consumer model, that’s arguably a fair decision, but it does put the GF6 at a disadvantage for manual focussing when compared with the PEN E-P5 and Fujifilm X-M1, both of which have newly-introduced focus peaking.
Lumix GF6 Continuous shooting
The Lumix GF6 offers four continuous shooting modes quoted at the following speeds: Low at 2fps, Medium at 3fps, High at 4.2fps or Super High at 20fps. In the Super High mode the GF6 is restricted to the Small 2 Megapixel image size and a burst of 39 images. These are pretty much the same burst modes at the same speeds as offered on its predecessor, the Lumix GF5, with a small boost in the fastest speed. With the same sensor and similar processing, they also match the continuous shooting specifications of the GX1.
One of the problems with fast continuous shooting on mirrorless cameras to date is their ability – or lack of – to show a live image between frames, allowing you to follow subjects and keep them in the frame. The Lumix GF6 only offers Live View when shooting at the Low and Medium speeds. Set the camera to High and you’ll be looking at the last image captured between frames, which makes it hard to follow fast or unpredictable action as you’re effectively looking at what’s just happened, not what’s happening right now. As for the Super High mode, it blanks the display during the capture, but only for just over a second before the buffer’s filled.
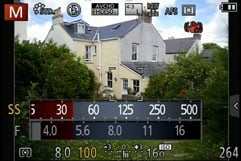
To put the continuous shooting capabilities to the test, I fitted the Lumix GF6 with a freshly formatted SanDisk Extreme Pro 8GB UHS Class 1 SD card, selected a shutter speed of 1/500, sensitivity of 400 ISO and set the quality to large 16 Megapixel Fine JPEGs. With the shutter held down the Lumix GF6 fired off a burst of 100 images with metronomic regularity and would probably have continued until the card was full. I timed it at 4.5fps, slighly faster than the quoted speed.
Switching to RAW files, the GF6 captured a burst of 8 files at close to 6fps, before slowing to around 2fps once the buffer filled. The buffer flushes in just under 4 seconds, you can start shooting again at any time but obviously the longer you wait the longer your next burst will be.
So the Lumix GF6 performs as per the specifications for continuous shooting, and even a little quicker when shooting RAW. A respectable enough performance for a consumer camera,and pretty much on a par with the Fujifilm X-M1. Both, however, are overshadowed by the PEN E-P5 with a faster 9fps mode that delivered 10fps in testing and 5fps with continuous AF.
Lumix GF6 Sensor
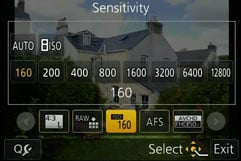
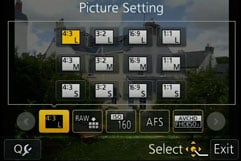
The Lumix GF6 employs a Micro Four Thirds sensor with 16 Megapixels that I believe is the same one used in the earlier Lumix GX1 and G3, albeit coupled with newer image processing. The new Venus Engine processor provides an ISO Range of 160-12800 and a shutter speed range of 60 seconds to 1/4000. There’s no bulb mode so 60 seconds is the longest exposure limit, something you might want to consider if you’re into night or astro photography.
Files are saved in JPEG format at one of two compression settings, Standard and Fine. 16 Megapixel Fine JPEGs range from 5 MB to 8MB in size and the GF6 can also save files in Panasonic’s RW2 RAW format.
To see how the quality of the Lumix GF6 measures-up in practice, take a look at my Panasonic Lumix GF6 quality and Panasonic Lumix GF6 noise results pages, browse my Panasonic Lumix GF6 sample images, or skip to the chase and head straight for my verdict.