Panasonic Lumix DMC-GF1
-
-
Written by Gordon Laing
Panasonic Lumix DMC-GF1 design and controls
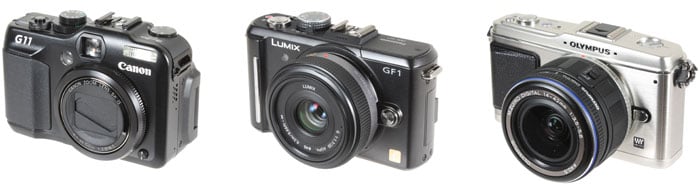
Viewed from the front, the Lumix GF1 is immediately identifiable as a Panasonic compact – indeed it looks like a chunkier version of the earlier LX3. The dimensions may be similar to the Olympus E-P1, but both cameras look quite different in style, with Panasonic adopting a modern-looking approach and Olympus going for an unashamedly retro-look. We’ve pictured the GF1 below, flanked by the Olympus E-P1 on the right and the Canon PowerShot G11 on the left. The GF1 and E-P1 were fitted with the Panasonic 20mm f1.7 pancake prime and Olympus 14-42mm kit zoom lenses respectively.
 |
|
Since both models employ the same Micro Four Thirds standard, they can also share the same lenses. We chose to photograph the E-P1 with its kit zoom for contrast here, although it will obviously look smaller when fitted with a pancake prime lens – and vice versa, although it should be noted Panasonic’s kit zoom is longer than the Olympus model because it doesn’t offer a collapsible option when not in use. The Olympus lens is pictured here collapsed, and therefore in its shortest configuration. In the spirit of fairness we’ve also pictured the E-P1 with the 20mm lens on the next page
Like the E-P1, the GF1 is larger than it looks in the photos. It’s certainly compact compared to a DSLR, but measuring 119x71x36mm for the body alone (without any lens mounted) and weighing 341g with battery, it’s definitely on the chunky side of the compact market. To be fair though, the Olympus E-P1 is virtually the same size at 121x70x35mm, albeit a bit heavier at 380g including battery. Remember the E-P1 has built-in stabilisation though whereas the Panasonic relies on stabilised lenses to counteract wobbles.
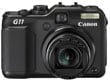
Both models compare favourably with a typical enthusiast’s compact like the Canon PowerShot G11, which at 112x76x48mm may be 9mm narrower, but 6mm taller and a considerable 13mm thicker; the G11 is also slightly heavier at 402g including battery. Of course the G11’s dimensions and weight include a built-in 5x 28-140mm equivalent zoom lens, while the GF1 and E-P1 measurements above are for their body and batteries alone.
 |
The smallest lens option for the Micro Four Thirds format is currently the Olympus 17mm pancake, a fixed f2.8 prime adding 71g to the weight and 22mm to its thickness, although most GF1 owners are more likely to use the Panasonic 20mm f1.7 which is available as a kit option; this adds 100g to the weight and 26mm to its thickness. Panasonic’s alternative kit zoom, the 14-45mm, adds 195g to the weight and 60mm to the thickness, which makes the GF1 much less pocketable. There’s a good reason why you most often see it promoted with a pancake lens, as the proportions look so much better.
It’s worth taking a second look at the Panasonic kit zoom specs as it’s actually 16mm longer and 45g heavier than the Olympus kit zoom. The extra weight is partly down to the built-in optical stabilisation which the Olympus lens doesn’t need as it has stabilisation built-into its body; interestingly fit both bodies with their respective kit zooms and the total weight becomes virtually identical. What the Panasonic zoom won’t do though is collapse when not in use, and the extra 16mm in length really does make it look much bigger. It’s also worth remembering the Panasonic pancake isn’t optically stabilised which means you’ll need to rely on sufficiently fast shutter speeds to counteract camera-shake, whereas the E-P1’s built-in stabilisation works just fine with it.
So the GF1 is clearly thicker and heavier than most compacts once you fit a lens (especially a zoom), and it’s more suited to carrying in a small bag or large coat pocket, but both it and the E-P1 are still impressively small considering their interchangeable lens capability and DSLR-sized sensors.
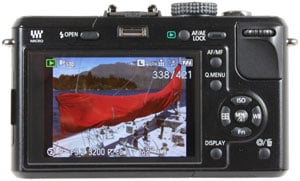
In terms of build quality, the GF1 feels very solid and creak-free, and in this respect is similar to the Olympus E-P1 or Canon G11. The front surface is completely flat other than a narrow bulge running down the right side as a grip. Despite a smooth surface, this provides just enough purchase to stop your fingers slipping, and with your thumb pressed against a bulge in the upper right corner on the rear, you can hold the camera pretty securely. It’s certainly possible to hold and use one-handed, but you’ll get the best results with two hands – remember if the lens isn’t optically stabilised, you won’t have an anti-shake system on your side.
 |
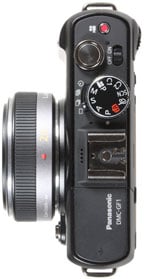
Most of the controls are on the upper right surface and to the right of the screen on the rear. To the right of the hotshoe you’ll find the GF1’s main mode dial with a rotary switch around it to set the drive mode; both are sufficiently stiff to avoid accidental operation in a bag or pocket, although you may find yourself unintentionally turning the drive switch depending on where you hold and turn the main mode dial.
To the right of these are a decent-sized shutter release, a small power switch and a red button dedicated to start recording video in any mode; there’s an additional Movie setting on the main dial, allowing adjustment of the aperture, but the red button’s there to ensure you’re ready for spontaneous video opportunities.
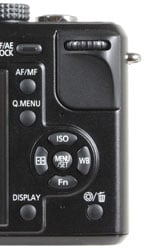 |
On the rear you’ll find the usual four cross-keys, which on the GF1 provide direct access to the ISO, White Balance and AF area, along with a programmable function key. In the upper right corner you’ll find a thumb wheel which a push-click function which effectively doubles its functions. In Manual mode for example, this single dial is used to adjust the shutter speed, while a push will switch it to controlling the aperture instead. This may seem more basic than the dual dials of the E-P1, but ergonomically we found the GF1’s controls easier to use – this is entirely personal though and you may prefer the Olympus.
Unlike many recent Panasonic compacts, playback is started by pressing a button rather than flicking a switch. This is a preferred approach as it ensures the camera’s ready to shoot at a half-press of the shutter without having to first remember to set a switch from play to record.
Finally to the lower right of the cross keys you’ll find the GF1’s preview button. This is particularly cunning, offering not just a depth-of-field preview of different aperture settings, but an additional shutter-speed option which previews the effect of a slow or quick exposure. This will actually show a subject in motion as a blur if you have a slow shutter speed selected. We tried this with waterfalls and it was useful to see a preview of the blurring effect at slower shutter speeds.
Panasonic Lumix DMC-GF1 flash
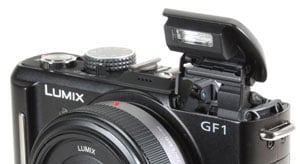 |
The Panasonic Lumix DMC-GF1 is equipped with a popup-flash housed in the upper right corner of its body; it’s only released by pushing the flash button on the rear, so it’s effectively disabled when folded back into the body. With a guide number of 6m at 100 ISO, it’s not particularly powerful, but it remains a useful fill-in light, while the mechanism raises it to a respectable height to minimise red-eye. It’s also a key advantage the GF1 has over the E-P1 which has no built-in flash at all.
 |
With the flash raised, you can choose from Auto, Auto with red-eye reduction, Forced-on, Forced-on with red-eye reduction, Slow-sync, Slow-sync with red-eye reduction and finally, forced off, although again you can achieve the latter by simply pushing the flash back into the body as it won’t raise on its on accord. The red-eye reduction fires a pre-flash, but if red-eye removal is enabled in the menus, digital correction is also applied before saving.
Like the E-P1 and Canon G11, the Lumix GF1 is also equipped with a hotshoe for mounting external flashes and other accessories. Panasonic suggests the optional DMW-FL220 for use with the GF1, but you may be able to use other units, albeit with manual control only. As you’d expect, there’s no PC Sync port.
Panasonic Lumix DMC-GF1 viewfinder
|
Like the Olympus E-P1, the Panasonic Lumix GF1 does not have a viewfinder built-into the body, with both models exclusively relying on their colour screens in their standard configurations. Both cameras do however offer optional viewfinder accessories which mount on the hotshoes, but they’re quite different types.
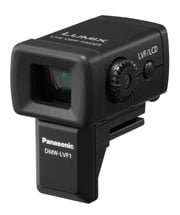 |
Olympus offers a simple optical viewfinder for the E-P1, matched to the coverage of the 17mm pancake lens (34mm equivalent). In contrast, Panasonic offers the DMW-LVF1, an electronic viewfinder which mounts on the hotshoe but additionally connects to a small port just beneath it. As far as we understand, this port is exclusively for use with the LVF1 and can’t support, for example, an external microphone for the movie mode.
As an electronic model, the LVF1 can replicate exactly what you’ll see on the screen, including 100% coverage with any lens, magnified focusing assistance and super-imposed graphics. Unlike an optical model, there is of course some power consumption, although you’ll still squeeze in more photos using it than with the screen – Panasonic quotes 380 photos with the screen or 430 with the EVF when the GF1 is fitted with the 20mm f1.7 lens.
The LVF1 employs the same Field Sequential Colour technology as the viewfinders in the Lumix G1 and GH1 models, although at a much lower resolution of 202k dots compared to 1,440k dots. As such the LVF1 shares a similar degree of detail to average electronic viewfinders on super-zoom cameras like the Canon SX20 IS and Panasonic FZ35 / FZ38. It also suffers from the same rainbow tearing effect of that in the G1 and GH1 when you quickly glance from one side to the other, without the consolation of their incredibly detailed images.
 |
The LVF1 is also a relatively pricey accessory, costing twice that of the Olympus optical viewfinder, and almost one quarter of an entire GF1 kit. But with that all said, it’s not as bad as many have made it out to be. Sure, it’s nowhere near as detailed as the G1 and GH1 viewfinders, but the image looks more coherent than a typical super-zoom EVF, and you can also vertically tilt the unit up by 90 degrees allowing you to compose at different angles. The tilting aspect is useful, but unlike an articulated screen, you’ll need your eye pressed up against the viewfinder to see the whole image, which means you’ll still be crouching down when shooting at low angles – just not as much as you would if composing with the fixed screen.
Holding a camera close to your face in order to use a viewfinder though does improve stability, which is a handy bonus for the GF1 as it doesn’t have built-in stabilisation.
At this point it would be remiss not to mention the upcoming Olympus E-P2, which comes in a kit with a new VF-2 electronic viewfinder, an accessory which again mounts on the hotshoe, but connects to a new port on the E-P2. This port is proprietary to the EP-2 which means the VF-2 won’t work on the E-P1 or GF1. This is a shame as the VF-2 has a pretty impressive specification with the same 1.4 million dot resolution as those on the Lumix G1 and GH1. The EP-2’s port also supports other accessories including an external microphone adapter. We look forward to testing the VF-2 on the E-P2, but pity the day a standard accessory port wasn’t made part of the original Micro Four Thirds standard.
Panasonic Lumix DMC-GF1 screen and menus
 |
The Panasonic Lumix DMC-GF1 is equipped a 3in screen with 460k resolution – this appears to be the same screen panel as that in the G1 and GH1, although here it’s fixed in position rather than being fully-articulated.
The 460k specification corresponds to a resolution of 480×320 pixels which delivers a noticeable step-up in detail over the 230k / 320×240 pixel screen of the Olympus E-P1, and is a key advantage the GF1 has over that model.
While the GF1’s screen looks much better than the E-P1 under normal or low light conditions though, the Olympus can have an edge outdoors under very bright conditions. The Queenstown New Zealand base of Camera Labs is often bathed with intensely bright Sunlight, and while both screens shared similar brightness levels when compared side-by-side under such conditions, the GF1 often suffered from more obvious reflections, especially if anything behind it was brightly illuminated. If you regularly shoot under such conditions, you may prefer the Olympus, or to use an optional viewfinder instead, but under less extreme conditions, most will much prefer the finer detail of the GF1 screen.
 |
Like the G1 and GH1 before it, you can choose a Power LCD mode which boosts the brightness of the screen or an Auto Power option which effectively adjusts it depending on surrounding lighting. Brightening the screen, whether automatically or manually, certainly made the image easier to see under very bright conditions, but beware of using the Auto mode if you need to critically evaluate the exposure on-screen though.
Interestingly despite using a sensor with a 4:3 native aspect ratio and an optional viewfinder with a matching 4:3 image, Panasonic has chosen to fit the GF1 with a slightly wider 3:2 aspect ratio screen – just like the G1 before it. As such when you’re shooting in the native 4:3 aspect ratio of the sensor, there’s thin black bars running vertically down either side of the image, although the shooting information still extends right to the edges. To be fair, the black bars aren’t particularly obtrusive (it’s nowhere near as bad as shooting 4:3 on a 16:9 screen), and had the screen been 4:3 in shape, it couldn’t have physically been any taller. As such, it’s a reasonable compromise, regardless of whether you’re shooting in 4:3, 3:2 or 16:9 aspect ratios.
As you might expect, the on-screen controls and graphics are similar to the G1 and GH1 before it, although the option which filled their screens with shooting information is missing here. Pressing the GF1’s Display button cycles between detailed shooting information running along the top and bottom of the image, followed by the exposure basics alone, and then the screen switched-off. This last option may seem a little odd without a viewfinder provided as standard as it effectively renders the GF1 blind, but it does give you the option to switch the screen off to save power when using, say, a third-party optical viewfinder mounted on the hotshoe.
 |
 |
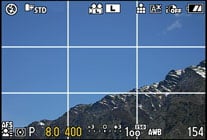 |
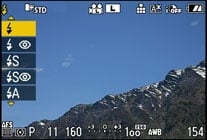
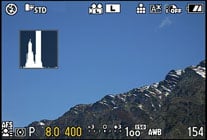
Options in the menu additionally allow you to overlay a live histogram (with an adjustable position on-screen) and the choice of three different guide lines: a traditional three-by-three grid, a star pattern, or two lines whose positions can be adjusted to pinpoint any spot on the frame.
 |  |
With the camera set to Manual focus, the GF1 can display a small frame on-screen which can be moved using the cross-keys and adjusted between two sizes using the thumb dial – these represent magnifications of five and ten times respectively, the latter corresponding to a view that’s a little greater than 1:1. Pressing the Menu / Set button then implements the magnification, which again you can adjust in position and size as desired. With the maximum magnification and fine resolution of the screen, precise manual focusing is quite possible.
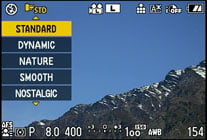 |
Pressing and holding the Q.Menu button on the back of the camera allows you to highlight and adjust any of the shooting details running along the top and bottom of the screen. In Program mode, these include the Flash setting, Film mode, Stabilisation (where supported by the lens), Continuous / Self-timer or bracketing options depending on the position of the drive switch, Movie quality, Still Resolution and Compression, LCD mode, Intelligent Exposure, AF area, Metering, Exposure Compensation, ISO, White Balance and the option to display either shots or movie time remaining. Like Panasonic’s other cameras, it’s a quick and easy way to access and adjust a wide range of options.
Pushing the Menu button in Program mode presents five pages of recording options, two of Movie options, five pages of Custom options, five setup pages, the My menu items and three pages of Playback options; many of the common options like Image Quality and Film Mode are duplicated in the Q.Menu system.
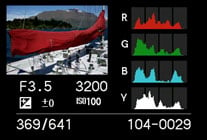
With the GF1 in playback, the Display button cycles between a clean image, one with basic shooting information, a third with a thumbnail and detailed shooting information, and a fourth which keeps the thumbnail but switches the right hand detail for red, green, blue and brightness histograms. You can use the finger dial to zoom-into 16 times filling the full width of the screen, or zoom-out to display increasing numbers of thumbnails: first 12, then 30, followed by a calendar view.
 |
 |
 |
Unlike models like the Lumix LX3, there’s no Dual Display option to show two thumbnails with the screen turned on its side, nor the fine rotation of its Levelling command, just basic 90 degree flipping, resize and trimming options.
Panasonic Lumix DMC-GF1 battery and connectivity
Despite its smaller dimensions, the Lumix GF1 is powered by the same battery as the G1: a 1250mAh rechargeable Lithium Ion pack, model number DMW-BLB13E. Panasonic quotes 350 or 400 photos under CIPA standards when the GF1 is fitted with the 14-45mm kit zoom and composing with the screen or optional LVF1 electronic viewfinder respectively. Switch to the 20mm pancake prime and you’ll squeeze around 30 more shots. These figures are slightly higher than the 300 shots Olympus quotes for the E-P1 when framing with its screen.
Battery life is indicated by a three segment graphic, and it’s a shame give the high-tech nature of the GF1 that Panasonic hasn’t implemented an accurate percentage remaining figure. If you prefer to run from mains power, Panasonic offers the optional DMW-DCC3 AC adapter.
 |
As a Panasonic camera, it’s no surprise to find the Lumix GF1 taking SD memory cards. Panasonic quotes compatibility with cards up to 32GB in size, so long as anything 4GB or greater conforms to the SDHC standard. We used a Lexar Professional 133x 8GB SDHC card during our tests.
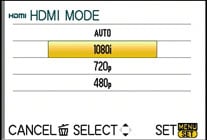 |
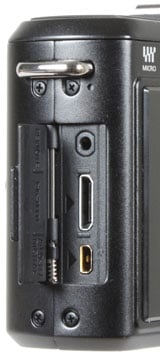
Behind a small door on the left side you’ll find the GF1’s three main ports: a remote terminal for the optional DMW-RSL1 cable release, a mini Type-C HDMI port, and a combined USB and TV output. The HDMI port can be used to deliver high definition slideshows or movie playback on an HDTV (although sadly not a Live View from the camera) and can be configured to output 1080i, 720p or 576p / 480p, the latter modes depending on whether it’s set to PAL or NTSC. There’s also a Viera Link option which allows the GF1 to be controlled by compatible Panasonic TVs over an HDMI link.
Sandwiched in the small gap between the screen and the hotshoe is a proprietary port for the optional DMW-LVF1 electronic viewfinder. As described above, this slides onto the hotshoe, while electronically connecting to the port below. At the time of writing, we understood this port was for the LVF1 only, with no mention of other accessories in the future.
This is a bit of a missed opportunity and one Olympus recognised following the release of its E-P1. So while the original E-P1 didn’t feature an accessory port, the subsequent E-P2 does, and it’s not just limited to connecting an electronic viewfinder. Olympus has announced there will also be an adapter which allows you to connect an external microphone to the E-P2 to improve the sound quality in the movie mode. Sadly there’s no means to connect a microphone to the GF1.
Now let’s check out the Panasonic Lumix DMC-GF1 Features section which includes details on the lens, sensor, continuous shooting and video recording.


