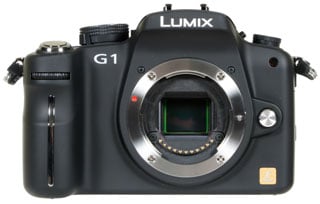
Panasonic Lumix DMC-G1
-
-
Written by Gordon Laing
Panasonic Lumix DMC-G1 lens and stabilisation
The Panasonic Lumix DMC-G1 is the first camera to employ a Micro Four Thirds lens mount. This is compatible with any Micro Four Thirds lens, and can also accommodate any full-sized Four Thirds lenses with the optional DMW-MA1 adapter, albeit with possible AF restrictions we’ll describe below.
 |
The adapter essentially acts as an extension tube, replacing the space saved by removing the reflex mirror, so any thickness advantage of the G1 will be lost. Note Micro Four Thirds lenses cannot be used on full-sized Four Thirds bodies. Whichever type of lens you mount on the G1 though, the field reduction factor remains two times, so the standard G VARIO 14-45mm kit lens will deliver coverage equivalent to 28-90mm.
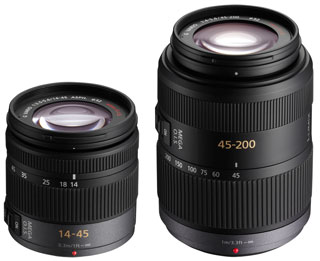
Panasonic launched the Lumix G1 with two kit lenses, the general-purpose G VARIO 14-45mm f3.5-5.6 and the G VARIO 45-200mm f4-5.6 telephoto zoom; kits are available with one or both lenses. The G VARIO 14-45mm measures 60x60mm while the G VARIO 45-200mm measures 70x100mm (diameter x length); they weigh 195g and 380g respectively. Both lenses feature optical image stabilisation, come with lens hoods and deliver a combined 14x equivalent range of 28-400mm which will cover most eventualities in a compact package.
 |
At the time of writing, these were the only Micro Four Thirds lenses available, although Panasonic has shown mock-ups of a 20mm prime, a 7-14mm ultra-wide zoom and a stabilised 14-140mm super-zoom, the latter also supporting AF and aperture control during HD video recording on future bodies.
While the Four Thirds adapter allows G1 owners to mount any existing Four Thirds lens, their subsequent size and potential AF restrictions (see focusing section below) mean it’s not an option we expect many to adopt on a regular basis – although we’d be interested to hear your thoughts on this in the Cameralabs forums. As such, new dedicated Micro Four Thirds lenses are very important for the standard, but basic general-purpose use is certainly well-catered by the launch pair.
 |
Interestingly, when you remove the lens from the G1, you’ll see its sensor; on traditional DSLRs, this would be hidden behind the shutter curtain. The G1 does employ a physical shutter curtain, but during an exposure it has to close before opening again to expose the sensor. Obviously there are initial concerns over what appears to be an exposed and vulnerable sensor, but between it and the elements is the SSWF anti dust filter, which Panasonic claims is more robust than a typical shutter curtain. This certainly sounds feasible, but only time will tell if the system compromises in other respects, such as shutter lifespan or additional dust work for the SSWF.
|
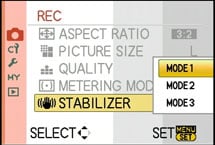
But back to the kit lenses, which offer optical image stabilisation, activated using a switch on the side of their barrels. When active, the G1 offers three different stabilisation options: Mode 1 stabilises continuously, Mode 2 only stabilises when the shutter release is pressed, and Mode 3 only corrects for vertical shake when panning.
To test the effectiveness of the G VARIO 14-45mm’s stabilisation we took a serious of photos with it zoomed-into an equivalent of 90mm where traditional photographic advice would recommend a shutter speed of 1/100 to eliminate camera shake. Our sequence therefore started at 1/100 and reduced by one stop each time until 1/3.
Panasonic Lumix DMC-G1 Image Stabilisation off / on (Mode 1) | ||
 | 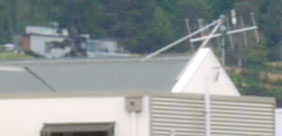 | |
100% crop, 14-45mm at 45mm, 1/6, 100 ISO, OIS off |
100% crop, 14-45mm at 45mm, 1/6, 100 ISO, OIS Mode 1 | |
Without the lens stabilisation enabled, the slowest shutter speed with which we could achieve a sharp image (at an equivalent of 90mm) was 1/50, whereas with OIS enabled we achieved sharp results down to shutter speeds of 1/6. You can see 100% crops taken from the 1/6 samples above.
A shutter of 1/6 corresponds to three stops of compensation over the 1/50 non-stabilised shot, and four stops over the 1/100 speed suggested by traditional advice. As always, the lens, conditions and the photographer themselves can produce different results. Achieving three stops of compensation in real-life is a respectable result for the lens.
Panasonic Lumix DMC-G1 focusing
By eliminating the reflex mirror of a traditional DSLR, the Lumix G1 also loses their quick and effective phase-change AF systems. As such, auto-focusing on the G1 is a contrast-based system only, like a compact camera or the uninterrupted Live View modes of DSLRs. Along with the lack of an optical SLR viewfinder, this is one of the major concerns over Micro Four Thirds, as contrast-based AF systems on DSLRs to date have been slow in operation. But as you’ll discover, Panasonic’s engineers have solved the problem and the G1’s AF performance is as good, or even better than the phase-change system on most budget DSLRs.
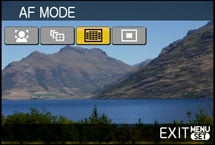 | 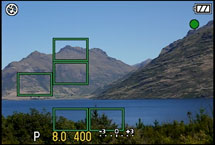 |
The Lumix G1 is equipped with a 23-area AF system, with additional options of single (adjustable) area AF, face-detection and AF tracking selectable from the on-screen Q.Menu. A dial on the upper left side of the body switches the camera between single, continuous and manual focusing modes.
The AF tracking system, inherited from the Lumix LX3, allows you to place a cross-hair over a subject, which is then tracked following a half-press of the shutter. The system will adjust the focus and exposure for the subject in the same way as Face Detection and works well for subjects which don’t move too quickly toward or away from you. Face Detection works in the same way as Panasonic’s compacts, quickly acquiring subjects and tracking them as they move.
If you want to photograph subjects moving toward or away from you at faster speeds, such as vehicles, the AFC mode from the dial is most appropriate. We used it on the G1 to successfully track on-coming road vehicles and boats during burst sequences using the G VARIO 14-45mm lens fully zoomed-in. The G1 also offers further AF options including Quick and Continuous modes which pre-focus prior to the shutter being pressed, along with priority options which will allow the camera to fire even if it’s not confirmed focus.
All four of the AF modes employ a contrast-based system, but unlike those on existing DSLRs, the G1’s AF is very quick. A half-press of the shutter release in any of the four AF modes sees the subject acquired and focused in a split second. At best it’s almost instant and at worst, you’re still looking at less than a second even when focusing from one extreme to the other. This makes it as quick, or even faster than the phase-change system on most budget DSLRs, especially when fitted with their respective kit lenses; it’s quieter than most too.
It’s a very impressive system which, like the Live View Finder, more than addresses concerns over the Micro Four Thirds standard – and remember not only is it comparable or superior in speed to the best AF modes on rival DSLRs, but you’re also getting a broader 23-area system to the typical 11, 9 or even 3-point AF systems in general use. This is another aspect where it excels over the Olympus E-420 and E-520, who’s phase-change AF systems employ a basic three-points.
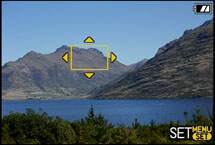 | 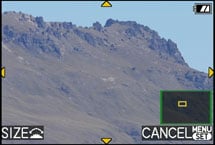 |
Manual focusing is another concern for a system with an electronic viewfinder, but as we found it’s perfectly usable on the G1. With the dial on the upper left side of the body set to Manual focus, the G1 displays a small frame on-screen which can be moved using the cross-keys and adjusted between two sizes using the finger dial – these represent magnifications of five and ten times respectively, the latter corresponding to a view that’s a little greater than 1:1. Pressing the Menu / Set button then implements the magnification, which again you can adjust in position and size as desired. With the maximum magnification and fine resolution of the screen or viewfinder, precise manual focusing is quite possible – and since you’re always monitoring a feed from the actual sensor, there’s no concerns over focusing errors which face phase-change systems.
But it’s not all good news. Restrictions with the contrast-based AF system mean many existing Four Thirds lenses (fitted using the optional adapter) will not auto-focus on the Lumix G1, and those that do will only offer Single AF and not Continuous AF. At the time of writing, Panasonic confirmed autofocus was only possible on the G1 using the following Four Thirds lenses: the 14-50mm, 14-150mm and 25mm from Leica, and the Zuiko Digital 25mm, 9-18mm, 14-42mm, 14-54mm II and 40-150mm from Olympus; the Olympus models will also need to be running the latest firmware.
All other Four Thirds lenses are manual focus only on the Lumix G1 until a firmware update is offered, and judging from the speed at which Olympus is updating existing lenses to work with its own E-system contrast-based systems, we wouldn’t hold your breath. Panasonic keeps a Micro Four Thirds lens compatibility page updated with the latest information.
Panasonic Lumix DMC-G1 metering, exposures and bracketing
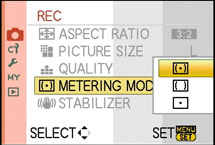 |
The Panasonic Lumix DMC-G1 offers the choice of three metering modes: Multiple, Centre-weighted and Spot. We used the default Multiple metering during our tests and found very few occasions when compensation was required; you can see various samples in our results and gallery pages.
Shutter speeds from 1/4000 to 60 seconds are directly available, with a Bulb option offering longer exposures to a maximum of four minutes; the fastest flash sync speed is 1/160.
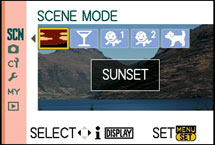
The contrast-based AF system of the Lumix G1 allows Panasonic to implement its full Intelligent Auto mode as seen on its latest compacts in addition to the usual PASM modes and Scene presets. Intelligent Auto on the G1 leverages Scene detection, face detection, digital red-eye reduction, Intelligent ISO, Intelligent exposure, Long shutter noise reduction, Quick AF, focus priority and backlight compensation to deliver a seamless automatic experience that has an uncanny ability of figuring out what you’re trying to take.
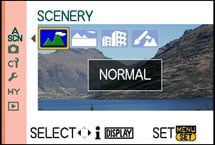 |  |
We repeated a test used on previous Lumix models and found the G1 switched to Landscape mode when pointed at a distant mountain, adjusted itself to Macro when moved toward a close subject, then fired-up its Portrait preset with Face Detection when turned towards people.
It continues to be by far the cleverest fully automatic mode we’ve tested, exploiting the camera’s full range of technologies, and fulfils Micro Four Thirds’ brief to be easier to use than a traditional DSLR by complete beginners. We’d certainly be happy leaving it set to Intelligent Auto for general day-to-day shots or trusting it for capturing spontaneous moments.
In terms of exposure bracketing, it would have been easy for Panasonic to offer the bog-standard three-frame option of most budget DSLRs.
But instead it’s reached for the mid-range and semi-pro categories by offering three, five and even seven-frame options with either one third or two third stops between them. HDR fans will be very satisfied – nice work Panasonic.
Panasonic Lumix DMC-G1 anti-dust
The Panasonic Lumix DMC-G1 is equipped with the legendary SuperSonic Wave Filter anti-dust system, or SSWF for short. In our tests with existing Four Thirds cameras, this has proven to be the most effective on the market at reducing the visibility of dust marks, although this may have as much to do with the sensor-to-filter distance than the effectiveness of the filter’s vibrations itself.
Interestingly the G1 makes little or no reference to the SSWF with no configuration options nor any indication when it’s operating. According to Panasonic the settings are fixed, and comes on at power-up for 0.1 seconds, and if necessary, pressing the shutter release will interrupt it. The implementations is also slightly different to Panasonic’s previous L1 and L10 models: the operating frequency has been increased from 30KHz to 50KHz and the operating time reduced from 0.3 to 0.1 seconds.
Following our usual DSLR torture-test we left our Lumix G1 face-up without a lens, inside and outside for ten minutes each; we can’t know how much dust entered the body during this time, nor even how much was present to start with, but we know such a process would result in dust being a problem for most models. We then powered the camera on and off twice to vibrate the filter.
We then took a series of photos at every aperture setting of a plain white surface at close range with the G VARIO 14-45mm lens zoomed-into 45mm and manually focused to infinity. Dust marks normally become most apparent at the smallest apertures (eg f16 and f22), but it’s also important to test at more common apertures.
| Support this site by shopping at Amazon | |
 |
Panasonic Lumix DMC-G1 dust example at f22 / f22 with Auto Levels | ||
 | ||
100% crop, 14-45mm at 45mm, f22 |
100% crop, 14-45mm at 45mm, f22 (auto levels) | |
Impressively, at f22 (the worse-case scenario), there were no visible dust marks, so we applied extreme Levels adjustments to reveal any faint offenders. The image following an extreme Levels adjustment revealed a handful of faint dust marks, two of which we’ve cropped and shown at 100% above right – but remember this is an extreme manipulation to show if there were any marks hiding, and even then they’re hardly visible. The crop above left is taken from exactly the same region (feel free to download it and apply Levels yourself to see), and as you can see, the marks have become essentially invisible under normal viewing.
This is a similar result to other bodies which use the SSWF, and while it could be as much to do with the sensor-to-filter distance as it is the effectiveness of the filter itself, there’s no denying dust will rarely become an issue for owners of the G1. It’s an impressive result for the G1.
Panasonic Lumix DMC-G1 sensor and processing
The Panasonic Lumix DMC-G1 is equipped with a newly developed 12.1 Megapixel Live MOS sensor which at 17.3x13mm conforms to both the Micro and original Four Third specifications.
 |
 |
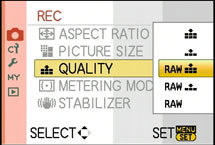 |
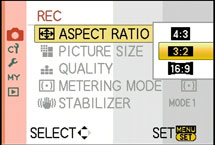
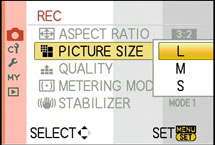
The sensor delivers 4:3 images at a maximum resolution of 4000×3000 pixels. Wider 3:2 and 16:9 aspect ratios are also available, but simply crop pixels from the top and bottom of the frame. Each aspect ratio is available in two lower resolutions, and the choice of Fine or Standard JPEG compression. The G1 can also record images in RAW, either by themselves, or accompanied by a Fine or Standard JPEG. Best quality Fine JPEGs at the highest 12.1 Megapixel resolution typically measure between 4.5 and 6MB each, while RAW files weigh-in at 14MB each, apparently regardless of content.
Sensitivity runs between 100 and 3200 ISO all at the sensor’s full resolution and you can see examples of each in our High ISO Results page. Auto and Intelligent ISO modes work between 100 ISO and either 400 or 800 ISO respectively.
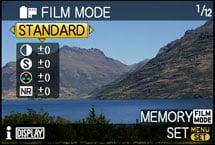
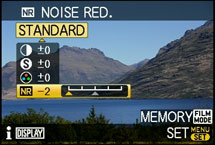
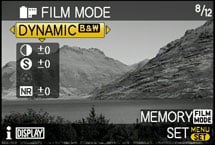
Contrast, Sharpness, Saturation and Noise Reduction are applied using the G1’s various Film Modes, each adjustable by two steps up or down and accessed by pressing the dedicated Film Mode button on the top right of the camera. The G1 offers nine Film Mode presets (six in colour and three in black and white, although sadly saturation isn’t replaced by any filters in the latter), along with two Custom modes and a Multi Film option which brackets by using your choice of three Film Modes. We used the default Standard Film Mode throughout our tests and found it delivered a natural-looking, if slightly refrained style to its JPEGs. If you’re into punchier output, choose one of the other Film Modes, or boost the settings as desired.
 |
 |
 |
The G1 also offers an Intelligent Exposure mode which adjusts the contrast to balance scenes with extremes of brightness. It’s applied automatically in Intelligent Auto, or manually adjusted between four settings in the other modes: Off (the default), Low, Standard or High. When testing the earlier Lumix FZ28, we found this setting made little effect, but we repeated the test on the G1 with our standard indoor Church shot which contains dark shadowy ceilings and brightly backlit windows.
|

Panasonic Lumix DMC-G1 i-Exposure (Off / High) | ||
 | ||
 |  | |
i-Exposure Off: 100 ISO, f8, 0.77 sec |
i-Exposure High: 100 ISO, f8, 0.77 sec | |
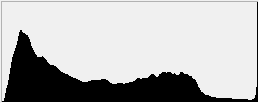
Above you can see samples complete with Histograms showing the same composition taken with Intelligent Exposure Off, then set to its maximum High option – and as you can see, the two images look essentially identical. Certainly there was no brightening of the dark areas or greater protection for those which had become saturated.
Finally, the G1 also applies in-camera reduction of coloured fringing to JPEGs. You can spot the difference when comparing in-camera JPEGs to RAW files which don’t have the same option applied in the SilkyPix processing software, although it should be noted this can be quite subtle as the G VARIO 14-45mm kit lens doesn’t suffer badly from the effect to start with.
Panasonic Lumix DMC-G1 drive modes and remote control
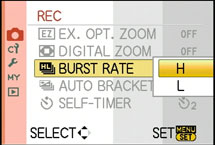 |
The Panasonic Lumix DMC-G1 offers two continuous shooting speeds: Low speed shoots at 2fps, while High speed shoots at the maximum rate of 3fps. According to Panasonic, you can keep firing off JEPGs at either rate until you run out of memory, or for up to seven RAW frames.
To put this to the test we fitted the G1 with a freshly formatted SanDisk Ultra II 1GB SD card and fired-off 50 Fine JPEGs in 18 seconds, which corresponds to a slightly slower rate of 2.8fps. Switching to RAW and the G1 fired-off five frames in 1.6 seconds, corresponding to around 3fps, although beyond five frames the G1 stalled slightly. So in terms of continuous shooting speed, the G1 is a little slower than the 3.5fps (in practice) of Canon’s EOS 450D / XSi, but quicker than the Sony Alpha A350, which only delivered 2.35fps in our tests.
Interestingly anyone who thought a mirror-less body would result in silent operation should remember the G1 still has a physical shutter, so the sound you hear when shooting photos is real and not an effect. It is a little quieter than the sound of a traditional DSLR taking photos, but not by a great deal – you can hear an example in our Lumix G1 video tour.
The G1’s self-timer offers standard 10 and two second options, along with a ten second option which takes three frames at around two second intervals. There’s no mirror lockup option because there’s no mirror.
Note: unlike Canon’s EOS range of DSLRs, there’s no PC-based remote control option, but Panasonic does offer an optional DMW-RSL1 wired remote control with a simple shutter release button and lock for Bulb exposures.
Now let’s check out the Lumix G1’s image quality in our results pages.


