Panasonic Lumix DMC-FX500
-
-
Written by Gordon Laing
Panasonic Lumix DMC-FX500 design and controls
The FX500 is immediately recognisable as a Panasonic compact, sporting the familiar clean, smart styling, brushed metal surface and cross-hatched Lumix logo. Measuring 95x57x23mm and weighing 175g with battery and SD memory card, it’s roughly sized between the slim Lumix FX35 at 95x52x22mm and the super-zoom Lumix TZ5 at 103x59x37mm. So while it’s not the slimmest compact around, it’ll still slip into most pockets with relative ease.
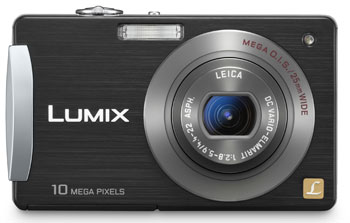 |
At first glance, the FX500’s clean front surface doesn’t appear to have anywhere for your middle finger to grip. But a ridged vertical bar on the right side, along with the cross-hatched Lumix logo offer a choice of surfaces which prevent this finger from slipping. Raised dots on the rear act as a thumb rest, and the combination allows you to hold the camera relatively securely with one hand. Like other Lumix compacts, the build quality is superb, but sadly unlike the FX35, there’s no underwater housing option.
 |
The controls on the upper surface of the FX500 are simplified compared to previous Lumix compacts as the mode dial has been replaced by a menu on the touch-sensitive screen (see full details below). As such you’ll simply find the power switch alongside the shutter release surrounded by a circular zoom rocker.
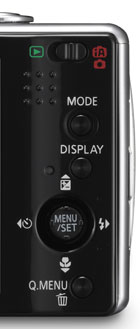
From top to bottom on the rear of the camera are a play / record switch, Mode and Display buttons, a small four-way indented joystick with a Menu / Set button in the middle, and finally at the bottom a button for Panasonic’s Q.Menu.
During record mode, pushing the joystick up adjusts the exposure compensation, pushing right adjusts the flash, pushing down puts the FX500 into macro mode, while pushing left sets the self-timer between 10 and two seconds. The joystick itself is quite small and proved slightly fiddly to use at times. Sometimes it felt easier to prod it from the opposite side rather than pushing toward the desired option; we’ve seen similarly tiny joysticks from Panasonic in the past, but if you have larger fingers, you may want to try this in person before buying as the options it controls are mostly unavailable via the touch-screen.
The Q.Menu is new to Panasonic’s 2008 range and fires-up the drop-down menu for quick access to most shooting options – again most of which are not accessible via the touch-screen – more about which below.
Panasonic Lumix DMC-FX500 exposures and creative modes
The Panasonic Lumix DMC-FX500 has shutter speeds from 1/2000 to 8 seconds (or impressively up to 60 seconds in its Starry Sky Scene preset), along with ten aperture settings at its disposal, and impressively for a compact, you have complete manual control over them.
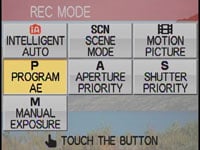 |
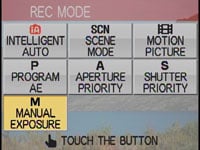
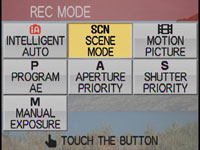
Press the FX500’s Mode button on the back of the camera and you’re presented with seven options on the screen, each on a rectangle: Intelligent Auto, SCN, Motion Picture, Program AE, Aperture Priority, Shutter Priority and Manual Exposure. Simply tap whichever mode you desire with your finger or the supplied stylus and you’re ready to go.
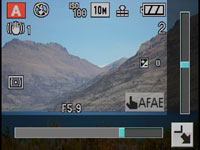
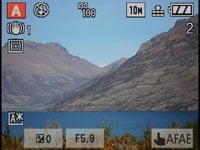
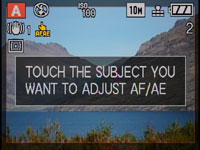
In Aperture and Shutter Priority, two bars are shown running down the right side and along the bottom of the screen. In both modes the vertical bar represents exposure compensation and you can use your finger to drag the bar to the desired value. The horizontal bar at the bottom controls the aperture or shutter in their respective modes and again simply dragging your finger or the stylus left or right allows you to choose the setting. In the meantime tapping the AF AE square in the lower right corner presents a frame which fills almost the entire screen, after which you can simply prod the area you’d like the camera to focus on.
 |
 |
 |
If these graphics prove distracting you can tap a small square in the extreme bottom right corner to exit. This then presents the current settings in small boxes at the bottom of the screen, and tapping them will return you to the control bars at anytime.
Unlike many touch-sensitive cameras, this actually works very intuitively and effectively in practice. Rather than learning the system and repeating a motion when it’s not recognised, the FX500’s touch control system worked smoothly every time with little or no need to consult the manual.
 |
 |
In Manual mode, the horizontal and vertical bars represent the shutter speed and aperture respectively, although in a missed opportunity, the bars are nowhere to be seen in Program AE mode. Surely one should be present here to adjust the exposure compensation, but instead you’ll need to prod the manual joystick upwards in this mode to access this setting.
That said, it’s still great to have full manual control over the aperture and shutter, and it’s certainly easy to adjust them with the touch-screen. Like most compacts though, there are some restrictions on aperture and shutter combinations. The full aperture range is only available at shutter speeds up to 1/1000. At 1/1300 and 1/1600, the largest apertures are f4 and f5.6, while at the top shutter speed of 1/2000, you’re restricted to the smallest aperture of f8.
 |
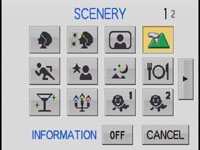 |
The FX500’s full manual control is complemented by the choice of 21 scene presets (selected by tapping the desired option on-screen), along with one of the best automatic modes on the market today. Like other 2008 Lumix compacts, the FX500 features Panasonic’s latest Intelligent Exposure mode which combines a number of technologies to figure out what kind of photo you’re trying to take.
Intelligent Auto in 2008 employs Automatic Scene Detection, Intelligent ISO and Intelligent Exposure, along with the image stabiliser, face detection, quick AF and red-eye correction modes. Automatic Scene Detection first identifies if the composition falls into the Portrait, Scenery, Macro, Night Portrait or Night Scenery categories, and if so, selects that scene preset. If it doesn’t match any of them, a standard shooting mode is used.
Next Intelligent ISO detects any motion in the frame and if necessary increases the ISO to achieve a shutter speed which will eliminate any unwanted blur. Finally, the latest Intelligent Exposure mode, new to the 2008 range, actually adjusts the ISO over different portions of the frame. This first divides the frame into around 3000 areas, then finds the brightest portion and exposes for it using the lowest sensitivity. Then it increases the gain in the darker portions of the frame to boost detail in shadow areas.
While the idea of having different sensitivities on the same image sounds unusual, it’s not actually that different in practice to other dynamic range optimisation systems which digitally increase the brightness in darker areas. The result is also similar, where shadows are boosted, but at the cost of more visible noise in those areas.
In practice the system as a whole works uncannily well. We repeated a test used on previous Lumix models and found the FX500 switched to Landscape mode when pointed at a distant mountain, adjusted itself to Macro when moved toward a close subject, then fired-up its Portrait preset with Face Detection when turned to people. It continues to be by far the cleverest fully automatic mode we’ve tested, exploiting the camera’s full range of technologies, and we’d happily recommend it for day-to-day use and spontaneous shots.
Then when you want to be more specific or creative, simply select from one of the 21 scene presets on offer or of course switch to Program, Manual, Aperture or Shutter Priority. Either way, the FX500 has it all covered.
Panasonic Lumix DMC-FX500 Flash
The Panasonic Lumix DMC-FX500 has a built-in flash with a variety of options cycled-through by pushing the tiny joystick to the right: Auto, Auto with red-eye reduction, Forced on, Slow sync with red-eye reduction and Forced off. There’s no flash compensation settings.
The modes with red-eye reduction fire the flash twice in an attempt to reduce the size of pupils, but also then apply digital correction. In most situations, this effectively eliminates the problem.
Panasonic Lumix DMC-FX500 Screen and menus
The Panasonic Lumix DMC-FX500 is equipped with a 3in screen with 230k pixels. Disappointingly for the flagship model, it doesn’t boast the 460k high resolution 3in screen of the Lumix TZ5, but of course it is the only model in Panasonic’s range that’s touch sensitive.
 |
The touch-sensitive aspect of the screen doesn’t compromise its quality or brightness which look as good as any 230k 3in screen we’ve tested. Inevitably, the surface of the screen can gather fingerprints, but they effectively disappear when the camera’s on and if you’d like to keep it pristine, you can always use the supplied stylus for tapping instead.
We’re covering the actual touch controls in detail in their relevant sections throughout the review, but briefly here, Panasonic’s approach worked very well in practice. At first you might think it odd to find a joystick and a number of buttons alongside a touch-screen which are used to navigate and confirm menus, but these do work out quicker in general use.
Sony’s pure approach on models like the Cyber-shot T70 may shun all physical buttons, but in turn navigating its menus and confirming options using the touch-screen alone can be infuriatingly slow. Instead Panasonic has taken a sensible approach to only using the touch-screen for controls which actually benefit from this style of operation, while relying on traditional buttons and joysticks for everything else. It may not be as high-tech, but it’s a whole lot easier in practice.
 |
 |
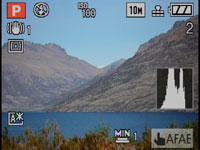 |
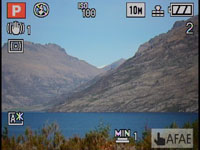
Pressing the FX500’s Display button cycles between a clear view of the composition with no information, one with a choice of alignment grids and one with detailed shooting information. A menu option allows you to also display a live histogram over both the recording info and grid screens.
Like previous models, Panasonic splits (and often duplicates) its various settings over a super-imposed dropdown function menu (now called Q.Menu on 2008 models) and a more conventional paged menu system. After using the same layout and graphics for some time, Panasonic has opted for a redesign with its 2008 range, but the operation remains the same. The joystick is used to navigate the Q.Menu and the paged menus.
 |
 |
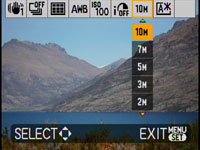
Pressing the Q.Menu button overlays a drop-down styled menu over your live composition and offers context-sensitive options. With the FX500 set to Program recording mode, you can adjust the stabilisation mode, continuous shooting, AF area, white balance, sensitivity, Intelligent Exposure, image resolution and LCD brightness mode. Compression quality and image aspect ratio can now be found in the main menu system.
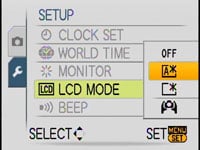 |
The LCD brightness section offers Power (brightening boost) and High Angle options, along with an automatic mode which can detect bright surroundings and switch into Power mode. We found this worked well in our often bright outdoor testing conditions and would recommend leaving the camera in this mode unless you need to save power.
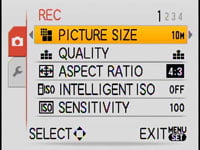
Pushing the joystick in fires-up the Menu system, which in Program recording mode offers four pages of recording options and five setup pages; many of the common options like sensitivity and white balance are duplicated in the Q.Menu system.
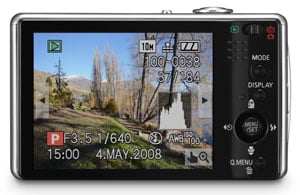
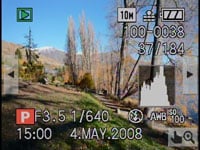
With the FX500 switched into playback mode, the Display button cycles between a clean image and ones with varying degrees of detail – if you have Histograms enabled in the setup menu, one will appear in the third screen.
 |
 |
 |
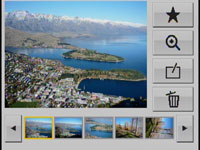
Exploiting the touch screen in playback, the FX500 lets you tap arrows left and right to switch between images, or tap anywhere on the image to enlarge it. You can then keep tapping to enlarge it further, or tap arrows on each side to scroll around. Alternatively you can drag the enlarged view around by pressing your finger on the screen and dragging it – this works very well in practice and we have a full demonstration in our video tour.
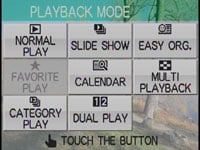 |
Pressing the Mode button during playback presents a number of options you can select using the touch-screen. The Dual Display option will already be familiar to those who’ve used the super-zoom TZ5. This displays two images simultaneously for easy comparison.
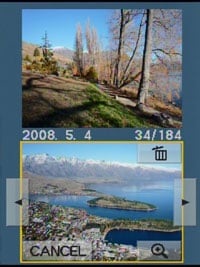 |
In theory this is really no different from a thumbnail mode which only shows two pictures, but Panasonic cleverly flips them on their side so you use the screen in a portrait orientation to maximise their reproduction. The touch controls for navigating each image remain.
 |
 |
Another option is Easy Organisation which allows you to tag images by category or as a favourite for tailored slideshows, along with trimming, resizing or adding text comments to images (the latter using a touch-screen keyboard that’s best operated using the stylus). Slideshows can be played with a variety of effects, along with a choice of music, although you can’t upload your own.
Panasonic Lumix DMC-FX500 Battery and connectivity
A single small door on the right side of the body opens to reveal a DC-input, a combined USB / AV port, and a component output for the optional DMW-HDC2 cable. With this cable the FX500 will output a 1080i signal for HDTVs (although the FX500’s HD movies are scaled from their native 720p). A larger door under the grip side of the body houses the battery and SD memory card slot.
The Lumix FX500 is powered by the same DMW-BCE10E 1000mAh Lithium Ion battery pack as the Lumix FX35 and the camera is supplied with a mains recharger. Panasonic claims each charge is good for 280 shots under CIPA conditions, but like other Lumix compacts we found that estimate a bit optimistic. If you have the image stabiliser, continuous AF and auto LCD activated, you can burn through the battery pretty quickly, so investing in a spare would be advisable.


