Panasonic Lumix DMC-L10
-
-
Written by Gordon Laing
Panasonic Lumix DMC-L10 design and controls
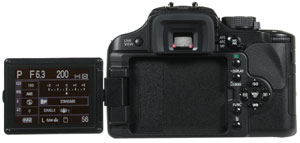
After the rather esoteric rangefinder-styled Lumix L1, Panasonic’s second DSLR is a much more conventional affair. The new Lumix DMC-L10 is a traditional-looking DSLR which externally resembles other models on the market. We’ve pictured it below on the left alongside Canon’s EOS 400D / XTi.
The Lumix L10’s body is a few millimetres larger in every dimension than the 400D / XTi, and actually a few grams lighter, but the biggest physical difference is when they’re fitted with their respective kit lenses. Leica’s new 14-50mm f3.8-5.6 kit lens for the L10 measures 93x74mm (length x diameter) and weighs 434g, compared to the 69x66mm and 190g of the Canon EF-S 18-55mm f3.5-5.6. With each lens fitted, both cameras look and feel like quite different propositions: the Lumix L10 is significantly bigger and heavier.
In terms of build quality, we’d say the L10 is a small step-up from the 400D / XTi and has a classier, less plasticky feel to it. The L10’s grip is also taller and deeper, which with the textured rubber coating, gives it a more serious look while also being more comfortable to hold. Overall its build quality and finish looks and feels closer to models like the Nikon D80. The Leica 14-50mm is also a big step-up in build quality over most kit lenses.
Like most consumer DSLRs, the bulk of the controls are found on the top right surface and to the right of the screen on the rear. Starting on the top side, you’ll find a large dial offering the traditional PASM modes along with fully automatic, direct access to five popular scene presets, a SCN position to access a further five presets via a menu, and finally a Custom position to call-up one of three user sets. The L10 offers shutter speeds from 60 seconds to 1/4000 along with a Bulb option, albeit one that like the Olympus E-510 is restricted to eight minutes.
Around the mode dial are two rotary levers: one to power the camera on and off, and a second which selects between the four drive modes. It’s nice to have direct access to these drive settings without delving into a menu or pressing buttons. Finally between the shutter release and mode dial is a button dedicated to the L10’s various Film modes which apply different colour settings – more of which on the next page.
In a welcome step-up from most consumer DSLRs, the L10 is equipped with both a finger and thumb dial – this allows you to independently adjust settings like the aperture and shutter or aperture and exposure compensation without having to hold down a button like a shift key first.
To the right of the optical viewfinder on the back of the camera you’ll find another switch, this time dedicated to selecting between AFS, AFC and manual focusing modes, with an AFL / AEL button in the middle – again a nice touch not to have to go into menus.
To the right of the screen you’ll find the usual four-way joypad arrangement used to navigate menus, scroll around images or offer direct access to the ISO, Metering (Multi, Center-weighted and Spot), White Balance and AF Area options. Finally, four buttons running vertically down the right side of the screen offer Playback, enter the Display or LCD modes, fire-up the Function menu – see below, with a final button dedicated to deleting images.
|
Panasonic Lumix DMC-L10 flash
The Lumix L10 is equipped with a popup flash which is released by manually pushing a switch to the side of the head – it won’t popup by itself, so there’ll be no surprises. Once popped-up, you can choose Auto, Forced On or Slow Sync modes, each available with or without red-eye reduction. You can also set the sync curtain and adjust the flash output power. The fastest sync speed is 1/160. A hotshoe allows you to mount the optional DMW-FL360 or DMW-FL500 flashguns.
Panasonic Lumix DMC-L10 viewfinder
 |
The Lumix L10 is equipped with an optical viewfinder which employs a penta-mirror arrangement and offers 95% coverage. Like most Four Thirds cameras, the shooting information is positioned to the right side of the frame, and in the case of the L10 shows the aperture, shutter, an exposure compensation scale, focus confirmation, metering mode and shots remaining. It also indicates if AE bracketing has been set, and the ISO value is temporarily shown while you press and hold the ISO button.
The framing area is dominated by the three AF points with small red dots in each which illuminate when active. The framing area itself appears similar in size to the Olympus E-510. As such while it appears the same height as that of, say, the Canon EOS 400D / XTi, the squarer 4:3 image ratio results in a narrower frame.
This gives the appearance of a more cramped viewfinder experience than other DSLRs, and is one of the downsides of most Four Thirds cameras, but we’d advise trying it for yourself to see if it’s an issue. Perhaps realising this, Panasonic supplies the L10 with a magnifying eye-cup which slips over the viewfinder to provide a bigger apparent view, although optically it reduces the quality a little – it’s a thoughtful touch though, and of course there’s also alternative composition using Live View, more of which below.
Panasonic Lumix DMC-L10 screen and menus
 |
One of the major selling points of the Lumix L10 is its flip-out screen, which really comes into its own during Live View. The screen itself is a 2.5in model with 207k pixels, fitted to a well-built articulated mounting which allows it to flip-out to a variety of angles.
You can flip the screen out and twist it up or down for shooting at low or high angles; you can twist it all the way round for self-portraits; or you can flip it back on itself for protection. This gives Live View the flexibility it deserves and it’s almost unbelievable to think the L10 is the only DSLR on sale at the time of writing to offer it – since the Olympus E-330 is long-discontinued and the flagship E-3 is yet to arrive. It gives the L10 a unique advantage over its rivals.
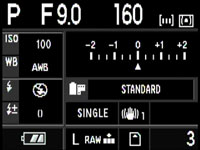 |
When not in Live View mode, the L10 uses its screen to display a wide array of shooting information, although unlike the Olympus models you can’t highlight the desired ones for adjustment. As described above though, there’s actually buttons or switches which offer direct access to every single setting you see on-screen, apart from the quality which is set from the main or function menus.
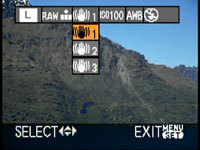 |
Like Panasonic’s compacts, pressing the FUNC button super-imposes a dropdown styled menu on the screen. This lets you adjust the image resolution, compression, OIS mode, sensitivity, white balance and flash. We’ve pictured it here in Live View mode with the scene behind it, although in non Live View, it appears on a black background.
Also like Panasonic’s compacts, pressing and holding the Display button fires-up the LCD mode options. Power LCD brightens the screen for easier viewing under direct sunlight, while Auto Power LCD adjusts it automatically. Thanks to the fully articulated screen, the High Angle option of Lumix compacts is no longer required.
Panasonic Lumix DMC-L10 Live View
A button to the left of the L10’s viewfinder activates the camera’s Live View mode – coincidentally, this is also the button you’ll need to press in order to manually clean the sensor. Like all DSLRs with Live View, there’s a slight pause as the camera flips its mirror up and the shutter open, but the L10 feels quicker than most, delivering its live feed in about half a second.
Like other models you can now overlay various graphics on the screen. Pressing the Display button cycles between the image only, the image with shooting information, a live histogram, a three-by-three grid, and finally a vertical cross pattern.
Press the shutter release button halfway to focus and you’ll experience one of the L10’s other fairly unique features: contrast-based AF. This uses the same technique as compact cameras to auto focus, and means the L10 doesn’t need to flip its mirror back and forth to take a reading. While operating slightly slower than a good compact, this process is still quicker – and quieter – than traditional Live View systems. The only other DSLR to offer it at the time of writing was Nikon’s D300.
Since contrast-based AF allows the L10 to focus like a compact, Panasonic’s used the opportunity to include additional options you wouldn’t normally find on a DSLR. The AF menu in Live View now allows you to choose between five main modes to use fewer focusing areas to accelerate the process, and there’s even a face detection option which can track up to 15 human subjects. We’re not sure how many people will take portraits with the L10 in Live View with face detection in practice, but it sure works and it’s there if you want it.
One important caveat though is the L10’s contrast-based AF requires support from the lens and right now there’s only two models which include the required communications: the new Leica 14-50mm f3.8-5.6 kit lens and the Leica 14-150mm super-zoom. Fit any other lens and the L10 will need to switch back to phase-difference AF which involves flipping the mirror down. Interestingly if you prefer this style of AF even with one of the new lenses, you can switch the L10 to only use phase-difference AF in Live View. For more details on the lens and focusing, see the next page.
Finally, when playing back images you can press the Display button to cycle between various degrees of shooting information, including one screen with red, green, blue and brightness histograms. You can also choose in a menu if you’d like blown highlights to flash or not; this isn’t available when composing with Live View though.
 |
Panasonic Lumix DMC-L10 Battery and connectivity
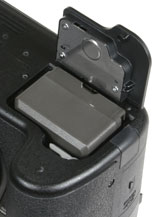
The Panasonic Lumix L10 is powered by a chunky DMW-BLA13E 1320mAh Lithium Ion battery pack and is supplied with a mains recharger. Panasonic claims each charge is good for 450 shots with the optical viewfinder or 280 in Live View. Using a mix of each, we actually managed to take just over 500 shots with the L10 before its battery gave up.
A door to the right side of the L10 houses an SD memory card slot, while above it is a smaller flap with a combined USB and AV output along with a socket for the optional DMW-RSL1 cable release.