
 Panasonic's Lumix GX9 is a feature-packed mid-range mirrorless camera, featuring a 20 Megapixel Four Thirds sensor that's stabilized within the body, an electronic viewfinder and touchscreen, both of which can tilt vertically, 9fps bursts with continuous autofocus, 4k video with Panasonic's array of clever 4k Photo modes, and Wifi complemented by Bluetooth for easy location tagging and seamless connections. Vloggers will wish it had a microphone input and a screen that flipped-forward to face them, while serious action shooters will be better-served by a camera with a phase-detect hybrid AF system; I'd also personally like it a lot more if Panasonic had used an OLED viewfinder panel which, to my eyes, delivers a steadier image. But there's no denying the appeal of the broad feature-set which covers most bases, image quality that can compete with rivals with bigger sensors, and the chance to use the largest catalogue of native mirrorless lenses. A recommended all-rounder.
Panasonic Lumix GX9 review
-
-
Written by Gordon Laing
Intro
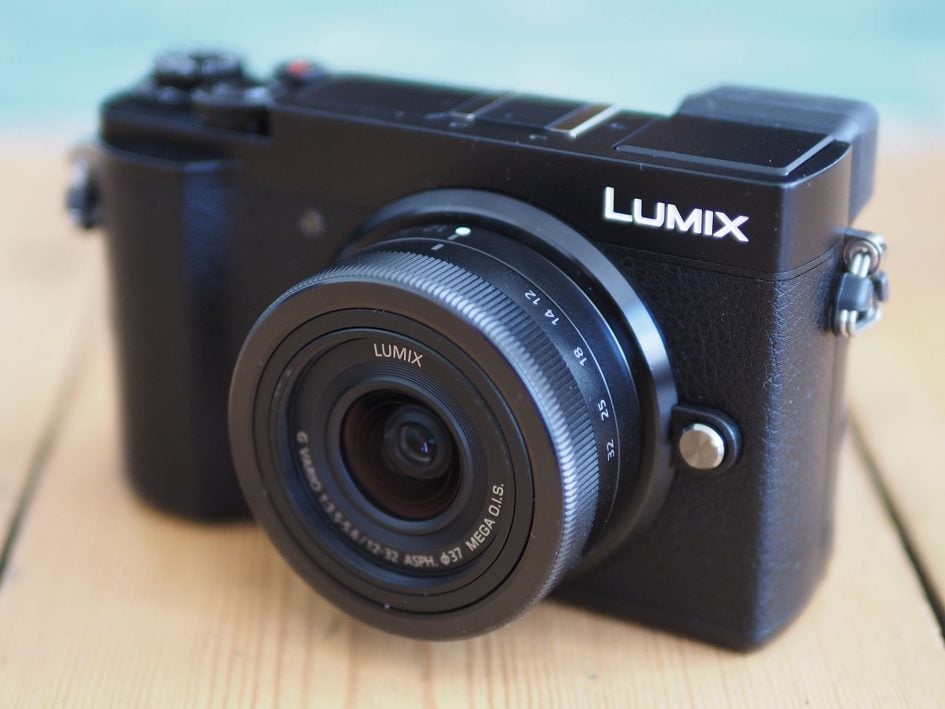
The Panasonic Lumix GX9 is a mid-range mirrorless camera with a 20 Megapixel Four Thirds sensor, built-in stabilisation, tilting viewfinder, tilting touchscreen, 4k video and Wifi with Bluetooth. Announced in February 2018, it’s numerically the successor to the GX8 but pitched at a lower-level; indeed coupled with its smaller dimensions, it’s more of a successor to the earlier GX7 and a return to this more compact form-factor. It could also be seen as a successor to the GX80 / GX85.
Like the GX8 and GX7 before it, the GX9 employs a rangefinder styled body with a flat-top and the viewfinder built-into the corner, but in terms of size it’s much more like the older GX7 or GX80 / GX85, eschewing the chunkier GX8’s dimensions for something more portable. As such it inevitably misses out on some of the GX8’s sophistication such as the chunky grip, weather-sealing, microphone input and fully-articulated side-hinged screen. Instead the GX9’s screen tilts vertically only, although I’m pleased to see the body retaining the unique tilting viewfinder of the GX8 that can angle-up by 90 degrees, and there’s a popup flash too which was absent on the GX8. In a move that disappoints me though, Panasonic has dropped the OLED panel of the GX8 viewfinder and returned to the field sequential technology of the GX7 and GX80 / GX85 that’s not as steady to my eyes and also annoyingly in the 16:9 shape which may be filled for video but results in a much smaller and less detailed image when shooting 4:3 shaped photos.
The sensor shares the same 20 Megapixels of the GX8 but drops the low-pass filter for crisper results, coupled with Panasonic’s latest image processing. The sensor’s also stabilised within the body with a five-axis system that claims four stops of compensation when used with a Dual IS-compatible lens. There’s also a new shutter mechanism claiming to greatly reduce the risk of shutter shock. As you’d expect, the GX9 can film 4k video and also supports Panasonic’s 4K Photo modes, and also now features Bluetooth to complement Wifi for easy connectivity and seamless location tagging. It’s another feature-packed camera from Panasonic, so check out my in-depth review to find out how it all comes together in practice and whether it’s right for you!
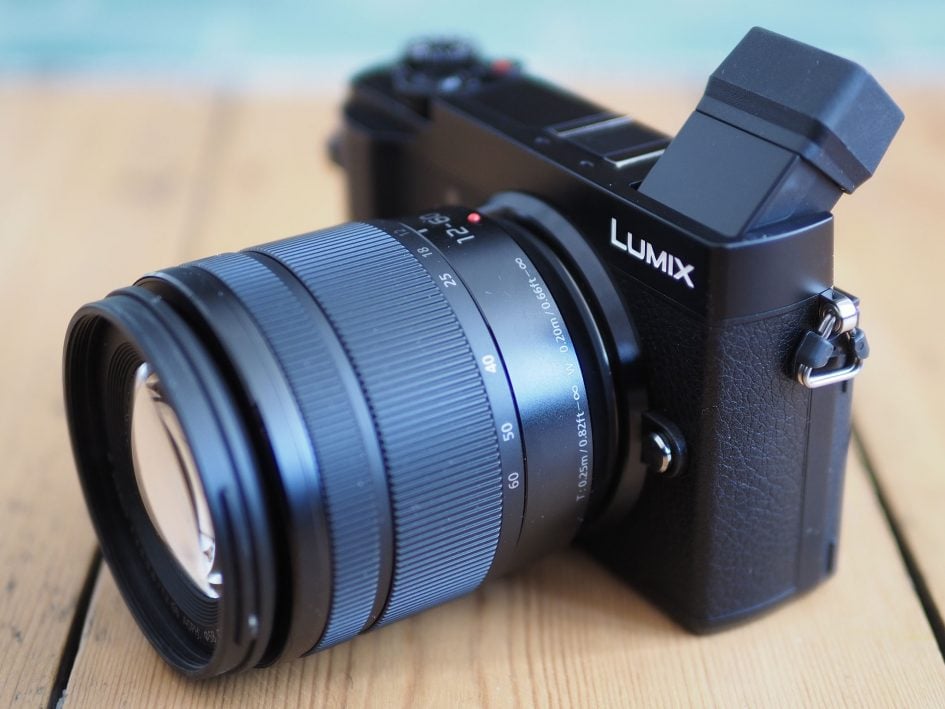
Like the GX8 and GX7 before it, the GX9 employs a rangefinder styled body with a flat-top and the viewfinder built-into the corner, but in terms of size it’s much more like the GX80 / GX85 or the older GX7, eschewing the chunkier GX8’s dimensions for something more portable. The configuration above with the Lumix G 12-60mm zoom weighs 660g. The smaller size and lower pitch means the GX9 inevitably misses out on some of the GX8’s sophistication such as the chunky grip, weather-sealing, microphone input and fully-articulated side-hinged screen, but it does include a popup flash which was absent on the GX8. Note like the GX80 / GX85, the grip and thumb rest are pretty small, so the GX9 feels most comfortable with fairly compact lenses.
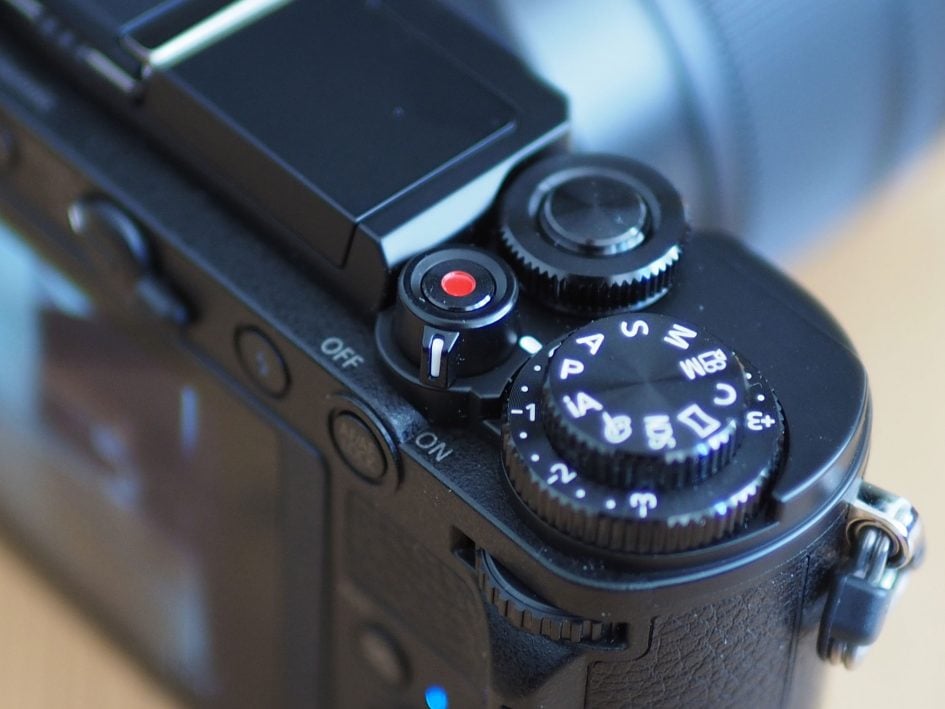
The upper right corner of the GX9 is where you’ll find the main mode dial, sat upon a dedicated exposure compensation dial with a +/-3EV range. One of the two control dials surrounds the shutter release and is operated by your index finger, while the second dial falls under your thumb on the rear and is clickable. The mild grip and thumb rest means it’s not as easy to operate both dials one-handed as, say, the Olympus bodies, but it’s just about possible. Also notice the movie record button with a collar switch for the main power. Overall the styling and grip are very similar to the GX80 / GX85.
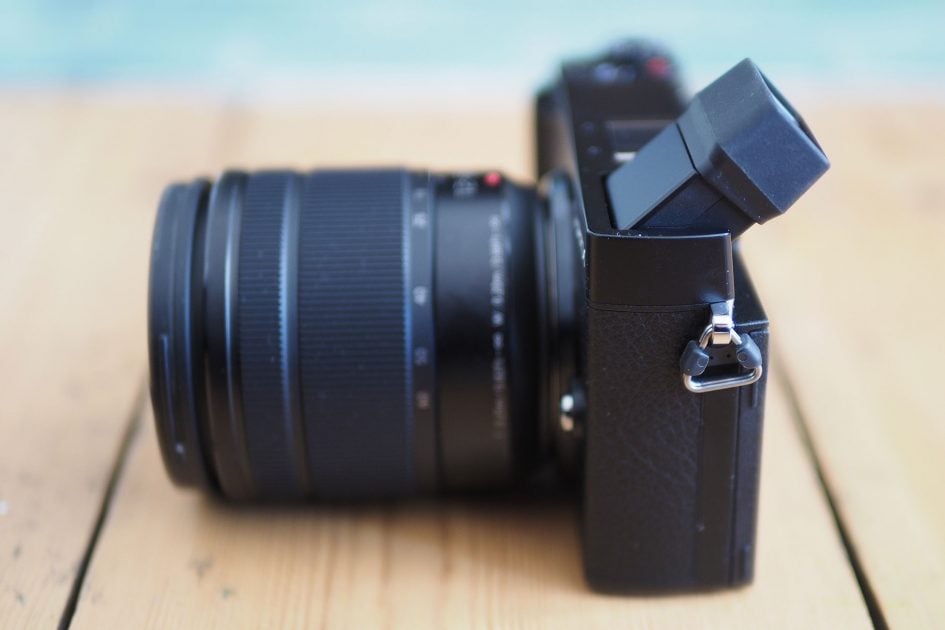
The GX9 is equipped with an electronic viewfinder which like the GX8 can angle-up by as much as 90 degrees. This is a pretty unique capability and allows you to more comfortably frame at low angles, although you also have the option of angling the screen if you prefer. Unlike the GX8’s 4:3 shaped OLED viewfinder panel though, the GX9 inherits the 16:9 shaped field-sequential panel of the GX7 and GX80 / GX85. The wide shape means the viewfinder image may be filled when filming HD or 4k video, but letter-boxed quite severely when shooting still photos in the native 4:3 shape where thick black bars are employed on the left and right sides. This in turn means composing – or playing – photos won’t exploit the full size or 2760k dot resolution of the viewfinder panel. A bigger issue – for me anyway – is the field sequential technology which can suffer from rainbow / tearing artefacts as you glance across the image, particularly with text or in menus. Some people, including myself, are very sensitive to this, while others won’t notice it at all. If you have sensitive eyes, I’d recommend trying the camera before buying, or going for a model with a more stable OLED panel instead; these also tend to use a 4:3 shape which is optimized for stills on Lumix cameras, although 16:9 video will of course become letter-boxed.
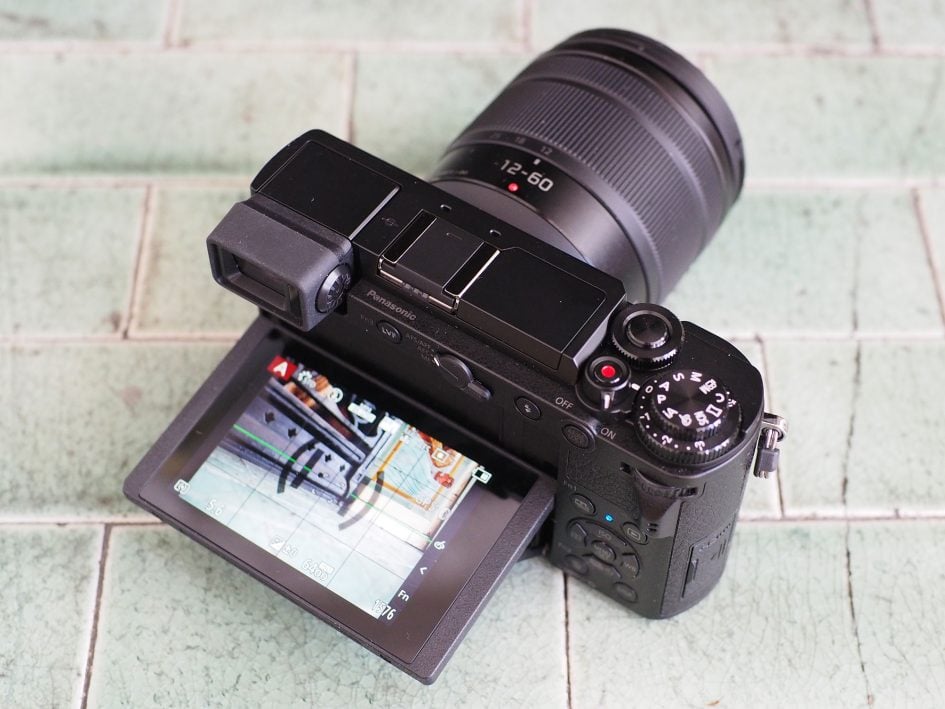
The GX9 is equipped with a 3in / 3:2 shaped / 1240k dot touchscreen which can angle up by around 90 degrees and down by about 45 degrees for easy composition at high or low angles; unlike the GX8 though, it won’t flip-forward to face the subject which is frustrating if you’re into selfies or vlogging. In some consolation though, the touchscreen interface is excellent, allowing you to not only tap to refocus, but also tap your way through the menus, drag guides, and swipe and pinch your way through playback. You can also use it as a touchpad to adjust the AF area while composing through the viewfinder, although if you’re a left-eyed shooter – like me – you’ll find your nose often inadvertently moving the AF area. In this instance, disable the touchpad feature – this will turn-off the touch screen when composing through the viewfinder, but return all touch functionality when you compose with the screen.

The GX9 is equipped with Micro USB and Mini HDMI ports, both of which behind an unusual door which springs back into the body; sadly it loses the microphone input of the GX8 though. The GX9 is charged over USB and is supplied with an AC adapter. In terms of battery life I managed around 200 shots plus a few minutes of video per charge; for video alone, I managed just under three half hour clips of 4k video with stabilisation enabled. The HDMI output matches the movie frequency, including 4k UHD at 24, 25 or 30p, and a setting can configure it for a clean image without icons.

The Lumix GX9 can use any lens designed for the Micro Four Thirds system, with a wealth of options from Panasonic, Olympus and a number of third parties; it’s the most established of all the mirrorless systems, and you can check out the models I recommend in my Best Micro Four Thirds lenses guide. As I mentioned earlier though, the modest grip means the GX9 feels most comfortable with the smaller lenses in the series. The GX9 is available in three different lens kits depending on region: there’s the basic Lumix 12-32mm (a tiny collapsing zoom equivalent to 24-64mm, pictured lower on this page), the Lumix 12-60mm f3.5-5.6 (a good mid-range option with a 24-120mm equivalent range and the one I chose for most of my tests here), and the Leica 12-60mm f2.8-4 (a high-end option with a brighter aperture than the Lumix version, allowing shallower depth-of-field effects). You can see the 12-60mm coverage above, taking you from wide to mid-telephoto.
The Lumix G 12-60mm isn’t going to set any record when it comes to delivering a shallow depth-of-field, but it’s par for the course for a kit zoom, and if you get close to the subject you can achieve some blurring in the background. Above are examples at close range at 12mm (left) and 60mm (right), both at their maximum focal ratios of f3.5 and f5.6 respectively.
If you’re after the maximum portability, the Lumix G 12-32mm transforms the GX9 (or indeed most Micro Four Thirds bodies) into a very compact package. That said, I personally prefer the greater reach and quality of the Lumix G 12-60mm zoom.
The Lumix GX9 features built-in sensor shift stabilisation that works with any lens you attach, and if you mount one of Panasonic’s Dual IS compatible lenses, their optical stabilisation works alongside the sensor-shift system to deliver even higher compensation. To put it to the test for stills, I shot a book case with two lenses: the Olympus 75mm f1.8, which has no optical stabilisation, and the Lumix G 12-60mm, which is a Dual IS compatible zoom. I’ll start with the Olympus 75mm which uses the sensor-shift system alone.

With the Olympus 75mm mounted on the Lumix GX9, I shot a series of images with shutter speeds descending one stop at a time, first without stabilisation, then with it enabled. Without stabilisation on the day, I needed a shutter speed of 1/160 for a perfectly crisp result, although I also managed good results at 1/80. With stabilisation enabled in the GX9 body, I matched the perfect crispness down to 1/20, and managed a good result at 1/10. I’ve presented 100% crops from the 1/10 samples above with the unstabilised version on the left. So in this test, the sensor-based stabilisation gave me a solid three stops of compensation, making unstabilised lenses much more usable. Remember not just to avoid camera shake in your photos, but also during composition and video.

With the Lumix G 12-60mm mounted on the GX9 and set to 60mm, I again shot a series of images with shutter speeds descending one stop at a time. With stabilisation disabled, I required a shutter speed of 1/60 for a perfectly sharp result on the day. With stabilisation enabled (in this case Dual IS), I could achieve the same result at 1/8, again resulting in a solid three stops of compensation. I’ve pictured 100% crops from the 1/8 versions above, with the unstabilised version on the left. So in my tests with still photos, the Dual IS lens didn’t deliver any measurable benefit over the one which used sensor-shift only, although it can help improve the steadiness when filming handheld video.
Like all Panasonic Lumix G bodies to date, the GX9 exclusively employs a contrast-based system for autofocus. The benefits are accuracy and operation in very low light levels, but the downside is less confident continuous focusing than a phase-detect or hybrid system. In terms of the benefits, the GX9 can certainly focus very quickly and accurately, snapping onto most subjects in a split second, and with operation down to -4EV, you’ll still be able to focus in very dim conditions when other cameras struggle. The face detection with eye detection also worked well.
In terms of continuous autofocus, Panasonic employs their Depth by Defocus, or DFD, technology that profiles their Lumix and Leica lenses to better understand how to refocus them based on how the blurred areas look. The system has matured over several generations now, and the GX9, like other recent Lumix G bodies, actually does a vey good job at tracking and refocusing on subjects moving towards or away from you even with long lenses. That said, it’s still most confident with predictable motion like cyclists, and less successful with more random subjects like birds in flight. The contrast-based system also can’t help but overshoot and pull back to confirm, and while this happens quickly for stills, it can be visually distracting during video as I’ll demonstrate later in the review. Ultimately if you shoot a lot of unpredictable fast action, there’s better choices for continuous AF, particularly from Sony.
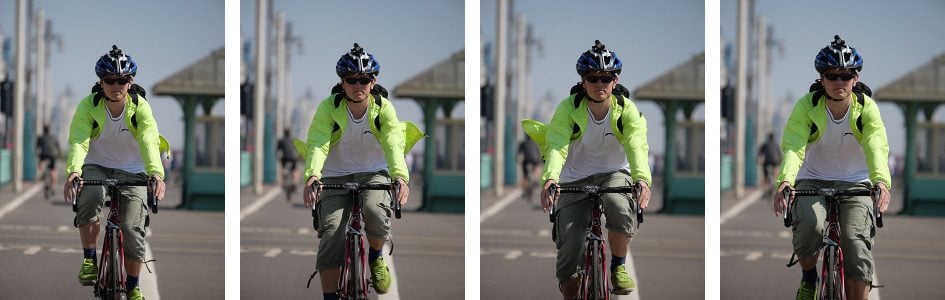
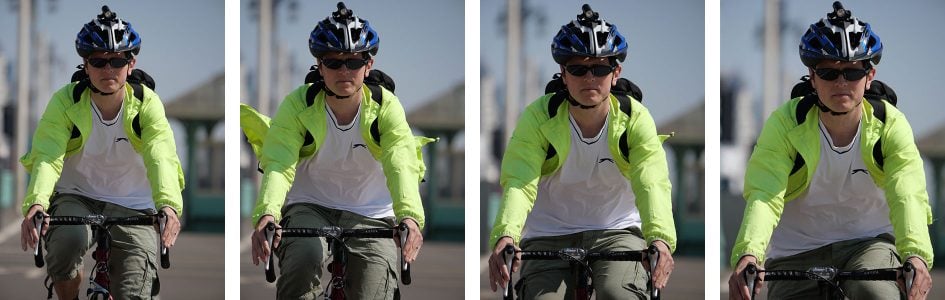
Above: Lumix GX9 at 9fps with Leica 50-200mm at 200mm f4. Below: 100% crops.

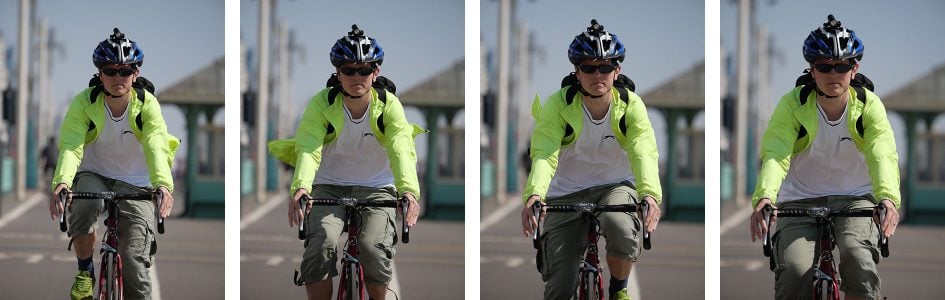
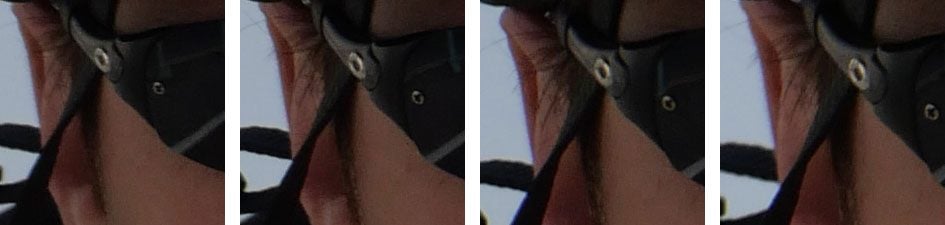
Above: Lumix GX9 at 9fps with Leica 50-200mm at 200mm f4. Below: 100% crops.

Above: Lumix GX9 at 9fps with Leica 50-200mm at 200mm f4. Below: 100% crops.

Above: Lumix GX9 at 9fps with Leica 50-200mm at 200mm f4. Below: 100% crops.
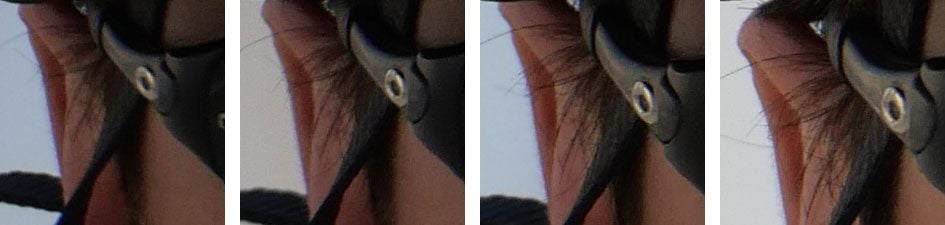
The GX9 can shoot bursts at 2, 6 or 9fps, all available with continuous autofocus if desired, although live feedback is only offered at the lower two speeds. Panasonic quotes a buffer of up to 30 RAW images or over 100 JPEGs. In my formal tests with a UHS-II card, the GX9 captured 120 Large Fine JPEGs in 12.95 seconds for a rate of 9.27fps before slowing down. Set to RAW, I captured 33 images in 3.6 seconds for a rate of 9.17fps before it stalled. In my real-life tests, I photographed my friend Ben cycling towards me using single or zoned areas and continuous autofocus. With the drive set to High speed bursts, the GX9 successfully kept him in sharp focus even when using the Leica 50-200mm at 200mm f4 – as seen above – although at this speed there was no live feedback, making it hard to track unpredictable action. When tracking more random subjects, like birds in flight, you’ll find it much easier to follow the action at the slower 6fps mode which provides live feedback. Even then though, as noted above, the GX9’s autofocus doesn’t feel that confident when shooting the unpredictable motion of birds in flight which enter the frame quickly and often move around randomly.

Above: Lumix GX9 Creative effects

Above: Lumix GX9 Creative effects
Set the mode dial to Creative Control and the Lumix GX9 offers 22 effect filters, a selection of which are shown above; some can also be applied to video. RAW processing in playback is also provided, allowing you to adjust the white balance, brightness, photo style, dynamic enhancement, contrast, highlight, shadow, saturation, noise reduction, resolution enhancement, sharpness, colour space and output resolution, although you’re unable to apply any of the Creative effects in playback. If you like to shoot silently, there’s the option of an electronic shutter mode which also extends the fastest shutter speed from 1/4000 to 1/16000, albeit with the usual limitations on shooting subjects moving quickly across the frame or under artificial lighting. There’s also 3, 5 or 7 frame exposure bracketing as well as focus bracketing available.

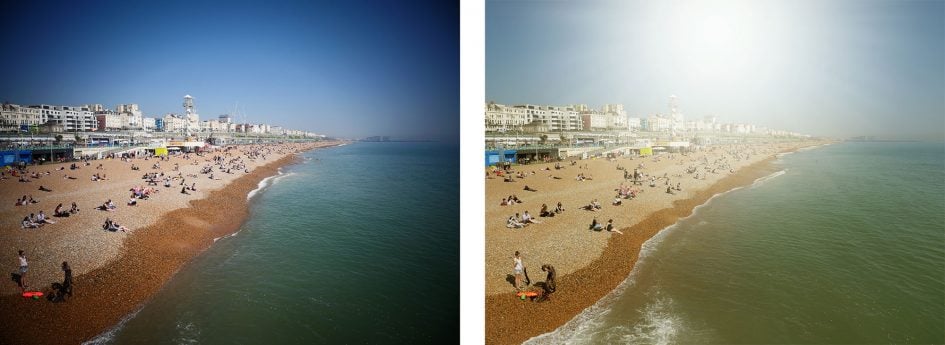
Above: Lumix GX9 panorama

A panorama mode is available and the GX9 does a fair job at in-camera stitching, although in the second example above it has made a mistake on the building.

Making its debut on the GX9 is Panasonic’s latest L Monochrome D Picture Style. Hot on the heels of the recent L Monochrome style, this is an even higher contrast option as seen above. The three monochrome Picture Styles on the GX9 now also offer a choice of three grain simulations, with crops of each pictured below at 100% alongside the plain version on the left. It’s nice to see Panasonic putting more effort into improving their JPEG engine with both colour and black and white options now looking better than ever.

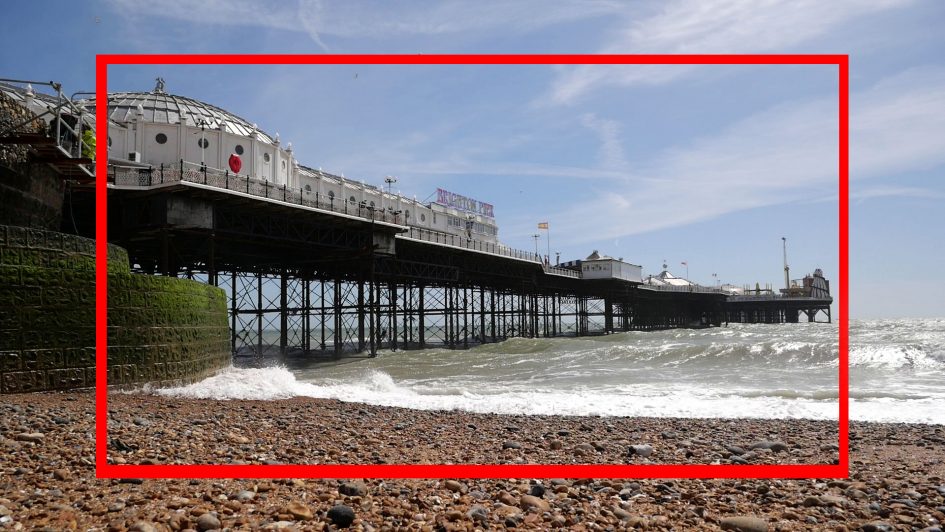
The Lumix GX9 is a very capable movie camera, able to film 720p at 25 or 30p, 1080p at 25, 30, 50 or 60p, or 4k UHD at 24, 25 or 30p; there’s no frame rates above 60p for slow motion. If you’d like to grade your footage, the Cinelike D profile is available for fairly flat output; this was added with the v1.1 firmware update. Footage filmed in 720p or 1080p takes the full sensor width, while 4k footage takes a crop; I’ve indicated the 4k coverage compared to 1080p above where the outside edge of the red frame indicates 4k footage. The 4k field-of-view works out at around a 1.26x crop horizontally compared to 1080p which is the same as the GX8 before it, but more severe than the 1.1x crop of 16 Megapixel Lumix bodies; note the G9 and GH5(s) avoid a crop in any mode. You can film a second shy of half an hour in any mode and in my tests I managed just under three half hour clips of 4k with stabilisation on a single charge; the camera was warm after filming for almost an hour and a half, but not hot. Audio is recorded with built-in microphones only as there’s no external mic input. Unlike the GX8, movies can exploit the sensor shift stabilisation with the option of additional digital stabilisation if desired, albeit with an extra crop to accommodate it, regardless of quality mode. Autofocus employs the GX9’s contrast-based system. I have examples, comparisons and demonstrations of all of this in my movie mode video below.
Above you can see a compilation of movie clips filmed with the Lumix GX9, comparing the quality between 4k and 1080p, as well as demonstrating the focus tracking and stabilisation options. If you’d like to check out the footage straight from the camera, you can download my Lumix GX9 4k daylight movie, Lumix GX9 4k Cinelike-D movie, Lumix GX9 4k handheld low light movie.

Like all recent Lumix cameras, the GX9 offers a variety of 4K Photo modes that exploit the fact 4k video essentially captures 8 Megapixel images at 30fps. When set to 4K Photo, the GX9 captures a short clip using photo-friendly exposures and a more traditional photo shape, avoiding the motion blur and wide shape of typical video footage. Then in playback you can go through the clip one frame at a time to find the perfect moment, before pushing a button to export an 8 Megapixel JPEG image. I enjoy using the PRE-BURST option which keeps a rolling buffer of the last second’s worth of action; then when you push the shutter button down, it commits the last second to memory, followed by one second afterwards. You end up with 60 frames, 30 of which are prior to the button being pressed which makes it easy to capture the decisive moment even if you pushed the button a split second afterwards. I use it to capture the moment birds take off, rewinding the action in playback to find the perfect frame. Note the focusing is very slow in 4K Photo modes, so it’s best for subjects that aren’t moving back and forth.

4K Photo also offers a Post Focus mode that refocuses the lens from near to far during a short clip. In playback you can then use the touchscreen to tap on the part of the image you’d like to be in focus – the camera then cleverly winds the video back or forth to the correct frame, after which you can export it as an 8 Megapixel JPEG. It’s great for portraits to ensure an eye is in focus, or for times when you simply want to readjust the area that’s sharp. I used a 200mm lens here for a very shallow depth-of-field, then used 4K Post Focus to capture the scene. During playback I tapped on the bottle on the far right to shift the focus, before exporting the image.

Here’s an image exported from the same file, but after tapping the bottle in the middle.

And here’s an image exported from the same file, but after tapping on the far left side. You can export as many images as you like from the same Post Focus file.

It’s also possible to specify a range of distances you’d like to be sharp, after which the camera exports the requires frames before stacking them into a single image. It can have varying results but here has done a fair job at getting almost all the bottles in focus – not back considering the shallow depth-of-field on each individual frame as seen in the previous three examples.

New to the GX9 is Sequence Composition which you can apply to 4k Photo files during playback. This lets you select multiple frames from a sequence, after which the camera extracts them and composites them into a single image. This works best with a tripod-mounted camera and a static background, allowing you to show a subject moving across the frame in different poses or positions. It’d work well for a bird flying across the frame, a ski jump or trick, or – ahem – a camera review Editor mucking about outside.
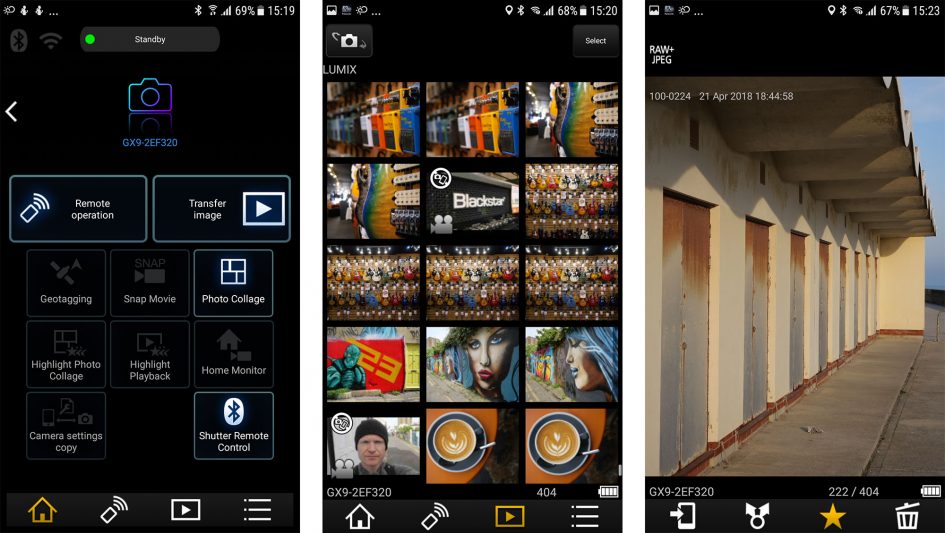
The Lumix GX9 is equipped with Wifi, aided by Bluetooth, and it’s one of the best implementations around. After pairing the Bluetooth on the camera and phone, you can use the Lumix Image App (for iOS or Android) to automatically connect them over Wifi with a simple tap. If ‘Remote Wakeup’ is enabled in the camera menus, you can even connect to it when the power switch is off; I used this feature to browse and transfer images even when the camera was packed away in a bag, and there’s also minimal power drain having the Bluetooth active all the time. It’s also possible to wirelessly copy 1080p videos to your phone using the app, although not ones filmed in 4k.
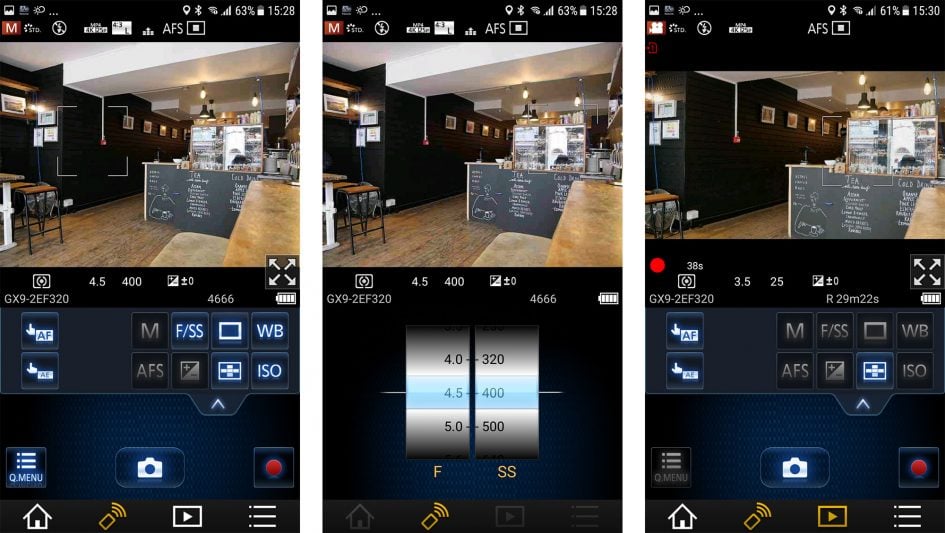
If you choose Remote Operation on the app, you can enjoy full remote control over the camera. You can’t change the exposure or focus mode without turning a physical dial on the camera, but pretty much everything else is up for grabs and gratifyingly if you do need to turn the mode or AF dial, the app remains connected with the GX9. Once connected, you can remotely adjust the shutter speed and aperture, drive mode, white balance, sensitivity and AF area, and use the live image to tap to refocus; you can also remotely trigger a movie recording and again use the phone’s screen to tap to pull-focus. It’s also possible remotely adjust a wide variety of camera settings, including the image and movie quality.
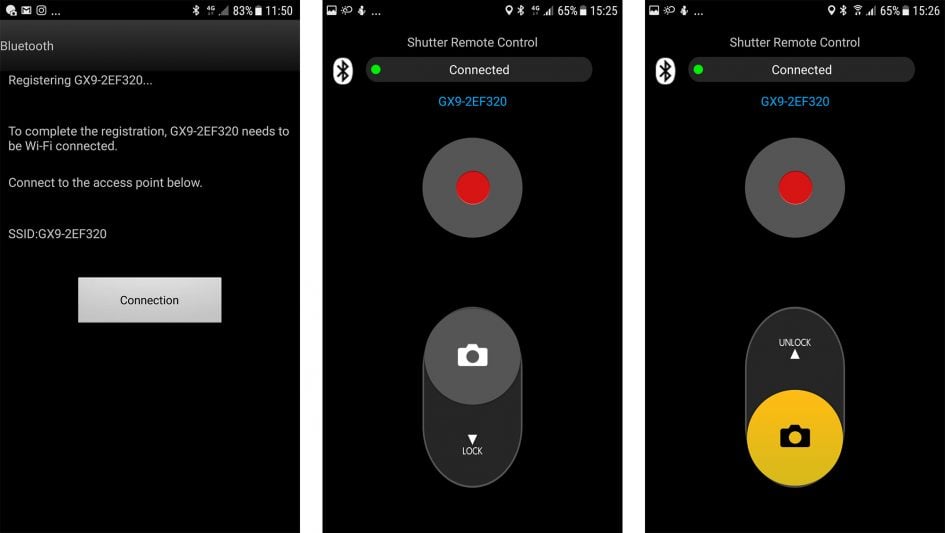
While image transfer and full remote control with live view require the GX9 and your phone to be connected over Wifi, the app allows some basic functionality with Bluetooth alone. There’s a simple Shutter Remote Control screen which lets you remotely fire the shutter or start and stop a video with your phone and since the connection is over Bluetooth, it feels very responsive and there’s no need for the connection delays of initiating Wifi. It’s also useful for long exposures with the camera set to T in Manual, although in a missed opportunity there’s no timer displayed on the phone or camera screen. Right now, only Canon and Panasonic offer a Bluetooth release function.
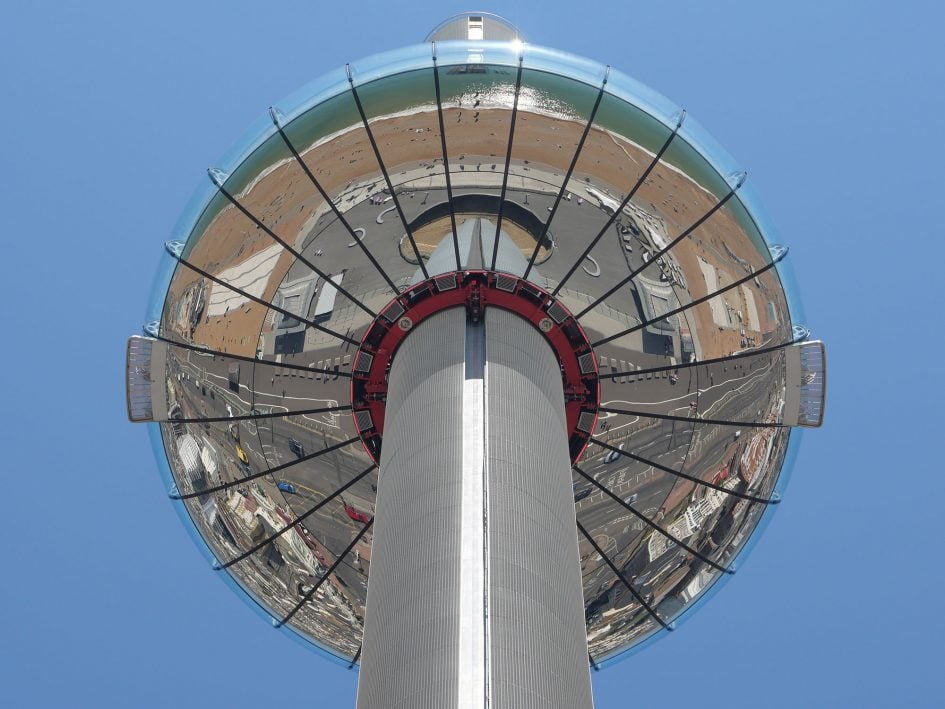
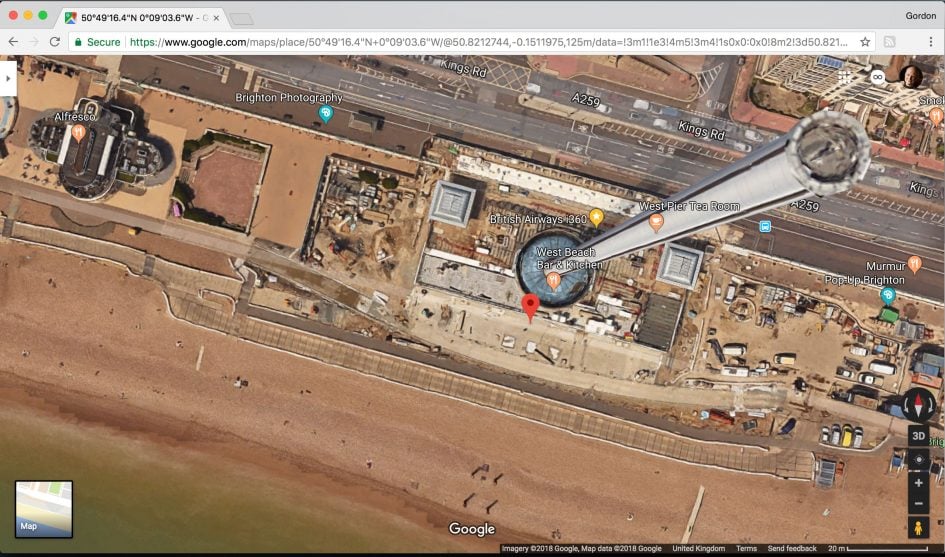
Once the camera and phone are connected over Bluetooth, you can also use the app to automatically tag images with their GPS position; after the initial Bluetooth pairing, all you need to do is enable Location Logging in the camera’s Bluetooth menu, then leave the Image App running on your phone. Bingo! GPS positions automatically embedded without the need to record a log and sync it later. In practice it works a treat and at the time of writing, only Panasonic, Canon and Sony offered similar functionality. I used it to tag most of the images in my review, and for the one above I entered the position into Google Maps.
Check prices on the Panasonic Lumix GX9 at Amazon, B&H, Adorama, or Wex. Alternatively get yourself a copy of my In Camera book or treat me to a coffee! Thanks!


