 The Lumix G9 is a confident high-performance camera that's a joy to use. The tough weatherproof body feels great in your hands with excellent controls, there's an enormous viewfinder image, a fully-articulated touchscreen with an excellent user interface, fast autofocus and burst shooting that can track action, very effective built-in stabilisation, and great image and video quality from the 20 Megapixel Four Thirds sensor that rivals 24 Megapixel APSC sensors at all but the highest sensitivities. The composite High Res mode genuinely delivers greater detail with the right subjects, there's charging and power over USB, powerful wireless features tied together by Bluetooth, and Panasonic's cunning 6K and 4K photo modes that make it easy to capture a moment before you push the shutter or adjust the focus after the event. There's little to complain about: you get used to the very sensitive shutter release and visual fluttering during continuous AF, and while the ten minute limit to 4k at 50p or 60p seems mean compared to the GH5, who else even offers 4k at 50p or 60p at this price? Plus you still get half hour clips at 30p. In use you feel there's little the G9 can't handle and it's highly competitive at the $1699 RRP.
Panasonic Lumix G9 review
-
-
Written by Gordon Laing
In depth
Panasonic’s Lumix G9 is a high-end mirrorless camera aimed at enthusiasts, delivering the best photo quality and fastest shooting from a Lumix G body to date. Announced in November 2017, it becomes a joint flagship with the Lumix GH5 and while both are very capable at photo and video, Panasonic describes the newer G9 as its ultimate stills camera. Like all Lumix G bodies to date, the G9 is based on the Micro Four Thirds standard co-developed by Panasonic and Olympus, allowing it to access the largest selection of native mirrorless lenses on the market.
The Lumix G9 inherits the 20 Megapixel Micro Four Thirds sensor of the GH5 that dispenses with the low pass filter for crisper results. Panasonic’s tuned the output though with improved JPEG processing for more natural skin tones, greater detail and better noise reduction, and has also improved the built-in 5-axis stabilisation from 5.5 to 6.5 stops. This has also allowed Panasonic to implement a tripod-based composite High Resolution mode that captures and combines eight images to boost detail and eliminate false colour artefacts, generating 40 or 80 Megapixel files.
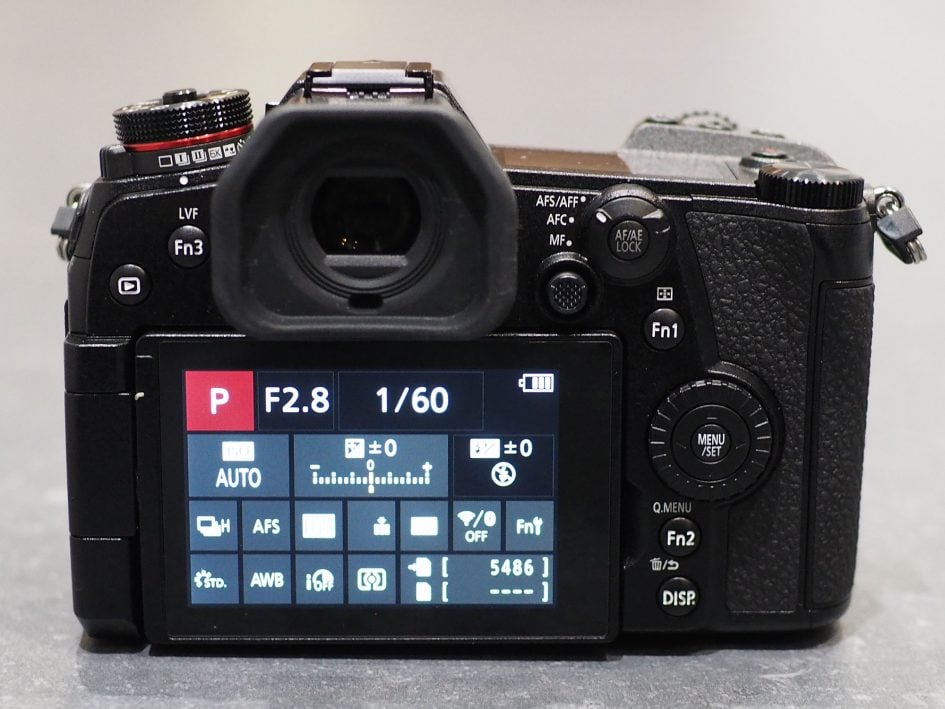
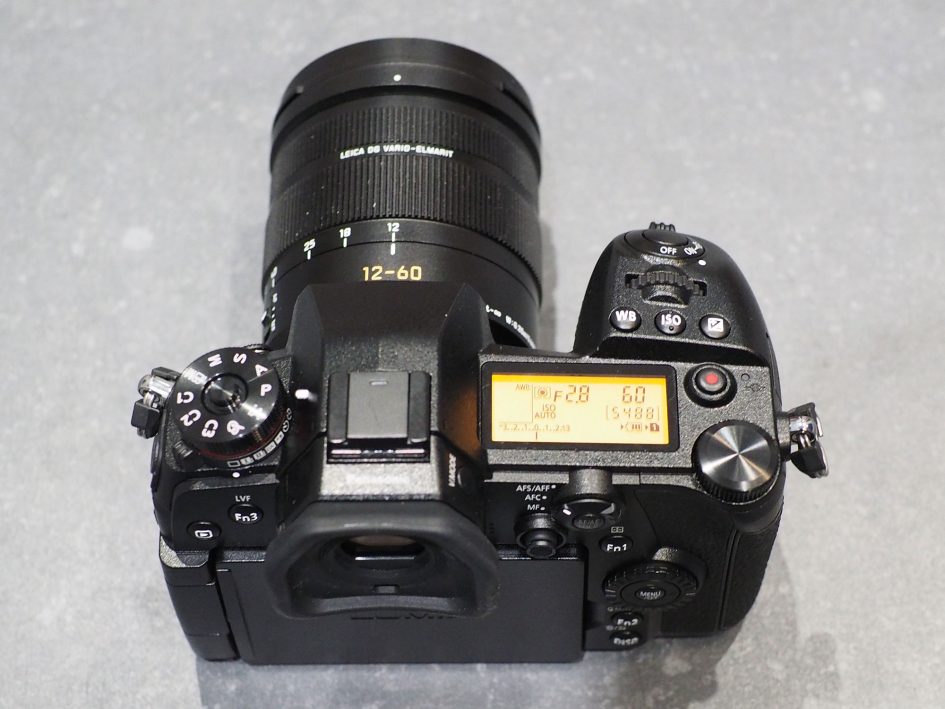
The newly-designed weatherproof body (with a red ring between the mode and drive dials to indicate the flagship status) features a fully articulated touchscreen, AF joystick, twin SD card slots (both exploiting UHS-II speed), a USB-3 port exploited by supplied tethering software (the port can also be used for charging as well as providing power), a full-size HDMI port, along with microphone, headphone and PC Sync ports. In a first for a Lumix G body there’s a backlit LCD status screen on the top surface and a front-mounted custom function lever (for switching between banks of settings), and the G9 also boasts the largest viewfinder to date with 3680k dots and 0.83x magnification; the view’s so large you can switch to lower 0.77x or 0.7x magnifications if preferred.
The Lumix G9 is also about speed, boasting 20fps with continuous autofocus and a 50-frame RAW buffer using the electronic shutter or 60fps with single AF; switch to the mechanical shutter and you’ll get 9fps with continuous AF and a 60-frame RAW buffer or 12fps with single AF. Alternatively you can extract 18 or 8 Megapixel JPEG stills from the 6k or 4k photo modes at 30fps or 60fps respectively. Focus remains contrast-based only, but Panasonic’s Advanced DFD system works down to -4EV and now calculates at 480fps, offers four custom presets and, with a 0.04 second response, claims to be faster than the GH5 not to mention several rivals with PDAF. While the G9 is Panasonic’s ultimate stills camera, it’s no slouch for video, sporting 4k at up to 60p, 1080 at 180fps, relay-recording by swapping SD cards, and 4:2:0 / 8 bit internal recording.
I spent several weeks shooting with the Lumix G9 over two separate periods, allowing me to perform and confirm a wide variety of tests, as well as filming several videos describing and demonstrating the features. I’ll start this review with a video overview of the camera to whet your appetite, followed by four deeper dives, all backed-up by my usual written review, tests and sample images!
Check prices on the Panasonic Lumix G9 at Amazon, B&H, Adorama, or Wex. Alternatively get yourself a copy of my In Camera book or treat me to a coffee! Thanks!
Panasonic Lumix G9 podcast review
In the Podcast below, Doug Kaye and I discuss everything you need to know about the G9! You may enjoy having it playing in the background as you read through the review and results!
Panasonic Lumix G9 design and controls
In the video below, Doug Kaye and I discuss the design and controls of the Lumix G9; if you prefer to listen while browsing my results and samples, you’ll find a longer audio version below it. Note in the video I comment that the charger uses a Micro USB cable that’s different from the USB 3 port on the camera; I’ve since confirmed one half of a USB 3 port can be used with a normal Micro USB cable, so it is possible to use the cable supplied with the charger to connect to the G9 and charge or power it. I’ve also confirmed that it is possible to power the G9 over USB (and you can use the supplied AC adapter and cable to do it), but there needs to be a battery fitted, it needs to have some charge already in it, and you need ‘USB Power Supply’ enabled in the menus.
Check prices on the Panasonic Lumix G9 at Amazon, B&H, Adorama, or Wex. Alternatively get yourself a copy of my In Camera book or treat me to a coffee! Thanks!
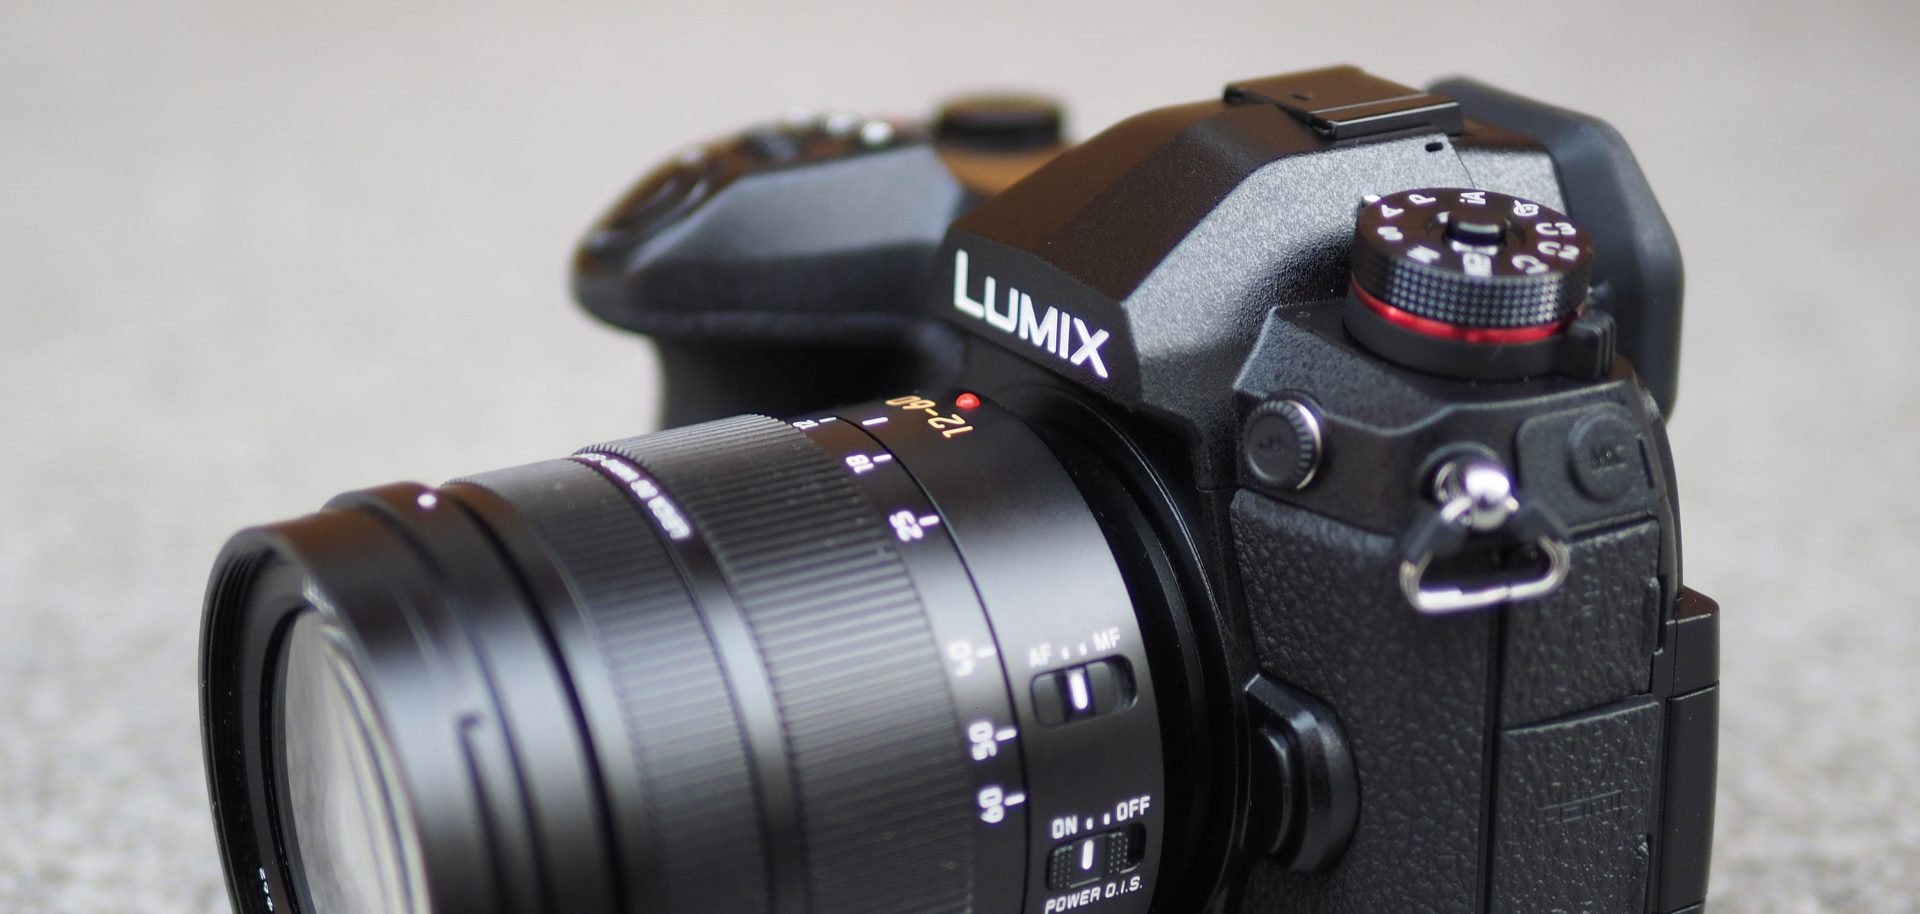
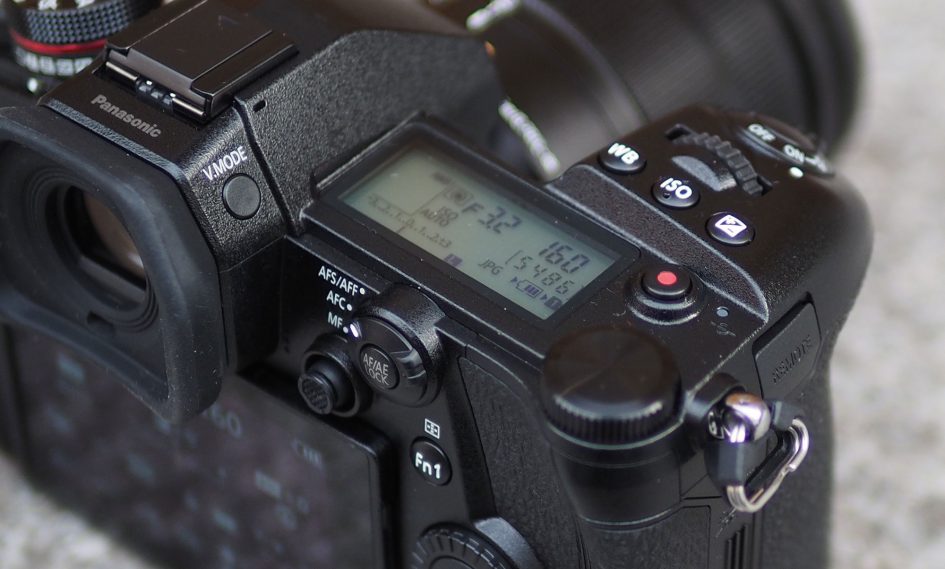
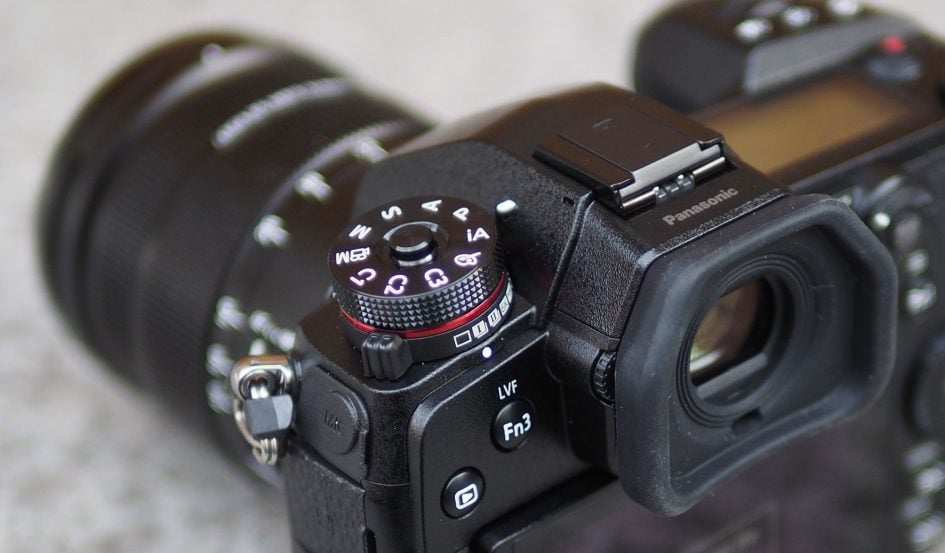
The Lumix G9 is a chunky, serious-looking camera that may share a great deal of design and control DNA with the Lumix GH5, but ends up having its own distinctive style. The viewfinder head features a defined ridge splitting it into two distinct surfaces, giving it a more angular appearance than the GH5’s smooth top. The main mode dial now sits atop the drive collar on the left side (as you hold the camera) and sports a red ring to denote the camera’s position as a flagship in Panasonic’s range. The newly-vacated upper right surface is now home to an LCD information panel, a standard offering on DSLRs of its class, but a rarity on mirrorless models and a first on a Lumix G body. The thumbwheel has been redesigned and positioned on the top surface to the side of the LCD panel, while the grip itself rises slightly above the top surface and employs a soft-touch shutter release with a power collar. These differences all add up to a camera that looks and feels quite different to the GH5, despite both sharing an almost identical control layout.
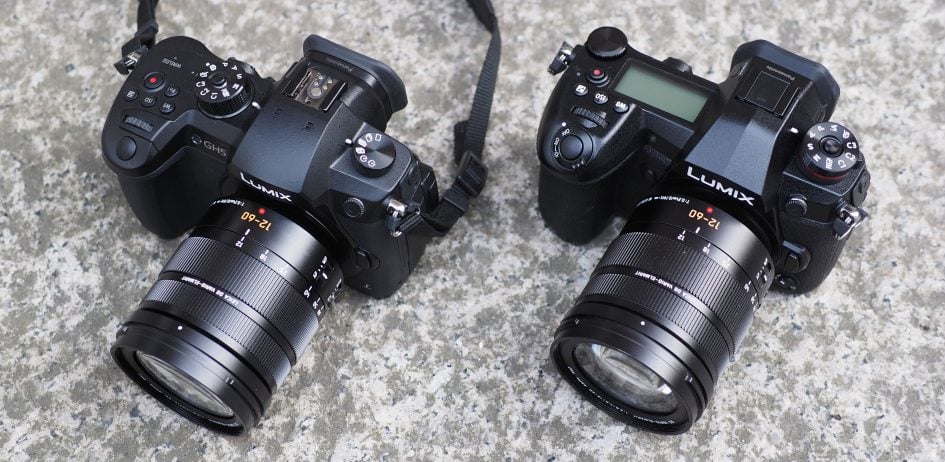
Above: Lumix GH5 (left) and Lumix G9 (right)
The design and position of controls is always a highly personal thing: I found the newly positioned rear wheel fell more comfortably below my thumb, but felt the AF joystick – like the GH5 – involved a bit of a stretch. The soft-touch shutter release is arguably inspired by higher-end DSLRs, as is the inclusion of an LCD information screen that’s backlit by a twist of the shutter collar. At first I found the shutter release was far too sensitive, accidentally taking shots as I tried to find the halfway position, but after a few days I got used to it and found it second nature – although hand it over to another photographer and they’ll almost certainly shoot-off a bunch of images without meaning to.
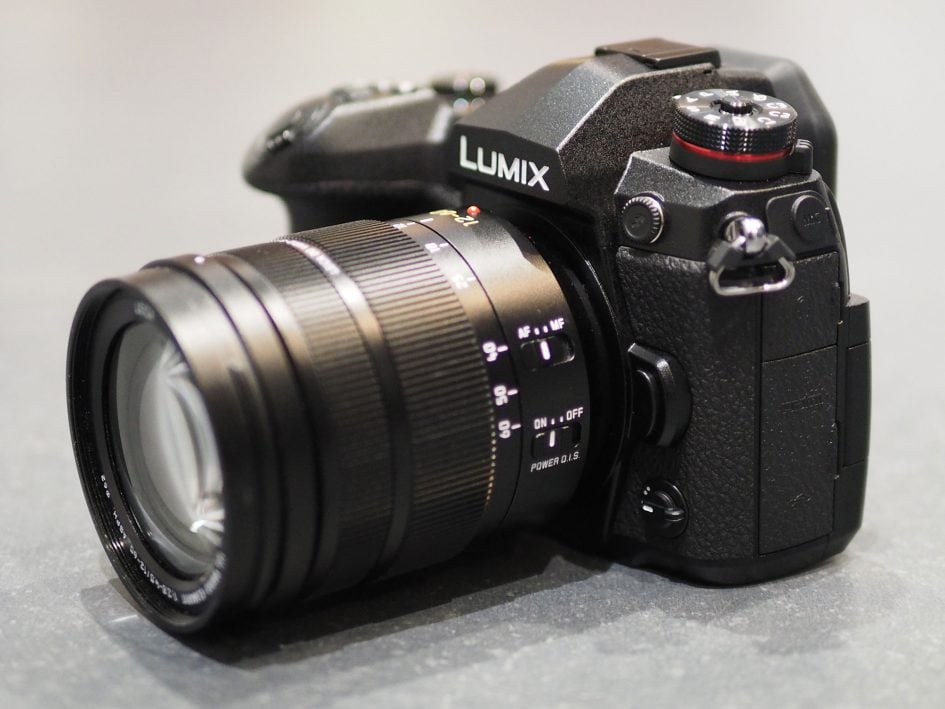
The body itself feels very solid and confident in your hands. I particularly liked the grip with its hooked inner ridge giving your fingertips some purchase – very reminiscent of Nikon ergonomics. Meanwhile the rear thumb rest is more pronounced than the GH5, allowing you to hold the camera securely. The overall build quality is to a very high standard and I’ve no doubts over Panasonic’s claims of weather-sealing having shot with the G9 in steady drizzle on several occasions.
There’s plenty of customization with three dedicated function buttons on the rear, two more on the front, five soft keys on-screen, and the chance to reconfigure the tilting function of the rear wheel and the AF joystick; indeed 19 in all, and it’s also possible to assign different functions to four of them during playback.
New to the G9 is a lever to the lower left side of the lens mount as you hold the camera, that can also be configured to one of 16 functions; I had it set to switch the camera into its night mode where all text was presented as red on black to preserve night vision. Very considerate although I’d still have preferred backlit buttons like Nikon’s higher-end DSLRs.
It’s also possible to customize the on-screen Q.Menu for quick access to your most common settings, as well as setting up a customized My menu page. There’s also three Custom modes on the dial.
In terms of composition you have the choice of a very large and detailed electronic viewfinder or a fully-articulated 3in touchscreen. The viewfinder is a real treat, employing a high resolution quad VGA OLED panel boasting 3680k dots or 1280×960 resolution, and an industry-leading magnification of 0.83x – that’s comfortably larger than any of its rivals. So large in fact that Panasonic provides a dedicated button on the side of the head to cycle through lower magnifications of 0.77x and 0.7x if preferred. Further enhancing the experience is the fact the native photo shape of 4:3 on Micro Four Thirds matches the viewfinder panel, allowing images to fill it in composition or playback; it really is an immersive experience. Note it’s possible to adjust the viewfinder refresh rate between 60 and 120fps and while the latter is preferred when panning, the display resolution on my sample reduced a little; as such I tended to leave the G9 viewfinder at 60fps.
Meanwhile the screen, like the GH5, is hinged at the side, allowing you to flip it out to almost any angle including facing-forward for pieces to camera or back on itself for protection. Like earlier Lumix cameras, the touch-screen interface is very well implemented. You can of course tap to reposition the AF area quickly and easily either for stills or to pull-focus in video.
The screen can also be set as a Touchpad, allowing you to adjust the position of the AF area by touch while composing through the viewfinder; something that works surprisingly well, although made somewhat redundant by the presence of an AF joystick. In use the Touchpad option did at least feel very responsive unlike the often sluggish performance of rivals, although I did miss the option of other cameras to reduce the active area of the screen to minimise accidental taps by your nose. To fix this you could simply flip the screen out, or again disable the Touchpad and use the joystick instead.
In addition you can tap your way through the super-imposed Q-Menu or navigate throughout the entire paged menu system by touch. If preferred you can use the cross-keys and centre button to navigate and select, but I’m pleased to report the touch interface works a treat and ended up being my preferred way of adjusting and selecting. Panasonic also cleverly uses the touchscreen to let you drag a live histogram around the screen to avoid getting in the way, or drag guidelines by handles to your preferred position, and there’s also the soft on-screen function keys mentioned above, exploited particularly well during the movie mode to make silent adjustments. Suffice it to say you can swipe through images in playback, pinch-to-zoom and also select the plane of sharpness in the 4k / 6k Post Focus modes. Overall it’s one of the best touch experiences around.
The screen itself employs a 3:2 shaped / 1040k dot LCD panel, slightly smaller than the panel on the GH5 but still very usable. The 3:2 aspect ratio means images shot or played back in the native 4:3 aspect ratio are displayed with thin black bars on the left and ride sides. This means the active image size is smaller than when displaying 3:2 images.
On the left side of the body behind a large flap you’ll find a USB 3 port and full-size HDMI port, the latter able to output 4k in 4:2:2 8 bit at up to 30p; if you want 10 bit internal or external, you’ll need the GH5. As for the USB port, I’ve no complaints over the speed of USB 3, and also appreciate the ability to finally charge and power the camera over USB, but perhaps a USB-C port (as used on the GH5) would have been more appropriate going forward than an older style USB-3 connection. On the upside, Panasonic does supply tethering software.
Above these and behind its own flap is a 3.5mm headphone jack, and above this, again behind its own flap, is a 3.5mm microphone input; the mic input is positioned sufficiently high on the side of the body that neither it nor the flap should obstruct the screen as it’s flipped out and around.
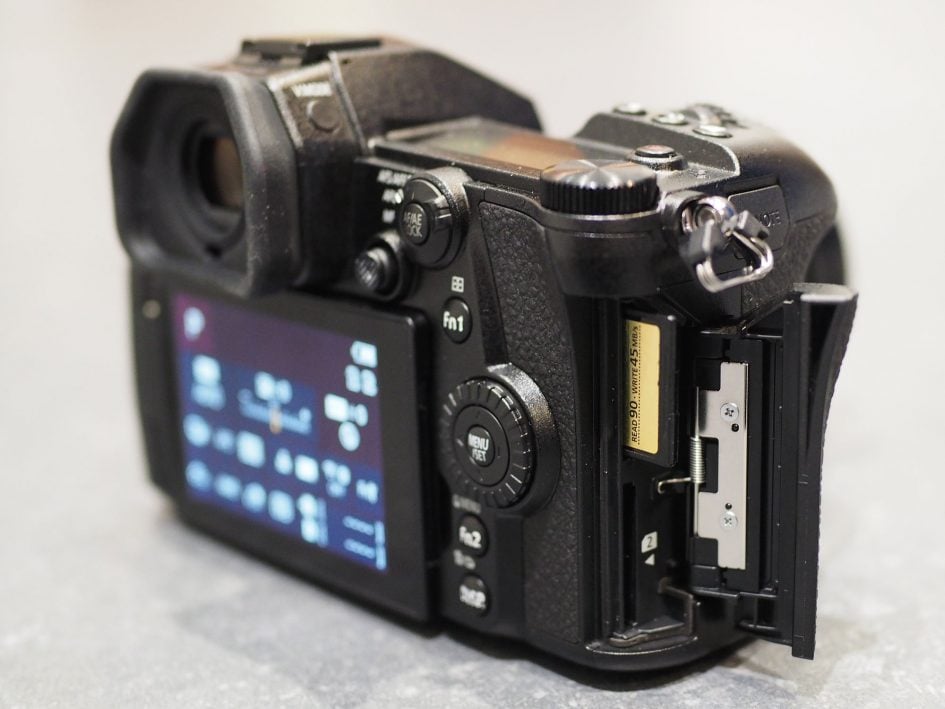
Like the GH5, the G9 sports twin SD memory slots and I’m pleased to report both will exploit the speed of UHS-II cards. You can configure these for Relay recording (where slot 2 takes over as soon as the card in slot one fills up), Backup (where the same data is recorded to both cards), and Allocation recording where you can configure the camera to save JPEGs, RAW files, movies or 6k/4k Photo files to whichever slot you want. I’ll go into more detail later in the review, but in my tests both slots indeed appeared to be the same speed, allowing the same burst depth and buffer-write times, although when they were configured to Backup with both writing simultaneously, the buffer depth did reduce in my tests; more later.
In terms of wireless, the G9 is equipped with Wifi and Bluetooth, the latter effectively making NFC on previous models redundant. I used both Wifi and Bluetooth extensively in my time with the G9, the former for image transfer and remote control, and the latter for seamless geo-tagging of images; I’ll provide more detail in a separate section later.
In terms of power the G9 is powered by the DMW-BLF19E, a beefy 1860mAh Lithium Ion pack that’s good for around 400 images under CIPA conditions but which can actually last a lot longer depending on how you’re shooting. I spent several long days shooting large bursts with the G9 using a combination of mechanical and electronic shutters and found I could easily double the total frame count.
If you’re into video, you’ll be pleased to hear the G9 battery lasted almost two and a half hours in my tests, capturing four consecutive half hour 4k / 24p clips, followed by one lasting 22 minutes before expiring. Like Olympus and Sony with their latest bodies, I feel battery life on mirrorless cameras is steadily becoming less and less of an issue; certainly I never felt held back or concerned by the battery life of the G9, and as noted earlier, it’s now possible to charge and power the camera over USB.
Yes, you read that right: charge and power, the latter something that I’ve previously only seen on Sony cameras. Connect a suitable USB source, be it the supplied AC adapter, a portable battery or a laptop port (I tried all three), and you can charge the battery in-camera. Switch the camera on with a USB source connected and you can externally power the camera from it too. Note for this to work, you’ll need to have some charge in the camera’s battery as well as having ‘USB Power Supply’ enabled in the menus.
You’ll know when USB power is working as the G9 displays a plug icon next to the battery meter and also warns you it won’t be charging the battery while the camera’s switched on. Oh one final note: the G9 may employ a USB-3 port with two-sections, but one half of this works as a standard Micro USB 2 port, allowing you to use standard USB cables for charging. When it comes to tethering with your laptop though, it’s better to use a proper USB 3 cable to exploit its faster speed.
Panasonic offers tethering software for Windows and Mac systems, designed to work with the Lumix GH5, G9 and GH5S over a USB cable; there’s no Wifi option for laptop tethering, although if you do require wireless control of the camera, Panasonic offers the powerful Image App for iOS and Android devices which I’ve devoted a section to later in the review. I tried Lumix Tether version 1.2 on my 13in MacBook Pro, with the G9 connected using a USB 3 cable to maximize the potential speed.
Once connected, you’re presented with a control panel that provides access to the shutter speed and aperture (so long as the camera’s mode dial is set to a mode that allows adjustments), white balance, ISO, exposure compensation, image resolution, RAW / JPEG mode, AF mode, Photo Style, metering mode and white balance adjust. Drive mode, movie quality, focus mode and manual colour temperature are displayed, but greyed-out from remote adjustments. It’s possible to change the exposure, drive and focus modes using the physical controls on the camera and see them reflected in the tethering software without having to restart or refresh it; for example if you want to change the aperture remotely, you’ll need to set the camera’s mode dial to Manual or Aperture Priority, otherwise it’ll be greyed-out.
Three large buttons at the top allow you to take a photo, start or stop a video, and provide AF/ AE locking. Photos and video can be set to record to the camera’s SD card and or the computer’s memory, although in the case of video, the file is copied to the computer after the recording’s finished – and you’re prompted to see if this is really what you want.
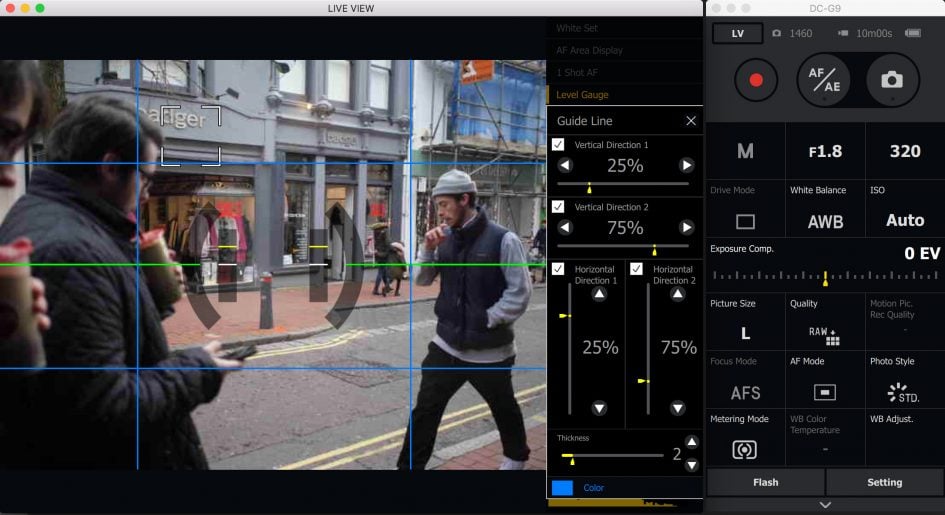
Another button enters Live View mode, presenting a live image of what the camera can see. There’s a wealth of graphics you can overlay and customize, including a histogram, choice of grids, leveling gauge, and adjustable guide lines.
If the camera’s focusing mode is set to Manual, you can remotely focus the lens with a choice of increments, as well as magnifying a small portion from three to six times with additional focus peaking for assistance. In my tests the live image wasn’t as high resolution as some other tethering solutions I’ve tried, but it was certainly responsive over a USB 3 connection, updating smoothly in real-time with no visible delay. Going forward I’d like to see the option of a higher resolution display, even if it incurs a slower refresh, as well as a Wifi option, again even if there’s an additional hit on performance. But otherwise the Lumix Tether program is a useful addition to the package, especially for studio shooters.
Panasonic Lumix G9 lenses and stabilisation
The Panasonic Lumix G9 employs a Micro Four Thirds sensor and lens mount which, like all Lumix G models before it (along with all Olympus PEN and OMD cameras), results in a field reduction of two times relative to full-frame systems. So a 25mm lens delivers an equivalent field of view to 50mm on full-frame, and the effective depth of field compared to full-frame is also reduced by two times, so f1.4 will deliver a depth of field equivalent to f2.8 on full-frame.
The Micro Four Thirds mount gives the Lumix G9 access to the broadest and most established native lens catalogue of all the mirrorless camera systems, with multiple options available at every focal length. At the time of writing, Micro Four Thirds had over 75 lenses available from Panasonic and Olympus along with third parties including Sigma, Tamron, Samyang, Voigtlander and others. So while many rival mirror-less formats are only now beginning to cover most bases with a single lens, Micro Four Thirds typically has two or more options available. Whether it’s Fisheye, ultra wide, fast aperture, macro, super-zoom or good old general-purpose, the Micro Four Thirds catalogue has it covered, and many of them are great quality too – find out more in my Micro Four Thirds lens guide.
The Lumix G9 is typically sold body-alone or with the recent Leica DG Vario Elmarit 12-60mm f2.8-4 zoom which offers a generous range equivalent to 24-120mm and a brighter focal ratio than typical f3.5-5.6 models. This lens, like most Lumix kit zooms, includes optical image stabilisation, but also supports Dual IS which means it can work alongside the built-in stabilisation of the body to deliver superior results. It also claims weather-sealing, although without a rubber seal at the mount, it may not be as resistant as higher-end options. But back to its coverage which takes you from fairly wide-angle to respectable telephoto, covering most bases in a compact package.
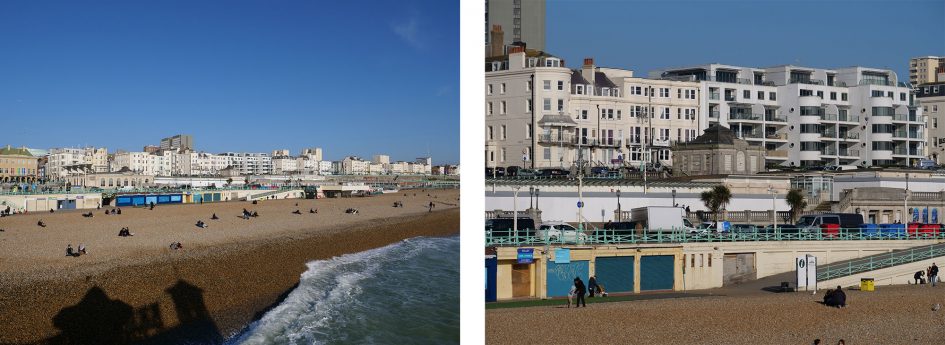
Above: Leica 12-60mm coverage
The f2.8-4 focal ratio is a brighter than a typical kit zoom and if you zoom it to 60mm, you’ll be able to achieve some blurring in the background. But if you want a really shallow depth-of-field, I’d recommend going for a prime at f1.8 or faster still. Here’s an example of the maximum blurring you can expect at 60mm f4.
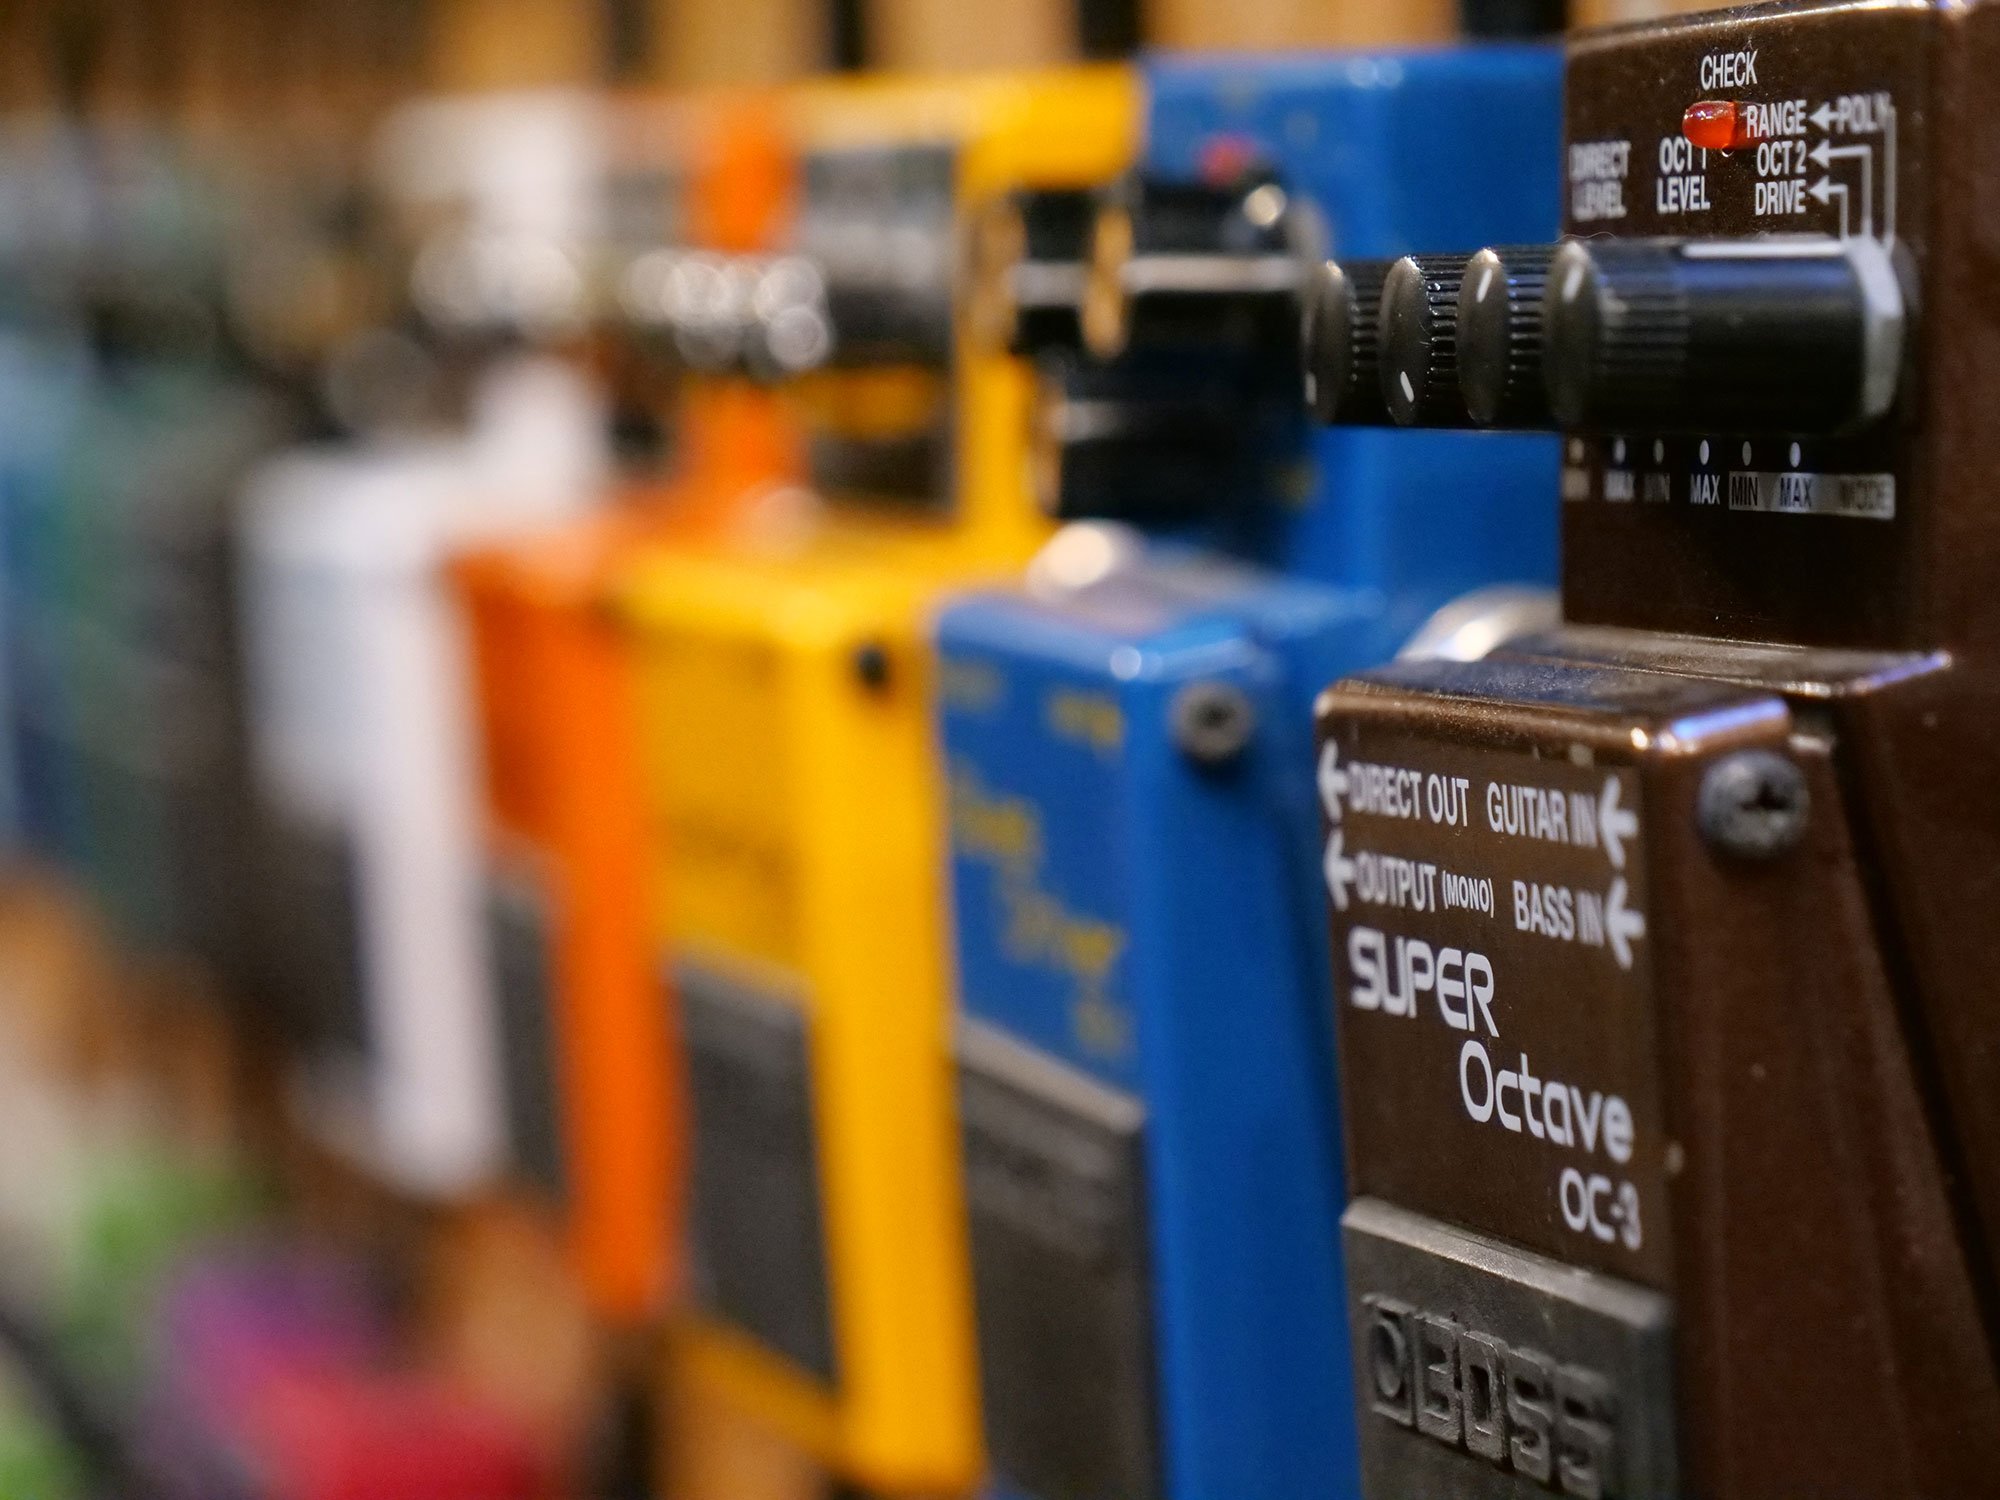
Above: Leica 12-60mm at 60mm f4
The Lumix G9 features built-in five-axis stabilisation which shifts the sensor to reduce camera-shake with any lens you attach, new or old, native or adapted. If you’re using one of Panasonic’s own Lumix G lenses that supports Dual IS 2, then the optical stabilisation in the lens can work alongside the sensor-shift system in the body to deliver even greater compensation. Panasonic’s steadily improved its stabilisation on every generation and claims the G9 is its best yet, boasting 6.5 stops when coupled with a Dual IS 2 lens. Dual IS 2 lenses include the Leica (and Lumix G) versions of the 12-60mm zoom, the Leica 200mm f2.8 telephoto, and recent upgraded versions of models like the 100-300mm. Meanwhile other lenses, including the Leica 100-400mm super-telephoto zoom, have received firmware updates to support Dual IS 2 – check the Panasonic support pages to see if there’s a firmware update for any Lumix lenses you own, although obviously they need to have optical OIS stabilisation in the first place.
To put Dual IS 2 to the test I fitted the Leica 12-60mm zoom to the G9, zoomed it to 60mm for a 120mm equivalent field of view, then took shots starting with a shutter speed of 1/125, reducing them one stop at a time until I reached one second. I performed the test twice, first without stabilisation enabled and secondly with it enabled; note if the lens supports Dual IS, you’ll see a ‘Dual’ icon in the corner of the screen or viewfinder, although there’s no visual identification between Dual IS and Dual IS 2. As with all stabilised systems, you should half-press the shutter and wait a second or so for the compensation to attain its maximum effectiveness. You’ll hear the stabilisation whirring faintly in the background at all times.
On the conditions of the day, I needed a shutter speed of 1/125 to handhold the lens without stabilisation and enjoy a sharp result. With stabilisation enabled, I achieved the same result at 1/15 and found my 1/8 result was almost perfect. I’ve presented 100% crops from both versions shot at 1/8 below for comparison. A shutter of 1/15 represents three stops, and 1/8 represents four stops, so a respectable result for the G9 when working with a Dual IS compatible lens, although interestingly not quite as good as when I tested the GH5.

Above: Leica 12-60mm at 60mm (120mm equivalent) and 1/8. 100% crops without and with Dual IS 2 stabilisation.
At the other end of the spectrum, I tested the new Leica 200mm f2.8 lens fitted with its supplied 1.4x tele-converter for a 560mm equivalent field of view; this is a Dual IS 2 compatible lens. With stabilisation disabled, I required a shutter speed of 1/500 to ensure a crisp result. With Dual IS 2 enabled, I could achieve the same result at 1/125 and an almost perfect one at 1/60, representing two to three stops of compensation. I should however add the results at 1/30, 1/15 and even 1/8 were pretty good, just not completely sharp. Again a lower result than I expected, but still very useful.

Above: Leica 200mm plus 1.4x teleconverter at 560mm equivalent and 1/60. 100% crops without and with Dual IS 2 stabilisation.
Here’s a couple of real-life examples of how decent stabilisation can help you grab shots handheld either in very low light or to deliberately blur portions of the frame.

Above: here’s a shot I took with the Leica 12-60mm at 12mm using a deliberately slow shutter speed to blur the waterfall. Thanks to Dual IS, I managed to handhold this without having to worry about using a tripod.

Above: Here’s an example where I managed to handhold sharp images with the Leica 200mm on the G9 during a night game drive at shutter speeds as low as 1/15. Considering I’d normally need over 1/400 to handhold 400mm equivalent without shake, being able to do this at 1/15 represents around five stops of compensation.
Stabilisation is also invaluable for video, so here’s two handheld clips I filmed with the Leica 12-60mm at 12mm, and the Leica 200mm, both on the G9.
Above: Download the original file (Registered members of Vimeo only).
Above: Download the original file (Registered members of Vimeo only).
But for me where it really starts to get interesting is when fitting a lens without any optical stabilisation at all, such as one of the many fabulous prime lenses available in the Micro Four Thirds system. Mount one of these and the stabilisation will be body-based alone, allowing us to see exactly how well the G9 is compensating for wobbles by itself, especially compared to Olympus models.
To put this to the test I fitted the Olympus 75mm f1.8 prime lens which has an equivalent field of view of 150mm. With stabilisation disabled, I needed a shutter speed of 1/160 to successfully handhold it without camera shake, but with the body-based stabilisation enabled, I achieved a similar result at 1/5. This represents around five stops of compensation which is an excellent result that essentially matches what I achieved with the Olympus OMD EM1 Mark II. Below are 100% crops taken from the 1/5 second images without and with stabilisation.

Above: Lumix G9 with Olympus 75mm at 1/5. Left without body IS, right with body IS. Both 100% crops
It’s important to note most stabilisation tests, including my own, are subject to a degree of experimental error and inconsistency, so I can’t say Dual IS isn’t as good as the body-based system working alone. But what I can say without a doubt is the G9’s built-in sensor shift stabilisation works a treat with unstabilised lenses during composition and recording, and in my tests matched what I measured on the flagship Olympus body. This is a great result for Panasonic which has finally caught up with its big rival in this regard.
Panasonic Lumix G9 shooting experience
The Lumix G9 is a fast and confident camera that’s designed to shoot action, so in this section I’ll discuss the autofocus and continuous shooting performance, along with overall handling and shooting options. I’ll start with a video report that covers the essentials, after which I’ll provide more detail in some specific areas.
Check prices on the Panasonic Lumix G9 at Amazon, B&H, Adorama, or Wex. Alternatively get yourself a copy of my In Camera book or treat me to a coffee! Thanks!
The Lumix G9’s lockable exposure dial offers the usual PASM modes, along with Creative Movie mode (unlocking all the video options), three Custom banks, Creative (with the choice of 22 effects) and the foolproof Intelligent Auto. Eagle-eyed Lumix spotters will note there’s no Scene presets on the G9’s mode dial, which means it also lacks the in-camera panoramas of lower models in the range. That said, scene detection is deployed behind the scenes by Intelligent Auto to recognise and adapt for different conditions and subjects.
The Lumix G9 offers four shutter options: Mechanical (MSHTR), Electronic Front Curtain (EFC), Electronic (ESHTR), and Auto which chooses between them based on the desired shutter speed. The mechanical shutter employs a traditional physical shutter at the start and end of exposures with a range of 1/8000 to 60 seconds plus Bulb up to 30 minutes. Switch to EFC and the G9 employs an electronic first curtain to start the exposure and a mechanical shutter to end it; it’s a tad quieter and avoids the risk of shutter shock at certain speeds, but limits the fastest shutter speed to 1/2000.
Both the mechanical and EFC shutters are fairly quiet, but if you prefer – or need – complete silence, the electronic shutter operates silently and with the option of faster shutter speeds up to 1/32000, albeit with a shorter minimum speed of one second. Like most electronic shutters to date, the G9’s can suffer from some skewing or rolling artefacts so it’s best used when not panning or capturing subjects moving quickly across the frame. The electronic shutter does however unlock the G9’s fastest burst speeds that I’ll discuss later in this section. It’s also used in the high res composite mode, meaning it too inherits a one second longest exposure.
Long exposure enthusiasts will appreciate the 60 second option in the standard mechanical and EFC range, although I wish it either kept going further like recent Fujifilm bodies or offered preset Bulb timers. On the upside you can start and stop a Bulb exposure remotely using the smartphone app. This works from both the full remote control option over Wifi, or the simpler Bluetooth remote option which may not show a live image nor provide control over exposure, but consumes much less power. The Wifi remote starts and stops a Bulb exposure with a tap, while Bluetooth version has a simple large shutter button with a sliding lock. Both work well, although in a missed opportunity the actual exposure time so far isn’t shown on either the camera or phone’s screen, so you’ll need a separate clock or timer for precise measurements.
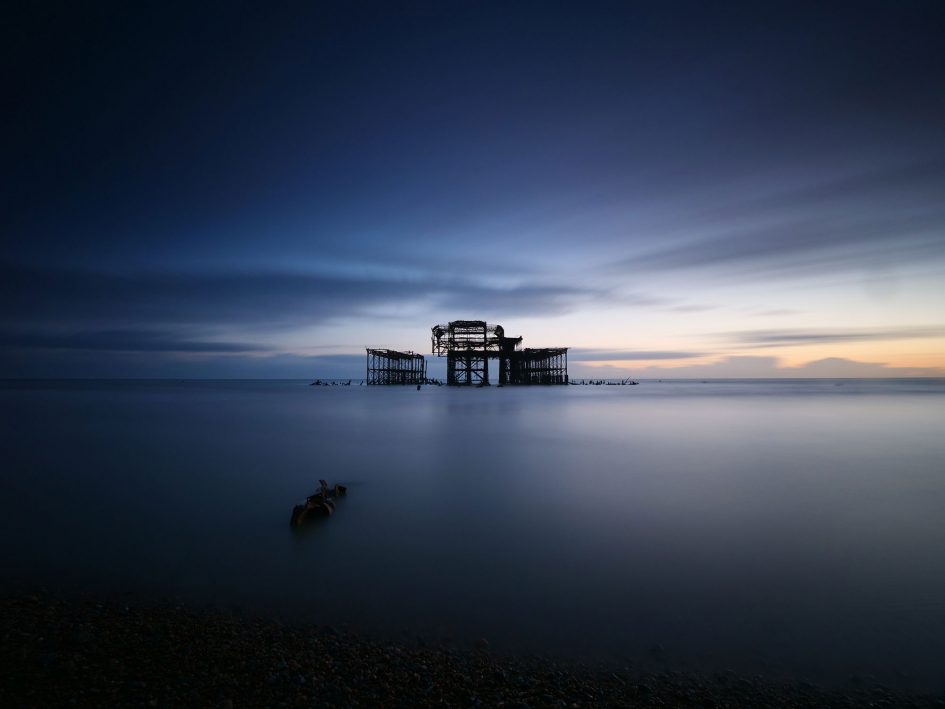
Above: A four minute exposure with the Lumix G9 and Leica DG 8-18mm fitted with Lee 10-stop and hard graduated filters. Long exposure noise reduction was disabled. I used the Bluetooth Remote Control on my phone to start and stop the exposure, but as noted above, there’s no indication of the actual exposure time either on the camera or the phone screen. Instead I needed to use my phone’s clock to time the exposure which is not as convenient, especially if you don’t have seconds displayed.
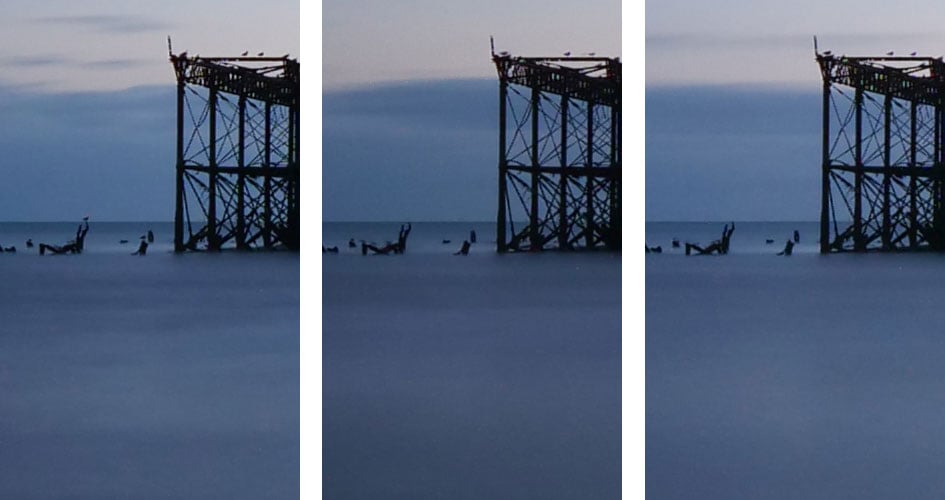
Above: 100% crops from long exposures of (from left to right) 50, 122 and 241 seconds. All were taken at 200 ISO with the same ND filters and with long exposure noise reduction disabled. I was able to balance the exposure by adjusting the aperture and simply exploiting the fact it was getting progressively darker as the evening progressed. Even without noise reduction, the Lumix G9 is delivering very clean images virtually bereft of artefacts, at least at 200 ISO. I found just one mildly ‘hot’ pixel on the 241 second shot, but it was quite discreet and easily retouched. A good result for the relatively small sensor, although again the experience for LE enthusiasts could be greatly enhanced with an on-screen timer.
Bracketing is available for exposure, aperture, focus and white balance. Exposure bracketing is offered in three, five or seven frames up to 1 EV apart, and you can change the sequence as well as triggering them in a burst or one at a time; the latter allows you to trigger the entire burst hands-free with the self-timer. If you’re recording in JPEG only, the G9 unlocks its in-camera HDR option which captures three frames at 1, 2 or 3EV intervals before compositing them into a single file.
Focus bracketing captures up to 999 frames at steps of one to ten, although unlike Olympus there’s no in-camera focus-stacking with the full res images. You’ll either need to employ separate software, like Helicon focus, or deploy the 4k / 6k Post Focus stacking option I demonstrated in the video and will describe later.
The sensitivity runs between 200 and 25600 ISO in single or one third EV increments, with an extended option allowing a lower 100 ISO option. Auto ISO is available with the option to set an upper and lower limit, along with a minimum shutter speed down to one second.
With the mode dial set to Creative you can choose from 22 effects on-screen with a preview of how they’ll look applied to the live image. Here’s a selection. Note it’s also possible to apply some of the effects to movies which are then encoded at the selected video size up to 1080 / 50p / 60p. I have an example of the miniature effect in my movie section later.

Above left: Impressive Art effect. Above right: Sunshine effect
Above left: Retro effect. Above right: Toy effect
Above left: Rough Monochrome effect. Above right: Silky Monochrome effect

Above: Lumix G9 using Impressive Art effect
Above: Lumix G9 using L Mono effect
Panasonic Lumix G9 drive modes
Under the exposure mode dial is a dedicated collar to switch between the various drive modes: single, burst shot 1 and burst shot 2 (both configurable in the menus), 6K Photo, Post Focus, Self Timer and Interval Timer.
Each of the burst shooting positions can be configured between Low, Medium and High speed, and if you’re using the electronic shutter, additional super-high options of SH1, SH2, SH1 PRE or SH2 PRE. The actual speed and function of each varies on whether you’re using the mechanical or electronic shutter, and whether the focus is set to single or continuous. This results in a bewildering array of speeds and numbers, but I’d encourage you to spend some time trying them all out as if you’re like me, you’ll end up finding two favourites and simply assign them to the two burst positions on the drive dial.
To make things easier here, I’ll just discuss the High speed and faster. If you’re using the mechanical shutter, the G9 actually shares the same top speeds as the GH5: 12fps with single autofocus and slightly delayed feedback, or 9fps with continuous autofocus and live view. The buffer’s huge too: when set to Single AF / High speed burst, I fired-off 514 JPEGs in in 49.43 seconds for a rate of 10.4fps and the camera seemed happy to continue. Set to RAW, I captured 82 frames in 7.93 seconds for a speed of 10.3fps before it slowed down. When fitted with a fast UHS-II card, the G9 took around 18 seconds to complete writing the burst of 82 RAW frames (although some were written during the capture process too).
The G9 is equipped with dual SD slots, which both claim to support the full speed of UHS-II cards, but I never take anything for granted so repeated my tests with the card in Slot-2. I’m pleased to report the effective buffer size, frame rate and final write times remained essentially the same as using Slot-1. I then tried configuring both slots for Backup, where the same data would be written to both cards. With two identical UHS-II cards fitted in the G9, I managed to capture 76 RAW frames in 7.26 seconds for a speed of 10.4fps. I repeated the tests with single and dual cards and while the total number of RAW frames varied by a couple, the total with one card was consistently a tad higher. I’m only talking an average of 84 frames versus 77 frames, but it did appear a consistent difference. Note the speed however remained exactly the same.
Interestingly in my Single AF tests, the G9 consistently delivered 10.4fps using the mechanical shutter, falling a little shy of the quoted 12fps in the specs. Switching to continuous AF with the mechanical shutter though delivered the quoted 9fps in practice. When I switched to the electronic shutter with continuous AF, I generally managed between 16 and 20fps in practice.
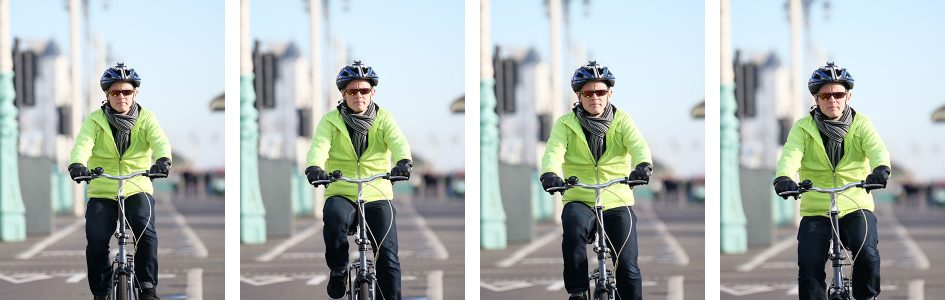
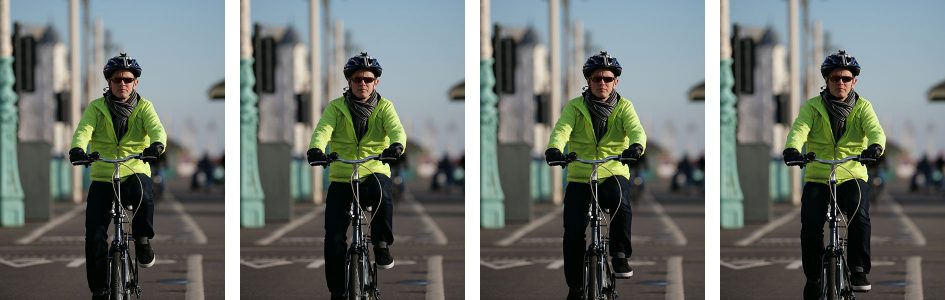
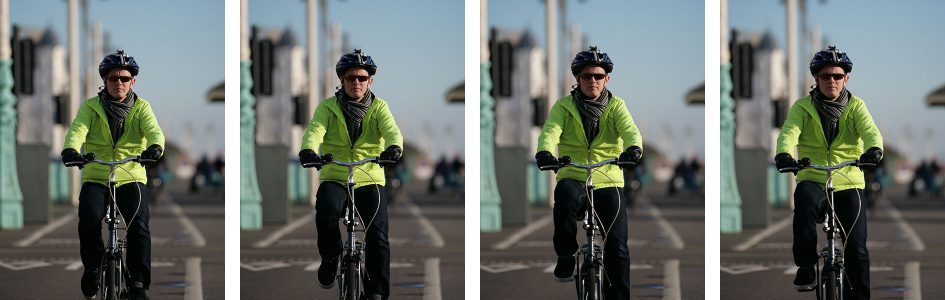
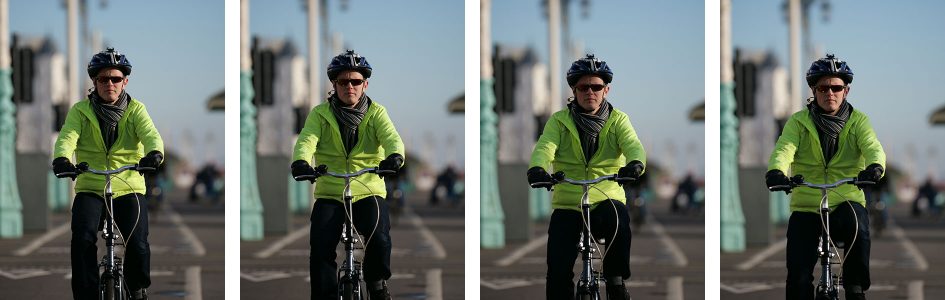
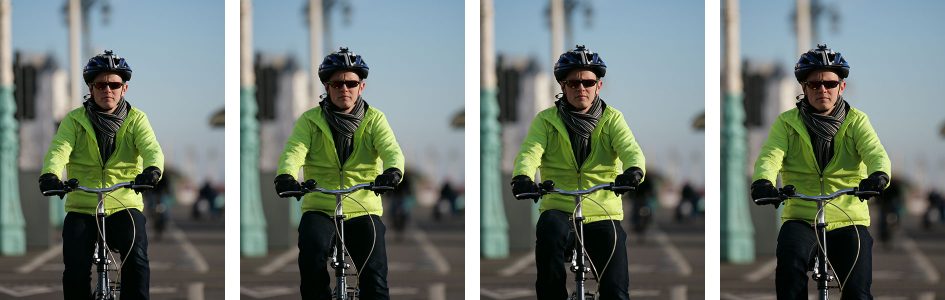
So how does it add up in real-life? I took to the streets of Brighton and photographed my friend Ben cycling towards me using the G9 fitted with the Leica 200mm f2.8 – opened wide to f2.8 of course. In terms of autofocus, the G9 still employs a 100% contrast-based system, albeit powered by Panasonic’s latest Depth by Defocus (DFD) technology. This profiles the blurred characteristics of Panasonic’s Lumix and Leica lenses to better predict what direction they need to focus in and by how much. This is coupled with an AF drive that, with the latest lenses, can operate at 480fps. In short, the G9 still needs to overshoot and pull-back in order to find the actual point of focus, but can do it faster and more predictably than ever.
In practice this rapid focus hunting makes for a slightly odd view with a mild wobbling or fluttering appearance that’s unlike rival phase-detect AF systems in operation; the G9 is literally checking the focus for every shot. The first few times you experience it in action, you can’t help but think the camera’s struggling, but once you check your images afterwards, you’ll find a very high hit-rate. Take this first sequence of Ben, captured with the mechanical shutter at 9fps where of the 16 consecutive frames, all of them are sharp. A couple may not quite be as good as the rest, but I’d still class them as being more than satisfactory.
Lumix G9 burst sequence: H speed, mechanical shutter, 9fps, Leica 200mm at f2.8

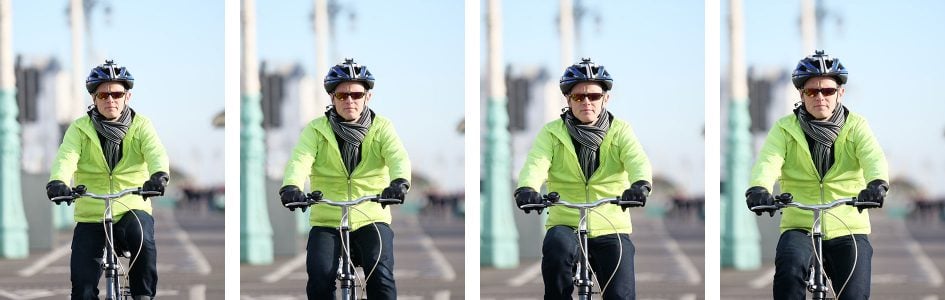

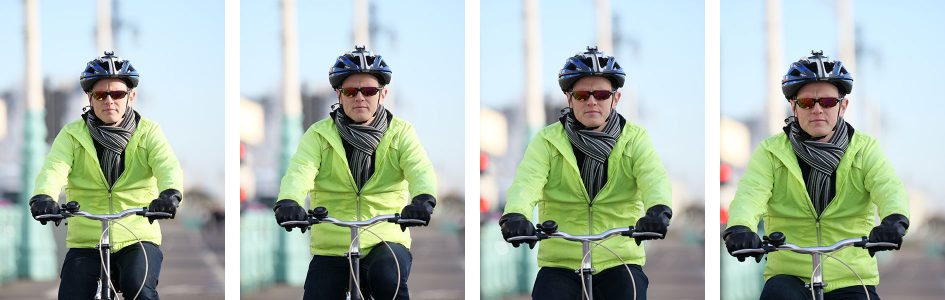


Of course the earlier GH5 could also shoot at 9fps with continuous AF using its mechanical shutter. What makes the G9 special compared to the GH5 is the ability to shoot with the electronic shutter at even faster speeds while maintaining continuous AF if desired. There’s four Super High speeds to talk about: SH1, SH2, SH1 PRE and SH2 PRE. All are limited to 50 frames per burst, but these can still include RAW files if desired.
When set to SH1 speed, the G9 fires at 20fps with single or continuous autofocus; when set to SH2 speed, it’ll accelerate to 60fps, but only for single autofocus. At 20fps, those 50 frames represent two and a half seconds of action, while at 60fps, you’ll burn through them in just 0.8 seconds.
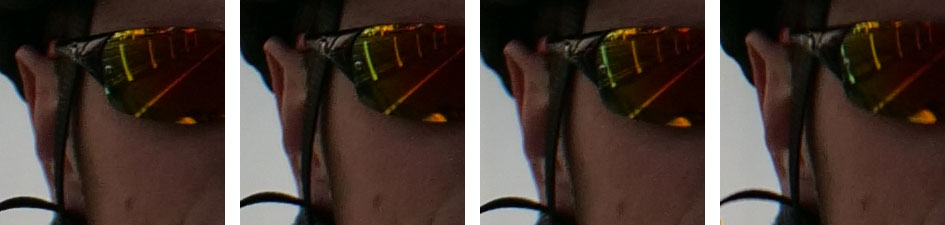
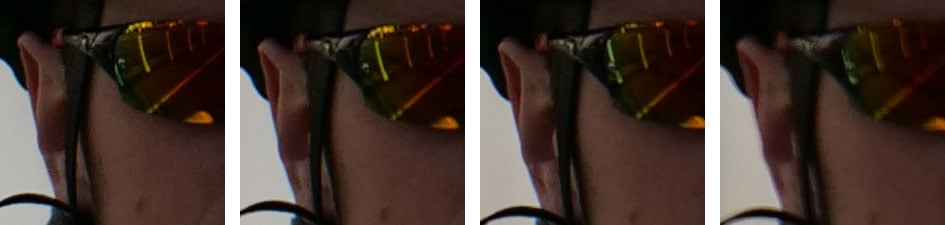
So back to Ben on his bike, again with the 200mm f2.8 at f2.8 but this time using SH1 (20fps) with continuous AF. As noted earlier, the actual frame rate I achieved often fell between 16 and 20fps, but again the hit rate was high. The only gotcha is the maximum burst size of 50 frames, resulting in just two and a half second’s worth of action at 20fps – so choose your starting point carefully.
In the sequence below, where I’ve again picked out 16 consecutive frames, I’d say only one is off and two are a little soft but still usable. So the G9 really can capture action at fast speeds with a high hit rate – it’s just that the fluttering display while you’re shooting looks slightly unfamiliar compared to more traditional solutions. I think you’d get used to it though.
A brief note on autofocus areas: I found a single AF area most reliable when shooting predictable cycling, or a small zone using Custom Multi when shooting less predictable subjects like birds in flight. When my subjects were fairly predictable, I found I could achieve a good hit rate using Olympus lenses (which don’t benefit from DFD profiling), but as the action got faster or less predictable, Panasonic’s own Lumix G or Leica DG lenses (which are profiled for DFD) proved more successful.
Lumix G9 burst sequence: SH speed, electronic shutter, 20fps, Leica 200mm at f2.8


Clever buffering also allows the additional SH1 PRE and SH2 PRE modes to start recording a handful of rolling images as you half-press the shutter release; the most recent are then committed to memory as you fully push down, allowing you to capture a split second of prior action. This is great for capturing the moment someone strikes a ball or a bird takes off.
If the focus mode is set to continuous, both SH1 PRE and SH2 PRE operate at the same speed of 20fps. In both cases they’d capture 50 frames in total over two and a half seconds, pre-buffering around one quarter of a second’s worth of action. So in my tests I’d have a burst of 50 images, five of which were from before I pushed the shutter fully-down.
Set the autofocus mode to single and SH1 PRE stays at 20fps, but SH2 PRE accelerates to 60fps; these capture their 50 frame bursts in two and a half seconds and 0.8 seconds respectively. In my tests both modes again captured action starting a quarter of a second before I fully pushed-down on the shutter, but in the case of SH2 PRE working at 60fps, this devoted more of the 50 frame buffer to the pre-moments.
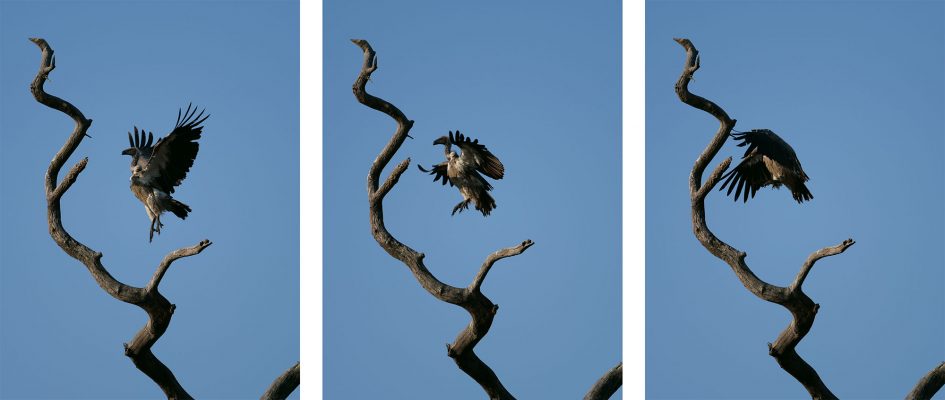
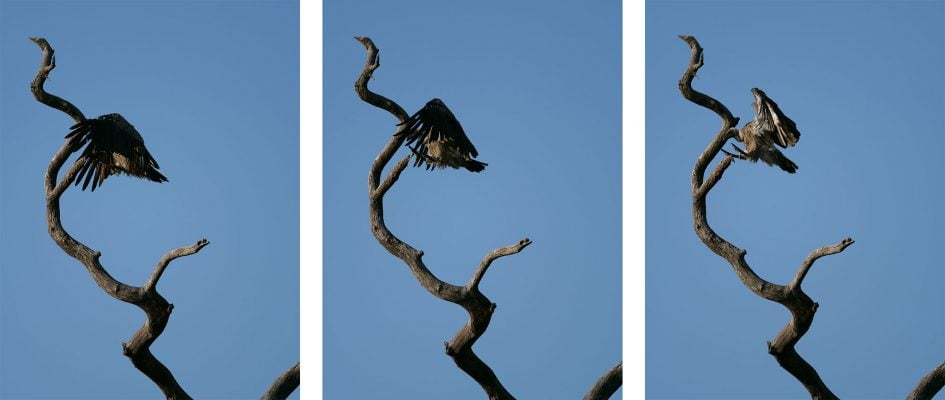
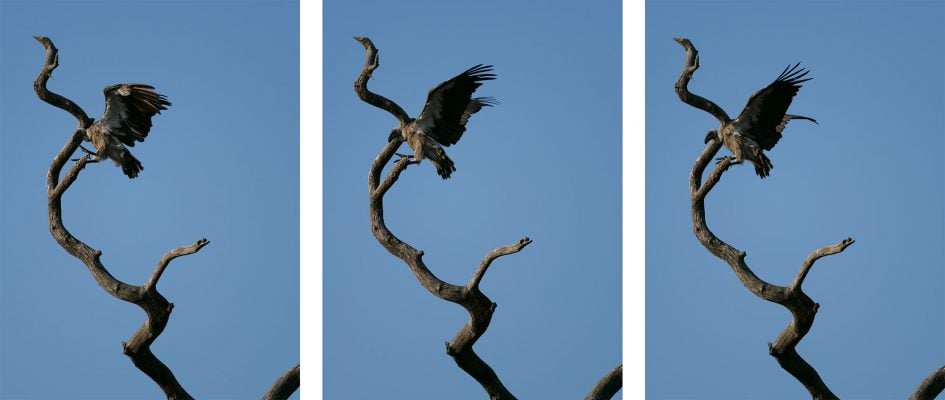
SH1 PRE and SH2 PRE are both useful, but you still have to be very careful with the timing. Depending on the mode and AF, the buffer will be full in just two and a half or 0.8 seconds, and you’ll only capture a quarter of a second prior to pushing the shutter button down. I found it most useful for very short periods of action like the moment a bird leaves the branch or a player makes contact with a ball; if you push down the instant you’re aware of the contact, you should have a few frames before and after, allowing you to capture the decisive moment. In the sequence below you can see how I used it to capture the moments a vulture hopped from one branch to another.
Lumix G9 SH1 PRE drive mode. Nine consecutive frames from longer sequence
The great thing about the SH modes is they record images at the full 20 Megapixel resolution, in RAW if desired, and with the camera’s full focusing speed. If you’re willing to reduce the resolution, shoot in JPEG and have slower focusing though, you can exploit the 6K and 4K Photo modes that can record for much longer periods, making them more appropriate for unpredictable or extended action sequences.
6K Photo, first seen on the GH5, takes the earlier 4K Photo concept to the next step in resolution. Like 4K Photo, it captures a video clip with the intention to grab still photos from it later in playback, using an easy shuttling interface; the difference is where 4K Photo extracted 8 Megapixel JPEGs, 6K Photo can extract 18 Megapixel JPEGs which are much more useful. 6K Photo on the G9 operates at up to 30fps, but if your subject demands something faster still, you can switch down to 4K Photo to access speeds up to 60fps. Note the capture speeds are fast, but the autofocus slows down considerably in 6K and 4K Photo modes, so it’s best suited for subjects that aren’t approaching or receding.
Extracted stills in the 6K and 4K Photo modes measure 4992×3744 and 3328×2496 pixels respectively in the 4:3 shape, or 5184×3456 and 3504×2336 pixels in 3:2. When set to 4K Photo, you can also record in 16:9 or 1:1 aspect ratios, but for 6K it’s just 4:3 or 3:2. Interestingly Panasonic says the 6K Photo stills are generated from original footage / images measuring 6000×3000 pixels, suggesting some interpolation and scaling takes place to generate the final image size and shape; 6000 pixels is also curiously wider than normal photos taken at the maximum native resolution. But whatever is going on behind the scenes, the bottom line is the real-life resolution of 6K Photos is comfortably higher than those recorded in the 4K Photo modes, so represent a significant upgrade in quality.
Beyond the improved resolution or frame rate, the modes are exactly the same as other recent Lumix G bodies. As such, there’s three options for 6K Photo: Burst (which records video while the shutter button is pressed), Burst S / S (which starts recording with one press and stops with another), and Pre-burst (which keeps a one-second rolling buffer to avoid unwieldy clips to store and go through). I ended up using the Pre mode more often than not. When you press the shutter in Pre-burst mode, the camera records two seconds worth of action: you get the second before you pressed the button and the second after. So if you press the button as soon as the action has just happened, you should have a frame that includes some part of it from a moment earlier.
When you play the capture back, you’re shown a still photo rather than a video clip, with the option to cycle through the frames quickly by pressing the left or right arrow keys. This makes it very easy to jog back and forth before selecting the perfect moment, after which a press of the Menu / Set button saves the frame as a new JPEG with 18 Megapixel resolution if you’re using 6K or 8 Megapixel if you’re using 4K. You still can’t save RAW files in the 6K / 4K Photo modes, but you can choose the aspect ratio prior to capture along with having full control over the focus, exposure mode, aperture, shutter and ISO.
The 6K Photo mode is great for capturing the perfect moment when faced with fast action, but it’s also surprisingly useful for portraits, especially of kids, where an expression can change between frames. I personally find the Pre Burst mode very useful for capturing birds taking off. Normally my reactions are too slow to capture the moment the bird first starts flapping its wings, but with Pre Burst I can push the shutter release and know I’ve recorded the previous second’s worth – enough for several decisive moments. Here’s an example which I took with the G9 in Pre-Burst mode using the Olympus 75mm f1.8 lens; I’ve saved three consecutive frames from the sequence.
 Above: Panasonic Lumix G9 with Olympus 75mm f1.8. 6K Photo Pre-Burst
Next there’s Post Focus, selected using a separate mode on the drive dial, which again exploits the ability of 6K video to record 30 relatively high resolution images every second. What makes it different from the 6K Photo modes though is during a short video clip the camera attempts to shift the focus between all the subjects in the frame, near and far. If successful, this short video clip essentially contains frames where any part of the composition is in focus, and it only took a few seconds to capture. The clever part is in playback where the camera lets you tap anywhere on the screen and the camera automatically selects the frame from the video where it’s in focus, offering focus-peaking to further help you make the choice. Like the 6K Photo modes, it then lets you export it as an 18 Megapixel JPEG.
In practice it works so transparently it almost feels like you’re working with a Light Field image. The initial process captures about two seconds of video while refocusing the lens, then takes a further three or four seconds to process it into an image you can navigate by touch. Once complete you simply tap the part of the image you’d like in-focus and it ‘magically’ becomes sharp – it’s a great party trick to impress your friends, although of course all you’re doing is using a clever media player to navigate a short video where the focus racked over the subjects from near to far.
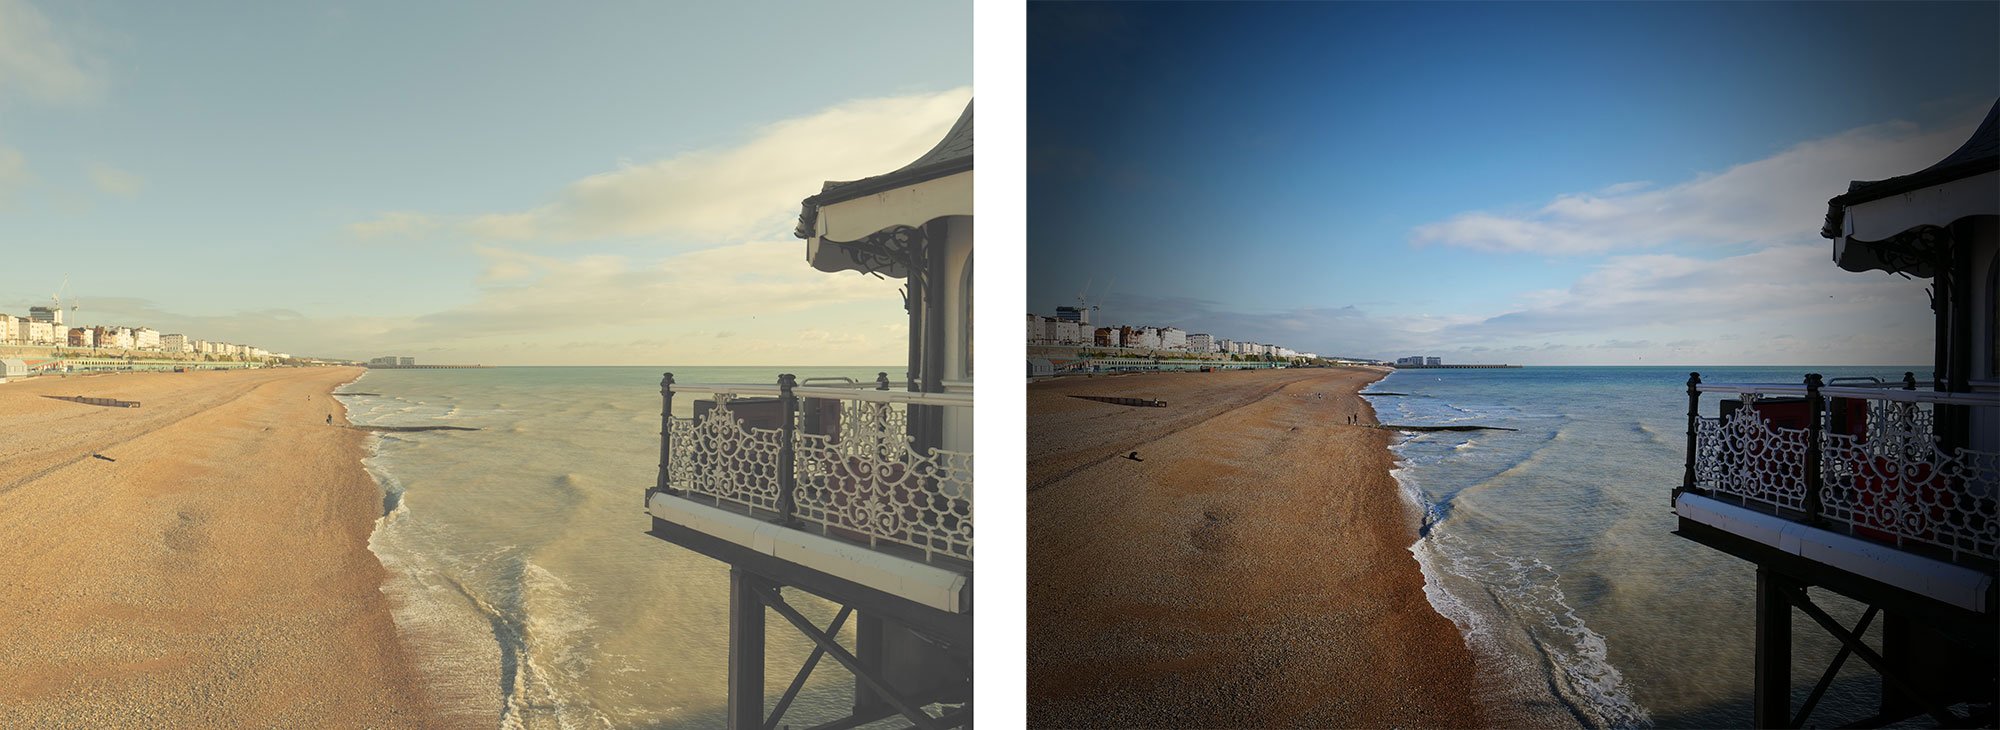
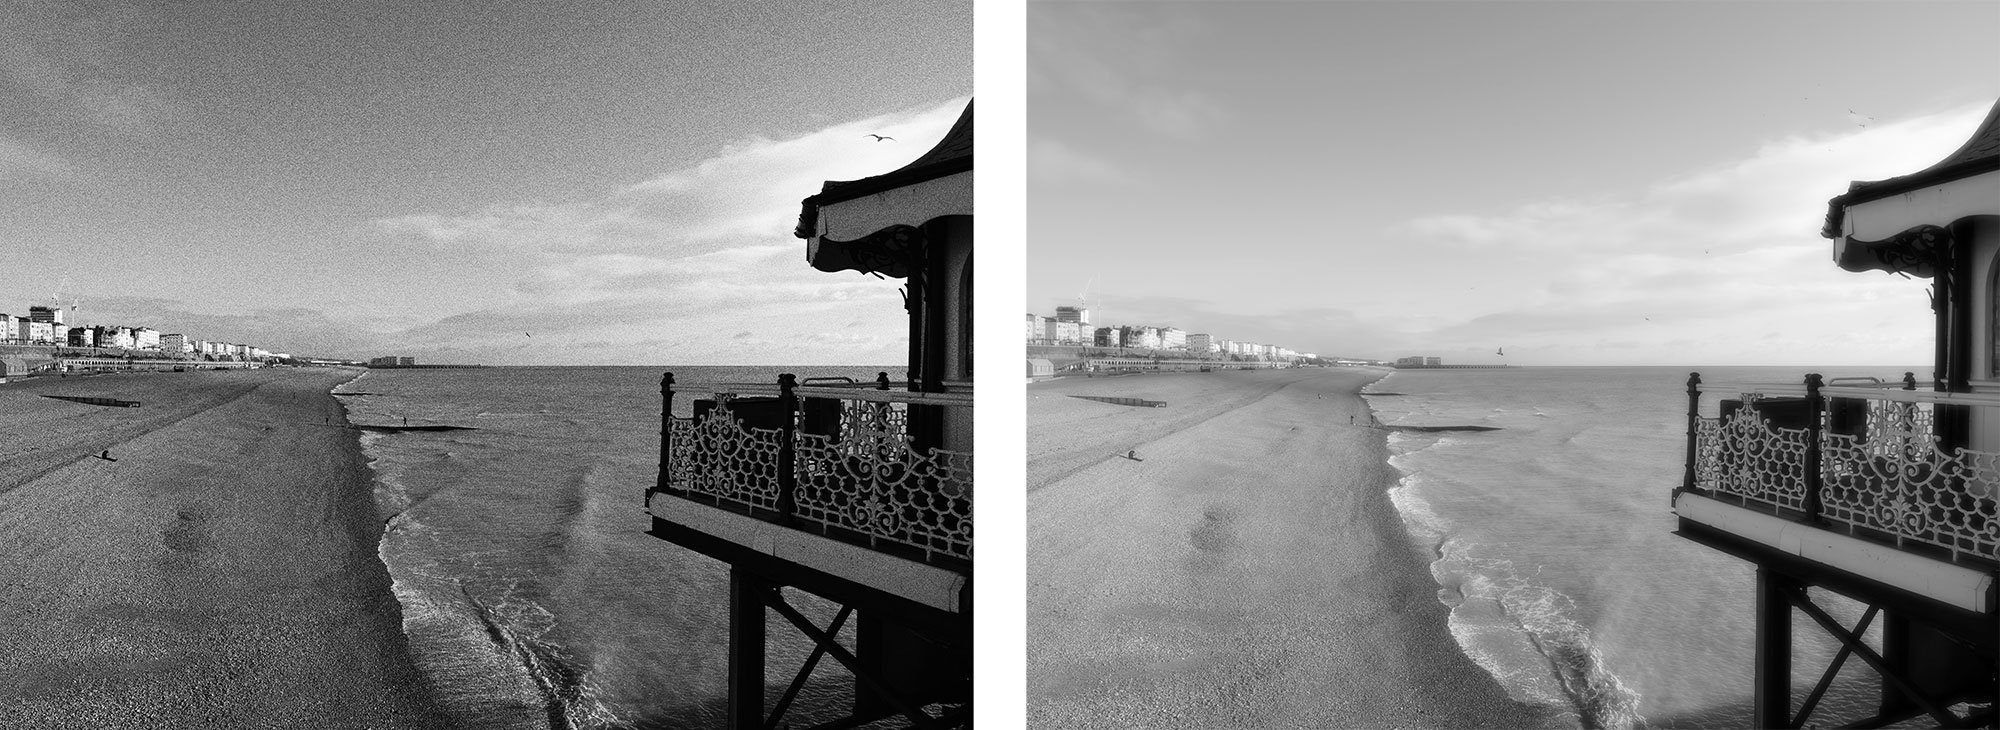
Here’s two examples where I tapped to choose to focus on two different areas after the event. In this case I’ve illustrated the extremes, changing the focus from near to far, but you can alternatively choose anywhere in-between, so long as it fell within an AF area.

Above: Lumix G9 6K Post Focus: tapped on right side of frame

Above: Lumix G9 6K Post Focus: tapped on left side of frame
In a feature which made its debut on the LX10 / LX15, the G9 inherits the Focus Stacking option. Focus Stacking is a technique that increases the depth-of-field by compositing multiple images where the focus has been adjusted a little between each. Of course the 6K Post Focus mode already has a video file that contains multiple images where the focus has been adjusted slightly, so the data required for stacking is ready to be redeployed.
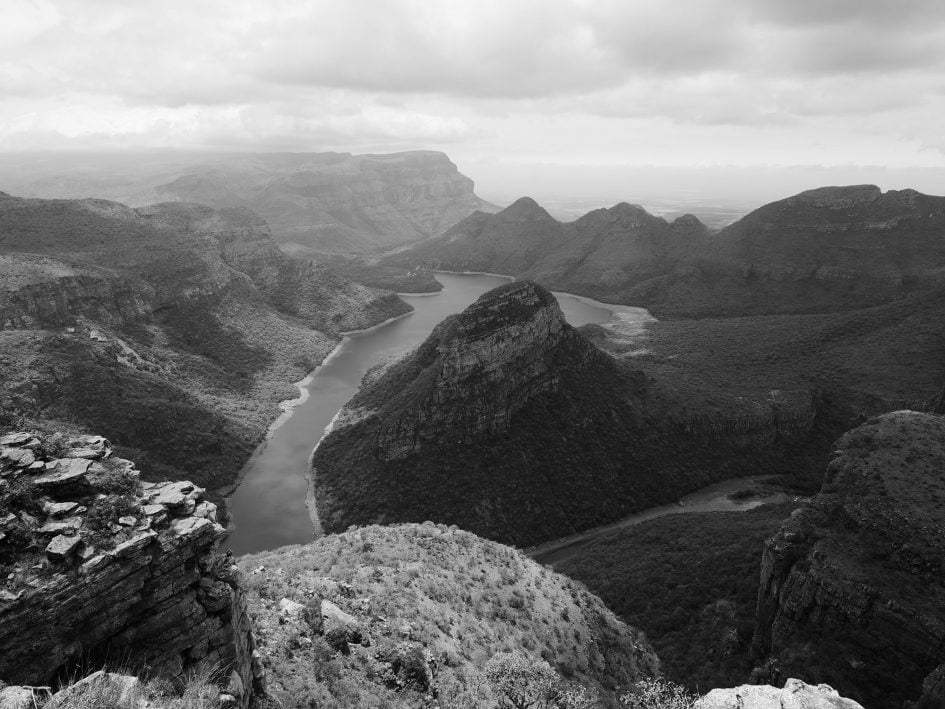
During Post Focus playback, the Lumix G9 lets you enter the Focus Stacking mode which then offers Range or Auto Merging options. Auto Merging maximises the depth-of-field by compositing the full range captured in the image, while Range Merging lets you define the closest and furthest points of sharp focus using the touch-screen. Once selected, the camera generates an 18 Megapixel JPEG with the desired depth-of-field. To illustrate it in practice I attempted to generate a version of the composition above with the maximum depth of field from near to far. Look closely and you may notice some compositing artefacts, but on the whole the end result is quite convincing. It also makes up for the fact the focus bracketing mode in the camera doesn’t yet offer a focus-stacking option.

Above: Lumix G9 6K Post Focus: Range Merged from near to far
I’ve grown fond of Panasonic’s various 4K Photo modes and now the G9’s ability to extract higher resolution 18 Megapixel stills from 6K footage – not to mention capturing 4K / 8 Megapxiels at a faster rate of 60fps – greatly improves their flexibility and usefulness. Capturing 6K footage for the purpose of higher resolution photos also gives the G9 a unique edge over rivals which have gradually begun to add basic image capture from 4K footage – although so far none have offered pre-burst or post-focus options on high resolution video footage. So Panasonic is ahead on frame rate, resolution and capture options.
There are of course still some limitations: you can’t extract RAW files, focusing was slow in my tests (particularly with Pre Burst), and there’s the risk of rolling shutter artefacts because you’re using an electronic shutter. But in the right situations it can provide invaluable and remains a very useful tool to have at your disposal. I should also add Panasonic can also cleverly exploit 3D Noise Reduction when extracting individual stills from footage, taking multiple frames on either side into account.
Finally for this section, the G9 is equipped with in-camera RAW Processing in playback. This lets you adjust the white balance, brightness correction, Photo Style, i-Dynamic, contrast, highlight, shadow, saturation, noise reduction, i-Resolution and sharpness, along with the colour space and image resolution. Sadly you can’t apply any of the Creative Filter effects after the event, but you can still have fun with the Photo Styles and it’s a useful capability.
Panasonic Lumix G9 movie mode
Panasonic’s Lumix G9 is billed as the company’s ultimate stills camera, leaving the GH5 and GH5S to enjoy the title of best hybrid and movie bodies in the range respectively. But while the GH5 and GH5S indeed boast superior movie capabilities, the G9 remains a very powerful and capable camera for filming video, sharing a great deal with its GH counterparts.
The G9 will film 4k UHD up to 60p in 8-bit, with a maximum clip length of 30 minutes up to 30p and ten minutes at 50 or 60p. If you’re filming 4k at 24, 25 or 30p, audio is encoded with AAC and the total bit rate is 100Mbit/s; if you’re filming 4k at 50 or 60p, audio is encoded with LPCM and the total bit rate is 150Mbit/s.
1080p video is available at 25 to 60p, with 25 and 30p at 20Mbit/s, and 50 and 60p at 28Mbit/s. Note 1080 at 24p is not available on the G9, although you could of course record 4k 24p and down-convert it. The highest selectable frame rate for 1080 video with audio recorded is 60p, but if you enable High Speed Video, you can record silently at 150 or 180p, which the camera interprets to 30p for playback five or six times slower. High Speed Video is also available in 4k at 48, 50 or 60p, again interpreted to 30p for up to two-times slow-down. Again there’s no audio captured in the High Speed Video modes, and focusing becomes manual only too.
There’s no horizontal crop in any mode, whether shooting 4k, 1080p or High Speed Video (even up to 180p). In each, the G9 takes the full width of the sensor and scales it down to the desired resolution without any cropping to the horizontal field-of-view.
The Creative Movie mode gives you full control over the exposure, including manual adjustment of the aperture and shutter while you film with silent touch-screen controls, as well as Auto ISO in Manual too. The Cinelike D profile offers fairly flat footage for grading later, and zebra patterns can be displayed (before or during filming) with two presets configurable between 55 and 105%. You can autofocus while filming, using the touchscreen to pull-focus if desired, or switch to manual focus with peaking assistance (before or during filming) with High or Low settings and the choice of five colours. There’s also 3.5mm jacks for an external microphone and headphones.
So why go for the GH5 instead? The GH5 gives you unlimited recording times in any mode rather than being limited to 30 or 10 minute clips. It can record internally in 10 bit rather than 8 bit, supports the wider Cinema 4k format and anamorphic options, higher bit rates for 4k and 1080p, and supports the optional V-Log profile for even flatter footage, plus more besides. The GH5S adds to this with a sensor optimized for lower light, Cinema 4k up to 60p, 1080 up to 240p, more anamorphic options, timecode in and out, and V-Log as standard.
But for most of us, the G9 remains a very respectable choice for movie recording with enough features and quality to keep all but the most demanding videographers satisfied. I’ve made a compilation of video footage to demonstrate what it’s capable of below.
Panasonic Lumix G9 wireless features
The Lumix G9 is equipped with Wifi for wireless image transfer and remote control with smartphones, along with Bluetooth for seamless location tagging, a more responsive remote shutter, and easy Wifi negotiation.
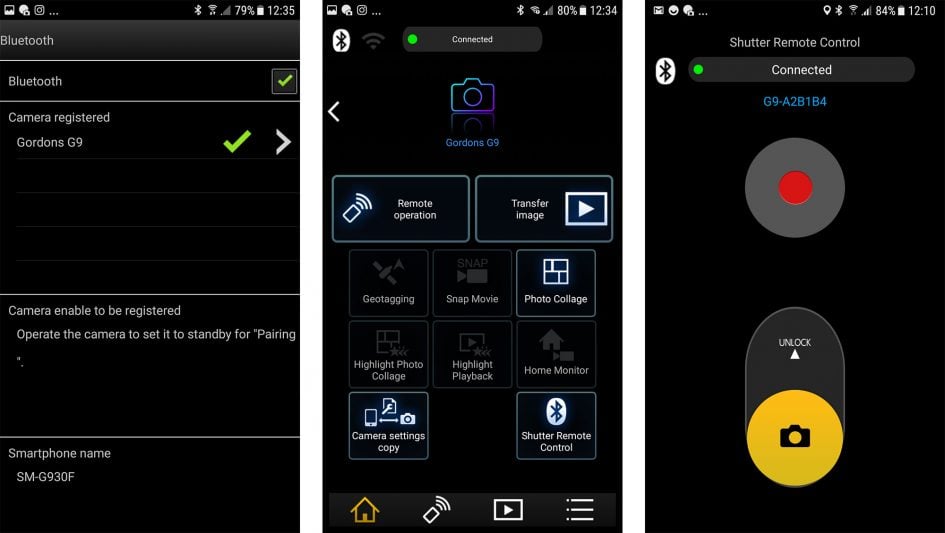
The first step is to pair the camera with your phone over Bluetooth using the free Lumix Image App for iOS or Android handsets; I used my Samsung Galaxy S7. Once paired over Bluetooth, the app remains in low-power contact with the camera, allowing it to pass location details and embed them on images with no effort or interaction; this can be enabled or disabled in the camera’s Bluetooth menus where you can also instruct the camera to take the time and date from the phone too which can be handy when travelling between different time zones. Note the Image App needs to be left running if you’d like location tagging to work.
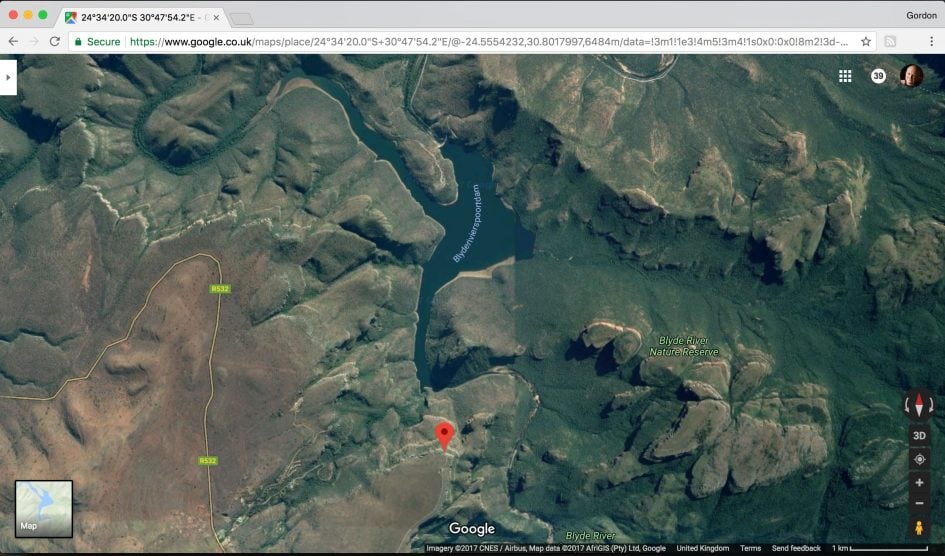
If the camera’s powering-up up from cold it takes roughly ten seconds for the Bluetooth to re-establish itself with your phone (after which a blue light illuminates on the top right surface), then another 15 seconds or so for the positional information to come through, indicated by a solid GPS icon on the screen and in the viewfinder. Here’s an image I took with the G9 with location details embedded and entered into Google Maps.

The Image App also offers a Bluetooth Shutter Remote Control that presents a simple button for triggering the shutter remotely; the benefit of doing it over Bluetooth is it’s more responsive than Wifi and doesn’t require the camera and phone to go through the Wifi connection process. The Bluetooth remote app doesn’t provide a live image or exposure control, but you can use it to lock the shutter open during a Bulb exposure (annoyingly without an on-screen timer on phone or camera), or switch to the movie mode and start and stop recording video if preferred.
For a live image, greater control or the chance to transfer images, you’ll need to connect over Wifi, but the Bluetooth can sort that out for you too; just tap Remote Operation or Transfer Image and the app will use Bluetooth to fire-up the Wifi on both devices and take care of passwords for you.
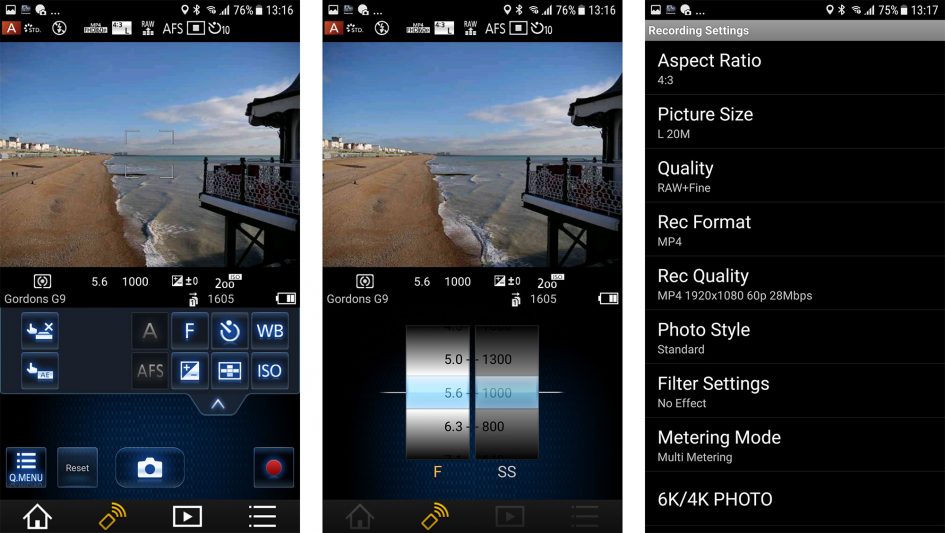
In Remote Operation you get (almost) full manual control over the camera with the chance to adjust pretty much anything that’s not set by a physical dial. So while the exposure mode still has to be adjusted on-camera using the camera dial, the app lets you set the photo and video quality, shutter, aperture, ISO, white balance, exposure compensation and AF area. You can start and stop video recordings of any quality via the app, and also tap the phone screen to pull-focus while filming. If peaking or zebras are enabled on the camera, you’ll also see them in the live view too.

During playback you can view thumbnails of stills and videos. JPEGs and even RAW files can be copied onto the phone over Wifi, and I confirmed the latter were the original files by subsequently sharing them onto Dropbox. Videos recorded in any quality can be streamed from the camera for playback on the phone’s screen, and you can copy 1080p clips onto your phone but not 4k ones.
Overall the wireless experience of the Lumix G9 is excellent with the Bluetooth in particular behaving exactly as you’d want it to: quietly and efficiently doing the hard work behind the scenes, leaving you to enjoy the remote access with your phone. It’s also possible to copy your camera’s settings to the app, allowing you to quickly redeploy them on a second body or one that’s been reset.
Panasonic Lumix G9 quality
In the video below Doug and I discuss the video and image quality of the G9 and give the camera a verdict. This is only one small part of my results and overall verdict though! Check out the quality tab for my full quality results including six examples of the High Resolution mode, and don’t forget to click the verdict tab for my final analysis and opinion!
I’ve dedicated the next page of the review to my quality results with the Lumix G9, starting with a sweep of the ISO range in JPEG and RAW, followed by lots of examples of the new high resolution mode that captures and composites eight frames to generate 40 or 80 Megapixel images! Simply click the Quality tab at the top or the link below, or check out my sample images page for a selection of photos taken with the G9 and a variety of lenses. Or if you’ve seen enough, skip straight to my verdict!
Check prices on the Panasonic Lumix G9 at Amazon, B&H, Adorama, or Wex. Alternatively get yourself a copy of my In Camera book or treat me to a coffee! Thanks!


