Olympus E-510
-
-
Written by Gordon Laing
Olympus E-510 screen
More Features : Lenses and viewfinder / Screen and menus / Sensor and processing / Anti dust / Anti shake
Olympus E-510 features continued…
Lenses and viewfinder / Screen and menus / Sensor and processing / Anti dust / Anti shake
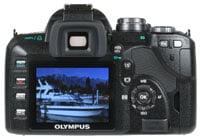 |
The Olympus E-510 is equipped with the same 2.5in / 230K pixel screen as the E-410, and like most budget DSLRs, it’s used to display all shooting information. As with other cameras, there’s pros and cons to this approach. One concern is these screens can be harder to read under bright conditions, but we didn’t experience any issues with the E-510 or E-410. One slightly annoying aspect is the screen doesn’t automatically switch off when you put your eye against the viewfinder, but a half-press of the shutter release will fix that.
 |
 |
On the upside, you can pack a great deal of information onto a high resolution colour screen, and the E-510 (like the E-410) excels in this respect by displaying battery life, exposure mode, aperture, shutter, today’s date, an exposure compensation scale, ISO, White Balance, flash mode, colour, metering, AF and drive modes, along with the memory format in use, the quality setting and the number of photos remaining. By pressing the Info button, the screen reformats with smaller fonts to display even more – it’s an impressive degree of information to have at a glance.
Olympus E-510 Live View
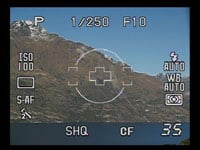
One of the major selling-points of the Olympus E-510 is its Live View facility. First seen on the Olympus E-330, this allows you to use the main colour monitor for composition like a consumer compact. The implementation of Live View on the E-510 is identical to the E-410, although on the former you can also use it to see the effect of its built-in Image Stabilisation.
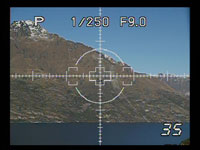
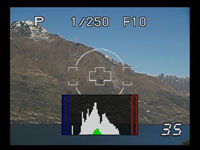
As with the E-410, Olympus has sensibly dropped the E-330’s choice of two Live View modes, and only implemented the more practical one here. Previously known as Mode-B, this uses the main sensor to deliver the live video feed, and on the E-510 provides 100% coverage, magnified manual focusing assistance (up to seven or ten times) and a live histogram option, along with the choice of three different graphical frame guides: an eight by six grid, measurement crosshairs, or a golden selection area.
 |
 |
 |
 |
Live View is activated by a dedicated button on the back of the E-510. The E-510’s mirror will then flip up and a moment later you’ll be presented with a live view. Like the E-410, the screen refresh on our E-510 wasn’t as smooth as most consumer compacts, but it still looked good. You can then press the Info button to cycle through the various overlaid graphics described above; the desired framing guide can be selected from a menu.
Unfortunately the auto-focus system in a DSLR is bypassed with the mirror flipped-up, so in order to auto-focus in Live View mode the E-510 must temporarily drop its mirror, take a reading, then flip back up again to continue the video feed. You do this by pressing the AEL / AFL button near the viewfinder and we have a demonstration in our E-510 video tour. Alternatively if you’re happy with the composition, just press the shutter release button down and the E-510 will focus and take the shot in one go.
In practice the auto-focus process in Live View can be quite laborious, and the resulting noises will make anyone nearby think you’ve just taken a couple of shots. It’s certainly neither quick nor discreet, but the advantages of Live View are undeniable: we found the 100% coverage and alignment options invaluable at times, and despite what its detractors say, also found it quite usable when handheld or at high or low angles.
Olympus E-510 Menus
 |
The E-510 offers a variety of ways to adjust settings. Like many DSLRs, the four direction buttons on the back provide direct access to the White Balance, AF, Sensitivity and Metering menus. This would be adequate, but like its predecessor, the E-510 offers an alternative means of modifying a broad variety of settings without requiring dedicated buttons or delving into menus.
With the camera powered-up, press the OK button and you’ll see the ISO value is highlighted in yellow. You can then either turn the thumb-dial to adjust it, or press OK again to enter a dedicated menu showing the available options. Alternatively you can use the direction buttons to shift the yellow highlight to a different setting, such as White Balance or quality, upon which you can again either turn the dial to directly adjust it, or press the OK button to present the corresponding menu.
In practice this system works really well and it’s quick and easy to change a large number of settings. This is in fact the only approach offered by the E-410, and while we found it ultimately preferable, it’s good to see the E-510 also offers more traditional direct access to the most common settings using its four direction buttons.
Pressing the Menu button presents the E-510’s options arranged into five vertically-tabbed pages: two for recording, one for playback and two for setup. These pages offer alternative access to the dedicated adjustments described above, along with a number of additional options, several of which have been inherited from the E-500 and are not available on the E-410.
 |
 |
For example in the first setup menu you’ll find the options which let you choose which direction the manual focusing ring should operate in, and whether you’d like the lens focus to reset itself to infinity when the camera powers down – see the previous features page for more details.
 | |
 | |
 | |
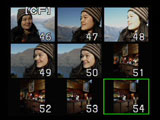
During playback, turning the thumb-dial anti-clockwise zooms-in on the image by up to 14 times, while turning it clockwise presents ever-increasing numbers of thumbnails: first four, then nine, then 16 and even 25, followed by a calendar view of the current month showing a tiny photo thumbnail on the days you took a photo.
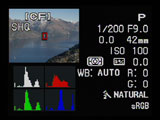
With an image filling the screen in playback, pressing the Info button cycles through RGB and brightness histograms, along with options to flash any clipped highlight or shadow areas. Like the E-410, the histograms look a little coarse compared to those on rival models (check out the Nikon D40x for example), but it’s still good to have a broad array of views and information at your fingertips.
The E-510 also offers a handy Light Box facility where the same section of two pictures can be compared on-screen side-by-side; this can be useful when judging exposure differences and bracketing results.
Finally, like the E-410, the new E-510 can use its orientation sensor to automatically rotate an image in playback so it always fills the screen. So if you have a portrait orientation shot, just turn the camera by 90 degrees to make it fill the screen during playback; this can take a brief moment to occur and we have a demonstration in our video tour.


