Olympus E-410
-
-
Written by Gordon Laing
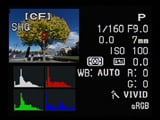
Olympus E-410 screen
More Features : Lenses and viewfinder / Screen and menus / Sensor and processing / Anti dust / Anti shake
Olympus E-410 features continued…
Lenses and viewfinder / Screen and menus / Sensor and processing / Anti dust / Anti shake
 |
The Olympus E-410 is equipped with the same 2.5in sized screen as its predecessor, although interestingly Olympus has upgraded it from 215K to 230K pixels; in use it looks pretty much the same though. Like its predecessor and an increasing number of digital SLRs these days including the Canon EOS 400D / XTi, Nikon D40(x) and the Sony A100, the E-410 employs its main screen exclusively for displaying shooting information.
As with these other cameras, there’s both pros and cons to this approach. On the positive side, you can pack an awful lot of information onto a high resolution colour screen, and the E-410 excels in this respect displaying battery life, exposure mode, aperture, shutter, today’s date, an exposure compensation scale, ISO, White Balance, flash mode, colour, metering, AF and drive modes, along with the memory format in use, the quality setting and the number of photos remaining; phew!
 |
 |
Pressing the Info button on the back reformats the screen with smaller fonts to pack in even more data still including colour space, actual pixel resolution and red and green white balance adjustments. That’s a massive amount of information to have at a glance.
On the downside, these displays can be harder to read under bright conditions than dedicated (and increasingly rare) secondary LCD information screens. To be fair in our tests the E-410’s screen remained readable under direct sunlight, but if you’re concerned you may wish to try it for yourself.
An annoying aspect of the earlier E-400 has been inherited though: unlike the Canon 400D / XTi or Sony A100, the E-410 doesn’t feature sensors which automatically switch the screen off when you look through the viewfinder. To be fair it does switch off when you half-press the shutter, but we’d ultimately prefer a sensor-based approach.
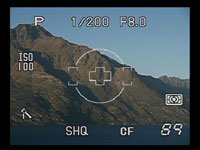
Olympus E-410 Live View
The major selling-point of the Olympus E-410 over its predecessor – and indeed its rivals – is the inclusion of Live View. First debuted in the Olympus E-330, this allows you to use the main colour monitor for composition like a consumer compact.
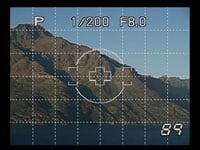
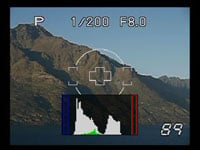
Unlike the E-330 though, Olympus has (sensibly) only implemented one Live View mode. Previously known as Mode-B, this uses the main sensor to deliver the live video feed, and on the E-410 offers 100% coverage, depth-of-field previews, a live histogram option, magnified manual focusing assistance (up to seven or ten times), along with the choice of three different overlaid shooting guides: an eight by six grid, measurement crosshairs, or a golden selection area.
 |
 |
 |
|
To activate Live View on the E-410, you’ll need to press the monitor button on the back of the camera – this used to be the Fn button on the E-400. The E-410’s mirror will then flip up and a moment later you’ll be presented with a live view. The screen refresh on our model wasn’t as smooth as most compacts, but it still looked good. You can then press the Info button to cycle through the various overlaid graphics.
So far so good, but the auto-focus system in a DSLR is actually bypassed with the mirror flipped-up, so in order to auto-focus in Live View mode the E-410 must temporarily drop its mirror, take a reading, then flip back up again to continue the view. You do this by pressing the AEL / AFL button and we have a demonstration in our E-410 video tour.
In practice this process can be quite laborious, not to mention noisy, but the advantages of Live View are undeniable. We found the 100% coverage and grid options invaluable at times and despite what its detractors say, also found it quite usable when handheld.
Olympus E-410 Menus
Like its predecessor, the E-410 doesn’t have any buttons dedicated to settings like the ISO or White Balance, but luckily you’re not forced to delve into the menu system just to adjust them.
 |
With the camera powered-up, press the OK button and the ISO value is highlighted in yellow. You can then turn the thumb-dial to change the setting, or if you prefer, press OK again to enter a dedicated adjustment menu. Alternatively with ISO highlighted, just use the up, down, left and right buttons to highlight any other option, before then using the dial to adjust it, or pressing OK to again view a dedicated menu. In practice it’s quick, intuitive and works really well. We’ve got a demonstration in our E-410 video tour.
 |
 |
Pressing the Menu button presents the E-410’s options arranged into five vertically-tabbed pages: two for recording, one for playback and two for setup. These pages offer alternative access to the dedicated adjustments described above, along with additional options including noise reduction, AE bracketing and configuration of the left arrow button to offer direct access to one-touch white balance, shoot a test photo without saving, or the choice of depth-of-field previews using the optical viewfinder or the Live View facility.
During playback, turning the thumb-dial to the right zooms-in on the image, while turning it to the left presents a number of thumbnails, first four, then nine, then 16 and even 25, followed by a fun calendar view of the current month showing a tiny photo thumbnail on the days you took a photo.
 |
 |
With an image filling the screen in playback, pressing the Info button cycles through RGB and brightness histograms, along with options to flash any clipped highlight or shadow areas. The histograms look a little coarse compared to those on rival models (compare to the Nikon D40x for example), but it’s still good to have this number of options on an entry-level DSLR.


