 The PEN E-P5's specifications are impressive, and its images look great, but it's in the handling that it really excels, and that's a difficult thing to get across in words and numbers, so more than ever, if the E-P5 is on your mirrorless compact system camera shortlist, you should attempt to spend some hands on time with it. In the time that I've spent using and reviewing it I've come to the conclusion that it's a very deserving recipient of a Cameralabs Highly Recommended award.
Olympus PEN E-P5 review
-
-
Written by Ken McMahon
Intro
The Olympus PEN E-P5 is a mirror-less compact system camera based on the Micro Four Thirds standard. Announced in May 2013, it’s the successor to the E-P3 launched two years previously, which makes it the new flagship in the Olympus PEN series. Note the PEN series are smaller models without built-in viewfinders, while the OM-D series are larger, DSLR-styled cameras with built-in viewfinders; at the time of writing there was only one OM-D model, the E-M5.
Starting with the headline specifications, the Olympus E-P5 inherits the 16 Megapixel sensor of the OM-D E-M5, a four Megapixel upgrade over the earlier E-P3, although revealingly no higher than any other model using the Micro Four Thirds standard, nor does it eliminate the low pass filter or employ a different colour filter array as some rival systems have tried with success. It also inherits the E-M5’s built-in five-axis stabilization which works with any lens you attach, a key benefit of Olympus cameras enjoy over most of the competition including Panasonic’s own Micro Four Thirds bodies to date. Another key feature is built-in Wifi for wireless remote control or image transfer, although it doesn’t have the NFC for easy Wifi setup like the Panasonic Lumix GF6.
As a PEN model there’s no built-in viewfinder, although you can still slide an optional unit onto the hotshoe, such as the new VF4 electronic viewfinder which features 2.36 million dots and an eye detector. What has changed though is the screen, which may remain touch-sensitive, but now sports a higher resolution and can tilt vertically – a nice upgrade borrowed from the EPL range. Continuous shooting is now up to 9fps with focus and exposure locked or at 5fps with AF, there’s a top mechanical shutter speed of 1/8000 (a first for any compact system camera), focus-peaking to help manual focusing and auto exposure bracketing up to seven frames; the earlier thumb roller has also been switched for more conventional front and rear dials, but sadly Olympus has resisted the opportunity to make the body weather-proof. Olympus is also launching the E-P5 with black versions of the 75mm, 45mm and 17mm f1.8 lenses and is likely to use the latter as a new kit lens.
Here I’ve tested the PEN E-P5 alongiside two key competitors. The Fujifilm X-M1 is the latest in Fujifilm’s X Series; unlike earlier models it foregoes a built-in viewfinder and old-school controls in favour of a more contemporary consumer-oriented design. And the Panasonic Lumix GF6 is the replacement for the year-old GF5 with higher end pretensions which will interest GX-1 owners. All three feature tilting screens and built-in wifi, but only the Panasonic complements it with NFC for tap-to-connect functionality with compatible handsets. Many will also be weighing-up the OM-D E-M5 against the E-P5, so I’ve includeed comparisons with that model too. So now let’s find out which will be best mirrorless camera for you!
 |
Olympus PEN E-P5 design and controls
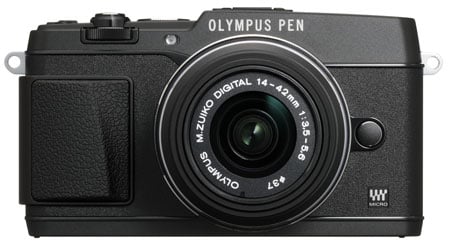
The PEN E-P5 doesn’t look radically different to its predecessor, the dimensions and weight are similar and the body shape and styling retain the retro design inspired by the original 1960’s PEN F. For the record, the dimensions and weight are 122x69x37.2mm and 420g including the battery and memory card. That makes it 3mm thicker than the E-P3 and 51 grams, or nearly two ounces heavier. Meanwhile the OM-D E-M5, at 121x90x41.9mm and 425g inc battery, is roughly the same width and weight as the E-P5, but 21mm taller and 4.7mm thicker. The extra height of the OM-D E-M5 is due to its built-in viewfinder, and if you were to ignore the head, the actual main body is very close in size, albeit thicker. Note the OM-D E-M5 also sports full weather-sealing, unlike the E-P5, although I should say the build quality of the new model is outstanding and the overall handling superb.
The new OLYMPUS PEN name plate (this time without the hyphen) further reinforces the link with the PEN E-P5’s classic namesake. Where the E-P3 had a removable grip, the new model’s is fixed and incorporates the Wi-fi antenna. On the white model I tested, the grip is made of textured soft plastic in a tan colour, with a matching thumb rest on the rear. On the silver and black models it’s black and there’s also a special edition model available with a polished wood grip, if you like that sort of thing. One other cosmetic change sees the metal strip dividing the top of the front plate from the main body section dip to mirror the split-level top panel.
Overall I think the new model looks even better, but the grip is a bit insubstantial, the ridge on the gently sloping front is slight and it feels insecure compared with the more pronounced lip on the Panasonic Lumix GF6. Having said that, the thumb grip is perfectly shaped and makes up for the shortcomings of the main grip to a degree.
 |
At 111.2 x 64.8 x 38.4 and weighing 323g with the battery and card, the Panasonic Lumix GF6 is a narrower and not quite so tall, but pretty much the same thickness as the PEN E-P5. It’s nearly a hundred grams lighter, though, and it looks and feels like an altogether more compact camera. With interchangeable lens cameras the lens can make a significant difference to overall size, weight and handling, however the new smaller Panasonic 14-42mm kit lens is almost identical in size and weight to the Olympus 14-42mm kit lens when collapsed. One of the reasons for the E-P5’s additional bulk and weight, is that it has built-in 5-axis image stabilisation, whereas the Lumix GF6 doesn’t (although the Panasonic kit lens itself is optically stabilised).
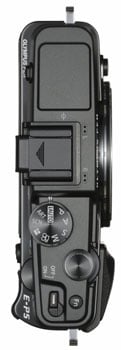
On the top panel, the control layout has undergone some modifications, the most obvious change being the substitution of an OM-D E-M5-style on/off switch for the on/off button of earlier PEN models. While I’m not a fan of switches on compacts, on the E-P5 (as well as on the Lumix GF6 where Panasonic has always favoured a switch) it makes sense. For one thing it resolves one of the PEN’s most irritating niggles, where you had to press the button twice to turn the camera off if it was in sleep mode – once to wake it up and the second time to actually turn it off. It also avoids any confusion, it’s a big, nicely designed switch that sits in a small recess in the back left corner and a quick glance at it tells you everything you need to know.
As before, there’s a single function button next to the large raised shutter release and behind and to the left of it, the mode dial extends backwards beyond the edge of the back panel and is operated with your thumb. There’s one new position on the mode dial for creating framed composite images which I’ll talk about in more detail in the shooting modes section.
But probably the most significant physical change is the addition of two new control wheels, a Sub dial at the front below the shutter release and a thumb-operated Main dial at the rear. Primarily, these are used to control exposure – aperture and shutter speed in Manual mode, one or the other plus exposure compensation in Aperture and Shutter priority modes, and Program shift plus exposure compensation in Program Auto mode. As you’d expect on a PEN, though, these dials are almost infinitely customisable; without even having to delve into the menu system, you can switch their function to ISO sensitivity and White balance by moving the rear-mounted switch surrounding the movie record button from the 1 to 2 position. Olympus refers to this system as 2×2 dial control.
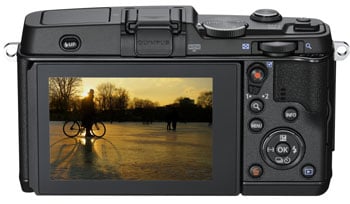
Moving onto the back, the button layout isn’t as linear as it was on the E-P3, and is in fact cleaner and less cluttered as a consequence of the new dials. There’s no longer a control wheel built into the four-way controller and the absence of the cylindrical thumbwheel makes space for a generous thumb-rest. The magnify button remains, but its function is now solely to check AF or assist manual focus, playback zoom is controlled using the Main (rear) dial. Surrounding the four-way arrow pad are Menu, info, playback and delete buttons.
Under a hinged door on the right side of the body are a micro HDMI port and a proprietary USB / AV port. A USB cable is supplied but to connect to a TV using either the USB / A/V or HDMI port you’ll need to buy your own cable.
 |
On the camera base there’s another hinged door that opens onto the combined battery and card compartment. The PEN E-P5 is compatible with SD, SDHC, and SDXC cards. It takes the same BLN-1 battery as the OM-D E-M5 (but not the other PEN models) from which it squeezes a respectable 400 shots under CIPA conditions, around 60 more than the Panasonic Lumix GF6. Note the OM-D E-M5 has a seperate compartment on its side for the memory card, so it won’t get blocked when mounted on a tripod.
But while the OM-D E-M5 does not have a built-in flash, the E-P5 does, mounted under a panel on the left side of the top plate. It pops up (a little too easily, I accidentally activated it nearly every time I picked the camera up) when you press a mechanically-linked button behind it on the the rear of the camera and, when you’re done, you simply push it back down again, but unlike the unit on the Panasonic Lumix GF6 you can’t bounce it by pulling it back with your finger. Once the flash is popped, there are four modes to choose from using the right button on the arrow pad – Fill in, Red-Eye + Fill-in, Flash Off, 2nd Curtain, and Manual. The fastest flash sync speed is 1/320, and the shutter can be synced with an external flash at up to 1/4000 in Super FP mode.
As before, it has a guide number of 10 (metres) at 200 ISO, giving it a range of just under 3 metres. That’s a little more powerful than the Panasonic Lumix GF6’s built-in flash, which has a GN of 6.3 at 160 ISO. If you need more power you can fit an external flash to the E-PL5’s hotshoe, though, of course, you won’t be able to use the accessory viewfinder at the same time. Olympus units such as the FL-300R and FL600R are supported with TTL Auto mode and can be wirelessly controlled off-camera using the built-in flash.
Olympus PEN E-P5 screen and viewfinder
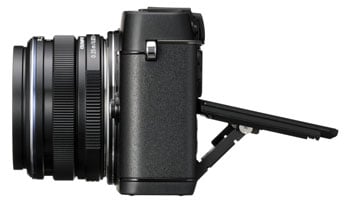
Olympus has upgraded the E-P5’s screen replacing the 3 inch 610k dot OLED screen on the E-P3 and OM-D E-M5 with a new 3 inch LCD monitor with 1.03 million dots and a resolution of 720 x 480 in a 3:2 aspect ratio. As before, it’s a capacitance touch-sensitive screen but where the E-P3’s screen was fixed, the E-P5’s flips out and can be angled upwards by 80 degrees or downwards 50 degrees, just as on the OM-D E-M5.
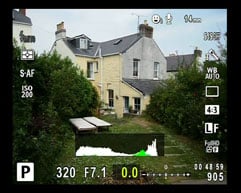
The 3:2 proportions means there are narrow black bars down either side when shooting in the sensor’s native 4:3 aspect ratio, just like Panasonic’s Micro Four Thirds models. Switch to movie mode and slightly wider black bands appear top and bottom. Clearly, you can’t have a screen that works equally well for 4:3 stills and 16:9 movies, but the PEN E-P5’s 3:2 screen is the best compromise you’ll find, the black areas are minimal and put to good use for information display which can be toggled using the display button. There are four options, the first of which turns everything off for an uncluttered view, followed by basic shooting mode and exposure info along with the electronic 2-axis level, third is the full info display and finally the live histogram. There’s also a fifth view, not enabled in the default setup, which shows highlight and shadow clipping.
The screen is bright, contrasty, steady and provides a detailed view that’s difficult to fault. You can adjust the brightness and white balance of the monitor, but I found the default settings worked pretty well in most situations. Like all displays, it’s quite difficult to see in bright sunlight, but being able to tilt it can help keep direct sunlight off the screen.
 |
Olympus has always taken quite a conservative line with touch screens on the PEN range and the E-P5 is no different. The touch screen takes a back seat in terms of control and handling and, though it provides some extremely useful functions, were you to take the option to turn it off, you could get by perfectly well without it. In shooting modes, tapping the screen will either focus on the tapped area, focus and take a shot, or do nothing, depending on the current mode, which is toggled using a touch icon. Other than that, use of the touch screen is fairly limited. A touch Wi-Fi icon provides quick access to the W-Fi functions without having to navigate menus. You can select individual settings in the Super control panel by tapping them, but from there on in adjustments can only be made using the physical controls. But the touch-screen really comes into its own in Intelligent auto mode, where Live Guides – simple adjustment sliders – can be activated and adjusted simply by tapping and sliding.
The Lumix GF6 also has a 3 inch articulated LCD screen. It shares the PEN E-P5’s 3:2 proportions, has the same 1040k dot resolution and has a capacitance touch screen rather than the pressure-sensitive type used on earlier models. The GF6’s screen is a little more flexible than the E-P5’s employing a cantilevered hinge that allows it to fold up and over for self shooting. In use, perhaps not surprisingly, it’s very difficult to tell the two screens apart.
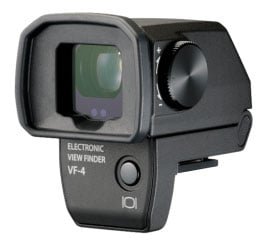 |
The screen isn’t the only way to compose shots on the PEN E-P5, at least not if you don’t mind spending extra on one of the available accessory electronic viewfinders. The new VF-4, launched concurrently with the PEN E-P5 has resolution of 2.36 million dots and a magnification of 1.48x, significantly bigger and more detailed than the earlier 1.44 million dot VF-2 and indeed any other electronic viewfinder on the market.
The one physical drawback of the VF-4 is that it adds considerably to the size of the PEN E-P5 – it’s a big black rectangular box that slides into the hotshoe and the AP-2 port to the rear of it. One other thing to bear in mind is that, currently, it appears to be available in black only – a colour that didn’t exactly co-ordinate well with the white model I had for review.
Like the earlier VF-2, the VF-4 can be used in the standard eye-level configuration or you can flip it up into a 90 degree position for low angle shooting; when you return it to the eye-level position it clicks into place, one of three thoughtful design touches; the other two being the unlock to remove button and an external dioptre adjustment wheel. On the VF-2 the vision adjustment on the circular eyepiece was all to easy to move accidentally and required continual re-adjustment. In its place, the VF-4 has a generous rubber eye-shield.
The VF-4 is equipped with a sensor that automatically activates it and turns off the LCD screen when you put your eye to it. This is disabled if you fold the screen out and can also be switched off in the menu, in which case you can use the button on the rear to manually toggle between the screen and EVF. This all works the way you’d expect it to, with exactly the same view appearing on either the EVF or the screen, but it would be useful to be able to assign different functions to each, for example with exposure information, or the super control panel displayed on the screen with Live view in the viewfinder.
In use I found the VF-4 delivered superb quality and in my view is a must-have accessory for the E-P5. But again it should be noted it adds considerably to the size of the camera, and it’s not exactly cheap either. Indeed if you were to leave it fitted all the time, you may well ask yourself if the (admittedly slightly lower quality) built-in viewfinder of the OM-D E-M5 would make that model a better bet than the combination of E-P5 and VF-4.
Olympus PEN E-P5 lens and stabilisation
The PEN E-P5 ships as a body only or a kit with either the M. Zuiko digital 14-42mm f3.5-5.6 II R MSC zoom or the M. Zuiko 17mm f1.8 ‘pancake’ lens and the VF-4 viewfinder. Olympus has also launched black versions of the M.ZUIKO DIGITAL 17mm f:1.8, 45mm f:1.8 and 75mm f:1.8 lenses. I tested the PEN E-P5 with the 14-42mm kit zoom, which, with the 2x field reduction of Micro Four Thirds, has a full frame 35mm equivalent range of 28-84mm. The MSC stands for ‘Movie and Still Compatible, which basically means it’s fast for stills shooting, and quiet for movie AF, a feat that Olympus achieves using a design that moves fewer of the lens elements in order to focus.
The lens construction is collapsible, extended by simply rotating the zoom ring; to collapse it again you need to slide forward a spring-loaded catch on the barrel. It’s a system which keeps things compact when the camera isn’t in use, but, as I mentioned earlier, it’s worth noting that, when retracted, the Olympus 14-42 lens is roughly the same size as the new Panasonic 14-42mm kit lens which is ready for action.
PEN E-P5 14-42mm f3.5-5.6coverage wide | PEN E-P5 14-42mm f3.5-5.6coverage tele | |
 |  | |
| 14-42mm at 14mm (28mm equiv) | 14-42mm at 42mm (84mm equiv) |
Before moving on, a quick note about the lenses available for the PEN E-P5 and Lumix GF6, both of which are based on the Micro Four Thirds standard. Jointly developed by Panasonic and Olympus, Micro Four Thirds is the most established of the mirror-less system camera formats, bringing bodies and native lenses to the market at least one year before its first rival arrived. Being first to market along with having not one but two major manufacturers behind it are two major advantages Micro Four Thirds enjoys over the competition, and it really shows when you compare their respective native lens catalogues.
As of mid 2013, Micro Four Thirds had over 40 lenses available from Panasonic and Olympus along with third parties including Sigma, Tamron, Samyang, Voigtlander and others. So while many rival mirror-less formats are struggling to offer even one lens in every category, Micro Four Thirds typically has two or more options available. Whether it’s Fisheye, ultra wide, fast aperture, macro, super-zoom or good old general-purpose, the Micro Four Thirds catalogue has it covered – find out more in my Micro Four Thirds lens guide.
While both Olympus and Panasonic share the same lens mount though, they take different approaches to stabilisation. Panasonic requires lenses with built-in optical stsbilisation, while Olympus builds stabilisation into the actual camera bodies. The benefit of the Olympus approach is enjoying stabilization with any lens you attach, whereas on a Panasonic body you’ll only have stabilization on lenses which support it. Panasonic does, however, equip most of its zooms with optical stabilization, including of course the common kit options.
The other advantage of sensor-shift stabilisation built in to the body is that when you upgrade to a new body with improved stabilisation, you get the benefit of the improved system with all of your existing lenses. And that’s exactly what Olympus has done, updating the 2-axis system of the earlier Pen E-P3 with the same 5-axis stabilisation used on the OM-D E-M5. There are even some improvements over the E-M5 stabilisation, with the ability to set stills and movie stabilisation separately, a new S-IS Auto mode which automatically detects panning, and the option to choose between sensor and lens stabilisation when shooting with Panasonic’s stabilised lenses.
As on the OM-D E-M5, Mode 1 is the full works, 5-axis stabilisation, while Modes 2 and 3 are confined to a single axis for horizontal and vertical panning respectively and you can turn the stabilisation off for when the camera is mounted on a tripod. While stabilisation is active you can hear it whirring quietly in the background.
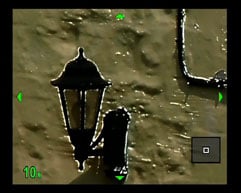
To test the PEN E-P5’s stabilisation I zoomed the lens to its furthest 42mm (84mm equivalent) position and took a series of shots in Shutter priority mode, first with the stabilisation turned off and then with it set to the 5-axis Mode 1 setting. Olympus claims the PEN E-P5’s stabilisation is effective for 5 stops, which means that it should be possible to get sharp hand-held shots at close to half a second with the kit lens zoomed to 42mm. That’s quite a claim and I wasn’t really expecting the E-P5 to live up to it, but, to my surprise, I was able to get reasonably sharp shots hand-held at half a second. They’re not pin-sharp, but I was able to achieve good results consistently.
Rather than the usual On/Off comparison I thought it would be more interesting to compare the E-P5’s built-in sensor-shift stabilisation with the Mega O.I.S. lens stabilisation on the Panasonic 14-42mm f3.5-5.6 kit lens. With a stabilised lens fitted the PEN E-P5 gives you the option to use either the camera’s built-in stabilisation or the lens stabilisation. The crop on the left is the EP-5’s built in stabilisation and the right crop shows the Panasonic lens stabilisation in action at half a second. As you can see, the 5-axis sensor-shift stabilisation built into the PEN E-P5 is more effective than the Mega O.I.S. stabilisation of the Panasonic 14-42mm kit lens.
Olympus PEN E-P5 with Lumix G Vario 14-42mm f3.5-5.6 stabilisation body vs lens | ||||
 |  | |||
100% crop, 14-42mm at 42mm 200 ISO 1/2 sec Lens priority Off. | 100% crop, 14-42mm at 42mm 200 ISO 1/2 sec Lens priority On. | |||
Olympus PEN E-P5 shooting modes
The PEN E-P5 shares all of the OM-D E-M5’s shooting modes with some exciting new additions and improvements, which I’ll come to in a moment. The E-P5 of course has the four PASM exposure modes for Program auto, semi-auto and Manual exposure control available on all PENs, as well as Intelligent auto mode with scene detection.
Intelligent auto mode features Live Guide controls, first introduced on the PEN E-PL1, which provide uncomplicated slider-based controls for jargon-free image adjustment including colour saturation, brightness, blur background and Express motion (slow shutter speed).
The E-P5 also has another Olympus innovation that’s been adopted in one form or another by just about every compact manufacturer, Art filters. Two more have been added to those available on the E-P3 to make 12 in all – Pop Art, Soft Focus, Pale & Light Colour, Light Tone, Grainy Film, Pin Hole, Diorama, Cross Process, Dramatic Tone, Gentle Sepia, Key Line, and Water colour.
As the Flagship PEN model firmly targetted at the enthusiast, you might think that with Intelligent auto, Live guides and Art filters, the PEN E-P5 already has plenty to satisfy novices and casual snappers, but Olympus clearly has different ideas and has added it’s Photo Story feature, first introduced on the Stylus XZ-10 compact; it even gets its own spot on the mode dial, (though that can be customised if you prefer). Photo story is a composite mode that combines several images into a multi-frame layout using art filters.
There are two frame sets available, Standard and Fun, (though the distinction is pretty arbitrary) with a total of seven layout variations between them. The layout is displayed on screen as you shoot with the Live view displayed in the current frame so you can see exactly what you’ll get and if you don’t like it you can delete your shot and try again. Crucially, if you shoot RAW plus JPEG, the RAW originals are there to fall back on if you prefer the original. It all adds up to a great new fun feature which I think will have wide appeal.
The new features aren’t limited to fun, there’s plenty to appeal to the serious photographer too. Like the E-M5 and E-PL5, the EP-5 provides automatic exposure bracketing up to 5 frames in 1/3, 2/3 and 1EV increments and a seven frame option at 1/3 and 2/3EV. You can also bracket white balance, ISO sensitivity settings, and flash exposure. Also included is the The E-PL5’s HDR bracket feature which provides a subset of the exposure bracketing options – 3, 5, or 7 frames at 2EV intervals with the 3 and 5 frame option also available at 3EV intervals. It doesn’t actually merge the frames into a final HDR result in-camera, but does take advantage of the E-P5’s 9fps burst rate to minimize movement between exposures. You can’t however trigger the burst using the self-timer.
The PEN E-P5 inherits the Live Bulb and Live time modes from the OM-D E-M5. These update the screen at regular intervals to show the current state of the image during a long exposure. The display interval can be set anywhere between 0.5 and 60 seconds with a maximum display count (the total number of preview peeks) being 24 at 200 ISO (the display count drops as the ISO sensitivity increases). So for a 24 second 200 ISO exposure you could, for example get a preview update every second. You can also update the display by touching the screen or half-pressing the shutter release though this might be inadvisable due to the risk of moving the camera.
The PEN E-P5 also gets a new intervalometer function which can combine automatically shot sequences into a time-lapse movie. You can set the interval time and a delay time, both with a maximum limit of 24 hours 59 minutes and 59 seconds. Bizarrely, though, The maximum limit on the number of frames is 99. The built-in time-lapse movie combines the shots into a 10fps movie, so your 99 shots will play for just short of ten seconds. While that’s fine for a casual effort, it’s woefully short of the mark for serious time-lapse photography, where you’d probably want to shoot much longer clips and combine them outside the camera into a 24 or 30fps movie. It’s a good start though, and hopefully a feature Olympus will build on in future.
One final thing to note here is that the PEN E-P5 is the first mirrorless compact system camera to offer a 1/8000 shutter speed. This is something that will be greatly welcomed by anyone who wants to freeze very fast action or has tried to achieve shallow depth of field in bright light with a fast lens and has run out of shutter speeds even at the lowest available sensitivity setting. That’s unlikely to happen with the 14-42 f3.5-5.6 kit lens, and in fact I had to resort to shooting at 1600 ISO in bright sunlight to get a sample shot at 1/8000, but for brighter primes it’ll prove really useful, especially combined with the extended 100 ISO sensitivity – and again it’s great for freezing very fast subjects.
Olympus PEN E-P5 movie modes
The Pen E-P5 builds on the movie capabilities of its predecessor with modes matching those available on the OM-D E-M5 and the PEN E-PL5, including a best quality 1080p30 video mode. Rather than a variety of frame rates, the E-P5 provides different quality modes at the same resolution and frame rate, so the 1080p30 mode has two options, Fine at 20Mbps and Normal at 17Mbps. Likewise there are two 720p30 modes at 13Mbps and 10Mbps respectively.
Movies are encoded using H.264 and saved as QuickTime files with a MOV extension in the same folder as still images. There are also two lower resolution modes, 1280×720 and 640 x 480, both at 30fps, that are encoded using the older, less efficient, but more editing-friendly Motion JPEG codec and saved as AVI files.
The PEN E-P5 mode dial has a movie position which provides a 16:9 view with black bars top and bottom so you can frame up your shot properly. Movie recording can be also started in any shooting mode by pressing the dedicated movie record button to the left of the thumb rest on the rear panel, but the exposure and ISO sensitivity are set automatically. Switch to the Movie position on the mode dial and you have access to PASM exposure modes for movie shooting, but whilst you can set the aperture and shutter speed before pressing the record button, during recording the exposure is fixed. For all of these modes the ISO sensitivity is selectable, but like the other exposure settings is fixed once recording has started.
The PEN E-P5 inherits the E-PL5’s touch-focusing while filming, bringing it in line with Panasonic’s Lumix G models – so you just tap where you want the camera to refocus. Annoyingly this feature was not available on the OM-D E-M5, which bizarrely disabled the touch-screen once you started filming. You can see an example of the E-P5’s touch-focus in action in the movie section below. Olympus still doesn’t completely understand video features though as the new focus peaking is only available when shooting still photos on the E-P5, when it could have also been so useful for video too.
In Movie Mode the PEN E-P5’s Live control menu allows you to change a range of settings independently of the same settings in stills shooting modes. These include the movie mode and quality settings, exposure and AF modes (including Face priority modes), processing options (Picture mode) ISO sensitivity, and audio recording. You can also set the movie stabilisation here, with two options, Off, or a special Movie IS mode which, in addition to 5-axis Auto IS, counteracts for walking motion.
The E-P5’s art filters aren’t available from the Live view menu in Movie mode, but you can still use them for movies by selecting the Art position on the mode dial and pressing the movie record button. The effect processing can slow down the frame rate considerably. In some cases the slow, jerky playback that results can actually add to the effect, but in the faux tilt-shift Diorama mode the sound is turned off and playback maintained at 30fps to speed up the action. You can’t control the playback or select the in-focus area or adapt it for portrait orientated shooting, instead the E-P5 uses the the AF area to select the in-focus image area around which blurring is applied.
The PEN E-P5 inherits two movie effects introduced on the OM-D E-M5. Multi shot echo and One shot echo are really two variations on the same effect which freezes a single frame and holds it at reduced opacity while the action continues. Think of all those movies you’ve seen where someone has a drug slipped into their drink and you see their point of view as they stumble into the furniture and lose consciousness and you’ll get the idea. It has limited applications (unless you make a lot of those kinds of movies) but it can be disabled if you don’t want to be bothered with it. Also included is the feature which allows you to view the developments of long exposures at fixed intervals on the LCD screen.
It doesn’t end there. There’s an art fade movie effect which transitions from one picture mode to another or into any of the Art filters (see the example below) and a One-push tele-converter movie crop feature. While you might think this is gimmickry that’s better handled in post processing, that’s what many people said about the Art filters when they were introduced and they’ve proved hugely popular. So it could be that Olympus is once again pushing the boundaries of in-camera processing and that, as before, others will follow where it leads.
You can take photos while recording video, though images are limited to the 16:9 aspect ratio and the video clip is split before and after the shot. The E-P5 has built-in stereo mics and although there’s no external mic socket you can attach an Olympus or other external mic via the optional SEMA-1 microphone adapter connected to the accessory port. You can also adjust recording levels to one of three positions and there’s a 3-position wind-cut filter. Though you have to delve into the menu system for these settings which is a bit of a pain.
| |
|---|---|
| |
| |
| |
|---|---|
| |
| |
| |
|---|---|
| |
| |
| |
|---|---|
| |
| |
| |
|---|---|
| |
| |
| |
|---|---|
| |
| |
| |
|---|---|
| |
| |
Olympus PEN E-P5
handling
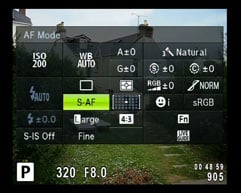
From a handling perspective, the redesign of the E-P5’s control layout makes it a completely different proposition to its predecessor and one with much greater appeal for photographers who like to have direct control of their exposure settings. At the heart of this is what Olympus calls its 2×2 Dial Control system comprising the front (Sub) and rear (Main) dials and a two-position switch mounted around the movie record button. When shooting manually, the switch on the back can quickly be moved to one of two positions. In the first position, the front dial adjusts aperture while the rear dial affects shutter speed. With the second setting, the dials change the ISO value and White balance respectively. In semi auto modes the main dial controls the exposure component with the front Sub dial handling exposure compensation. Alternatively, you can assign other functions to the rear switch.
The PEN series has gained a reputation as one of the most customisable of all mirrorless compact systems and the PEN E-P5 is no exception. Virtually every button or dial is customisable including the movie record button and the arrow pad. The custom functions are similar to those on the OM-D E-M5 and earlier PENs, so here I’ll confine myself mainly to the the 2×2 controls i.e. the Main and Sub dials along with the dual-position switch on the rear.
As I’ve already mentioned, in the default set up, the dials control exposure settings with the switch in position 1 with ISO sensitivity and White balance available in position 2. The Custom menu provides three further modes for the Lever function; Mode 2 switches the dial functions (i.e. with ISO sensitivity on the rear dial and White balance on the front rather than the other way around). In Mode 3 the switch controls the function of the movie record button at its centre, with any assigned function in position 1 and movie recording in position 2. Finally, Mode 4 toggles between two AF modes.
The only criticism I’d make of this is that if, like me, you tend to set auto white balance and forget about it, the dial that’s allocated to White balance in position 2 is wasted. It’s not possible to set custom dial functions for position 2, so you’re stuck with it. But there are so many custom options on the E-P5 it’s hardly worth worrying about. One other custom option worth noting is that you can assign any position on the Mode dial to one of the four Custom settings, Myset 1-4. So if you’re not a fan of Art filters or the new Photo story mode, you can assign them to a more useful custom set up.
As on the E-PL5, the touch-screen provides touch shooting and touch focussing functions and, the PEN E-P5 becomes the second PEN which allows you to use the touch screen to change the focus while shooting a movie. Aside from that, the touch screen isn’t particularly central to the EP-5’s handling. You can use it to select the AF area after first pressing the left button on the rear dial and to select settings on the Live control and Super control panels, but not to change the settings once they’re selected. For that you need to use the rear dial and OK button.
While you can scroll through images in playback mode, you can’t use pinch gestures to zoom in and out (though you can pan around by dragging with your finger), instead a zoom slider control appears on the right. And the PEN E-P5’s menu system is a touch-screen dead zone, relying solely on the rear dial to navigate and select menu options. Interestingly the touch screen plays a much bigger role when using the novice-targetted Live Guide adjustments.
It’s a different approach to that of the Lumix GF6 which can be fully controlled via the very capable touch-screen interface. Once you’ve pressed the GF6’s Q.Menu button, you can use the touch-screen to adjust the photo style, flash mode, movie and photo quality, focusing mode, focusing area, metering, exposure compensation, sensitivity and white balance; you can even tap to adjust the aperture and shutter speed with two more soft-function keys on-screen. Panasonic’s touch screen interface is broader in scope and better by design, having said that, the low-key nature of the E-P5’s touch interface is likely to appeal to those who like the idea of touch-control for some things, like focussing, for example, but just don’t want it to be at the centre of everything. Ultimately, if you really don’t like it, you can turn it off altogether.
 |  |  |
 |  |  |
 |  |  |
Olympus PEN E-P5
wifi
The E-P5 becomes the first PEN to feature built-in wifi which you can use to connect to a smartphone for picture sharing, GPS tagging and remote control. To use the wifi you’ll need the Olympus Image Share app which is currently available for Android and iOS devices, I tested it with my iPhone 4S. While Olympus might be a step behind Panasonic, which uses NFC (Near Field Communication) technology to initiate wifi connections between suitably equipped cameras like the GF6 and a compatible smartphone simply by tapping them together, the E-P5 does have a neat trick which simplifies the set up by removing the need to enter SSID and password details.
When you press the wifi screen icon a QR code is displayed which you then scan using the Image Share app to automatically set up a connection. This worked first time without any problems. There are two connection options, one-time, which uses a unique password for when you just want to share a few selected images with friends, and Private, which allows you to connect using the same password each time. So when using your own phone you only have to go through the QR scanning routine once, after which you just turn on the wifi and select it from your phone settings in the same way you would any other access point.
Once connected, you can remote control the camera, import photos to your phone, apply Art filters, (but not crop or edit in any other way) and share to Facebook, Twitter, email, or simply back to your phone. The remote functions are basic, you can tap to focus and shoot and there’s a self-timer that’s adjustable from two to 10 seconds, but no other camera controls are provided. Images are saved to the card in the camera and after each shot you have the option to save a version to your phone.
Photos can be imported to a smartphone at their orginal resolution or a range of smaller sizes down to 1024×768, but everything has to go via the phone app, there’s no way to backup files directly to a computer using either a peer to peer connection or via a wireless LAN. The E-P5 is always setup as the access point and, though you can connect to it with devices other than your phone, there’s no way to access images other than with the app. The Olympus Viewer 3 software can’t access the camera even when you’re connected to it via wifi, which is a shame. So overall the Wifi functionality is basic, and lacks the extended control provided by the Panasonic app with the Lumix GF6, but it’s easy to use and it works flawlessly.
Though the PEN E-P5 lacks a built-in GPS receiver, the Olympus Image Share app provides the option to record a GPS track log which you can subsequently use to tag images in the camera. Again, this is easy to set up, you simply turn on the logger and leave it to get on with the job. When you’re ready you can then connect to the camera and tap the button on the app that tells it to find any images for which track log data exists and tag them with the relevant co-ordinates.
Olympus PEN E-P5 Autofocus
The PEN E-P5 inherits the AF system, with some feature enhancements, from the OM-D E-M5, which, when launched, was claimed was the World’s fastest AF system and Olympus is claiming the E-P5 is even faster. It’s certainly very fast, at least in single AF mode where there’s very little if any perceptible delay between half pressing the shutter and the AF locking on, even when the lighting conditions are less than optimal. Compared with the Lumix GF6 it was impossible to detect a difference in the speed of AF response between the two. Both models were, however, significantly faster than the Fujifilm X-M1. If minimising delay is a priority a new custom mode allows you to set a shorter than normal shutter lag time at the cost of slightly reduced battery life. Olympus claims this reduces the lag to 44ms.
The default AF area mode has 35 areas in a 7×5 grid covering all but the edges of the frame. You can quickly select an individual area either by using the four-way controller or by tapping the screen and the AF area can be set to one of four sizes. The screen can also be used to meter, focus and shoot in a single tap – process that happens virtually instantaneously even when the camera has to refocus from close to distant objects. With face detection enabled the camera will lock onto multiple faces in the frame and you can also set one of three eye priority AF modes – left, right and auto which selects the eye closest to the camera. All very useful and it works, though for the eye priority mode to work effectively the subject does need to be reasonably close and well lit.
Set to continuous AF mode, the E-P5 will adjust its focus as the subject approaches or moves further away. Like other cameras with contrast-based AF systems this can prove a bigger challenge than those with phase-detect AF systems. A contrast-based system can’t help but search back and forth a little when confirming focus, which means it may struggle to keep up with a subject in constant motion. In its favour, the E-P5 can certainly perform the confirmation process very quickly, and as a consequence can generally do a fair job at tracking, but it’s no pro sports camera in this respect.
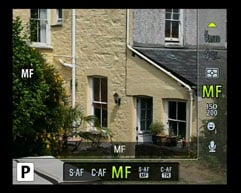
As well As S-AF and C-AF modes there’s a C-AF TR tracking mode which locks onto a subject and follows it around the frame. There’s also S-AF MF which allows you manually fine tune once the AF has locked and finally Manual focus. With MF assist activated, or by making use of the magnify button, manual focusing is surprisingly easy. In my review of the OM-D E-M5 I bemoaned the fact that it lacked a focus peaking feature like that found on Sony’s NEX range, which highlights the edges of high-contrast (i.e. in-focus) areas and guess what? Olympus has now included focus peaking on the E-P5 and it’s incredibly useful when manually focusing, especially with non-native lenses via an adapter. You can assign peaking to a button or have it activate with MF Assist when the focus ring is turned in MF mode and select one of two colours, black or white, though not red and yellow as on the NEX models, maybe next time. In a missed opportunity though, focus peaking is only available when shooting stills, not video, which is a real shame. Panasonic offers focus peaking for stills and video on the Lumix G6, although sadly it’s not available at all on the GF6.
Olympus PEN E-P5 Continuous shooting
The E-P5 matches the OM-D E-M5 with a fastest sequential shooting speed of 9fps with the focus and exposure locked on the first frame. If you’d like continuous AF, you need to switch down to a slower speed of 5fps, although this is a little quicker than the OM-D E-M5 offered. According to the specifications the buffer can hold 18 RAW images. To test the E-P5’s sequential shooting I fitted it with a newly formatted Sandisk Extreme Pro UHS-1 Card. For these tests the release setting which turns image stabilisation off during sequential shooting in the default position was left unchanged, in other words the IS was disabled.
First I set the image quality to Large Normal JPEG and fired a burst of images by holding down the shutter release. The PEN E-P5 shot 26 at a regular rate, before slowing appreciably, taking 2.6 seconds for the initial burst making a frame rate of exactly 10fps. Switching to Large fine JPEGs didn’t slow the frame rate, but reduced the burst slightly to 23 frames, before slowing. Incidentally, once the intitial 10fps burst is over, the E-P5 slows to around 4fps.
Switch to RAW and you’ll get a burst of 18 frames – exactly as it says in the specification. The full buffer takes 12 seconds to empty, you can start shooting again at any time, but once the buffer is full, the E-P5 will drop back to a slower rate. Below you can see 15 images from a sequence shot with the E-P5 in the Sequential H 9fps mode.
 |  |  |  |  |
 |  |  |  |  |
 |  |  |  |  |
Olympus PEN E-P5 Sensor
The PEN E-P5 shares the same 16.1 Megapixel MOS sensor introduced on the OM-D E-M5 and also used in the PEN E-PL5. The sensor is the same size as used in other Micro Four Thirds compact system cameras including the Panasonic Lumix GF6. As such it’s smaller than the APS-C sensors common in DSLRs and used in the Fujifilm X-M1 and results in a 2x reduction in the field of view compared with a full frame 35mm sensor.
The new sensor increases the E-P5’s sensitivity range over its predecessor with the same 200 base ISO setting and an extended range from 100 to 25600 ISO. The shutter speed range is 1/8000 to 60s plus Bulb and time modes with a maximum 30 minutes. Files are saved as JPEGs at one of two compression settings, Fine and Normal. At the best quality fine setting image files are around 5 to 8MB in size. The PEN E-P5 can, of course, also save RAW files.


