Olympus ‘PEN’ E-P2
-
-
Written by Gordon Laing
Intro
The Olympus E-P2 is a compact camera with a DSLR-sized sensor and removeable lens mount. Announced in November 2009, it’s an enhanced version of the E-P1 launched just five months earlier. Like that model, the E-P2 is based on the Micro Four Thirds standard jointly developed by Olympus and Panasonic to deliver DSLR quality and flexibility without the size, weight and perception of difficult operation.
Micro Four Thirds achieves this goal by taking the sensor of the existing Four Thirds DSLR standard, but dispensing with the traditional SLR mirror and optical viewfinder to allow a much shorter lens to sensor distance; this in turn enables smaller and lighter cameras to be built, and the E-P2, like the E-P1 before it, is certainly compact considering the size of the sensor within.
The E-P2 takes the retro-styled E-P1 with its 12.3 Megapixel sensor, HD video and built-in stabilisation, and makes one major improvement alongside a number of minor enhancements. The big feature is a new accessory port positioned below and behind the flash hotshoe. The first accessory to exploit this port is the VF-2 high resolution electronic viewfinder which is normally bundled with the E-P2. Olympus also offers a second accessory which equips the E-P2 with an external microphone input to greatly improve the audio quality in its Movie mode. Other enhancements include two new Art Filters, an i-Enhance Picture Mode, the addition of a manual exposure controls for Movies, AF tracking and support for CEC, allowing HDMI control of the camera with a compatible TV. To further differentiate the E-P2 from its predecessor, it’s also finished in smart black. But anyone hoping for an improved screen, faster AF or a popup flash will be disappointed.
In our review of the E-P2, we’re concentrating on its new features and the key aspects where it differs from the E-P1, along with its rival from Panasonic, the Lumix GF1. This review is designed to be read alongside our original E-P1 report which should be referred back to for more detail on the aspects both cameras have in common. So check out our Olympus E-P1 review for further information on these shared features as we’ll be brief about them here. You may also wish to open our Panasonic Lumix DMC-GF1 review for further comparisons.
Despite sharing the same sensor and image processing pipeline as the E-P1, we’ve fully retested the E-P2 for real-life detail and noise. Reflecting its audience of enthusiasts, we’ve also now included extensive results in RAW. To further complement our existing E-P1 review, we additionally tested the E-P2 with its other kit lens, the Olympus M.Zuiko Digital 17mm f2.8 pancake prime and have included results for it at various apertures.
Olympus E-P2 design and build
The Olympus E-P2 is physically identical to the original E-P1 with two exceptions: the black finish and a slightly raised hotshoe making room for the new accessory port just below and behind it. Despite sharing exactly the same body design and controls though, the new black finish really does give the E-P2 quite a different look to the silver or white E-P1. The preference between silver or white and black is of course entirely personal, but we felt the E-P2 looked smarter than either of the E-P1 versions. Either way, you don’t have a choice of colours with the E-P2, so if you want the accessory port and the other enhancements, you’ll need to accept the black finish.
Like the original E-P1, the E-P2 is a little larger in the flesh than it looks in the photos. It’s certainly compact compared to a DSLR, but measuring 121x70x35mm for the body alone (without any lens mounted) and weighing 385g with battery and card, it’s definitely on the chunky side of the compact market. To be fair though, Panasonic’s Lumix GF1 is virtually the same size at 119x71x36mm, albeit a bit lighter at 341g including battery. Remember the E-P2 has built-in stabilisation though whereas the Panasonic relies on stabilised lenses to counteract wobbles.
Both models compare favourably with a typical enthusiast’s compact like the Canon PowerShot G11, which at 112x76x48mm may be 9mm narrower, but 6mm taller and a considerable 13mm thicker; the G11 is also slightly heavier at 402g including battery. Of course the G11’s dimensions and weight include a built-in 5x 28-140mm equivalent zoom lens, while the E-P2 and GF1 measurements above are for their body and batteries alone.
The smallest lens option for the E-P2 is the Olympus 17mm pancake, a fixed f2.8 prime adding 71g to the weight and 22mm to its thickness, while the standard 14-42mm 3x zoom adds 150g to the weight and 44mm to its thickness. We tested the original E-P1 with the 14-42mm zoom, and the E-P2 with the 17mm pancake, and while the latter doesn’t have the flexibility of an adjustable focal length, it was preferred for its smaller size and brighter aperture. We also found the Panasonic GF1 was ultimately more charming when fitted with its 20mm f1.7 pancake prime lens, and remember this lens will also work on the Olympus bodies thanks to it conforming to the Micro Four Thirds standard.
Indeed, the combination of the Panasonic 20mm f1.7 lens and the built-in stabilisation of the Olympus bodies make them the ultimate low-light combination in the Micro Four Thirds world. The Panasonic 20mm may be a little thicker than the Olympus 17mm, but it’s ultimately preferred for its brighter aperture, while the black finish of the lens is a better match for the E-P2.
Both the E-P2 and E-P1 share exactly the same controls, so for full details, see our Olympus E-P1 review. As commented in that review, it’s nice to have the dual control wheels, but we personally found both occasionally tricky to operate – ergonomically you may find them fine, but we’d recommend trying them out in person. Sadly there’s still no popup flash, although it’s worth noting the recently announced Olympus EPL-1 model does have one, along with the same accessory port as the E-P2.
Olympus E-P2 accessory port and VF-2 viewfinder
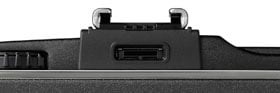 | |
The E-P2’s accessory port is located just below and behind the flash hotshoe – which itself has been slightly raised to accommodate it. This is the major new feature of the E-P2 over the E-P1, and no doubt inspired by the similar port on the Panasonic Lumix GF1. The Olympus E-PL1, announced three months after the E-P2, also features the same port.
While both the Olympus and Panasonic ports are located in the same place and primarily used to support electronic viewfinders, they’re incompatible with each other – so you can’t use Olympus accessories on the Panasonic or vice versa. It’s a shame a standard accessory port couldn’t have been included as part of the Micro Four Thirds standard from day-one.
While the Panasonic GF1’s accessory port can – to date – only be used with its optional LVF1 electronic viewfinder, the Olympus E-P2’s accessory port boasts greater flexibility with two accessories known at the time of writing. The main accessory is of course the VF-2 electronic viewfinder supplied as standard with the E-P2, but Olympus has also announced the (S)EMA-1 which equips the E-P2 with an external microphone input. Both accessories slide onto the hotshoe, with an over-hanging plug mating with the accessory socket; this means only one accessory can be mounted at a time, and by hogging the flash hotshoe, also obviously prevents the simultaneous use of an external flashgun.
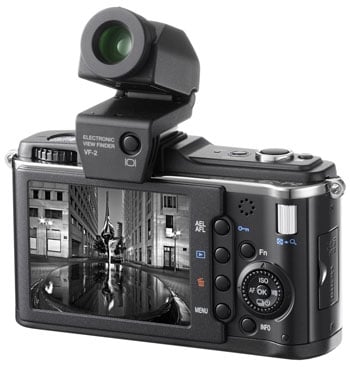 | |
The Olympus VF-2 and Panasonic LVF1 may both be electronic viewfinders which can vertically tilt and replicate what you see on the screen with 100% coverage, but both are worlds apart in quality. After the superb ‘Live View Finders’ of the larger Lumix G1 and GH1, Panasonic decided to keep costs down on the LVF-1 by equipping it with an average 202k pixel resolution. The Field Sequential Colour technology may have eliminated any gaps between the dots, but the view itself was much coarser than the 1440k dots of the G1 and GH1 viewfinders and ultimately disappointing.
Olympus has gone the other way with the VF-2. This larger unit matches the 1440k dot resolution of the Lumix G1 and GH1 viewfinders, albeit with a smaller quoted magnification of 1.15x to the Panasonic’s 1.4x. 1440k dots correspond to 480k colour pixels, or an 800×600 grid. Like the Lumix G1 and GH1 before it, this allows the VF-2 to deliver a highly detailed image which is a joy to compose with, and which makes manual focusing much easier.
|
Without any visible gaps between pixels, we assume the VF-2 shares a similar display technology to the Panasonic Live View Finders, but in use it managed to avoid the occasional rainbow tearing effect we experienced with the Lumix models when glancing quickly from one side of the frame to the other. Sadly we were unable to compare the VF-2 side-by-side against the G1 and GH1 Live View Finders, so can’t make any definitive statements on superiority, but the bottom line is the Olympus VF-2 looked absolutely superb with its large, bright and detailed image – and again avoided the artefacts we experienced with the Panasonic models. It’s certainly vastly superior to the Panasonic LVF-1, although we can’t rule-out an improved model in the future (assuming the Lumix accessory port is up to the job).
So the VF-2 is very nice, but how often would you actually use it? We were initially sceptical about how often we’d switch to it, not to mention concerned over the extra size it added to the top of the camera, but in use we ended up composing roughly half our shots with it. The VF-2 really came into its own when bright sunlight made the screen harder to view, or at times when we wanted a more detailed look at the subject – the fine detail also makes manual focusing much easier.
One often overlooked benefit of using a viewfinder (whether electronic or optical) is that composing with the camera held up to your face also allows you to hold it more steadily, reducing shake. It should also be noted the extra bulk of the VF-2 mounted on the E-P2 didn’t prevent it from fitting in any of the bags or pockets we’d used with the camera body alone. Ultimately we very much enjoyed using the VF-2 and it remained proudly mounted on the E-P2 throughout the review period. However good it is though, remember like all electronic viewfinders, the clean, smooth image under bright conditions will become noisy and less fluid in low light.
That said, for the number of other people we showed it to who enthused about its quality, there were an equal number who couldn’t see the point. There’s also the undeniable fact it adds considerably to the price of the E-P2, so you have to ask yourself if you really want it. There are of course a number of other benefits to the E-P2 over the E-P1, but if you’re not bothered about the VF-2, you could save yourself a great deal by going for the older model without missing out on too much. Alternatively if you can’t afford the VF-2 today, but don’t want to rule out the possibility of using it in the future, you could always go for the more recent Olympus EPL-1 instead, which features the same accessory port as the E-P2, not to mention a new popup flash, albeit with a smaller screen and more basic controls.
The inclusion of the VF-2 in the E-P2 kit does however go some way to make up for the average screen inherited from the E-P1. Like that model, the E-P2 is equipped with a decent-sized screen at 3in, but one with a disappointingly average 230k resolution. This is in contrast to the more detailed 460k screen of the Panasonic Lumix GF1. While the GF1’s screen is preferred under ideal conditions, it is however important to note the Olympus screen remains more visible in direct sunlight thanks to lower reflections. See our Olympus E-P1 review for full details on the screen and menus.
Olympus E-P2 focusing
Following the accessory port, the other enhancements to the E-P2 over the E-P1 are more modest, although still useful. Arguably the most important of them concerns improvements to the autofocus, at least in terms of capabilities if not actual speed.
New to the E-P2 is an AF tracking mode, which allows you to place a target over a desired object, after which the camera will follow it while the shutter release remains half-pressed. This works very similarly to the AF tracking option on the Lumix GF1, although for easier initial aiming, you should also set the AF to a single area, otherwise the E-P2 will have to guess at what you’re hoping to follow from its 11 areas.
|
|
|
|
In use, the tracking worked fairly well, quickly following the subject as it moved around the frame, although changes in distance were limited by the camera’s Continuous AF speed and the lens in use. With the Olympus 17mm f2.8, there was a small but perceptible delay as the lens adjusted to changes in distance. It snapped-into focus after a moment, making it fine for subjects which paused after moving or for minor adjustments in composition, but anything moving quickly and continuously could be lost.
One of the complaints of the original E-P1, especially compared to the Panasonic GF1, was its fairly leisurely AF speed. This was slightly improved with the v1.1 firmware update for the E-P1, and the E-P2 (as tested) inherits this most recent capability. As such you’re looking at roughly one second to autofocus with the 17mm f2.8 lens under ideal conditions, which still makes it slower than the GF1. In general-use with static subjects you won’t care, but as soon as you’re trying to capture fleeting smiles from fast-moving kids, you’ll find the GF1 enjoys a higher success rate. In our tests, the GF1’s face detection also proved more reliable than the E-P2, with the Olympus often focusing just in front of the identified face when the subject was turned slightly. We experienced the same issue with the E-P1.
Olympus E-P2 Art Filters
The Olympus E-P2 is equipped with the same six Art Filters of the E-P1 along with two new ones, Diorama and Cross Process. Art Filters apply digital special effects to images, and while you can achieve the same results in software afterwards, the opportunity to do it in-camera is obviously more convenient.
If you don’t want to permanently disfigure your JPEGs, it’s also possible to apply any of the eight Art Filters to the E-P2’s RAW files using the supplied Olympus Master software, although interestingly when an E-P1 RAW file is opened in the same version of the software, only the original six filters become available.
Olympus E-P2 Art Filters: Diorama / Cross Process | ||
 |  | |
Diorama Art Filter |
Cross Process Art Filter | |
The new Diorama Art Filter applies a tilt-and-shift effect which blurs much of the image, leaving a sharp strip in the middle. This in turn delivers the miniaturisation effect much-loved by owners of exotic tilt / shift lenses. The Cross Process Art Filter applies vibrant colour and contrast effects to achieve a stark and dramatic looking image. You can see examples above of both Art Filters applied to our standard outdoor test composition. Like earlier Art Filters, you may love or loathe the effect, but again they don’t do anything you can’t achieve in software later. For examples of the other six Art Filters, see our Olympus E-P1 review.
Olympus E-P2 i-Enhance
The Olympus E-P2 features a new Picture Mode called i-Enhance. This analyses the image and selectively boosts the contrast and saturation in certain areas in an attempt to mimic your often enhanced memories of the subject. Olympus cites the example of a sunset which you may recall looking much more vibrant than captured in your photos.
i-Enhance is the first entry in the E-P2’s list of Picture Modes, although Natural, the third option, remains the default for the camera when set to PASM. Switch the camera to iAuto though, and i-Enhance is automatically applied whether you like it or not as no other Picture modes are available
In use we tried i-Enhance on a variety of compositions, and it certainly boosted certain areas while leaving others alone for a punchier result without looking too unnatural. As an example, blue skies and lakes became more vibrant without overly saturating the rest of the image. This was certainly a more natural-looking and preferable result to simply boosting the saturation and contrast overall. As such, it’s a useful quick fix for those who miss the vibrant output from a traditional compact but don’t want anything which looks too artificial.
Olympus E-P2 i-Enhance: off (Natural) / on | ||
 |  | |
Natural Picture Mode |
i-Enhance Picture Mode | |
Like the Art Filters, i-Enhance can also be applied after the event to RAW files processed with the supplied Olympus Master software, and with a choice of three levels too. But like the two new Art Filters, this option disappears when you open an E-P1 RAW file in the same software.
Olympus E-P2 movie mode
The Olympus E-P2 features the same movie modes as the E-P1 with the choice of either 640×480 (VGA) or 1280×720 (720p HD) video recorded at 30fps and encoded using the Motion JPEG format then stored in an AVI wrapper. As before you’re looking at about approximately 1MB per second of footage in the HD mode, with each clip limited to a maximum file size of 2GB; Olympus estimates this will get you around seven minutes of HD footage or 14 minutes in the VGA mode. You can see two examples of the HD movie mode below using the 17mm pancake lens; the first clip was handheld and in fully automatic with stabilisation enabled.
Like the E-P1, a Movie AE menu allows you to shoot video in Program or Aperture Priority modes or with any of the Art Filters applied in real(ish) time (including the two new ones), but new to the E-P2 is a full Manual option. This allows you to fix the shutter speed and aperture as desired for more creative effects and is a welcome upgrade.
You can see an example of shooting in Manual mode in the lower of our two video clips to the left – it shows the E-P2 manually focusing from one subject to another with a shallow depth-of-field using the 17mm pancake lens at f2.8.
As before though, shooting movies with the more intensive Art Filters (such as the new Diorama or older Grainy B&W and Pinhole options) will greatly reduce the frame rate with jerky results.
The E-P2’s accessory port also allows you to mount the (S)EMA-1 adapter which lets you connect an external microphone for far superior audio quality during movies. The Manual exposure mode and option to connect an external microphone – albeit with an additional accessory – are both decent upgrades to the movie capabilities of the E-P2, and could swing the decision from the E-P1 for serious film makers.
Registered members of Vimeo can download the two clips shown above for closer examination on their own computers. You can find them here and here.
Olympus E-P2 HDMI enhancements
Behind a door on the right side of the E-P2 you’ll find what appear to be the same combined USB / TV output and mini HDMI port as the E-P1, but like many newer cameras the HDMI port has been upgraded here to support Consumer Electronics Control, or CEC for short. CEC allows the E-P2 to be controlled over HDMI by a compatible TV set, so you could use the TV’s remote to browse images and start slideshows.
Once again, this page has concentrated on the brand new features of the Olympus E-P2, so if you want more information on the things it shares in common with the E-P1, check out our Olympus E-P1 review!
As mentioned above, the E-P2 may share the same sensor and image processing as the E-P1, but we’ve conducted all our real-life tests for detail and noise again for this new model, and over the following results pages you’ll also find detailed comparisons in RAW, along with a report on the optical quality of the Olympus 17mm f2.8 pancake lens. So head on over to our Olympus E-P2 Real-life results, and be sure to check all the sub-categories for the RAW, noise and lens reports.


