Olympus PEN E-P1
-
-
Written by Gordon Laing
Olympus E-P1 lenses
The E-P1 is equipped with a standard Micro Four Thirds lens mount and like full-sized Four Thirds bodies, its sensor results in a field-reduction of two times – so the 14-42mm kit lens offers coverage equivalent to 28-84mm. The E-P1 can use any Micro Four Thirds lens, and thanks to the short sensor to mount distance, various adapters allow it to accommodate a number of other lenses. Most obviously there’s an adapter for full-sized Four Thirds lenses, but additional third party adapters allow you to mount Nikon F, Canon FD, Pentax K, OM system, Voigtlander and Leica M lenses.
 |
This gives Micro Four Thirds bodies an enormous choice of optics, including some very tempting high-end primes, but there are unsurprisingly restrictions in their use. Autofocus is only possible with Micro Four Thirds lenses or full-sized Four Thirds models, although the latter won’t support Continuous AF on the E-P1. Metering is possible with Micro Four Thirds, Four Thirds or OM system lenses, but pretty much everything else becomes a complete manual experience. Whatever you mount, you’ll still be looking at a field-reduction of two-times, and remember the mount itself wasn’t designed with hefty third party lenses in mind, so beware of damage. Caveats aside though, these adapters give the Micro Four Thirds standard a unique advantage in the market.
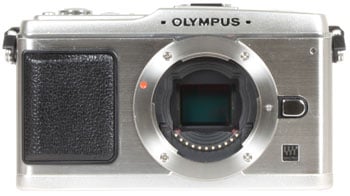
One glance at the photo of the E-P1 body above reveals another fairly unique aspect about the Micro Four Thirds standard: with no reflex mirror and a shutter that’s open by default, the sensor (or at least its protective filter) is exposed to the elements by default. This is a little disconcerting at first, although potentially greater damage could be done to the delicate shutter curtain if it were closed.
Like other Micro Four Thirds models to date, the E-P1’s sensor is protected from dust and other foreign particles by the legendary SuperSonic Wave Filter, or SSWF for short, and a small light on top of the body illuminates when the filter is active. In our standard anti-dust tests where the body is left open inside and outside for ten minutes each, the E-P1 managed to avoid any troublesome dust marks. Like other (Micro) Four Thirds models, it’s not so much that the dust isn’t there, but it’s so far out of the focal plane to rarely come into sharp focus even at f22. We spotted a couple of very faint marks at f22, but they were barely visible without Levels adjustments. By f16 they’d disappeared.
Olympus launched the E-P1 with two new Micro Four Thirds lenses, and kits with either are available. There’s the M.Zuiko Digital 14-42mm f3.5-5.6 zoom and 17mm f2.8 pancake prime, which join Panasonic’s existing Micro Four Thirds lenses, the G VARIO 14-45mm f3.5-5.6, 45-200mm f4-5.6, 14-140mm f4-5.8, 7-14mm f4 and 20mm f1.7 pancake prime.
The Panasonic 20mm f1.7 will undoubtedly be a popular option for the E-P1 as the combination of a bright aperture and a body with built-in stabilisation will be great for low light work.
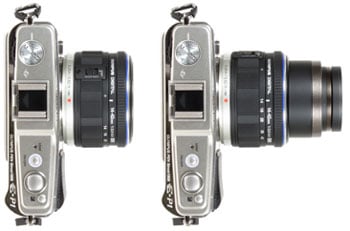 |
The Olympus M.Zuiko Digital 14-42mm kit zoom is not without its own appeal, featuring an interesting physical design which allows it to collapse down to 44mm in thickness when not in use.
When you want to use the camera, you simply twist the zoom ring anti-clockwise to extend the barrel, and once you reach the 14mm focal length, the mechanism locks into a normal range. To collapse the lens again, you push a switch on the side of the barrel which allows the zoom ring to twist clockwise beyond the 14mm mark and back to its transportation size.
|
When extended for use, the barrel adds between 27 and 33mm to the total length depending on the focal length, so the collapsed configuration is certainly much more compact, albeit still double the thickness of the pancake prime – you can see examples of the zoom in its various configurations here. Two annoyances with the kit zoom are a rotating front section (frustrating for users of polarising filters, although par-for-the-course with most DSLR kit zooms), and the tiny lens cap which clips onto the equally narrow 40.5mm filter thread – we almost lost this on numerous occasions.
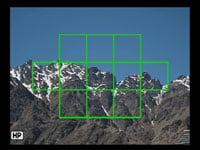
As mentioned above, the sensor size results in a field-reduction factor of two times, so the 14-42mm zoom delivers equivalent coverage of 28-84mm. You can see an illustration of this coverage on the E-P1 below.
Olympus E-P1 coverage with M.Zuiko Digital 14-42mm kit zoom | ||
 |  | |
14-42mm at 14mm, f8 (28mm equivalent) |
14-42mm at 42mm, f8 (84mm equivalent) | |
Olympus E-P1 image stabilisation
Like most of the E-series DSLRs which preceded it, the E-P1 features built-in stabilisation which physically shifts the sensor. This has the benefit of counteracting camera-shake with any lens you attach, and is a key advantage it has over Panasonic’s GF1, which instead relies on stabilised lenses. Considering both the E-P1 and GF1 bodies are roughly the same size, it’s all the more impressive to find sensor-based stabilisation in the Olympus – although despite being a 100% live view system, the stabilising effect doesn’t appear to be visible on-screen while composing.
There’s three IS modes: IS1 stabilises constantly, IS2 only stabilises in the vertical axis for use when panning, while IS3 only stabilises in the horizontal axis for use when panning with the camera held on its side. Considerately, you can also manually enter focal lengths between 8 and 1000mm when using lenses which aren’t automatically recognised by the camera.
Olympus E-P1 with M.Zuiko Digital 14-42mm Image Stabilisation IS1 off / on | ||
 |  | |
100% crop, 14-42mm at 42mm, 1/20, 100 ISO, IS off |
100% crop, 14-42mm at 42mm, 1/20, 100 ISO, IS1 enabled | |
To test the stabilisation of the E-P1 we took a series of photos with the kit lens zoomed-into an equivalent of 84mm at ever-decreasing shutter speeds 1EV apart. We started at 1/80 as this is close to what conventional wisdom would suggest to avoid camera shake at a focal length of 84mm in a non-stabilised system. We repeated the sequence with and without stabilisation enabled.
Under the conditions of the day, we required a shutter speed of at least 1/80 to avoid camera-shake with stabilisation turned-off. With IS enabled, we achieved a similar degree of sharpness at 1/20, corresponding to two stops of compensation. You can see 100% crops taken from both the stabilised and non-stabilised images at this shutter speed above. Like other body-based systems we’ve tested, the E-P1’s stabilisation proved slightly less effective than lens-based optical systems. But while we didn’t achieve the usual three stops of compensation with the E-P1, it’s still very useful to have two at your disposal, and a key advantage it has over the Panasonic GF1.
Olympus E-P1 focusing
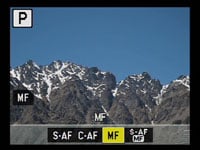
The Olympus E-P1 is equipped with an 11-area contrast-based autofocus system. You can choose to use all 11 areas automatically, or manually select from one in single-target mode. There’s also the choice of Single AF, Continuous AF or Manual focusing modes, along with an S-AF+MF mode which allows you to fine-tune the focusing manually after the AF system has got close. There’s also a Face Detection option.
Note like other Micro Four Thirds models, Continuous AF only works with Micro Four Thirds lenses – fit anything else, including Four Thirds models with an adapter, and you’ll be limited to Single AF at best. If you intend to use the E-P1 with non Micro Four Thirds lenses via an adapter, you may wish to verify which focusing (and metering) modes are supported.
Manual focusing on Micro Four Thirds lenses (to date) is also a fly-by-wire process where a motor actually performs the adjustment based on a turn of the manual focusing ring. If you’re used to mechanically-linked focusing, this process can feel a little detached, although it does allow the E-P1 to offer fairly unique options like reversing the effective direction of the focusing ring.
 |
 |
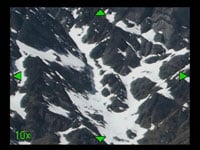 |
Unlike most DSLR kit lenses which force you to twist the end of the actual barrel, the E-P1’s 14-42mm kit lens features a dedicated and smooth manual focusing ring. Twisting this in Manual focusing mode with MF Assistance enabled presents a magnified view at the same 7x or 10x as the Live View assistance option, allowing you to confirm sharp focus. It works very well.
In use the contrast-based AF system of the E-P1 proved to be a mostly reliable, but fairly leisurely process. With the original 1.0 firmware running on both the body and kit zoom, you’d be typically looking at between one and 1.5 seconds for the focusing to work back and forth before locking-on. In mid-September 2009, Olympus released a firmware update (version 1.1) which claimed to improve AF speed. In our tests with firmware 1.1 running on both the body and kit zoom, the AF speed was certainly a little faster, but you were still looking at around one second (or just under) to lock-on.
We also found that while the face detection system quickly identified and locked onto subjects in a variety of conditions, the subsequent focusing itself was happiest when the subject was facing the camera. As the subject turned to profile, the on-screen frame still identified them easily, but we found several occasions when the subject on the actual image itself was slightly out of focus. This proved problematic when shooting our usual portrait in the magazine shop, forcing us to revert to a single-target AF mode instead.
So autofocus is a bit of a disappointment on the E-P1, operating fairly slowly with the kit zoom (even with the firmware update) and with patchy face detection. Both are areas where its arch rival, the Panasonic GF1, performs better – being both faster and offering more consistent face detection. As such, the E-P1 kit (as tested) is better-suited to landscapes and posed portraits than candid or action shots.
Olympus E-P1 metering and exposures
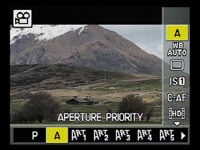
The E-P1’s shooting mode is adjusted using the recessed dial in the upper left side of the camera. Along with the usual PASM modes are full Auto, Movie mode, and positions for the Art filters and Scene presets. The Scene position lets you choose from 19 presets including panorama and document modes – see lower down this page for details on the Art Filters.
In PASM modes, the E-P1 has access to shutter speeds from 1/4000 to 60 seconds, while Bulb can be set to run from one to a maximum of 30 minutes. The maximum flash synch speed is 1/180 or up to 1/4000 in Super FP mode with a compatible flashgun. As mentioned above, the Function button can be assigned to deliver a depth-of-field preview, which also automatically increases the brightness of the screen to give a good preview of what you’ll actually capture; under dimmer conditions, there’ll inevitably be some noise on the screen preview, but this won’t appear on the final image.
 | |
The E-P1 offers the same five metering modes as its recent DSLRs: Digital ESP (now with 324 zones), Center-weighted, and the choice of three spot-metering options. Along with normal spot-metering, the additional HI Spot and SH (Shadow) Spot modes are designed for scenes dominated by large areas of light and dark respectively; these modes then deliberately over and under-expose respectively to compensate.
Exposure compensation is available in a range of +/- 3EV, although bracketing is fairly basic with the usual three frames up to 1EV apart. Interestingly there’s also an ISO bracketing option which fixes the shutter and aperture, and instead takes three frames at ISO values up to 1 EV apart.
A multiple exposure mode is also available, although with just two frames. In playback you get slightly more flexibility, with an option allowing you to overlay up to three RAW files to create a new single image.
Olympus E-P1 sensor and processing
|
The Olympus E-P1 is equipped with a 12.3 Megapixel Live MOS sensor, which measures 17.3x13mm. This is the same size as the sensor in full-sized Four Thirds DSLRs, and while it falls below the APS-C dimensions of most DSLR sensors (measuring approx 23x16mm), it’s simply massive compared to those found in typical compacts. This is the major selling point of the E-P1 (and the Panasonic GF1): to pack a DSLR-sized sensor with its benefits of low noise, high dynamic range and potentially shallow depth-of-field into a compact form factor. We also believe the E-P1’s sensor is the same as that in the E-620 and E-30 DSLRs.
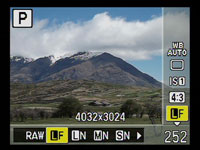 | 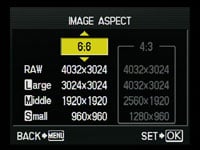 |
It generates 4:3 aspect ratio images which are narrower than the traditional 3:2 aspect ratio of other DSLRs, although a variety of cropped aspect ratios are also available: 3:2, 16:9 and a square 6:6 format. The maximum resolution is 4032×3024 pixels in the 4:3 format, with two lower resolutions and the choice of Fine or Normal JPEG compression. A compressed 12-bit RAW option is also available, accompanied by a JPEG if desired at a variety of resolutions. Large Fine JPEGs and RAW files typically measure 5.7 and 14MB each respectively.
Sensitivity runs between 200 and 6400 ISO in Auto, with a 100 ISO option available in manual selection. Image processing is applied by the latest TruePic V image processor, and while this is a newer processor to the E-620, the options available are almost identical. There’s optional noise reduction on long exposures and like recent E-series DSLRs, four different noise filter settings, Off, Low, Standard and High. You’ll find these options in the Custom menus section.
 | |
Alongside Auto White Balance and eight presets, there’s a custom mode and the option to dial in an exact colour temperature. You can also fine-tune the white balance in the amber / blue or green / magenta directions, or apply adjustments as part of a white balance bracketing option. Like the noise reduction settings, the fine-tuning is now hidden away in the custom menus.
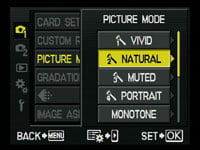
Contrast, sharpness and saturation are applied using a choice of Picture Modes: Vivid, Natural, Muted, Portrait, Monotone and a Custom option. In the colour Picture Modes, contrast, sharpness and saturation can all be adjusted on a scale of -2 to +2; the Custom mode adds a Gradation option. In the Monotone mode you can apply colour effects including a sepia tone, or simulate the use of colour filters including yellow, orange, red and green.
 |
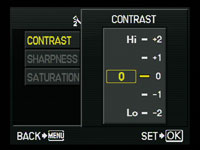 |
 |
We used the default Natural setting which looked good for most shots, but in some (including our main results images), came across as a little ‘over-cooked’ with high sharpening and contrast. As described above though, the E-P1 offers a wide array of adjustments, allowing you to fine-tune as desired.
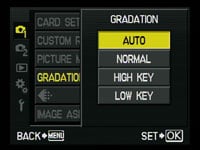
Also following recent E-series DSLRs, the E-P1 additionally offers a choice of Gradation options: along with the default Normal there’s High Key and Low Key settings which extend tonal graduations for subjects which are mostly highlighted or in shadow respectively. The Auto Gradation option activates the E-P1’s Shadow Adjustment Technology, or SAT for short.
SAT divides the image into regions and adjusts the brightness in each which Olympus describes as being effective for compositions with very bright or dark areas. Note: if you’ve set the Function key to enable Face Detection, then the Gradation will also set to Auto (handy for backlit portraits), but if you directly enable Face Detection using the screen controls, it won’t.
As with the E-620, we found SAT uses slightly quicker exposures to better-protect highlight areas, while artificially boosting shadow areas. The results can be fairly effective depending on the subject, although like all brightness-boosting technologies, there’ll be more visible noise in shadow areas.
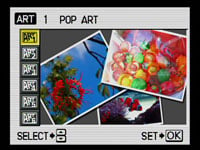 |
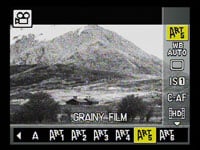
The E-P1 also inherits the E-620’s Art Filters, which Olympus bills as a headline feature. These six filters apply special effects to the image and go beyond the usual sepia or monochrome options on most cameras – although it has to be said, there’s nothing which can’t be done with post-processing in software afterwards. The key here is being able to apply the filters without the need to touch a computer, which could be handy if you’re software-phobic or printing direct from the card.
To apply an Art Filter, simply turn the mode dial to ART and choose the desired effect: like the E-620 you have the choice of Pop Art (which greatly saturates colours), Soft Focus, Pale and Light Colour, Light Tone, Grainy Film (which turns the image to monochrome with a grainy effect) and Pin Hole (which introduces vignetting to darken the corners and concentrate the viewer on the centre). Three appear to simply soften or mute the image, so we’ve shown examples of the most dramatic options below.
Olympus E-P1 Art Filters | ||||
 |
 |
 | ||
Pop Art Filter |
Grainy Film Art Filter |
Pin Hole Art Filter | ||
Olympus E-P1 movie mode
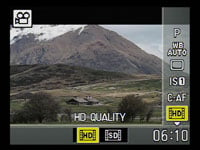
The Olympus E-P1 offers a movie mode at the choice of two resolutions: 640×480 (VGA) and 1280×720 (720p HD), both at 30fps. Video is encoded using the Motion JPEG format and stored in an AVI wrapper. You’re looking at about approximately 3-4MB per second of footage in the HD mode, with each clip limited to a maximum file size of 2GB; Olympus estimates that will get you around seven minutes of HD footage or 14 minutes in the VGA mode.
To start shooting video, turn the main dial to the Movie icon, then press the shutter release to start and again to stop. Stabilisation is available, but electronic rather than sensor shift, in turn resulting in a slightly enlarged image. Audio is recorded using the built-in mono microphone, and there’s no input for an external microphone. You can’t take a photo while filming, but you can set the camera to automatically take a photo at the end of the recording if desired.
 |
 |
 |
From the Movie AE menu you can choose whether to shoot in Program (for automatic exposure), Aperture Priority (for control over depth of field), or in automatic with any of the six Art filters applied for special effects.
You can choose from the normal Single, Continuous or Manual focusing options, although with some operational caveats. Single AF mode will only autofocus once as you half press the shutter before recording. Continuous AF will attempt to keep focusing while recording (with compatible lenses), but it’s a slow and audible process. Similarly Manual focusing mode allows you to make adjustments as you film, but again with the motorised system being audible and not particularly quick.
So focusing while filming isn’t really practical on the E-P1, although control over the depth-of-field is in Aperture Priority mode. You can easily throw a background out of focus (at least as well as you can for still photos anyway), or increase the depth-of-field to become more forgiving on focusing. The Motion JPEG format may not be as efficient as H.264 / AVCHD, nor offer as long recording times per clip, but it is easy to edit on most computers.
So overall the movie mode experience with the E-P1 is similar to the latest DSLRs with video capabilities. The actual quality in HD can look as good as other 720p modes, with detailed and clean results, although handheld footage can suffer from the dreaded jello effect, especially if you suffer from minor wobbles or attempt a zoom while hand-holding – see clip above. There are some useful exposure controls, and it is possible to control the depth-of-field, although again continuous auto-focusing while filming isn’t really practical here, and what you ultimately have is no replacement for those who want to casually film with a camcorder.
We’ve put together a short compilation of clips filmed with the E-P1’s HD movie mode and 14-42mm kit lens in our Video tour section. Registered members of Vimeo can also download the original file seen above here for closer examination on their own computers.
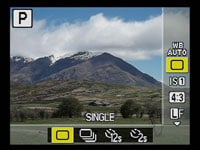
Olympus E-P1 drive modes
 |
The Olympus E-P1 offers one continuous shooting option, rated at approximately 3fps; Olympus quotes around 12 Large Fine JPEGs or 10 RAW files. To put this to the test we fitted a formatted Lexar Professional 133x 8GB SDHC card, and fired-off 15 Large Fine JPEGs in six seconds before the camera began to slow; this corresponds to a rate of 2.5fps, and while the camera could keep shooting beyond 15 frames, it greatly slowed down.
Switching to RAW mode we measured pretty much the same experience, shooting 14 frames in a fraction under six seconds for much the same speed of 2.5fps. So while we managed to shoot a few more frames than quoted, they were at a slightly slower speed of 2.5fps. This remains better than most compacts, but slower than a typical DSLR at this price point.
In terms of a self-timer, there’s two and 12 second countdowns, but no options for a remote control.
Now it’s time to head over to our results pages where you’ll see how the E-P1’s image quality compares with a traditional compact and DSLR.


